
An application needs to be altered before translations will work. It has to know for instance that it is going to be translated, by setting some properties.
This recipe will show how an application can be prepared for translations.
To start with this recipe we will need a new application. We will use the EMP and DEPT tables to build a straightforward application with minimal effort.
- In the Application Builder, click Create to start making a new application.
- Select Database as the Application Type and click Next.
- Select From Scratch and click Next.
- Name the application HR Multilingual. Leave the Application ID and other options on their default values and click Next.
- Select the Page Type: Report and Form.
- Enter EMP as the Table Name.
- Select the Implementation Classic and click Add Page.
- Repeat these steps to add a Report and Form for the DEPT table.
- Press Create to finalize the application using Theme 1 or click Next and follow the wizard to select another theme. When you do that, remember to keep the language on English.
We now have an application with five pages; one Login page and a Report and Form page for both the EMP and DEPT tables.

When we run the application, we will see the application in English as can be expected. We are now ready to implement the functionality that is necessary to make this a multilingual application.
Now that we have an application at our disposal, we can start to prepare it for translations. The first step that we have to take is that we have to tell the application how it will know what language to use. This is going to require a special application item.
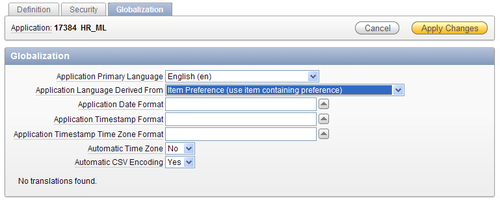
APEX now knows that it can derive the language to show the page in from a special application item. But this item still has to be created. To do this, follow the next steps:
- Go to Shared Components.
- Under Logic click on Application Items.
- Click on the Create button.
- Enter the name FSP_LANGUAGE_PREFERENCE for the item and leave all other properties on their default value.
- Click Create to finish.
The item is called FSP_LANGUAGE_PREFERENCE, because APEX recognizes that name as an item reserved for application languages. When a page is rendered, APEX checks the FSP_LANGUAGE_PREFERENCE item to see in what language the page has to be shown.
There is a snag in this process. Because of the way Application Express builds up its page, a change in the FSP_LANGUAGE_PREFERENCE item is not immediately visible. Whenever the language is changed, the page has to be reloaded to show the result.
To make this happen, we will add an Application Process that will handle the reloading of the page:
- Return to Shared Components.
- Under Logic click on Application Processes.
- Click the Create button.
- Enter the name set_language.
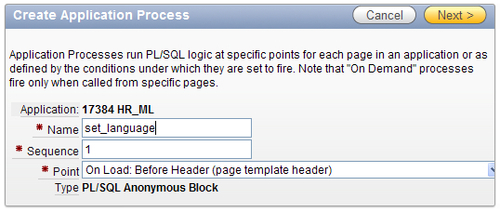
- Select On Load: Before Header (page template header) at the Point property to trigger the process as soon as possible on the page.
- Click Next.
- In the Process Text, enter the following PL/SQL code:
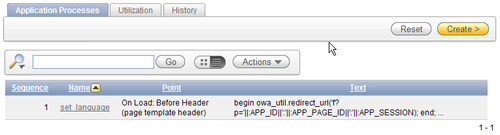
begin owa_util.redirect_url('f?p='||:APP_ID||':'||:APP_PAGE_ID||':'||:APP_SESSION); end; - In the Error Message box, enter Process cannot be executed and click Next.
We choose to start this process when a page is called using a special Request. This will be defined with the following steps:
- As the Condition Type, select Request = Expression 1.
- In the textarea that appears enter LANG (all uppercase).
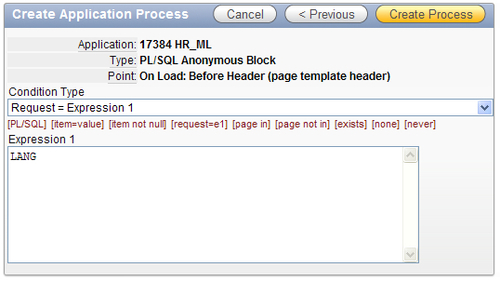
- Click Create Process to finish.
When we now review the list of application processes, we can see the new process has been added to the list.
The application is now ready to be translated. Everything is in place to run it in any language imaginable.
To call the application in another language, change the URL of your application to the following:
http://yourdomain:port/pls/apex/f?p=&APP_ID.:&PAGE_ID.:&SESSION_ID.:LANG:NO::FSP_LANGUAGE_PREFERENCE:nl
This example will call the chosen page in the application and show it in the Dutch language instead of in English. To select another language change the property nl at the end of the URL to your desired language code.
Now that we have a translatable application, we can start on the translation itself. The application is still only available in English, so we will have to create a translated version of the application in another language.
This will be shown in the recipe called Using XLIFF files.
Next to that we can only call the application in other languages by changing the FSP_LANGUAGE_PREFERENCE item in the URL. We should create a more user-friendly way to navigate to different languages.
This topic will be covered in the recipe called Switching languages.
Item preference is not the only way of telling an application how to get it's language. A new option in APEX 4.0 is 'Session'. The recipe called Translating data in an application will show how to use this. It will also show an example of translating the data in an application.