
The colored pixels that make up an image work much like the tiles in a mosaic. When you view a mosaic up close, you may not be able to tell what the overall image is supposed to be — move far enough away, however, and the mosaic's tiles blend together to make a complete image. If you enlarge the pixels in an image in Photoshop, they look like an unrelated collection of colored squares. Reduce the size of the pixels, and they blend together to form an image that looks like a standard photograph. Photoshop deceives the eye, counting on the distance that printing or normal onscreen viewing puts between the person's eye and the image pixels, and in most cases, the deception works quite well.
Of course, there are differences between pixels and mosaic tiles. Pixels come in 16 million distinct colors. Also, you can resample, color separate, and crop electronic images, often working at a very zoomed-in, you-can-see-the-individual-pixels level. Luckily, you can get extremely close to the image to make changes that have a very subtle impact when viewed at that aforementioned eye-deceiving distance.
In this chapter, you learn about how images are constructed, how to change their resolution, how to crop out what you don't want, how to save your files (including an exhaustive discussion of file formats and choosing the right ones for the way your files will be used), and ways to better organize and view your saved images. You also learn about automating the use of Photoshop, finding out more about actions and how you can use them to record often-performed and/or complex tasks over and over again, with the press of a button or the click of an icon.
If you haven't already guessed, the term image size describes the physical dimensions of an image. Resolution is the number of pixels per linear inch in the final printed image. The term linear is used because you measure pixels in a straight line. If the resolution of an image is 72 ppi — that is, pixels per inch — you get 5,184 pixels per square inch (72 pixels wide × 72 pixels tall = 5,184).
Assuming the number of pixels in an image is fixed, increasing the size of an image decreases its resolution, and vice versa. An image that looks good when printed on a postage stamp, therefore, probably looks jagged when printed as an 11×17-inch poster.
Figure 3.1 shows a single image printed at three different sizes and resolutions. The smallest image is printed at twice the resolution of the medium-sized image; the medium-sized image is printed at twice the resolution of the largest image.
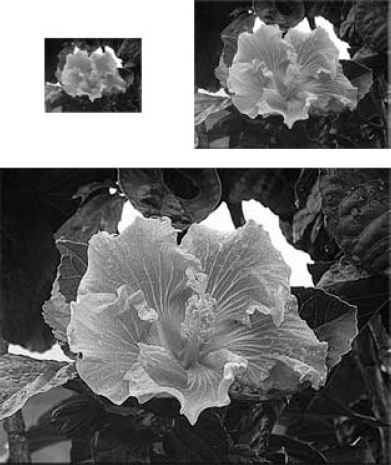
Figure 3.1. These three images contain the same number of pixels but are printed at different resolutions. Doubling the resolution of an image reduces it to 25 percent of its original size.
One inch in the smallest image includes twice as many pixels vertically and twice as many pixels horizontally as an inch in the medium-sized image, for a total of four times as many pixels per square inch. Therefore, the smallest image covers one-fourth the area of the medium-sized image.
The same relationships exist between the medium-sized image and the largest image. An inch in the medium-sized image comprises four times as many pixels as an inch in the largest image. Consequently, the medium-sized image consumes one-fourth the area of the largest image.
When printing an image, a higher resolution translates to a sharper image with greater clarity. Photoshop lets you change the resolution of a printed image in one of two ways:
Choose Image

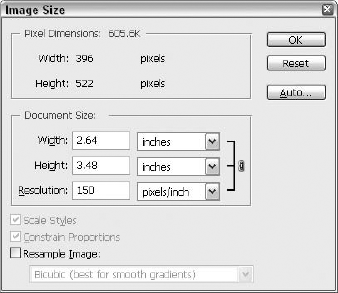
A good idea (although not essential) is to deselect the Resample Image option, as demonstrated in Figure 3.2. If you leave it selected, Photoshop may add or subtract pixels, as discussed later in this chapter. Of course, if you're shrinking an image for posting on the Web, resampling the image is necessary. For non-Web images, deselecting resampling instructs Photoshop to leave the pixels intact but change how many of them print per inch. This is especially important when going from a lower resolution to a higher one.
Alternatively, you can ask Photoshop to scale an image during the print cycle. You hand down this edict with the Print command. Choose File
Photoshop saves the Resolution setting with the image; the scale settings in the Print dialog box affect only the current print job. Together, the two determine the printed resolution. Photoshop divides the Resolution value in the Image Size dialog box by the Scale percentage from the Print dialog box. For example, if the image resolution is set to 72 ppi and you reduce the image to 48 percent, the final printed image has a resolution of 150 ppi (72 divided by 0.48).
Note
With apologies to the non-mathematically inclined readers out there, it's important to remind you that whenever you use a percentage in an equation, you first convert it to a decimal. For example, 100 percent is 1.0, 64 percent is 0.64, and 5 percent is 0.05. This little tip can help you make sense of the discussions of image size, resolution, and so on throughout this chapter and the rest of the book.
Tip
To avoid confusion, most people rely exclusively on the Resolution value and leave the Print dialog box Scale value set to 100 percent. The only exception is when printing tests and proofs. Because inkjet and other consumer printers offer lower-resolution output than high-end commercial devices, you may find it helpful to proof larger images so that you can see more pixels. Raising the Scale value lets you accomplish this without upsetting the Resolution value. Just be sure to restore the value to 100 percent after you make your test print.
Note
When you view the list of Resample Image options in the Image Size dialog box, you now get tips as to which resampling method might work best for your current image or goals for resizing it. For example, you are reminded that Bicubic resampling works well for smooth gradients, while Bicubic Smoother is your best choice if you're enlarging an image.
The Scale value in the Print dialog box value has no effect on the size and resolution of an image imported into an object-oriented application, such as QuarkXPress or Illustrator. But these same applications do observe the Resolution setting from the Image Size dialog box.
Specifying the resolution in Photoshop is a handy way to avoid resizing operations and printing complications in your page-layout program. For example, when images were created for this book, their resolution was preset so the production team had only to import the images in preparation for the printing process.
Photoshop is as good as or better than any other program at adjusting pixels. It's a good idea, therefore, to take advantage of its considerable powers and prepare your images as completely as possible in Photoshop before importing them into another program.
After all this explanation of pixels and resolution, you may still be wondering what the best resolution would be for any image — images that will be printed, displayed onscreen, or both. The answer is a frustrating "non-answer" to some and a liberating "whatever you want!" to others: The resolution is entirely up to you, and there's no hard and fast rule. You're best off using the highest resolution possible, of course, because the higher the resolution, the cleaner, crisper, and more detailed the image is, but there are no absolute right answers. The images in this book vary from 150 ppi for figures that show black-and-white images, dialog boxes, and other parts of the workspace to 300 ppi for the images that appear in color. Now, despite the lack of an established rule for determining resolution, here's a little help to assist you in making effective choices for your images:
Most experts recommend that you set the Resolution value to somewhere between 150 percent and 200 percent of the screen frequency of the final output device. The screen frequency is the number of halftone dots per linear inch, measured in lpi (short for lines per inch). So ask your commercial printer what screen frequency he uses — generally 120 lpi to 150 lpi — and multiply that times 1.5 or 2.
More specifically, for high-end photographic print work, it's hard to go wrong with the standard Resolution value of 267 ppi. That's around 200 percent of 133 lpi, arguably the most popular screen frequency. When in doubt, most professionals aim for 267 ppi.
If you're printing on a home or small-office printer, the rules change slightly. Different manufacturers recommend different optimum resolutions for their various models, but the average is 250 to 300 ppi. Experiment to see how low you can go, though — sometimes you can get by with fewer pixels than the manufacturer suggests. And don't forget that the quality of the paper you use may be more to blame than a lack of pixels for a lousy print — copier-quality paper absorbs the ink and colors, and detail can be lost to that. You want bright white paper that won't suck up all the ink. Most papers you can buy at the office-supply store or printer will be marked clearly as to what kind of printing they're best used for — photos, brochures, flyers, informal publications, and so on.
What if you don't have enough pixels for 267 ppi? Say that you shoot a digital photograph that measures 768×1024 pixels and you want to print it at 6×8 inches. That works out to a measly 128 ppi. Won't that look grainy? Probably. Should you add pixels with Image Size or some other command? No, that typically won't help. You have a finite number of pixels to work with, so you can print the image large and a little grainy, or sharp and small. The choice is yours.
What if you have a photograph or slide and you can scan it at any resolution you want? Flatbed scanners typically offer two maximum resolutions: a true optical maximum and an interpolated digital enhancement. The lower of the two values is invariably the true optical resolution. Scan at this lower maximum setting. Then use Image
Finally, just take the pixels you have and try to make them look the best you can. Then print the image at the size you want it to appear, or for images that will be viewed solely online or onscreen, make sure they look good on the monitor and leave it at that — the Save for Web dialog box (discussed later in this chapter and again in Chapter 20) can help you make sure your image is both visually appealing and browser-friendly in terms of fast-loading for your onsite patrons. Overall, if you focus on the function of your image first and worry about resolution and other technical issues second, you'll produce better art.
Tip
While it's often a case of making the best of what you've got, you can improve images prior to printing and onscreen display. Check out Chapters 10, 11, and 12 for ideas on using filters to blur, sharpen, and otherwise manipulate your image content — from subtle changes that smooth out noise and graininess to others that apply fancy-schmancy artistic effects, some of which can creatively mask a low-resolution, otherwise shabby-looking image.
Regardless of the Resolution and Scale values, Photoshop displays each pixel onscreen according to the zoom ratio (covered in Chapter 2). If the zoom ratio is 100 percent, for example, each image pixel takes up a single screen pixel. Zoom ratio and printer output are unrelated.
This same rule applies outside Photoshop as well. Other programs that display screen images — including multimedia development applications, presentation programs, and Web browsers — default to showing one image pixel for every screen pixel. This means that when you're creating an image for the screen, the Resolution value has limited impact. Some people might recommend that screen images should be set to 72 ppi on the Mac or 96 ppi for Windows, and while there's nothing wrong with doing this, anything at or over 72 ppi should be fine, considering that the load time is king when it comes to Web images — unlike print, where the image quality is primary. On the Web, you want the image to look good, but to load fast — even if that means sacrificing image quality somewhat.
When publishing for the screen, just scan or capture at a high resolution — 300 ppi or more — make your corrections, retouches, edits, and so on — and then use the Save for Web dialog box to optimize the image for the Web. The dialog box contains a preview that lets you choose the right format, quality, and color range, and the software does the work of setting the resolution for you. You also get a load-time estimate so you can decide whether you want to sacrifice some of the clarity in order for your image to load in under a minute. The Save for Web dialog box is discussed later in this chapter, and also in Chapter 20.
So, in the end, all that counts is the 100 percent view. That means you want the image to fit inside the prospective monitor when you choose View
Believe it or not, before you can work on an image in Photoshop — whether you're creating a brand-new document or opening an image from disk — you must first load the image into an image window. Here are the basic ways to create an image window:
File
New: Create a new window by choosing FileNote
If you opt to choose Transparent or Background Color from the Background Contents drop list, you'll either see a dim checkerboard effect or the currently-selected background color (see the toolbox for what's currently chosen).
File
Open: Choose FileFile
Browse: This command opens the Bridge, a separate workspace that allows you to organize and print your images.Note
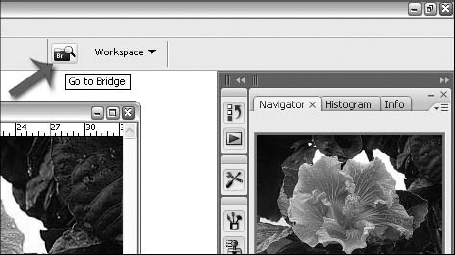
You also can open the Bridge by clicking the Go To Bridge button (found just to the left of the Workspace drop list on the Options bar). The Bridge is discussed later in this chapter and also in Chapter 20.
File
Open Recent: A variation on the Open command, Open Recent displays a list of the images that you recently opened. Click an image name to crack open the image file without taking that tedious trip to the Open dialog box. You can set the number of files that you want to appear in this list in the File Handling panel of the Preferences dialog box.Edit
Paste: Photoshop automatically adapts a new image window to the contents of the Clipboard (provided that those contents are bitmapped). So if you copy an image in a different application or in Photoshop and then choose FileFile
Import: This command's submenu, as it relates to opening images, includes commands for opening a digital camera image, grabbing an image from your scanner, or bringing in video frames as layers. Typically, if you have a scanner or camera, your installation of that device (for using the device with your computer) has made Photoshop "aware" of the device and enabled it to support it. You also may have to deal with the device's plug-in module, which lets you transfer an image directly into Photoshop. Just copy the module into Photoshop's Plug-Ins folder and then run or relaunch the Photoshop application. To initiate a scan or to load an image into Photoshop, choose the already set-up scanner from the FileAfter you choose the command, Photoshop launches the device's download software. If you're scanning, select the scanner settings and initiate the scan as usual; the scanned picture appears in a new image window in Photoshop. If you're transferring images from a digital camera, the camera software typically creates thumbnail previews of images in the camera's memory so that you can select the ones you want to transfer to Photoshop. If you're bringing in video frames to be viewed as layers in an image, you are presented with a dialog box through which you can choose the video file and the frames within that video for import.
Tip
Save your images to disk immediately after you scan or download them; unlike some other programs, Photoshop doesn't automatically take this step for you. Also, if your digital camera stores images on removable memory cards (CompactFlash, SmartMedia, Memory Stick, and the like), it's a good idea to invest in a card reader or adapter that enables your computer to see the memory card as just another hard drive — if your computer didn't already come with a built in reader. You can then just drag and drop images from the memory card to your computer's hard drive, a process that, depending on your camera, may be much faster and more convenient than transferring images using a cable connection.
Note
Open as Smart Object is another command on the File menu, and it does two jobs. It opens an image, but it also opens it as a Smart Object, which prepares the image for use with Smart Filters, among other benefits. Find out more about Smart Objects as they relate to Blend Modes in Chapter 14 and as they relate to Filters in Chapter 10.

Whether you're creating an image from scratch or transferring the contents of the Clipboard to a new image window, choose File
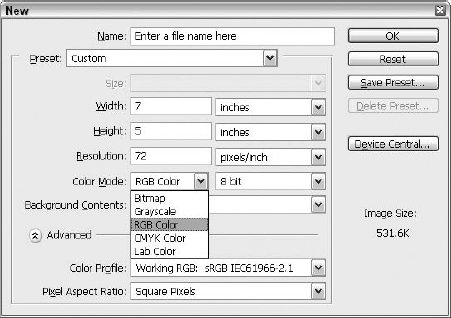
Figure 3.4. Use the New dialog box to specify the size, resolution, and color mode of your new image. You can even give the file a name at this stage, if you want.
Tip
When in doubt about the size of your new image, go for bigger rather than smaller. If you have a general sense that the image needs to print at 3 inches by 4 inches, go for 4 inches by 5 inches, or even use one of the preset sizes, such as 4×6. You can always crop away unwanted periphery, and it's better to have too much room than not enough.
The Preset pop-up menu gives you easy access to several popular document sizes, common settings for working in print or on the Web, and several presets for video and film formats such as NTSC, PAL, and HDTV. Photoshop also lets you select the pixel aspect ratio of your document. You find more information about pixel aspect ratios later in this chapter.
Tip
You also have the New Document Preset Resolutions settings in the Units & Rulers panel of the Preferences dialog box, which let you set a default resolution for print or screen; the resolutions you set in the Preferences dialog box appear when you select certain options from the Preset menu.
Note
When you select one of the video presets from the Preset pop-up menu, Photoshop automatically adds guides to your image that are specific to that setting. These guides delineate areas known in the video industry as the action-safe and title-safe zones. Because most television screens crop a certain amount off the borders of a video image, it's extremely helpful to be aware of what will and won't be visible on any given television set. These days, you'll be safe on most televisions if you keep your graphics within the outermost, or action-safe, zone. You can quickly toggle the visibility of these guides on and off by pressing Ctrl+; (semicolon) (
Note
Device Central, represented by a button in the New dialog box as well as the File menu (File
If you don't like Photoshop's preset document sizes, you can easily create your own. The moment you make any sort of change to one of Photoshop CS3's predefined presets, you get access to the Save Preset button. Click it to open the New Document Preset dialog box, shown in Figure 3.5. Here you can type a name for the new preset and specify which of your current settings you'd like to include. This is a great feature that can be a huge timesaver when you're creating a large batch of identically sized files. If you later decide that you want to delete a custom document preset, simply select it from the Preset pop-up menu in the New dialog box and click Delete Preset.
Size and Resolution Tips
Although Photoshop matches the contents of the Clipboard by default, you also can match the size and resolution of other images:
Press Alt (Option on the Mac) when choosing File
You also can match the size and resolution of the new image to any other open image. Any images you currently have open appear at the bottom of the Preset pop-up menu.
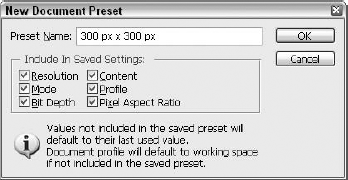
Figure 3.5. The New Document Preset dialog box lets you name and save custom document presets for future convenient use.
The Width and Height pop-up menus contain the six common units of measure mentioned earlier: pixels, inches, centimeters, millimeters, points, and picas. But the Width pop-up menu offers one more: Columns. If you want to create an image that fits exactly within a certain number of columns when it's imported into a desktop-publishing program, select this option. You can specify the width of a column and the gutter between columns by pressing Ctrl+K and Ctrl+6 (
Setting the Unit of Measure
You can set the default unit of measurement for the Width and Height pop-up menus in the Units & Rulers panel of the Preferences dialog box. (Select the value from the Rulers pop-up menu; the Type menu sets the measurement unit for text-related controls.) But if the dialog box isn't already open, here are two quicker options:
Press Ctrl+R (or

If you're a Windows users, you can display the same pop-up menu by pressing F8 to display the Info palette and then click or drag the cross icon (next to the X and Y coordinate values) in the palette's lower-left corner. Click the unit you prefer.
The Gutter value affects multiple-column images. For example, if you accept the default setting of a 15-pica column width and a 1-pica gutter, and you specify a one-column image in the New dialog box, Photoshop makes it 15 picas wide. If you ask for a two-column image, Photoshop adds the width of the gutter to the width of the two columns and creates an image 31 picas wide.
The Height pop-up menu in the New dialog box lacks a Column option because vertical columns have nothing to do with the image height.
In most cases, the onscreen dimensions of an image depend on your entries in the Width, Height, and Resolution option boxes. If you set both the Width and Height values to 10 inches and the Resolution to 72 ppi, the new image measures 720×720 pixels. An exception occurs if you choose pixels as your unit of measurement. In this case, the onscreen dimensions depend solely on the Width and Height options, and the Resolution value only determines the size at which the image prints.
Use the Color Mode pop-up menu to specify the number of colors that can appear in your image. Choose Bitmap to create an image consisting of only black and white pixels, and choose Grayscale to access only gray values. RGB Color, CMYK Color, and Lab Color all provide access to a full range of colors, although their methods of doing so differ. You can read all about these color modes and how they work in Chapters 4, 17, and 18.
In addition to specifying the color mode, Photoshop lets you set the bit depth of your image in the New dialog box. The bit depth determines the amount of color information available to each individual pixel in the image. Choosing 1 bit limits your image to black and white pixels and thus can be used only in Bitmap mode. The option you'll probably use most often is 8 bit, which is standard fare for most full-color images. Choosing 16 bit gives your image a much greater number of available colors, providing you with a more accurate color representation and finer color controls. But the 16-bit option also greatly increases the file size and limits your editing options. For more information on using 16-bit mode, see Chapter 4, where you also can read about taking an existing image and bumping it up to 32-bit mode, using the Image
Note
RGB stands for red-green-blue, CMYK for cyan-magenta-yellow-black, and Lab for luminosity and two abstract color variables: a and b. To learn how each of these color modes work, read Chapter 4.
The New dialog box also provides a Background Contents pop-up menu that enables you to change the color of the background for the new image. You can fill the new image with white, with the current background color (which may be white anyway, of course), or with no color at all. This last setting, Transparent, results in a floating layer with no background image whatsoever (represented by a gray and white checkerboard pattern), which can be useful when editing one layer independently of the rest of an image or when preparing a layer to be composited with an image. For an in-depth examination of layering, see Chapter 13.
If you do select a transparent background, you must later flatten the layers if you want to save the image to a format that doesn't support layers. (See the upcoming discussion on saving an image to disk for information about options that retain layers when saving.) The advantage of the Transparent setting, however, is that Photoshop doesn't create a new layer when you press Ctrl+V (
At the very bottom of the New dialog box, you find an Advanced option (click the button to the left of the word Advanced). The Advanced settings offer options for selecting a Color Profile and the Pixel Aspect Ratio for your image.
In the first option, Color Profile, you can determine the color space in which your new image will exist. Essentially, the color profile of an image provides the information necessary to make sense of how an image should be displayed or printed based on the circumstances under which the image was created. For an in-depth look at the sometimes daunting world of color management, check out Chapter 17.
The second and final setting in the Advanced section of the New dialog box lets you set the Pixel Aspect Ratio for your image. Computer monitors display images with an assortment of perfectly square pixels. The pixels that make up an image on a television, however, are of a more rectangular nature. The result is that an image created with square pixels in Photoshop looks somewhat squashed when imported into video-editing software and output onto a television screen.
Luckily, Photoshop can help. By selecting a non-square pixel aspect ratio or choosing any of the non-square video presets, you can work with a preview of the image that more accurately represents its appearance in your final film or video project. It's important to note, however, that these settings don't actually alter the pixels in your image. They simply present them to you in a way that more closely matches your specific destination. You always have the option of displaying the pixels in a square ratio by choosing View
Tip
If you decide to change the pixel aspect ratio of an image after you've begun to edit it, simply choose Image
Note
It's important to note that choosing a non-square aspect ratio affects the behavior of many tools. For example, if you Shift-drag with the Elliptical Marquee tool to draw a circular selection outline, a different number of pixels are selected depending on whether you're working with square or non-square pixels. This pertains to all shape tools and even brushes. A 90-pixel circular brush used on an NTSC image, for example, paints a circle 90 pixels tall and 100 pixels wide.
Photoshop provides a File menu command, Open Recent, which displays a list of the images you worked on in recent Photoshop sessions. Click the name of the image you want to open. You set the number of files that appear on the list by typing a value in the Recent File List Contains option box, found on the File Handling panel of the Preferences dialog box, which you access by pressing Ctrl+K and then Ctrl+3 (
Tip
Some tricks for Mac people:
Also, the icon in the title bar gives you an instant hint as to whether your image has been edited since it was last saved. If the image has unsaved changes, the title bar icon appears faded. (Mac OS 10.X users also can look at the red Close button in the title bar; if it contains a black dot, the image has been edited since it was last saved.)
Of course, you can always open images the old-fashioned way by choosing File
The default Open dialog box behaves just like the ones in other Windows and Macintosh applications, with a folder bar at the top, a scrolling list of files, and the usual file management and navigation options. You also can open multiple files at one time. To select a range of files on the PC and in Mac OS 10.X, click the first file name and then Shift-click the last file in the range. Ctrl-click (
The Photoshop version of the Open dialog box (not to be confused with the Adobe Open dialog box, discussed just a few paragraphs from here) also includes a few controls that most other programs lack. You can read about these options in the next sections. But first, a few other brief notes about opening files:
When you choose File
When you open an image, Photoshop may display a dialog box telling you that the color profile of the image doesn't match the default color profile you've established. You have the option of converting the image to the default profile or leaving well enough alone. See Chapter 17 for help with this issue.
Tip
When opening an image, you may occasionally encounter a dialog box warning you that some data in the file cannot be read and will be ignored. Well, it's a bunch of bunk. If this happens to you, just click OK to dismiss the warning and open the image as usual.
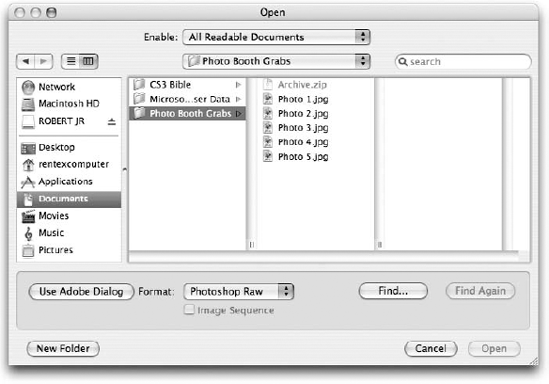
The Adobe Open dialog box (displayed by clicking the Use Adobe Dialog button in the lower-left corner of the default Open dialog box) offers the same options as the default Open dialog box. You can click the Look in drop-down list to choose from disks, drives, and other places to look for your file. You also can click the icons on the left side of the dialog box to look on the Desktop and in particular folders. In the main area of the dialog box, shown in Figure 3.6, you can view the images in the open folder or drive in the same ways that you can in the default Open dialog box — in Details view, where file name, size, status, type, and date modified are displayed, Icons, Thumbnails, or Tiles view. Wait — Tiles? Yes, as shown in Figure 3.6, Tiles view shows an icon for the image — indicating format — and some basic stats for the image, including name, size, and date/time modified.
Tip
Click the Tools button (looks like a little briefcase) in the upper right of the dialog box to access a menu that includes commands for accessing the Bridge, creating a new project, editing file properties, creating new folders, and looking at or restoring deleted files. This menu also offers a command for going back to the "OS Dialog" (OS standing for Operating System), which you also can do by clicking the Use OS Dialog button that has replaced the Use Adobe Dialog button in the lower-left corner of the dialog box. There also is an Adobe dialog version of the Save and Save As dialog boxes — look for coverage of these later in this chapter.

Figure 3.6. The Tiles view in the Adobe version of the Open dialog box offers enlarged image icons and file information that rivals the familiar Details view's list of file statistics.
To help you assess an image before you open it, Photoshop displays a thumbnail preview of the selected file in the Open dialog box, as shown in Figure 3.7. On the Mac, the column view found in Open dialog boxes automatically displays a preview of graphic files. On the PC, Photoshop automatically displays thumbnails for any files saved in the native format (PSD). If you're running Windows XP, the operating system may generate thumbnails for files saved in other formats.
On the Mac, the thumbnail space may appear empty, which means the file does not contain a Photoshop-compatible preview. The file may have been created by a piece of hardware or software that doesn't support thumbnails, or the thumbnail feature may have simply been turned off when the image file was saved. To generate thumbnails when saving images in Photoshop, press Ctrl+K and then Ctrl+3 (
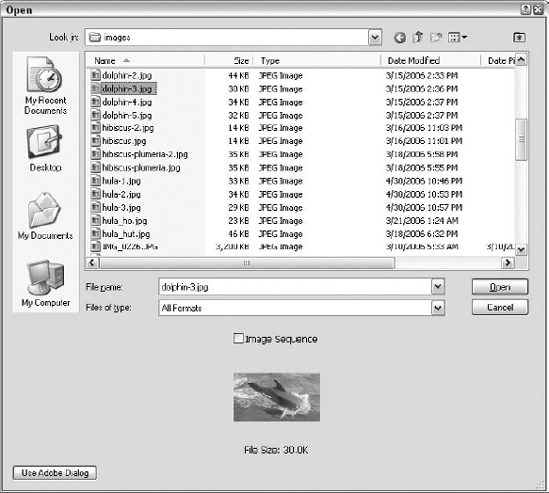
Figure 3.7. You can see a preview of an image if you previously saved it in Photoshop with the thumbnails option selected.
Note
What's that Image Sequence check box in the Open dialog box all about? This option pertains to video and image sequence files. Photoshop CS3 allows users to open and edit video, frame by frame, and to open sequential image files. Find out more about Photoshop CS3's video image support in Chapter 19.
Mac OS 10.X is pretty clever about generating previews of graphic files all on its own. Depending on the file format, you can generally get a preview of a graphic file, no matter what the thumbnail saving settings were. Select an image in the Finder and press
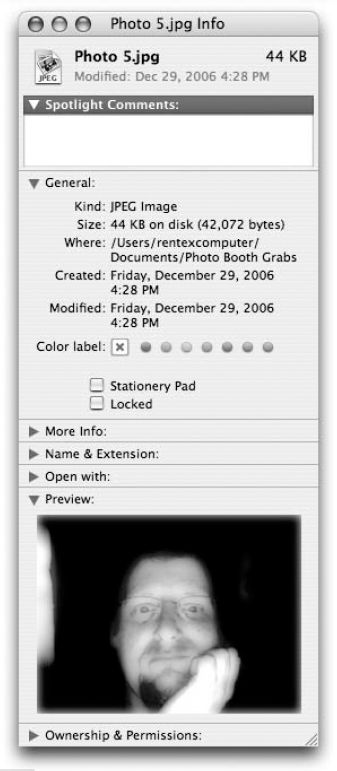
Figure 3.8. The Get Info command in Mac OS X can show previews of many different graphic file types.
Tip
The Open dialog box isn't the only place where you can preview an image before you open it. To preview an image file directly in Windows Explorer under Windows XP or 2000, simply navigate to the folder in which the image is located and click the file to highlight it. A section on the left side of the folder window, labeled Details under Windows XP, displays a high-quality image preview, provided a preview was saved along with the image. Alternatively, you can view thumbnail previews for an entire folder of images by choosing View
The scrolling list in the Open dialog box contains the names of the documents that Photoshop recognizes it can open. If you can't find a desired document on your PC, it may be because the Files of Type pop-up menu is set to the wrong file format. To view all supported formats, either select All Formats from the Files of Type pop-up or type *.* in the File Name option box and press Enter.
If a file lacks an extension, the Open dialog box won't be able to identify it. This unusual situation may arise in one of two ways. On rare occasions, a file transmitted electronically (through the Internet, for example) loses its extension en route. But more likely, the file comes from a Macintosh computer. The Mac doesn't need file extensions — the file type identification resides in the resource fork — so many Mac users never give a thought to three-character extensions.
You can solve this problem by renaming the file and adding the proper extension or by choosing File
If you can't find a document in the Open dialog box on your Mac, it may be because Photoshop doesn't recognize the document's four-character type code. The type code for a document created or last edited on a Macintosh computer corresponds to the file format under which the image was saved (as explained in the upcoming section on file formats).
For example, TIFF is the type code for a TIFF image, JPEG is the code for a JPEG image, GIF is the code for a GIF image, and so on. However, if you transferred a document from another platform, such as a Windows machine or a Unix workstation, it probably lacks a type code. In the absence of a type code, Photoshop looks for a three-character extension at the end of the file name, such as .tif or .jpg or .gif. But if the extension is as much as a character off — .tff or .jpe or .jif, for example — Photoshop won't know what to do.
To see all documents regardless of their type code or extension, select All Documents from the Show pop-up menu in the Open dialog box, as shown in Figure 3.9. When you click a document in the scrolling list, the Format option displays the format that Photoshop thinks the file was saved in — if it has any thoughts to offer. If you disagree, click the Format option and select the correct file format from the pop-up menu. As long as the image conforms to the selected format option, Photoshop opens the image when you press Return. If you get an error message instead, either select a different format or try to open the document in a different application.
If you know the name of a file — or at least part of the name — but you can't remember where you put it, click the Find button, type some text in the resulting option box, and press Return. Photoshop searches the disk in a fairly random fashion and takes you to the first file name that contains the exact characters you typed.
If the first file name isn't the one you're looking for, click the Find button again to find the next file name that contains your text. If you want to search for a different string of characters, click Find and type some different text.
The Bridge, introduced with Photoshop CS2 and enhanced for CS3, replaces the File Browser for accessing, organizing, and storing data about your images. To call the Bridge a feature seems like a gross understatement. The Bridge is really an application unto itself — it has its own workspace, menus, and tools, and it opens as a separate application in terms of how the operating system (Windows or Mac) sees it.
You can access the Bridge without opening Photoshop at all, or you can use any one of these methods for opening it from within Photoshop:
The Go to Bridge button: Click this button, shown in Figure 3.10, found to the left of the palette dock. The Bridge opens in its own window shortly thereafter.
Choose File
Browse: This opens the Bridge in its own window.Choose File
Close and Go to Bridge: This closes the active image and opens the Bridge in its own window. You would do this when you're finished with an image and ready to go find another one, using the Bridge tools for accessing images. The Bridge interface appears in Figure 3.11.
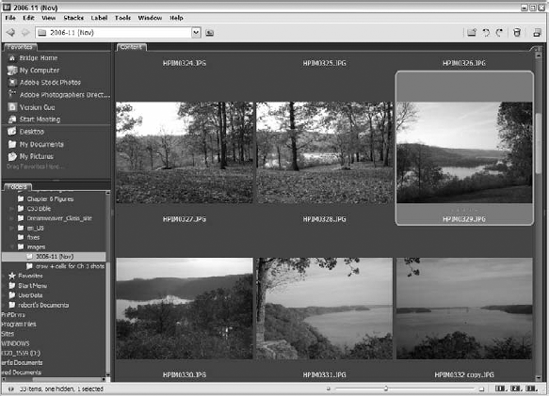
The sequence of events that takes you to and through the Bridge might go something like this: You remember that you need to find a particular photo, but you're not sure of the file name. Or, you want to check whether you have all the photos you should have stored in a particular folder or on a particular CD. The Open dialog box doesn't show you all your photos at once, and hopping out to the Finder (Mac) or Explorer (Windows) to look at thumbnails is too time-consuming. What to do? Fire up the Bridge.
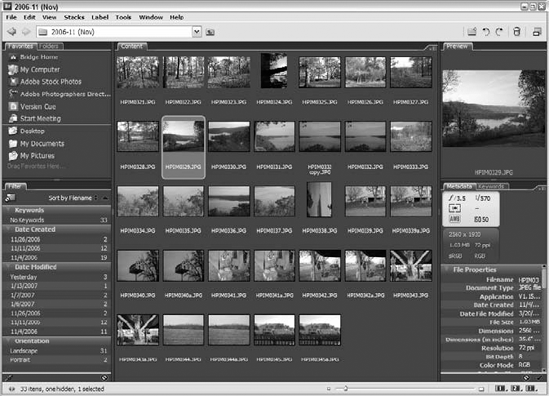
Using any of the aforementioned methods — clicking the Go to Bridge button or using the File
Tip
You can resize the different parts of the Bridge workspace by clicking and dragging the walls of the various panels. Drag to the right to widen the panel of tabs on the left; drag up and down on the dividers between the Favorites/Folders, Content, and Metadata/Keyword panel areas. By resizing different areas of the workspace, you can rob space from information that you don't care about to make more room for the stuff you need to see more clearly or in its uncluttered entirety.
Assuming that you're now looking at an array of thumbnails of the subfolders and images within the folder, drive, or disk you've chosen from the tree, you can click an individual photo and view its data (see the Metadata panel in the upper right, shown in Figure 3.13) or change your view to Details — by choosing View
If you want to open a particular file, just double-click it. If Photoshop was not already open, it opens in its own window (the Bridge remains open, too), with the selected file open in its own image window. If Photoshop was already open, it becomes the active application and displays the selected file in its own image window — so the final outcome is the same, whether the Bridge tells Photoshop to open and show you your image, or if you had Photoshop open, ready, and waiting.
You also can select multiple images, too — just click them and press Shift to select a series of files, or Ctrl (Windows) or

Tip
If you want to open or move everything but the file or files you have selected, choose Edit
Note
The Bridge in CS3 now has a Stacks menu, which should not be confused with Stack Mode in Photoshop (see Chapter 14). You can stack a group of photos [select them with the Shift or Ctrl (
The whole point of the Bridge is to give you a powerful, yet simple way to view your images and access information about them. Of course, being able to open the files after viewing them is important, too, but you can do that through Photoshop itself. No, the big plus to the Bridge are the image viewing options, each accessible through the View menu (big surprise, eh?). You also can use the view buttons in the lower-right corner of the workspace.
In the View menu, you have these choices:
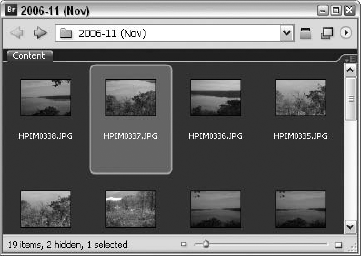
Compact Mode: Choose this, and the Bridge workspace is reduced to a small window, without a menu, as shown in Figure 3.14, and it moves to the lower right of your desktop. You can resize it with your mouse, but the idea is for it to be small and out of the way. Double-click the title bar (or click the Maximize/Restore button) to return it to its original size.
Slide show: Choose View
Tip
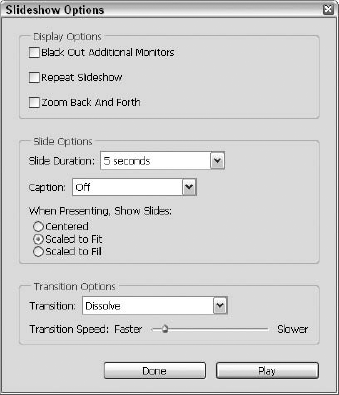
The next command after Slideshow is Slideshow Options. Choose this to change how your slideshow looks and works. As shown in Figure 3.16, you can customize the Display, the way the slides run (and how the whole show runs, including choosing how long individual slides stay onscreen), and how the slides transition from one to the next.

Figure 3.15. Want to have your images shown to you one at a time? Choose View
Slideshow. Your images take up the full screen, for maximum preview power.That's it in the View menu, in terms of choices for how your images display in the Bridge. Now let's look at the numbered buttons in the lower-right corner of the Bridge workspace. By default, you see three buttons — 1, 2, and 3 — and if you click any one of them and hold the mouse (or click the tiny triangle in the lower-right corner of the button), the pop-up menu shown in Figure 3.17 appears. These eight viewing options offer something for everyone:
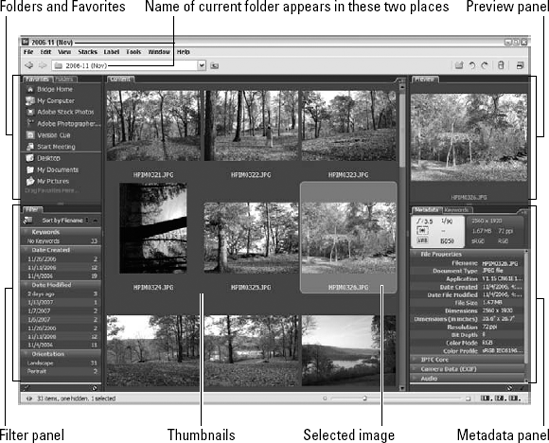
Default: That's the view we first showed you, with Content in the middle, Folders/Favorites in the upper left, Filter information in the lower left, and Metadata/Keywords on the right. You can see this view back in Figure 3.12.
Light Table: This view shows you just your images, in thumbnails that you can resize with the slider in the lower right, next to the numbered view buttons.
File Navigator: Choose this view if finding files is your big issue — maybe you don't know where the one you want is hiding, or you need to get a better sense of your overall file storage system — assuming you have one, that is! Figure 3.18 shows this view, with thumbnails taking up the entire right 2/3rds of the Bridge, and navigational tools — Favorites and Folders broken out into their own separate panels — on the left.
Metadata Focus: This view is the opposite of File Navigator, in that on the left, instead of Folders and Favorites, you see the Metadata and Keywords tabs broken out into two panels, and the rest of the window is your image thumbnails. This view assumes you know where your files are, but want to look at and edit the information stored about them.
Horizontal and Vertical Filmstrips: These two views give you just what you'd expect — a strip of images, running either horizontally or vertically, in sizes that you can control with the slider on the lower right, next to the numbered view buttons. As shown in Figure 3.19 (Horizontal Filmstrip view only, but you get the idea), a strip of images appears along the bottom, and a larger thumbnail appears singly, above the strip. To see a large version of any image in the scrollable strip, click the thumbnail in the strip, and the large image appears in the Preview area. The left panels are Favorites and Filter in this view.
VCStart Page: Again, you have a very simple view, this time with only Favorites and Folders tabs on the left and resizable thumbnails in the remaining majority of the window.

Figure 3.19. View your images one at a time, selecting them from a filmstrip that either runs along the bottom (as shown here) or down the right side of the window (Vertical Filmstrip, not shown).
Note
You can move and resize the panels on the left side of the Bridge workspace much like you can move and resize the palettes in Photoshop. Click the panel's tab itself and drag it up or down to regroup the tabs within the right-hand panel. You can group the palettes in any configuration you want — for example, you can drag them all so that they share a single box so less vertical space is taken up in the left-hand panel. To determine which tabs are displayed, use the View menu to select and deselect them by name. A check mark indicates that the panel is currently displayed.

You can select images — choosing from those displayed in the main viewing area — by clicking them with your mouse, as shown in Figure 3.20, or by making selection command choices from the Edit menu. You also can select images by searching for them (see coverage of the Find dialog box later in this section of this chapter). Once found, the images meeting your Find dialog box criteria can be selected en masse or by clicking the one that you really wanted to find.
To select images with your mouse, click once on the single image you want, or to gather more images, press Shift to select a series — as shown in Figure 3.20 — or press Ctrl (
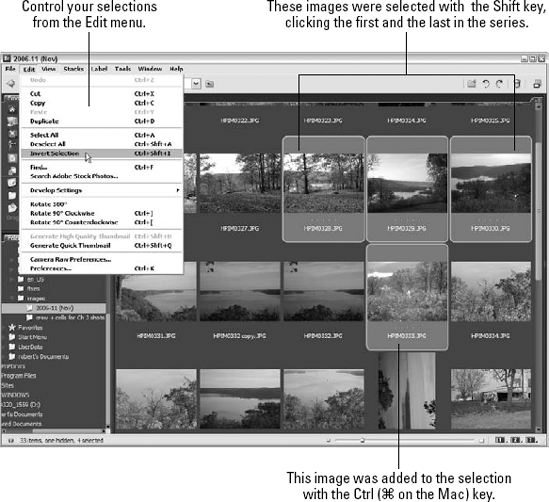
Figure 3.20. Select a contiguous group of images with the Shift key, or use Ctrl (
Warning
If yours is not the latest and greatest computer with lots of memory, you may want to avoid opening several images at once. Start small: Open one or two images, and if things don't slow down too much, you can open additional images until you notice the application becoming a bit clumsy. You may be prompted that your virtual memory setting is too low, and if you're a Windows user, Windows beefs up the memory allocation to meet your needs at the time.
In Photoshop, you can rotate the image canvas, turning an image that was scanned lengthwise or upside down that you want to see turned around. The change made through the Image
As shown in Figure 3.21, you can select an image and then choose Edit
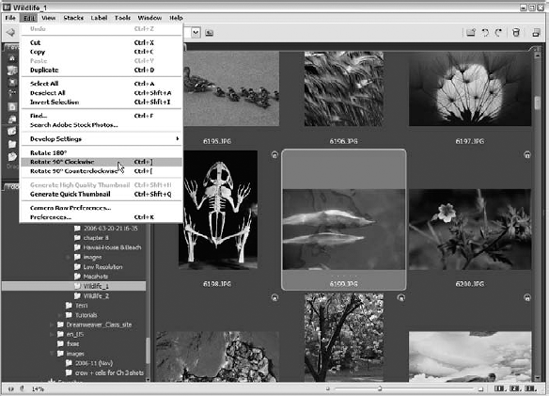
Figure 3.21. Rotate an image thumbnail for easier viewing, without actually rotating the image itself.
Tip
In the upper-right corner of the workspace is a series of buttons — New Folder, and then the two rotation buttons: Rotate 90 Clockwise and Rotate 90 Counterclockwise. You can use these on whichever image is selected at the time — or use them to rotate multiple selected images all at once. There's also a trash can button for deleting images, and the last one gives you quick access to Compact Mode.
Like the sites you've added to your Favorites (or Bookmarks) in your Web browser, images that you want to be able to come back to quickly and easily (and frequently) also can be turned into Favorites, accessible through the Favorites panel on the left side of the Bridge workspace. Figure 3.22 shows the Favorites list, which includes locations on the computer, folders, and images.
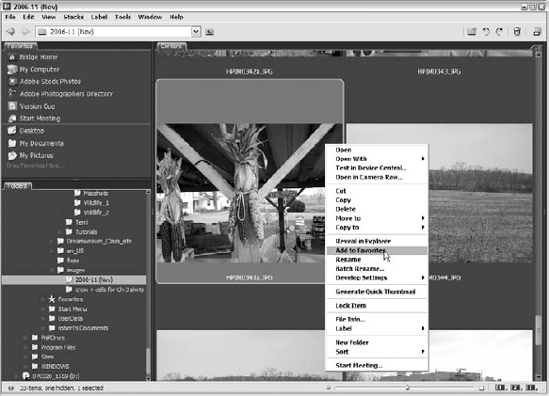
Figure 3.22. Are there images you use often and navigating to them via the Open dialog box is a pain? Add them to the Bridge Favorites list, and they're always right where you need them.
Tip
If you're not a big Bridge user and want your oft-used images to be easily accessible, increase the number of files that can be included in the File
To add an image to Favorites, just right-click (Control-click on the Mac) and choose Add to Favorites from the pop-up menu. You also can choose File
Tip
When you click an image in the Favorites list, the Bridge assumes you want to open it in Photoshop, so don't click the image in the list unless you want that to happen.
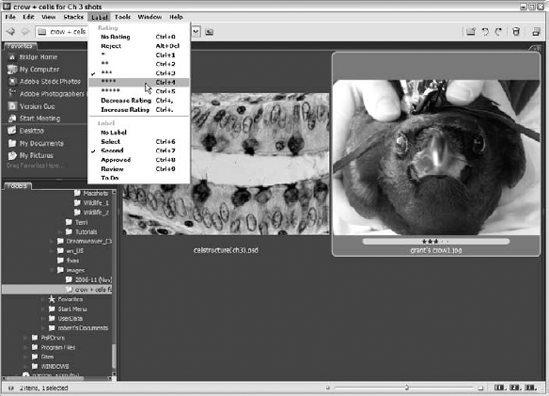
Humans' affinity for ranking and rating things is obvious — there are entire books of top-ten lists, and a popular late-night talk host compiles a funny top-ten list for each show. Applying value, even if it's totally subjective, is something most of us can't resist. The Bridge, being aware of this, gives you the ability to rate and label your images — ranking them with stars (from one star to five stars) and applying color-coded labels. As shown in Figure 3.23, the Label menu offers five ratings and five color labels, plus the ability to incrementally increase and decrease the existing rating for any image. You also can right-click (Control-click on the Mac) an image and use the Image command in the pop-up menu to access the Label color options.
Metadata, as described earlier in this chapter, is a cornucopia of file information, divided into three sections. You can scroll through them in the Metadata panel, shown in Figure 3.24. You can look at File Properties (the most commonly used and therefore visible without scrolling), IPTC Core data, and Camera Data (EXIF). As stated earlier, in CS3, there's also DICOM data, for medical imaging (storing patient's name, gender, etc.).
For many of your files, the vast majority of these bits of data will be blank; clicking the little pencil icon next to any currently blank or editable fields opens a text box into which you can type the appropriate information. Actually, for many users, this area may be entirely ignored, because either the file name or one glance at the image itself tells you all you need to know. On the other hand, if you need to keep track of things like when the picture was taken, how big a file it is, what its width and height are, and its pixel depth, the File Properties section is there for you, ready to house that sort of thing.
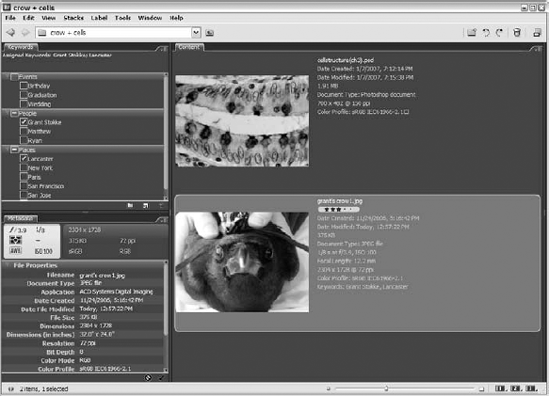
Figure 3.24. "Intellectual Genre"? Okay, maybe somebody needs that field, but information about the photographer and the date the picture was taken are the fields most of us will use.
The IPTC Core data houses even more information that you may or may not care about — usually stuff that pertains to other people's images — so if you typically work with other artists' images, you'll find plenty of places to keep their facts straight. Camera Data is just that — data about the camera used to take the image, which is right there and filled in if you took the picture with a digital camera. If you (or someone else) took the picture the old-fashioned way, the camera data will have to be entered manually.
Whether or not you use some or all of the data in these categories in the Metadata panel, you may have need of what little is there. The Bridge makes it easy to use the data, as desired, and one of the ways you can do so is through the Metadata panel's options menu button (triangle button on the top right of the panel's tab), where you're presented with the following commands/options:
Find: This command opens the Find dialog box (now there's a surprise), through which you can search for files based on various criteria and locations, and you can customize the results you want to see included. You set up your search from the top of the dialog box, shown in Figure 3.25, starting with Look In, where you can choose from all the folders and drives to which you have access on and through your computer. You also can click Browse at the foot of that folder to open a navigation window that makes it easier to search for the drive/folders in which you want to search.
Next, enter your search Criteria through the three fields in that section. You can select the field to look in (a list of the fields in the Metadata section of the Bridge window appears), choose the standard (contains, does not contain, exists, does not exist), and then type the text that should be compared to your criteria. Click the plus sign to add multiple criteria levels [such as Date Created is greater than (after) 03/01/2005 AND Filename contains "Beach"]. You can have up to 13 criteria levels (use the minus sign to remove extra criteria levels from your search), and for each type of criteria, the appropriate choices for matching records and entering in your values change, helping you fill things in a way that'll make sense to the software.
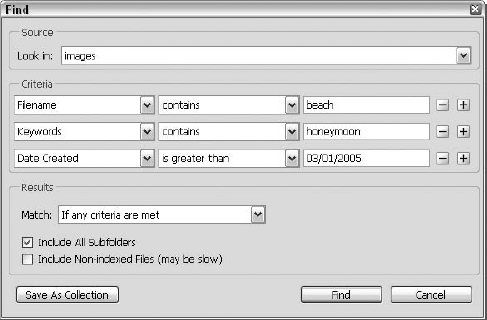
Figure 3.25. Use the Find dialog box to locate a file based on any of the stored information about the file.
After you have your search set up, use the Results section to fine-tune your results. Include Subfolders is a good one to turn on, and of course the Match setting allows you to decide how stringently your criteria settings are followed (if any criteria are met versus if all criteria are met). Click Find to send the Bridge sniffing for your files, or click Cancel to scrap the whole enterprise.
Increase Font Size and Decrease Font Size: These commands change the display font size for the data in the Metadata panel.
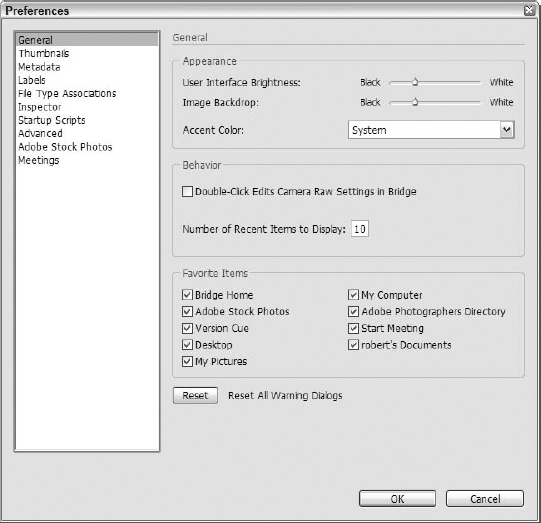
Preferences: This opens the Preferences dialog box, shown in Figure 3.26, through which you can customize the Bridge. You can customize the settings for nine different areas of the Bridge, including General (basic Bridge settings) to Thumbnails (how they look) to Labels (what the colors mean) to File Type Associations (which applications fire up automatically for which file types).
Show Metadata Placard: You know that little graphic on the upper left of the Metadata panel, with a gray background (it's shown in any view of the Metadata panel)? Well here's your chance to say sayonara to that little item if you find it bothersome. Maybe it takes up too much room, or maybe you don't care about the data it displays (camera settings). Whatever your reason, you can turn the placard on and off through this command.
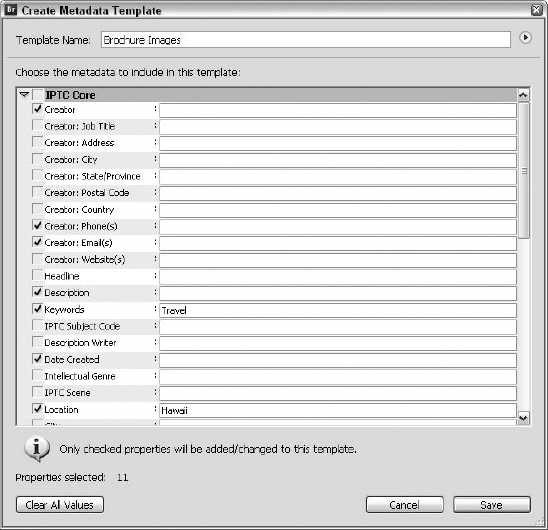
Create Metadata template: Choose this if you want to pick and choose the fields that show in the Metadata panel and save your own set of fields as a template. For any fields where you want something to always appear, enter those values into the boxes on the right of the individual fields. After you've done this, the following two commands become available, and their submenus list your saved templates. Figure 3.27 shows the IPTC Core data list of fields.
Append Metadata: Using preset templates, you can establish new data that will be stored about individual files.
Replace Metadata: Instead of adding to the metadata, this command allows you to choose from data templates that replace the metadata that appears by default.
Next to the Metadata panel tab is the Keywords panel tab, shown in Figure 3.28. Keywords are searchable text that is associated with individual images and stored with the file's data to help you locate files easily. Keywords are one of the Criteria you can set in the Find dialog box used to search for files. For example, if you're looking for all your wedding photos, you can tell Photoshop to find all files with "Wedding" in the Keyword list.
To view the Keywords for any file, click the file in the main display area and then click the Keywords tab on the left. A list of words — names, places, and categories such as "Birthday" and "Graduation" — appears with check boxes next to them. Boxes with check marks indicate an association with that keyword.
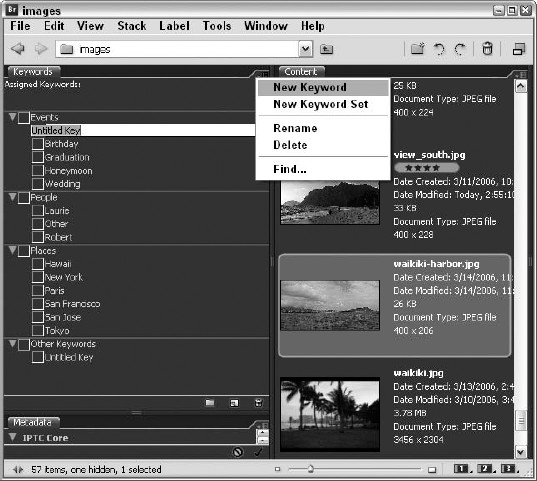
To add your own keywords to the list, click within the Keyword Set you want to add a keyword to and click the Keywords panel options menu button (that triangle again). Choose New Keyword, and an "Untitled Key" entry appears in the list (see the menu and the resulting Untitled Key in Figure 3.28) and becomes highlighted; you can type a new keyword to replace the sample text. In this case, a new keyword is being added to the Events Keyword Set.
To set up a new category, click the Options button and choose New Keyword Set. As shown in Figure 3.29, an Untitled Set appears, and you can again replace the sample text with a set name of your choice. After making a new set, you need to use the New Keywords command to create keywords for the set. For example, if you create a set called "Family," you can create keywords for individual people ("Mom" or "Uncle Emil") and/or you can create keywords for family events, like "Christmas" or "Bar Mitzvahs."
After you've created your own keywords and sets, additional commands become available in the Keywords panel options menu. The Rename and Delete commands appear, and you can use them to do just what you'd expect — rename a selected keyword or set, or delete a keyword or set you no longer need.
Note
The Find command appears in the Keywords options menu, just as it does in the Metadata menu. The resulting dialog box is the same as the one described earlier in our discussion of the Metadata options menu commands.
To apply a keyword to an individual image, select the image and then place check marks in the boxes next to one or more of the words in the Keywords panel. You can check as many boxes as you want, and if you think of any other words that you might want to use in searching for the selected image in the future, use the New Keyword command to create them.
The Creative Suite (referenced by the "CS" in Photoshop CS3) is a group of Adobe applications that are typically used — if not at the same time — together in terms of sharing files. The movie clips edited in Adobe Premiere may end up edited as still shots in Photoshop, for example, or the still photos you edit in Photoshop might end up in a Dreamweaver Web site or used for page layout with InDesign. You get the idea.
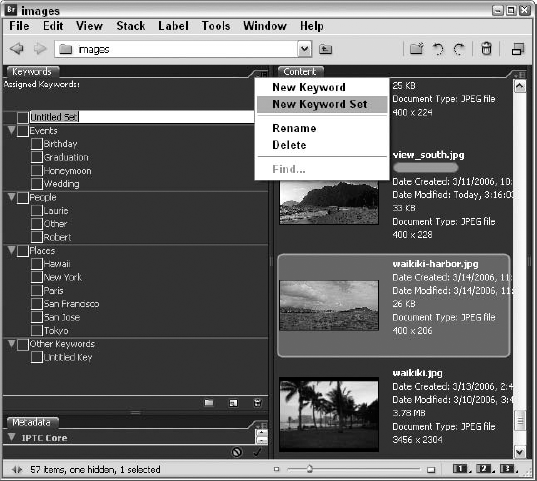
Figure 3.29. Choose to create a new Keyword Set to give yourself even more ways to categorize and organize your images — for your use and to simplify things for other people who use your images, too.
What assists the suite in operating as a cohesive unit is the synchronization of color settings. Through the Bridge, you can make sure that Photoshop holds up its end of the bargain, working with the dialog box shown in Figure 3.30. To display and work with this dialog box, choose Edit
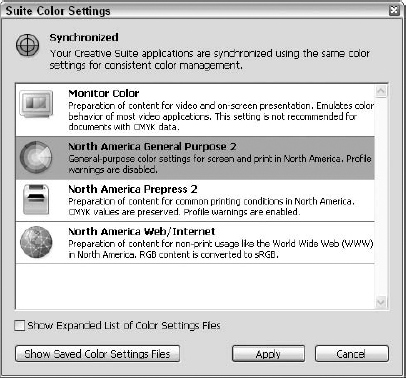
To synchronize the settings, you can select one from within the dialog box. This sets up the suite applications — as many as you have installed on your computer from the same version of the suite — to work together with the same color settings.
Tip
To access the settings files, click the Show Saved Color Settings Files button, which opens an Explorer window with a folder tree on the left and the settings files on the right. If the right side of the window is empty, you have no saved color settings files.
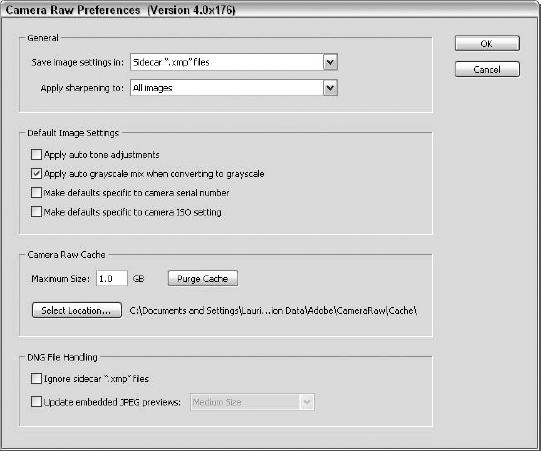
Camera Raw, a file format supported by Photoshop, is discussed later in this chapter and elsewhere in this book (see Chapter 18). You can set your Camera Raw preferences through the Bridge, using the Edit menu (or the Bridge CS3 menu if you're on a Mac). After the Camera Raw Preferences dialog box, shown in Figure 3.31, is open, you can choose how image settings are saved (pick a format; Sidecar ".xmp" files is the default), choose how sharpening is applied, set the Default Image Settings, and set up the Camera Raw cache, which includes deciding where the cache file is saved (find out more about cache later in this chapter) and how much space to allocate to cache files. You also can choose how CS3 deals with DNG files. After you like your settings, click OK.
The old saying "A place for everything, and everything in its place" is a philosophy that many tidy people live by. It's also a good motto for Photoshop users, because productivity hinges on easy access to the tools you need. Keyboard shortcuts can help put things at your fingertips (literally), but they don't always help enough when it comes to using palettes, tools, and so forth. Photoshop is sensitive to this and gives you the Window
When you choose this command, the Save Workspace dialog box appears, giving you the chance to apply a relevant name to the workspace and to choose a keyboard shortcut (Ctrl + any of the function keys from F6 through F12, except F10, for Windows users, cmd + the F1 through F6 keys if you're on the Mac) that invokes the saved workspace configuration. You also have an option to Save Window Location as Part of Workspace — meaning if you have the Bridge window sized and positioned the way you want it, you can save that position, too.
Note
"What about preset workspaces?" you may ask. Good question. If you choose Window
You may spend several minutes generating previews, rotating thumbnails, and ranking images inside the Bridge. Because not a single one of these functions or their impact on the image display in the Bridge is saved with the image file, you might wonder how Photoshop prevents you from losing your work. It does this by saving a cache file that records all changes made to an entire folder full of images.
This all happens in the background without any assistance from you, but problems can crop up, and if Photoshop didn't have some sort of plan in the works, you'd lose your work if anything went wrong while you were trying to juggle multiple open images, view new images on a CD, share files over a network, or any other combination of common, often concurrent activities.
It can't be that you have to lose all your work at the slightest change in display or other settings, nor can it be that you have to spend all your time worrying about this caching process. There is, in fact, a backup plan, in the form of two commands that can help ease the burden and prevent the loss of your work — just choose Tools
To rename a handful of specific files, click and Shift-click their thumbnails to select them. To rename all files in a folder, choose Select All or Deselect All from the Edit menu. Then right-click (Control-click on the Mac) and choose Batch Rename (or choose Tools
You have the option of renaming files in the folder where they currently reside (the most common choice) or moving them to a different folder. If you click Move to New Folder, the File Browser asks you to select a destination. Note that moving means just that — Photoshop relocates the files as opposed to copying them to the new location.
You can specify up to six File Naming variables, though two or three are usually sufficient. The three Document Name options retain or change the case of the name currently assigned to the file. Alternatively, you can type your own name in an option box.
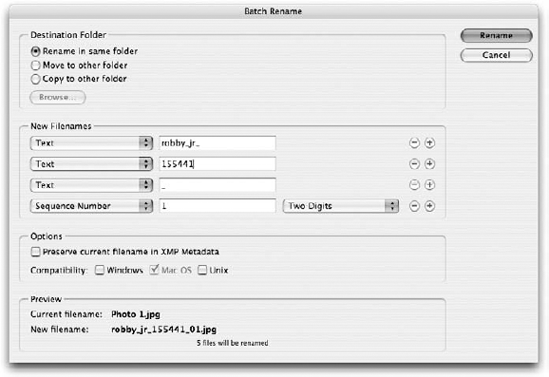
Figure 3.32. Use the Batch Rename command to rename multiple files in a single operation. You can select naming options from a pop-up menu or type your own name.
Warning
To ensure that your images are named so that they'll work on any computer, select all three Compatibility options. (Either Windows or Mac OS is already selected, depending on your platform.) Then click OK to apply your changes. Note that, as with other File Browser operations, renaming is not undoable. So be sure that all settings are correct before you click OK. If you have any doubt about how the command works, experiment on a few trial images before renaming important files.
As we've seen, an image file can contain much more information than the image data. On top of pixels, alpha channels, color profiles, and all the other image data you can cram into your image files, you can add a variety of reference information — where you shot the picture, who owns the image copyright, your thoughts on the photo, potential uses for the prints, and so on.
Despite the abundance of data already available to you through the Bridge Metadata panel, sometimes you need to be able to edit and access more information than a little panel can hold. That's when you should choose File
To switch from one File Info area to another, press Ctrl+1 through Ctrl+8 (
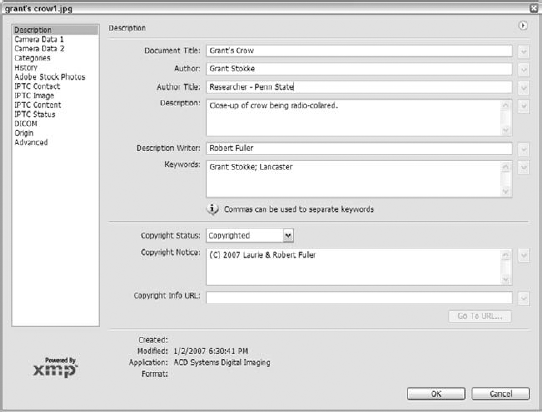
Description: The options in this panel are fairly straightforward. For example, if you want to create a caption, type it in the Description option box, which can hold up to 2,000 characters. If you select Description in the Output section of the Print dialog box, the caption appears below the image when you print it from Photoshop. You also can add a copyright notice to your image. If you choose Copyrighted Work from the Copyright Status pop-up menu, a copyright symbol (©) appears in the image window title bar and in the information box at the bottom of the screen on the PC or at the bottom of the image window on the Mac. This symbol tells people viewing the image that they can go to the Description panel to get more information about the owner of the image copyright. Choose Public Domain if you want to make it clear that the work isn't copyrighted (an Unmarked image might actually be a neglected copyrighted one).
You also can include the URL for your Web site, if you have one. Then, when people have your image open in Photoshop, they can come to this panel and click Go to URL to launch their Web browser and jump to the URL.
Tip
Click the down arrow to the right of an option to reveal a pop-up menu containing information that you've previously entered for the option in other images. For example, if you've listed yourself as the author of another image you recently worked on, you can click the arrow next to the Author option and select your name.
Note
Because only people who open your image in Photoshop have access to the information in the File Info dialog box, you may want to embed a digital watermark in your image as well. Many watermarking programs exist, ranging from simple tools that merely imprint copyright data to those that build in protection features designed to prevent illegal downloading and reproduction of images. Photoshop provides a watermarking utility from Digimarc as a plug-in on the Filters menu; before using the plug-in, visit the Digimarc Web site (
www.digimarc.com) to find out which, if any, of the Digimarc watermarking schemes best suits the type of work you do.Camera Data: Following the Description options you'll find two panels of Camera Data values. This is where the EXIF information discussed earlier in the chapter is displayed. EXIF data is written by the digital camera, not the user, so these fields cannot be altered.
Categories: The Categories panel may seem foreign to anyone who hasn't worked with a news service. Many large news services use a system of three-character categories to file and organize stories and photographs. If you're familiar with this system, you can type the three-character code in the Category option box and even throw in a few supplemental categories up to 32 characters long.
History: If you've selected the History Log option in the General panel of the Preferences dialog box, this panel displays the history data for the image. Otherwise, it's blank. (For complete details on setting up the History Log, see Chapter 2.)
Origin: This panel provides more option boxes for entering specific information about how the image came to be, including the date, the location, and a headline. Click the Today button to automatically enter the current date and time in the Date Created field. You can use the Urgency pop-up menu to indicate the editorial timeliness of the photo.
Advanced: The Advanced panel displays all the information you've set for the image in metadata's XMP format. On a PC, file information is saved only in image file formats that support saving extra data with the file. This includes the native Photoshop (.psd) format, EPS, PDF, JPEG, and TIFF. On a Mac, file information is saved with an image regardless of the format you use. Photoshop merely tacks the text onto the image's resource fork. If you need the metadata of an image to travel with the image file, regardless of platform, application, or operating system, saving an XMP file is the way to go. XMP, which stands for eXtensible Metadata Platform, is essentially a text file containing metadata that can be assigned to an image and read by many applications. The Advanced panel lets you save this type of file with the metadata you're currently viewing. From this panel, you also can open an XMP file and use it in place of your current metadata, as well as add the information from an XMP file on top of your image's metadata. Selecting any of the categories of metadata in the Advanced panel and clicking Delete clears that specific data from your image file.
Perhaps the most useful metadata-related feature in Photoshop is the capability to create metadata templates. If you have a collection of images with the same author or origin information, you don't want to have to go through the task of opening the File Info dialog box and manually entering metadata (or importing an XMP file) for each and every one. Photoshop can take care of this for you. Creating a metadata template is simple: Just open the File Info dialog box for any one of the images, and enter the common characteristics of the group. Next, click the right-pointing arrowhead in the upper-right corner of the dialog box, and choose Save Metadata Template. You'll be asked to type a name but not a location (Photoshop does that for you). Click Save, and you're finished. Photoshop automatically adds the metadata template to the pop-up menu in the File Info dialog box, so you can easily access it.
You can assign your saved metadata templates to multiple files at once in the File Browser. Simply select the files to which you want to assign the metadata and choose Edit
Have you ever wanted to try an effect without permanently damaging an image? Photoshop offers multiple undos, and you'll get a kick out of using the History palette to see before and after views of your image (as explained in Chapter 7). But what if you want to apply a series of effects to an image independently and compare them side by side? And save the variations as separate files? Or perhaps even merge them? This is a job for image duplication.
To create a new window with an independent version of the foreground image, choose Edit
The first rule of image editing — and of working on computers in general — is to save the file frequently. If your computer or Photoshop crashes while you're working on an image, all edits made during the current editing session are lost.
To save an image for the first time, choose File
After you save the image once, choosing the Save command updates the file without bringing up the Save dialog box. To save the image with a different name, location, or format, choose File
You also can execute the Save As command by pressing Ctrl+Shift+S (
Tip
To speed the save process, you may want to save an image in Photoshop's native format until you've finished working on it. Then, when the file is all ready to go, you can choose File
If you have multiple files open, you can close them in one step by choosing File
On the Mac, the Preferences dialog box includes an option that lets you append a three-character file extension to your files. Again, this option is located in the File Handling panel, so press
Why add PC file extensions on a Mac? Obviously, it makes life easier when sharing images with Windows users, and for Mac users, if you're working with an application that uses file extensions to indicate the source application (such as iPhoto, for example), you'll find it to be very helpful. More importantly, it's another form of insurance. If you're a Mac person and you ever find yourself using a PC, you're going to have tons and tons of old Macintosh image files that you'd like to open and reuse. With file extensions, you'll have no problem. Without them, good luck. The file extension is the only way a Windows application has to identify the file format. If there's no file extension, you have to tell the application which format to use. Although I don't question the basic record-keeping capabilities of your brain, you probably have better things to remember than what file format you used five years ago.
Tip
As mentioned in Chapter 2, you can automatically append an extension from the Save dialog box regardless of your preference settings. Press Option, choose an option from the Format pop-up menu, and there it is.
Certain save options that once upon a time were available only through the Save a Copy command now appear in the Save dialog box all the time. You also get access to these options when you choose Save As or press its keyboard shortcut, Ctrl+Shift+S (
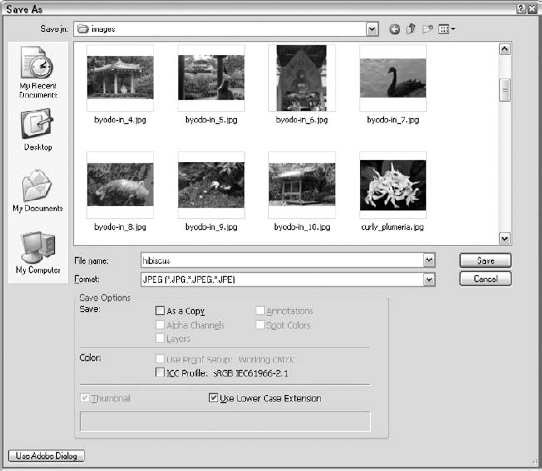
Figure 3.34. Here's a look at the default Save As dialog box, which incorporates the Save a Copy command (previously a separate File menu command) as a save option.
There's a Use Adobe Dialog button in the Save As dialog box, which opens the Adobe Save dialog box — just like there's an Open dialog box in Adobe format, as described earlier in this chapter. After you click the Use Adobe Dialog button, the dialog box changes and you see the version shown in Figure 3.35. Note that the dialog box has a Use OS Dialog button that you can click to go back to the default Save As dialog box.
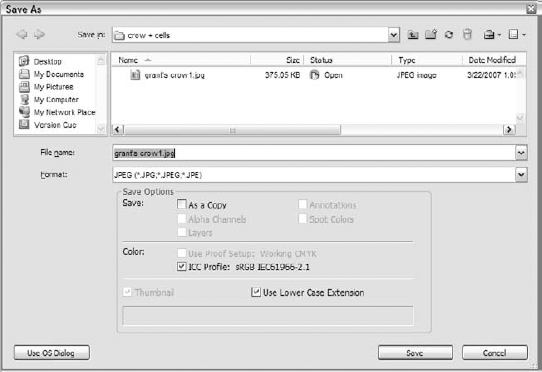
Figure 3.35. Should you use the Adobe Save As dialog box? Sure, why not? Its layout is a little different, and you may prefer it to the OS Dialog box, especially if you have to work in both Mac and Windows versions of Photoshop.
Note that the options you can select vary depending on the image file and the selected file format. If an option is dimmed, it either doesn't apply to your image or isn't supported by the file format you chose. And if your image includes features that won't be saved if you go forward with the current dialog box settings, Photoshop gives you the heads up by displaying a warning message at the bottom of the dialog box.
As a Copy: Select this option to save a copy of the image while leaving the original open and unchanged — in other words, to do what the Save a Copy command did in Photoshop 5.5 and earlier. The result is the same as duplicating an image, saving it, and closing the duplicate all in one step.
The whole point of this option is to enable you to save a flattened version of a layered image or to dump other extraneous data, such as masks. Just select the file format you want to use, and let Photoshop do the rest for you.
Annotations: Select this option to include any annotations that you created using the notes and audio annotation tools. You can find out how to annotate your images in the section "Adding Annotations" later in this chapter.
Alpha Channels: If your image contains an alpha channel — Photoshop's techy name for an extra channel, such as a mask (discussed in Chapter 9) — select the Alpha option to retain the channel. Only a few formats — notably Photoshop, PDF, PICT, PICT Resource, TIFF, and DCS 2.0 — support extra channels.
Spot Colors: Did you create an image that incorporates spot colors? If so, select this option to retain the spot-color channels in the saved image file. You must save the file in the native Photoshop, PDF, TIFF, or DCS 2.0 format to use this option.
Layers: TIFF and PDF can retain independent image layers, as can the native Photoshop format. Select the option to retain layers; deselect it to flatten the image.
Warning
If you're working with a layered image and select a file format that doesn't support layers, a cautionary message appears at the bottom of the dialog box. However, Photoshop doesn't prevent you from going through with the save, so be careful. All layers are automatically merged when you save the file in a nonlayer format. However, when you close the file, Photoshop reminds you that you haven't saved a version of the image that retains all data and gives you the opportunity to do so.
Use Proof Setup: This option relates to Photoshop's color profile options. If the current view's proof setup is a "convert to" proof, Photoshop converts the image to the selected proofing space when saving.
ICC Profile (Win)/Embed Color Profile (Mac): If you're saving your image in a file format that supports embedded ICC profiles, selecting this option embeds the profile. The current profile appears next to the option name. See Chapter 17 for advice about working with color profiles.
If your image is bound for the Web, you want to use the File
View side-by-side versions of the image: On the left, as shown in Figure 3.36, is the original; on the right (in the 2-up view), the optimized version. This enables you to see whether the optimization process has degraded the file at all.
Preview File Sizes and Load Times: Under the optimized view, the current file format, the file size, and how long that file would take to load for a site visitor using a 28.8 Kbps modem are displayed. The quality setting chosen on the upper-right side of the dialog box also appears in this area. Note that if you're using Windows, Preset options appear in a drop-down list, and on the Mac, they appear in a pop-up menu.
Choose the right format for the file: GIF, JPG, or PNG? Although these options are discussed later in this chapter, you can make your pick through the Preset options in the Save for Web dialog box. From GIF 128 Dithered to PNG-8 128 Dithered (with 10 options in between), you can choose from any Web-safe format, in any configuration.
Set the file quality or color density: If you've opted to save the file as a JPEG (which you should if it's a photo), there's a Quality slider. If you chose GIF (for line art or drawings with solid colors), you have a Colors option that allows you to set the image to display from 2 to 256 colors.
Customize the image: Using options that vary depending on which Preset you chose, you can totally customize the quality and display behavior of the file. Choose the Transparency, Dither, Lossy, and Matte settings (for GIF images), or choose to make your JPEG appear in Progressive fashion, with or without Blur.
Animate your GIF images: If the image is already saved as a GIF file, you can use the buttons along the bottom-right side of the dialog box (in the Color Table tab) to animate the image, layer by layer. You can create animated GIF images from simple on-off affairs to more elaborate movie-like graphics. Read more about this in Chapter 20.
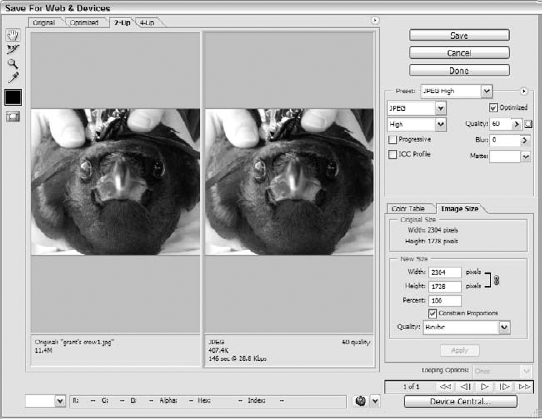
After making your choices in the Save for Web dialog box, all you have to do is click Save, which opens a Save dialog box through which you can name and choose a location for your file. By default, if the file is already saved in PSD or another format (prior to your opening the Save for Web dialog box), Photoshop attempts to give the file that same name — with the extension for the format you chose for the Web-bound file. If the file name you gave it previously is not Web-friendly — bearing capital letters and punctuation other than dashes — edit the name accordingly.
And speaking of file formats, in the next section you learn more about different formats supported by Photoshop, their uses, benefits, and possible drawbacks.
Photoshop CS3 supports more than 25 file formats from inside both the OS and Adobe versions of the Open and Save dialog boxes. It can support even more through the addition of plug-in modules that attach commands to the File
File formats represent different ways to save a file to disk. Some formats provide unique image-compression schemes that save an image in a manner that consumes less space on a hard drive. Other formats enable Photoshop to trade images with different applications running under Windows, the Mac, or some other platform.
Like most programs, Photoshop offers its own native format — that is, a format optimized for Photoshop's particular capabilities and functions. This PSD format saves every attribute that you can apply in Photoshop — including layers, extra channels, file info, and so on — and is compatible with versions 3 and later of the program. Of course, when you open files in earlier versions of Photoshop, you lose file attributes related to later versions, such as annotations, color proof options, and so on.
Note
Photoshop isn't the only application that uses PSD as its native format; PSD also is the native format for the "lite" version of Photoshop, called Photoshop Elements.
Tip
Perhaps not surprisingly, Photoshop can open and save more quickly in its native format than in any other format. The native format also offers image compression. Like TIFF's LZW compression, the Photoshop compression scheme does not result in any loss of data. But Photoshop can compress and decompress its native format much more quickly than it can TIFF, and the compression scheme is better able to minimize the size of mask channels (as explained in Chapter 9).
The downside of the Photoshop format is that relatively few applications other than Photoshop support it, and those that do don't always do a great job. Some applications, such as Corel Photo-Paint and Adobe After Effects, can open a layered Photoshop image and interpret each layer independently. But most of the others limit their support to flat Photoshop files. To accommodate these programs, you can either deselect the Layers option in the Save dialog box to save a flattened version of the image or set the Maximize PSD File Compatibility option in the Preferences dialog box to Ask or Always.
There's another way to look at this, however. Photoshop's native format was never intended to be an inter-application standard. It's not like a DOC or RTF file created by Microsoft Word, which is meant to be compatible with any other word processor. You can save your Photoshop creation in a variety of formats, making it possible to work with other programs, but the PSD format isn't so transferable. It's actually easier to set the Maximize PSD File Compatibility to Never, which you can read about in Chapter 2. If you need to share an image you've created or edited in Photoshop with someone who doesn't have Photoshop, just save it in a format that person can use — like TIFF or JPEG. And always keep a PSD version for yourself, so that flattening the file for someone else doesn't rob you of future editing capabilities in Photoshop.
With so many file formats from which to choose, you can imagine that most are not the kinds you'll be using on a regular basis. In fact, apart from the native Photoshop format, you'll probably want to stick with TIFF, JPEG, and GIF for Web images and EPS when preparing images for placement in InDesign, QuarkXPress, and other layout programs.
Many of the other formats are provided simply so that you can open an image created on another platform, saved from some antiquated paint program, or downloaded from the Web. These formats are covered in other places in the book — Chapter 20 for Web-safe formats, for example. Moving forward here, you learn about the more robust formats — from BMP to TGA, and lots of other alphabet soup in between.
BMP (Windows Bitmap) is the native format for Microsoft Paint (included with Windows) and is supported by a variety of Windows and DOS applications. Photoshop supports BMP images with up to 16 million colors. You also can use RLE (Run-Length Encoding), a lossless compression scheme specifically applicable to the BMP format.
Note
The term lossless refers to compression schemes that conserve disk space without sacrificing any data in the image, such as BMP's RLE and GIF's LZW (Lempel-Ziv-Welch). The only reasons not to use lossless compression are that it slows down the open and save operations, although this isn't as much of an issue on newer machines, and it may prevent less-sophisticated applications from opening an image. (Lossy compression routines, such as JPEG, sacrifice a user-defined amount of data to conserve even more space, as explained later.)
The most common use for BMP is to create images for use in help files and Windows wallpaper. In fact, designing your own Windows wallpaper can be a fun way to share your Photoshop skills with coworkers, family, and with yourself, too. For the best results, make sure you set your image to exactly the same pixel dimensions as your screen (which you can check from the Settings panel in the Display control panel). To conserve memory, you may want to reduce the number of colors in your wallpaper image to 256 using Image
When you save the wallpaper image, Photoshop displays the options shown in Figure 3.37. Generally, you'll want to select the Windows and Compress (RLE) options, but it really doesn't matter when creating wallpaper. Don't mess with the Depth options. Either you reduced the bit depth using the Indexed Color command as directed previously, or you didn't. There's no sense in changing the colors during the save process.
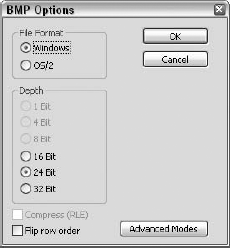
Figure 3.37. Want to save an image for use as your desktop? Choose Bitmap as your file format, and respond to this dialog box.
To load the wallpaper onto your Windows desktop, right-click anywhere on the desktop and choose the Properties command. This brings up the Display Properties dialog box. Go to the Background tab, and click Browse to locate your BMP image on disk. After you find it, double-click it to select it, and then click Apply to see how the image looks. You can tweak its appearance on the desktop by choosing from the three Picture Display options — Stretch, Center, or Tile.
When opening images from a digital camera, Photoshop gives you the ability to work with Camera Raw files. These are the untouched, pristine files generated by mid-level to high-end digital cameras before the images are run through various in-camera compression and color-correction passes. Think of Camera Raw as the digital equivalent of a film negative. Camera Raw files are proprietary, meaning that cameras manufactured by Canon, Fuji, Minolta, and others produce different types of files. Luckily, Photoshop supports a variety of Camera Raw file formats. When you open a supported Camera Raw file, it appears in a special Camera Raw dialog box, where you can make minute adjustments to colors, brightness levels, and other values in your image with virtually no loss in quality. You can find more information on the Camera Raw dialog box in Chapter 18.
Cineon is a film- and video-related format supported by Photoshop. Developed by Kodak and used for years as the standard for transferring computer-based images to film, Cineon is a robust, high-quality format and one of the few capable of saving images in 16-bit mode. When Cineon files are used with the Cineon Digital Film System, they can be output to film with absolutely no loss in image quality.
In the old days, the CompuServe online service championed GIF (short for Graphics Interchange Format) as a means of compressing files so you could quickly transfer photographs over your modem. Like TIFF, GIF uses LZW compression, but unlike TIFF, GIF is limited to just 256 colors.
Over the years the GIF format has grown slightly more sophisticated. You can save an image with or without transparency by choosing File
Tip
GIF files can be animated through the Save for Web dialog box. Save the file in GIF format through Photoshop's Save As dialog box, and then open the Save for Web dialog box to access animation tools that turn image layers into components that can be made to move or blink on and off for one loop or an endless series of repeating actions.
PCX doesn't stand for anything. Rather, it's the extension PC Paintbrush assigns to images saved in its native file format. Although the format is losing favor, many PCX images are still in use today, largely because PC Paintbrush is the oldest painting program for DOS. Photoshop supports PCX images with up to 16 million colors. You can find an enormous amount of art, usually clip art, in this format. However, don't save files to PCX unless a client specifically demands it. Other formats are better.
PDF (Portable Document Format) is a variation on the PostScript printing language that enables you to view electronically produced documents onscreen. This means that you can create a publication in QuarkXPress or InDesign, export it to PDF, and distribute it without worrying about color separations, binding, and other printing costs. Using a program called Adobe Reader, you can open PDF documents, zoom in and out of them, and follow hypertext links by clicking highlighted words. Adobe distributes Mac, Windows, and Unix versions of the Adobe Reader for free, so almost anyone with a computer can view your stuff in full, natural color. Mac OS X users will also enjoy the fact that PDF files can be displayed in virtually any Mac application (written for use in OS X), and that in many Mac applications' Print dialog boxes, a Save as PDF option appears, making the creation of PDF files quite simple.
PDF files come in two flavors: those that contain just a single image and those that contain multiple pages and images. You can only save single-page PDF files using the File
You open PDF files in different ways depending on what elements of the file you want to access:
Use File
Choose File
Choose File
The real question, however, is why would you want to open or place a PDF file in Photoshop instead of viewing it in Adobe Reader, which provides you with a full range of document-viewing tools not found in Photoshop? Furthermore, because you can save only single-page PDF files, why on earth would you save to PDF in Photoshop?
There are really only two scenarios where Photoshop's PDF functions may be of use:
You want to see how images in a PDF document will look when printed on a high-resolution printer. Open the PDF file using File
You need a convenient way to distribute images for approval or input. You can save an image as a PDF file and send it to clients and colleagues, who can view the image in Acrobat or Adobe Reader if they don't have Photoshop. You can even add text or voice annotations to your PDF file. In addition to annotations, Photoshop PDF supports layers, transparency, embedded color profiles, spot colors, duotones, and more. This enables you to route an image for approval without having to flatten the image or otherwise strip it of its Photoshop features. Of course, features not supported by Adobe Reader aren't accessible to the viewer.
When you save to PDF in Photoshop, you have a choice of two encoding options, as shown in Figure 3.38. Choose ZIP only for images that feature large expanses of a single color; otherwise, opt for JPEG. Keep the Quality option set to Maximum to maintain the best print quality, just as you do for regular JPEG files.
Note
If you select JPEG encoding, you need a PostScript Level 2 or later printer to output your PDF file. Also be aware that separating files into individual plates can be problematic if you're working in a Windows environment.
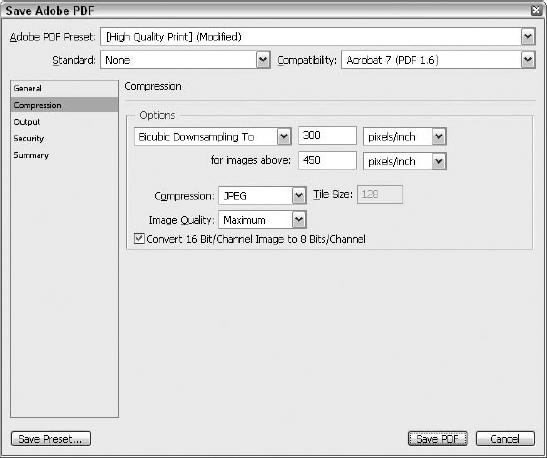
Figure 3.38. Click any one of the five items listed on the left to display a new set of options. Here, the Compression options are displayed.
When saving to PDF, you also encounter several other options:
Save Transparency: If your image has transparency and you're saving it as a PDF without layers, the Save Transparency option determines whether or not the transparency is maintained.
Image Interpolation: Selecting this option enables other programs to interpolate the image when resampling to another size.
Downgrade Color Profile: Here's an option you'll probably never use. PDF doesn't support version 4 ICC profiles. Selecting this option converts them to version 2 profiles so that they'll work in PDF. The thing is, you probably don't have a version 4 ICC profile anyway, in which case this option is dimmed. For more on ICC profiles, see Chapter 17.
PDF Security: This option allows you to assign passwords to PDF documents — if users don't know the password, they can't open the document. To set the security information, select the PDF Security option and click Security Settings. You can set the user password here, along with a master password, which can prevent others from changing the user password. The Encryption Level options take effect only when the document is being opened with Adobe Acrobat; you can choose the version of Acrobat and determine whether options such as saving changes and printing are allowed.
Include Vector Data and Embed Fonts: Select these two options to retain any vector graphics and font data, respectively. Alternatively, you can select Use Outlines for Text to save text as character outlines that are editable in the PDF file.
PICT (Macintosh Picture) was the native graphics format for Mac OS 9. (Mac OS X has adopted PDF as its standard graphics file format.) Based on the QuickDraw display language that the system software uses to convey images onscreen, PICT handles object-oriented artwork and bitmapped images with equal aplomb. It supports images in any bit depth, size, or resolution. PICT even supports 32-bit images, so you can save a fourth masking channel when working in the RGB mode.
If you've installed QuickTime on the Mac, you can subject PICT images to JPEG compression. But although PICT's compression options may look similar to JPEG's, they are actually significantly inferior. The differences become especially noticeable if you open an image, make a change, and again save it to disk, effectively reapplying the compression.
In most cases, you'll want to use the JPEG format instead of PICT when compressing images. JPEG images are compatible with the Web; PICT images are not. Also, more Windows applications recognize JPEG than PICT, and it's extremely difficult to find a Windows program that can handle PICT files with QuickTime compression.
In fact, the only reason to use PICT is low-end compatibility. If you're trying to save an image in a format that your mom can open on her ancient Mac, for example, PICT may be a better choice than JPEG. Heck, you can open PICT files inside a word processor, including everything from SimpleText to Microsoft Word. Just be sure mom has QuickTime loaded on her machine.
When you save a PICT image, Photoshop also lets you set the bit depth. You should always stick with the default option, which is the highest setting available for the particular image. Don't mess around with these options; they apply automatic pattern dithering, which is a bad thing.
If you're using a PC, you may need to open a PICT file a Mac friend sends you. Photoshop can do this, but one thing may trip you up: On the Mac, you have the option of saving PICT files with a variety of JPEG compressions supplied by Apple's QuickTime. Unless you have QuickTime installed on your PC or if you've installed iTunes for your iPod (which installs QuickTime automatically)— you won't be able to open compressed PICT images.
PICT resources were the images contained in the resource fork of a Mac file in OS 9. (Windows programs can't recognize resource forks, so this section is relevant only to Mac users.) The only reason you would want to save a PICT resource is if you are creating an OS 9 startup screen, and the most likely reason to open one is to extract images from the OS 9 Scrapbook. However, because Photoshop CS3 (and its predecessors, CS and CS2) no longer runs under OS 9, you can be fairly confident that you won't be using this format. For the time being, however, Photoshop continues to support the format.
Pixar has created some of the most memorable computer-animated short films and features in recent memory. Pixar works its 3-D magic using extremely expensive proprietary workstations. Photoshop enables you to open a still image created on a Pixar machine or to save an image to the Pixar format so you can integrate it into a 3-D rendering. The Pixar format supports grayscale and RGB images.
The PNG (pronounced ping) format enables you to save 16-million color images without compression for use on the Web. Although PNG has been generally supported by Netscape Navigator and Microsoft Internet Explorer since 1997, these main two browsers still can't be counted on to fully support all the features of PNG. Couple that info with the obvious fact that you can't count on the general public to have anywhere near the most recent version of any software application, and using PNG might seem like a dicey proposition. It's a great format, though, offering full-color images without the pesky visual compression artifacts you get with JPEG.
Recently, many applications have adopted the capability to work with and save files more than 2GB in size. If you're editing nonlinear video, the need to use gigantic files makes perfect sense. Image-editing applications like Photoshop have been slower to adopt support for such huge files, but Photoshop has leapt into the fray with its new Large Document Format (PSB). Finally, you won't need to figure out a work-around when designing that billboard for the surface of the moon.
Photoshop is capable of opening and saving existing PSB files by default, but if you want to create a Large Document Format file from scratch, you need to select the Enable Large Document Format (.psb) option in the File Handling panel of the Preferences dialog box (that's Ctrl+K, Ctrl+3 on the PC and
Note
Another format that you can use for storing enormous files is Photoshop Raw, but it's not nearly as capable as PSB. Most important, the image needs to be flattened, meaning you can kiss your layers goodbye. Photoshop Raw can be useful for other purposes, though, as is explained shortly.
Some high-end commercial printers use Scitex printing devices to generate color separations of images and other documents. Photoshop can open images digitized with Scitex scanners and save the edited images to the Scitex CT (Continuous Tone) format. Because you need special hardware to transfer images from the PC to a Scitex drive, you'll probably want to consult with your local Scitex service bureau technician before saving to the CT format. The technician may prefer that you submit images in the native Photoshop, TIFF, or JPEG format. The Scitex CT format supports grayscale, RGB, and CMYK images.
TrueVision's Targa and NuVista video boards enable you to overlay computer graphics and animation onto live video. The effect is called chroma keying because, typically, a key color is set aside to let the live video show through. TrueVision designed the TGA (Targa) format to support 32-bit images that include 8-bit alpha channels capable of displaying the live video. Support for TGA is widely implemented among professional-level color and video applications on the PC.
If your preferences are set correctly in Adobe Acrobat, you can select any image file in a PDF document, right-click it (Control-click on the Mac), and choose to edit the image externally in Photoshop. Acrobat creates a temporary file with a long, indecipherable name, called a TouchUp Image, and opens Photoshop. After you save the file and return to Acrobat, the changes you made are incorporated automatically. A quick tip: Make sure you don't alter the dimensions of an image you're touching up — doing so alters the layout of the PDF file — and remember to flatten any layers you may have created before you return to Acrobat.
Hey, those crude little graphics found on handheld wireless devices have to come from somewhere, right? Why not Photoshop? Photoshop can open and save in WBMP (Wireless Bitmap) format, an up-and-coming standard for cell phones and personal digital assistants. To save an image to the Wireless Bitmap format, the image must be in Bitmap mode, with only black and white pixels.
In the name of inter-application harmony, Photoshop supports a few software-specific formats that permit you to trade files with popular object-oriented programs, such as Illustrator and QuarkXPress. Every one of these formats is a variation on EPS (Encapsulated PostScript), which is based in turn on Adobe's industry-standard PostScript printing language.
Photoshop supports object-oriented files saved in the EPS format. EPS is specifically designed to save object-oriented graphics that you intend to print to a PostScript output device. Just about every drawing and page-layout program on the planet (and a few on Mars) can save EPS documents.
Prior to version 4, Photoshop could interpret only a small subset of EPS operations supported by Illustrator (including the native .ai format). But then Photoshop 4 came along and offered a full-blown EPS translation engine, capable of interpreting EPS illustrations created in FreeHand, CorelDraw, and more. You can even open EPS drawings that contain imported images, something else version 3 could not do. When you open an EPS or native Illustrator document, Photoshop rasterizes (or renders) the artwork — that is, it converts the artwork from a collection of objects to a bitmapped image.
Photoshop renders the illustration to a single layer against a transparent background. Before you can save the rasterized image to a format other than native Photoshop, you must eliminate the transparency by choosing Layer
Tip
Rendering an EPS illustration is an extremely useful technique for resolving printing problems. If you regularly work in Illustrator or FreeHand, you no doubt have encountered limitcheck errors, which occur when an illustration is too complex for an imagesetter or other high-end output device to print. If you're frustrated with the printer and tired of wasting your evening trying to figure out what's wrong (sound familiar?), use Photoshop to render the illustration at 300 ppi and print it. Nine times out of 10, this technique works flawlessly.
If Photoshop can't parse the EPS file — a techy way of saying Photoshop can't break down the individual objects — it attempts to open a TIFF preview. This exercise is usually futile, but occasionally you may want to take a quick look at an illustration to, say, match the placement of elements in an image to those in the drawing.
If you want to introduce an EPS graphic into the foreground image rather than render it into a new image window of its own, choose File
After you import the EPS graphic, it appears inside a box — which Photoshop calls a bounding box — with a great, big X across it. You can move, scale, and rotate the illustration into position before rasterizing it to pixels. Click and drag a corner handle to resize the image; drag outside the image to rotate it. You also can nudge the graphic into position by pressing the arrow keys. When everything is the way you want it, press Enter (Return on the Mac) or double-click inside the box to rasterize the illustration. If the placement isn't perfect, don't worry. The graphic appears on a separate layer, so you can move it with complete freedom. To cancel the Place operation, press Esc instead of Enter or Return.
When preparing an image for placement in a drawing or page-layout document that will be printed to a PostScript output device, many artists prefer to save the image in the EPS format. Converting the image to PostScript up front prevents the drawing or page-layout program from doing the work. The result is an image that prints more quickly and with less chance of problems. (Note that an image does not look any different when saved in EPS. The idea that the EPS format somehow blesses an image with better resolution is pure nonsense.)
A second point in the EPS format's favor is clipping paths. As explained graphically at the end of Chapter 8, a clipping path defines a free-form boundary around an image. When you place the image into an object-oriented program, everything outside the clipping path becomes transparent. While some programs — notably InDesign and PageMaker — recognize clipping paths saved with a TIFF image, many programs acknowledge a clipping path only when saved in the EPS format.
Third, although Illustrator has remedied the problems it had importing TIFF images, it still likes EPS best, especially where screen display is concerned. Thanks to the EPS file's fixed preview, Illustrator can display an EPS image onscreen very quickly compared with other file formats. And Illustrator can display an EPS image both in the preview mode and in the super-fast artwork mode.
So if you want to import an image into Illustrator, QuarkXPress, or another object-oriented program, your best bet is EPS. On the downside, EPS is an inefficient format for saving images thanks to the laborious way that it describes pixels. An EPS image may be three to four times larger than the same image saved to the TIFF format with LZW compression. But this is the price we pay for reliable printing.
Warning
Absolutely avoid the EPS format if you're a Windows user and you plan on printing your final pages to a non-PostScript printer. This defeats the entire purpose of EPS, which is meant to avoid printing problems, not cause them. When printing without PostScript, use TIFF or JPEG.
To save an image in the EPS format, choose Photoshop EPS from the Format pop-up menu in the Save dialog box. After you press Enter or Return, Photoshop displays the dialog box shown in Figure 3.39. The options in this dialog box work as follows:
Preview: Technically, an EPS document comprises two parts: a pure PostScript-language description of the graphic for the printer and a bitmapped preview so you can see the graphic onscreen. On a PC, select the TIFF (8 bits/pixel) option from the Preview pop-up menu to save a 256-color TIFF preview of the image. On a Mac, select the Macintosh (8 bits/pixel) option from the Preview pop-up menu to save a 256-color PICT preview of the image for users of Mac OS9 and earlier (they won't be using CS3, obviously). Or select the Macintosh (JPEG) option for a 24-bit preview (which in most cases takes up less room on disk, thanks to the JPEG compression). If you plan on passing off the image to a Windows colleague, select TIFF (8 bits/pixel). The 1-bit option provides a black-and-white preview only, which is useful if you want to save a little room on disk. Select None to include no preview and save even more disk space.
Encoding: If you're saving an image for import into Illustrator, QuarkXPress, or some other established program, select the Binary encoding option (also known as Huffman encoding), which compresses an EPS document by substituting shorter codes for frequently used characters. The letter a, for example, receives the 3-bit code 010, rather than its standard 8-bit ASCII code, 01100001 (the binary equivalent of what we humans call 97).
Sadly, some programs and printers don't recognize Huffman encoding, in which case you must select one of the less efficient ASCII options. ASCII stands for American Standard Code for Information Interchange, which is fancy jargon for text-only. In other words, you can open and edit an ASCII EPS document in a word processor, provided you know how to read and write PostScript.
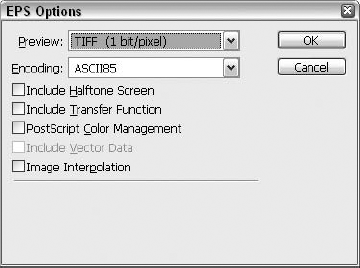
Figure 3.39. When you save an image in the EPS format, you can specify the type of preview and tack on some printing attributes.
Tip
Actually, this can be a useful technique if you have a Mac file that won't open on a PC, especially if the file was sent to you electronically. Chances are that a Mac-specific header got into the works. Open the file in a word processor and look at the beginning. You should see the four characters %!PS. Anything that comes before this line is the Macintosh header. Delete the gobbledygook before %!PS, save the file in text format, and try again to open the file in Photoshop.
Warning
The remaining Encoding options are JPEG settings. JPEG compression not only results in smaller files on disk but also degrades the quality of the image. Select JPEG (Maximum Quality) to invoke the least degradation. Better yet, avoid the JPEG settings altogether. These options work only if you plan to print your final artwork to a PostScript Level 2 or Level 3 device. Earlier PostScript printers do not support EPS artwork with JPEG compression and will choke on the code.
So to recap, ASCII results in really big files that work with virtually any printer or application. Binary creates smaller files that work with most mainstream applications but may choke some older-model printers. And the JPEG settings are compatible exclusively with Level 2 and later PostScript printers.
Include Halftone Screen: Another advantage of EPS over other formats is that it can retain printing attributes. If you specified a custom halftone screen using the Screens button in the Page Setup dialog box, you can save this setting with the EPS document by selecting the Include Halftone Screen option. But be careful; you can just as easily ruin your image as help it. Read Chapter 20 before you select this option.
Include Transfer Function: As described in Chapter 20, you can change the brightness and contrast of a printed image using the Transfer button in the Page Setup dialog box. To save these settings with the EPS document, select the Include Transfer Function option. Again, this option can be dangerous when used casually.
PostScript Color Management: Like JPEG compression, this option is compatible with Level 2 and Level 3 printers only. It embeds a color profile, which helps the printer to massage the image during the printing cycle to generate more accurate colors. Unless you plan on printing to a Level 2 or later device, leave the option deselected. (For more information about color profiles, read Chapter 17.)
Include Vector Data: Select this option if your file contains vector objects, including shapes, non-bitmap text, and layer clipping paths. Otherwise, Photoshop rasterizes the objects during the save process. When you select the option, Photoshop displays a warning in the dialog box to remind you that if you reopen the file in Photoshop, you rasterize any vector objects that you saved with the file.
Transparent Whites: When saving bitmap mode images as EPS files in Photoshop, the four options previously discussed drop away, replaced by Transparent Whites. Select this option to make all white pixels in the image transparent.
Although Photoshop EPS is the only format that offers the Transparent Whites option, many programs — including Illustrator and InDesign — treat white pixels in black-and-white TIFF images as transparent as well.
Image Interpolation: Select this option if you want another program to be able to interpolate the image when resampling it to another size. For example, suppose you import an EPS image into InDesign and scale it to 400 percent. If Image Interpolation is deselected, InDesign just makes pixels in the image four times larger, as if you had used the nearest neighbor interpolation in Photoshop. If you select Image Interpolation, however, InDesign applies bicubic interpolation to generate new pixels. (For details on nearest neighbor and bicubic interpolation, see Chapter 2.) Unless you have a reason for doing otherwise, select this option.
Quark developed a variation on the EPS format called DCS (Desktop Color Separation). When you work in QuarkXPress, PageMaker, and other programs that support the format, DCS facilitates the printing of color separations. Before you can use DCS, you have to convert your image to the CMYK color space using Image
If you add a Pantone channel to an image, DCS 2.0 is the only PostScript format that you can use. If your image doesn't contain any extra channels beyond the basic four required for CMYK, DCS 1.0 is the safer and simpler option.
After you press Enter or Return, Photoshop displays the DCS Options dialog box, the contents of which varies depending on whether you've selected DCS 1.0 or 2.0, as shown in Figure 3.40. The DCS 1.0 format invariably saves a total of five files: one master document (which is the file that you import into QuarkXPress) plus one file each for the cyan, magenta, yellow, and black color channels (which are the files that get printed). The DCS 2.0 format can be expressed as a single file (tidier) or five separate files (better compatibility).
Either way, the DCS pop-up menu gives you the option of saving a 72-ppi PostScript composite of the image inside the master document. Independent from the bitmapped preview — which you specify as usual by selecting a Preview option — the PostScript composite makes it possible to print a low-resolution version of a DCS image to a consumer-quality printer. If you're using a black-and-white printer, select the 72-pixel/inch grayscale option; if you're using a color printer, select the final option. Be forewarned, however, that the composite image significantly increases the size of the master document on disk. The two options at the bottom of the options dialog boxes for DCS 1.0 and 2.0, Include Vector Data and Image Interpolation, work just as described earlier for the Photoshop EPS format.
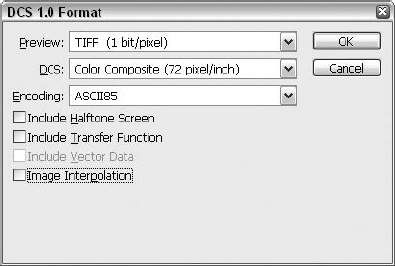
Adobe Premiere Pro is a popular video-editing application for the PC. The program is a wonder when it comes to fades, frame merges, and special effects, but it offers no frame-by-frame rotoscope-style animating capabilities. For example, you can neither draw a mustache on a person in the movie nor can you make brightly colored brushstrokes swirl about in the background — at least, not in Premiere.
You can export the movie to the Filmstrip format, though, which is a file-swapping option exclusive to Photoshop and Premiere. A Filmstrip document organizes frames in a long vertical strip. A gray bar separates each frame from the next. The number of each frame appears on the right; the SMPTE (Society of Motion Picture and Television Engineers) time code appears on the left. The structure of the three-number time code is minutes:seconds:frames, with 30 frames per second.
Warning
If you change the size of a Filmstrip document inside Photoshop in any way, you cannot save the image back to the Filmstrip format. Feel free to paint and apply effects, but stay the heck away from the Image Size and Canvas Size commands.
While you won't really find much coverage of the Filmstrip format anywhere else in this book, it's useful to pass along a few quick Filmstrip tips:
First, you can scroll up and down exactly one frame at a time by pressing Shift+Page Up or Shift+Page Down, respectively.
Second, you can move a selection exactly one frame up or down by pressing Ctrl+Shift+up arrow (
If you want to clone the selection as you move it, press Ctrl+Shift+Alt+up arrow (
Note
Although we don't get into any particular video-editing software in this book, we do delve further into editing video frames and working with video through Photoshop, because CS3 has added lots of functionality in this area. To find out more, check out Chapter 19.
The process of editing individual frames as just described is sometimes called rotoscoping, named after the traditional technique of using live-action film as a source when creating animated sequences. You also can try out some scratch-and-doodle techniques, which is where an artist scratches and draws directly on frames of film. If this isn't enough, you can emulate xerography, in which an animator makes Xerox copies of photographs, enhances the copies using markers or whatever else is convenient, and shoots the finished artwork, frame by frame, on film. In a nutshell, Photoshop extends Premiere's functionality by adding animation to its standard supply of video-editing capabilities.
Note
Rotoscoping is something Photoshop CS3 is built to do, thanks to enhanced capabilities discussed in Chapter 19.
You can save an image in the Filmstrip format through the Save As dialog box. But remember, you can save in this format only if you opened the image as a Filmstrip document and did not change the size of the image.
The formats discussed so far are all very interesting and they fulfill their own niche purposes. But two formats — JPEG and TIFF — are the all-stars of digital imagery. You'll probably use these formats the most because of their outstanding compression capabilities and almost universal support among graphics applications.
The JPEG format is named after the people who designed it, the Joint Photographic Experts Group. JPEG is the most efficient and essential compression format currently available and is likely to be the compression standard for years to come. JPEG is a lossy compression scheme, which means it sacrifices image quality to conserve space on disk. You can control how much data is lost during the save operation, however.
When you save an image in the JPEG format, you're greeted with the JPEG Options dialog box, as shown in Figure 3.41. The most vital option in this dialog box is the Quality setting, which determines how much compression Photoshop applies to your image.
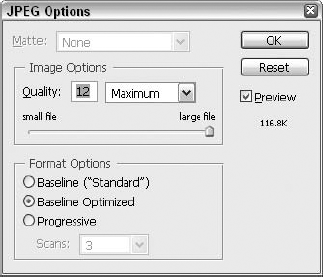
Figure 3.41. The JPEG Options dialog box provides a total of 13 compression settings, ranging from 0 (heaviest compression) to 12 (best quality).
Select an option from the Quality pop-up menu or click and drag the slider from 0 to 12 to specify the quality setting. Of the named options, Low takes the least space on disk but distorts the image rather severely; Maximum retains the highest amount of image quality but consumes more disk space. Of the numbered options, 0 is the most severe compressor and 12 does the least damage.
Note
JPEG evaluates an image in 8×8-pixel blocks, using a technique called Adaptive Discrete Cosine Transform, or ADCT. It averages the 24-bit value of every pixel in the block (or the 8-bit value of every pixel, in the case of a grayscale image). ADCT then stores the average color in the upper-left pixel in the block and assigns the remaining 63 pixels smaller values relative to the average.
Next, JPEG divides the block by an 8×8 block of its own called the quantization matrix, which homogenizes the pixels' values by changing as many as possible to zero. This process saves the majority of disk space but loses data. When Photoshop opens a JPEG image, it can't recover the original distinction between the zero pixels, so the pixels become the same, or similar, colors. Finally, JPEG applies lossless Huffman encoding to translate repeating values to a single symbol.
In most instances, using JPEG only at the Maximum Quality setting (10 or higher) is a good idea, at least until you gain some experience with it. The smallest amount of JPEG compression saves more space than any non-JPEG compression format and still retains the most essential detail from the original image.
Note
Check the coverage of the Save for Web dialog box earlier in this chapter, and see Chapter 20 for more information on the JPEG format and its use for images that will be displayed online.
Warning
JPEG is a cumulative compression scheme, meaning that Photoshop recompresses an image every time you save it in the JPEG format. There's no disadvantage to saving an image to disk repeatedly during a single session, because JPEG always works from the onscreen version. But if you close an image, reopen it, and save it in the JPEG format, you inflict a small amount of damage. Use JPEG sparingly. In the best of all possible worlds, you should save to the JPEG format only after you finish all work on an image. Even in a pinch, you should apply all filtering effects before saving to JPEG, because these have a habit of exacerbating imperfections in image quality.
JPEG is best used when compressing continuous-tone images (images in which the distinction between immediately neighboring pixels is slight). Any image that includes gradual color transitions, as in a photograph, qualifies for JPEG compression. JPEG is not the best choice for saving screen shots, line drawings (especially those converted from EPS graphics), and other high-contrast images. These are better served by GIF if you want to post them on the Web or by a lossless compression scheme, such as TIFF with LZW. The JPEG format is available when you are saving grayscale, RGB, and CMYK images.
Occupying the bottom half of the JPEG Options dialog box are three radio buttons, designed primarily to optimize JPEG images for the Web. If your image is destined for print, just select the first option, Baseline ("Standard"), and be done with it. For Web graphics, select the Baseline Optimized option to make images display onscreen line by line or select the Progressive option to make images display in multiple passes.
Developed by Aldus in the early days of the Mac to standardize an ever-growing population of scanned images, TIFF (Tagged Image File Format) is the most widely supported image-printing format across both the Macintosh and PC platforms. Unlike EPS, it can't handle object-oriented artwork, but otherwise it's unrestricted. In fact, TIFF offers a few tricks of its own that make it very special.
In Photoshop, TIFF supports up to 24 channels, the maximum number permitted in any image. In fact, TIFF is the only system other than DCS 2.0, "raw," and the native Photoshop format that can save more than four channels. To save a TIFF file without extra mask channels, deselect the Alpha option in the Save As dialog box. (For an introduction to channels, read Chapter 4.) Even more impressive, TIFF supports multiple layers. If you want layers to remain independent when you save the file, you can select the Layers option in the Save As dialog box.
When you save an image as a TIFF file, Photoshop displays the TIFF Options dialog box, shown in Figure 3.42, which offers the following controls:
Image Compression: You can choose among three different types of compression: LZW (which stands for Lempel-Ziv-Welch, in case you're ever on a game show and ask the host, "File Format Trivia for $200, Alex!"), ZIP, or JPEG. Here are the major differences:
LZW: Like Huffman encoding (previously described in the section "Saving an EPS image"), LZW digs into the computer code that describes an image and substitutes frequently used codes with shorter equivalents. But instead of substituting characters, as Huffman does, LZW substitutes strings of data. Because LZW doesn't so much as touch a pixel in your image, it's entirely lossless. Most image editors and desktop-publishing applications — including Illustrator, FreeHand, InDesign, PageMaker, and QuarkXPress — import LZW-compressed TIFF images, but a few still have yet to catch on.
ZIP: The problem with LZW (from a programming perspective) is that it's regulated by a patent. And whenever a bit of technology costs money to use, you can bet somebody out there is trying to come up with a free equivalent. Hence ZIP, a competing lossless compression scheme used in PDF documents. Why use it? Theoretically, it's a bit smarter than LZW and can on occasion deliver smaller image files. On the other hand, Photoshop is currently one of the few programs to support ZIP compression in a TIFF file. So unless you discover big savings when using ZIP, you should stick with LZW until ZIP support becomes more widespread.
JPEG: If two lossless compression schemes aren't enough options, the TIFF format also permits you to apply lossy JPEG compression. Long-time Photoshop users may balk at JPEG compression inside TIFF options. After all, one of the major benefits of TIFF is that it ensures optimum image quality; by applying JPEG compression, which results in loss of image data, you defeat the purpose. But now that TIFF supports layers, JPEG inside TIFF permits you a unique opportunity to cut the size of your layered image files in half. Experience shows that JPEG in TIFF results in only a modest loss of data. And because JPEG does not affect the transparency mask — which defines the outlines of the layers — the layers continue to exhibit nice, sharp edges.
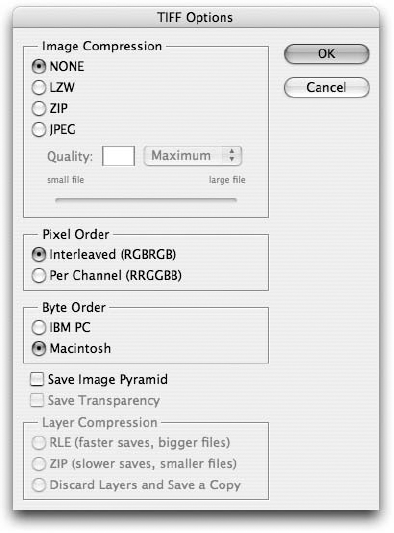
Note
If names such as Huffman, LZW, and ZIP ring a faint bell, it may be because these are the same compression schemes used by StuffIt, PKzip, WinZIP, and other file compression utilities. For this reason, using an additional utility to compress a TIFF image that you've already compressed using LZW, ZIP, or JPEG makes no sense. Neither do you want to compress a standard JPEG image, because JPEG takes advantage of Huffman encoding. You may shave off a few K, but this isn't enough space to make it worth your time and effort.
Warning
Also be aware that some programs may gag on compressed TIFF files, regardless of which compression scheme you apply. If an application balks at opening your Photoshop TIFF file, try resaving the file with no compression.
Pixel Order: These two options allow you to choose how pixels will be organized — note the symbolic use of "RGBRGB" and "RRGGBB" (respectively) next to the options. The default (Interleaved) is your best bet because not all TIFF-reading applications will be able to support Per Channel pixel order.
Byte Order: Every once in a while, Photoshop chooses to name a straightforward option in the most confusing way possible. Byte Order is a prime example, and it relates to the two variations of TIFF, one for the PC and the other for the Mac. This probably has something to do with the arrangement of 8-bit chunks of data, but do you care? Probably not. More likely, you're sure about your choice of either wanting to use a PC or a Mac, regardless of TIFF variations.
Save Image Pyramid: Select this option to save tiled TIFF files. This variation of the standard TIFF file-saving algorithm divides your image into tiles and then stacks the tiles in a pyramid. Each level of the pyramid represents your image at a different resolution, with the highest-resolution version serving as the base of the pyramid. The idea is that an application can use the low-resolution tiles to perform certain image-processing tasks and dig down to the high-resolution version only when absolutely necessary. When you're working with very large image files, this approach not only speeds up certain editing tasks but also puts less strain on your computer's resources. (If you're familiar with the FlashPix format, the concept is the same.)
Unless you're saving your image for use in a program that you know supports tiled TIFF images, however, deselect this option. Photoshop itself can't take advantage of the tiled technology, and many applications can't open tiled images at all.
Save Transparency: If the image contains transparent areas, select this option to retain the transparency. Otherwise, transparent areas become white.
Layer Compression: Not only can you decide whether you want to use lossless or lossy image compression, but Photoshop lets you specify how you want to save the layers themselves. The choices speak for themselves; RLE saves more quickly but makes bigger files, and the reverse is true for ZIP. Alternatively, you can choose to discard the layers altogether and save a flattened copy of your file.
Nope, the discussion of formats is not quite complete. There are two more, the odd men out. Why are they formatting pariahs? One format has a purpose so specific that Photoshop can open files saved in the format but it can't save to the format. The other is not so much a format but a manual file can opener that may come in handy for prying open a file from an unknown source.
Photoshop can open Eastman Kodak's Photo CD and Pro Photo CD formats directly. A Photo CD contains compressed versions of every image in each of the five scan sizes provided on Photo CDs — from 128×192 pixels (72K) to 2,048×3,072 pixels (18MB).
The Pro Photo CD format can accommodate each of the five sizes included in the regular Photo CD format, plus one additional size — 4,096×6,144 pixels (72MB) — that's four times as large as the largest image on a regular Photo CD. As a result, Pro Photo CDs hold only 25 scans; standard Photo CDs hold 100. Like their standard Photo CD counterparts, Pro Photo CD scanners can accommodate 35mm film and slides. But they also can handle 70mm film and 4-×-5-inch negatives and transparencies. The cost can be an issue, as scanning an image to a standard Photo CD costs between $1 and $2, but scanning it to a Pro Photo CD costs about $10. Your budget will determine which path makes the most sense for you.
Both Photo CD and Pro Photo CD use the YCC color model, a variation on the CIE color space, which is discussed in Chapter 4. YCC provides a broader range of color — theoretically, every color your eye can see. By opening Photo CD files directly, you can translate the YCC images directly to Photoshop's Lab color mode, another variation on the CIE color space that ensures no color loss.
When you open a Photo CD image, a Photo CD dialog box appears divided into three main sections: Image Info, Source Image, and Destination Image. The Image Info section simply tells you the type of film on which the image was shot and the type of scanner used to scan the image to CD. Selections that you make in the Source and Destination areas tell Photoshop how you want it to open the image.
Photoshop cannot save to the Photo CD format. And frankly, there's little reason you'd want to do so. Photo CD is strictly a means for transferring slides and film negatives onto the world's most ubiquitous and indestructible storage medium, the CD-ROM.
Note
Kodak also offers a product called Picture CD, which is quite different from Photo CD: Don't get the two confused. With Picture CD, consumers can drop off rolls of undeveloped film and receive both traditional prints and a CD containing scanned versions of their pictures. Picture CD images are provided in the JPEG format, so none of the Photo CD file-opening features discussed here apply. You open Picture CD images like any other JPEG file.
A raw document is a plain binary file stripped of all extraneous information. It contains no compression scheme, specifies no bit depth or image size, and offers no color mode. Each byte of data indicates a brightness value on a single color channel, and that's it. Photoshop offers this function specifically so you can open images created in undocumented formats, such as those created on mainframe computers.
To open an image of unknown origin on a PC, choose File
Width, Height: If you know the dimensions of the image in pixels, type the values in these option boxes.
Swap: Click this button to swap the Width value with the Height value.
Count: Type the number of color channels in this option box. If the document is an RGB image, type 3; if it is a CMYK image, type 4.
Interleaved: Select this value if the color values are stored sequentially by pixels. In an RGB image, the first byte represents the red value for the first pixel, the second byte represents the green value for that pixel, the third the blue value, and so on. If you deselect this option, the first byte represents the red value for the first pixel, the second value represents the red value for the second pixel, and so on. When Photoshop finishes describing the Red channel, it describes the Green channel and then the Blue channel.
Depth: Select the number of bits per color channel. Most images contain 8 bits per channel, but scientific scans from mainframe computers may contain 16.
Byte Order: Though not the issue it once was before the recent changes in Mac's move to the Intel processor, if you specify 16 bits per channel, you may want to tell Photoshop whether the image comes from a Mac or a PC.
Header: This value tells Photoshop how many bytes of data at the beginning of the file consist of header information it can ignore.
Retain When Saving: If the Header value is greater than zero, you can instruct Photoshop to retain this data when you save the image in a different format.
Guess: If you know the Width and Height values, but you don't know the number of bytes in the header — or vice versa — you can ask Photoshop for help. Fill in either the Dimensions or Header information, and then click Guess to ask Photoshop to take a stab at the unknown value. Photoshop estimates all this information when the Raw Options dialog box first appears. Generally speaking, if it doesn't estimate correctly the first time around, you're on your own. But hey, the Guess button is worth a shot.
Tip
If a raw document is a CMYK image, it opens as an RGB image with an extra masking channel. To display the image correctly, choose Image
Note
Don't confuse Photoshop Raw with Camera Raw, which is the untreated image created by a digital camera before processing. Camera Raw is as impressive as Photoshop Raw is bland. You take a closer look at Camera Raw in Chapter 18.
Photoshop also lets you save to the raw document format. This capability is useful when you create files you want to transfer to mainframe systems or output to devices that don't support other formats, such as the Kodak XL7700.
Warning
Do not save 256-color indexed images to the raw format, or you will lose the color lookup table and, therefore, all color information. Be sure to convert such images first to RGB or one of the other full-color modes before saving.
When you save an image in the raw document format, Photoshop presents the dialog box shown in Figure 3.43. The dialog box options work as follows:
File Type: This option is only pertinent to Mac users. (Under Windows, the option is always dimmed. Feel free to ignore it.) Type the four-character file type code (TIFF, PICT, and so on) in this option box. (You should check the documentation for the application you plan to use to open the raw document.) If you plan to use this file on a computer other than a Mac, you can type any four characters you like; only Macs use this code.
File Creator: Again, this option is relevant only on a Mac. Type the four-character creator code, which tells the system software which application created the file. By default, the creator code is 8BIM, Photoshop's code. Ignore this option unless you have a specific reason for changing it — for example, to open the image in a particular Macintosh application. (You won't hurt anything by changing the code, but you will prevent Photoshop from opening the image when you double-click the document icon at the Finder desktop.) On Windows machines, the 8BIM default code is selected for you and the option is dimmed.
Header: Type the size of the header in bytes. If you type any value but 0, you must fill in the header using a data editor, such as Norton Disk Editor.
Save Channels In: Select the Interleaved Order option to arrange data sequentially by pixels, as described earlier. To group data by color channel, select the Non-interleaved Order option.
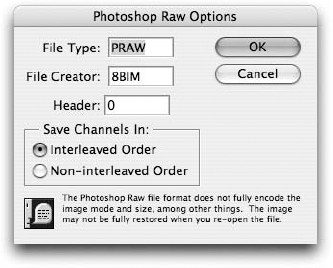
File format specs are continually evolving, so programs that provide support for a particular format may not support the specific version of the format used to save the file you're trying to open. For example, JPEG is notorious for causing problems because there were several private implementations in the early days. As a result, some JPEG files can be read only by the originating application.
If you can't open a file in Photoshop, you may have another program that can read and write the problem format. Try the problem file in every program you have, and hope you get lucky.
Tip
You also may want to try a program such as GraphicConverter from Lemke Software, or HiJaak, TransverterPro, DeBabelizer Toolbox, or DeBabelizer Pro from Equilibrium.
Adobe PDF has become the "it" file format for sharing and reviewing documents, but you don't need to export to PDF to add comments to your images. Borrowing from Adobe Acrobat, Photoshop offers tools that let you attach written notes and audio clips that you can view and play right from the image window. The following section has the details.
Photoshop enables you to slap the digital equivalent of a sticky note onto your image. The notes can be viewed in Adobe Acrobat (assuming that you save the image as a PDF) as well as in Photoshop. You can jot down ideas that you want to remember later, for example. Or, if you're routing an image for approval, you can ask questions about a certain image element — or, more likely, explain why a part of the picture looks the way it does and why changing it would be a mistake of life-altering proportions.
The Photoshop Notes tool works like its counterpart in Adobe Acrobat: Click in the image window to display a blank note or drag to create a custom-sized note. If you don't want to use the name that appears in the note's title bar (it defaults to the name you typed when you installed Photoshop), type the desired name in the Author box in the Options bar. Next, type your comments — all the standard text-editing techniques apply — and then click the Close box in the upper-left corner of the note window. Your note shrinks to a little note icon, as shown in Figure 3.44. Double-click the icon to redisplay the note text, as shown in the figure.
When you save your image, be sure to save in the native Photoshop format or PDF and select the Annotations option in the Save dialog box. Otherwise, you lose all your notes. For information on how to delete individual notes in an open image and how to customize and import notes, see the section "Managing annotations."
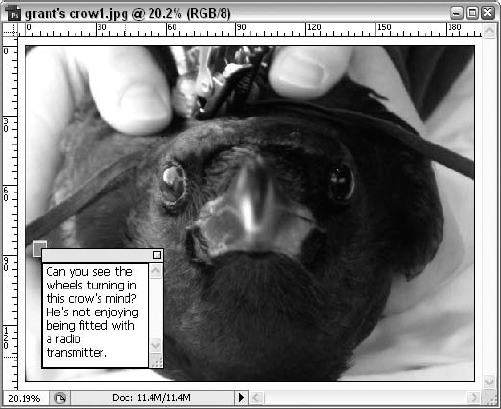
If you like to speak your mind rather than put your thoughts in writing, check out the Audio Annotation tool. This tool works like the Notes tool except that it inserts an audio recording of your voice rather than a text message into the file. Of course, you need a microphone, speakers, and a sound card installed in your computer to use this feature, and so does the intended recipient of the file — if you'll be sharing the file with a coworker or other associate. Photoshop retains audio annotations only when you save the image file using the Photoshop native format or PDF, as with text notes. Be aware, too, that audio files increase file size significantly — which probably will make e-mailing the file out of the question.
The Audio Annotation tool shares a button with the Notes tool in the Toolbox. Press N to toggle between the two tools (or Shift+N, depending on your preference setting for switching tools). Click in your image at the spot where you want the icon representing your message to appear. When the Audio Annotation dialog box appears, click Start to begin your recording and then talk into the microphone. Click Stop when you've said all you have to say.
Photoshop represents your audio message with a little speaker icon in the image window. Double-click the icon to play the message.
If you're a solo artist and the only approval of your work you need is your own, you may not have much reason to use the Notes or Audio Annotation tools. Then again, even if you do work alone, you may be forgetful or so busy that real notes or even thoughts just get lost in the shuffle. Whatever the reason you want to commit ideas and so forth to memory, annotations are a terrific way to remind yourself exactly what you're trying to accomplish in an image. And why not store a recording of your baby's first words with a picture of the kid? If someone wants to look at the picture in the first place, chances are good that this feature will be entertaining. Whether you're using annotations for fun or profit, employ the following strategies to manage audio and text annotations:
Use the Font and Size controls in the Options bar to change the font and type size in an open note.
Click the Color icon to change the color of the icon and title bar for any new note you create. This option comes in handy if several people will be reviewing the image and contributing their thoughts and ideas. You can assign a different color to each author. To change the color of an existing note, open the note and click the Color icon. This time, you affect only the open note — other notes by the same author don't change.
You can move and copy annotations between image windows. Just click the icon and use the Cut, Copy, and Paste commands as you do to move and copy any selection.
If an icon blocks your view of the image, you can click and drag it out of the way. However, when you open the note, its window appears in the icon's original location. Click and drag the size box in the lower-right corner of an open note to shrink the window if necessary. You also can drag the title bar of a note to reposition it onscreen.
Choose View
To delete a single annotation, click its icon and press Delete. Or right-click (Control-click on the Mac) the icon and choose Delete Note or Delete Audio Annotation. If you want to delete all annotations, choose Delete All Annotations or click the Clear All button in the Options bar.
Tip
If you send out several copies of the same image for approval, you don't have to open each copy individually to read the annotations. Instead, open just one copy and then import the annotations from the other files. Choose File
Warning
Remember to save your image as a PDF or a TIFF or in the native Photoshop file format to retain annotations in a file. And if you're sending an annotated file to other people for viewing, tell them that they need to use Adobe Acrobat 4.0 or higher to access the annotations.
After you bring up an image — whether you created it from scratch or opened an existing image stored in one of the formats from the seemingly endless list discussed in the preceding pages — its size and resolution are established. Neither size nor resolution is carved in stone, however. Photoshop provides two methods for changing the number of pixels in an image: resampling and cropping.
Typically, when people talk about resizing an image, they mean enlarging or reducing it without changing the number of pixels in the image, as demonstrated back in Figure 3.1. By contrast, resampling an image means scaling it so the image contains a larger or smaller number of pixels. With resizing, an inverse relationship exists between size and resolution: Size increases when resolution decreases, and vice versa. But resampling affects either size or resolution independently. The resampled and original images have identical resolutions, but the resized image has twice the resolution of its companions.
To resize an image, use one of the techniques discussed near the beginning of this chapter. To recap briefly, the best method is to choose Image
You also use Image
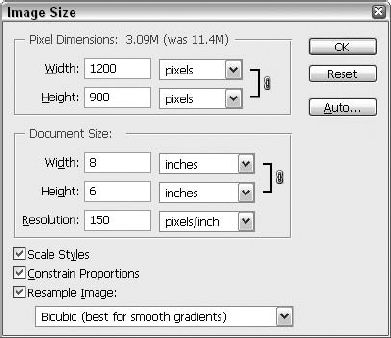
Figure 3.45. With the Resample Image option selected, you can modify the number of pixels in your image.
When Resample Image is selected, the Resolution value is independent of both sets of Width and Height values. (The only difference between the two sets of options is that the top options work in pixels and the bottom options work in relative units of measure, such as percent and inches.) You can increase the number of pixels in an image by increasing any of the five values in the dialog box; you can decrease the number of pixels by decreasing any value. Photoshop stretches or shrinks the image according to the new size specifications.
At all times, you can see the new number of pixels Photoshop will assign to the image, as well as the increased or decreased file size. In Figure 3.45, for example, the first Width value has been changed to 1200 pixels. The Pixel Dimensions value at the top of the dialog box reflects the change by reading 3.09M (was 11.4M), which shows that the file size has decreased.
To calculate the pixels in the resampled image, Photoshop must use its powers of interpolation, as explained in Chapter 2. The interpolation setting defaults to the one chosen in the Preferences dialog box, but you also can change the setting right inside the Image Size dialog box. Simply select the desired method from the Resample Image pop-up menu. Bicubic generally results in the smoothest effects, as does Bicubic Smoother; it does its best to reinterpret your image with the smoothest pixel transitions possible. Bicubic Sharper is recommended for preserving the sharpness of an image that you're reducing or downsampling. Bilinear is faster than any of the other options, but doesn't provide the smoothest results. Nearest Neighbor turns off interpolation, so Photoshop merely throws away the pixels it doesn't need or duplicates pixels to resample up.
Here are a few more random items you should know about resampling with the Image Size dialog box:
This may sound wrong, but you generally want to avoid adding pixels. When you resample up, you're asking Photoshop to make up details from thin air, and the program isn't that smart. Simply put, an enlarged image almost never looks better than the original; it merely takes up more disk space and prints slower.
Tip
Resampling down, on the other hand, is a useful technique. It enables you to smooth away photo grain, halftone patterns, and other scanning artifacts. One of the most tried-and-true rules is to scan at the maximum resolution permitted by your scanner and then resample the scan down to, say, 72 or 46 percent (with the interpolation set to Bicubic Sharper, naturally). By selecting a round value other than 50 percent, you force Photoshop to jumble the pixels into a regular, homogenous soup. You're left with fewer pixels, but these remaining pixels are better. And you have the added benefit that the image takes up less space on disk.
To make an image tall and thin or short and fat, you must first turn off the Constrain Proportions option. This enables you to edit the two Width values entirely independently of the two Height values.
Layer styles in Photoshop are dynamic, meaning you never lose the ability to edit their values. Accordingly, the look of a style you've applied to a layer can change when you resample an image. Select the Scale Styles option to avoid unwanted changes in your image's layer styles when you resample. Keep in mind, however, that this option is available only if Constrain Proportions is also selected.
Tip
You can resample an image to match precisely the size and resolution of any other open image. While the Image Size dialog box is open, choose the name of the image you want to match from the Window menu.
If you ever get confused inside the Image Size dialog box and want to return to the original size and resolution settings, press Alt (Option on the Mac) to change the Cancel button to Reset. Then click Reset to start from the beginning.
Warning
Photoshop remembers the setting of the Resample Image option and uses this same setting the next time you open the Image Size dialog box. This can trip you up if you record an action in the Actions palette that uses the Image Size command. Suppose that you create an action to resize images, deselecting the Resample Image option. If you later resample an image — selecting Resample Image — the option stays selected when you close the dialog box. The next time you run the action, you end up resampling instead of resizing. Always check the status of the option before you apply the Image Size command or run any actions containing the command.
Note
The Resample Image options include parenthetical information about which method works best in various situations and images. For example, the default Bicubic is accompanied by the advice that it's best for smooth gradients, while Bicubic Smoother is said to be best for enlargements. This assistance, new to CS3, is a nice addition.
Another way to change the number of pixels in an image is to crop it, which means to clip away pixels around the edges of an image without harming the remaining pixels. (The one exception occurs when you rotate a cropped image or use the perspective crop feature, in which case Photoshop has to interpolate pixels to account for the rotation.)
Cropping enables you to focus on an element in your image. For example, the top image in Figure 3.46 shows an image with some unwanted content in the periphery — visual distractions that aren't necessary. By cropping down to the content seen at the bottom, a real portrait is created.
Photoshop offers several cropping options, including the capability to crop nonrectangular selections, automatically trim away transparent areas from the borders of an image, correct perspective effects while cropping, and crop and straighten crooked scans. You can read about all these features in the upcoming sections.
One way to crop an image is to choose Image
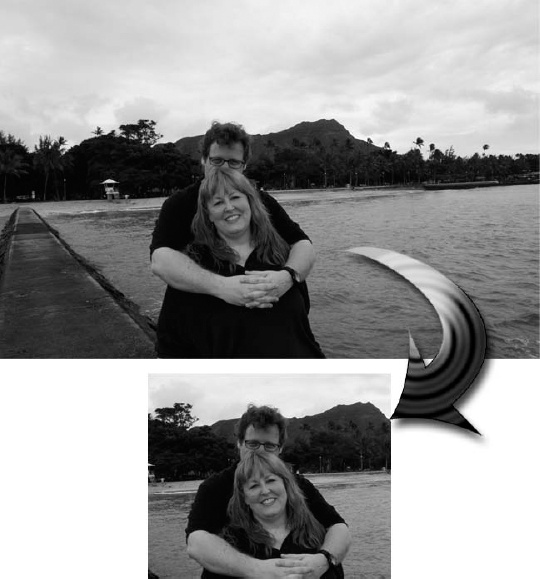
Figure 3.46. Focus your viewer's eyes on the really important part of the picture by cropping away all distractions. Of course, what's important is entirely subjective, as the beautiful beach background disappears in favor of the happy couple.
The Canvas Extension Color pop-up menu lets you specify a color when you increase the canvas area in your image. You can choose the current Background or Foreground color, Black, White, or Gray, or Other to select a color using Photoshop's Color Picker dialog box. Keep in mind that you can select a color only when you're working with an image that contains a background layer. Otherwise, Photoshop fills the newly expanded canvas area with transparent pixels. Either way, if you reduce the canvas, you crop the image. Just type the new desired pixel dimensions in the Width and Height boxes.
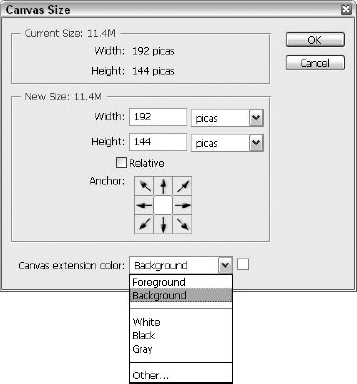
Figure 3.47. Choose Image
Selecting the Relative option allows you to change the height or width (or both the height and the width) of the canvas by a specific pixel amount. For example, type 2 in each option box to change a 100-×-100-pixel image into a 102-×-102-pixel image; type −2 to crop it down to a 98-×-98-pixel image. Not only can this save you from having to do a little math, but it can really be quite useful when you want to add the same number of pixels to a batch of different-sized files.
Click inside the Anchor grid to specify the placement of the image on the new canvas. For example, if you want to add space to the bottom of an image, enlarge the canvas size and then click the upper-middle square. If you want to crop away the upper-left corner of an image, create a smaller canvas size and then click the lower-right square. The Anchor grid offers little arrows to show how the canvas will shrink or grow.
To shrink the canvas so that it exactly fits the image, try the Image
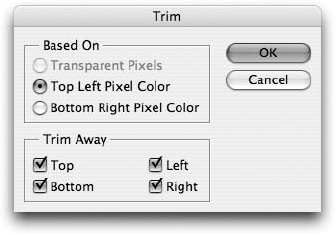
Figure 3.48. To quickly snip away transparent areas from the edges of an image, use the Image
Tip
When you want to enlarge the canvas but aren't concerned with making it a specific size, try this timesaving trick: Click and drag with the Crop tool to create a crop marquee and then enlarge the crop marquee beyond the boundaries of the image (see the next section if you need help). When you press Enter or Return to apply the crop, the canvas grows to match the size of the crop marquee.
In general, the Canvas Size command is most useful for enlarging the canvas or shaving a few pixels off the edge of an image. If you want to crop away a large portion of an image, the Crop tool is a better choice — if only because you can actually see what you're doing and see the crop as it happens.
Press C or click the crop icon in the Toolbox to activate the tool, and then click and drag to create a rectangular marquee that surrounds the portion of the image you want to retain. You can see what will be cropped away if you proceed, because the content outside the box you've created is now darker than what's inside the box: It's an overlay, which you can choose not to see if you don't want to, as you'll discover in these cropping tips:
To help you distinguish the borders of the crop marquee, Photoshop displays a colored, translucent overlay on the area outside the crop box — similar to the way it indicates masked versus unmasked areas when you work in the Quick Mask mode. If you hate the overlay, deselect the Shield option in the Options bar. You also can click the neighboring color box to change the overlay color and set the overlay opacity through the Opacity pop-up menu. Note that these controls don't appear in the Options bar until after you create your initial crop marquee.
You have the option of permanently discarding the pixels you crop or simply hiding them from view. Before you drag with the Crop tool, click the Delete or Hide option in the Options bar to signify your preference. If you choose Hide, you can bring the hidden regions back into view by enlarging the canvas or by using the Image
Tip
As you drag, you can press the spacebar to move the crop boundary temporarily on the fly. To stop moving the boundary and return to resizing it, release the spacebar.
If you don't get the crop marquee right the first time, you can move, scale, or rotate it at will. Here's what you do:
Click and drag inside the crop marquee to move it.
Drag one of the square handles to resize the marquee. You can Shift-drag a handle to scale the marquee proportionally (the same percentage vertically and horizontally). You also can drag the sides of the marquee to resize it.
Drag outside the crop marquee to rotate it, as explained in the next section. This may strike you as weird at first, but it works wonderfully.
Drag the origin point, labeled in Figure 3.49, to change the center of a rotation.
Select the Perspective option in the Options bar, and you can click and drag corner handles to distort the image. This corrects any convergence problems that occur when shooting images at an angle. For example, let's say you have a billboard in perspective, so that it declines toward the horizon. Using the Perspective option, you can crop the billboard and remove its perspective so it appears flat.
Although Perspective is a solid feature, it can prove confusing. For one thing, you can't preview the results of your changes before applying the crop. Also, in an attempt to conserve important detail, Photoshop tends to stretch the image after applying the perspective. This is actually a good thing — better to stretch an image than trash data — but it requires you to reverse the stretch in a second operation. If this bothers you, you may be better off tackling perspective problems using the Free Transform command, covered in Chapter 12, and do your cropping afterward.
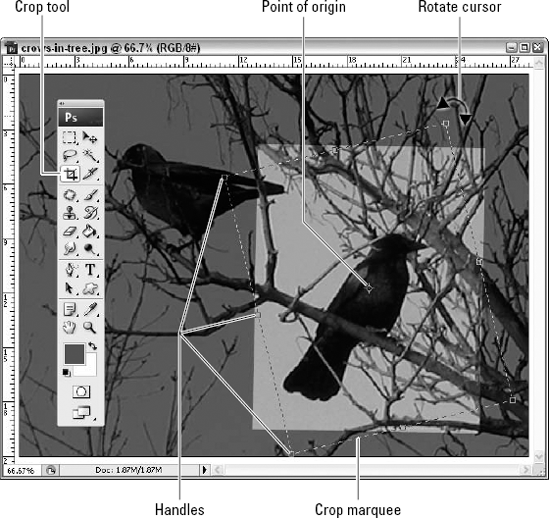
When the marquee surrounds the exact portion of the image you want to keep, apply the crop by pressing Enter (Return on the Mac) or double-clicking inside the marquee. You also can click the OK (check mark) button at the right end of the Options bar.
If you change your mind about cropping, you can cancel the crop marquee by pressing Esc or clicking the Cancel button, the universal "no" symbol next to the check mark in the Options bar.
As stated earlier, you can rotate an image by clicking and dragging outside the crop marquee. Straightening a crooked image, however, can be a little tricky. Rarely, if ever, does your first (or sometimes second) attempt to straighten an image by rotating it manually (in Free Transform mode) work the way you want it. Either you rotate it too far or not far enough. If your rotation fails to give you the straightening effect you want, choose Edit
A better solution is to do it right the first time. Locate a line or general axis in your image that should be straight up and down. Rotate the crop marquee so it aligns exactly with this axis. In Figure 3.50, the crop marquee was rotated so one edge bisected the vertical content on the right. After you arrive at the correct angle for the marquee, drag the handles to size and position the boundary properly. As long as you don't drag outside the marquee, its angle remains fixed throughout.
Yet another solution is to use the Measure tool. Just click and drag with the tool along the axis you want to make vertical. Choose Image
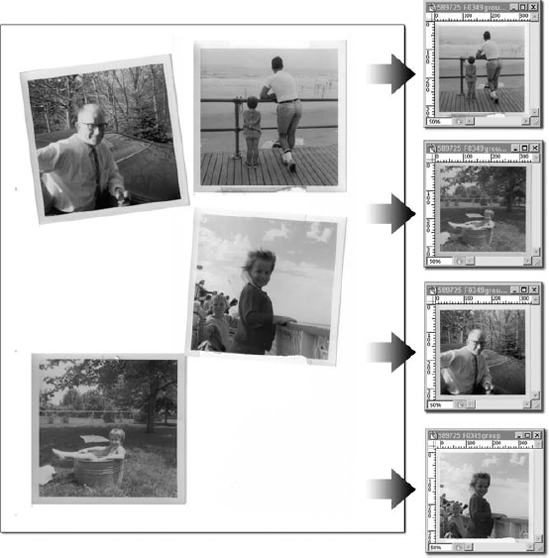
You can crop an image so it matches the size and resolution of another image in two ways:
Bring the image you want to crop forward, and choose Image
Tip
This method doesn't give you much control when cropping an image, but it's a great way to enlarge the canvas and add empty space around an image.
Better yet, use the Crop tool in its fixed-size mode. First, bring the image you want to match to the front. Then select the Crop tool, and click the Front Image button in the Options bar. The Width, Height, and Resolution options automatically update to show the size and resolution of the front image.
Now bring the image you want to crop to the front, and drag with the Crop tool as normal. Photoshop constrains the crop marquee to the proportions of the targeted image. After you press Enter or Return, Photoshop crops, resamples, and rotates the image as necessary.
Note
The next time you select the Crop tool, it starts out in fixed-size mode. To return the tool to normal, click the Clear button in the Options bar.
Another way to crop an image is to create a selection and then choose Image
Another advantage of the Crop command is flexibility. After drawing a selection, you can switch windows, apply commands, and generally use any function you like prior to choosing Image
And finally, you can use the Crop command on selections of any shape, even feathered selections and multiple noncontiguous selections. Of course, your image canvas remains rectangular no matter what the selection shape. Photoshop simply crops the canvas to the smallest size that can hold all selected areas.
When it comes to scanning images, you have two basic options: Scan each and every image in a separate pass, which can be hopelessly time-consuming, or scan a group of images together. In the past, if you scanned your images as a group, you had to go at them with the Marquee tool, slice them up, separate them into layers, duplicate the layers into new images, rinse and repeat. It was arduous and soul-numbing to say the least, not to mention the fact that you then needed to rotate every new image to compensate for slightly skewed scanning. With the release of Photoshop CS, however, Adobe streamlined all these steps into one simple command, and this ability remains in CS3.
Naturally, you need to begin with a one-layer scanned image consisting of the photos you want to crop out, such as the one on the left side of Figure 3.50. Then choose File
Note
It's important to note, however, that the Crop and Straighten Photos command only fixes images that were scanned crookedly, not photos that were taken with a shaky hand. For a quick trick that makes correcting crooked photos a snap, see Chapter 13.
If you want to crop out and straighten only certain images from your scan, draw a selection border around the area you want to isolate and carry on as you normally would. If the command repeatedly splits one scanned image into two, select that particular scanned image, press and hold Alt (Option on the Mac), and repeat the process. This tells Photoshop that the selected area represents only one scanned image. Keep in mind that the Crop and Straighten Photos command doesn't even need real photos to work its wonders. For example, suppose you have a sheet full of drawings that you want to divide into separate images. You can simply draw a clear border around each drawing and scan in the page. Because Photoshop is now intelligent enough to detect the borders inside of a multi-image scan, you're one leap closer to a collection of mini-masterpieces.
New in Photoshop CS3, the Analysis menu provides measurement tools that you can customize for your own purposes, meeting the need to mark, scale, and measure various points in your images, simply and accurately. The menu consists of the following commands:
Set Measurement Scale: This offers two options, Default and Custom. If you choose Custom, you can use the Measurement Scale dialog box, shown in Figure 3.51, to choose from preset measurement scales, set the pixel and logical length, and save your own presets. Whenever this dialog box is open, the Ruler tool is activated, so you can use it to set the scale within your image while the dialog box is onscreen. Be sure to press and hold the Shift key as you drag the distance with the Ruler tool, so that you know your line is straight. For example, if you want 150 pixels to be equal to 1 pixel in terms of scale, you can drag 150 pixels within your image (you may have to drag the dialog box aside) and you can see your new scale set in the dialog box as a result. Of course, if your dragging doesn't allow for an exact measurement or you know exactly what scale you want to set, you can type it in manually.
Select Data Points: This command has only one submenu option: Custom. Choosing this opens the Select Data Points dialog box, shown in Figure 3.52, through which you can choose which pieces of information are stored about each of the points you click on when using the Record Measurements command (that's the next one we talk about here). By default, all the data points in four categories are on: Common (things like Label, Date and Time, Document, Source, and so on), Selections, Ruler tool, and Count tool. You can turn any of these on and off as you please, and if you want to save the data point selections you've made, use the Save Preset button to save your selections for future use.
Record Measurements: This does just what you'd expect it to do — record your measurements. Wouldn't it be awful if we just stopped our explanation there? Just kidding. The use of this command opens a new palette, called Measurement Log, shown in Figure 3.53. This palette, sharing its home with the Animation palette (and its Timeline version, covered in Chapter 19), shows the measurements you've made with the Ruler, recorded each time you chose the Record Measurements command (or clicked the Record Measurements button in the Measurement Log palette itself). You see a column in the palette for each Data Point you chose in the Select Data Points dialog box, and you also have four buttons for selecting, deselecting, exporting, and deleting your recorded measurements. You can see these buttons in the upper-right corner of the palette, as shown in Figure 3.53.
Ruler Tool: This command simply activates the Ruler tool, which you also can do by pressing the letter I on your keyboard (keep pressing it to toggle through Ruler, Count, Eyedropper, and Color Sampler, too). Once active, the Ruler tool, discussed at greater length shortly, allows you to measure lengths you drag with your mouse. Pretty simple. The data about the lengths you've measured appears in the Info dialog box, covered in Chapter 2.
Count Tool: Again, this command simply activates a tool you also can activate from the Toolbox or by pressing the letter I on your keyboard. While the Count tool is active, you can click in various spots in your image to mark places that you want to edit or that you simply think are important to look at, such as the spots in Figure 3.54. Both automatic counting and manual counting are covered in greater detail later in this section.
Place Scale Markers: This command fires up the Measurement Scale Marker dialog box, shown in Figure 3.55. Through this dialog box, you can set the appearance of the scale marker — a graphic that appears as a key or legend within your image, defining the scale you've established for your image. When the scale marker appears in your image, it also appears as a new layer (with two sub-layers), represented in the Layers palette. As shown in Figure 3.56, the scale marker can be black or white, can be any length you set, and can appear either at the top or bottom of the image. The figure also shows the Layers palette, which you can use to hide or display the marker, set the font and font size, and even apply blend modes to the text. If you attempt to add more scale markers when there are already some in place, the prompt appearing in Figure 3.56 pops up, allowing you to Remove or Keep the existing markers. This is handy if you want to come back and add another marker (Keep) or if you want to start from scratch (Remove).
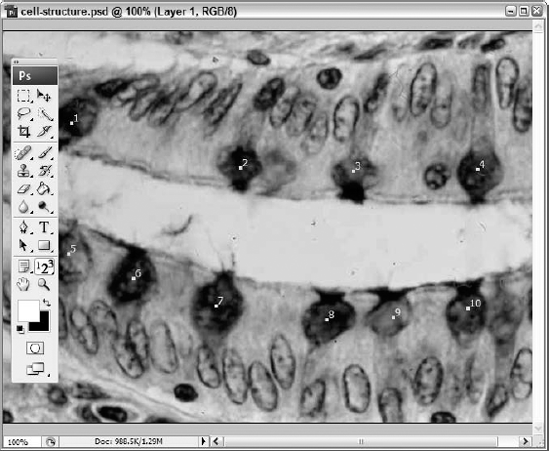
Figure 3.54. Count and mark special items in your image — for editing later or just so you don't forget to study them in greater detail later.
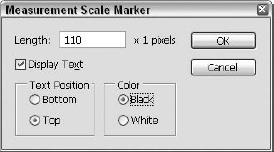
Figure 3.55. Decide how you want your scale markers to look, and then work with them through the layers palette.
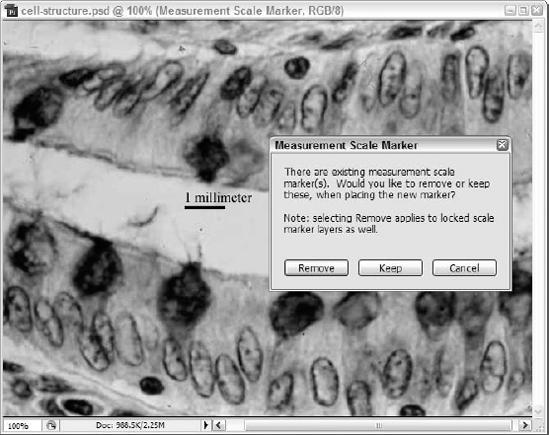
Figure 3.56. Remove or Keep your existing scale markers, through a prompt that reminds you that you already have a marker in place.
Tip
Quickly resize the text part of your scale marker by pressing Ctrl+T (
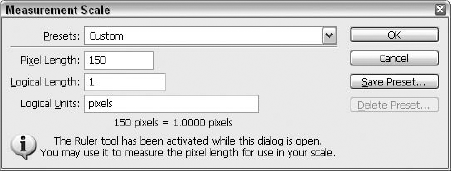
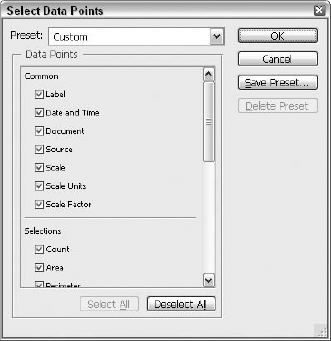
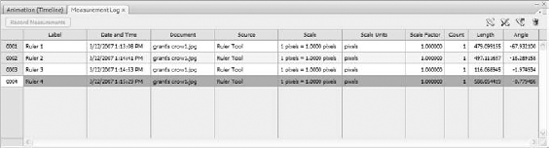
The Ruler tool is painfully simple to use. Simply click and drag, as shown in Figure 3.57, to mark the distance between two points. The data about that span appears in the Info palette which also appears in the figure and also on the Options bar for the Ruler tool.
You also can measure angles, creating two lengths of line and connecting them at the end of the first and the beginning of the second. To do this, drag the first line, being sure to release the mouse and end the first line. Then, press Alt (Option on the Mac), and click at the end of the first line, dragging a new line, as shown in Figure 3.58. The resulting data — the length of the two lines (L1 and L2) and the angle between the two lines (A) — appears in the Info palette and on the Options bar.
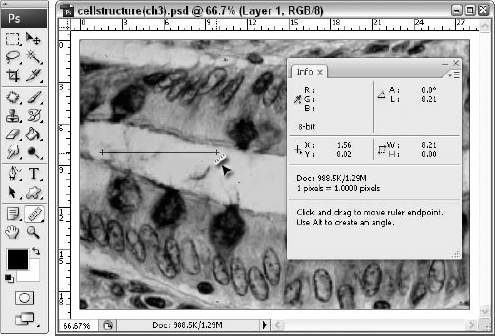
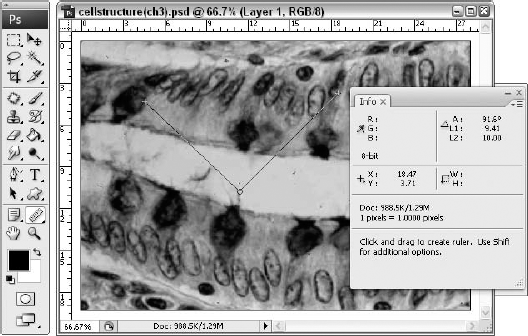
You can draw only one line or one set of two lines. Subsequent clicks of the mouse while the Ruler tool is active wipe out existing measurements in favor of whatever you do next with the tool.
The Count tool, which you can access from the Toolbox (it shares a button with the Eyedropper, Color Sampler, and Ruler tools) or by choosing Analysis
On the Options bar, shown in Figure 3.59, you can see the total count of Count tool markers placed, and the markers themselves are quite obvious. You can click the Color button to open the Color Picker and set a new color for your markers, choosing a color that will stand out against your image colors.

Figure 3.59. Need to count the occurrences of something in your image? Use the Count tool to mark each one and keep track of the total items counted.
Warning
The counts you create with the Count tool do not remain in place after you close an image — even if you save it after having used the Count tool.
Photoshop provides a ridiculous number of shortcuts. To be perfectly honest, it provides more shortcuts than you'll ever need. For example, you may never meet anyone who regularly links layers by Ctrl+Shift+Alt-right-clicking (
But sometimes a simple keyboard shortcut isn't enough. You may find yourself performing certain sequences of commands in the same order each time. Maybe you have a series of very similar images shot with a digital camera, and they all need the same saturation adjustment via Hue/Saturation, the same gamma tweak via Levels, and the same sharpening via Unsharp Mask. Even hitting three shortcuts in a row for each image in a large group can get pretty tiresome.
Photoshop's answer is the Actions palette, which lets you record an entire sequence of commands and other operations as a single action, and then apply those operations to an open image or an entire folder of files while you take a much-needed break. Much better than a keyboard shortcut that can only open a command, actions can actually use the command to change your image, close that file, and move on to the next one. If you spend lots of your time performing repetitive tasks, actions can help you automate your workaday routine so you can devote your creative energies to something more important, such as a nap.
Choose Window
As with layers, you can organize actions into sets. But although sets are optional with layers, they're essential with actions. Sets are the only method for saving actions so that you can use them on another machine, transfer them to an upgraded version of Photoshop, or keep them safe in case of a crash.
With that in mind, here is how you go about recording your own custom action.
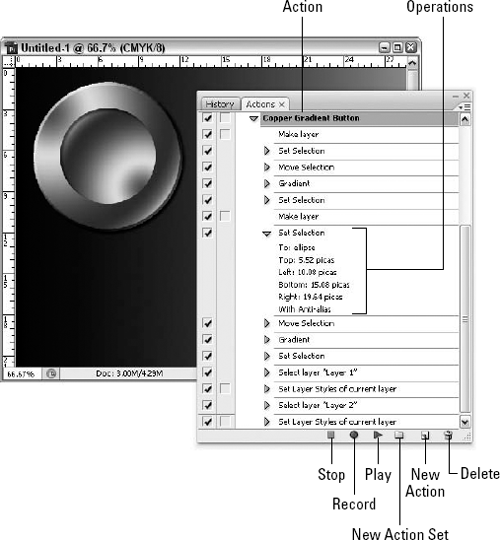
Figure 3.60. The Actions palette lets you record a sequence of operations and assign a keyboard shortcut.
Steps: Recording an Action
Select a set in which to store your new action. Just click the set that makes sense. Or create a new set by clicking the little folder icon at the bottom of the Actions palette. Sets are useful for organizing similar actions, but you don't absolutely have to create a set for any action unless you want to or feel you'll be creating similar actions or actions that are somehow related to each other.
Tip
Naturally, Photoshop asks you to name the set. If you don't want Photoshop to bother you with such trivialities, Alt+click (Option+click on the Mac) the folder icon to bypass the New Set dialog box. You can likewise Alt+click other icons to skip other dialog boxes, but it's not really a good idea; when recording actions, it always pays to stay as organized as possible.
Create a new action. This is very important. Much as you might like to click the record button and go, you have to first make an action to hold the recorded operations. Click the new action icon — the one that looks like a little page at the bottom of the Actions palette. Photoshop responds with the New Action dialog box, shown in Figure 3.61.
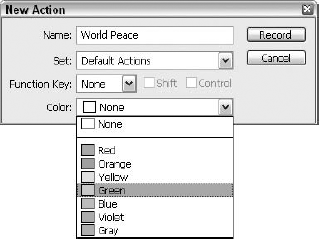
Figure 3.61. When creating a new action, you can assign a name, shortcut, and color. The shortcut must involve a function key. The color shows up in the Actions palette's button mode.
If you accidentally start recording and immediately decide against it, press Ctrl+Z (
Enter a name for your action. If you decide that your new action belongs in a different set than you originally imagined, choose the alternative set from the Set pop-up menu. Strange as it may sound, you also can assign a color to an action. The color affects the appearance of the action in the Actions palette's button mode, as discussed later.
Assign a keyboard shortcut. Photoshop prohibits you from assigning alphanumeric shortcuts, instead limiting you to function keys in combination with Shift and/or Ctrl (
Press Enter or Return to start recording. The circular record icon at the bottom of the Actions palette turns red to show you that Photoshop is now observing your every action.
Perform the desired operations. If you want to record a sequence of operations, work through the sequence as you normally would.
But whatever you do, relax. There's no hurry and no pressure to perform. Photoshop is not recording your actions in real time, and nobody's watching you. Failed attempts to make a selection, pulling down the wrong menu: These things can happen during your recording and they don't matter. You can start to choose a command and then change your mind. You can even open a dialog box and cancel out of it. Even if you mess up, just keep going. Photoshop lets you insert, delete, and reorder operations after you've finished recording an action.
When you're finished, click the stop button. That's the square icon at the bottom of the Actions palette. Or just press the Escape key. Congratulations, you've now successfully recorded an action.
Tip
Photoshop not only records your operations in the Actions palette, but it also applies them to whatever image or images you have open. If you switch to a different image window or open an image while recording, Photoshop adds the operation to the action. For this reason, it's usually a good idea to have a dummy image open. When you're finished recording, you can choose File
If you take it slow and easy, you have a good chance of recording your action right the first time. But it's no problem if you flub it. Photoshop offers the following options to help you get it exactly right:
Adding more operations: To add more operations at the end of an action, select the action and click the round record icon. Then start applying the operations you want to record. When you finish, click the stop icon. Photoshop automatically adds the new operations to the end of the action. To add operations at a specific point, twirl open the action, select the operation name after which you want to begin recording, and click record.
Moving an operation: To change the order of an operation, drag the operation up or down in the list. You can even drag an operation from one action into another if you like.
Copying an operation: To make a copy of an operation, press Alt (Option on the Mac) and drag it to a different position in the action.
Investigating an operation: If you can't remember what settings you entered in a dialog box or you don't recognize what an operation name such as Set Current Layer means, click the triangle in front of the operation name to expand it. Figure 3.62 shows an example of the operations Set Selection, Move Selection, and Gradient (only part of this last one's operations are visible) expanded to show the recorded settings.
Changing a setting: If an operation name includes an empty square to the left of it (as it does next to one of the steps in Figure 3.62), it includes dialog box settings. When you expand the operation, Photoshop lists those settings. To modify the settings, double-click the operation name, revise the options in the dialog box, and click OK.
Tip
As when you record an action, Photoshop applies the settings to your current image. If this is a problem, press Ctrl+Z (
Leaving a setting open: Not all images are alike, and not all images need the same settings applied to them. If you want to enter your own settings as the action plays, click inside the empty square in front of the operation name. A little dialog box icon appears to show you that you must be on hand when the action is played. In Figure 3.62, for example, a dialog box icon appears next to Make layer. When the action is played, Photoshop leaves the "Save Changes?" alert message onscreen until you confirm your decision. Then the action continues playing until it reaches the next dialog box icon or the end of the action.
Tip
Press Alt (Option on the Mac) and click the square in front of an operation name to display a dialog box icon for that one operation and hide all others. To bring up dialog boxes for everybody, Alt-click (Option-click on the Mac) the same dialog box icon again or click the red dialog box icon in front of the action name.
Forcing Photoshop to record a command: If Photoshop seems unable or unwilling to record a command, choose Insert Menu Item from the Actions palette menu, shown in Figure 3.63. Photoshop displays a dialog box that asks you to choose a command. Go ahead and do it; the dialog box won't interfere with your progress.
Tip
Insert Menu Item also turns out to be the only way to record a dialog box with no settings whatsoever. This means that you can capture commands such as Image Size and Canvas Size with no predetermined changes. Insert Menu Item also recalls filters such as Unsharp Mask and Gaussian Blur with the last-applied settings.
Inserting a stop: A stop is a pause that permits you to convey a message to the user of an action. The user can't do anything during the stop except read your message and then opt to continue or cancel. But it's a great way to identify a complex action so you remember its purpose and how it works later on.
Tip
Right at the outset of a big action, choose Insert Stop from the Actions palette menu. Then enter a message that explains the action. (Select the Allow Continue check box to enable the user to continue the action after reading the message.) After you record the action and get all the bugs ironed out, deactivate the stop by turning off its check in the left-hand column of the palette. This way, it's there when you need it. What do you do two years later when you forget what the action does? Turn on the stop, play the action, and read your message.
Changing the name and function key: Renaming an action works just like it does in the Layers palette: Double-click the name to highlight it, and then enter a new one. To change the shortcut or color assigned to an action, press Alt (Option on the Mac) and double-click the action name. Note that function keys assigned to other actions appear dimmed and unavailable.
Deleting an operation: To delete an operation, drag it to the trash icon at the bottom of the Actions palette, or select the operation and Alt-click (Option-click on the Mac) the trash can icon. If you use the latter technique, a warning appears, giving you the chance to rethink your deletion.
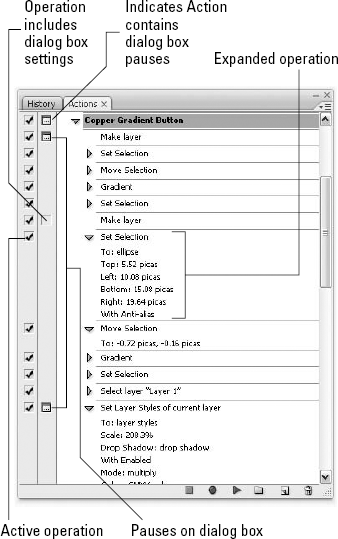
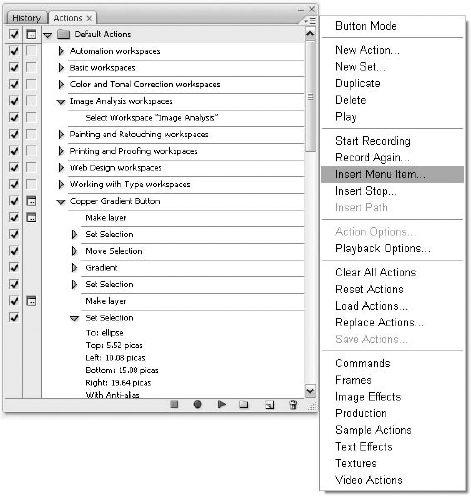
When it comes time to play your action, you can play all of it or just a single operation. The simplest way to play back an entire action is to press the function key you assigned to it. If you can't remember the function key or didn't assign one, you may prefer to switch to the button mode. To do so, choose the Button Mode command from the Actions palette menu, as shown in Figure 3.64. You can now see the colors you assigned to the actions, as well as the function keys. Just click the button for the action you want to play.
But the button mode has its drawbacks. All you can do is click buttons. You can't edit actions, you can't change the order of actions, you can't assign new function keys, and you can't play individual operations. This is a great mode if you want to protect your actions from less adept users, but it's an awful mode if you want to modify your actions and create new ones.
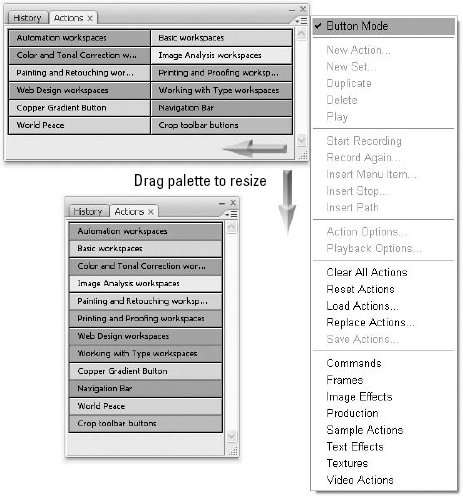
Figure 3.64. Choose the Button Mode command to view each action as an independent button. You can resize the palette to view buttons in a single column (bottom) or as multiple columns (top).
To return to the standard Actions palette, choose the Button Mode command again. Then try some of these less-restrictive action-playing techniques:
To play a selected action, click the play icon at the bottom of the palette. You also can play an action by Ctrl-double-clicking an action name. (On the Mac,
To play an action from a certain operation on, select that operation name in the palette and click the play icon.
Tip
To play a single operation and no more, Ctrl-double-click (
You can tell Photoshop which operations to play and which to skip using the check marks in the on/off column (the leftmost column, labeled back in Figure 3.62). Click a check mark to turn off the corresponding operation. Alt-click (Option-click on the Mac) the check mark in front of an operation to turn that one operation on and the rest off. To turn all operations on again, Alt-click (Option-click on the Mac) the check mark again or click the red check mark by the action name.
Tip
If an action makes a mess of your image, it's generally not a problem thanks to Photoshop's multiple undos. To restore your image to its previous appearance, switch to the History palette and click the state in the list that comes directly before the first operation in your action. If you're at all concerned that an action may do irreparable damage — say, it contains more than 20 undoable steps — then record yourself saving a snapshot at the very beginning of the action. As long as the image remains open, the snapshot remains available. For complete information on the History palette, see Chapter 3.
Photoshop requires you to put every action inside a set. But that doesn't mean the set automatically gets saved. It's true that Photoshop saves sets and actions to a special preferences file, but only when you quit the program. If you crash, any actions recorded during this session are lost.
Anytime you record an action, go ahead and take a moment to save or update its set. To do so, click the set name in the Actions palette, and then choose Save Actions from the palette menu. Actions are 100 percent cross-platform. But to work on any platform, the file name must include the three-character extension .atn.
You also can load sets of actions. By default, Photoshop displays only the Default Actions, a set of a dozen actions from Adobe. To open other predefined Adobe sets, choose one of the commands at the end of the Actions palette menu. To load some other set, choose the Load Actions command.
Tip
Turns out, you can add your own custom sets to the presets at the end of the Actions palette menu. Quit Photoshop. Then copy the action set (.atn) files to the Photoshop Actions folder inside the Presets folder that's inside the same folder as the Photoshop application. Then relaunch Photoshop and check out the Actions palette menu. Note that Photoshop doesn't automatically load the custom set; you have to choose the command to do that.
In this chapter, you learned to resize an image for the printer and for the screen, keeping in mind the needs of your image and your goals for its use. In addition, core skills for opening and saving images were covered, along with techniques for searching for and viewing images, and managing image data with the Bridge. You also learned about pixel depth, dimensions, and resolution, resampling an image, and cropping images to rid them of unnecessary edge content.
File formats were covered, too; you explored JPEG, GIF, PDF, and many other file formats and learned about rendering object-oriented EPS images. Using Photoshop's less-often-used but very important tools for annotating and adding voice commentary to images, you learned to extend the editing process beyond the image itself.
This chapter also introduced you to the new Analysis menu and its tools for scaling, scale-marking, and measuring your image and its contents. You also learned about the Count tool, and the creation, editing, and use of actions was covered — enabling you to record your steps in oft-performed tasks or to automate complex operations for repeated use.