
7. Recording and Playing Back Audio
Now that you’ve configured a session and set audio input levels, it’s time to lay down some tracks.
This chapter shows you the basics of recording and playing back audio in Pro Tools. We’ll begin by discussing the Transport window—the control center for all recording and playback operations. You’ll learn how to use various transport controls and features for punching, looping, and navigating tracks.
In addition, we’ll show you how to record a single audio track, as well as how to record multiple audio tracks simultaneously. Then, we’ll talk about overdubbing tracks using automated punch recording, loop recording, recording to playlists, and recording on the fly with QuickPunch.
Finally, we’ll cover Pro Tools’ playback features such as playback scrolling, loop playback, and scrubbing tracks to locate punches.
The Transport Window
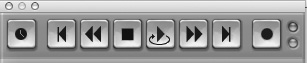
Although the Transport window (Figure 7.1) features many of the basic controls you’ll find on a CD player or tape deck, it also provides some advanced tools for punching, looping, and synching tracks.
Figure 7.1. The Transport window.
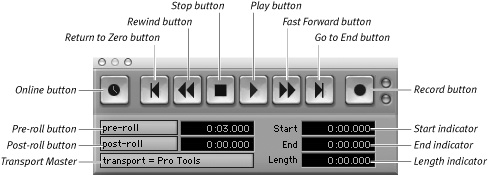
The Transport window contains the following buttons:
Online: This button lets Pro Tools receive an external time code source for synchronization. Clicking the button puts Pro Tools online.
Return to Zero: This button locates to the session start point. Alternatively, you can press Return (Macintosh) or Enter (Windows).
Rewind: This button rewinds from the current play location.
Stop: This button stops playback or recording. Alternatively, you can press the spacebar.
Play: This button begins playback. If you’re in Record-Ready mode, however, it begins recording from the timeline insertion point. (See tip later in this section.) Pressing the spacebar also works. For half-speed playback, press Shift-spacebar.
Fast Forward: This button fast-forwards from the timeline insertion point.
Go to End: This button locates to the end of the session. You can also press Option-Return (Macintosh) or Control-Enter (Windows).
Record: This button, which flashes when pressed, puts Pro Tools in Record-Ready mode. You can also press F12, Command-spacebar (Macintosh), or Control-spacebar (Windows).
Pre-Roll: This button specifies the amount of track that plays before a punch-in point. Click the button to enable pre-roll, and then enter a pre-roll value in the adjacent field.
Post-Roll: This button specifies the amount of track that plays after a punch-out point. Click the button to enable post-roll, and then enter a post-roll value in the adjacent field.
Transport Master: The Transport Master lets you drive (or slave) devices from the Pro Tools transport controls. Conversely, you can set Pro Tools to slave from the transport controls Transport Master. For more information on slaving devices to Pro Tools, see the Pro Tools Reference Guide.
The Transport window also contains these indicators:
Start: The Start indicator displays the start time of a record or play range. Enter a value in the field to set the start time.
End: The End indicator specifies the end point of a record or play range. Enter a value in the field to set the end time.
Length: The Length indicator displays the length of a record or play range. Enter a value in the field to set a new length.
• You can play tracks at different speeds and in different directions by setting your keyboard’s numeric keypad to Transport mode. To do this, choose Setup > Preferences. Click the Operation tab, and then select Transport from the Numeric Keypad options.
• To change the track playback speed, select a maximum of two tracks. Then press Control (Macintosh) or Start (Windows) and a number key (0–9). The higher the number, the faster the playback speed.
• To change the playback direction, press either the Plus key to go forward or the Minus key to go backward. For more information on Numeric Keypad modes, see the Pro Tools Reference Guide.
• Record-Ready mode is not to be confused with the Record-Enable button. The former is a built-in safety mode, common to most recording devices, that protects your tracks from inadvertent erasures. The latter is a channel strip track control that opens a track to audio signal input.
Viewing the Transport window
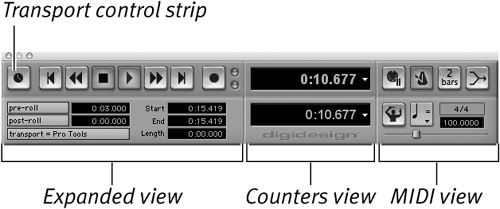
You can expand or contract the Transport window as needed. If you’re tight on screen space, you can condense it to a simple control strip (Figure 7.2).
Figure 7.2. Condensed view of the Transport window.

To open the Transport window
• Choose Window > Transport.
You can expand the Transport window to include the following views (Figure 7.3):
Counters: The Counters view includes the same Location indicator found in the Edit window. It displays the current play position in both Main and Sub Time Scales.
Expanded: The Expanded view includes pre- and post-roll buttons, and start, end, length, and transport master indicators.
MIDI Controls: The MIDI Controls view includes Wait for Note, Click, Countoff, MIDI Merge, Tempo, Meter, and Conductor. For information on using Pro Tools’ MIDI-based click track feature, see Chapter 6: Getting Ready to Record. For more information on MIDI Transport controls, see Chapter 18: Recording MIDI.
Figure 7.3. Expanded view of the Transport window.
To see the Transport window’s Expanded view
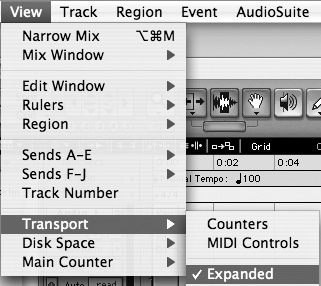
• Choose View > Transport > Expanded (Figure 7.4).
Figure 7.4. Choose View > Transport > Expanded to view the Expanded Transport window.
To see the Transport window’s Counters view
• Choose View > Transport > Counters.
To see the Transport window’s MIDI Controls view
• Choose View > Transport > MIDI Controls.
Recording Audio Tracks
When you record audio into Pro Tools, it’s saved on your hard disk as an audio file. Audio files are stored in the Audio Files folder inside the Session folder. In Pro Tools’ default Non-destructive Record mode, audio files are protected from being accidentally overwritten or erased. For more information on audio files, see Chapter 2: Software Basics and Chapter 8: File Management Basics.
Pro Tools lets you record both mono and stereo audio tracks.
To record an audio track
1. Choose Track > New.
2. Create a new mono or stereo audio track.
(For instructions on creating new audio tracks, see Chapter 5: Working with Tracks.)
3. Assign an input to the track.
(For information on assigning track inputs and outputs, see Chapter 5: Working with Tracks.)
4. Record-enable the track.
5. Set the audio input level.
Ideally, input levels should top out in the yellow zone of the level meter. If levels are consistently hitting the red zone, the signal is clipping and the level should be turned down. (For information on setting audio input levels, see Chapter 6: Getting Ready to Record.)
6. Click the Return to Zero button in the Transport window to ensure that you start recording from the beginning of the track (Figure 7.5).
Figure 7.5. Click the Return to Zero button in the Transport window to return to the start of a track.

7. Click Record in the Transport window to put Pro Tools in Record-Ready mode (Figure 7.6).
Figure 7.6. Click the Record button to put Pro Tools in Record-Ready mode.

8. Click Play in the Transport window or press the spacebar to begin recording (Figure 7.7).
Figure 7.7. Click the Play button to start recording.

9. Click Stop in the Transport window or press the spacebar to stop recording.
• To start recording, use these quick key commands: Press F12; press Command-spacebar (Macintosh) or Control-spacebar (Windows); or press 3 on the numeric keypad in Transport mode.
• To cancel a take while recording, press Command-period (Macintosh) or Control-period (Windows). This removes the audio from your hard drive and deletes the region from the track’s playlist.
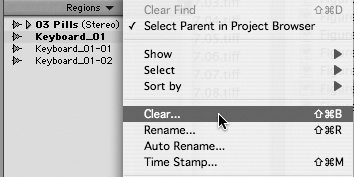
• To delete audio files from your hard drive, select the name of the audio file that you want to delete in the Regions list of the Edit window (Figure 7.8). Choose Clear from the Regions list pop-up menu (Figure 7.9), and then select Delete from the Clear Audio window.
Figure 7.8. The Regions list on the right side of the Edit window.
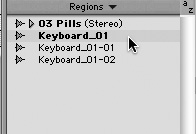
Figure 7.9. Use the Clear command in the Regions list pop-up menu to delete audio files from your hard drive.
Recording multiple audio tracks
You can record multiple tracks of audio simultaneously. This is useful for live band situations or any time you have multiple audio sources.
To record multiple audio tracks simultaneously
1. Choose Track > New.
2. Specify the number of mono or stereo audio tracks you want, and then click Create (Figure 7.10).
Figure 7.10. Specify the number of audio tracks that you want to create in the New Tracks dialog box.

3. Assign an input to each track.
4. Record-enable the tracks (Figure 7.11).
Figure 7.11. You can record-enable multiple tracks simultaneously. See “Record-Enabling Tracks” in Chapter 6.

5. Set the audio input level.
6. Click Record in the Transport window.
7. Click Play in the Transport window or press the spacebar to begin recording.
8. Click Stop in the Transport window or press the spacebar to stop recording.
• To append new material to the end of a track, press the Go to End button in the Transport window, and begin recording. The new audio is added to the end of the track.
Note that in Non-destructive Record mode, appending new audio creates a new audio file and region. In Destructive Record mode, the new audio is added to the original audio file on the track.
• You may want to experiment with recording an instrument at half-speed. Reducing the speed can create some interesting sonic effects. To record audio at half-speed, press Command-Shift-spacebar (Macintosh) or Control-Shift-spacebar (Windows).
Punch-Recording Audio
If you have a great take with only a glitch or two, try fixing it with punch recording. Punch recording means literally pressing or punching the Record buttons into and out of Record mode at precise track locations.
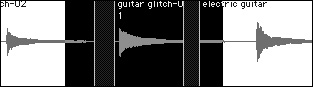
Pro Tools’ Zoom and Selection tools let you make incredibly precise punches—automatically. The Edit window’s viewing features let you quickly zoom in on waveforms to accurately identify errors (Figure 7.12) and select audio regions to punch.
Figure 7.12. Use the Edit window’s Zoom tools to zoom in to the sample level on waveforms.

Once you’ve selected a region to punch, Pro Tools does the punching for you—entering Record mode at the punch-in point and leaving Record mode at the punch-out point. You can also set pre- and post-roll values to give the performer some lead-in time.
To punch-record audio
1. Record-enable the track you want to punch.
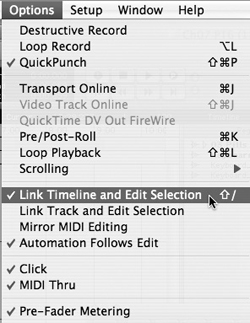
2. Select Options > Link Timeline and Edit Selection (Figure 7.13).
Figure 7.13. Select Options > Link Timeline and Edit Selection.
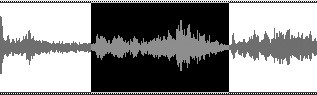
3. Select a range to punch (Figure 7.14).
Figure 7.14. Use the Selector tool in the Edit window to select a range to punch.
4. Set pre- and post-roll times (Figure 7.15).
Figure 7.15. Set a pre-roll time in the Transport window to give yourself some lead time before the punch.
![]()
Be sure to give the performer enough time to get in the groove of the track.
5. Click the Record button in the Transport window.
6. When you’re ready to record, click Play.
If pre-roll is enabled, the track plays back until the punch-in point, and then switches into Record mode. If post-roll is enabled, the track switches back out of Record mode at the punch-out point and plays for the post-roll time.
In Non-destructive Record mode, a new audio file is written to your hard drive and a new audio region appears in the Regions list.
• You can set the start and end points of a record range for punch- and loop-recording in the following ways:
• Select a range in a track’s playlist.
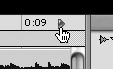
• Select a range in a Timebase ruler (Figure 7.16).
Figure 7.16. Select a record range in any Timebase ruler. The above ruler is minutes:seconds.
![]()
• Drag the playback markers in the ruler (Figure 7.17).
Figure 7.17. Drag the playback markers to select a record range.
![]()
• Enter start and end times in the Transport window.
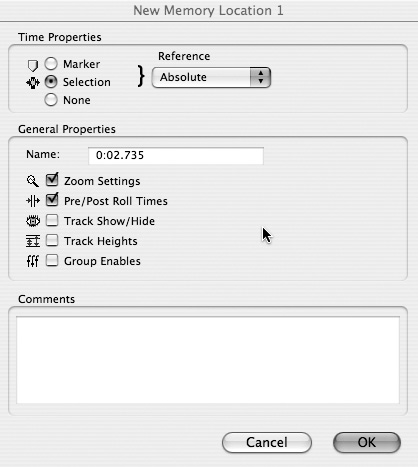
• Recall a memory location (Figure 7.18).
Figure 7.18. The Memory Location dialog box lets you save and recall selections.
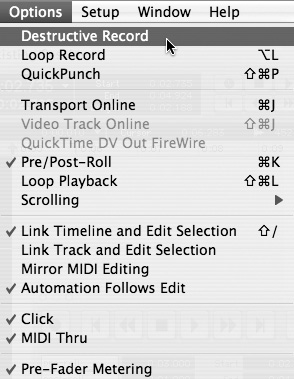
• Use Destructive Record mode if you want to overwrite the region of the audio file that you’re punching. Choose Options > Destructive Record (Figure 7.19).
Figure 7.19. Use Destructive Record mode to permanently overwrite an audio file.
• When punching, use Auto Input Monitoring in the Track menu. This plays back the track until the punch-in point, when it switches to the audio input (so you can monitor what you’re recording). At the punch-out point, it switches back to track playback.
Using QuickPunch
You can use QuickPunch mode to make punches on the fly. QuickPunch lets you punch up to 200 times during one playback.
To punch on the fly with QuickPunch
1. Select Options > QuickPunch (Figure 7.20).
Figure 7.20. Use QuickPunch Record mode to make punches on the fly.

The letter P appears inside the Record button (Figure 7.21).
Figure 7.21. In QuickPunch Record mode, the letter P appears inside the Record button.

2. Set a QuickPunch crossfade length in the Editing Preferences window. Setting a crossfade length can help smooth the attack on punch-ins and punch-outs. (For instructions, see the next task.)
3. Record-enable the track you want to punch in on.
4. Locate a start point.
Set pre- and post-roll times, if desired.
5. Start playback by clicking Play in the Transport window.
6. When you reach the punch-in point, click Record in the Transport window.
or
If you’re using a Digi 002 or Digi 002 Rack system with a connected footswitch, press the footswitch at the punch-in point.
7. To punch out, click the Record button (or press the footswitch) again.
To set the QuickPunch crossfade length
1. Choose Setup > Preferences.
2. Click the Editing Preferences window tab.
3. Enter a value (in milliseconds) for the QuickPunch crossfade length (Figure 7.22).
Figure 7.22. Enter a value (in milliseconds) for the QuickPunch Crossfade Length.

• A 32-track session is limited to sixteen simultaneous tracks of QuickPunch. If you want to QuickPunch on more tracks, reduce the session’s total tracks. For more information on QuickPunch, see the Pro Tools Reference Guide.
Loop-Recording Audio
You can use Pro Tools’ Loop Record mode to lay down successive nondestructive takes over the same section of a track. This can help a performer maintain focus and be more creative. For example, a songwriter could loop record while developing a melody to a song. Or a guitar player may want to loop record while developing a guitar part for a song. Or, loop-recording a vocalist can help them warm up, reduce performance anxiety, and help them stay in the flow of the music.
To loop-record audio
1. Enable Loop Record Mode by selecting Options > Loop Record (Figure 7.23).
Figure 7.23. Select Options > Loop Record.

The Record button displays a loop symbol (Figure 7.24).
Figure 7.24. In Loop Record mode, the Record button displays a loop symbol.

2. Record-enable the track.
3. Select a recording range in the track’s playlist (Figure 7.25).
Figure 7.25. Select a recording range in the track’s playlist.
4. Set a pre-roll time, if desired.
5. Click Record in the Transport window.
6. When you’re ready to record, click Play.
When the start point is reached, Pro Tools begins recording. When the end point is reached, the track loops back to the start point and continues recording.
7. When you’ve finished recording, click Stop.
The recorded takes appear in the Regions list numbered sequentially. The most recently recorded take remains visible in the audio track.
Auditioning Takes
Pro Tools provides some thoughtful ways to audition takes created with punch- and loop-recording. One easy way is to grab and drag individual takes from the Regions list onto the track.
To audition takes using the Regions list
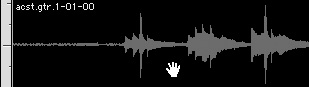
1. In the Edit window, select the current take by clicking it with the Grabber tool (Figure 7.26).
Figure 7.26. Select a take to audition by clicking it with the Grabber tool.
2. Command-drag (Macintosh) or Control-drag (Windows) from the Regions list the take you want to audition (Figure 7.27). The region replaces the previous take on the track and snaps to the correct location.
Figure 7.27. From the Regions list, Command-drag (Macintosh) or Control-drag (Windows) the take that you want to audition.
3. Repeat the preceding steps as desired to audition other takes.
The Takes List pop-up menu
You can also audition multiple takes on a track with the Takes List pop-up menu. This menu lets you choose from a list of takes with the same user time stamp, which means they have matching start times.
For more information on the Takes List pop-up menu, see the Pro Tools Reference Guide.
To audition takes using the Takes List pop-up menu
1. Command-click (Macintosh) or Control-click (Windows) with the Selector tool at the precise beginning of the loop or punch range.
or
Select the track and Command-click (Macintosh) or Control-click (Windows) it.
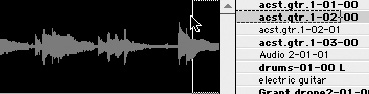
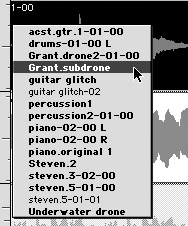
The Takes List pop-up menu appears with a list of takes with the same user time stamp (Figure 7.28).
Figure 7.28. The Takes List pop-up menu displays a list of takes with the same user time stamp.
2. Choose a region from the pop-up menu.
The region replaces the previous take and snaps to the current location.
3. Repeat the preceding steps to audition other takes.
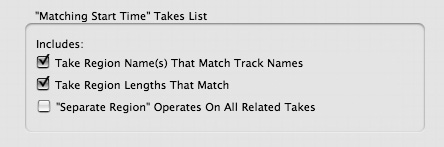
• Use these Editing Preferences options to specify which takes are included in the Takes List pop-up menu (Figure 7.29):
Take Region Name(s) That Match Track Names: When this option is selected, regions that share the same root name with the track appear in the Takes List pop-up menu.
Take Region Lengths That Match: When this option is selected, takes matching the length of the current selection appear in the Takes List pop-up menu.
“Separate Region” Operates on All Related Takes: When this option is selected, editing a region with the Separate Region command also affects all other takes with the same user time stamp.
Figure 7.29. Use the “Matching Start Time” Takes List options in the Editing Preferences window to determine which takes appear in the Takes List pop-up menu.
Recording to Playlists
Perhaps the best way to record multiple takes on a track is to record to playlists. All you do is create a new playlist, and then record. Use the Playlist selector to audition each playlist—each take—separately and identify the best one.
When you record to a new playlist, the audio file is written to disk and appears in the Audio Regions list. For more information on playlists, see Chapter 2: Software Basics and Chapter 10: Editing Basics.
To record to a new playlist for a track
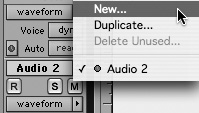
1. From the track’s Playlist Selector pop-up menu, choose New (Figure 7.30).
Figure 7.30. Create new playlists for a track from the Playlist Selector pop-up menu.
Enter a name for the new playlist and click OK.
2. Record-enable the track.
3. In the Transport window, click the Return to Zero button.
4. Click Record in the Transport window.
When you’re ready to record, click Play.
5. When you’ve finished recording, click Stop.
A new audio region appears in the track’s region playlist.
To audition a take, choose its playlist with the Playlist selector (Figure 7.31).
Figure 7.31. Audition a playlist with the Playlist selector.

Recording from a Digital Source
Pro Tools lets you record from digital sources, such as DAT or ADAT, depending on your system’s digital hardware inputs. Digi 002 and Digi 002 Rack users can choose from S/PDIF (RCA) inputs and ADAT optical inputs, whereas Mbox and Mbox 2 users are limited to S/PDIF (RCA) digital inputs.
For more information on connecting digital devices, see Appendix A: Connecting Your Studio and the Pro Tools Reference Guide.
To record from a DAT or ADAT into a Pro Tools session
1. Connect the digital output of the DAT or ADAT recorder to the appropriate digital inputs of your interface.
2. Choose Setup > Hardware.
The Hardware Setup dialog box appears.
3. Select the appropriate sample rate.
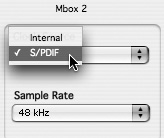
4. Select the appropriate clock source (S/PDIF or Optical) and click OK (Figure 7.32).
Figure 7.32. Choose the appropriate clock source in the Hardware Setup dialog box.
5. Record-enable a track.
Because this is a digital transfer, there’s no need to set input levels.
6. Click Record in the Transport window.
When you’re ready to record, click Play.
7. Start playback on the DAT or ADAT recorder.
8. When you’re finished recording, click Stop in the Transport window.
Note: When you’ve finished recording from a digital source, return the sync mode to Internal. Failure to do so could result in record and playback errors.
• The digital outputs of Pro Tools LE systems are active at all times. Thus, you can send digital audio to multiple external digital devices (such as an ADAT or DAT machine) simultaneously during mixdown.
Playing Audio Tracks
Playback in Pro Tools is instantaneous: You can go immediately to any location in a recording without having to rewind or fast forward. Just click anywhere in a track with the Selector tool to begin playback from that point.
There are two cursors in the Edit window: The playback cursor is a solid line that shows the current playback location, and the edit cursor is a flashing line that shows the current edit location. The latter appears when you click on a track with the Selector tool.
By default, the playback and edit cursors are linked. To unlink them for editing purposes, just use the Link Selection button (Figure 7.33) in the Edit window.
Figure 7.33. The Link Selection button in the Edit window.
![]()
To begin playback from a track location
1. Select Options > Scrolling > None.
2. Select Options > Link Timeline and Edit Selection.
or
Enable the Link Selection button.
3. With the Selector, click in the track at the location at which you want playback to start.
4. Click Play in the Transport window to start playback
or
Press the spacebar to start playback.
5. Click Stop in the Transport window to stop playback
or
Press the spacebar to end playback.
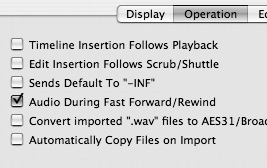
• To hear playback during fast forward and rewind, select the Audio During Fast Forward/Rewind check box in the Operation Preferences window (Figure 7.34). This will help you cue up a track location by ear.
Figure 7.34. To hear playback during fast forward and rewind operations, select Audio During Fast Forward/Rewind in the Operation Preferences window.
Setting playback scrolling
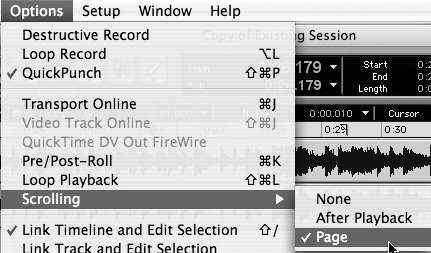
Pro Tools offers the following options for scrolling the contents of the Edit window during playback and recording (Figure 7.35):
None: The Edit window does not scroll during or after playback. The playback cursor moves across the Edit window, indicating the playback location.
After Playback: The Edit window scrolls to the final playback location after playback has stopped. The playback cursor moves across the Edit window, indicating the playback location.
Page: The Edit window scrolls during playback. The playback cursor moves across the Edit window, indicating the playback location.
Figure 7.35. Select a playback scrolling option in the Options menu.
To choose a playback scrolling option
• Choose Options > Scrolling and select a scrolling option.
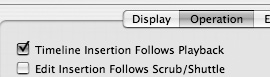
• You can set the edit cursor to appear at the precise location at which playback stops. To do so, select the Timeline Insertion Follows Playback check box in the Operation Preferences window (Figure 7.36). Then select Options > Link Timeline and Edit Selection.
Figure 7.36. To set the edit cursor at the location where playback stops, select Timeline Insertion Follows Playback in the Operation Preferences window.
Looping playback
Looping playback is a great way to create drum loops or loops of any other sound. Just select a playback range to loop, and then fine-tune the range until the loop fits the session. (Looping playback is also a useful, hands-free way to listen back to takes while making coffee.)
To loop-playback a selection
1. Select Options > Link Timeline and Edit Selection.
2. With the Selector tool, choose the track range that you want to loop.
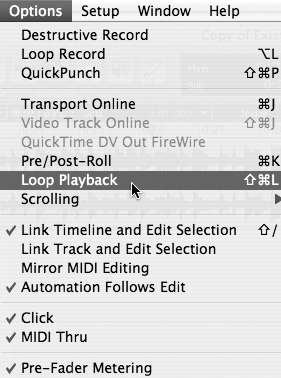
3. Select Options > Loop Playback (Figure 7.37).
Figure 7.37. Select Options > Loop Playback.
The Play button displays a loop symbol (Figure 7.38).
Figure 7.38. The Play button displays a loop symbol when in Loop Playback mode.
4. Click the Play button.
Playback begins from the start point and continues until the selection’s end point, where it loops back to the start point and repeats.
5. Click Stop in the Transport window to stop playback.
• You can also enable Loop Playback by Control-clicking (Macintosh) or right-clicking (Windows) the Play button in the Transport window. Or, with the numeric keypad set to Transport mode, press 4.
Locating the playback cursor
Pro Tools provides a handy Playback Cursor Locator, which lets you quickly find the playback cursor when it moves offscreen. This feature is mainly relevant when scrolling options are set to None.
If the playback cursor moves beyond the time visible in the Edit window, the Playback Cursor Locator appears at the right edge of the Main Timebase ruler. If the playback cursor is located before the time visible in the Edit window, the Playback Cursor Locator appears at the left edge of the Main Timebase ruler.
To locate the playback cursor
• Click the Playback Cursor Locator in the Main Timebase ruler (Figure 7.39).
Figure 7.39. Click the Playback Cursor Locator to center the moving playback cursor at its current location in the Edit window.
The moving playback cursor appears at its current time location in the center of the Edit window.
Scrubbing tracks
You can audition, or scrub, audio by running the Scrubber tool (Figure 7.40) back and forth over an audio region. Scrubbing is quite useful for locating punch or edit points that might be difficult to see in a waveform.
Figure 7.40. The Scrubber tool in the Edit window.
![]()
To scrub an audio track
• Select and drag the Scrubber over the audio region that you want to audition (Figure 7.41).
Figure 7.41. Drag the Scrubber over the region of audio that you want to audition.
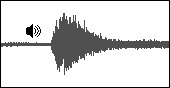
The length and speed of audio played during scrubbing depends on the distance and speed at which you drag the Scrubber.
The resolution of the Scrubber is dependent on the zoom resolution of the track. Press Command (Macintosh) or Control (Windows) to scrub at finer resolutions.
To scrub two audio tracks simultaneously
• Drag the Scrubber between two adjacent tracks (Figure 7.42).
Figure 7.42. Drag the Scrubber between two adjacent tracks to audition both simultaneously.

or
• Scrub within a selection that contains multiple tracks.
(Only the first two tracks are scrubbed.)
• To scrub at fast speed, press Option (Macintosh) or Alt (Windows) while scrubbing.
• To automatically locate to the point where scrubbing stops, select the Edit Insertion Follows Scrub/Shuttle check box in the Operation Preferences window (Figure 7.43).
Figure 7.43. To locate to the point where scrubbing stops, select the Edit Insertion Follows Scrub/Shuttle check box in the Operation Preferences window.
