This book presents Cell programming in great detail, so the first order of business is to obtain and install the required tools. The goal of this chapter is to install the Cell Software Development Kit (SDK), provided free of charge by IBM. These directions walk you through the steps needed to both install the operating system and get the SDK up and running.
There are four ways to program the Cell:
Write and compile code on a Linux PC, and then run applications on the Cell simulator.
Write and compile code on a Linux PC, and then run applications on a Cell system (Sony’s PlayStation 3, IBM’s BladeCenter QS22, Toshiba’s SPURS engine).
Write code on a PC (any OS), and then compile and run applications on a Cell system.
Write and compile code on a Cell system, and then run applications on the Cell system.
If you’re a Windows user, I recommend the third option: Write code on your PC and transfer it to a Cell system (such as a PS3) to be compiled and executed. In this case, you only need to install the Cell SDK on the Cell system. I explain how to transfer files between Windows and the Cell system later in this chapter.
If you’re a Linux user, I recommend the second option: Write and compile code with the SDK tools on your PC, and then run applications on the Cell system. In this case, you need to install the SDK on your Linux PC and on the Cell system. The installation takes time, but you’ll be able to use the Cell simulator and the Cell IDE, discussed at length in following chapters.
At the time of this writing, the Cell SDK is available to run only on the Linux operating system. There are many distributions of Linux, and Terra Soft Solutions has released its Yellow Dog Linux specifically for the Cell processor. Ubuntu is currently the most popular distribution, but the SDK instructions call for either Red Hat’s Fedora Core (FC) or Red Hat Enterprise Linux (RHEL).
FC and RHEL have a great deal in common, and most applications that run on one will run on the other. But Red Hat recommends RHEL for “business, government, or other users looking for stable, supported, and certified Linux” and Fedora Core for a “highly technical enthusiast using Linux in non-critical computing environments.” You can choose RHEL if you prefer, but this chapter focuses on installing the SDK on top of Fedora Core.
The PlayStation 3 (PS3) is currently the most inexpensive and widely available Cell processor system available. There are other platforms: IBM has released its Cell-based blade servers, and Toshiba has announced research into a Cell-based laptop, and these systems come with specific documentation for Linux. The PS3 does not come with documentation for installing Linux, so this section serves that purpose.
By default, every PS3 runs Sony’s proprietary operating system, GameOS, and you can see its welcome screen when you first turn on the console. There’s no way to disable GameOS, but you can take over a portion of the PS3’s memory and install a second operating system. This second OS does not have complete access to the PS3’s resources, and is subject to a number of limitations, including the following:
The second OS can’t run privileged functions or access privileged memory.
The second OS can’t transfer data using the Cell’s input/output interfaces.
The second OS can’t access the Nvidia RSX processor on the PS3.
The second OS can’t communicate with two of the Cell’s eight Synergistic Processor Units (SPUs).
Don’t be dismayed. Despite these limitations, you can run applications that control the Cell’s PowerPC Processor Unit (PPU) and six of the SPUs. That’s a great deal of computational power.
Installing Linux on the PS3 isn’t short or simple, so this section divides the process into three tasks:
Download the Fedora Core disk image (*.iso) and burn it onto a DVD.
Download the Cell PS3 Add-On disk image and burn it to a CD.
Use both disk images to install Linux on the PS3.
Depending on the speed of your Internet connection, this may take a while.
To install Linux on the PS3, the first task is to download the Fedora Core disk image (*.iso) for the Cell processor. This compressed file contains the structure of the Fedora Core file system. It’s provided free of charge, and after you’ve downloaded it, you need to burn it onto a DVD. To do so, follow these steps:
Determine which version of Fedora Core is required by the Cell SDK.
Open a web browser and go to www.ibm.com/developerworks/power/cell/. Click the Downloads tab and find out which Fedora Core version is compatible with the current Cell SDK. I’ll call this version number version_num.
Find a site that provides Fedora Core, release version_num, for the PowerPC.
Red Hat doesn’t provide the disk image directly, but other sites, called mirrors, allow you to download it for free. Open a web browser and go to http://mirrors.fedoraproject.org/publiclist. In the upper-right, the Mirror List Filter lets you filter sites that don’t provide the image you’re looking for. Figure 2.1 shows what this looks like.
The Cell processor looks like a PowerPC to the operating system, so click ppc under the Architecture heading, where version equals version_num.
The bottom of the screen lists sites that provide the iso file for the PowerPC, version version_num. In the leftmost column, look for your country’s two-letter designation (US for United States, GB for United Kingdom, KR for South Korea) and find a mirror site with a high Bandwidth value. Click either ftp or http in the Contents column.
Download the Fedora Core ISO file.
The new browser window should present a link to a folder called releases. Click this link and on the version_num link in the window that follows. Click Fedora, then ppc, then iso. Finally, you should see a link for a file called F-version_num-ppc-DVD.iso. Download this file to your computer.
Burn the disk image onto a DVD.
After the disk image finishes downloading, you need to write its contents onto a DVD. There are many applications available. For Windows, common utilities include Windows DVD Maker, Nero Burning Rom, and Sonic RecordNow. If you’re running Linux on a PC,
cdrecordburns ISO files to DVDs from the command line, andgnomebakerandk3bprovide graphical interfaces.

If you look at the contents of the DVD, you should not see the file F-version_num-ppc-DVD.iso. You should see the decompressed directories and files that make up the disk image. If you only see the ISO file, you need to find a new method of burning the file to DVD. For example, if you’re using Nero Burning ROM, go to the menu option Recorder and then Burn Image.
When you’ve successfully burned the disk image to a DVD, you’re ready to start the second step, which is much easier.
Before the PS3 can install Linux, you need to provide it with a compatible bootloader. This file, called kboot, interfaces with the PS3 operating system and makes it possible to load the Linux operating system. This is freely available from the web, but the hosting site changes on a regular basis. Further, the PS3 doesn’t recognize many old versions of the bootloader.
At the time of this writing, Geoff Levand at Sony has provided many useful PS3/Linux files at www.kernel.org/pub/linux/kernel/people/geoff/cell. The most important file for our purposes is CELL-Linux-CL_date-ADDON.iso. This image contains kboot and Sony’s add-on software for running Linux on the PS3. It may be located in a directory called ps3-distro-kit. Download this file to your computer.
Burn CELL-Linux-CL_date-ADDON.iso onto a CD (not a DVD) just as you burned the previous disk image. If you look at the contents of the CD, you’ll find a file called otheros.bld in the PS3/otheros directory. This is the bootloader file that the PS3 will read during the third and final step.
When you have the DVD containing Fedora Core and the CD containing Sony’s add-on tools, you’re ready begin the main installation. I’ve divided the process into 16 steps:
Plug a USB keyboard and mouse into the front of the PS3. If you intend to connect your PS3 to a PC with a wired connection, make sure the network cable is plugged into the back of the console.
Turn on the console and insert the add-on CD into the PS3. Get to the main menu and use the keyboard’s arrow keys to navigate to the Settings option. If you haven’t already, update your firmware with the Settings, System Update option. The console will restart.
Go to Settings, System Settings, press Enter, and navigate to Format Utility. Select Format Hard Disk, then Yes, then Custom. Choices include: assign all the memory for the PS3, assign 10GB to Linux, or assign 10GB to the PS3 and the rest to Linux. The last option is best, but the second option will also work.
Choose between Quick Format and Full Format. I recommend the quick version, which takes seconds rather than hours. Select Yes to delete all data on the formatted memory. Press Enter to restart the PS3.
Go to Settings, System Settings, and select Install Other OS. The PS3 will scan for a suitable installer. If it doesn’t find one on the add-on CD, you need to obtain a newer add-on file or reburn the add-on ISO. If it does find the installer, select Start and the PS3 will read the bootloader from the CD.
When the console finishes installing the bootloader, eject the CD from the PS3 and insert the DVD containing Fedora Core. Go back to the main menu and select Settings, System Settings, Default System. When you choose this entry, you’ll see options for PS3 and Other OS. This selection determines which operating system will start when you turn on the console. Choose Other OS and then Yes to restart the PS3.
When the PS3 restarts, the screen should display two penguins on top and a series of startup messages below. When the
kboot:prompt appears, enter the bolded text:kboot: linux64 xdriver=fbdev video=720pThe
videoparameter is optional and identifies your display (720p, 1080i, or 1080p). The 720p setting works well for most displays.After a brief startup check, a blue Welcome to Fedora screen will appear. Choose your language and keyboard type, and then select the Local CDROM option.
If the following screen reads No driver found, click Select driver and scroll down until you find the option that reads PlayStation 3 internal storage (ps3_storage). Select this option and press Enter. Test your DVD image or skip the test.
The graphical Linux installer will start. Click Next to leave the title page. A warning dialog will appear and ask you whether you want to initialize the main drive. ClickYes.
The next window displays the partitioning layout for your drive. Toward the bottom, you’ll see a check box: Review and modify partitioning layout. If modifying partitions doesn’t make you nervous, check this box. Click Next, and if a warning box appears, click Yes to remove all Linux partitions.
If you chose to modify the partitioning layout, the next window will list the partitions on the hard drive (ext3 and swap). The PS3 doesn’t provide much RAM (256MB), so you’ll want a larger swap partition. Double-click the ext3 partition and reduce its size. Then double-click the swap partition and increase its size by the same amount. I’ve set my swap size to 2GB, but you may choose more or less depending on your needs. After you’ve changed the partition sizes, click Next.
If a Low Memory box appears and asks to write the partition table, click Yes. Click Next to keep the default network settings. Find your time zone and click Next. Choose a root password and click Next.
The next screen allows you to install additional software. I recommend that you deselect Office and Productivity and select Software Development. I’ll explain how to add more features to your installation shortly. For now, click Next.
The installer checks for package dependencies, and when it asks you to begin the installation, click Next. The package installation can take a few hours, but when it’s done, you’ll have Linux fully installed on your PS3.
Click Reboot. Restart the PS3 if necessary and click Forward to get through the introductory Linux screens. You can leave all the default security options checked (SELinux enabled, SSH is a trusted service). Make sure the Date and Time settings are accurate and create a user account. Check your audio output and click Finish. The install is complete.
Note
At this point, Linux will load when you turn on the PS3. To go back to GameOS, restart the console and press the front power button until you hear a beep. To get to Linux from GameOS, go to Settings System Settings, Default System, select Other OS, and restart the console.
Congratulations! Installing a foreign operating system on a game console is no small task, and you have every right to be proud. The rest of this chapter explains how to add software to your installation, and we’ll start with the Cell SDK.
Now that you have Linux working, installing the Cell SDK is straightforward; you don’t need to burn any CDs or DVDs. You just have to download a few files from IBM and install them.
On the Cell system, log in as root and explore the Linux GUI. Start the web browser (Applications, Internet, Browser Name) and open a terminal (Applications, System Tools, Terminal).
Open the browser and go to IBM’s primary site for Cell-related information: www128.ibm.com/developerworks/power/cell/. Click the Downloads tab and find a link called SDK Downloads or something similar. Follow this link and find links for the Fedora download page and the RHEL download page. Click the link for the Fedora download page.
If you haven’t already, register at the developerWorks site to obtain the Cell SDK. The process is simple: Enter your name and e-mail address, then provide contact information. For what it’s worth, IBM has never pestered me because of this registration.
When you reach the download page, three files are available:
cell-install-version.noarch.rpm (the Cell SDK install package)
CellSDK-Devel-Fedora_version.iso (the Cell SDK tools and libraries)
CellSDK-Extras-Fedora_version.iso (extra tools and libraries)
You only need the first two, but I recommend that you download them all. Choose Save to Disk for each, and when you’re finished, they should appear as icons on your desktop. Make a directory called cellsdkiso in the /tmp folder and place all the files in /tmp/cellsdkiso.
With the SDK files in /tmp/cellsdkiso, you’re nearly ready to install the Cell SDK. But first, open a terminal and enter the following command:
yum install rsync sed tcl wget
This calls on the Yellow dog Updater, Modified (YUM) to install additional packages required by the SDK. YUM can also be used to update existing packages, and it’s a good idea to update your security configuration with the following command:
yum update selinux-policy selinux-policy-targeted
The YUM updater daemon runs in the background and checks its repositories for package updates. This interferes with the SDK installation, so stop the daemon with this:
/etc/init.d/yum-updatesd stop
The last step of the preparation is to install the package containing the SDK installation tool. This is contained in the RPM that you downloaded from the developerWorks site. It’s not part of a repository, so the tool must be installed directly with the Red Hat Package Manager, rpm. Change to /tmp/cellsdkiso and enter the following:
rpm -ivh cell-install-version.noarch.rpmVersion is the version number of the corresponding file in the /tmp/cellsdkiso directory. The i flag tells rpm to install, v tells it to provide messages, and h tells it to display hash marks (#) as the installation progresses.
There’s a new directory in /opt called cell, and inside /opt/cell you’ll find a shell script called cellsdk. This script is very important, but before you run it, you should understand what it does and what options are available.
The cellsdk script calls on the YUM updater to manage packages contained in the Cell SDK. When you run cellsdk, you need to enter a task name and any optional flags. Table 2.1 lists the tasks available.
Table 2.1. Cellsdk Tasks
Function Name | Purpose |
|---|---|
| Install new SDK packages from the repository |
| Install newer versions of previously installed packages |
| Remove packages |
| Check and list the available/installed SDK packages |
| Interface an ISO file to access Cell SDK packages |
| Break interface with an ISO file |
| Rolls back the SDK to uninstall a previous update |
Additional options are available to configure how the script receives and displays data. These flags, listed in Table 2.2, must be placed between the cellsdk command and the task name.
Table 2.2. Cellsdk Flags
Function Name | Purpose |
|---|---|
| Use a GUI for install, update, and uninstall tasks |
| Directory containing ISO files |
| Only accesses packages related to the Cell runtime environment |
| Automatically responds with “y” when prompted |
| Display version number of the Cell SDK |
| No messages during execution |
| Display messages during execution |
| Display additional messages during execution |
Installing the Cell SDK is performed with the install task, and —iso should identify where the CellSDK-Devel-Fedora_version.iso file is. Change to the /opt/cell directory and enter the following:
./cellsdk --iso /tmp/cellsdkiso install
Accept the licenses (which are discussed shortly), and the full SDK installation will proceed. Many of the packages are installed from the ISO file, but others have to be downloaded from the Barcelona Supercomputing Center (www.bsc.es). The connection between your PS3 and Barcelona may break during the course of the install, and if you receive timed-out errors, don’t worry; keep entering the cellsdk install command until the full installation succeeds.
To prevent the installed BLAS package from being overwritten by the YUM updater, enter the following:
exclude=blas
If you want to restart the YUM update daemon, enter this:
/etc/init.d/yum-updatesd start
Finally, it’s a good idea to run the following to see which packages have been installed and which haven’t.
./cellsdk verify
The next subsection shows how to access and install optional SDK packages.
cellsdk installs many tools and libraries for the SDK, but not all of them. Table 2.3 groups the SDK RPMs into components and lists each one. Every component is listed as Default (installed automatically) or Optional (installed separately).
Table 2.3. Cellsdk Components and RPMs
SDK Component | Install | RPMs | License |
|---|---|---|---|
Accelerated Library Framework (ALF) Development | Default |
| ILAR |
ALF Extras | Optional |
| ILAR |
Basic Linear Algebra Subprograms (BLAS) | Default |
| ILAR |
Cell Performance Counter | Optional |
| ILAR |
Crash SPU Commands | Optional |
| GPL |
Digital Communication and Synchronization (DaCS) | Default |
| ILAR |
DaCS Extras | Optional |
| ILAR |
Feedback-Directed Program Restructuring (FDPR) | Optional |
| ILAR |
GCC Toolchain | Default |
| GPL |
GCC Toolchain Extras | Optional |
| GPL |
Hybrid Performance Tools | Optional |
| ILAR |
Integrated Development Environment (IDE) | Optional |
| ILAR |
Kernel | Default |
| GPL |
Kernel (Extra) | Optional |
| GPL |
Fast Fourier Transform (FFT) Library | Optional |
| ILAR |
SPE Runtime Management Library (Libspe) | Default |
| LGPL |
Libspe Extras | Optional |
| LGPL |
Mathematical Acceleration Subsystem (MASS) | Default |
| ILAR |
NetPBM | Default |
| GPL |
Non-Uniform Memory Access (NUMA) | Default |
| LGPL |
OProfile | Default |
| GPL |
Performance Debugging Tool (PDT) | Optional |
| ILAR |
Random Number Library | Optional |
| ILAR |
Single-Instruction, Multiple Data (SIMD) Math | Default |
| ILAR |
SIMD Math Extras | Optional |
| ILAR |
Simulator | Default |
| ILAR |
SPU Isolation | Optional |
| ILAR |
SPU Timer | Optional |
| ILAR |
SPU Timing Tool | Optional |
| ILAR |
Sysroot Image | Default |
| GPL |
XL C/C++ | Optional |
| ILAR |
Note
This listing does not include RPMs that provide documentation and examples. Some of the optional packages may be available for Fedora but not RHEL.
The installed components will differ depending on whether you’re installing the SDK on a Cell system or not. For example, components ending in -cross-devel will be installed only if the system doesn’t have a Cell.
The Cell SDK installs a large number of libraries and tools by default, but there’s also a great deal left uninstalled. To install an optional package, make sure that the CellSDK-Extras-Fedora_version.iso file is in the /tmp/cellsdkiso directory. Then mount the Extras ISO with the following command:
./cellsdk --iso /tmp/cellsdkiso mount
This tells the YUM updater to search through /tmp/cellsdkiso when it looks for new packages. For example, to install the optional RPMs that provide Feedback-Directed Programming Restructuring (FDPR) and the Cell Performance Counter Tools, enter the following:
yum install fdprpro cellperfctr-tools
You can see that YUM automatically checks for dependencies and includes any dependency packages in the install.
This book doesn’t describe all the SDK’s capabilities, but the subsequent chapters delve into quite a few. As you link your code to SDK libraries, keep in mind the legal restrictions that apply. Software licensing is an important topic to understand, and is the subject of the next section.
The rightmost column in Table 2.3 identifies the software license for each SDK component. As a rule of thumb, the low-level compilation and analysis tools (gcc and oprofile) are released as open source, whereas the high-level software libraries (MASS, BLAS) and frameworks (ALF, DaCS) are released under IBM’s proprietary ILAR license. The three licenses are the GPL, LGPL, and ILAR, and although I have no legal background, I’ll do my best to summarize their restrictions. The documents in /opt/cell/sdk/license provide additional information.
The good news is that IBM’s SDK software is free of charge, powerful, and easy to use. The bad news is that the ILAR license is very restrictive; it requires that ILAR-licensed software be used only for evaluation. Using an ILAR-licensed library or tool in a production environment is forbidden, as is modifying, distributing, or transferring the code. Evaluation is allowed for 90 days, and after that period, the tool may contain a “disabling device” that prevents it from operating.
One question that has stirred a great deal of interest on the developerWorks forum involved whether an application dependent on an ILAR-licensed library could be sold commercially. IBM’s response was that the application couldn’t be sold with the library, but it would be acceptable to require customers to install the SDK. This way, the application will still be able to run. Therefore, if your application depends on an ILAR-licensed library, you may still sell it so long as the user has the SDK installed.
The executables in Sony’s Cell development toolchain (ppu-gcc, spu-gcc, ppu-ld, spu-ld, and so on) are released under the GNU General Public License, or GPL. This is the oldest and best known of the open source licenses, and is “free as in speech,” although not necessarily “free as in beer.” That is, GPL-licensed software can be released for free or sold for a profit, but any user must be able to run, modify, and redistribute the code.
There’s a catch. When you release an application containing any GPL code, you must make all the application’s source code available to users. This released code must also be subject to the GPL, so users can modify and redistribute it under the terms of the GPL. So if you intend to sell a GPL-licensed application, keep in mind that customers must be able to acquire and redistribute its source code.
If a code library is released under the GPL, any application that links against it must also be GPL licensed. The Lesser GNU General Public License (LGPL) removes this restriction, and allows applications linked against LGPL-licensed libraries to be sold under a proprietary, closed source license. However, “derivative works” of LGPL-licensed software must have their source code released as if they were licensed under the LGPL.
For example, if your application links against the LGPL-licensed SPE Runtime Management Library (the subject of Chapter 7, “The SPE Runtime Management Library (libspe)”), you can sell the application under whatever terms you choose. But if you create a product by slightly modifying this library, your product is a derivative work and its source code must be released according to the terms of the LGPL.
At this point, you’ve installed the SDK and you have a basic idea of what components are available. Let’s look at where these libraries and tools have been placed inside the Linux file system. The location of these files depends on whether you’ve installed the SDK on a system containing a Cell processor or a system containing an x86 processor.
If you’ve installed the SDK on a Cell-based system, then the primary tools are either in /usr/bin or /opt/cell/sdk. As a rule of thumb, the basic executables needed to build applications are placed in /usr/bin and everything else, such as SDK libraries, performance tools, and ILAR-licensed features, are placed in /opt/cell/sdk.
Sony has created a set of executables for compiling code based on the GNU Compiler Collection. The following chapter will go into much greater depth, but for now, you should know what they are and where they’re located. If you list the contents of the /usr/bin directory, you’ll see hundreds of executables, including the following:
ppu-gccCompiles C files (*.c) into assembly codeppu-g++Compiles C++ files (*.cpp) into assembly codeppu-asAssembles assembly files (*.s) into object codeppu-ldLinks object code to form an application
Each of these serves a crucial role in converting a C/C++ text file into a binary file to run on the PowerPC Processor Unit (PPU). Also in this directory, you’ll find the same executables starting with spu- rather than ppu-. These build code for applications running on the Synergistic Processor Unit (SPU).
The /usr/bin directory is automatically added to your PATH environment variable, so you don’t have to remember where all of these executables are located. To see all the directories identified in the PATH, enter the following:
echo $PATH
You can modify the PATH variable for a session with export or change it permanently by altering the .bash_profile file in your home directory.
One of the directories created by the install RPM is /opt/cell, and this directory holds the cellsdk installation script. In the subdirectory /opt/cell/sdk, you’ll find the bulk of the SDK’s nonessential libraries and tools. A sizable portion of this book is dedicated to explaining the interfaces and inner workings behind these capabilities, particularly for math and graphics. Let’s start with a bird’s-eye view.
There are five directories inside /opt/cell/sdk:
buildutils contains the primary makefiles needed to compile example code.
docs contains documentation related to the example code and libraries.
prototype contains example code still in the prototype stage.
src contains source code for the examples.
usr contains executables and libraries created from the code in the src and prototype.
A large part of the discussion in this book focuses on the last three subdirectories, and I recommend that you take a casual look at the files they contain. The code in the prototype directory changes from SDK version to SDK version, and represents capabilities that are still under development. As I write this, only code for the Accelerated Library Framework (ALF) is placed in this directory by default, but the optional packages for SPU isolation and the Digital Communication and Synchronization (DaCS) framework will be placed here if installed.
The src folder contains the source code for the SDK’s examples, and the next chapter explains how to decompress and compile the code in this directory. After the example applications are built, they are placed in the usr directory, specifically opt/cell/sdk/usr/bin/examples. The usr directory also contains header files, code libraries, and helpful executables.
As mentioned earlier, the SDK for x86 systems is quite different from the SDK for Cell-based systems. The reason is simple: The x86 can’t run Cell executables, so all the installed libraries and tools are geared toward cross-development. For example, the SDK for the Cell contains the libspe2-devel package for creating applications with the SPE Runtime Management Library. But the SDK for an x86 system contains libspe2-cross-devel, which makes it possible to compile applications on an x86 that can later run on a Cell. The SDK for the x86 contains essentially the same tools as the SDK for Cell systems, but they’re located in different locations.
One of the most important differences between the SDK on the x86 versus a Cell system is the location of the build tools. If you’re looking for GCC tools (ppu-gcc, spu-gcc, ppu-g++, spu-g++, and so on) in /usr/bin, you won’t find them. They’re in /opt/cell/toolchain/bin. This directory is not added to the PATH environment variable by default, so it’s a good idea to modify the variable in .bash_profile.
In addition, many libraries that would normally be found in /usr/lib are placed in /opt/cell/toolchain/lib. For example, all the libraries that would normally be located in /usr/lib/gcc can be found in /opt/cell/toolchain/lib/gcc.
The Cell simulator (SystemSim) is one of the most important aspects of the SDK on the x86. Chapter 4 discusses this in depth, but for now, you should know that the files related to the simulator are placed in /opt/ibm/systemsim-cell. The script that launches the simulator (systemsim) is in /opt/ibm/systemsim-cell/bin, and the script containing the default startup commands (systemsim.tcl) is in /opt/ibm/systemsim-cell/lib/cell.
If you prefer command lines to graphical interfaces, you might be better off writing, compiling, and running code directly on the local Cell system, such as the PlayStation 3. This way, you don’t have to transfer files or send commands across a network. You don’t even have to worry about maintaining a separate computer. This is the simplest method of Cell development.
But if you’re connecting to the system across a network, you’ll write code on a host computer. For this arrangement to work, you need to be able to do two things: send commands to the Cell system and transfer files to the Cell system. The Cell’s operating system is Linux, so the usual way to communicate involves ssh (Secure Shell) to send commands and scp (Secure Copy) to send files. If your host computer runs Linux or OS X, you can use these tools directly from the command line.
ssh and scp aren’t immediately available on Windows systems, but Windows users have at least two options. Cygwin (www.cygwin.com) provides a UNIX-like environment that makes it possible to run ssh and scp from the Cygwin command line. Alternatively, there are two freely available tools that can communicate with the remote Cell system: PuTTY for sending commands and WinSCP for sending files. I recommend PuTTY and WinSCP for Windows users, and the next subsection explains how to install and use these tools.
The PuTTY executable is an SSH/Telnet client that allows you to log in to the Cell operating system from Windows. Currently, it can be downloaded without charge from www.chiark.greenend.org.uk/~sgtatham/putty/. Once the executable is downloaded, double-click it. The window that appears should look similar to Figure 2.2.
The only information PuTTY needs is the host name or IP address assigned to the Cell system. You can find this by accessing your router (go to http://192.168.0.1 in your browser) or by running ifconfig on the Cell command line (find the inet addr field). In the preceding example, the IP address of the Cell system is 192.168.0.102. This must be entered in the Host Name (or IP address) box.
Click Open. If PuTTY is configured correctly and Linux is running on the remote system, a window will appear asking for a username and password. Log in and you’ll see a Linux shell prompt. This means you’ve established remote access to the Cell system.
There are many different ways to send files across a network, and most file transfer tools will suffice. The open source WinSCP tool from http://winscp.net/ is particularly helpful, and it’s as simple to use as PuTTY: Just download, configure, and start running. Figure 2.3 shows what the WinSCP configuration window looks like.
Enter the same host name or IP address as you did for the PuTTY configuration, and enter the username/password that you want to log in with. You can save this profile with the Save button, and when you click Login, WinSCP will attempt to connect to the Cell system. If it succeeds, you’ll see a window similar to that shown in Figure 2.4.
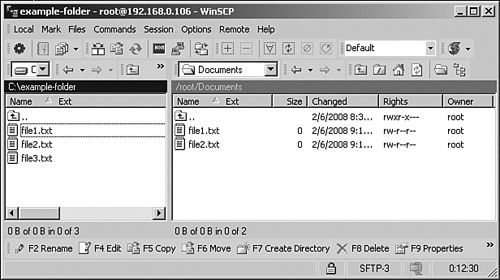
You can switch directories on either the host or target system by right-clicking the pathname above the file listing and selecting Open Directory/Bookmark and Browse. In Figure 2.4, if you right-click the C:example-folder box and select Open Directory/Bookmark and Browse, a dialog will allow you to change the Windows directory. On the other side, if you right-click the box containing /root/Documents and select Open Directory/Bookmark and Browse, the dialog will allow you to change the directory on the Cell system.
To transfer files, click a file or folder on one side and drag it across to the other. As the transfer finishes, you can watch its progress toward the bottom of the window.
Installing Linux on a Cell system takes time and effort, but when you’ve finished, installing the Cell SDK isn’t difficult at all. If you get tripped up, you can always reboot the system and start again.
The cellsdk script in /opt/cell is central to this discussion. It manages the SDK’s packages, and can install, update, and remove them. By using ./cellsdk verify, you can see which components are installed and which are located but uninstalled. To tell cellsdk to look in a new location, use ./cellsdk mount.
After you’ve installed the Cell SDK, I strongly recommend that you explore its libraries and tools. If you installed the SDK on a system running on a Cell, you can find the primary SDK files in /usr/bin, /usr/lib, and /opt/cell/sdk. If you installed the SDK on an x86-based system, the SDK tools will be located in /opt/cell/toolchain, and the files related to the simulator will be placed in /opt/ibm/systemsim-cell.
The ssh and scp tools make it possible to access a Cell system from a host computer. If you’re running Linux or OS X, there’s nothing to worry about: Just run ssh and scp inside a terminal with the right IP address. If you’re running Windows on the host computer, I recommend the PuTTY and WinSCP utilities, which make it simple to transfer commands and files to the Cell target.