
Whilst it's good to be able to listen in on the action using our computer, we're dependent on having a network connection with the listening Pi, either through Ethernet or over Wi-Fi. This means it's not very portable or discreet, so wouldn't it be great if we could eavesdrop wirelessly from the next room or outside with just a Bluetooth headset or small speaker? Just like a bugging device.
Bluetooth is a short-range radio technology that allows wireless communication between devices such as mobile phones, computers and headset or speakers. As such, the Bluetooth system features an audio protocol as standard, which we make use of (called Advanced Audio Distribution Profile or A2DP for short). Standard Bluetooth gives us a range of up to about 10-20 meters between devices - enough to listen in from the next room or outside.
As an added bonus to make our system even simpler, the new Raspberry Pi version 3 boards include a Bluetooth radio on board, which means our listening box can be more compact and discreet than before. Of course, you can achieve the same results with other Pi boards by adding a compatible USB Bluetooth dongle, and the steps in this topic should work for that configuration also.
We're now going to set up our Raspberry Pi as a listening device and relay the audio from the microphone to a Bluetooth headset or speaker.
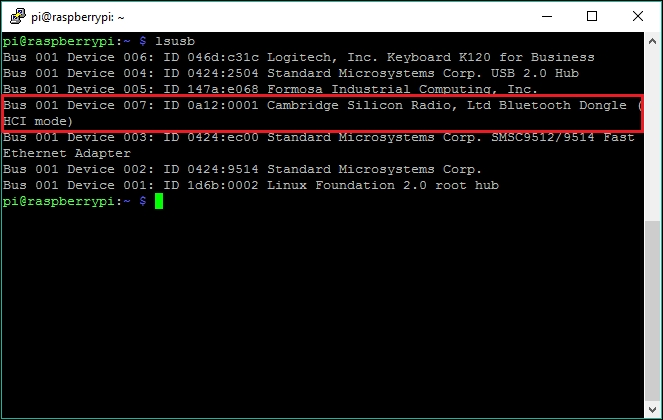
If you don't have a Pi 3, then shut down your Pi and plug in a Bluetooth dongle. Power your Pi back up and when it's booted up and you're logged back in, we check that it can be seen by typing this:
pi@raspberrypi ~ $ lsusb
You should then see your device listed similar to this:
Now that we have our Bluetooth radio connected, we need to install the Raspberry Pi Bluetooth support package (including Bluez 5). On the Pi 3 running Raspbian Jessie, you should already have it installed; otherwise type the following command:
pi@raspberrypi ~ $ sudo apt-get install pi-bluetooth
Raspbian Jessie is using Bluez 5, which has dropped support for ALSA (previously provided by the bluez-alsa package) so the alternative is to use PulseAudio, which we'll deal with a bit later.
With Bluez installed, let's check whether our Bluetooth hardware is working by typing:
pi@raspberrypi ~ $ hciconfig -a
You should now see the connected Bluetooth device(s) listed as follows:
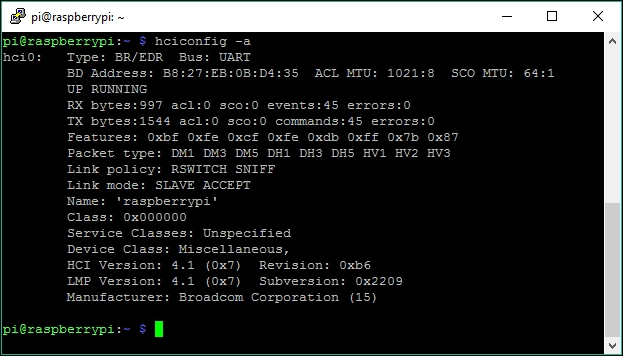
On the Raspberry Pi 3, the Bus setting will show as UART rather than USB, which it does when using a dongle.
Next we need to allow our pi account to access and make changes to Bluetooth configuration stuff:
pi@raspberrypi ~ $ sudo usermod -a -G lp pi
PulseAudio is a sound proxy that takes audio from different inputs (sources) and routes them through to a single output (or sink). Think of it as a bit like the Volume Mixer on Windows, which sits between your applications and your sound hardware. We will use it to take our mic input from our sound card and route the audio to the Bluetooth adapter on our Raspberry Pi, which will send the audio to our headset or speaker using Bluetooth A2DP.
So let's install PulseAudio:
pi@raspberrypi ~ $ sudo apt-get install pulseaudio pulseaudio-module-bluetooth
Now would be a good time to reboot our Pi:
pi@raspberrypi ~ $ sudo reboot
In order to make a Bluetooth connection between your Pi and headset, you'll need to know its unique identifier or MAC address. To do this, put your headset or speaker into discoverable mode and then run the following command on your Pi:
pi@raspberrypi ~ $ hcitool scan
After a few seconds, you should see all discoverable devices, and in particular your audio device. In the following screenshot, you can see that my Pi has found my Plantronics 590 Bluetooth headset and provided me with its MAC address:
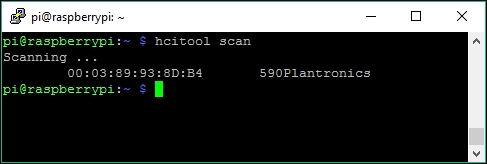
Take a note of the MAC address so that we can pair it with your Pi using the following steps:
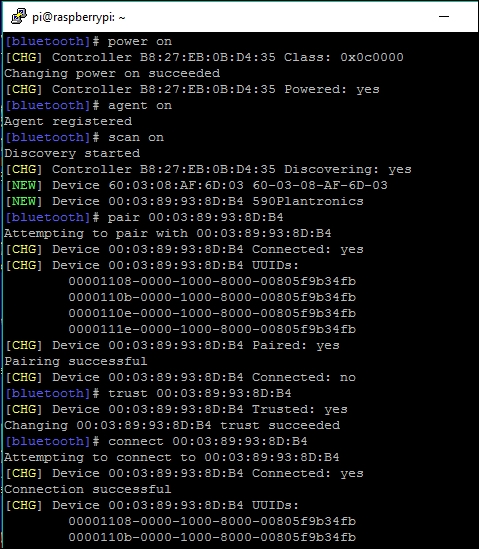
- Enter the Bluetooth Control console using this:
pi@raspberrypi ~ $ bluetoothctl - Power up the Bluetooth radio by typing
power on:[bluetooth]# power on - Ensure the agent is switched on by typing
agent on:[bluetooth]# agent on - Ensure your headset is switched on and in discoverable mode.
- Scan for the device using
scan on:[Bluetooth]# scan on - Pair the Bluetooth headset using its MAC address, using
pairfollowed by your device's address:[Bluetooth]# pair XX:XX:XX:XX:XX:XX
- Add the Bluetooth headset to the list of trusted devices using
trustfollowed by your device's address:[Bluetooth]# trust XX:XX:XX:XX:XX:XX - Now we can connect to the Bluetooth audio device using
connectfollowed by your device's address:[Bluetooth]# connect XX:XX:XX:XX:XX:XX
Here's what the console should look like after entering these commands:
Now, that process can get a bit tedious if you want to do it often, so let's write a script that automates those steps for us (you can use Nano and save it in your home directory).
The script works by piping individual commands into the Bluetooth Control Console, assuming that we know the MAC address of the Bluetooth device and that it's on and ready to be connected to:
#!/bin/sh
DEV_MAC="00:03:89:93:8D:B4" #mac addr of headset
echo "power on" | bluetoothctl -a
echo "agent on" | bluetoothctl -a
echo "connect $DEV_MAC" | bluetoothctl -a
echo "exit" | bluetoothctl -a
bt-audio.sh
Before running the script, we need to make it executable using the following command:
pi@raspberrypi ~ $ chmod +x ./bt-audio.sh
Now run the script by typing this:
pi@raspberrypi ~ $ sudo ./bt-audio.sh
Once it's been run, you can check whether you are connected to your Bluetooth device with the following command:
pi@raspberrypi ~ $ hcitool con
Your device should be listed under Connections:
Connections:
< ACL 00:03:89:93:8D:B4 handle 12 state 1 lm SLAVE AUTH ENCRYPT
As it stands, our Raspberry Pi core is the default output device (sink), so we need to tell PulseAudio to direct audio to our Bluetooth headset or speaker. In order to do this, we need to find the device name according to PulseAudio.
First, we need to start the PulseAudio daemon so we can use it:
pi@raspberrypi ~ $ pulseaudio --start
Enter the following PulseAudio command:
You will then be presented with a long list of data about the devices PulseAudio knows about. In fact, since we only want to know the name at this time, we can limit what it returns by piping into grep, which will make our output a tad more palatable:
pi@raspberrypi ~ $ pacmd list-sinks short | grep -e 'name:'
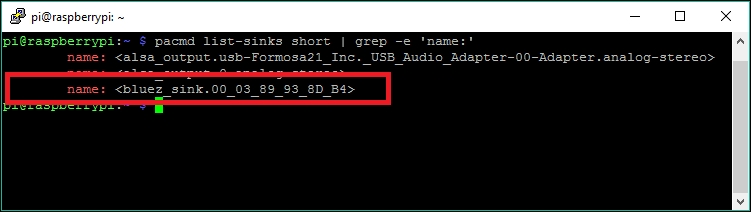
You'll be looking for something like the name I've highlighted in the previous screenshot, in my case bluez_sink.00_03_89_93_8D_84.
So to set the default PulseAudio output device, we use the following command (you could include this in your previous automation script):
pi@raspberrypi ~ $ pactl set-default-sink bluez_sink.00_03_89_93_8D_B4
If you now play the recorded file we made earlier, you should hear it through the Bluetooth headset or speaker:
pi@raspberrypi ~ $ sox myrec.wav -d
To restore the default back to the Raspberry Pi jack output, use this command:
$ pactl set-default-sink alsa_output.0.analog-stereo
And now, to get your listening device working with your microphone, we can just start up the sox monitoring loop we used earlier:
pi@raspberrypi ~ $ sox -t alsa plughw:1 -d
If you get into a bit of mess with all these audio configurations, you can reset the ALSA configurations using this command:
sudo /etc/init.d/alsa-utils reset
Happy listening!