
Let's say you're out in the field with a couple of fellow agents and you want to quickly put up a network for your computers, maybe even share an Internet connection together; your Pi equipped with a Wi-Fi dongle (or with just a Pi 3 with the built-in Wi-Fi) can easily be made into a makeshift access point.
Before setting up your wireless hotspot, ensure you have set up a static IP on your Pi, as per the previous section, then follow these steps to set up your hotspot:
- First install the required software with the following command:
pi@raspberrypi ~ $ sudo apt-get install hostapd bridge- utils - Next we need to prevent Raspbian from interfering with the Wi-Fi interface. Open up
/etc/network/interfacesfor editing:pi@raspberrypi ~ $ sudo nano /etc/network/interfaces - Find the block that starts with allow-hotplug wlan0 and put a
#character in front of each line, like we've done here:#allow-hotplug wlan0 #iface wlan0 inet manual #wpa-conf /etc/wpa_supplicant/wpa_supplicant.conf #iface default inet dhcp - Optionally, if you would like to share a wired Internet connection with the wireless clients, add the following three lines to create a bridge between the Ethernet and Wi-Fi interfaces:
auto br0 iface br0 inet dhcp bridge_ports eth0 wlan0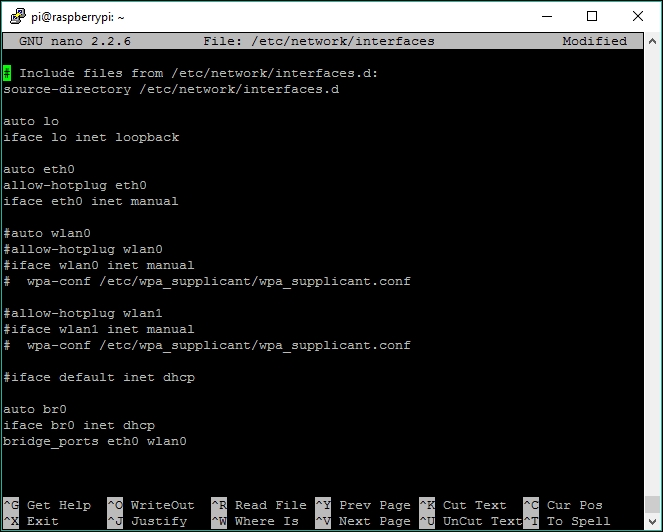 Adding a bridged Wi-Fi interface on the Raspberry Pi
 - Save and exit
nano, then reboot your Pi. - Next we need to create a configuration file for
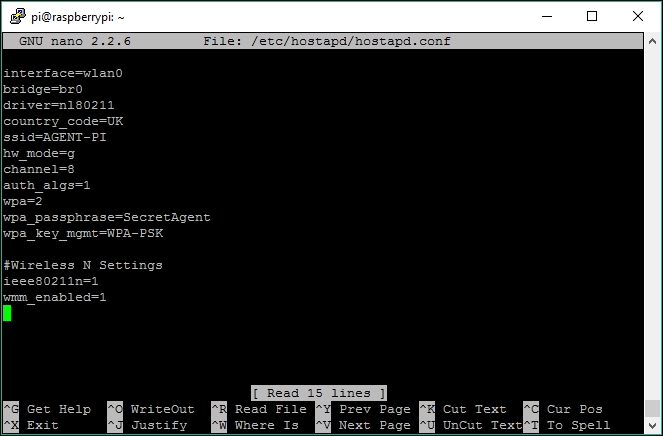
hostapd. Innano, open/create the configuration file:pi@raspberrypi ~ $ sudo nano /etc/hostapd/hostapd.conf - Add the following configuration options:
interface=wlan0 bridge=br0 driver=nl80211 country_code=UK ssid=AGENT-PI hw_mode=g channel=6 auth_algs=1 wpa=2 wpa_passphrase=SecretAgent wpa_key_mgmt=WPA-PSK #Wireless N Settings ieee80211n=1 wmm_enabled=1 - Let's take a look at some of the options:
interface=wlan0: This is the wireless interface you are using for the access point.bridge=br0: Allowshostapdto share the wired Internet connection by creating a bridge between the Ethernet and Wi-Fi interfaces. You can comment this out if you didn't create the bridge earlier.ssid: Change this line to choose a name for your access point.auth_algs=1: Supports WPA2 encryption that we're going to enable on our network.wpa=2: Enable WPA2 encryption.wpa_passphrase: The password (8 characters minimum) required to join your Wi-Fi network:
- Now we can try out our new access point, first running it in the foreground:
pi@raspberrypi ~ $ sudo hostapd -d /etc/hostapd/hostapd.conf - You should now be able to find and connect to your Pi access point from other computers. Type Ctrl + C to quit
hostapd.Note
Attention Edimax EW-7811Un Wi-Fi dongle users
This popular tiny USB dongle, and possibly others like it based on the Realtek RTL8188CUS chipset, needs a special version of hostapd to work. Simply download and replace your installed hostapd binary using the following command:
pi@raspberrypi ~ $ sudo wget http://files.raspiplace.com/hostapd-rt -O /usr/sbin/hostapd - To make your Pi run
hostapdautomatically in the background on boot, we need to make a slight adjustment to a configuration file:pi@raspberrypi ~ $ sudo nano /etc/default/hostapd - Uncomment the line beginning with
DAEMON_CONF=""and change it to point to yourhostapdconfiguration file:DAEMON_CONF="/etc/hostapd/hostapd.conf"
Then save and exit
nano. Your Pi will now become an access point on boot.