
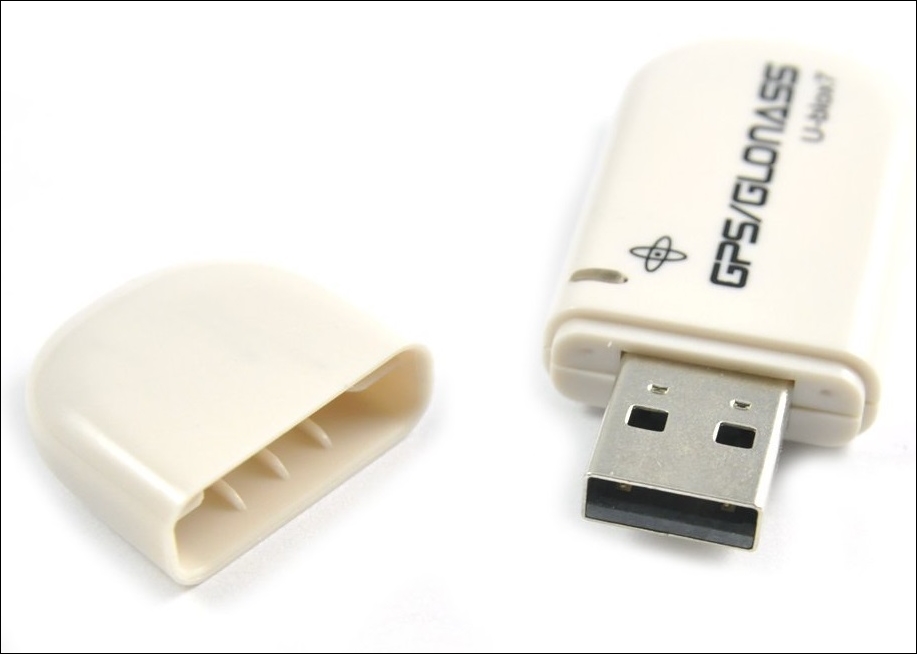
Go right ahead and connect your GPS gadget to the USB port of your Raspberry Pi. I'm using a U-blox7 device, which supports both the well-known American-owned GPS system, as well as the lesser known Russian-own, GLOSNASS system, which it will use in conjunction with GPS to improve accuracy.
Note
Many GPS modules designed for boards such as the Raspberry Pi or Arduino often come with a serial interface, which connects to the UART pins on the Raspberry Pi's GPIO connector, and work in the same way as USB dongles.
However, the Raspberry Pi Model 3 has changed the way these UART pins work, as the UART is now linked to the onboard Bluetooth system, and so devices designed to connect to those pins won't work anymore without a lot of work re-configuring the Pi's firmware. Therefore, stick to using the USB-based versions to save yourself a whole load of hassle.
To see if your device is seen by the Raspberry Pi, after it's been plugged in, type the following command to list the USB devices the operating system can see:
pi@raspberrypi ~ $ lsusb

Most GPS units appear to Linux as serial ports with device names starting with tty then are commonly followed by ACM0 or USB0. Type in the following command and focus on the last line:
pi@raspberrypi ~ $ dmesg -T | grep tty
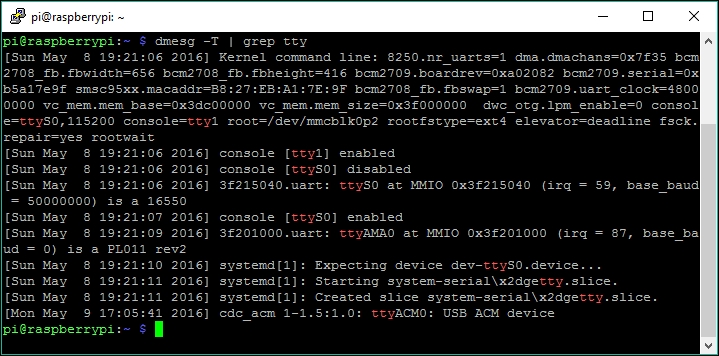
The first couple of lines talk about the serial port built into the Pi (ttyS0 on the Pi 3 or ttyAMA0 in earlier models). On the last line, however, a USB device is identified, which is most likely our GPS unit and will be accessible as /dev/ttyACM0. We can confirm that it's a GPS by trying to read from it using the following command, where [XXXX] should be replaced by the name of your device:
pi@raspberrypi ~ $ cat /dev/tty[XXXX]
A GPS conforming to the NMEA standard will start flooding your screen with sentences beginning with a code such as $GPGGA followed by comma-separated data (see http://aprs.gids.nl/nmea/ if you're curious about those messages). Even if your GPS outputs binary garbage, it'll probably work fine, so keep reading. Press Ctrl + C to stop the feed.
Once you've found the right device, it's important that you adjust the baud rate of your GPS port to the rate recommended in the manual for your GPS device. Use the following command to verify the current baud rate:
pi@raspberrypi ~ $ stty -F /dev/tty[XXXX] speed
If it differs from the recommended rate, use the following command to change it:
pi@raspberrypi ~ $ stty -F /dev/tty[XXXX] speed
    [recommended
speed]
Now we're all set to install some software to help us make sense of those cryptic NMEA strings:
pi@raspberrypi ~ $ sudo apt-get install gpsd
    gpsd-clients
The gpsd package provides an interface daemon for GPS receivers, so that regular applications that want to work with GPS data don't have to know the details of how to talk to your particular brand of GPS. So, gpsd will be running in the background and relaying messages between your GPS and other applications through the 2947 TCP port.
Let's start gpsd using the following command:
pi@raspberrypi ~ $ sudo gpsd -n /dev/tty[XXXX]
Now we can try reading data from gpsd by using the basic GPS console client cgps:
pi@raspberrypi ~ $ cgps -s
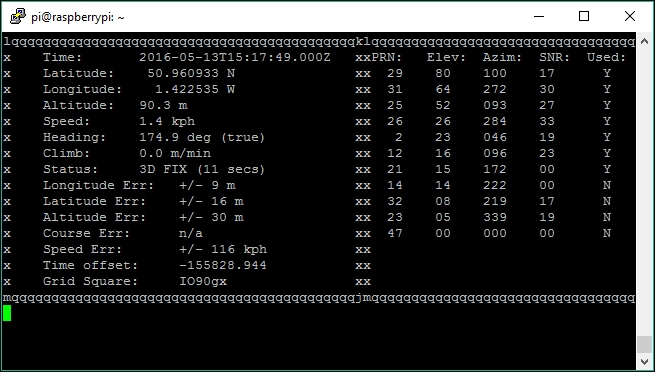
You'll want to position your GPS receiver so that it has a clear view of the sky. If your Status continues to display NO FIX, try placing your GPS receiver on a windowsill.
The left-hand side frame contains the information that has been obtained from the list of satellites in the right-hand side frame. To quickly verify the coordinates on a map, simply paste the Latitude and Longitude strings into the search field at http://maps.google.com.
Press the S key to toggle the raw NMEA sentences that we've hidden by supplying the -s argument to cgps, or press the Q key to quit.
So what can we do with this GPS data? We can either log the Pi's position at regular intervals to a waypoint database that can then be plotted onto a map, or we can update the position in real time on a remotely connected Google Earth session for that classic spy movie beaconing look.
To get the GPS data into a remote Google Earth session for live tracking, we must first massage the data into the Keyhole Markup Language (KML) format that Google Earth expects and then serve the data over an HTTP link so that Google Earth can request new GPS data at regular intervals.
First, we need to download a Python script called gegpsd.py, written by Stephen Youndt, with the following command:
pi@raspberrypi ~ $ wget http://files.raspiplace.com/agentpi/gegpsd.py
You can find out more information about this script on the Wiki at http://tjworld.net/wiki/Linux/Ubuntu/GoogleEarthPlusRealTimeGPS.
This script will continuously fetch data from gpsd, and write it in the KML format, to /tmp/nmea.kml. We'll also need an HTTP server to serve this file to Google Earth. Python comes with a simple HTTP server that we can use for this purpose. Start the Python script and HTTP server using the following command:
pi@raspberrypi ~ $ python ~/gegpsd.py & cd /tmp &&
    python -m SimpleHTTPServer
The KML data should now be generated and available from http://[IP address]:8000/nmea.kml, where [IP address] is the address of your Raspberry Pi.
Let's move on to Google Earth.
The setup procedure for Google Earth is very similar across all platforms:
- Visit http://www.google.com/earth/download/ge/agree.html to download Google Earth for your platform.
- Install and start Google Earth.
- From the Add drop-down menu, select Network Link.
- Put a name for your GPS link in the Name field and add the
http://[IP address]:8000/nmea.kmlKML data link to the Link field. - Go to the Refresh tab and change the Time-Based Refresh to Periodically in the drop-down menu.
- (Optional) Tick the Fly to View on Refresh checkbox to have the view automatically centered on your GPS as it moves.
- Now click on the OK button and you should see your GPS link as an entry under My Places in the sidebar on the left-hand side. Double-click on it to zoom in on your GPS location.
When you can't travel with your Pi, and you can't be within the Wi-Fi range to monitor its position in real time, you can still see where it has been by recording and analyzing GPX files—a standard file format for recording GPS waypoints, tracks, and routes. Use the following command to start logging:
pi@raspberrypi ~ $ gpxlogger -d -f /tmp/gpslog.gpx
The -d argument tells gpxlogger to run in the background and the -f argument specifies the log file. Before you open up the log file in Google Earth, it's important that the gpxlogger process has quit properly, otherwise you might end up with a broken log (usually, this can be fixed by adding a closing </gpx> tag to the end of the file). Kill the process using the following command:
pi@raspberrypi ~ $ killall gpxlogger
Next, start the simple Python HTTP server:
pi@raspberrypi ~ $ cd /tmp && python -m SimpleHTTPServer
Then download the log file to your computer through the following address:
http://[IP address]:8000/gpslog.gpx
Now in Google Earth, under the File drop-down menu, select Open... and point to your log file. Click on OK in the GPS Data Import dialog that follows, and you should see a post for your GPS device under Temporary Places in the sidebar to the left, and time controls that can be used to play back the travel route.
If you run Kismet, which was discussed in the Monitoring Wi-Fi airspace with Kismet section of
Chapter 4, Wi-Fi Pranks - Exploring Your Network, with GPS support, it will record geographic information about the access points to ~/kismetlogs/Kismet-[date].netxml. To massage this data into the KML format that Google Earth expects, we need to install an additional utility called GISKismet.
- It's written in Perl and requires a couple of modules to be installed first:
pi@raspberrypi ~ $ sudo apt-get install libxml-libxml-perl libdbi-perl libdbd-sqlite3-perl - Now we need to download and install the GISKismet utility itself, with the following command sequence:
pi@raspberrypi ~ $ wget
    http://files.raspiplace.com/agentpi/giskismet-
    svn30.tar.bz2
pi@raspberrypi ~ $ tar xvf giskismet-svn30.tar.bz2
pi@raspberrypi ~ $ cd giskismet
pi@raspberrypi ~/giskismet $ perl Makefile.PL
pi@raspberrypi ~/giskismet $ make
pi@raspberrypi ~/giskismet $ sudo make install
- Once installed, you may exit the source directory and delete it:
pi@raspberrypi ~/giskismet $ cd .. && rm -r giskismet - Getting a KML file out of GISKismet is a two-step process; first we import the Kismet network data into a SQLite database, and then we select the information that we want to export to KML with a SQL query. This line will perform both steps with one command, but adjust
[date]to the correct filename:pi@raspberrypi ~ $ giskismet -x kismetlogs/Kismet- [date].netxml -q "select * from wireless" -o /tmp/mywifi.kmlThe
-xargument tells GISKismet to import the data from the specifiednetxmlfile to an SQLite database in the current directory calledwireless.dblby default. The-qargument specifies the SQL query that will be used to obtain data from the database, which will be written in KML format to the file we specify after the-oargument.You can restrict which access points go into the database using Input Filters (type
giskismetwithout arguments to see them), or filter the KML output through the SQL query, for example,select * from wireless where Channel=1would put only access points on channel one in the KML file. - Next, start the simple Python HTTP server:
pi@raspberrypi ~ $ cd /tmp && python -m SimpleHTTPServer - Now in Google Earth, add a new Network Link as in the previous section but adjust the address to
http://[IP address]:8000/mywifi.kml. You should now see a list of all the access points in the sidebar to the left.
As we've mentioned in previous chapters, the Raspberry Pi lacks a Real-Time Clock, and depends on other computers to relay the correct time through the network. While the Pi may not have network connectivity out in the field, a GPS can actually be used as an alternative time source. All we need to do is to tell ntpd, the Network Time Protocol daemon, to use the time information supplied by gpsd as a potential time source:
- Type in the following command to open up the
ntpdconfiguration file for editing:pi@raspberrypi ~ $ sudo nano /etc/ntp.conf - Find the predefined block of
serverdirectives ending withserver 3.debian.pool.ntp.org iburstand add the following statements beneath:# GPS server 127.127.28.0 fudge 127.127.28.0 time1 0.420 refid GPS server 127.127.28.1 prefer fudge 127.127.28.1 refid PPS - Now restart
ntpdusing the following command:pi@raspberrypi ~ $ sudo service ntp restart - We can verify that the GPS is being used as a time source with the following command:
pi@raspberrypi ~ $ ntpq -pYou'll have two lines mentioning GPS and PPS in the refid column. The second line will show activity only if your GPS receiver supports the more accurate PPS pulse method.
Note
If your
datecommand reports a year of 1969 or 1970 (an unset clock),ntpdwill refuse to set the correct time. This can happen when an unset clock date has been saved to/etc/fake-hwclock.data. You need to set a date manually using the following command, and then reboot your Pi:pi@raspberrypi ~ $ sudo date --set='Mon Jan 1 12:00:00 GMT 2016
Out in the field, we obviously won't be there to start gpsd manually, so we need a way to make it run at boot time. The gpsd package does come with a few scripts for this purpose, but they're not the most reliable and will only auto-detect a handful of GPS models.
Instead, we'll add our own GPS setup routine to the /etc/rc.local script that we've used throughout this book:
- Open it up for editing using the following command:
pi@raspberrypi ~ $ sudo nano /etc/rc.local - Anywhere before the last exit 0 line, add the following script snippet, adjust the
GPSDEVandGPSBAUDvariables to match your GPS, and enable the optionalGPSBEACONandGPSLOGGER,as follows:# GPS startup routine GPSDEV="/dev/ttyACM0" GPSBAUD="38400" GPSBEACON="y" GPSLOGGER="y" if [ -c "$GPSDEV" ]; then stty -F $GPSDEV speed $GPSBAUD gpsd -n $GPSDEV if [ "$GPSBEACON" = "y" ]; then sleep 5 sudo -u pi python /home/pi/gegpsd.py & cd /tmp && sudo -u pi python -m SimpleHTTPServer & fi if [ "$GPSLOGGER" = "y" ]; then sudo -u pi gpxlogger -d -f /tmp/gpslog.gpx fi fi - Now reboot the Pi with the GPS attached and verify with
cgps -sthatgpsdwas started.