
When you're out in the field and need to call in a favor from a fellow agent or report back to HQ, you don't want to depend on the public phone network if you can avoid it. Landlines and cell phones alike can be tapped by all sorts of shady characters and to add insult to injury, you have to pay good money for this service. We can do better.
Welcome to the wonderful world of Voice-over IP (VoIP). VoIP is a blanket term for any technology capable of delivering speech between two end users over IP networks. There are plenty of services and protocols out there that try to meet this demand, most of which force you to connect through a central server that you don't own or control.
We're going to turn the Pi into the central server of our very own phone network.
To aid us with this task, we'll deploy GNU SIP Witch-a peer-to-peer VoIP server that uses Session Initiation Protocol (SIP) to route calls between phones.
While there are many excellent VoIP servers available (Asterisk, FreeSwitch, Yate, and so on), SIP Witch has the advantage of being very lightweight on the Pi because its only concern is connecting phones and not much else.
Once we have the SIP server up and running, we'll be adding one or more software phones or softphones. It's assumed that server and phones will all be on the same network, so if you're away from home with your Pi, you might want to have a look at the Turning the Pi into a Wi-Fi hotspot section in Chapter 5, Taking Your Pi Off-Road first. Let's get started!
- Install SIP Witch using the following command:
pi@raspberrypi ~ $ sudo apt-get install sipwitch - Once installed, we have to define
PLUGINSin/etc/default/sipwitchbefore running SIP Witch. Let's open it up for editing:pi@raspberrypi ~ $ sudo nano /etc/default/sipwitchFind the line that reads
#PLUGINS="zeroconf scripting subscriber forward"and remove the#character to uncomment the line. This directive tells SIP Witch that we want the standard plugins to be loaded. - Next we'll have a look at the main SIP Witch configuration file:
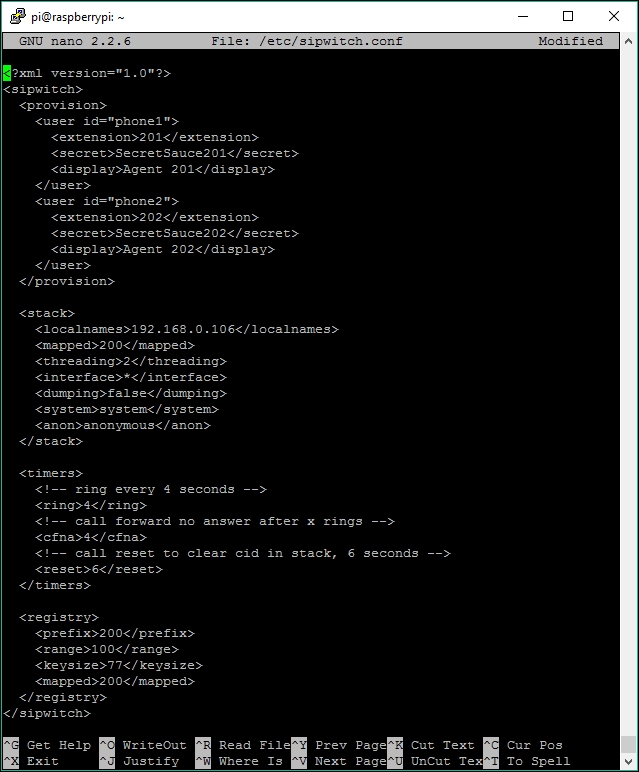
pi@raspberrypi ~ $ sudo nano /etc/sipwitch.confNote how some blocks of text are between
<!--and-->tags. These are comments in XML documents and are ignored by SIP Witch. Whatever changes you want to make, ensure they go outside of those tags. - Now we're going to add a few softphone user accounts. It's up to you how many phones you'd like on your system, but each account needs a username, an extension (short phone number) and a password. Find the
<provision>tag, make a new line and add your users:<user id="phone1"> <extension>201</extension> <secret>SecretSauce201</secret> <display>Agent 201</display> </user> <user id="phone2"> <extension>202</extension> <secret>SecretSauce202</secret> <display>Agent 202</display> </user>The user ID will be used as a user/login name later from the softphones. In this default configuration, the extensions can be any number between 201 and 299. The secret is the password that will go together with the username on the softphones. We will look into a better way of storing passwords later in this chapter. Finally, the display string defines an identity to present to other phones when calling.
- One more thing that we need to configure is how SIP Witch should treat local names. This makes it possible to call a phone by user ID, in addition to the extension. Find the
<stack>tag, make a new line and add the following directive, but replace[IP address]with the IP address of your Pi:<localnames>[IP address]</localnames>Those are all the changes we need to make to the configuration at the moment.
 Basic SIP Witch configuration for two phones
 - With our configuration in place, let's start up the SIP Witch service:
pi@raspberrypi ~ $ sudo service sipwitch startNote
On Raspbian Jessie, I found that sipwitch wouldn't start properly unless I rebooted the Pi after it was installed. Also it seemed that it started up automatically on boot-up. If you want to stop it from automatically starting up, use the command:
$ sudo systemctl disable sipwitchYou can then manually start it when you need to with:
$ sudo systemctl start sipwitchThe SIP Witch server runs in the background and only outputs to a log file viewable with this command:
pi@raspberrypi ~ $ sudo cat /var/log/sipwitch.log - Now we can use the
sipwitchcommand to interact with the running service. Typesipwitchfor a list of all possible commands. Here's a short list of particularly handy ones:Command
Description
sudo sipwitch dumpShows how the SIP Witch server is currently configured.
sudo sipwitch registryLists all currently registered softphones.
sudo sipwitch callsLists active calls.
sudo sipwitch message [extension] "[text]"Sends a text message from the server to an extension. Perfect for sending status updates from the Pi through scripting.
Running your own telecommunications service is kind of boring without actual phones to make use of it. Fortunately, there are softphone applications available for most common electronic devices out there.
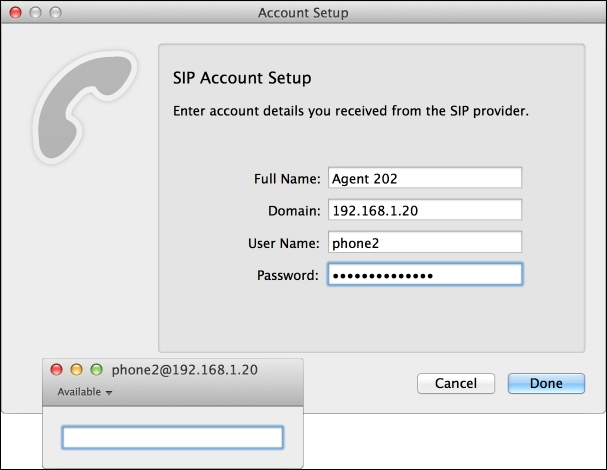
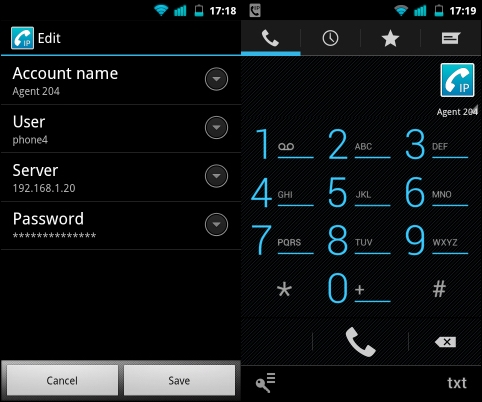
The configuration of these phones will be pretty much identical no matter which platform they're running on. This is the basic information that will always need to be specified when configuring your softphone application:
- User/Login name:
phone1orphone2in our example configuration - Password/Authentication: The user's secret in our configuration
- Server/Host name/Domain: The IP address of your Pi
Once a softphone is successfully registered with the SIP Witch server, you should be able to see that phone listed using the sudo sipwitch registry command.
What follows is a list of verified decent softphones that will get the job done.
MicroSIP is an open source softphone that also supports video calls. Visit http://www.microsip.org/downloads to obtain and install the latest version (MicroSIP-3.12.1.exe at the time of writing, which supports Windows 10):
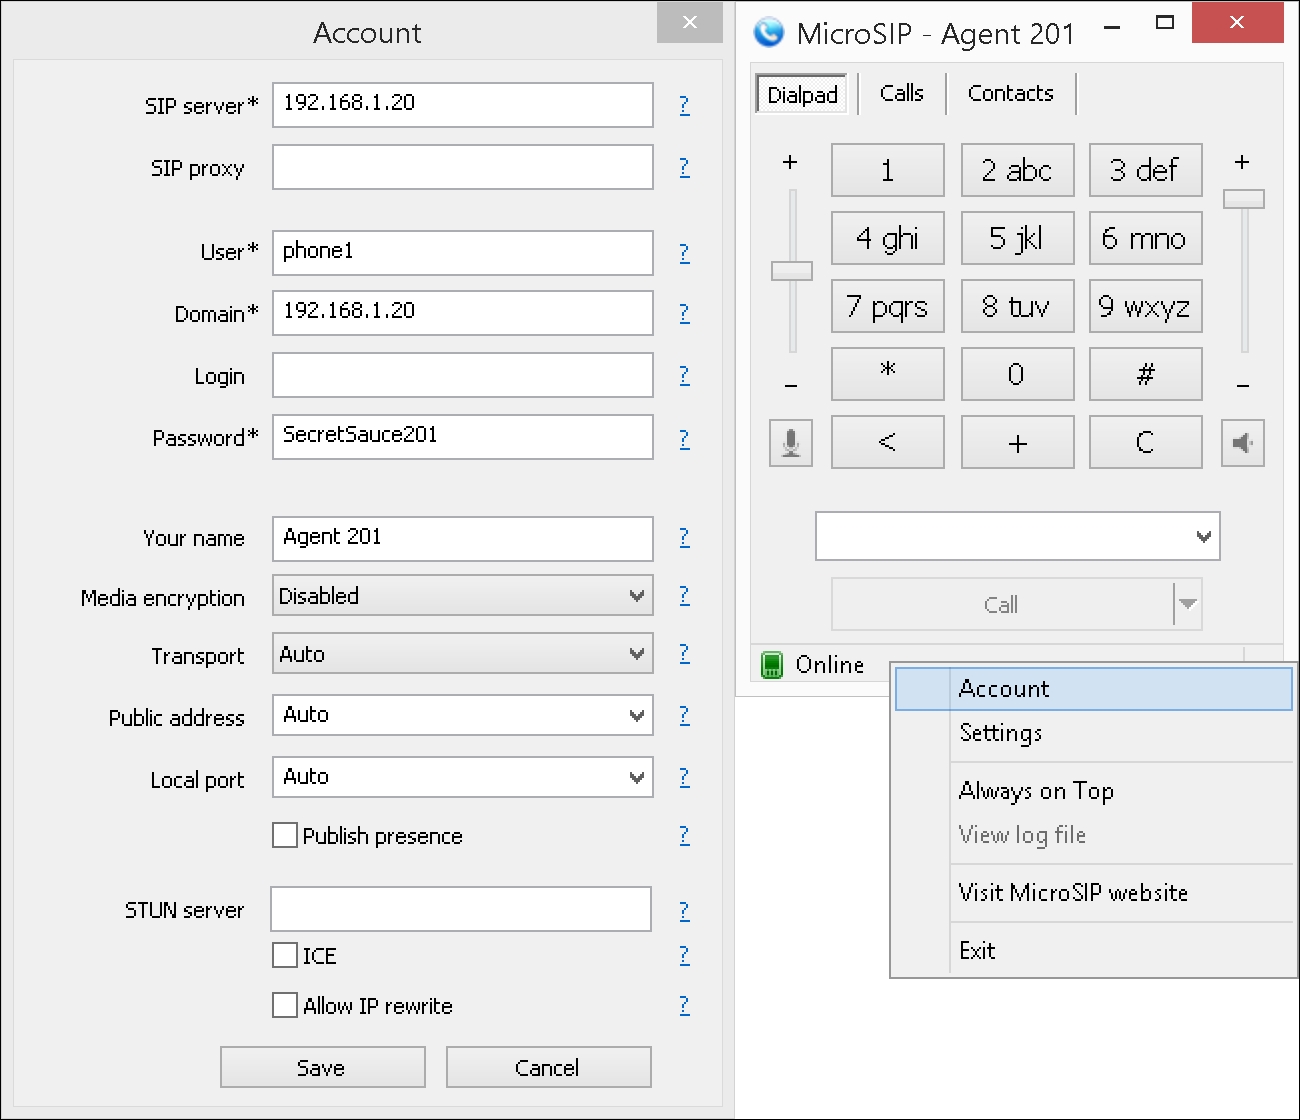
Right-click on either the status bar in the main application window or the system tray icon to bring up the menu that lets you access the Account settings.
Telephone is a basic open source softphone that is easily installed through the Mac App store:
Ring (formally SFLphone) is an open source softphone with packages available for all major distributions and client interfaces for both GNOME and KDE. Instructions on how to download and install it for your particular distribution can be found at https://ring.cx/en/download/gnu-linux.
CSipSimple is an excellent open source softphone available from the Google Play store. When adding your account, use the basic generic wizard:
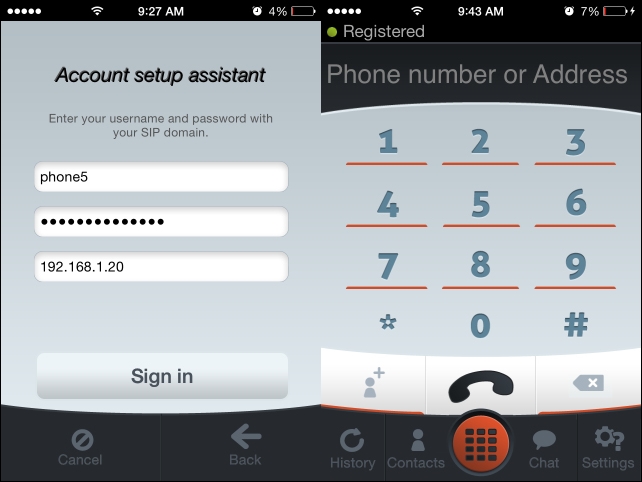
Linphone is an open source softphone that is easily installed through the iPhone App Store. Select I have already a SIP-account to go to the setup assistant:
It's always good to be able to reach your agents directly from HQ, that is, the Pi itself. Proving once again that anything can be done from the command line, we're going to install a softphone called Linphone that will make good use of your USB microphone.
This new softphone obviously needs a user ID and password just like the others. We will take this opportunity to look at a better way of storing passwords in SIP Witch.
Type sudo sipwitch dump to see how SIP Witch is currently configured. Find the Accounts section and note how there's already a user ID named pi with extension 200.
This is the result of a SIP Witch feature that automatically assigns an extension number to certain Raspbian user accounts. You may also have noticed that the display string for the pi user looks empty. We can easily fix that by filling in the full name field for the Raspbian pi user account with the following command:
pi@raspberrypi ~ $ sudo chfn -f "Agent HQ" pi
Now restart the SIP Witch server with sudo service sipwitch restart and verify with sudo sipwitch dump that the display string has changed.
So how do we set the password for this automatically added pi user? For the other accounts, we specified the password in clear text inside <secret> tags in /etc/sipwitch.conf. This is not the best solution from a security perspective if your Pi happens to fall into the wrong hands. Therefore, SIP Witch supports specifying passwords in encrypted digest form. Use the following command to create an encrypted password for the pi user:
pi@raspberrypi ~ $ sudo sippasswd pi
We can then view the database of SIP passwords that SIP Witch knows about:
pi@raspberrypi ~ $ sudo cat /var/lib/sipwitch/digests.db
Now you can add digest passwords for your other SIP users as well, and then delete all <secret> lines from /etc/sipwitch.conf to be completely free of clear text.
With our pi user account up and ready to go, let's proceed to set up Linphone:
- Linphone does actually have a graphical user interface, but we'll specify that we want the command-line only client:
pi@raspberrypi ~ $ sudo apt-get install linphone-nogtk - Now we fire up the Linphone command-line client:
pi@raspberrypi ~ $ linphonec - You will immediately receive a warning that reads:
Warning: Could not start udp transport on port 5060, maybe this port is already used.That is, in fact, exactly what is happening. The standard communication channel for the SIP protocol is UDP port 5060, and it's already in use by our SIP Witch server. Let's tell Linphone to use port 5062 with this command:
linphonec> ports sip 5062 - Next we'll want to set up our microphone. Use these three commands to list, show, and select what audio device to use for phone calls:
linphonec> soundcard list
linphonec> soundcard show
linphonec> soundcard use [number]
- For the softphone to perform reasonably well on the Pi, we'll want to make adjustments to the list of codecs that Linphone will try to use. The job of a codec is to compress audio as much as possible while retaining high quality. This is a very CPU-intensive process, which is why we want to use the codec with the least amount of CPU load on the Pi, namely PCMU or PCMA. Use the following command to list all currently supported codecs:
linphonec> codec listNow use this command to disable all codecs that are not PCMU or PCMA:
linphonec> codec disable [number] - It's time to register our softphone to the SIP Witch server. Use the following command but replace
[IP address]with the IP address of your Pi, and[password]with the SIP password you set earlier for thepiuser:linphonec> register sip:pi@[IP address] sip:[IP address] [password] - That's all you need to start calling your fellow agents from the Pi itself.
- Type
helpto get a list of all commands that Linphone accepts.
The basic commands are call [user id] to call someone, answer to pick up incoming calls, and quit to exit Linphone. All the settings that you've made will be saved to ~/.linphonerc and loaded the next time you start linphonec.
Now that you know the Linphone basics, let's explore some interesting features not offered by most other softphones.
At any time (except during a call), you can switch Linphone into file mode, which lets us experiment with alternative audio sources. Use this command to enable file mode:
linphonec> soundcard use files
Do you remember eSpeak from earlier in this chapter? While you rest your throat, eSpeak can provide its soothing voice to carry out entire conversations with your agents. If you haven't already got it, install eSpeak first:
pi@raspberrypi ~ $ sudo apt-get install espeak
Now we tell Linphone what to say next:
linphonec> speak english Greetings! I'm a Linphone, obviously.
This sentence will be spoken as soon as there's an established call. So you can either make an outgoing call or answer an incoming call to start the conversation, after which you're free to continue the conversation in Italian:
linphonec> speak italian Buongiorno! Mi chiamo Enzo Gorlami.
Should you want a message to play automatically when someone calls, just toggle auto answer:
linphonec> autoanswer enable
How about playing a pre-recorded message or some nice grooves? If you have a WAV or MP3 file that you'd like to play over the phone, it has to be converted to a suitable format first. A simple SoX command will do the trick:
pi@raspberrypi ~ $ sox "original file.mp3" -c 1 -r 48000 playme.wav
Now we can tell Linphone to play the file:
linphonec> play playme.wav
Finally, you can also record a call to file. Note that only the remote part of the conversation can be recorded, which makes this feature more suitable for leaving messages and such. Use the following command to record:
linphonec> record message.wav