The Raspberry Pi Camera Module is an official Raspberry Pi accessory that works with all models of the Pi, and can be used to take high-definition still and video images. It connects directly to the Pi board's CSI (Camera Serial Interface) port, dedicated for these modules to enable high-speed operation.
The first release of the Raspberry Pi Zero didn't have a dedicated CSI port for the camera, but the latest v1.3 of the Pi Zero board now features this connector, opening all sorts of possibilities by connecting the official camera module. Note that the connector is actually smaller than the one on the standard-sized Pi boards, so you will need a different flat cable to connect to your camera. You can get these from your usual Pi-friendly online stores, such as pimoroni.com.
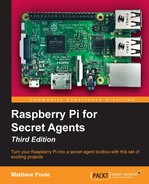
The latest version 2 of the camera itself is an 8-megapixel fixed-focus sensor supporting 1080p, 720p, and VGA video modes and still captures. The original version was 5 mega-pixels and even that gave great results:
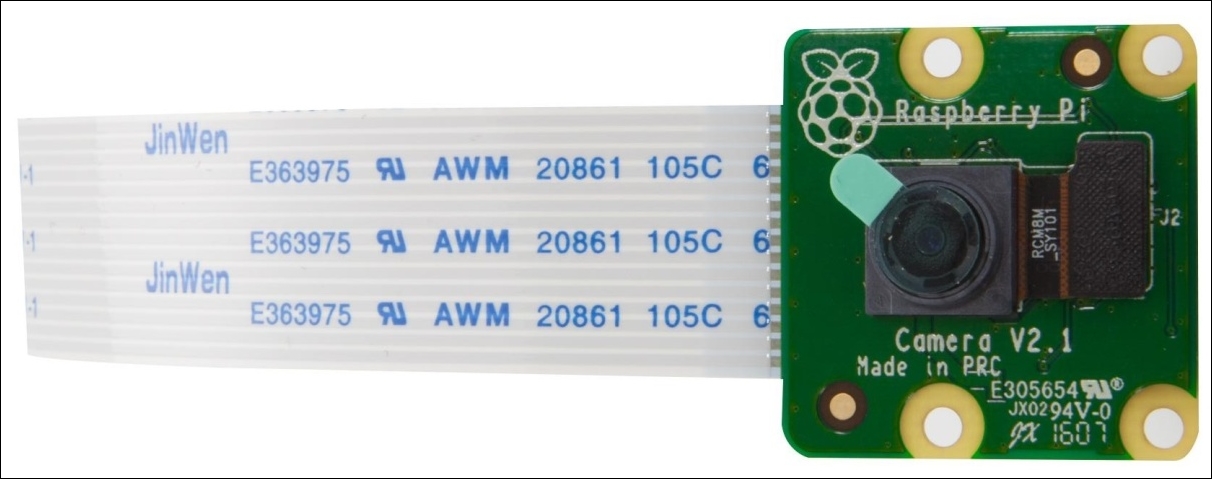
You can also obtain housings for the camera modules, which, unless you're going to build your own enclosure for the camera system, I recommend you use:
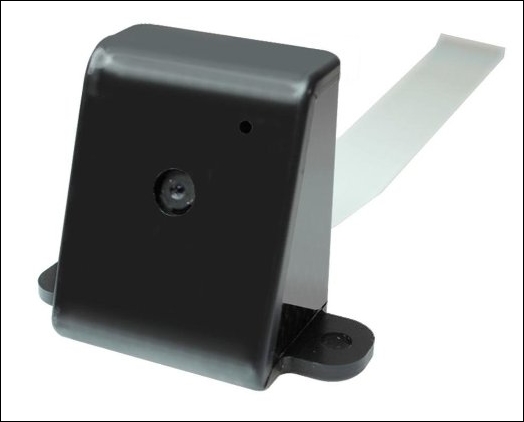
The camera module connects directly to the Raspberry Pi board via its dedicated camera interface, as shown in the following image. When connecting the camera, the contact side of the ribbon cable is towards the HDMI connector and the blue side of the cable is toward the network connector:
Here's a step-by-step guide for connecting it:
- Before handling the camera module, ground yourself to get rid of any static electricity you might have picked up, by touching a radiator or a PC chassis.
- The flexible flat cable connects to the CSI connector located between the Ethernet and HDMI ports on the Pi board.
- Open up the connector by pulling the plastic tab upward.
- With the blue side facing the Ethernet port, push the flex cable into the connector.
- While holding the flex cable in place, push down on the plastic tab to secure the cable. Make sure the cable is evenly pushed into the connector. There might be a small piece of translucent blue plastic film covering the camera lens to protect it during transportation. This should be peeled off and discarded.
- The camera module is now connected to Raspberry Pi:
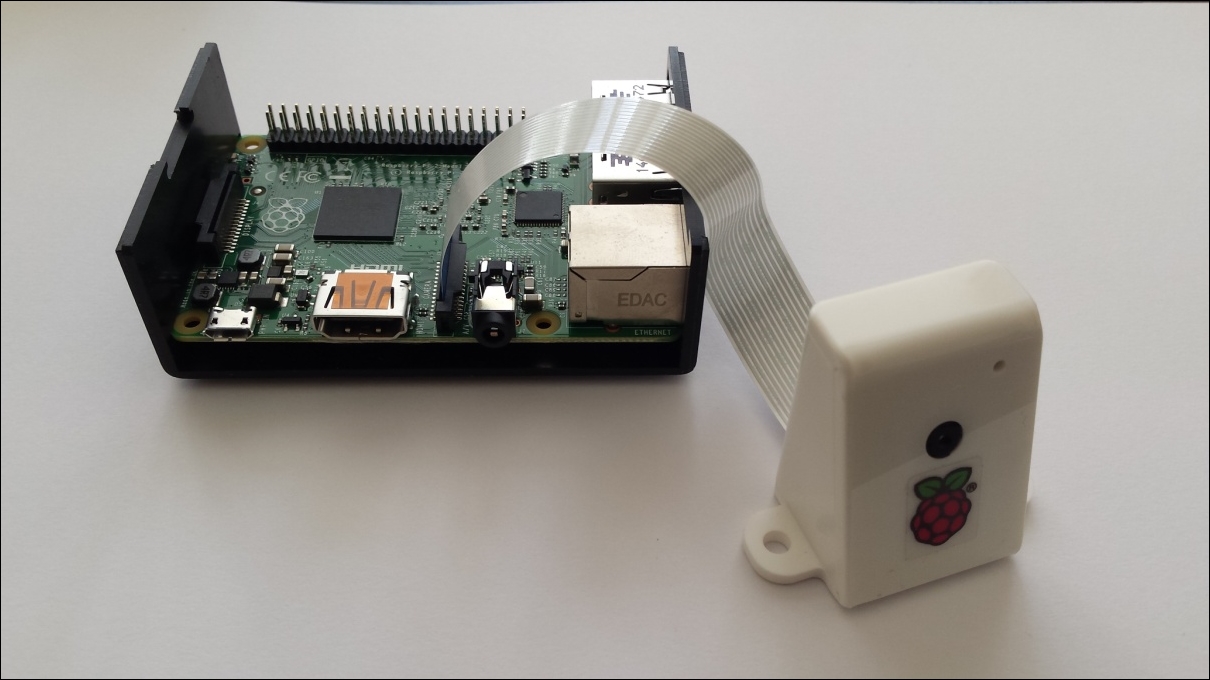 Camera module housed within an enclosure
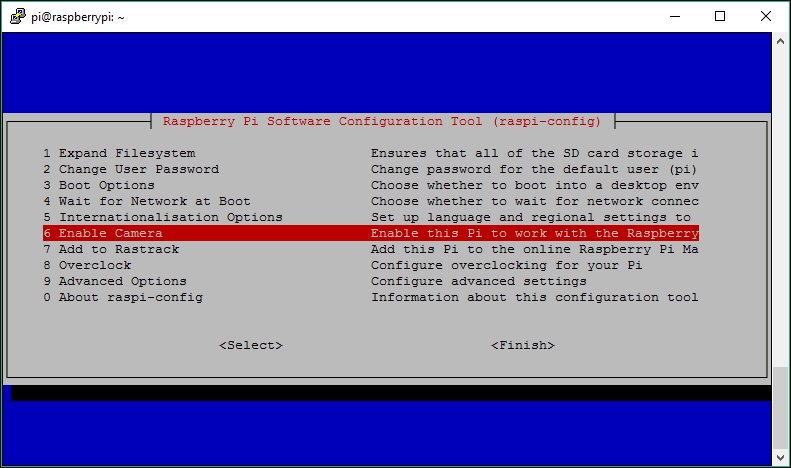
Before we can use the camera module, we need to enable camera support on the Raspberry Pi. To do this, we use the raspi-config tool:
- Connect to your Raspberry Pi in the normal lazy way from your sofa using SSH or directly, using a keyboard and monitor.
- Once you've logged in, launch the config tool with:
$ sudo raspi-config - Select option 6 Enable Camera...:
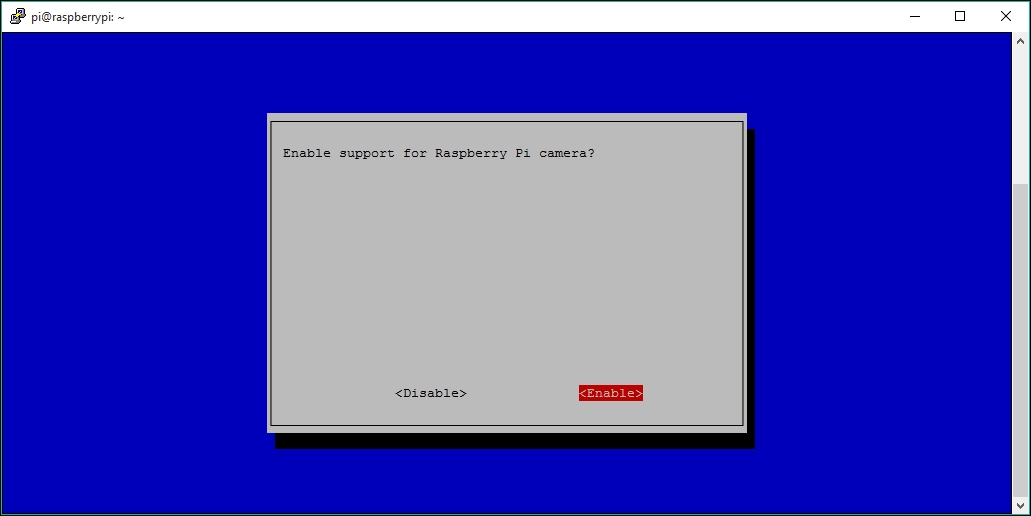
- Select Enable.
- Then select Finish and reboot your Pi to enable the camera settings (use the Tab key to navigate between the menu options):
- Test the camera module.
Once your Raspberry Pi has rebooted, your camera should be enabled. To check this, we can test this by taking a still image using the raspistill utility:
$ raspistill -v -o test.jpg
This will delay for 5 seconds then take a picture, while displaying various pieces of information, such as that shown in the following screenshot:
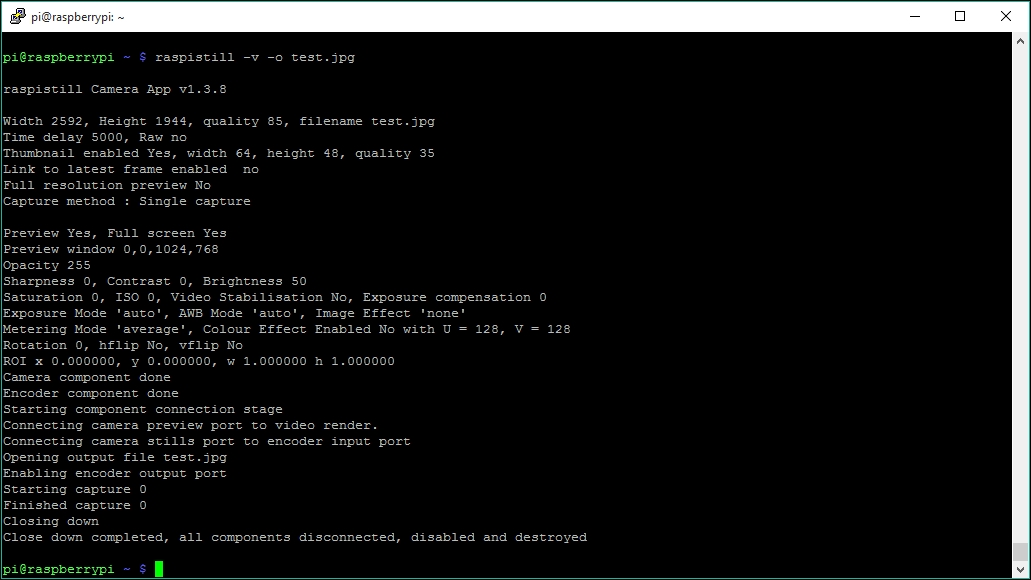
All being well, you should find that the file test.jpg is in your home folder. As you're connected via the shell, you wouldn't have seen the five-second preview image displayed when the command was running.
If you download the image file to your PC, you should see a nice quality snap taken by the camera module.
Tip
If you find that raspistill outputs errors when you run it, ensure that the camera is connected properly at both ends of the ribbon cable. One other gotcha is that sometimes the ribbon connecting the actual camera lens component to the tiny connector on the camera board can come loose. Just ensure that this is securely connected too. I've had this issue a couple times of after the camera modules have been taken out of my box of random test bits to be used.
raspistill has loads of options for manipulating the images it captures; to see the available options, run raspistill without any options and they will be listed:
$ raspistill
We can also test its video capability by recording a 10 second test video using raspivid, as follows:
pi@raspberrypi ~ $ raspivid -o camtest.h264 -t 10000
Then play it back through the HDMI port to an attached monitor:
pi@raspberrypi ~ $ omxplayer camtest.h264
You can send any recorded audio through the HDMI port by using this version of the command:
pi@raspberrypi ~ $ omxplayer -o hdmi camtest.h264
Finally, we need to make our Camera Module accessible to other applications, via a standardized V4L interface. We need to make sure that a certain kernel module gets loaded at boot time.
To do this, open up /etc/modules for editing using nano:
pi@raspberrypi ~ $ sudo nano /etc/modules
Add this line:
bcm2835-v4l2
Now press Ctrl + X to exit and select Y when prompted to save the modified buffer, then press the Enter key to confirm the filename to write to.
Reboot your Pi and use the following commands to confirm that your camera module is now accessible through a V4L interface:
pi@raspberrypi ~ $ v4l2-ctl --list-devices
The output should show a mmal service accessible through /dev/video0:
pi@raspberrypi:~ $ v4l2-ctl --list-devices

mmal service 16.1 (platform:bcm2835-v4l2):

/dev/video0
Type this command to enable a preview video overlay on your monitor connected to your HDMI connector (when in the GUI desktop):
pi@raspberrypi ~ $ v4l2-ctl --overlay=1
If your camera is upside down, just flip it with the following command:
pi@raspberrypi ~ $ v4l2-ctl -c vertical_flip=1
Explore the cool camera effects by supplying a number from 1 to 15:
pi@raspberrypi ~ $ v4l2-ctl -c color_effects=5
Type the following command to disable the overlay window:
pi@raspberrypi ~ $ v4l2-ctl --overlay=0
For optimal use, in stealthy situations, you may also want to consider disabling the red LED to avoid leading any intruders straight to the camera. Open up /boot/config.txt for editing:
pi@raspberrypi ~ $ sudo nano /boot/config.txt
Make a new line and add the following configuration directive, then reboot:
disable_camera_led=1
Instead of using the Raspberry Pi Camera Module, it's also possible to use a standard USB webcam to take still images. You should be aware, though, that the dedicated camera module is far superior to most USB webcams in terms of image quality, although you may already have a webcam knocking about in your box of bits, so plug it in and boot up your Pi.
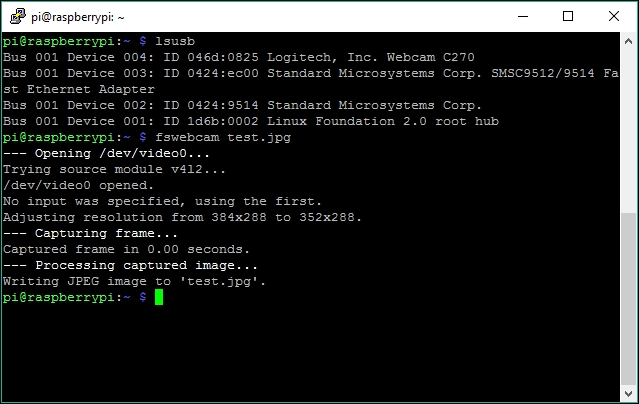
After you've plugged your webcam into a USB port on your Pi, you can check it's been recognized using the lsusb command:
pi@raspberrypi ~ $ lsusb
I'm using a reasonably small and discreet Logitech C270 webcam, which gets reported on my Raspberry Pi 3 as follows with lsusb (Device 004):
pi@raspberrypi:~ $ lsusb

Bus 001 Device 004: ID 046d:0825 Logitech, Inc. Webcam C270

Bus 001 Device 003: ID 0424:ec00 Standard Microsystems Corp. SMSC9512/9514 Fast Ethernet Adapter

Bus 001 Device 002: ID 0424:9514 Standard Microsystems Corp.

Bus 001 Device 001: ID 1d6b:0002 Linux Foundation 2.0 root hub
Not all webcams will work with the Raspberry Pi. Even though it may be recognized as a USB device, it might not actually work properly with the operating system and create a video device (for example, /dev/video0). For example, an old cheap Trust webcam I had appeared as a USB device, but wouldn't capture any images.
Note
You can check whether your webcam is likely to work with the Pi by checking the make and model here: http://elinux.org/RPi_USB_Webcams.
So now that the Pi knows that we have a webcam device attached, we can use the fswebcam utility to capture image frames. You can find out more about fswebcam from the developer's site at http://www.sanslogic.co.uk/fswebcam/.
Install fswebcam with:
pi@raspberrypi ~ $ sudo apt-get install fswebcam
Take a snap. You can now test the webcam by capturing a still image, done by running the following command:
pi@raspberrypi ~ $ fswebcam test.jpg
You should expect to see output similar to the following:
If you have both the Pi camera module and a USB camera attached, you need to check which device is assigned to which by using this command again:
pi@raspberrypi ~ $ v4l2-ctl --list-devices
If it's /dev/video1, for example, then use the device parameter with fswebcam to specify this:
pi@raspberrypi ~ $ fswebcam test.jpg -d /dev/video1
If you experimented with the dwc_otg.speed parameter to improve the audio quality during the previous chapter, you should change it back now by changing its value from 1 to 0, as chances are that your webcam will perform worse or will not perform at all, because of the reduced speed of the USB ports.
Before we start grabbing videos with our webcam, it's very important that we find out exactly what it is capable of in terms of video formats and resolutions. To help us with this, we'll add the uvcdynctrl utility to our arsenal, using the following command:
pi@raspberrypi ~ $ sudo apt-get install uvcdynctrl
Let's start with the most important part—the list of supported frame formats.
To see this list, type in the following command:
pi@raspberrypi ~ $ uvcdynctrl -f
Or, if specifying a particular device:
pi@raspberrypi ~ $ uvcdynctrl -f -d /dev/video1

pi@raspberrypi:~ $ uvcdynctrl -f

Listing available frame formats for device video0:

Pixel format: YUYV (YUYV 4:2:2; MIME type: video/x-raw-yuv)

Frame size: 640x480

Frame rates: 30, 25, 20, 15, 10, 5

Frame size: 160x120

Frame rates: 30, 25, 20, 15, 10, 5

Frame size: 176x144

Frame rates: 30, 25, 20, 15, 10, 5

Frame size: 320x176

Frame rates: 30, 25, 20, 15, 10, 5

Frame size: 320x240

Frame rates: 30, 25, 20, 15, 10, 5

... blah blah blah ...

Frame size: 1280x960

Frame rates: 30, 25, 20, 15, 10, 5

Pixel format: MJPG (Motion-JPEG; MIME type: image/jpeg)

Frame size: 640x480

Frame rates: 30, 25, 20, 15, 10, 5

Frame size: 160x120

Frame rates: 30, 25, 20, 15, 10, 5

... blah blah....

Frame size: 1280x960

Frame intervals: 2/15, 1/5
According to the output of this particular webcam, there are two main pixel formats that are supported. The first format, called YUYV, or YUV 4:2:2, is a raw, uncompressed video format; the second format, called MJPG, or MJPEG, provides a video stream of compressed JPEG images.
Below each pixel format, we find the supported frame sizes and frame rates for each size. The frame size, or image resolution, will determine the amount of detail visible in the video. Three common resolutions for webcams are 320 x 240, 640 x 480 (also called VGA), and 1024 x 768 (also called XGA).
The frame rate is measured in Frames Per Second (fps), and will determine how fluid the video will appear. Various frame rates, from 5 fps to 30 fps, are available for each frame size on this particular webcam.
If you happen to be the unlucky owner of a camera that doesn't support the MJPEG pixel format, you can still go along, but don't expect more than a slideshow of images at 320 x 240 from your webcam. Video processing is one of the most CPU-intensive activities you can do with the Pi, so you need your webcam to help with this by compressing the frames first.
Right, let's see what our sneaky glass eye can do!
For our camera surveillance and capturing needs, we're going to use some excellent software called Motion and MotionEye. Motion, written by Kenneth Lavrsen, is a rather clever application that takes a feed from one or more cameras and can monitor the feed to see if areas of the image have changed. The official Motion site is here: http://www.lavrsen.dk/foswiki/bin/view/Motion/WebHome.
Motion is a command-line based service, which can be quite tricky to work with, so we're going to use MotionEye, which is a rather good, web-based frontend, which sits on top of the Motion daemon. MotionEye was developed by a guy called Calin Crisan, and the official Wiki site can be found here: https://github.com/ccrisan/motioneye/wiki.
So let's get our surveillance system set up. First install the Motion package with:
pi@raspberrypi ~ $ sudo apt-get install motion
On the current version of Raspbian Jessie, dependent packages such as v4l-utils should already be pre-installed.
MotionEye is written using Python, so we now need to install some Python packages and other libraries that it needs:
pi@raspberrypi ~ $ sudo apt-get install python-dev
And then:
pi@raspberrypi ~ $ sudo apt-get install libssl-dev libjpeg-dev
We then install the actual motioneye package using the Python Package Manager:
pi@raspberrypi ~ $ sudo pip install motioneye
Once it's installed, we start the motioneye service with:
pi@raspberrypi ~ $ sudo systemctl start motioneye
MotionEye should install nicely, using the preceding steps, however, it does require a few dependencies, and there could be some conflicts with some of the packages. If you have any issues, then take a step back and follow these Raspbian-specific instructions on the MotionEye Wiki at: https://github.com/ccrisan/motioneye/wiki/Install-On-Raspbian.
Now the MotionEye server is running, we can access our surveillance console through our web browser. The web server, by default, runs on port 8765, so accessing it is as simple as typing the IP address of your Pi plus the port number, into the URL bar of your browser:
http://<my-ip>:8765.
I'm currently eyeing up the comings and goings of vehicles in the car park on the estate grounds:
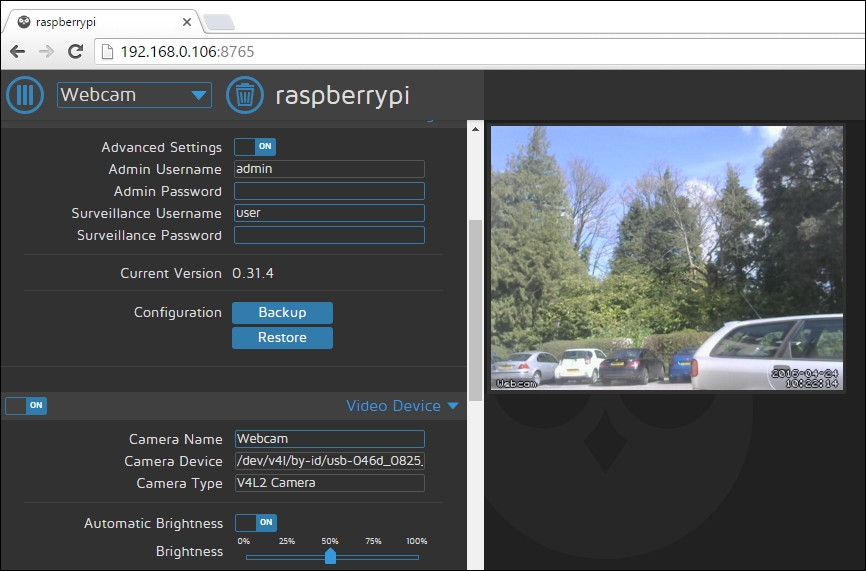
The default login for the MotionEye is the username admin and a blank password.
The MotionEye interface allows us to configure how we want to capture the video stream—either by continuously recording or by taking snapshot images. Switch the Advanced Settings to On to see all of the settings available to you in the interface—you'll soon see how easy it is to set up your covert camera surveillance options with MotionEye:
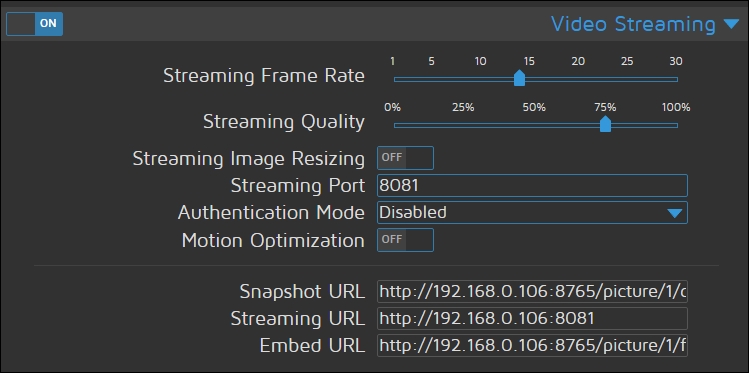
If you want to access the live stream from an external application, such as VLC player or within your own web pages, you can do so with the alternative direct video stream feed offered by the Motion daemon. The access URLs can be seen in the Video Streaming section of the MotionEye settings. More about this in the next section:
You might be perfectly content with your current camera setup and viewing the stream in your browser, but for those of you who prefer to watch all videos inside your favorite media player, this section is for you. Also note that we'll be using VLC for other purposes further in this chapter, so we'll go through the installation here.
Let's install VLC and open up the camera stream by following these steps:
- Visit http://www.videolan.org and download the latest version of the VLC installer package (
vlc-2.2.2-win32.exe, at the time of writing). - Install VLC media player using the installer.
- Launch VLC using the shortcut on the desktop or from the Start menu.
- From the Media drop-down menu, select Open Network Stream...
- Enter the direct stream URL shown in the MotionEye settings above (
http://<my-ip>:8081), and click on the Play button: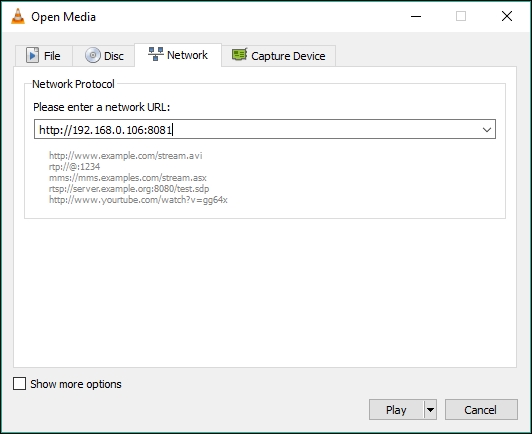 Open Media dialogue in VLC Player allows access to your streams
 Viewing our feed in the VLC player
Let's install VLC and open up the camera stream:
- Visit http://www.videolan.org/ and download the latest version of the VLC installer package (
vlc-2.2.2.dmg, at the time of writing). - Double-click on the VLC disk image and drag the VLC icon to the Applications folder.
- Launch VLC from the Applications folder.
- From the File drop-down menu, select Open Network...
- Enter the direct stream URL shown in the MotionEye settings above (
http://<my-ip>:8081), and click on the Play button. - (Optional) You can add live audio monitoring from the webcam by opening up a terminal window (located in Applications | Utilities), and typing in the command line you learned from the Listening in on conversations from a distance section in Chapter 2, Audio Antics:
$ ssh pi@[IP address] sox -t alsa plughw:1 -t sox - | sox -q -t sox - -d
Let's install VLC or MPlayer and open up the camera stream:
- Use your distribution's package manager to add the VLC or MPlayer package.
- For VLC, either use the GUI to open a network stream, or launch it from the command line with this command:
$ vlc http://[IP address]:8081 - For MPlayer, you need to tag on an MJPG file extension to the stream using the following command:
$ mplayer -demuxer lavf "http://[IP address]:8081" - (Optional) You can add live audio monitoring from the webcam by opening up a Terminal and typing in the command line you learned in the Listening in on conversations from a distance section of Chapter 2, Audio Antics:
$ ssh pi@[IP address] sox -t alsa plughw:1 -t sox - | sox -q -t sox - -d
The best way to save a video clip from the stream is to record it with VLC, and save it into an AVI file container. With this method, we get to keep the MJPEG compression while retaining the frame rate information.
Unfortunately, you won't be able to record the webcam video with sound. There's no way to automatically synchronize audio with the MJPEG stream. The only way to produce a video file with sound would be to grab video and audio streams separately and edit them together manually in a video editing application such as VirtualDub.
We're going to launch VLC from the command line to record our video:
- Open up a command prompt window from the Start menu by clicking on the shortcut or by typing in
cmdin the Run/Search field. Then type in the following command to start recording the video stream to a file calledmyvideo.avi, located on the desktop:C:> "C:Program Files (x86)VideoLANVLCvlc.exe" http://[IP address]:8081 --sout="#standard{mux=avi,dst=%UserProfile%Desktopmyvideo.avi,access=file}"If your particular Windows version doesn't have a
C:Program Files (x86)folder, just erase the (x86) part from the path on the command line. - It may seem like nothing much is happening, but there should now be a growing
myvideo.avirecording on your desktop. To confirm that VLC is indeed recording, we can select Media Information from the Tools drop-down menu and then select the Statistics tab. - To stop the recording, simply close VLC.
We're going to launch VLC from the command line to record our video:
- Open up a Terminal window (located in Applications | Utilities) and type in the following command to start recording the video stream to a file called
myvideo.avi, located on the desktop:$ /Applications/VLC.app/Contents/MacOS/VLC http://[IP address]:8081 --sout='#standard{mux=avi,dst=/Users/[username]/Desktop/myvideo.avi,access=file}'Replace [username] with the name of the account you use to log in to your Mac, or remove the directory path to write the video to the current directory.
- It may seem like nothing much is happening, but there should now be a growing
myvideo.avirecording on your desktop. To confirm that VLC is indeed recording, we can select Media Information from the Window drop-down menu and then select the Statistics tab. - To stop the recording, simply close VLC.
We're going to launch VLC from the command line to record our video:
- Open up a Terminal and type in the following command to start recording the video stream to a file called
myvideo.avi, located on the desktop:$ vlc http://[IP address]:8081 --sout='#standard{mux=avi,dst=/home/[username]/Desktop/myvideo.avi,access=file}'Replace
[username]with your login name, or remove the directory path to write the video to the current directory. - It may seem like nothing much is happening, but there should now be a growing
myvideo.avirecording on your desktop. To confirm that VLC is indeed recording, we can selectMedia Informationfrom theToolsdrop-down menu and then select the Statistics tab. - To stop the recording, simply close VLC.
Let's dive right into the wonderful world of motion detection!
The basic idea of motion detection is pretty simple from a computer's point of view—the motion detection software processes a continuous stream of images and analyzes the positions of the pixels that make up the image. If a group of contiguous pixels above a certain threshold starts to change from one frame to the next, that must mean that something is moving. The tricky part of motion detection is weeding out false positives triggered by naturally occurring changes in light and weather conditions.
We've already installed the Motion software above, which will do the motion detection work for us, and the MotionEye web frontend will help us to easily set this up.
The Video Device section of the MotionEye settings allows us to configure the camera that will be used for our motion detection scheme:
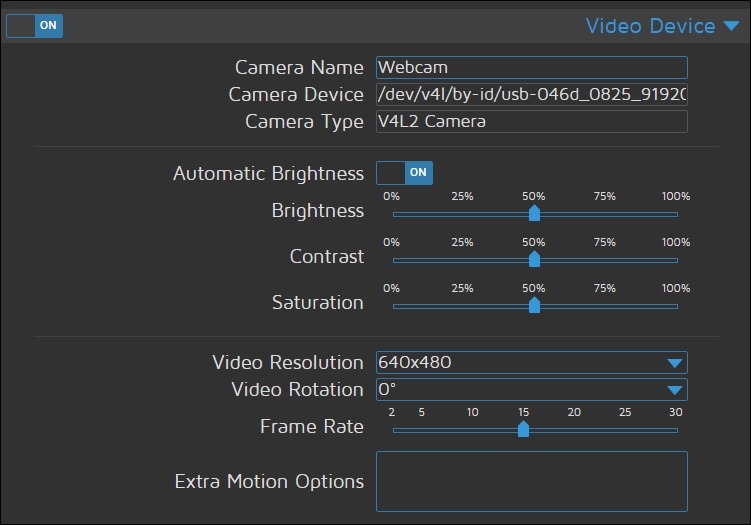
In the preceding settings, I'm using my USB webcam and have set a VGA video resolution with a frame rate of 15fps.
The Motion package itself has an overwhelming number of options, but we can use the MotionEye front-end to setup the key ones for us:
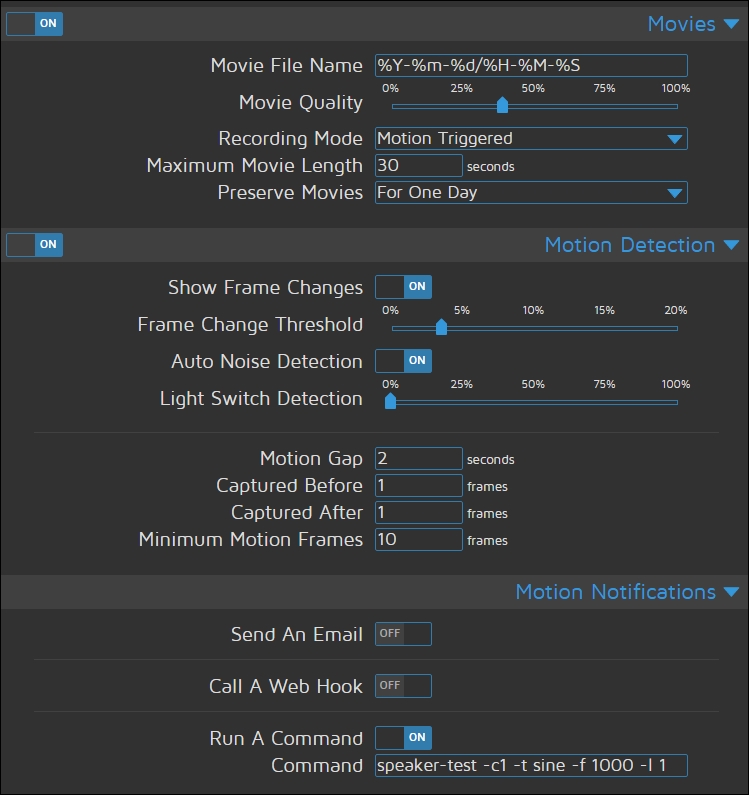
In the preceding configuration, we're telling Motion to start recording a video when motion is detected. It will also run the following command (in Motion Notifications), which is our temporary alarm sound until we find something better in a minute:
pi@raspberrypi ~ $ speaker-test -c1 -t sine -f 1000 -l 1
Once you've entered your settings, click the Apply button at the top of the page and they will take effect.
Alright, let's take our motion detection system out for a spin by following this procedure:
- Point your webcam away from yourself and any movement in view of the camera.
- Now try waving your hand in front of the webcam. If your Pi sent out a high-pitched note through the speakers, and you see messages from the speaker test application on the console, we have managed basic motion detection! Even if you didn't trigger anything, keep reading to find out what's going on with the detection system.
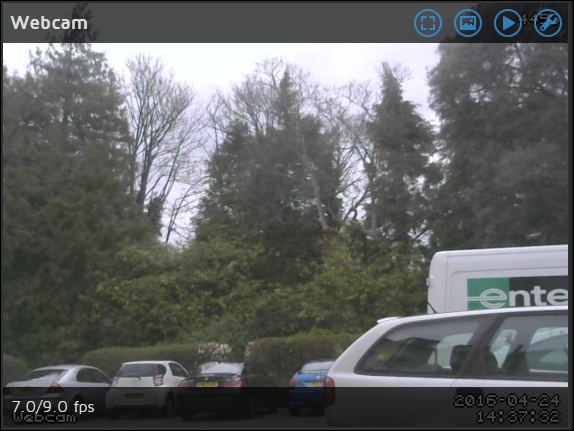
- In your web browser, view the live video feed from your camera in MotionEye. You should see the clock in the lower-right corner and the number of changed pixels in the upper-right corner. (If you're looking, instead, at a gray image with the text unable to open video device, there's most likely a problem with stream.)
Studying the number of changed pixels is one of the best ways to understand the motion detection system. The number will spike whenever you move the camera, but should come to rest at zero as Motion learns about light sources and applies an automatic noise filter to minimize the risk of false positives.
Now if you wave your hand in front of the camera, the pixel counter should climb and a rectangle will be drawn onto those areas in the image where Motion detected the largest changes in pixels.
If the number of pixels climbs over the set frame threshold value (roughly 9,200 when set at 3%), an event will fire, which is currently set to play the high-pitched tone.
When no motion has been detected for the number of seconds specified by the gap value (currently two), the event ends and a new event can begin.
The MotionEye maintains a library of clips it has collected when it detects movement in the camera. To access the library, click on the actual camera feed to view some options and click the triangular Play button at the top:
You'll then be presented with your library of movies recorded by the webcam.
In the preceding image, you'll notice that a new car appeared in the scene. I can access and download the movie in which it was first detected, with the red square highlighting the moving vehicle, as you can see in the following video screenshot. Pretty cool eh?

Now that we've established an initial working Motion setup, we have to decide what actions we want the system to take upon detection. Sounding an alarm, saving images and videos of the detected activity, logging the activity to a database, or alerting someone via e-mail are all valid responses to detection.
Let's create a directory to hold our evidence:
pi@raspberrypi ~ $ mkdir ~/evidence
We're going to revisit the MotionEye settings web panel, but this time, we're setting up the system for use in the real world. Once again, we'll go through the configuration file and pause to explain or change options.
Under the Video Device section, change the following settings to keep our CPU usage low:
- Video Resolution:
640x480 - Frame Rate:
5
We'll change the R
oot D
irectory setting under the File Storage section to: /home/pi/evidence
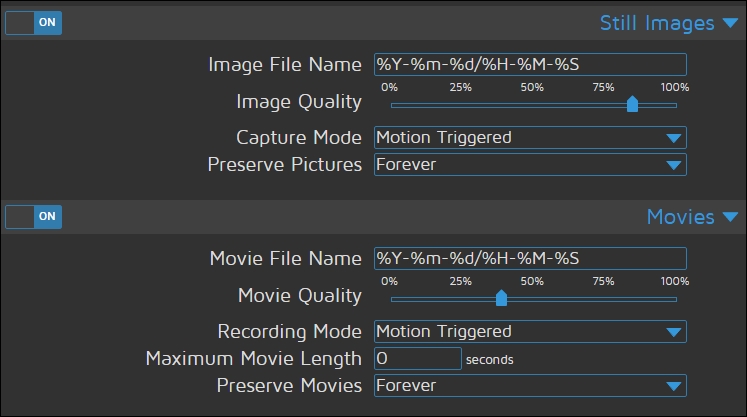
Ensure the Still Images section is enabled, so that a snapshot is taken when motion is detected:
- Image Quality:
50% - Capture Mode:
Motion Triggered
Ensure the Movies section is enabled so that video is recorded:
- Movie Quality:
30% - Recording Mode:
Motion Triggered
Under the Motion Detection section:
- Switch Show Frame Changes to
Offto prevent the rectangle from being drawn onto our evidence. - Motion Gap:
30seconds
Under Motion Notifications:
- Run a command. It's up to you whether you want to keep the alarm tone, but you could generate a better one yourself with
espeak—perhaps a robot voice saying intruder alert!—and then play it back with a simplesoxcommand.
Now if you click Apply to save your settings and trigger a detection, a video file will start recording the event to your ~/evidence directory, and after the 30 second gap, a JPG snapshot with the largest change in motion will be written to the same location.
Whenever a new file is recorded, the filename will be shown in the image and movies library, accessible by clicking the camera feed as shown previously.
To view the videos on the Pi itself, use VLC or an other compatible player and specify a filename, for example:
pi@raspberrypi ~ $ vlc ~/evidence/2016-04-24/15-26-49.avi
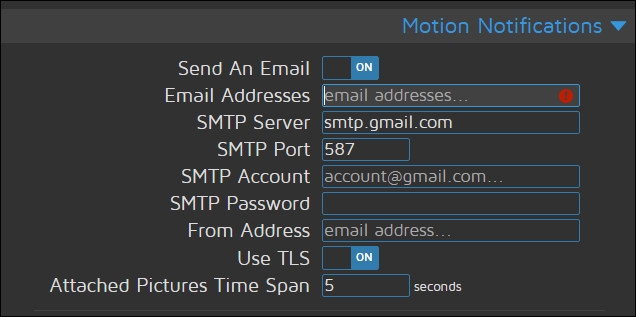
Having the images stored on your Raspberry Pi is not really much if you're not glued to the monitoring web page. Ideally, you would want the motion-triggered images sent to you straightaway, as soon as they are captured, so that you can view them on your smartphone. This would be pretty handy if you wanted to know if you had any visitors while you were out.
Fortunately, this is nice and simple in MotionEye—just enable the Email settings in the Motion Notification section of the settings panel:
If you've got an extra webcam at home, perhaps built into a laptop, it would be a shame not to let it help out with the motion detection mission, right?
We're going to look at how to connect more camera streams to MotionEye. These streams might come from conventional IP security cameras, but the same method works equally well for webcams on Windows and Mac computers, with some tinkering.
We'll use webcamXP to add additional cams in Windows. The following are the necessary steps:
- Visit http://www.webcamxp.com/download.aspx to download the latest webcamXP free application installer (
wxpfree590.exeat the time of writing). Free for private use, webcamXP also allows two camera streams. - Install webcamXP using the installer.
- Launch webcamXP using the shortcut (webcamXP 5) from the Start menu.
- Right-click on the large image frame and select your webcam from the list; it will most likely be located under PCI / USB (WDM Driver).
You should be able to confirm that the stream is working by opening up a new tab in your browser and entering the following address in the address bar, but change [WinIP] to the IP address of your Windows computer: http://[WinIP]:9090/cam_1.cgi.
If the stream is working all right, proceed to add it to the Motion setup.
You may quit webcamXP to stop the stream at any time.
We'll be using VLC to add additional cams in Mac OS X:
- You should have VLC installed already as per the instructions in the Viewing your webcamin VLC media player section in this chapter.
- Launch VLC from the Applications folder.
- From the File drop-down menu, select Open Capture Device....
- Check the Video checkbox and select your webcam from the list.
- Show Media Resource Locator (MRL) and copy the string that starts with
qtcapture://, followed by the ID number of your particular webcam. You will need this ID string next. - Now quit VLC and open up a Terminal window (located in Applications | Utilities) and type in the following command, replacing [ID] with the ID of your webcam and adjusting the width and height to suit your camera:
/Applications/VLC.app/Contents/MacOS/VLC qtcapture://[ID] --qtcapture-width 640 --qtcapture-height 480 --sout='#transcode{vcodec=mjpg}:duplicate{dst=std{access=http{mime=multipart/x-mixed-replace;boundary=--7b3cc56e5f51db803f790dad720ed50a},mux=mpjpeg,dst=:8080/stream.mjpg}}' - VLC will start serving a raw M-JPEG stream over HTTP on port 8080, suitable to feed into Motion.
You should be able to confirm that the stream is working by opening up a new tab in your browser and entering the following address in the address bar, but change [MacIP] to the IP address of your Mac: http://[MacIP]:8080/stream.mjpg.
If the stream is working all right, proceed to add it to the Motion setup.
You may quit VLC to stop the stream at any time.
MotionEye does all of the hard work of configuring the underlying Motion daemon to support multiple streams. To add a new camera feed into MotionEye, select Add Camera... from the camera list drop-down at the top of the page. You'll then get a dialog box in which to enter your remote camera details:
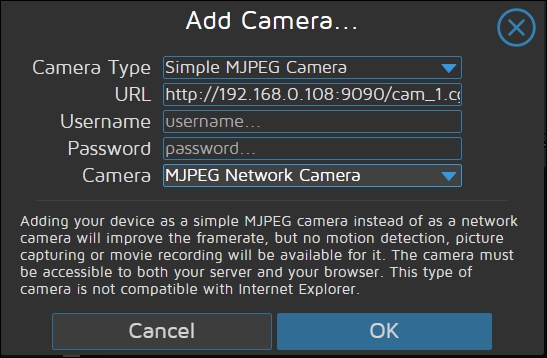
For the Camera Type, select Simple MJPEG Camera for it to work with our feed.
In the URL field, enter either http://[WinIP]:9090/cam_1.cgi or http://[MacIP]:8080/stream.mjpg.
You should now see the new camera feed added to the monitoring panel in the MotionEye web page.
To stop the MotionEye service, use the command:
pi@raspberrypi ~ $ sudo systemctl stop motioneye
As you can see, MotionEye gives us a proper villain's security monitoring wall, with all of our camera feeds being shown at once. But MotionEye also rather helpfully adds a unique embed URL too in the Video Streaming section, so that we can access each camera image individually. Handy if we want to build our own video surveillance wall.
What if you'd like to monitor your headquarters from afar, or invite a fellow agent to keep an eye out for trouble while you're away on a mission? Well it just so happens that our MotionEye installation can help us with this
You could try to make the Pi accessible directly over the Internet, but it's much more convenient to let a stream broadcasting service pick up the Pi camera feed and make it available to any number of viewers.
There are a few different stream-broadcasting services to choose from, and we'll be looking at one called Ustream, but the method described here should be applicable to other companies as well.
Follow this procedure to get started with Ustream:
- Visit http://www.ustream.tv/ and sign up for a new account.
- After verifying your e-mail address and signing in, click on Go live! You're signing up for the free Basic broadcasting service, which is fine for our purposes.
- Pick a name for your channel—make it something easy to remember. Your unique channel URL will be shown underneath the Channel Name in the Channel Info section.
- With your channel created, click your user icon at the top of the page and select Dashboard from the menu.
- Under the Channel options, click on Broadcast settings and then the View link in the Encode settings section.
- The RTMP URL and Stream Key fields shown will be copied to the command line to deliver the camera stream to the broadcasting service.
To transmit the camera feed over Real-Time Messaging Protocol (RTMP), we'll need to use an application called avconv that's part of the ffmpeg package. If you installed Motion earlier in this chapter, you already have this package; otherwise, install it now with the following command:
pi@raspberrypi ~ $ sudo apt-get install ffmpeg
Now let's try broadcasting. You'll get the best performance if you let the avconv utility grab the video straight from the camera, without Motion running in the background. Enter the following command, but replace [RTMP URL] and [Stream Key] with the values copied previously:
pi@raspberrypi ~ $ avconv -f video4linux2 -s 480x270 -r 15 -i /dev/video0 -f flv [RTMP URL]/[Stream Key]
These are the lowest recommended broadcast settings for resolution and frame rate. You might have to adjust them slightly to fit your camera's capabilities.
You should now be able to tune in to your camera feed from any web browser by visiting your channel URL, which can be found in the Info section of your Channel Manager.
If you want to run MotionEye at the same time, start it up again with the following command:
We can now make the avconv utility read the camera stream as input from MotionEye instead:
pi@raspberrypi ~ $ avconv -f mjpeg -r 1 -i "http://localhost:8081" -f flv [RTMP URL]/[Stream Key]
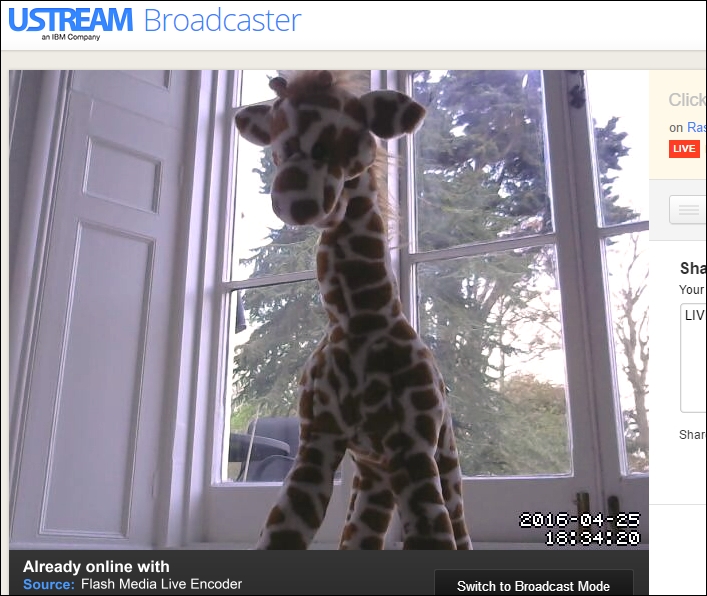
All being well, you should now see the video stream in the MotionEye browser window being replicated on the Ustream broadcast, complete with text overlays.
The following screen shows a video stream of my rather inanimate giraffe in front of my webcam—but it shows the possibilities!
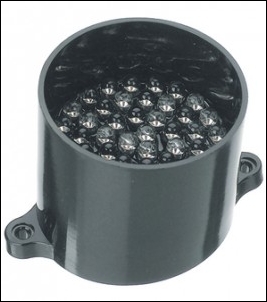
The standard Raspberry Pi camera and webcams are great for taking daytime snaps of cars driving past, but when it comes to nighttime surveillance, these are not really suitable. One way to counter this and give your camera night-vision is to use the Raspberry Pi NoIR camera module along with an infrared LED array to let the camera see in the dark.
If you don't want to illuminate an area with bright lights before capturing an image, you can use infrared lighting in conjunction with a compatible camera. The standard Raspberry Pi camera module, and many webcams, won't work with infrared lighting, however, because they contain infrared filters; but we can use the NoIR version of the camera module instead.
The Raspberry Pi NoIR camera module is exactly the same as the standard one, except that it doesn't have an infrared filter built in, which means it will see in the dark with the aid of infrared lighting:
Tip
If you're interested in controlling the infrared LEDs from the Pi using a motion detector, then my previous book, Building a Home Security System with Raspberry Pi published by Packt Publishing will show you how: https://www.packtpub.com/hardware-and-creative/building-home-security-system-raspberry-pi.