
When you send your Raspberry Pi out in the world on stealthy missions, you might not be able to stay connected to it at all times. However, as long as the Pi has Internet access via a Wi-Fi network or USB modem, you'll be able to communicate with it from anywhere in the world.
In this example, we'll be using Twitter, a popular social networking service for sharing short messages. We're going to make the Pi send regular tweets about the mission and its whereabouts. If you do not already have a Twitter account, or you'd like a separate account for the Pi, you'll need to sign up at https://twitter.com first. Follow these steps to get started with Twitter:
- Before you post anything on Twitter, you should consider enabling tweet privacy. This means the messages won't be publicly visible and only selected people on Twitter will be able to read them.
To enable tweet privacy, go to your account settings (https://twitter.com/settings/account) and check the Protect my Tweets checkbox under Security and privacy, then click on the Save changes button.
- Next, install a console Twitter client using the following command:
pi@raspberrypi ~ $ sudo apt-get install ttytter - Now start the client and follow the onscreen instructions for the one-time setup procedure:
pi@raspberrypi ~ $ ttytter -ssl - Once you've entered your PIN and you are back at the prompt, you can run
ttytter -sslagain to start the client in interactive mode, where anything you type that doesn't start with a slash will be tweeted to the world. Type/helpto see a list of the possible commands and/quitto exitttytter. - Let's try a simple status update first, with a few useful arguments added for good measure:
pi@raspberrypi ~ $ ttytter -ssl -status="Alive: $(date)
    from $(curl -s ipogre.com)" -autosplit -hold
Raspberry Pi reporting its time and external IP address on Twitter
- The
-sslargument enables encryption when we're talking to Twitter and is now a requirement. - The
-statusargument with the tweet enclosed in double quotes is the quickest way of sending a single message from the command line without entering interactive mode. In this message, we're using a feature of the shell called command substitution that allows the output of a command to be inserted back in place.
-autosplitis used to automatically split messages that are longer than 140 characters into multiple tweets.-holdinstructsttytterto keep retrying to send the message in case there's a problem communicating with Twitter.
- The
- Chances are that you'll want to use those same three arguments with all future
ttyttercommands, therefore it makes sense to put them into a file called~/.ttytterrcthat will be interpreted byttytteras a list of features to enable automatically on startup. Open it up for editing with the following command:pi@raspberrypi ~ $ nano ~/.ttytterrc - Then put the features in, one per line, but in a slightly different form from what we saw earlier:
      ssl=1
      autosplit=1
      hold=1
As an alternative to regular tweets, we can also send direct messages to a specific person using the following command, but replace [user] with the person's Twitter account name:
pi@raspberrypi ~ $ ttytter -runcommand="/dm [user]
    My hovercraft is full of eels"
The -runcommand argument is used to launch, from the command line, any action that you could type while in interactive mode.
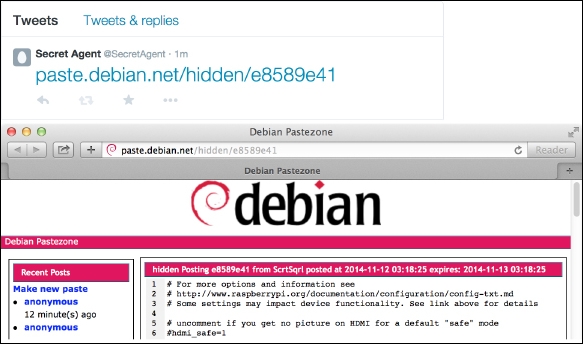
What if we need our Pi to report the contents of an important document or other lengthy output? How can we break the 140-character barrier? Simple: paste the document to a private pastebin and report the link on Twitter. Debian's Pastezone at http://paste.debian.net is a good candidate; it's easy to interact with and supports hidden pastes.
Download a utility Python script to interact with Debian's Pastezone, written by Michael Gebetsroither, with the following command:
pi@raspberrypi ~ $ sudo wget
    http://files.raspistuff.com/agentpi/debpaste.py
    -O /usr/bin/debpaste && sudo chmod +x /usr/bin/debpaste
We can now combine the debpaste and ttytter utilities in the following command line:
pi@raspberrypi ~ $ cat /boot/config.txt | debpaste
    -n ScrtSqrl -e 24 -p add | grep -o
    'http://paste.debian.net/hidden/.*' | ttytter -status=-
We start with piping the text file that is to be pasted to the debpaste utility. The -n argument is optional and sets the name to be associated with the paste. The -e argument sets the number of hours the paste will remain readable for before it is deleted. The -p flag is important and enables the hiding of your paste from public view. After the paste has been submitted, the debpaste utility outputs a bit of information about your entry.
Since we can't fit all of this information in a tweet, we use grep to fish out only the URL that we're interested in from that output. We then pipe the URL to ttytter and tell it to read the message to be posted from standard input by using the - character.
If you have a GPS connected to the Pi, we can tag each tweet with a geographical location. Follow these steps to get started:
- First, you need to allow geotagging for your Twitter account. Go to your account settings and check the Add a location to my Tweets checkbox under Security and privacy, then click on the Save changes button.
- Next, we need a way of obtaining the coordinates from
gpsdand feeding them tottytter. We'll need to create our own shell script for this purpose. Open up~/passgps.shfor editing with the following command:pi@raspberrypi ~ $ nano ~/passgps.sh - Add the following script snippet:
      #!/bin/bash

      LAT=""
      LONG=""

      gpspipe -d -w -o /tmp/gpsdump

      while ([ -z $LAT ] || [ -z $LONG ]) ; do
        if [ -f /tmp/gpsdump ] ; then
          LAT=$(cat /tmp/gpsdump | awk 'BEGIN{RS=","; FS=":"}
          /lat/ {save=$2} END {print save}')
          LONG=$(cat /tmp/gpsdump | awk 'BEGIN{RS=","; FS=":"}
          /lon/ {save=$2} END {print save}')
        fi
      done

      killall gpspipe
      rm /tmp/gpsdump

      echo "-lat=$LAT -long=$LONG"
Save and exit
nano, then make the script executable withchmod +x ~/passgps.sh.The script launches a
gpspipesession in the background, which will fill up/tmp/gpsdumpwith data obtained fromgpsd. We then enter a while loop until we're able to filter out the latitude and longitude from/tmp/gpsdumpby using anawkcommand and we put the coordinates into theLATandLONGvariables. Then we clean up a bit after our script and output the coordinates on a line suitable forttytter. - Now, all we need to do is tweet something with
-locationadded as an argument, to enable geotagging for this particular tweet, then let our script pass in the GPS coordinates. Just remember that you need to havegpsdrunning for our script to work:pi@raspberrypi ~ $ ttytter -status="$(vcgencmd measure_temp) today, feeling cozy" -location $(~/passgps.sh)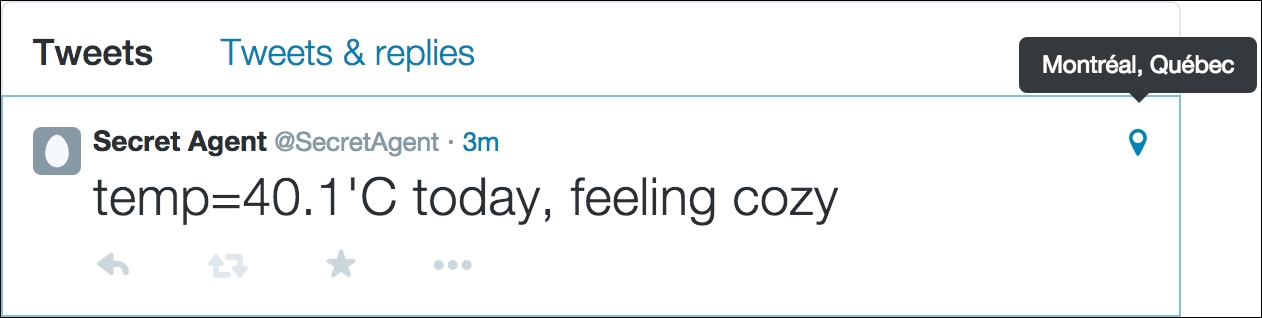 Tweet tagged with location obtained from GPS
With the right software, it's possible to compose e-mails, complete with attachments, directly from the command line. We'll be using some simple tools to add e-mail capabilities to your shell scripts.
Tip
Important:
It seems that the voicecommand package we installed back in Chapter 2, Audio Antics, sets up a Cron job, which tries to out an e-mail every minute. It's important that you remove the job file before going any further otherwise you are going to receive a non-delivery report in your mailbox every minute!!
pi@raspberrypi ~ $ sudo rm /etc/cron.d/gtextcommand
pi@raspberrypi ~ $ sudo apt-get install ssmtp
You'll now need to set up the client to send e-mails through your e-mail account. In the following configuration file, I've assumed that you have a Gmail account. The settings may be different if you use another e-mail provider.
Open the ssmtp configuration file using Nano:
pi@raspberrypi ~ $ sudo nano /etc/ssmtp/ssmtp.conf
Replace the entries with the following configuration:
root=<your-username>@gmail.com

mailhub=smtp.gmail.com:587

rewriteDomain=gmail.com

AuthUser=<your-username>@gmail.com

AuthPass=<your-password>

FromLineOverride=YES

UseSTARTTLS=YES
Let's break down each option:
root: This identifies what user account receives all mail for user ID under 1,000 on the local system. That basically means system accounts, such as the root user account. In other words, if your computer is trying to send your root account an e-mail message, it will send it to whatever e-mail address you specify here. This should normally be your primary e-mail account—probably the account for which you're configuringssmtpto send e-mails.mailhub: This is the fully qualified hostname for the SMTP server you will be using, so thatssmtpknows where to send outgoing e-mails. This option may actually take the formmailhub=mail.domain.com:587, which sets the port number to use when contacting the SMTP server to 587. This allows unencrypted connections to use 25 (the default port number for SMTP traffic). Port 587 is the standard alternate port number for TLS-protected SMTP connections on Gmail.rewriteDomain: This tellsssmtpthat your mail headers need to be edited to say that the domain name you use for your e-mail address will be listed as the source of your e-mail address. Failing to rewrite the source domain name in this manner may cause problems at the receiving end when your e-mail address arrives at its intended destination.AuthUser: This is the username used to log in to the remote SMTP server. In many cases, this is the part of the e-mail address that comes before the@sign in your e-mail address, or could be the entire e-mail address.AuthPass: This is the authentication password used with the username above.Because your e-mail password is stored in the file, you may want to make sure the
ssmtp.conffile permissions are set to640using thechmodcommand. This ensures that thessmtpand root accounts can access the file as needed, but no other accounts have access to the contents of the file.You will also need to ensure that you create an SSMTP user (with a command like:
       pi@raspberrypi ~ $ sudo pw useradd ssmtp -g nogroup
       -h - -s /sbin/nologin -d /nonexistent -c "ssmtp
       system user"
And set ownership of
ssmtp.confto that user:pi@raspberrypi ~ $ sudo chown ssmtp ssmtp.confFromLineOverride=YES: The From: header in an e-mail handled byssmtpcan be overwritten. Setting this to YES just uses the From: value provided by the program that sent the e-mail tossmtpto be forwarded to the SMTP server in the first place.UseTLS=YES: This is the configuration line that tellsssmtpto encrypt its connection to the SMTP server, protecting your authentication username and password, as well as the rest of the communications.
ssmtp can be used on its own, but can be a bit of a faff to automatically send e-mails (by default, you manually type the e-mail in with the command line, or create a text file), so we're also going to install the mailutils package:
pi@raspberrypi ~ $ sudo apt-get install mailutils
Once it's installed, we can use the mail command to send emails more easily. Send a test email through the (G)mail account setup above using the following command to make sure your settings are working:
pi@raspberrypi ~ $ echo "Test Email" | mail -s
    "Test Pi-Mail" [email protected]
In the preceding example, we are simply sending an e-mail with the body text Test Email to the recipient [email protected] with the subject Test Pi-Email.
All being well, you should receive the test e-mail in your mailbox within a few seconds or so.
Now that we can send basic e-mails from our Pi, let's try sending the WAV file we recorded earlier. But first, we need to install yet another package to help us with this:
pi@raspberrypi ~ $ sudo apt-get install mpack
Once that's installed, we'll use Gmail to send a message with a WAV file attachment:
pi@raspberrypi ~ $ sudo mpack -s "Pi Report"
    ~/myrecording.wav [email protected]
If the e-mail delivery fails, it's likely that you've received an e-mail in your Gmail inbox with the subject sign-in attempt blocked. To allow ssmtp to send mail, you will need to enable "less secure apps" by visiting the link in that e-mail. Alternatively, you can find it under the security settings of your Gmail account.
While we've done plenty of command scheduling with at in this book, it will only run a command once. If we need a command to be run regularly at certain times, Cron is better for the job and is already installed. To add a new task to run, we need to add it to our scheduling table, or crontab, with the following command:
pi@raspberrypi ~ $ crontab -e
If you are prompted to choose your text editor because it's the first time you've opened crontab, then select number 2 for nano.
Add your task to the bottom of the file on a blank line according to the following form:
Minute | Hour | Day of month | Month | Day of week | Command to execute
For example, to tweet a status update every hour:
0 * * * * ttytter -status="Alive: $(date)"
To tweet a status update every 10 minutes:
*/10 * * * * ttytter -status="Alive: $(date)"
You can also use one of the special predefined values among @hourly, @daily, @weekly, @monthly, @yearly, or @reboot to have a command run at startup.
Once you're happy with your line, save and exit nano to have your new crontab installed. To view your crontab, use this command:
pi@raspberrypi ~ $ crontab -l