

For more information, see “COLOPHON= System Option” in SAS System Options:
Reference.
Configuring Universal Printing Using the
Windowing Environment
Overview of the Universal Printing Menu
SAS Universal Printing windows are accessible from the File menu.
The following display shows the File menu containing the Universal Printing choices of
Page Setup, Print Setup, Print Preview, and Print.
Figure 15.5 File Menu Displaying Universal Printing Options
Table 15.5 Menu Choices or Commands to Open Universal Printing Windows
Menu Choice Equivalent Command
Page Setup DMPAGESETUP
Print Setup DMPRINTSETUP
Configuring Universal Printing Using the Windowing Environment 257

Menu Choice Equivalent Command
Print Preview DMPRTPREVIEW
Print DMPRINT
Windows Specifics
In the Windows operating environment, SAS uses the Windows print windows as the
default. To access the Universal Printing user interface, the UNIVERSALPRINT
system option must be set. To do this, include the following line of code in the string
that you use to invoke SAS in Windows:
-uprint
UPRINT is an alias for the UNIVERSALPRINT system option.
You can open Universal Printing windows by entering commands at the command line
or into the command box in the menu bar. The following table lists the commands for the
most common tasks.
Table 15.6 Commands to Open Universal Printing Windows
Action Command
Print the current window DMPRINT
Change the default printer DMPRINT or DMPRINTSETUP
Create a new printer or previewer definition DMPRTCREATE PRINTER or
DMPRTCREATE PREVIEWER
Modify, add, remove, or test printer
definitions
DMPRINTSETUP
Show default printer properties sheet DMPRINTPROPS
Show page properties sheet DMPAGESETUP
Print preview the current window DMPRTPREVIEW
Setting Up Printers
Print Setup Window
The File ð Print Setup menu selection opens the Print Setup window, where you can
perform the following tasks:
• Change the default printer.
• Remove a printer from the selection list.
• Print a test page.
• Open the Printer Properties window.
258 Chapter 15 • Printing with SAS
• Launch the New Printer wizard.
Alternatively, you can issue the DMPRINTSETUP command.
Change the Default Printer
To change the default printer device for this SAS session and future SAS sessions,
follow these steps:
1. Select File ð Print Setup. The Print Setup window appears.
2. Select the new default device from the list of printers in the Printer field.
3. Click OK.
Alternatively, you can issue the DMPRINTSETUP command.
Remove a Printer from the Selection List
To remove a printer from the selection list:
1. Select File ð Print Setup. The Print Setup window appears.
2. Select the printer that you want to delete from the list of printers in the Printer field
3. Click Remove.
Note: Only your system administrator can remove printers that the administrator has
defined for your site. If you select a printer that was defined by your system
administrator, the Remove button is unavailable.
Alternatively, you can issue the DMPRINTSETUP command.
Define a New Printer
While Universal Printing provides you with predefined printers, you can also add your
own printers with the Define a New Printer wizard. This wizard guides you step-by-step
through the process of installing a printer.
To start the New Printer wizard and define a new printer, follow these steps:
1. Select File ð Print Setup and click New.
The following window appears.
Configuring Universal Printing Using the Windowing Environment 259
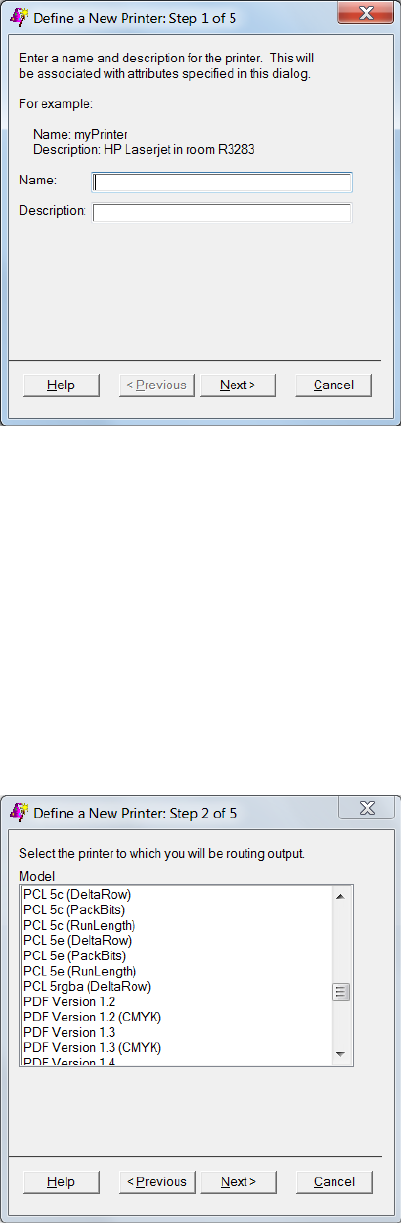
Figure 15.6 Printer Definition Window to Enter Name and Description
Alternatively, you can either issue the DMPRTCREATE PRINTER command or
issue the DMPRINTSETUP command and click New.
2. Enter the name and a description for the new printer (127-character maximum, no
backslash characters, not case sensitive).
The printer name is required. The description is optional.
3. Click Next to proceed to Step 2 of the wizard.
Select a printer model. If your exact printer model is not available, select a general
model that is compatible with your printer. For example, for the HP LaserJet printer
series, select PCL5 for monochrome printers or PCL5c for color printers.
Note: General models might provide fewer options than specific models.
Figure 15.7 Printer Definition Window to Select Printer Model
4. Click Next to proceed to Step 3 of the wizard.
The following window appears:
260 Chapter 15 • Printing with SAS

Figure 15.8 Printer Definition Window to Select Output Device
5. Select the Device type for your print output. Put this sentence in a paragraph under
the numbered item
The device type selections are host-dependent.
If you select Catalog, Disk, Ftp, Socket, or Pipe as the device type, then you must
specify a destination.
If you select a device type of Printer, then a destination might not be required,
because some operating environments use the Host options box to route output.
Note: Examples for your operating system of Device Type, Destination, and Host
options are also provided in “Sample Values for the Device Type, Destination,
and Host Options Fields” on page 281.
6. Enter the Destination for your file.
The destination is the target location for your device type. For example, if your
device type is disk, then your destination is an operating environment-specific
filename. With some system device types, the destination might be blank and you
can specify the target location using the Host options box.
7. Select or enter any host-specific options for the device that you chose.
This field might be optional for your operating environment. For a list of host
options, see the FILENAME statement information for your operating environment.
Note: The Destination and Host Options lists can also be populated using the
REGISTRY procedure. Click the Help button in step 3 to see the “Populating
Destination and Host Option Lists” topic, which contains more details.
8. Click Next to proceed to Step 4 of the wizard, in which you select from a list of
installed print previewers.
If no previewers are defined, proceed to the next step of the wizard.
Configuring Universal Printing Using the Windowing Environment 261
..................Content has been hidden....................
You can't read the all page of ebook, please click here login for view all page.