
Creating New Sprites Using Scratch’s Paint Editor
In addition to using the sprites supplied with Scratch and graphics that you acquire from the Internet, you can always create your own sprite using any graphic/paint program. Although it does not have all of the bells and whistles that applications like Corel Paint Shop Pro or Adobe Photoshop have, Scratch’s built-in Paint Editor, shown in Figure 2.20, offers everything needed to draw or modify graphics for use as sprites and backgrounds.
Figure 2.20. Scratch’s built-in Paint Editor program provides everything needed to create sprites and costumes.
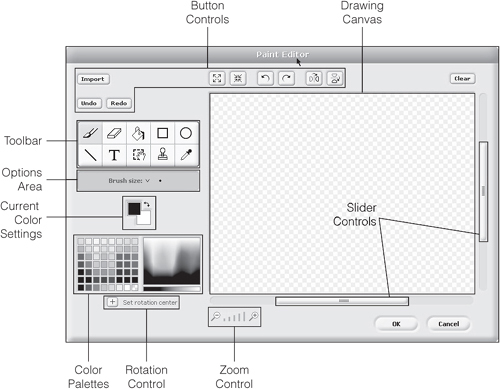
As Figure 2.20 demonstrates, Scratch’s Paint Editor is divided into multiple components. Thanks to Scratch’s cross-platform design, the Paint Editor looks and operates identically on both Microsoft Windows and Mac OS X.
Examining the Drawing Canvas
Links to the Paint Editor program are located just under the stage and within the Costumes and Backgrounds tabs located in the scripts area. The Paint Editor program can be used to create or modify new sprites, costumes, and backgrounds. Most of the space on the Paint Editor’s window is dedicated to a drawing canvas. To draw on the canvas, you select different drawing commands from the toolbar and then use the mouse to draw on the canvas. You can work with different colors and apply a range of special effects.
If the size of the graphic being worked on exceeds the available area, scrollbars are enabled on the right-hand side and the bottom of the drawing canvas, allowing you to view all parts of the graphic. You can also use the Zoom In and Zoom Out buttons located at the bottom of the Paint Editor window to temporarily increase or decrease the magnification of the drawing canvas.
Working with the Toolbar and Options Area
When creating or editing a graphic image on the drawing canvas, the buttons located on the Paint Editor’s toolbar provide access to essential features and functionality. The following list offers an overview of the functionality provided by each toolbar button:
Paintbrush. Allows you to draw freehand on the drawing canvas using the current foreground color and brush size.
Eraser. Allows you to erase selected portions of the drawing canvas using the current eraser size. Erased portions of the drawing canvas are returned to a transparent state.
Fill. Allows you to fill in enclosed areas with either a gradient or a solid color, depending on the selected option specified in the options area.
Rectangle. Allows you to draw filled-in or outlined rectangle shapes using the current foreground color.
Ellipse. Allows you to draw filled-in or outlined ellipses using the current foreground color.
Line. Allows you to draw straight lines using the current foreground color.
Text. Allows you to include text as part of a drawing using the current font type and size.
Selection. Allows you to select a rectangular portion of the drawing canvas and move it to a different part of the drawing canvas (cut and paste).
Stamp. Allows you to select a rectangular portion of the drawing canvas and copy it to different parts of the drawing canvas (copy and paste).
Eyedropper. Allows you to select the foreground color.
Most of the toolbar buttons accept configuration options that further refine the functionality provided by the button control. For example, Figure 2.21 shows the four configuration options that are provided when the Fill button has been selected. These options set the fill style that is applied and include the application of a solid color and the use of a horizontal gradient, vertical gradient, or radial gradient.
Figure 2.21. The content of the options area changes based on the selected toolbar button.

Note
A gradient is a color created by blending together the foreground and background colors.
Working with Button Controls
As shown in Figure 2.22, Scratch’s Paint Editor program includes a number of button controls that can initiate an assortment of different actions.
Figure 2.22. The Paint Editor provides access to key functionality through various button controls.
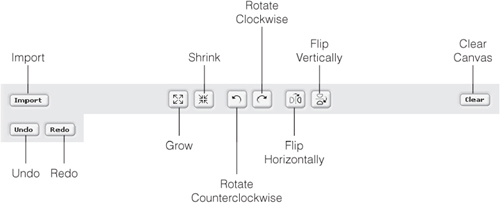
The following list identifies each of these buttons and explains its purpose:
Import. Opens an image from a graphic file stored on your computer.
Grow. Increases the size of the drawing canvas, allowing you to focus in on a particular area.
Shrink. Decreases the size of the drawing canvas.
Rotate counterclockwise. Rotates the drawing canvas counterclockwise.
Rotate clockwise. Rotates the Drawing canvas clockwise.
Flip horizontally. Flips the drawing canvas horizontally.
Flip vertically. Flips the drawing canvas vertically.
Clear canvas. Clears any graphics currently displayed on the drawing canvas.
Undo. Undoes the last action that you performed in the Paint Editor.
Redo. Redoes the last undone action.
Specifying Color Settings
The Paint Editor lets you specify current color settings for both foreground and background drawing using the current Color Settings control located on the left-hand side of the Paint Editor window, just under the options area. To set the current foreground color, click on the top square and then select a color from one of the color palettes that are displayed beneath the control. Likewise, you can set the current background color by selecting the bottom square and then selecting a color from one of the color palettes.
Configuring a Sprite’s Rotation Center
One final but very important Paint Editor feature that you definitely need to know how to use is the Set Rotation Center button located in the lower-left corner of the Paint Editor window. When clicked, this button displays a set of cross-hairs on the Paint Editor’s drawing canvas, as demonstrated in Figure 2.23. You can then use drag and drop to move the cross-hair over the portion of the sprite that you want to set up as the sprite’s rotational center when the sprite is rotated on the stage.

The sprite shown in Figure 2.23 is that of a rock that might be used in a space shooter game like Asteroids. In this type of game, the asteroid would move around the screen, threatening to destroy the player’s ship by colliding with it. To provide a realistic look and feel, you might want to tell Scratch to rotate the rock as its moves around the screen. By setting up the rock’s rotation point as the center of the sprite, it will appear to rotate or spin around its center. On the other hand, by settings its rotation point to be one of the edges of the rock, you can make it rotate in a more wobbly manner.