
Storing Data in Variables
As has already been stated, you can embed numeric data inside different types of code blocks, using it to control the operation of scripts. You can also store numeric data collected when your applications execute using variables. In Scratch, variables allow you to store, retrieve, and modify numeric data.
Note
Scratch cannot store string or Boolean data in variables.
Creating Scratch Variables
In order to store, modify, and retrieve data in a Scratch application, you need to create variables. In order to work with variables within your Scratch applications, you must first define and add them to your application projects. This is done by clicking on the Variables button located at the top of the blocks palette and then clicking on the Make a Variable button, as shown in Figure 7.2.
Figure 7.2. Creating and deleting Scratch variables.

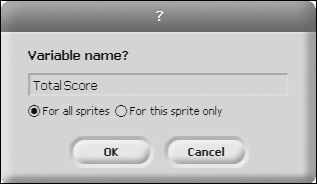
Once this button has been clicked, Scratch displays the window shown in Figure 7.3, allowing you to assign a name to the variable.
Figure 7.3. Assigning a name to a new Scratch variable.

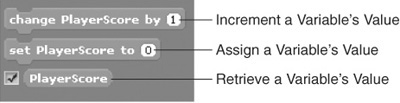
The name that you assign will be used to create and add three new code blocks to your Scratch project, as shown in Figure 7.4.
Figure 7.4. Scratch creates three new code blocks for each variable that you create.
In addition, a monitor showing the variable’s value is automatically displayed on the stage, as demonstrated in Figure 7.5.
Figure 7.5. Every new variable supports a monitor that displays its value.
![]()
Using the three code blocks created for every variable, you can assign an initial value to the variable, change its value while your application is running, and display a monitor on the stage, which shows the variable’s value.
Assigning Variables to Sprites and the Stage
Variables in Scratch applications belong to the sprites in which they are defined (or to the stage). Therefore, it is important that when adding new variables to your application, you select the thumbnail for the sprite (or stage) where the variable belongs. For example, variables that need to be accessed by different scripts belonging to different sprites may best be added to the stage, whereas a variable needed only by a specific sprite should be added to that sprite.
Assigning Names to Your Variables
Unlike many programming languages, Scratch is very flexible when it comes to naming variables. You can make variable names as long or as short as you want. Variable names can include:
Letters
Numbers
Special characters
Blank spaces
Because Scratch creates an endless supply of code blocks for each new variable that you define, it eliminates any concerns about case-sensitivity, making things a lot easier to work with.
Tip
Make your variable names as descriptive as possible. This will help make your scripts self-documenting. Although Scratch variable names can be extremely long, it’s a good idea to limit their length to a maximum of 30 characters. This provides you with plenty of room to create descriptive, manageable variable names.
Understanding Variable Scope
One very important concept that you need to understand when working with variables is variable scope. A variable’s scope identifies the location within an application where the variable’s value can be modified. Scratch supports two levels of variable scope, as outlined here:
Local. Variables that can be modified only by scripts belonging to the sprite in which the variable is defined.
Global. Variables that can be modified by any script in an application.
Note
Although local variables can only be modified by scripts belonging to the sprite in which they are defined, their assigned values can be retrieved (not modified) by scripts belonging to other sprites using sensing code blocks, as demonstrated a little later in this chapter.
Creating Local Variables
Local variables can be modified only within the sprite in which they are defined. The following procedure outlines the steps involved in creating a local variable.
1. | Select the sprite (or stage) to which the variable is to be added. |
2. | Click on the Variables button located at the top of the blocks palette. |
3. | Click on the Make a Variable button. |
4. | Enter the name you want to assign to the variable and then select the For This Sprite Only option, as demonstrated in Figure 7.6. |

Since a local variable can only be modified within the sprite to which it has been added, it cannot be modified by scripts belonging to other sprites. If you need a variable that can be accessed by any script within an application, create a global variable as discussed in the next section.
Creating Global Variables
Unlike local variables, a global variable’s value can be modified by any script within the application where it has been defined. You use the exact same procedure to create a global variable as you do when creating a local variable, the only difference being that you need to leave the default For All Sprites option selected when naming your variable, as demonstrated in Figure 7.7.
Figure 7.7. Creating a global variable named Total Score.
Tip
It is considered a good programming practice to restrict the scope of all variables to local whenever possible. This helps to make your applications easier to maintain and eliminates the possibility that you might accidentally modify the variable’s value using scripts belonging to other sprites.