
Getting Comfortable with the Scratch IDE
Scratch is a graphical programming language. Scratch applications are created by executing Scratch projects made up of different types of media, including graphics and sound, using scripts made up of different code blocks. Scratch projects are created using its IDE. As shown in Figure 2.1, Scratch’s IDE is composed of numerous components.
Figure 2.1. The Scratch IDE facilitates the development and execution of Scratch applications.

Together, all of the components identified in Figure 2.1 provide a robust and powerful, yet initiative and fun, work environment, providing everything needed to develop Scratch applications. The rest of this chapter will offer a detailed overview of each of the major components that make up the Scratch IDE.
Getting Familiar with Menu Bar Commands
Like most graphic applications, the Scratch IDE has a menu bar made up of a collection of buttons located at the top of the IDE, as shown in Figure 2.2.
Figure 2.2. The menu bar provides easy access to commands that you can use to create and save Scratch projects.
These buttons provide access to commands that allow you to create, open, and save Scratch projects as well as share them on the Internet, undo previous commands, change the language used by the IDE, and much more. The following list provides an explanation of each of the buttons that make up the menu bar.
New. Creates a new Scratch application project.
Open. Opens an existing Scratch application project.
Save. Saves the current Scratch project (with a file extension of .sb).
Save As. Saves the current Scratch project under a new name.
Share! Uploads a copy of the project to the Scratch website (http://scratch.mit.edu) where it can be made available for viewing and downloaded by other Scratch programmers.
Undo. Restores the last script, code block, or sprite deleted from the application project during the current working session.
Language. Lets you specify the language to be used by the Scratch IDE.
Extras. Displays a popup list from which you can select one of the following commands: Import Project, Start Single Stepping, Compress Sounds, or Compress Images.
Want Help? Displays a page that provides a link to the Scratch website as well as to the following set of resources: Reference Materials, Tutorials, or Frequently Asked Questions.
Most of the commands listed above are self-explanatory. However, the last three commands merit additional explanation. When clicked, the Language button displays a menu of programming languages from which you can select. Depending on the language selected, a complete translation may be available. In other cases, only scripts and code blocks may be translated.
Tip
You can display a tool tip for any of the button controls shown on the Scratch IDE by moving the mouse pointer over the button.
When clicked, the Extras button displays a menu that has the following options.
About. Displays a popup window that provides information about the version of Scratch being used.
Import Project. This command imports all of the sprites and backgrounds, along with any related scripts, from the specified project into the current project. As such, this command makes the sharing and movement of sprites and backgrounds between Scratch projects a snap.
Start Single Stepping. This command tells Scratch to execute an application a step at a time, allowing you to observe the execution flow of code blocks. This command will be discussed more thoroughly in Chapter 15, “Finding and Fixing Program Errors.”
Compress Sounds. This command compresses any sound files used by the current application project to reduce the project’s size. This is important because the Scratch website imposes a 10MB limit on the size of Scratch applications.
Compress Images. Like the Compress Sounds command, this command compresses any graphic image files used by the current application project to reduce the project’s size. By compressing the size of your application, you can sometimes reduce large Scratch projects enough to allow them to upload.
The last button on Scratch’s menu bar is the Want Help? button. When clicked, this button opens a browser window that provides access to the following resources.
Getting Started. Opens the “Getting Started with Scratch” PDF user guide.
Help Screens. Displays a collection of help screens that document the use and purpose of every Scratch code block.
Reference Guide. Opens the Scratch “Reference Guide” PDF reference file.
Visit the Scratch support page. Displays the Scratch support web page located at http://scratch.wik.is/Support.
Running Scratch Applications on the Stage
The stage is the area on the Scratch IDE, located in the upper-right side, as shown in Figure 2.3, where your Scratch applications execute. The stage provides a place for the sprites that make up your applications to interact with one another and the user.
Figure 2.3. The stage provides the canvas upon which sprites are displayed and interact with one another.

The stage is 480 units wide and 360 units high. The stage is mapped out into a logical grid using a coordinate system made up of an X-axis and a Y-axis, as demonstrated in Figure 2.4.
Figure 2.4. Sprites are placed on the screen and moved around using a system of coordinates.
As you can see, the X-axis runs from coordinates 240 to –240, and the Y-axis coordinate runs from coordinates 180 to –180. The middle of the stage has a coordinate location of (0, 0). Scratch keeps you informed of the pointer’s location whenever it is moved over the stage by displaying its (X, Y) coordinate position in the mouse x: and mouse y: fields just beneath the bottom-right side of the stage.
The stage can be assigned one or more backgrounds, allowing you to change its appearance during application execution. By default, all Scratch applications are assigned a blank background. You can add new backgrounds by clicking on the Stage thumbnail, located on the left-hand side of the sprite list, and then clicking on the Backgrounds tab located just above the scripts area. Like sprites, the stage can be assigned its own scripts and sound effects.
Tip
If you right-click on an open area on the stage, a popup menu will appear, displaying the following menu items:
Grab screen region for new sprite. Makes a copy of a selected portion of the stage and uses it to create a new sprite.
Save picture of stage. Saves a copy of the stage as a .GIF file.
Running Applications in Presentation Mode
As you saw in Chapter 1 when you created the Hello World project, Scratch runs your applications on the stage within the IDE by default. However, if you click on the Presentation Mode button, located just beneath the bottom-left corner of the stage, you can run your Scratch application project in Presentation mode. To see how this works, click on the Open button located at the top of the Scratch IDE and then locate and open the Hello World project. Next, click on the Presentation Mode button to switch to full-screen mode. Once in Presentation screen mode, single-click on the sprite representing the kitten and watch as your application executes, as demonstrated in Figure 2.5.
Figure 2.5. Running a Scratch application project in Presentation mode.

You can exit Presentation mode at any time either by clicking on the Exit Presentation Mode icon located just above the upper-left side of the stage or by pressing the Escape key.
Controlling Application Execution
Whether running your application from the IDE’s stage or in Presentation mode, you can automatically start any scripts that begin with the green flag control block by clicking on the green flag button located in the upper-right corner of the IDE, as shown in Figure 2.6. This same button is also available in Presentation mode. By clicking on the red stop button located right next to the green flag button, you can stop the execution of your applications any time you finish working with them.
Figure 2.6. The green flag and red stop buttons provide control over script execution.
![]()
Working with the Sprite List
Scratch applications are made up of sprites that interact with one another as they move around the stage. Each sprite that makes up a Scratch application is displayed as a thumbnail in the sprite list area, located on the lower-right portion of the Scratch IDE, as shown in Figure 2.7. Although it has no impact on a Scratch application, you can reorganize the order in which sprites are displayed in the sprite list by dragging and dropping thumbnails to any location that makes sense to you.
Figure 2.7. The sprite list displays a thumbnail for each sprite in an application.

In addition to a thumbnail, Scratch also displays the name of each sprite as well as the number of scripts and costumes belonging to each sprite. To work with a sprite and edit its scripts, costumes, and sound effects, just click on its thumbnail. The currently selected sprite is highlighted by a blue outline. Once selected, you can click on the Scripts, Costumes, and Sounds tabs located at the top of the script area to edit a sprite’s scripts, costumes, and sound effects.
If you right-click on a sprite’s thumbnail, the following list of menu options is displayed:
Show. Centers a sprite on the stage, placing it on top of all other sprites.
Export this sprite. Exports a sprite as a file, making it available to be imported into other Scratch projects.
Duplicate. Makes a copy of the sprite.
Delete. Removes a sprite from the project.
Tip
You can also export, duplicate, and delete sprites by right-clicking on any sprite on the stage and then selecting the corresponding menu items that are displayed.
The sprite list also displays a thumbnail representing the application project’s stage. When the stage’s thumbnail is selected, you can add scripts to the stage, modify the stage’s background by assigning it one or more graphic files, and also add sounds to the stage.
Generating New Sprites
Scratch makes it easy for you to work with sprites by providing three different options for adding them to your applications. These options are accessed through the New Sprite buttons located just below the stage, as shown in Figure 2.8.
Figure 2.8. The New Sprite buttons provide access to tools for adding and creating new sprites.

When clicked, the Paint New Sprite button starts Scratch’s Paint Editor program. This program provides everything you need to draw new sprites on a transparent background. You will learn the ins and outs of how to work with the Paint Editor program a little later in this chapter.
When clicked, the Choose New Sprite from File button displays the New Sprite window shown in Figure 2.9, providing access to different collections of graphic files that you can add to your Scratch applications as sprites. To select and add a sprite, all you have to do is to drill down into one of Scratch’s folders, find the sprite you want, and then click on the OK button. The sprite that you selected will then appear in the center of the stage, and a thumbnail representing the sprite will be added to the sprite list.
Figure 2.9. Scratch supplies easy access to a wide selection of ready-made sprites.

The Get Surprise Sprite button randomly retrieves one of Scratch’s ready-made sprites and adds it to your application project. It can be used to generate all kinds of wacky projects.
Tracking Mouse Pointer Location
As you learn how to develop your own Scratch applications, you will need to keep track of the initial placement and subsequent movement of sprites on the stage. Scratch assists you in this task by keeping track of mouse-pointer movement whenever you move the pointer across the stage (see Figure 2.10). You can use this information to identify the coordinates data that you need to incorporate into your application code as you develop the programming logic that drives your Scratch projects.
Figure 2.10. The Scratch IDE makes it easy to track the mouse-pointer’s location when it moves around the stage.

Working with the Scratch Toolbar
Another important component of the Scratch IDE is the toolbar, shown in Figure Figure 2.11. The toolbar provides access to commands that you can use to interact with and control the sprites that make up your applications.
Figure 2.11. The Scratch toolbar provides tools for interacting with sprites.

The following list summarizes the functionality provided by each of the toolbar’s buttons:
Move. Allows you to drag and drop sprites to different locations on the stage (default toolbar selection).
Duplicate. Makes a copy of the currently selected sprite, including its scripts, costumes, and sounds, providing an easy way of adding new sprites to your applications. Once a sprite is duplicated, you can customize the new copy of the sprite as you see fit.
Delete. Removes a sprite, including all its scripts, costumes, and sounds, from the project and removes its thumbnail from the sprite list.
Grow Sprite. Increases a sprite’s size, in case its actual size does not meet the needs of your application.
Shrink Sprite. Decreases a sprite’s size, in case its actual size does not meet the needs of your application.
By default, the Move button is always selected. However, you may select any of the other toolbar buttons by clicking on them and then clicking on the sprite that you want to work with.
Switching Between Code Block Groups
Like applications created by any programming language, Scratch applications execute program code made up of collections of code blocks that manipulate sprites and interact with the user. Scratch’s program code is organized into scripts belonging to sprites. Every sprite in an application can be assigned one or more scripts. In addition, the stage can also execute its own scripts.
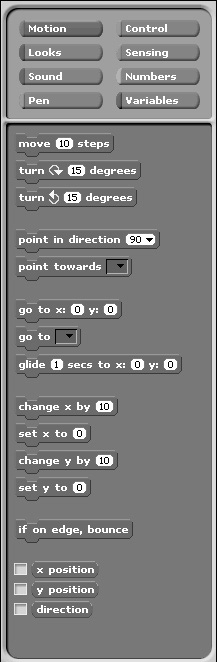
As you have already seen, the first step in creating a script is to select the sprite (or the stage) to which the script will belong. This is done by clicking on the appropriate thumbnail in the sprites list. You can then add code blocks by dragging the blocks from the blocks palette and dropping them into the scripts area (when the Script tab is selected). The blocks palette is organized into two sections. The top section contains eight button controls, each of which represents a different category of code block. Each of the buttons is color coded. The currently selected button is easily identified because it is filled in with its assigned color. The left-hand edge of the unselected buttons shows the color of the code blocks belonging to its category. For example, Figure 2.12 shows how the blocks palette looks when the Motion button has been selected.
Figure 2.12. Each category of code block is designed to accomplish a related set of tasks.
Trick
You can right-click (Control-click on Mac OS X) on any code block and then select Help from the resulting popup menu to get help information on any code block.
Getting Comfortable with the Scripts Area
The last major part of the Scratch IDE that you need to become familiar with is the scripts area, which consists of two major sections. The Current Sprite Info section, located at the top of the scripts area, displays information about the currently selected sprite. The rest of the scripts area is controlled by three tabs, which allow you to add scripts, costumes, and sounds to sprites.
Examining Sprite Details
The Current Sprite Info section displays the name currently assigned to the selected sprite, which, as demonstrated in Figure 2.13, is Sprite1. You can change a sprite’s name by typing over it. The sprite’s current coordinates and direction are displayed just beneath its name, and the sprite’s currently assigned costume is displayed just to the left of its name.
Figure 2.13. Changing a sprite’s name and viewing detailed information about the sprite.

Take note of the blue line that is displayed on the thumbnail in the Current Sprite Info section. It shows the sprite’s currently assigned direction. You can change the sprite’s direction by dragging the outside edge of this line to a new direction. If you do not like the direction that you have set for the sprite, double-click on the sprite to reset it back to its default direction (90-degree angle).
You can export the scripts as a stand-alone line by clicking on the Export button. This opens the Export Sprite window shown in Figure 2.14, allowing you to specify the location where you want to save the sprite, making it available for use in other Scratch application projects.
Figure 2.14. Exporting a sprite as a stand-alone graphic file.

Just beneath the Export button is a graphic file representing a padlock. Clicking on this image toggles the graphic between a locked and unlocked state. When set to locked, Scratch prevents the sprite from being dragged around the stage by the user when the script is run in Presentation mode or when run from the Scratch website.
Just to the left of the sprite’s currently selected costume are three buttons that you can use to specify the sprite’s rotation style. These three buttons are mutually exclusive, meaning that you can only select one. Table 2.1 identifies the rotational style represented by each of these buttons.
Tip
To get a better feel of the effect that Scratch’s rotational buttons have on a sprite, click on each of them and observe the rotational movement of the sprite costume in the Current Sprite Info section.
Editing Scripts
As you have already seen, Scratch scripts are created by dragging code blocks from the blocks palette onto the scripts area (when the Scripts tab has been selected). Of course, the code blocks must be added in a manner that makes logical sense, which is what Chapters 5 through 22 are designed to teach you.
Tip
As you add new scripts and modify existing ones, it is easy to leave the scripts area in a mess. One way of dealing with this situation it to spend a few minutes dragging and dropping scripts so that they line up and are evenly spaced. However, a much faster and easier option is to right-click on a free area within the scripts area and then click on the clean-up option located in the popup menu that is displayed. In response, Scratch will realign all of your scripts for you.
Adding Costumes
A sprite can have one or more costumes, allowing it to change its appearance as an application executes. A sprite must have at least one costume. For example, Figure 2.15 shows a sprite that has two costumes. Each costume is assigned a unique name and number (displayed just to the left of the costume’s image).
Figure 2.15. Importing and assigning a sound file to a sprite.

By default, Scratch only displays a sprite’s first costume. You can drag and drop costumes to change their position in the list. When moved, the number assigned to the costume is automatically changed as well.
Scratch gives you three different ways of adding new costumes to sprites. For starters, you can click on the Paint button. This opens the Paint Editor program, which you can use to draw a new costume. You can also add a new costume to a sprite by clicking on the Import button and specifying an image file from a folder on your computer. Lastly, you can drag and drop an image file from the Internet or your desktop onto the scripts area when the Costumes tab is selected.
Note
Scratch can work with different types of graphic files, including GIF, JPG, BMP, and PNG files. Scratch can also work with animated GIF files. An animated GIF file is a graphic made up of two or more frames, each of which is displayed as an automated sequence when the GIF file is displayed.
Once added, you can modify a costume by selecting it and clicking on the Edit button, which opens the Paint Editor. You can also add a new costume to a sprite by selecting an existing costume and then clicking on the Copy button. Once the copy of the costume has been added, you can click on its Edit button, allowing you to modify it using the Paint Editor.
You can delete a costume from a sprite by selecting it and then clicking on the round Delete button to the right of the Copy button. You can also turn a costume into a sprite or export it as a stand-alone costume by right-clicking on it and selecting the appropriate option from the popup menu that appears.
Note
The stage can be assigned a graphic to be used as a background upon which the application’s sprites are displayed. In fact, the stage can be assigned a series of backgrounds, allowing an application to change backgrounds during application execution. To view, edit, and make a copy of a background, select the stage thumbnail located in the sprite list. When you do this, the Costumes tab in the scripts area changes to the Backgrounds tab, allowing you to modify and work with application backgrounds. From here you can also create new backgrounds yourself by clicking on the Paint button. This opens Scratch’s Paint Editor program, discussed later in this chapter, allowing you to create any background you want. You can also click on the Import button to add an external graphic file to your application as a background.
Adding Sound Effects
Just as sprites can have different costumes, you can also assign one or more sounds to them (or to the stage), which can be played during application execution, either as background music or noise or as sound effects during game play. Scratch can play back MP3 files as well as most WAV, AU, and AIF audio files. To view the sound files associated with a sprite or to record or import a new file, select the sprite’s thumbnail in the sprite list and then click on the Sounds tab in the scripts area. A list of the sound files belonging to the sprite is displayed, as demonstrated in Figure 2.16.
Figure 2.16. Adding and editing sound files.

Once the Sounds tab has been selected, you can perform any of the following actions on any sound files that belong to the sprite:
Change the name used to refer to the sound within the application.
Click on the Play button to listen to the sound.
Click on the Stop button to halt sound playback.
Click on the Delete button to remove the sound from the application project.
In addition to interacting with a sprite’s existing sound file, you may add new sound files by clicking on the Record button. In response, the Sound Recorder window appears, as shown in Figure 2.17, allowing you to record and save a new sound file. Of course, to record your own sound files, your computer will need to have a microphone.
Figure 2.17. Recording a new audio file to be used as part of a Scratch application.

You can also add new sound files to your Scratch application by clicking on the Import button, which opens the Import Sound window, as shown in Figure 2.18, allowing you to select a sound file. Scratch provides access to tons of prerecorded sound files. By default, the Import Sound window displays a listing of folders containing different collections of sound files.
Figure 2.18. Importing and assigning a sound file to a sprite.

Keeping Project Notes
Another important feature of the Scratch IDE is the ability to add and update project notes. Scratch allows you to add project notes when you first save your application project. Once they are saved, you may update your project’s notes at any time by clicking on the Project Notes icon located in the upper-right corner of the IDE. In response, the Project Notes window displays, as demonstrated in Figure 2.19.

The Project Notes window operates like a simple Notepad program, allowing you to type in any text you want.
Tip
Use the Project Notes window to help document your Scratch applications, leaving behind information that explains the application’s purpose and why you designed it the way you did. If you plan on uploading your project to the Scratch website, then project notes take on additional value. Specifically, text saved as notes is displayed on the same web page as your project and can therefore provide instructions for running your application.