
Three Basic Types of Scratch Blocks
Scratch applications are made up of sprites that interact with one another and the user. Sprites are controlled and animated by scripts. Sprites can have any number of scripts, each of which is designed to perform a specific task or action. Scripts are made up of one of more Scratch code blocks. In total, there are more than 100 different Scratch blocks, each of which is designed to fulfill a specific purpose. These blocks can be broadly classified into three categories, as outlined here:
Stack blocks
Hat blocks
Reporter blocks
Working with Stack Blocks
The majority of code blocks provided by Scratch are stack blocks. Stack blocks are code blocks with a notch at the top or a bump at the bottom. The notches and bumps serve as visual indicators that identify how the blocks can be snapped together to create programming logic. Figure 3.2 shows an example of a typical stack block.
Figure 3.2. An example of a code block that is used to halt the playback of an audio file.
![]()
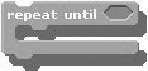
The notch on the top indicates that the code block can be attached to the underside of another code block. The bump at the bottom of the code block allows other code blocks to attach to its underside. Figure 3.3 shows an example of another stack block. This block will repeatedly execute any code blocks that you choose to embed inside it for as long as a tested condition evaluates as true.
Figure 3.3. This code block allows other stack blocks to be embedded within it.
Note
You will learn about the application of repetitive and conditional programming logic in Chapter 9.
Some stack blocks include an input area inside them that allows you to specify a value by typing in a number. For example, the stack block shown in Figure 3.4 lets you assign the color to be used when drawing by inserting a color-associated numeric value.
Figure 3.4. This code block is used to specify the color to be used when drawing.
![]()
To modify the value assigned to a block like the one shown in Figure 3.4, click on the white area within the code block and type in a new value. Some code blocks let you configure them by selecting a value from a pull-down list, as demonstrated in Figure 3.5.
Figure 3.5. This code block has a pull-down menu that you can use to configure how it operates.

Working with Hat Blocks
A hat block is a code block with a rounded or curved top and a bump at the bottom, visually indicating that it can be snapped on top of other stack blocks. Hat blocks provide the ability to create event-driven scripts. An event-driven script is one that automatically executes when a specified event occurs. An example of an event that can automatically trigger script execution is when the user clicks on the green flag button. When this event occurs, any scripts that begin with the hat block shown in Figure 3.6 are automatically executed.
Figure 3.6. This hat block automatically runs a script when the user clicks on the green flag.
![]()
Script execution can also be triggered when the user clicks on a sprite. This can be set up by adding the code block shown in Figure 3.7 to the beginning of the script.
Figure 3.7. This hat block runs a script whenever the user clicks on the sprite to which this script belongs.
![]()
Note
Every sprite in an application can potentially have its own scripts. You can automate the execution of any or all of the scripts using hat blocks. In addition to sprites, the stage can also have scripts.
Working with Reporter Blocks
A third type of Scratch code block is a reporter block. A reporter block is a code block that has either rounded or angled sides and is specifically designed as a mechanism for providing input for other code blocks to process. For example, the code block shown in Figure 3.8 is a typical reporter block.
Figure 3.8. This code block retrieves a numeric value indicating a sprite’s volume.
![]()
As you can see, this reporter block has rounded sides. As such, it can only fit into code blocks like the one shown in Figure 3.9, whose input area displays a shape with rounded sides.
Figure 3.9. You can provide input to this code block by either keying it in or using a reporter block.
![]()
Figure 3.10 shows an example of a reporter block that has angled sides. This particular code block returns a value of true if the user has pressed the spacebar or a false if the spacebar has not been pressed. Because it has angled sides, it can only be embedded inside code blocks that contain an input area whose sides are also angled.
Figure 3.10. Angled report blocks pass Boolean data to other code blocks for processing.
![]()
Note
Boolean is a term used to represent data that has one of two values, either true or false.
To take advantage of a reporter block like the one shown in Figure 3.10, you need to embed the reporter block into another code block that has been designed to work with it. For example, Figure 3.11 shows one such code block.
Figure 3.11. This code block pauses script execution until a specified event is true.
![]()
Figure 3.12 demonstrates how a reporter blocks looks after being embedded within another code block.
Figure 3.12. This particular combination of code blocks will pause script execution until the user presses the spacebar.
![]()