
Developing the Basketball Quiz Project
The rest of this chapter is devoted to guiding you through the development of your next Scratch application, the NBA Trivia Quiz. This application makes extensive use of variables to store and retrieve player input and to keep track of the player’s quiz results. In total, the application is made up of a background, six sprites, and six scripts.
When executed, this application presents the user with an electronic quiz made up of five questions, designed to evaluate the user’s knowledge of NBA trivia.
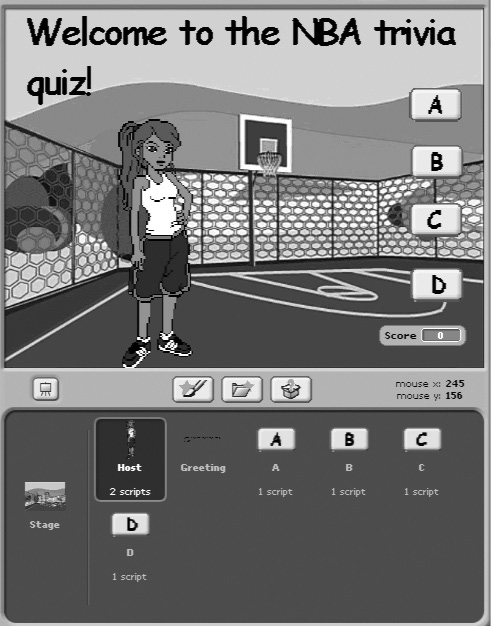
Figure 7.13 shows an example of how the game looks when first started. To begin game play, the user must click on the sprite representing the game’s hostess, at which point she will begin administering the quiz.
Figure 7.13. The NBA Trivia Quiz presents the user with a series of multiple choice questions.
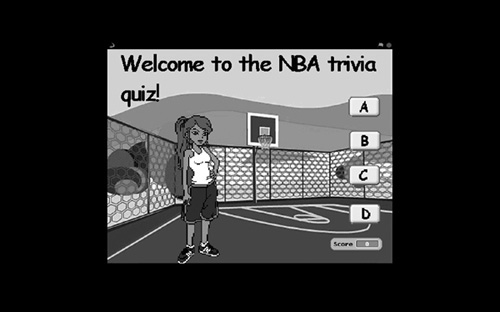
Figure 7.14 provides an example of how the hostess interacts with the user when administering the quiz.
Figure 7.14. The user answers questions by clicking on buttons labeled A, B, C, and D located on the right-hand side of the stage.

The hostess provides the user with immediate feedback after each question is answered, letting the user know if the answer was correct or incorrect. In addition, the user’s score is automatically tabulated after each answer is evaluated and displayed in a monitor located at the lower right-hand side of the stage.
The development of this application project will be created by following a series of steps, as outlined here:
1. | Creating a new Scratch application project. |
2. | Adding a background to the stage. |
3. | Adding and removing sprites and costumes. |
4. | Adding variables needed by the application. |
5. | Adding scripts to each button sprite to collect user answers. |
6. | Adding the programming logic required to administer the quiz. |
7. | Saving and executing your work. |
Step 1: Creating a New Scratch Project
The first step in creating the NBA Trivia Quiz application is to create a new Scratch application project. Do so by starting Scratch, thereby automatically creating a new Scratch application project or, if Scratch is already running, by clicking on the New button located on the Scratch menu bar.
Step 2: Selecting an Appropriate Stage Background
Once you have created your new Scratch project, it is time to get to work. Let’s begin by adding an appropriate background to the stage. To do so, click on the blank stage thumbnail located in the sprite list. Once selected, modify its background by clicking on the Backgrounds tab located at the top of the scripts area. To add a new background to the application, click on the Import button. When the Import Background window opens, click on the Indoors folder and then select the basketball-court thumbnail and click on the OK button.
Since this application only requires one background, you can remove the default blank background named background1 from your project by clicking on its Delete This Costume button.
Step 3: Adding and Removing Sprites
This application consists of a number of sprites, representing a hostess who is responsible for administering the quiz, four buttons on which the user must click when answering quiz questions, and a graphic containing a welcoming text message. Before adding any sprites, go ahead and remove the cat sprite from the application, since it will not be needed.
To add the sprite representing the game’s hostess, click on the Choose New Sprite from File button to open the New Sprite window. Drill down in to the People folder and then select the girl3-standing sprite and click on the OK button. Enlarge the sprite and reposition it as demonstrated in Figures 7.13 and 7.14. While you are at it, change the name assigned to the sprite to say host.
Next, click on the Choose New Sprite from File button and then drill down into the Things folder and select the button sprite and click on the window’s OK button. Once the button sprite has been added, select it in the sprites list, click on the Costumes tab located at the top of the scripts area, and then click on the Edit button. This will open the sprite in the Paint Editor program. Click on the Text button located on the Paint Editor’s toolbar and then specify ComicSans as the font type and 18 as the font size, type an uppercase letter A onto the middle of the button sprite, and then click on OK. Next, rename the sprite A.
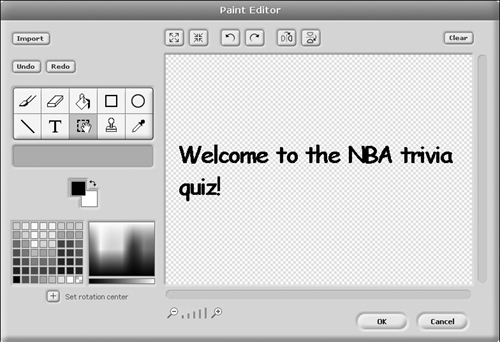
Using the same series of steps outlined in the previous paragraph, add three additional instances of the button sprite to the application, naming them B, C, and D. Once added, align all four of the button sprites along the right-hand side of the stage, as demonstrated in Figures 7.13 and 7.14. At this point, you only have one last sprite to add. This sprite will need to be created from scratch. To do so, click on the Paint New Sprite button and then after specifying ComicSans as the font type and 18 as the font size, type Welcome to the NBA trivia quiz! as demonstrated in Figure 7.15 and click on the OK button.
Once added, reposition this new sprite at the top of the stage, as shown in Figures 7.13 and 7.14.
Step 4: Adding Variables Required by the Application
In order to execute, this application needs three variables as shown in Figure 7.16. To add these three variables to the application, click on the Variables button located at the top of the blocks palette and then click on the Make a Variable button three times to create three global variables named Answer, Clicked, and Score.
Figure 7.16. The NBA Trivia Quiz requires the addition of three global variables.

The variable named Answer will be used to keep track of the user’s answers to each quiz question. The variable named Clicked will be used to control application execution, making sure that the script used to administer the quiz pauses and waits each time the user is prompted to answer a new question. The variable named Score will be used to keep track of the user’s score (grade).
By default, Scratch will display monitors on the stage for all three of these variables. However, the game only needs to display the Score monitor. Therefore, you should clear the monitor check boxes for the Answer and Clicked variables. Also, the monitor for the Score variable needs to be moved to the lower right-hand corner of the stage.
Step 5: Adding Scripts to Button Sprites to Collect User Input
The programming logic that controls the overall administration of the quiz will be added to the host sprite, which is responsible for displaying quiz questions, collecting user answers, and then grading the results. In order to answer quiz questions, the user must click on one of the four sprite button (A, B, C, or D) when prompted by the hostess. Each of these four sprites has a small script belonging to it, which sets two variables when it is clicked. Below is the script that is executed when the A sprite is clicked.

As you can see, this script begins with a hat block that executes whenever the A button is clicked. When this happens, the valued assigned to the Clicked variable is set to 1, and the value assigned to the Answer variable is also set to 1.
The Clicked variable is used in the application to keep track of when the user answers a question. This variable’s value is set to 1 when the A sprite is clicked, indicating that the user has submitted an answer. Once the answer has been evaluated by a script belonging to the host sprite, the value of Clicked is set back to 0, making the application ready to process a new question. The Answer variable is used to identify which button has been clicked. Assigning a value of 1 to this variable indicates that the A sprite has been clicked.
The programming needed by the B sprite is shown next. As you can see, it is almost identical to the code assigned to the A sprite, with the value assigned to the Clicked variable being set to 1 when the button is clicked. Note that the value assigned to the Answer variable is 2, indicating that the second button (the B sprite) has been clicked.

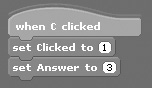
The code blocks that make up the C sprite scripts are shown next. As you can see, the third code block is used to identify when it is clicked.
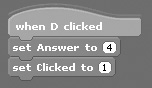
As you have probably anticipated, the code blocks that make up the script for the D sprite, shown next, assign a value of 4 to the Answer variable.
Step 6: Automating the Administration of the Quiz
At this point, you should have added scripts to each of the button sprites that indicate when they have been clicked and uniquely identify which of the four buttons was selected. Now it is time to create the two scripts belonging to the host sprite. The first script, shown next, is responsible for starting the application and getting the application ready to administer the quiz.

As you can see, this script has been set up to execute when the user clicks on the green flag button. When this happens, the values assigned to all three of the script’s variables are set to 0 (setting the score to zero, indicating that none of the buttons have been clicked, and that no answer has been specified). Next, two looks code block are used to display instructions, welcoming the user and then instructing her to click on the hostess when ready to begin taking the quiz.
The host sprite’s second script, shown here, is responsible for the overall administration of the quiz. As you can see, it is pretty big and is made up of many different types of code blocks, some of which you have not learned about yet. As such, only a high-level overview of the script will be provided in this chapter. Once you have read Chapters 9 and 10, you may want to return and review this script again.
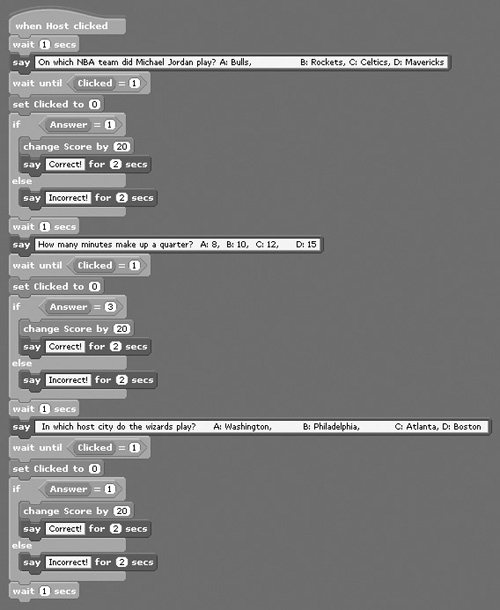
This script begins with a hat code block that executes when the user clicks on the host sprite. Next, the script’s execution is paused for one second, and then a looks block is used to display a text message, presenting the user with the quiz’s first question. The next code block, which contains a pair of embedded code blocks, pauses script execution and waits until the value assigned to the Clicked variable is set to 1 (which will occur only when the user specifies an answer by clicking on one of the four button sprites).
The value assigned to Clicked is then reset to 0, making the variable ready for the next quiz question. Next, a control code block is used to evaluate the user’s answer to the quiz question. This is accomplished by checking to see if the player clicked on the A sprite, as indicated by a value of 1 being assigned to Clicked. If this is the case, the user’s score is increased by 20, and a looks block is used to display a text message informing the user that her answer was correct. If this is not the case, the user is notified that the answer provided was incorrect.
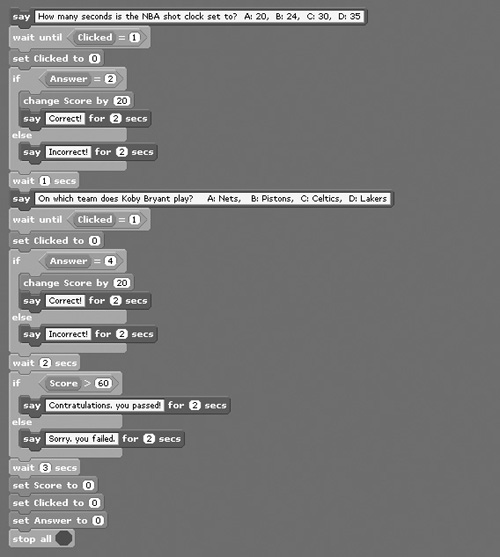
The next four quiz questions are administered using programming logic that is identical to that used to administer the first question, the only difference being that a different question is presented, and a different answer is required. Finally, once the last quiz question has been processed, the script’s execution is paused for two seconds, after which the user’s grade (the value assigned to Score) is evaluated to see if it is greater than 60, in which case the hostess announces that the user has passed the quiz. If this is not the case, the hostess announces that the user has failed. Either way, a three-second pause ensues, after which the values assigned to all three variables are reset to their default starting value of 0, to make the quiz ready for the next person. Finally, one last control block is executed, ensuring that all scripts within the application terminate their execution.
Step 7: Saving and Executing Your New Application
At this point, you have all the information needed to create your own copy of the NBA Trivia Quiz. Assuming that you have been following along and creating your copy of the application as you made your way through this chapter, then your application project should look something like the example shown in Figure 7.17.
Figure 7.17. The completed application consists of a stage background, six sprites, and six scripts.
If you have not done so, go ahead and save your new application. Once saved, switch to Presentation mode and start the NBA Trivia Quiz. As you test your new application, make sure that the feedback being provided by the hostess after each answer is correct. In addition, keep an eye on the Score monitor and make sure that the game is correctly tabulating your grade.