
Creating the Virtual Scratch Fish Tank
The rest of this chapter is dedicated to leading you through the development of a virtual fish tank application. In this Scratch application, five sprites, representing a range of colorful fish and a small octopus, busily swim around the fish tank, represented by a suitable background, as demonstrated in Figure 5.13.
Figure 5.13. An example of the virtual fish tank application in action.

This application will be created by following a series of steps, as outlined here:
1. | Creating a new Scratch application project. |
2. | Adding a stage background. |
3. | Adding and removing sprites to and from the project. |
4. | Importing a sound file into the application. |
5. | Adding the programming logic required to play a background sound effect. |
6. | Adding the programming logic required to animate fish tank activity. |
7. | Saving and executing your work. |
Step 1: Creating a New Scratch Project
The first step in creating this Scratch project is to start Scratch, thereby automatically creating a new Scratch application project. Alternatively, if you already have Scratch up and running, you can create a new project by clicking on the New button located on the Scratch menu bar.
Step 2: Adding a Background to the Stage
Once you have a new application project ready to go, let’s begin by adding a suitable background to the stage that will give the virtual fish tank an appropriate look and feel. To set this up, click on the blank thumbnail representing the stage in the sprite list and then click on the Backgrounds tab located at the top of the scripts area. Next, click on the Import button, displaying the Import Background window. Double-click on the Nature folder, scroll down and select the underwater graphic, and then click on the OK button. Once the new background has been added, go ahead and remove the blank stage background from the application.
Step 3: Adding and Removing Sprites
The next step in the development of the virtual fish tank application is to add sprites to the application representing different marine life. Before doing this, remove the cat sprite from the application, since it is not needed. To do so, right-click on its thumbnail in the sprites list and select Delete from the popup menu that appears. Once you have removed the cat sprite, it is time to add new sprites needed by the application.
In total, you need to add five new sprites. Four of the sprites will represent different fish, and the fifth sprite will represent a small octopus. To add the octopus sprite, click on the Choose Sprite from File button located in the middle of the new sprite button controls. This will open the New Sprite window. Double-click on the Animals folder, scroll down and select the fish1 - a sprite, and then click on the OK button. Next, click on the sprite’s thumbnail in the sprites area and then change the name assigned to the sprite to Blue.
Using the same set of steps described above, add the following list of sprites to the application project, renaming each sprite as indicated in Table 5.1.
| Sprite Filename | Sprite Application Name |
|---|---|
| fish2 | Purple |
| fish3 | Yellow |
| fish4 | Spotted |
| octopus1-a | Squid |
Once you have added all five sprites, move the sprites to random locations on the stage. Next, change the direction in which each sprite moves by selecting each sprite and then changing it in the sprite info area by repositioning the direction of the blue line displayed on the image of the sprite.
Tip
To make the virtual fish tank more interesting, set the fish and the octopus up so that each moves in a different direction and angle.
Step 4: Adding a Suitable Audio File to the Stage
Now that the application’s background and sprites have been added, it is time to add an audio file that when played will give the virtual fish tank a realistic feeling. Specifically, we’ll add an audio file that when played makes bubble sounds. To accomplish this task, click on the thumbnail representing the stage in the sprite list and then click on the Sounds tab in the scripts area. Next, click on the Import button to display the Import Sound window. Next, double-click on the Effects folder and then select the Bubble audio file and click on OK.
Tip
To help keep your Scratch application as small as possible, remove the default pop audio file from the background.
Step 5: Playing the Audio File
Now it is time to add the programming logic needed to make your new application run. In total you will need to add six scripts to the project, one for the stage and one for each of the application’s five sprites.
The script to be added to the stage will be responsible for playing the background sound effect that makes the virtual fish tank sound like a real fish tank. To create it, click on the stage thumbnail located in the sprites area and then select the Scripts tab located at the top of the scripts area. Next, add and configure the following code blocks exactly as shown here:

This script consists of a hat block that will execute whenever the green flag button is pressed. When this occurs, a loop is set up that repeatedly executes two blocks. The first code block is a sound block that plays the audio file you previously added to the stage. The second code block pauses script execution for four seconds to give Scratch time to finish playing the audio file, before allowing the loop to repeat and play it again.
Step 6: Animating the Swimming of the Fish
With the programming logic required to provide the application’s background sound effect now in place, it is time to write the scripts that will animate the movement of the fish and octopus. To set this up, you need to add a small script to each of the sprites that provides the programming logic required to control the movement of the sprites as they move (or swim) around the fish tank.
Scripting the Movement of the Blue Fish
Let’s begin by automating the movement of the sprite name Blue. Do so by clicking on the sprite’s thumbnail and then creating the following script for it:

As you can see, this script is set up to begin executing the moment the user clicks on the green flag button. It contains a control block that sets up a loop that repeats the execution of two embedded motion blocks. The first motion block moves the sprite in its current direction every time the loop repeats. The second motion block tells Scratch to bounce the sprite off of the edge of the stage when reached. As a result, the sprite (blue fish) will appear to swim around the fish tank from side to side, and depending on whether you have adjusted its direction as instructed at the end of Step 3, it will move up and down as well.
Scripting the Movement of the Purple Fish
Next, let’s create a script that controls the movement of the purple fish. Rather than build this script from scratch, let’s take a shortcut. With the script for the blue fish currently displayed on the scripts area, drag and drop the script onto the thumbnail representing the purple sprite in the sprites list. This adds an exact copy of the script to the purple sprite, which you can then view and modify by clicking on the purple sprite’s thumbnail.
To make things interesting, modify the number of steps that the purple sprite is moved from 1 to 2, as shown here:
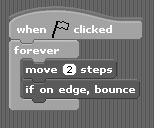
Other than moving the purple fish at a little faster pace than the blue fish, the programming logic that controls both fish is identical. In fact, the programming for all of the remaining fish and the octopus is identical, except for variances in the number of steps the sprites are moved.
Scripting the Movement of the Yellow Fish
Using drag and drop, add a copy of the purple sprite’s script to the yellow sprite and then modify it as shown here:

As you can see, the yellow sprite has been configured to move at the same pace as the blue sprite.
Scripting the Movement of the Spotted Fish
Once again, using drag and drop, add a copy of the yellow sprite’s script to the spotted sprite and then modify it as shown here:
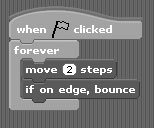
This time the sprite has been configured so that it moves two steps at a time.
Scripting the Movement of the Octopus
Last but not least, drag and drop the script for the spotted sprite onto the sprite representing the octopus and then modify it as shown here:
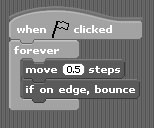
As you can see, this sprite has been configured to move slower than any of the other sprites, at just a half step at a time.
Step 7: Saving and Executing Your New Scratch Application
At this point your copy of the virtual fish tank application should be complete and should look like the example shown in Figure 5.14.
Figure 5.14. The completed application consists of a background, five sprites, and six scripts.

If you have not done so yet, save your new application and then run it to see how it looks. To save your application, click on the Save button located on the Scratch menu bar. This will display the Save Project window, allowing you to specify the name of the application, the location where you want to store it, your name, and comments documenting the application and its purpose.
Once you have saved your application, go ahead and run it. Since all of the scripts in the application are configured to execute when the green flag button is pressed, all you have to do is to click on the green flag button and then sit back and relax as you watch and listen to your virtual fish tank.