
Developing the Ball Chase Game
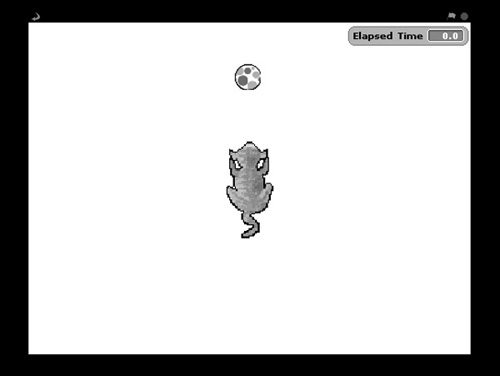
The rest of this chapter is dedicated to teaching you how to create your next Scratch application, the Ball Chase game. This application makes heavy use of different control blocks to control the movement of the ball and the cat that chases it around the stage. In total, the application is made up of four sprites and nine scripts. The object of the game is to try to prevent the cat from catching the ball as it chases it around the stage. If you can keep the ball out of the cat’s reach for 30 seconds, you win. Figure 9.8 shows how the game looks when first started.
Figure 9.8. The object of the game is to prevent the cat from catching the ball.
To play, all you have to do is move the mouse-pointer around the stage, and the ball will automatically follow. If the cat manages to catch the ball before 30 seconds is up, the game ends, as demonstrated in Figure 9.9.
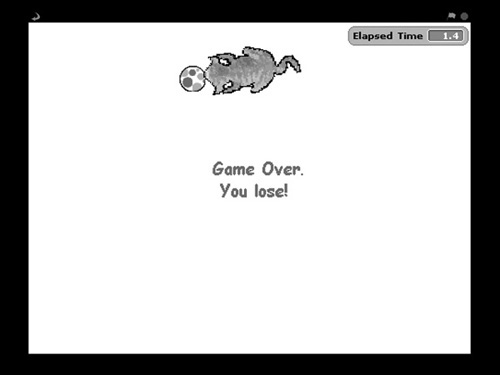
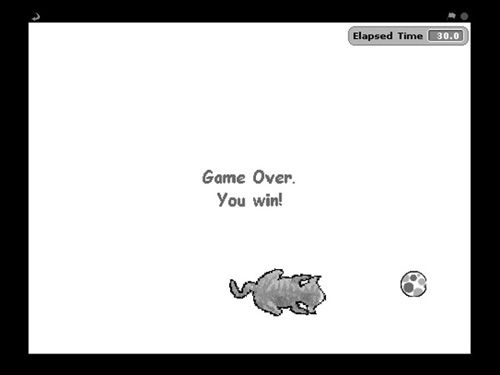
Figure 9.10 shows how the game looks when the player successfully manages to evade the cat for the entire 30 seconds.
Figure 9.10. The player wins if the ball can be kept away from the cat for 30 seconds.
The development of this application will be accomplished by following a series of steps, as outlined here:
1. | Creating a new Scratch project. |
2. | Adding and removing sprites. |
3. | Adding variables needed by the application. |
4. | Adding an audio file to the application. |
5. | Adding a script to control ball movement. |
6. | Adding scripts that display game over messages. |
7. | Adding the scripts required to control and coordinate game play. |
8. | Saving and executing your work. |
Step 1: Creating a New Scratch Project
The first step in the development of the Ball Chase game is to create a new Scratch project. To do so, start Scratch, automatically creating a new Scratch project, or if Scratch is already running, click on the New button located on the Scratch menu bar.
Step 2: Adding and Removing Sprites
The Ball Chase game is made up of the default Cat sprite plus three other sprites and a variable monitor, as shown in Figure 9.11.
Figure 9.11. An overview of the different parts of the Ball Chase game.

Since the default Cat sprite is not needed in this application, go ahead and remove it. In its place you need to add a different sprite, representing a top-down view of a different Cat sprite. To add this sprite, click on the Choose New Sprite from File button. When the New Sprite window opens, drill down in to the Animals folder and then select the cat2 sprite and click on the OK button. By default, the sprite is placed in the middle of the stage and faces in a 90-degree direction. Leave this sprite in its default location in the middle of the stage, change its direction to 0, and then change its assigned name to Cat. Next, add the Ball sprite by clicking on the Choose New Sprite from File button, drilling down in to the Things folder, selecting the beachball1 sprite, and then clicking on the OK button. Place the Ball sprite on the top center of the stage and change its assigned named to Ball.
To add the application’s remaining two sprites, which will be nothing more than text strings saved as sprites, you must create them, which you can do using Scratch’s built-in Paint Editor program. Both of these sprites consist of text messages. For the first of these two sprites, open the Paint Editor by clicking on the Paint New Sprite button. When the Paint Editor program opens, specify a font type of ComicSans, a font color of red, and a font size of 18. Type Game Over, press the Enter key, type You lose! into the Paint Editor, and then click on the OK button. Using this same process, create a second sprite that says Game Over! You win. Change the names assigned to these two sprites to LosingMsg and WinningMsg, respectively.
Step 3: Adding Variables Required by the Application
To execute, the Ball Chase game requires one variable as shown in Figure 9.12. To add this variable to the application, click on the Variables button located at the top of the blocks palette and then click on the Make a Variable button to define a variable named Elapsed Time.
Figure 9.12. The Ball Chase game requires one variable.
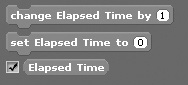
This variable will be used to display the amount of time remaining in the game. Make sure that you leave the check box for this variable selected and that you reposition the variable’s corresponding monitor to the upper right-hand corner of the stage.
Step 4: Adding an Audio File to the Application
The Ball Chase game makes use of one sound effect, which simulates the meowing of the cat as its chases the ball around the stage. To add this audio file, select the Cat sprite thumbnail in the sprite list and then click on the Sounds tab located at the top of the scripts area. Next, click on the Import button to display the Import Sound window, double-click on the Animal folder, select the Meow audio file, and finally click on the OK button to finish adding the audio file to the sprite.
Step 5: Adding a Script to Control Ball Movement
The objective of the game is to try to keep the ball out of the reach of the cat for 30 seconds. The following script, which should be added to the Ball sprite, is responsible for controlling the movement of the ball on the stage.
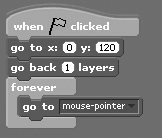
This script begins with a hat block. Next, a motion block is used to position the ball in the upper middle portion of the stage. A looks block is then used to move the sprite back one layer, ensuring that if the Ball sprite encounters the Cat sprite, the Ball sprite will be displayed under the Cat sprite instead of on top of it. (You will learn about looks blocks in Chapter 10, “Changing the Way Sprites Look and Behave.”)
The rest of the script consists of a loop that repeatedly executes another motion block. The motion block is responsible for moving the Ball sprite around the stage to where the mouse-pointer is.
Step 6: Adding Scripts That Display Game Over Messages
You will add the script that is responsible for making the cat chase the ball around the stage in the next section. Before doing so, add the following pair of scripts to the WinningMsg sprite. These scripts are responsible for displaying and hiding the game’s winning message.

The first of the two scripts shown above is responsible for hiding the display of the sprite to which it has been added. The second script, on the other hand, is responsible for displaying the sprite whenever a broadcast message of You win is received. Note that this script includes a looks block that pushes the sprite to the front of any other sprites that it may happen to overlap. This ensures that the message is completely visible once displayed.
Once you have created and added these two scripts to the WinningMsg sprite, drag and drop both of them onto the LosingMsg sprite and then edit the second script so that it executes whenever a broadcast message of You lose is received.
Step 7: Adding Scripts Needed to Control and Coordinate Game Play
To wrap up your work on the Ball Chase game, you need to add four scripts to the Cat sprite. The first of these scripts is shown next and is responsible for ensuring the cat chases the ball around the stage.
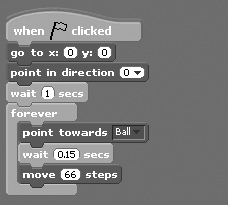
This script begins by moving the Cat sprite to the center of the stage and pointing it in its default upward direction. Next, it pauses for one second and then enters into a loop, which repeatedly executes the embedded code blocks. The first of these three code blocks points the cat sprite towards the Ball sprite. The second code block pauses the loop’s execution for .15 seconds, after which the third block moves the Cat sprite 66 steps in the direction of the Ball sprite.
Note
The reason for imposing the .15 second delay in the script’s loop is to slow down things enough to give the player a chance to keep the ball from the cat. If the little extra delay were removed from the loop, the speed at which the cat moves would easily overcome even the fastest player.
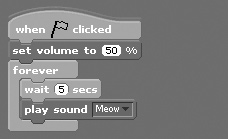
The second of the four scripts to be added to the Cat sprite is shown next. This script is set to execute when the player starts the game by clicking on the green flag button. The script begins by setting the value at which the audio is played to 50% of the level of the computer’s current sound level. The rest of the script is controlled by a loop that repeatedly runs two embedded code blocks. The first code block pauses script execution for five seconds. The second code block plays the Meow audio file. The result is that the cat will meow every five seconds as it chases the ball around the stage.
The third script to be added to the Cat sprite is responsible for halting the execution of all scripts in the application in the event that the cat manages to touch the sprite during game play. The code blocks that make up this script are shown here:
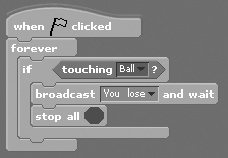
This script is executed when the player starts the game by clicking on the green flag button. The script’s overall execution is controlled by a loop. Within the loop, a conditional test is performed that checks to see if the Cat sprite has made contact with the Ball sprite. If this is the case, a broadcast message of You lose is sent. Once this message has been received and processed by the other scripts in the application, the last code block in the loop is executed, halting all script execution.
The last script to be added to the Cat sprite is shown next. This script is responsible for keeping track of time as the application executes and for halting game play after 30 seconds, should the player manage to keep the cat at bay for that long.
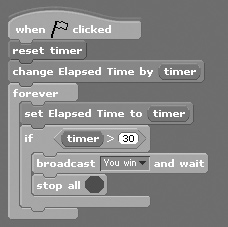
When started, this script begins by resetting Scratch’s internal timer and then assigning the current value of the timer (0.0) to a variable named Elapsed Time. The rest of the script is controlled by a loop. Each time the loop executes, it updates the value assigned to the Elapsed Time variable to reflect the timer’s current value. Next, a check is made to see if the timer’s value has exceeded 30 seconds, and if it has, a broadcast message of You win is sent. Once processed by the other scripts in the application, the execution of all scripts in the application is halted. If, on the other hand, the timer’s value is less than 30 seconds, the loop simply executes again. Accordingly, if the cat does not manage to catch the ball within 30 seconds, thus ending the game, the fourth script will end the game and declare the player to be the winner.
Step 8: Saving and Executing Your Scratch Project
All right! Assuming you have followed along closely with each of the steps presented in this chapter, your copy of the Ball Chase game should be ready for testing. If you have not done so yet, save your new Scratch project. Once saved, switch over to Presentation mode and execute the game. Remember that game play begins when you click on the green flag button and that your object is to keep the ball out of the cat’s reach for 30 seconds.