
Chapter 2. Getting started with Roo
- Creating projects with the Roo shell
- Roo project layout and architecture
- SpringSource Tool Suite integration
- Refactoring Roo code and leaving Roo behind
You saw in chapter 1 that Spring Roo, with only a few commands, can really make you more productive as a Spring developer. And by now you’re probably itching to get started on your own Roo-based application. You’ve come to the right place.
In this chapter, we use the Roo shell to create and manipulate an application. We look “under the hood,” exploring the physical layout of a typical Spring Roo project. You’ll learn where key artifacts are located and define some of the key configuration files and directory structures. We also discuss the architectural patterns used by Roo.
Roo encourages experimentation, so let’s get started by firing up the shell and building a basic Roo application.
2.1. Working with the Roo shell
As we mentioned in chapter 1, Roo is controlled through a command-line shell. Let’s use the shell to create a simple training task management application, and introduce some of the major topics we cover in the book along the way.
Using your operating system shell, create an empty directory, taskmanager. Switch to the directory and fire up the Roo shell, using the roo command. You’ll be presented with the Roo command-line prompt:
roo>
Book Convention: Don’t Type the roo> Prompt
To help you figure out where to type your commands, we sometimes show the roo> prompt to the left of what you need to type. We do the same thing if you’re at the operating system prompt. We use the $ symbol to show that we’re on an OS prompt line, rather than executing commands in the Roo shell.
The Roo shell supports code completion, a help command, and hints. Try it now: hit your TAB key and see how Roo automatically prompts you with a list of commands you can type.[1]
1 If launched from the SpringSource Tool Suite, Roo uses CTRL-SPACE (or CMD-SPACE on Mac).
2.1.1. Give me a hint!
Let’s try the hint command to ask Roo what the next logical steps are for managing your application. When you’re finished experimenting with tab completion and hint, type quit to exit the Roo shell. You can ask Roo to guide you through the project configuration process by typing the hint command:
roo> hint
Welcome to Roo! We hope you enjoy your stay!

Before you can use many features of Roo,
you need to start a new project.

To do this, type 'project' (without the quotes) and then hit TAB.

Enter a --topLevelPackage like 'com.mycompany.projectname' (no quotes).
When you've finished completing your --topLevelPackage, press ENTER.
Your new project will then be created in the current working directory.

Note that Roo frequently allows the use of TAB, so press TAB regularly.
Once your project is created, type 'hint' and ENTER
for the next suggestion.

You're also welcome to visit http://forum.springframework.org
for Roo help.
Roo provides the hint command as a way of guiding beginners in configuring a project. As you progress through the configuration process, you’ll see the hints change—from creating the project, to configuring the database, to creating entities, and more. Let’s do the first activity suggested above. Let’s create an application.
2.1.2. Common Roo commands
Before we go any further, we need to show you how to get a list of all commands in your Roo shell.
Make sure you’re on an empty Roo command prompt, and hit the [TAB] key. You’ll see the valid commands for your project at this stage:
roo> [TAB]
!             */            /*             //
;             addon         backup         class
controller    date          dependenc      development
dod           download      email          enum
exit          field         flash          focus
help          hint          interface      jms
jpa           json          logging        metadata
mongo         osgi          perform        persistence
pgp           poll          process        properties
proxy         quit          reference      script
service       system        test           version
web
roo>
The actual list will depend on the version of Roo, what stage of development you’re in, and what add-ons you’ve configured (see chapters 11 and 12 for information on creating and using Roo add-ons). Let’s review a few of the key commands:
- jpa setup—The jpa setup command installs database persistence using JPA and whatever object-relational mapping (ORM) API that backs it, including Hibernate, OpenJPA, EclipseLink, and DataNucleus. We cover the jpa setup command, as well as some other commands (among them, field) to create and manipulate JPA entities, in chapters 3 and 4. Prior to Roo 1.2, this command was named persistence setup.
- web—The web command list includes a number of commands, including web mvc install, which installs Spring MVC language files and views, web mvc embed, which can install a number of Web 2.0 objects such as videos, Twitter feeds, photos, streams, and a number of other features. The web gwt command configures the Google Web Toolkit web user interface. Finally, web flow configures Spring Web Flow, a directed navigation web technology that rides on top of Spring MVC.
- jms and email—These commands install the JMS using ActiveMQ, and an email sender, respectively. These two commands, which configure JMS messaging and email, are covered in detail in chapter 10.
- test—This command configures JUnit tests both inside and outside of the Spring container. dod will configure data-on-demand objects, which are used by the integration tests to generate fake test data. We cover testing the persistence tier in chapters 3 and 4 and devote a full chapter to unit and web testing in chapter 9.
- security(not shown)—This command installs Spring Security, which we discuss in chapter 8. The reason it’s not shown is because we haven’t configured Spring MVC yet, so the Roo shell is hiding the command.
- repository—This command builds Roo JPA repositories using the Spring Data JPA API. We talk about how these work in chapter 3.
- service—This command exposes a Spring service for a given entity. If the entity is backed with ActiveRecord, it will write calls to the CRUD methods on the entity. Otherwise, it will detect the repository and call methods on the repository instead. We discuss Roo services in chapter 4.
There are several other commands that perform housekeeping for you, including backup, monitoring, and scripting.
2.1.3. Creating an application
To create an application, type the project command, and, as instructed in the previous hint, hit the [TAB] key to trigger code completion. You should see the following:
roo> project --topLevelPackage
Roo wants you to specify the root package name for your Java artifacts. Roo will configure various frameworks to scan for any annotation-driven components (JPA entities, Spring beans, repositories, and controllers, for example) using this top-level package. Let’s use org.rooinaction.taskmanager. Go ahead and type the package name, type a space, and then type a double-hyphen (--). This signifies that you’re about to enter another option. Your command line should look like this:
roo> project --topLevelPackage org.rooinaction.taskmanager --
Now, hit the [TAB] key again. Roo will prompt you with a series of allowable options:
project --topLevelPackage org.rooinaction.taskmanager --java
project --topLevelPackage org.rooinaction.taskmanager --packaging
project --topLevelPackage org.rooinaction.taskmanager --parent
project --topLevelPackage org.rooinaction.taskmanager --projectName
You want the --projectName option, so start typing the beginning of the option name, pro, and hit [TAB] again. Then type taskmanager. Hit [ENTER], and watch Roo build your project:
roo> project --topLevelPackage org.rooinaction.taskmanager --projectName taskmanager
Created ROOT/pom.xml Created SRC_MAIN_RESOURCES Created SRC_MAIN_RESOURCES/
     log4j.properties Created SPRING_CONFIG_ROOT Created SPRING_CONFIG_ROOT/
     applicationContext.xml ...
roo>
In the preceding output, the uppercased names represent file paths; SRC_MAIN_RESOURCES equates to src/main/resources. If you’ve worked on any Maven-based projects in the past, you’ll recognize the path structures, and especially the Maven project object model file, pom.xml. The Maven build system is used to make it easy for other developers to on-board themselves onto your project, regardless of IDE or operating system.
Table 2.1 outlines the key Maven folders, Roo Shell uppercase labels, and purpose for each one.
Table 2.1. Roo directories
|
Directory |
Roo shell label |
Purpose |
|---|---|---|
| src/main/java | SRC_MAIN_JAVA | Holds Java source code. Generally, this source code starts in the package named in the project command’s --topLevelPackage argument. |
| src/test/java | SRC_TEST_JAVA | Holds Java test source code. The tests are generally stored within the same packages as the classes under test. |
| src/main/resources | SRC_MAIN_RESOURCES | Holds all application-level configuration data such as database properties, Spring configuration files, and the project’s persistence configuration. |
| src/test/resources | SRC_TEST_RESOURCES | Holds any test-specific Spring configuration files, test property files, or anything else needed during testing to support the test classes. |
| src/main/webapp | SRC_MAIN_WEBAPP | Holds web application code if your project is configured with Spring MVC. This includes Spring MVC configuration, views in JSPX format, style sheets, JavaScript files, and other web tier assets. |
As you’ll see in section 2.2, Roo configured the Spring application context file, applicationContext.xml, in the resource directory META-INF/spring. You’ll also notice the log4j.properties file installed in the root resource directory.
2.1.4. Adjusting the logging level
Now let’s adjust your project configuration, specifically the logging level of your application. First, you’ll ask Roo to tell you about the logging command. Type the command help logging:
roo> help logging
Keyword:                   logging setup
Description:               Configure logging in your project
 Keyword:                  ** default **
 Keyword:                  level
   Help:                   The log level to configure
   Mandatory:              true
   Default if specified:   '__NULL__'
   Default if unspecified: '__NULL__'
...
As you can see, the Roo shell contains a help system, which can fetch information about the various commands that can be executed from the command line. The logging system can be configured by executing the logging setup command. Here’s a simple example:
roo> logging setup --level WARN
Roo responds with the following:
Updated SRC_MAIN_RESOURCES/log4j.properties
The uppercased name refers to the path src/main/resources, where the log4j.properties file resides. Roo changed the logging level in the beginning of this file:
#Updated at Sun Oct 02 11:44:17 EDT 2011
#Sun Oct 02 11:44:17 EDT 2011
log4j.appender.stdout=org.apache.log4j.ConsoleAppenderlog4j.rootLogger=WARN,
     stdout
If you want to be more specific, you can change a particular component’s logging level. Use the tab key to see what options are available to you. Let’s say you want to increase the logging for your project files (the nonframework ones) to the level of TRACE. You could use the --level attribute of TRACE; then, using tab completion again, type --package. Roo provides several important options here:
roo> logging setup --level TRACE --package[TAB]

ALL_SPRING    AOP    PERSISTENCE   PROJECT   ROOT   SECURITY
TRANSACTIONS WEB
roo> logging setup --level TRACE --package PROJECT
Updated SRC_MAIN_RESOURCES/log4j.properties
Now Roo defines another log configuration entry, just for your project top-level package:
log4j.logger.org.rooinaction.taskmanager=TRACE
Spring errs on the side of detail when outputting log messages in trace or debug mode. Although that’s a lot of potentially useful information, it can prove extremely difficult to dig through the noise to find the one thing you’re interested in.
You can edit the src/main/resources/log4j.properties file yourself and narrow logging to the specific Spring class you want to observe. For example, if you set ALL_SPRING to DEBUG, and want to back off to just the JPA container class, simply change that entry from
log4j.logger.org.springframework=DEBUG
to something more targeted, such as this (package replaced with ... for book formatting):
log4j.logger.org...orm.jpa.LocalContainerEntityManagerFactoryBean=DEBUG
Add as many of these to your log4j.properties file as needed while troubleshooting or debugging.
2.1.5. Adding persistence and running the application
With that step finished, let’s ask for more hints:
roo> hint

Roo requires the installation of a persistence configuration,
for example, JPA or MongoDB.

For JPA, type 'jpa setup' and then hit TAB three times.
We suggest you type 'H' then TAB to complete "HIBERNATE".
After the --provider, press TAB twice for database choices.
For testing purposes, type (or TAB) HYPERSONIC_IN_MEMORY.
If you press TAB again, you'll see there are no more options.
As such, you're ready to press ENTER to execute the command.

Once JPA is installed, type 'hint' and ENTER for the next suggestion.

Similarly, for MongoDB persistence, type 'mongo setup' and ENTER.
According to the hint command, Roo requires that you configure your database. Let’s do that and also create your Task entity. Type in these commands, each time waiting until the configuration operations complete before continuing:
jpa setup --database DERBY_EMBEDDED --provider ECLIPSELINK
entity jpa --class ~.model.Task --testAutomatically
field string --fieldName description --notNull --sizeMax 40
field boolean --fieldName completed --value false
web mvc setup
web mvc all --package ~.web
Believe it or not, you now have a complete working application. Build it now:
roo> quit
$ mvn jetty:run
Now, try it out by pointing your browser to http://localhost:8080/taskmanager. Create some tasks and complete them. See? You’re pretty RAD yourself, and in only five commands. Figure 2.1 shows the listing page of your task manager.
Figure 2.1. The task manager application—five lines of Roo; awesome!

Convinced about the productivity you can get with Spring Roo? Wait, there’s more...
2.1.6. Backup, the Roo log, and scripting
Before a major change, you may want to back up your application. The backup command does this for you. Just type backup at the Roo shell command prompt:
roo> backup
Created ROOT/taskmanager_2011-10-02_12:06:23.zip
Backup completed in 9 ms
Although you could argue that version control is a much better plan (especially using Git or Mercurial, where the developer keeps a copy of the entire repository on their hard drive) that’s a pretty handy command for quick and dirty prototyping.
A Roo add-on exists for managing your application in Git. In the Roo shell, type (on one line) this:
roo> pgp automatic trust roo> addon install bundle --bundleSymbolicName org.springframework.roo.addon.git
You’ll then get commands to manage your project from Git, including
- git setup—This command configures your project as a Git project, adding a handy.gitignore file.
- git commit all—This command commits changes to your Git repository for all changes.
- git config—This command configures features such as automatic commits, the repository you’ll use to push your code, and other settings.
- git push—This command pushes your code to the Git repository.
Once you install this add-on, it’s available for all Roo projects. We discuss add-ons in detail in chapters 11 and 12.
Now let’s see how Roo tracks changes it has made to your project.
2.1.7. The Roo shell log file
If you were to look around in your file explorer, you might also find a file named log.roo. This file is a log of all shell commands typed into the Roo shell. At the start of each session, Roo date-stamps the time the shell is launched so that you can find out when a particular command was requested. A snippet from the log file for the application you’re working with would look like this:
// Spring Roo 1.2.1.RELEASE [rev 6eae723] log opened at 2011-12-28 04:50:352
hint
project --topLevelPackage org.rooinaction.taskmanager --projectName taskmanager
help logging
logging setup --level WARN
logging setup --level TRACE --package PROJECT
quit
What if you wanted to run that script to create a new project with the same configuration? Just create another directory, copy the file into that directory (name it something other than log.roo, so it doesn’t get overwritten), and edit the file to taste. Now, just fire up the Roo shell. You can execute the script command to create your application:
$ mkdir ../doppleganger
$ cp log.roo ../doppleganger/runme.roo
$ cd ../doppleganger/
$ roo
    ____  ____  ____
   / __ / __ / __
  / /_/ / / / / / / /
 / _, _/ /_/ / /_/ /
/_/ |_|\____/\____/    1.2.1.RELEASE [rev 6eae723]

Welcome to Spring Roo. For assistance press TAB or type
"hint" then hit ENTER.
roo> script --file runme.roo
hint
...
help
...
project --topLevelPackage org.rooinaction.taskmanager --projectName taskmanager
...
That was pretty easy. You can imagine how easy it would be to define starter project frameworks with just a handful of Roo commands. Talk about rapid productivity on the Spring platform!
2.1.8. A final word on scripting
Remember, Roo stores those commands you’ve entered in log files, and you can distribute scripts to other developers to reproduce your application template from scratch. Of course, those scripts won’t write any business logic, or style a web page, but they at least can get things started for you.
The two ways of invoking scripting are using the script command inside of the Roo shell, and from the operating system, invoking the script command on the command line.
From within the Roo shell, you call the script command, passing it the file to execute:
roo> script --file../roo-scripts/setup-roo-domains.roo
You can use this technique when doing rapid prototyping; perhaps somebody has created a set of domain object models, and you want to try using them from various front ends such as Spring MVC, JSF, or GWT.
The other way, as you saw in chapter 1, is to invoke the script as you load the Roo shell:
$ roo script pizzashop.roo
Either way, the Roo shell commands can be stored and shared across multiple projects. You can even use setup scripts to configure developers’ Roo add-on environments and other settings.
Now let’s take a look at some of the rules for developing Roo-based applications.
2.2. How Roo manages your projects
Now we’ll review the project structure for the taskmanager project, discussing the files generated by Roo. We’ll also switch the architecture from the default Active Record model to a service-and-repository model and see what additional files have been created.
But before we begin discussing specific project structure, we should cover some basic tenets of how you should manipulate files in the Roo system. Here are some basic rules:
- Don’t touch the AspectJ (.aj) files—These files, generated by Roo, are meant to be managed by Roo itself, and may be upgraded when you install newer versions of Roo. Opening the shell causes Roo to adjust, create, or remove these files automatically. We discuss the ways you can extract methods from the aspects and customize them, write your own aspects, and even remove Roo entirely from your application.
- Do manipulate standard artifacts—Any files you’d normally create yourself, such as the Maven pom.xml file, Spring application context files, log4j configuration files, persistence files, JSPX web files, or other artifacts can be manipulated by the developer. Roo may add methods or settings to these files, so don’t delete anything you think may be used by the Roo system, such as the transaction management or JPA persistence setup.
- Take care manipulating scaffolded objects—Scaffolding is the act of dynamically generating code for a particular object, such as the web pages and controller that expose a JPA persistent entity. If Roo scaffolds a given object, such as a controller or view, please take care to learn how Roo manipulates the object so you don’t break the bidirectional synchronization between the Roo shell and the source code. Examples include scaffolded controllers and views.
- Create your own objects and annotate them with Roo annotations—You can create your own Java classes in your favorite editor and annotate them with Roo annotations. The Roo shell will then generate the same Roo-managed files, such as AspectJ ITDs or even JSPX web pages, being created on behalf of the user as those created by Roo commands themselves.
For Java classes, make sure they live within the top-level package defined when the project is created. You can use any annotation, as long as you know what it does. For example, annotating a Java class with @RooToString and @RooJavaBean will add the _Roo_ToString.aj and _Roo_JavaBean.aj aspects to that class. This can be quite handy and save you a lot of time when you are heads down in your IDE.
As we move through the book, we’ll note the artifacts you can modify or should leave alone. Once you get the feel for what you can change, you’ll be able to move quickly and easily throughout your Roo-managed application without fear of breaking it with simple modifications.
2.2.1. The taskmanager project layout
The application you just created, taskmanager, is a fairly typical Spring Roo project, created using Roo’s default Active Record–based entities.
Let’s review each of the major directories under src/main/java/org/rooinaction/ taskmanager. First, look at your entity directory, model:
model/
   Task.java
   Task_Roo_Configurable.aj

   Task_Roo_JavaBean.aj
   Task_Roo_Jpa_ActiveRecord.aj
   Task_Roo_Jpa_Entity.aj
   Task_Roo_ToString.aj
Your task model uses two ITDs to manage access to the database: Task_Roo_Entity.aj and Task_Roo_Jpa_ActiveRecord.aj. The way you define your task also causes Roo to generate the @Configurable annotation, which is contained in Task_Roo_Configurable.aj (we’ll discuss the other database ITDs and approaches in chapter 3). The Task entity also contains a @RooJavaBean annotation, which generates Task_Roo_JavaBean.aj, and the @RooToString annotation (Task_Roo_ToString.aj).
Next, you’ll view the web controller package, web:
web/
  ApplicationConversionServiceFactoryBean.java
  ApplicationConversionServiceFactoryBean_Roo_ConversionService.aj
  TaskController.java
  TaskController_Roo_Controller.aj
You see the TaskController.java class, which is annotated with the standard Spring MVC @Controller annotation, and @RooWebScaffold, which generates the Task Controller_Roo_Controller.aj aspect. This aspect contains all of the required Spring MVC controller methods to handle creation, listing, editing, and removing tasks.
Roo also generates views for each of the main create, read, update, and list actions of the controller in src/main/webapp/WEB-INF/views:
$ ls -1 src/main/webapp/WEB-INF/views/tasks
create.jspx
list.jspx
show.jspx
update.jspx
views.xml
You also see the ApplicationConversionServiceFactoryBean.java class, which is mounted as a Spring bean on startup and converts entity instances to Strings for the default display of drop-down option lists.
We discuss web applications in detail in chapter 5, and how to customize the fields, views, and other elements in chapter 6.
Let’s convert this application to a traditional Spring service-and-repository application and see Roo adjust your source listing.
2.2.2. Adding a service and repository
Want to build a traditional layered application instead? You’re actually almost there. Just open up the Roo shell in the taskmanager project and type these two commands:
roo> repository jpa --interface ~.repository.TaskRepository --entity ~.model.Task

roo> service --interface ~.service.TaskService --entity ~.model.Task
Roo automatically creates the service and repository beans, and their respective ITDs:
service/
   TaskService.java
   TaskServiceImpl.java
   TaskServiceImpl_Roo_Service.aj
   TaskService_Roo_Service.aj

repository/
   TaskRepository.java
   TaskRepository_Roo_Jpa_Repository.aj
But Roo did more than that. It adjusted several files:
- It injected the task service into the TaskController_RooController.aj class and delegated all code originally written against the Task entity’s Active Record methods to the service.
- It injected the TaskRepository into the TaskService_Roo_Service.aj file, delegating all service calls to the repository.
- It also updated all generated entity test files to test the entity via the service and repository instances.
Oh, speaking of tests, we didn’t review the test file directory for entities, org/rooinaction/taskmanager/model, located in src/test/java.
2.2.3. The tests and data on demand
Looking at the project files before and after the service-and-repository layer should convince you that you can rapidly refit projects to different APIs with Spring Roo, at a much more rapid rate than it would take to do the same tasks by hand. Roo generates these files in src/test/java under the org/rooinaction/taskmanager directory:
model/
   TaskDataOnDemand.java
   TaskDataOnDemand_Roo_Configurable.aj
   TaskDataOnDemand_Roo_DataOnDemand.aj
   TaskIntegrationTest.java
   TaskIntegrationTest_Roo_Configurable.aj
   TaskIntegrationTest_Roo_IntegrationTest.aj
The src/test/java directory shadows the main Java directory. It contains two major components within the ~.model[2] package, the TaskIntegrationTest and a helper class to generate test data, TaskDataOnDemand. If you run the Maven command mvntest, it will execute the JUnit test, using the TaskDataOnDemand class to generate instances of valid tasks.
2 Remember, ~.model is shorthand for org.rooinaction.taskmanager.model, a helpful shorthand both for Roo itself and for conversations about the project structure.
2.2.4. The web layer
The web layer is where Roo configures your web application. The files are located in src/main/webapp. Let’s look at the directories generated in table 2.2.
Table 2.2. Web application directories for Spring Roo projects
|
Directory |
Purpose |
|---|---|
| src/main/webapp | The root directory of the web application. Any home page named index.jsp will be served from here by default as the home page of the application. |
| |-- WEB-INF | The root configuration directory of the web application. As with all web applications, this directory is not visible for browsing. The web.xml web application descriptor file, generated by Roo, lives here and manages the Spring Web application context. |
| |-- classes | Contains all compiled Java class files, with the AspectJ ITDs woven into them. |
| |-- i18n | Contains localized property files for the application framework and user-defined form elements. |
| |-- layouts | Contains the Apache Tiles layouts. |
| |-- spring | Contains the Spring Web MVC configuration files. |
| |-- tags | Contains Roo’s generated JSPX tags, which aid in building menus, scaffolding, and configuring form fields and display elements. |
| |-- views | Contains all application view files and Apache Tiles view definitions. |
| |-- images | Contains all predefined Roo image files such as icons for country flags, add, update, delete, and list buttons, and so on. |
| |-- styles | Contains all CSS style files. |
As you can see, Roo generates an organized Spring MVC web application, another task that takes a lot of time to do by hand. But we’re not done. We need to look at the key configuration files Roo uses to manage your application.
2.2.5. Spring configuration files
Spring Roo manages a number of APIs for you when it creates your applications. They’re managed by mounting them as APIs and services from within the Spring Framework. Knowing where these files live and what they do is key to the success of any Spring-based project, including one generated by Spring Roo.
Spring configuration files are generally stored in two locations in a Roo project—the business-tier application context directory, META-INF/spring in src/main/ resources and the web-tier application context in WEB-INF/spring, located in the src/ main/webapp directory. They serve two similar but distinct purposes:
- Business-tier Spring configuration (META-INF/spring/applicationResources*.xml)—This location is where Spring Roo will store Spring context files. As Roo adds features, such as JMS, email, or Spring Security, it may add files to this directory. When Roo creates an initial project, this directory contains a single Spring context file, applicationContext.xml. If you add, for example, Spring Security, it will add an additional context file, applicationContext-security.xml. Roo configures Spring to look for any files starting with applicationContext and ending in xml in this directory, so you may add your own Spring configuration files as needed here.
- Web-tier Spring configuration (WEB-INF/spring)—If you configure your application as a web application, Roo will generate the Spring MVC context files in this location to manage the web artifacts such as controllers, views, URL handling, Apache Tiles configuration, and a number of other features. The main file here is webmvc-config.xml.
Other configuration files you should be aware of include
- log4j.properties (in src/main/resources)—The Apache log4j logging framework settings file.
- META-INF/persistence.xml (in src/main/resources)— The JPA deployment descriptor, which is configured when you configure your database settings. See chapter 3 for more details.
- META-INF/spring/database.properties (in src/main/resources)—The JDBC connection settings for establishing access to a database in Roo, if you’re using a standard JDBC data source. We discuss this file in chapter 3.
- WEB-INF/web.xml (in src/main/webapp)—The standard web application deployment descriptor. Review this file to see how the Spring MVC and Spring Security frameworks are mounted using filters and servlets. We cover Spring MVC in detail beginning in chapter 5, and Spring Security in chapter 8.
Spring Roo configured all of these files for you, without any work on your part, beyond stating preferences in the shell commands. Better still, if a feature is upgraded, such as a newer version of Spring, a newer version of Roo may upgrade generated files, or change the version property in the Maven pom.xml file. But Spring Roo won’t remove your Java code from artifacts you create, so you can go about developing your application logic without worrying about losing your code.
2.2.6. About AspectJ ITDs
When you issue a Roo entity command, Roo builds not only the entity class, but a series of AspectJ inter-type declaration files, abbreviated ITDs. For example, when creating the Active Record–driven Task entity and field commands,
entity jpa --class ~.model.Task --testAutomatically
field string --fieldName description --sizeMax 40 --notNull
field boolean --fieldName completed --value false
Roo responds by generating the Roo entity as shown next.
Listing 2.1. The Task entity—Task.java
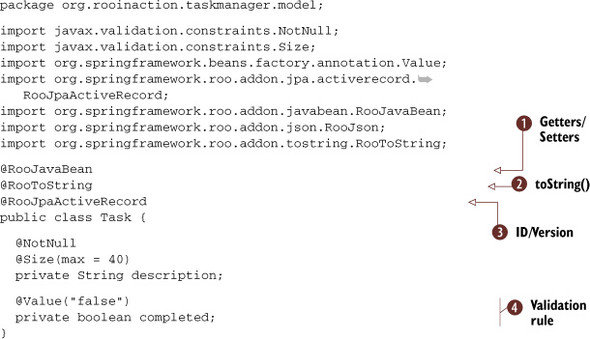
This class, which is seen as a JPA entity, is managed by Roo via the @RooJpaActive-Record annotation ![]() . It’s defined as a JavaBean due to the @RooJavaBean annotation,
. It’s defined as a JavaBean due to the @RooJavaBean annotation, ![]() and it sports a handy generated toString() method due to the @RooToString
and it sports a handy generated toString() method due to the @RooToString ![]() annotation. It contains two fields, description
annotation. It contains two fields, description ![]() , which is required and must not exceed 40 characters, and an optional Boolean completed
, which is required and must not exceed 40 characters, and an optional Boolean completed ![]() field. You were able to quickly surmise this because all of the boilerplate code has been extracted elsewhere, and you’re
only looking at the code that makes this class unique.
field. You were able to quickly surmise this because all of the boilerplate code has been extracted elsewhere, and you’re
only looking at the code that makes this class unique.
2.2.7. What ITDs did you just generate?
The files Roo created when you defined your entity mix behavior into the entity class at compile time, and are generated by the Roo shell in response to the annotations that Roo added to the class definition. The key ITD files are as follows:
- Task_Roo_Javabean.aj (via@RooJavaBean)—This aspect contains the getters and setters for all member variables defined in Task.java.
- Task_Roo_Configurable.aj (via@RooJpaActiveRecord)—This adds the @Configurable annotation to the Task class.
- Task_Roo_Jpa_Entity.aj (via@RooJpaActiveRecord)—This defines the primary key, key generation, and version management strategies for the entity.
- Task_Roo_Jpa_ActiveRecord.aj—This contains all JPA methods to find, persist, update, list, and remove Task entity instances.
- Task_Roo_ToString.aj—This defines the toString() method based on all of the fields mapped by this entity. Generated via the @RooToString annotation.
To see how these ITDs work, we’ll take a look at one from the Task class.
2.2.8. Exploring an ITD
We’ve mentioned ITDs and other likely unfamiliar terms a lot so far. You’re probably wondering what these ITDs look like. Let’s take a look. The following listing shows the definition of an ITD, Task_Roo_JavaBean.aj.
Listing 2.2. The JavaBean ITD for the Task entity
// WARNING: DO NOT EDIT THIS FILE. THIS FILE IS MANAGED BY SPRING ROO.
// You may push code into the target .java compilation unit if you wish
to edit any member(s).

package org.rooinaction.taskmanager.model;

import java.lang.Boolean;
import java.lang.String;

privileged aspect Task_Roo_JavaBean {

    public String Task.getDescription() {
        return this.description;
    }

    public void Task.setDescription(String description) {
        this.description = description;
    }

    public Boolean Task.getCompleted() {
        return this.completed;
    }

    public void Task.setCompleted(Boolean completed) {
        this.completed = completed;
    }

}
ITDs are not Java classes per se; they’re defined by the keywords privileged aspect rather than class. But they contain Java source code. You’ll notice that each method or variable is prefixed with the name of the class into which they are being woven—for example, Task.getDescription().
Roo uses the Maven aspectj-maven-plugin tool to compile these ITDs during the compile phase of your build process. When the compiler sees a definition starting with the class name of a Java class, it weaves the code into that type; hence the name inter-type declaration. The aspect type Task_Roo_JavaBean mixes code into the Java type Task.java.
In this way, the byte code for all of the methods, variables, and annotations defined in these ITDs are folded into the class file of your original Java object.
What do all of these ITDs do for your Task entity? Anything repetitive or boilerplate. They handle your dirty work.
2.2.9. Yeah, they handle your dirty work
We all know the standard line of movie Mafia Dons when they want to get rid of a troublemaker: “Take care of my dirty work...” How much dirty work do you have to do on a daily basis? Chances are, to write and test the code that manages a Task object, quite a lot. But you’re using Spring Roo; it generated all of that code behind the scenes so that you don’t have to.
When you issued the entity command to build your Task, the Roo shell emitted the entity class. Then it went on to generate all of the aspects defined in the annotations @RooJpaActiveRecord, @RooJavaBean, and @RooToString, as shown in figure 2.2.
Figure 2.2. The Task.java Roo entity and all related ITDs. See the tiny class, Task.java?
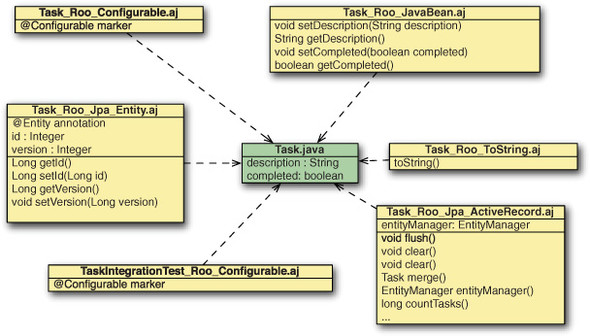
You may even find more AspectJ ITD files than the preceding ones, as Roo evolves to add additional features to the entities you create. Roo expects you to mostly ignore these generated files and focus on writing your business logic. But if you open up the ITDs in a text editor, you’ll see it’s the dirty work you’re used to coding yourself.
As you saw, all of these files are created by the Roo shell, which takes direction from special annotations contained within the source file, Task.java. At compile time, the Maven aspectj compiler plug-in weaves them into the actual Task class file. Any Roo ITD can be mixed into the class definition so that it appears exactly as if you wrote that code in Task.java yourself.
Roo will create the TaskIntegrationTest, TaskDataOnDemand, and the related ITDs only if you specify the --testAutomatically flag on the entity command, or use the test integration command after the entity is created. The generated test class and ITD actually spins up the Spring container and runs integration tests against the entity, helping you identify problems with the database design and mapping process early in the project lifecycle. You can execute the Roo-generated tests within an IDE or by executing the Maven command mvn test. We begin working with Roo’s testing framework in chapter 3, and devote an entire chapter to testing, chapter 9.
JPA, ORM, Active Record, Entity! What are they Talking About?
If these terms confuse you, don’t worry. We’ll demystify them a bit in chapters 3 and 4. For now, just remember that the Roo shell can generate database persistence code in special Java classes that are annotated with @RooJpaActive-Record, and a few other annotations.
2.2.10. Multimodule projects
Roo can even build a multimodule project comprised of multiple Maven projects called modules. These modules are created to separate your application into horizontal tiers, such as web and business layers, or vertical slices, such as functional business layers. A single Roo project can potentially contain several web applications, JAR projects that provide business or infrastructure logic, or other components.
To create a multimodule project, you begin by defining the outer project using the --packaging tag, setting the value to POM:
roo> project --topLevelPackage org.rooinaction.taskmanager --packaging POM --projectName taskmanager
Roo uses Maven’s pom project type as an aggregator; it allows you to add subprojects below but doesn’t actually create a new deliverable artifact. For example, to create a JAR-based project to hold Spring beans, you’d issue a module command:
roo> module create --moduleName infrastructure --topLevelPackage ~ --packaging JAR
Note the special --topLevelPackage syntax to refer to the outer project’s package—the ~ symbol used when referring to top-level packages when defining other Roo objects. This symbol can be post-fixed with your module’s specific subpackage. This allows you to define your services within your outer project, separated in their own jar:
--topLevelPackage ~.infrastructure
When you create a module, the roo> prompt will switch to that module, focusing to it, prefixing the module name before the word roo:
infrastructure roo>
Whatever commands you issue affect the current module. You can switch to another module using the module focus command. For example, to switch to another module use the following:
infrastructure roo> module focus --moduleName taskmanager-data
infrastructure roo>
You can also move to the top-level Maven project by focusing on ~ (available via tab completion, as for all module names):
taskmanager-data roo> module focus --moduleName ~
roo>
You can define a web-based application module as well:
roo> module create --moduleName taskmanager-web --topLevelPackage ~.web --packaging WAR
... much fanfare ...
taskmanager-web>
Mind the currently focused module when working on Roo projects. Working with modules adds an additional level of complexity to your project, so when beginning just focus on nonmodular web applications. You’ll do much better adding modules later, when you can appreciate the component models you’re building and how they relate each other.
Now that you’ve configured your project files using the Roo shell, let’s look at how you can open these Roo projects in your favorite Java IDE.
2.3. I want my IDE!
Most developers find it easier to work within an IDE for many reasons, including the immediate visual feedback. It would be inconvenient if you had to flip back and forth between the command line and an IDE when building applications. Currently, two IDEs are able to work with Roo applications: SpringSource Tool Suite and IntelliJ IDEA. Let’s take a look at the support for Roo projects in both applications.
2.3.1. SpringSource Tool Suite
SpringSource has a version of the Eclipse IDE known as the SpringSource Tool Suite, which we’ll call STS. Geared toward developing Spring-based applications, STS is chock full of features supporting the Spring Framework, such as
- Spring context editing support —STS provides automatic code fill-in features and namespace support for Spring context files. The editor can visualize these files graphically as well.
- Code completion —Not only does STS provide the fairly typical [CTRL]-SPACE code completion features from Eclipse, it does so when completing information in Spring XML context files.
- Maven —Built-in support for Maven using the m2e Eclipse Maven plug-in.
- API-based editors —Editing support for Spring WebFlow, Spring Integration, Spring Batch, and other features is provided. Open one of these files in the editor and see the tabs along the bottom, which provide graphical editing features.
- Spring template project support —Kick off any Spring project quickly using some Maven archetype-based starter projects.
- RAD —Full support for SpringSource’s rapid application development platforms, Grails and Roo.
We could go on and on about STS. But this isn’t a sales call, so let’s discuss the features specific to Roo:
- The Roo command shell —STS can open a Roo command shell on any Roo project.
- AspectJ ITD support —Part of STS’s support for AspectJ, it will let you show or hide the generated ITDs and provides navigational access to the code written in those ITDs when editing source code or debugging your application.
- Refactoring support —STS supports refactoring of code written in Roo ITDs; you can push-in refactor methods out of ITDs and into Java code for customization purposes.
Loading your project into STS can be done with the Eclipse’s import function.
To import the project from within STS, select File > Import... > Maven > Existing Maven Projects. Then navigate to the directory where the project was created.
2.3.2. The Roo context menu
Roo projects are automatically detected upon being opened, and display two small letter indicators in their project icons, an M to denote that they’re managed Maven projects, and an S to show that they’re Spring projects. Roo projects have a special nature to them, and STS adds special right-click menu options within the Spring Tools section as seen in figure 2.3.
Figure 2.3. The right-click menu is enabled when a Roo project is imported into the STS workspace.
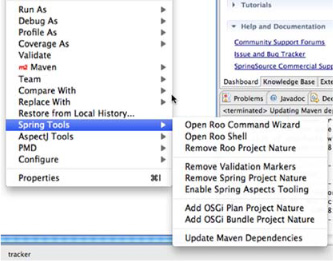
There are a number of features directly available to you in a Roo project, over and above the typical Spring application:
- The Roo Shell —You can open the Roo shell on the current project within STS.
- The Roo Command Wizard —You can browse all commands, which is essentially the same as running help command on each one and presenting it in a graphical user interface.
- Remove Roo Project Nature —You can remove Roo features from STS; this will disable access to the Roo shell. This is useful if you’ve decided that you’ve taken your application as far as you want to with Roo, and want to treat it like a regular Spring project.
- Enable Spring Aspects Tooling —This enables weaving of the ITD code within Roo. You can turn on this feature and then use [CTRL]-[SPACE] to use methods from these ITDs in your Java source code.
- The Refactor menu (not shown) —A menu item in the Refactor... menu, Push-In, is meant to be used to push code out of an ITD (.aj file) and back into a Java file for customization and editing.
Let’s take a look in detail at the Roo shell support provided by STS.
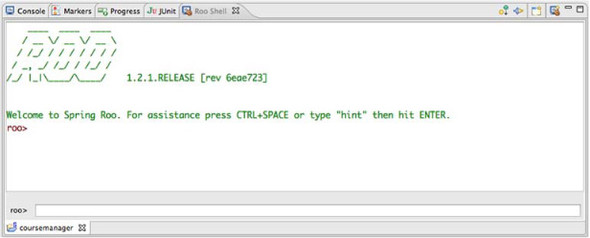
2.3.3. The Roo shell
The Roo shell is opened automatically when opening a Roo-based project in STS, as shown in figure 2.4.
Figure 2.4. Roo shell view
The Roo Command-Line Shell in STS
In STS, the Roo shell has one functional difference from the command-line version. Instead of pressing [TAB] to complete commands, you use the standard Eclipse code completion [CTRL] [SPACE] keystroke.
2.3.4. Showing and hiding Roo ITDs
Initially, STS will hide the Roo ITDs (*.aj) files. This provides you with a concise view of the objects that you work with day to day. But to see the generated code, you need to bring up the Filters dialog. This can be done from two places:
- From the Package Explorer, click on the drop-down triangle and select the Filters... menu item.
- From the Project Explorer, click on the drop-down triangle and select the Customize View... menu item.
Figure 2.5 shows the way to select the Customize View menu from the Project Explorer view.
Figure 2.5. The drop-down triangle menu, shown in the Project Explorer view
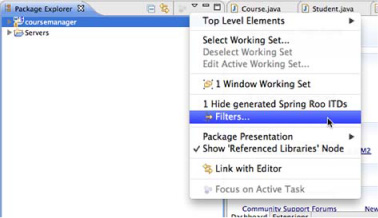
Once you select the Filters... menu, you’ll be presented with a Filter dialog, where you can toggle the Hide Generated Spring Roo ITDs option off and on. If you’ve done this before, it appears as a selectable shortcut. This feature will toggle display of the generated AspectJ ITD files. Figure 2.6 shows the filter dialog.
Figure 2.6. The STS filter dialog
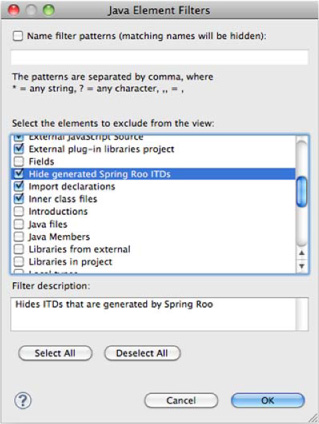
Figure 2.7 shows the resulting project pane, which will look quite different when displaying the generated ITDs.
Figure 2.7. The project pane with ITDs
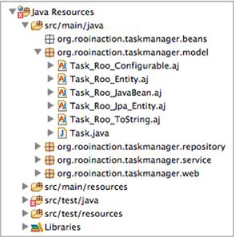
You can see all of the ITDs generated for each artifact. Viewing the aspects isn’t just a convenience; as you get more used to Roo, you may find yourself customizing the behavior of a given Roo entity or controller to handle an atypical problem. That is where push-in refactoring comes in, which is the ability to push code out of the ITDs and into the Java classes themselves.
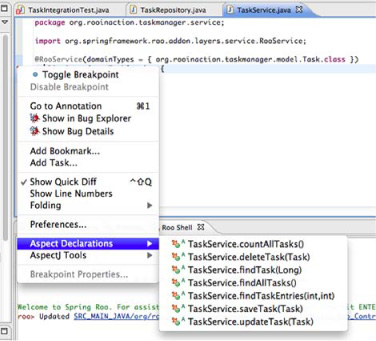
Now take a look at another STS feature—the ability to navigate to the woven ITD methods right from the Java source editor.
If you see a special ![]() icon to the left of your editor pane, that means that the class has been woven with ITD methods. You can right-click on that
icon and select from several menu options, including the Aspect Declarations pane shown in figure 2.8.
icon to the left of your editor pane, that means that the class has been woven with ITD methods. You can right-click on that
icon and select from several menu options, including the Aspect Declarations pane shown in figure 2.8.
Figure 2.8. The Aspect Declarations menu in action; note the weaved data access ITD methods for this service
In short, support for Roo in STS is first-rate, and it’s improving with each release. Being a free option, STS is a good choice for developers who are beginning to experiment with Spring Roo, and who want to work with frameworks such as Spring and AspectJ.
2.3.5. IntelliJ IDEA and other IDEs
Of the two other popular Java IDEs (NetBeans and IntelliJ IDEA), NetBeans doesn’t support AspectID ITD files, so it won’t launch the AspectJ weaver. It won’t make methods in the ITDs available in code fill-in features, and will only show the AspectJ files as pure text files. Any code that references ITD methods directly, such as integration tests, will fail to compile.
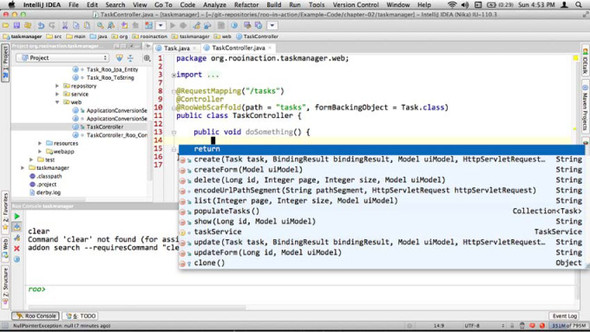
On the other hand, IntelliJ 11.0 and above provides full support for Roo as well, including a command-line utility, code completion, and syntax highlighting for the Roo aspects as shown in figure 2.9.
Figure 2.9. IntelliJ code completion and command-line console
IntelliJ IDEA also has built-in support for Spring Beans, Hibernate, JSPs, JavaScript, and Maven. This makes it another excellent choice for developing Roo-based applications. You can choose to run the Roo shell in the IDE, or you can keep the shell running in the background in an operating system window. Which method you choose is up to you. You will want to turn on the Maven auto-import feature so that you get configuration changes as soon as Roo reconfigures your project.
In short, basic IDE support for Roo is available from SpringSource Tool Suite and Jet-Brains IntelliJ. Unfortunately, AspectJ support, the key enabling technology for Spring Roo, is dormant in the NetBeans IDE to date. Until a solution arrives that allows developers to edit code built on AspectJ ITDs on that platform, developers who use Net-Beans will have to use command-line Maven or another IDE to work with Spring Roo.
2.4. Refactoring, Roo ITDs and leaving Roo
Now we’ll discuss how you can work with your ITDs. There are three techniques you need to learn to make the most out of the Roo development platform: push-in refactoring, pull-out refactoring, and removing Roo from your project.
Each of these techniques is supported from the SpringSource Tool Suite. IntelliJ also allows you to perform these operations, but we will focus on STS in this discussion.
We’ll begin by discussing push-in refactoring.
2.4.1. Push-in refactoring
Push-in refactoring is used to customize and replace the default behavior of Roo’s aspects. The technique moves a method or attribute from a Roo project to the Java source file. From there, the developer can modify the method code directly. Push-in refactoring is used for many purposes. Here are a few:
- Sorting the data to be retrieved to feed a list from the Roo JPA ITD
- Adding custom server-side validations to your Spring MVC controllers
- Customizing the way your entity is created, setting code-based defaults or pre-populating data from a web service
To perform push-in refactoring using the SpringSource Tool Suite, make sure STS is showing the Roo-generated ITDs (see section 2.3.4). Switch to the Package Explorer view using Window...> Show View...> Package Explorer.
You’ll implement a new business requirement for your task manager. Every time you mark a task complete, you’ll prepend the task text with (completed) so that it is obvious you’ve done your work.
About Our Approach
Because of the fact that JPA doesn’t guarantee the order of setters called when persisting an entity, you can’t implement this customization using the entity setter method, setCompleted(). Instead, you’ll implement this in the service tier as you’re updating your task, and manually set the data on the way to the repository, thus skipping any strange JPA implementation logic issues.
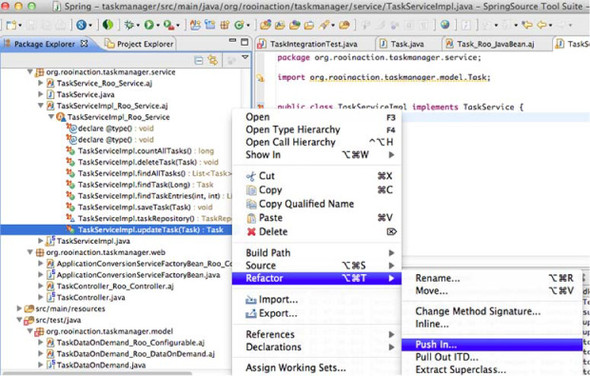
Open up the Java source folder org.rooinaction.taskmanager.service, and expand the TaskServiceImpl_Roo_Service.aj aspect. Expand the ITD to show the member methods. Right-click on the updateTask(Task): void method, as shown in figure 2.10.
Figure 2.10. The refactoring push-in menu
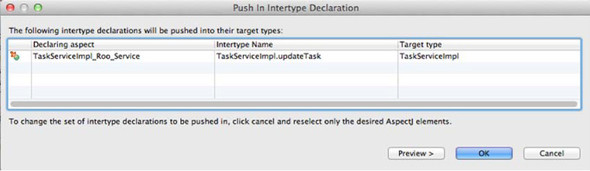
You’ll then see the Push In Intertype Declaration dialog, as shown in figure 2.11. If you selected the method correctly, only the Task.setCompleted method will be pushed in. If, on the other hand, you clicked on the ITD itself and not a method or member variable, the entire ITD will be pushed in. This dialog is a chance to review your pending changes.
Figure 2.11. Refactoring in STS using the push-in dialog
You can preview your changes by clicking the Preview > button, as shown in figure 2.11. Click OK to perform the operation, as shown in figure 2.12.
Figure 2.12. Previewing the push-in
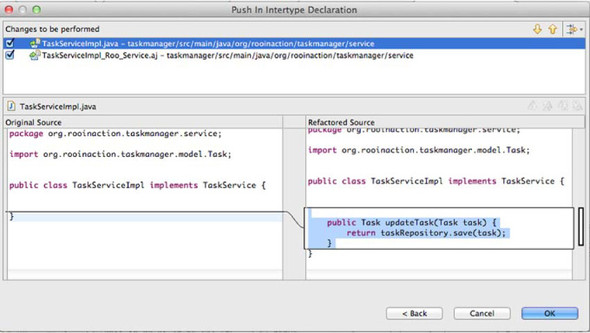
Once the refactoring is complete, you’ll see the method vanish from the ITD, and appear in TaskServiceImpl.java. This will only happen if your Roo shell is running. If nothing happens, fire up the shell. Now you can customize it to prepend your message to the task text:
public Task updateTask(Task task) {
  if (Boolean.TRUE.equals(task.getCompleted())) {
    task.setDescription("(completed) " + task.getDescription());
  }
  return taskRepository.save(task);
}
And there you have it. You’ve just extracted the default implementation of update-Task from the TaskServiceImpl_Roo_Service.aj ITD and pushed it in to the Task ServiceImpl.java service implementation.
2.4.2. Verify refactoring
Let’s run the application now, this time on tc Server within STS. To do so, just drag the project from the Package or Project Explorer bar to the VMWare Fabric tc Server Developer Edition server, either v2.5 or 2.6. This is located in the Servers view. You can then right-click on the server and select Start. Once the server is started, you can right-click on the application name in the server pane, and select Open Home Page.
If you execute your taskmanager web application again and complete a few tasks, you’ll see the completed message appear when you click on the checkbox and update your task.
What if I Don’t Use STS?
If you don’t download STS, you’re missing out on a productive IDE. Although Eclipse can be clunky at times, STS installs several plug-ins that make developing Roo applications a snap, including AspectJ refactoring techniques, the Spring MVC namespace editor, and Maven editing support.
But if you don’t use STS, you can just cut and paste the code from your AspectJ ITDs, and use your editor’s search/replace feature to remove the Classname. prefix from the elements. Fire up the Roo shell and allow it to remove the methods from the ITD. Roo can then remove the ITD completely if you remove the annotation that created it, such as @RooWebScaffold.
2.4.3. Pulling code out to ITDs
You can actually create your own ITDs and pull code out of your class file into them. This works as long as the code you’re pulling out isn’t supposed to exist because of the presence of another Roo annotation. You can’t push in your JavaBean setters and getters and then pull them out to another aspect without removing the original @RooJavaBean annotation, for example.
To create your own ITD, you just use the File> New> Aspect menu item in STS. The ITDs you generate need to be marked as privileged aspect ITDs—you can just swap the public keyword with privileged. Once the ITD is created, you can use the Package Explorer to select a method of a Java class, then use the right-click menu to select Refactor> Pull Out ITD. Figure 2.13 shows the pull-out dialog.
Figure 2.13. Pulling out Java code to an ITD
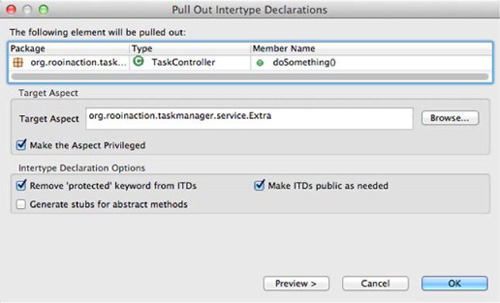
Once finished, the method will be extracted into the AspectJ ITD you selected.
2.4.4. Leaving Roo behind
As much fun as you might have with Spring Roo, there may come a time when you want to remove it from your project. Perhaps you aren’t comfortable with supporting an AspectJ-based application platform, or you’re using Roo to prototype your project, but then will switch over to a traditional Spring application architecture.
Leaving Roo, because it’s a compile-time platform, is as simple as several steps:
1. Right-click on the project in the STS Package Explorer and select Refactor > Push-In.
2. Accept the settings to remove all ITDs.
3. Edit the Maven pom.xml file and remove the aspectj-maven-plugin from the configuration.
As outlined in the Roo installation guide, you can leave the Roo annotations in the source code. That way, if you decide to re-install Roo and continue coding, you don’t have to redefine the annotations. You may remove the Roo annotations if you wish. If you do so, you can actually remove all of the Roo configuration, including AspectJ support, from the Maven pom.xml file by removing the aspectj-maven-plugin plugin configuration entry from the build/plugins stanza.
Don’t Forget to Switch Your Transaction Configuration if You Remove AspectJ
If you remove AspectJ from your Maven build, you’ll also want to switch to the standard Spring proxy mode of providing transaction support by removing the italicized mode="aspectj" entry from the application Context.xml fragment below:
  <t:annotation-driven  mode="aspectj"
      transaction-manager="transactionManager"/>
Other configuration settings are no longer relevant either, such as the AspectJ Maven Plugin, and skipping the scan of AspectJ ITDs, because they’ll no longer exist in the project. Remove what you wish, unless you think at some point you may want to resume using Roo on your project.
Now let’s review what you’ve learned about working with the Roo shell, aspects, and the Eclipse IDE.
2.5. Summary
In this chapter, you’ve seen how you can work with the Roo shell to manipulate projects. We introduced some of the Roo configuration commands, and explained how they create artifacts or configure project settings.
We reviewed how Roo organizes project structure, including where it stores various configuration files. If you’re already a Maven or Spring developer, much of this looks familiar, since Roo follows common architectural patterns. We also discussed the tiers in a typical application, and how Roo provides a more entity-driven model of developing a data-driven application, using either the Active Record pattern or the service/ repository pattern.
You also worked with the SpringSource Tool Suite to import a project, and enabled the Roo shell. You experimented with pushing in code from an ITD, and pulling code out to your own ITDs. We also discussed how to leave Roo if the time comes.
The next three chapters should be read together. Chapter 3, “Database persistence with entities,” discusses how Roo manages database applications using the JPA API and JPA Entities. Chapter 4, “Relationships, JPA, and advanced persistence,” explains how to create and manage relationships, add a service layer, and call JPA API code directly. We also discuss the MongoDB NoSQL database. Finally, chapter 5 explains how Roo helps you develop web-based applications, and how you can use those entities you learned about in the prior chapters.
2.6. Resources
Books
- Laddad, Ramnivas. AspectJ in Action, Second Edition (Manning Publications, 2009)
Web
- For more internals on Roo from the founder of the Roo project, Dr. Ben Alex, see http://mng.bz/s8Rc. Although out of date, this is a great read to see what they were thinking when they originally architected Roo.
- Ken’s interview with Ben Alex provides an audio history of the project. See Episode #45 of the Chariot TechCast podcast, “SpringSource’s Ben Alex on Roo, a Java-based agile framework,” located at http://techcast.chariotsolutions.com.