
A huge percentage of “switchers” do not, in fact, switch. Often, they just add. They may get a Macintosh (and get into the Macintosh), but they keep the old Windows PC around, at least for a while. If you’re in that category, get psyched. It turns out that communicating with a Windows PC is one of the Mac’s most polished talents.
That’s especially good news in the early days of your Mac experience. You probably have a good deal of stuff on the Windows machine that you’d like to bring over to the Mac. Somewhere along the line, somebody probably told you how easy this is to do. In fact, the Mac’s reputation for simplicity may even have played a part in your decision to switch.
In any case, this chapter describes the process of building a bridge from the PC to the Mac, so that you can bring all your files and settings into their new home. It also tells you where to put all of them. (The next chapter is dedicated to the slightly hairier process of getting your email and addresses copied over.)
As it turns out, files can take one of several roads from your old PC to your new Mac. For example, you can transfer them on a disk (such as a CD or iPod), by a network, or as an attachment to an email message.
Tip
The first part of this chapter covers the mechanical aspects of moving files and folders from your Windows PC to the Mac. In Where to Put Your Copied Files, you’ll find a more pointed discussion of where to put each kind of data (mail, photos, music, and so on) once it’s on theMac.
By far the easiest way to transfer all the stuff from your PC to your new Mac is to let Apple do it for you. Yes, that’s right: those busy Geniuses who work at the 200 Apple stores around the world are prepared to bring your music, pictures, documents, address book, email, bookmarks, and other stuff to its new home on your Mac.
And believe it or not, you may be able to get this service for free.
It’s important to understand, though, that there are two levels of this service:
Standard. This lower-tier service requires some planning. You’ll be instructed to put everything that you want rescued into a folder on your Windows desktop called Transfer. Put your Pictures, Music, and Documents folders in there, at the very least.
If you’re smart, you’ll also export your address book, email, calendar, and bookmarks from the various Windows programs they’re in now, as described in this chapter and the next. Put those exported files into the Transfer folder, too.
The Apple store will copy that single Transfer folder to the desktop of your new Mac. That’s it. They won’t put those files in the right places for you (photos into iPhoto, music into iTunes, etc.); that’s left for you to do.
In other words, the Standard service is a great value if you’re tech-savvy enough to import and export data into the proper programs. (Although actually, this book describes those steps pretty well.)
The best part: if you bring in your old PC at the time you buy a new Mac, this service is free.
Tip
You don’t necessarily have to bring in your PC the day you buy the Mac. If you bring a new Mac to the shop reasonably soon after buying it, even if you bought it online, the Geniuses are generally still willing to do the deed for you.
Complete. Now we’re talking. With the Complete service, you just hand over your PC, and the Apple dudes do everything. They take your entire Windows world and transfer everything into the appropriate programs on the Mac.
For example, all your Windows pictures (even if they’re in Picasa or special photoediting programs from HP or Kodak) get brought over to the Mac and imported into iPhoto. All your music is imported into iTunes on the Mac. Your documents and movies get copied to the Documents and Movies folders on the Mac. Your Web bookmarks from Internet Explorer or Firefox get transferred to Safari on the Mac. Even your email, address book, and calendar get transferred from Outlook or Outlook Express on the PC and brought into Mail and iCal on the Mac.
When they say complete, they mean complete.
Tip
Behind the scenes, the Apple geniuses use exactly the same techniques and tools described in this chapter, including the O2M shareware for transferring mail, calendar, and address book out of Outlook.
This service costs $50. However, it’s free if you sign up for one of Apple’s training services, like One to One (which gives you weekly private lessons—on any Mac topic—for $100 a year).
The rest of this chapter covers do-it-yourself ways to transfer your stuff. But man, there’s nothing like having a professional do it for you.
The iTornado is a special USB “smart cable” designed expressly for transferring stuff from a Windows PC to a Mac. You connect the USB cable to each machine, and that’s it: you see a table-of-contents screen for each machine (Figure 5-1). You copy files back and forth simply by dragging their icons in either direction.
Using this technique, you can move your PC photos directly into theMac’s Pictures folder, your iTunes library into the iTunes folder on the Mac, and so on.
It’s fast and, goodness knows, simpler than any other do-it-yourself method. It does, however, cost money—the list price, at this writing, is $80. Fortunately, the special code at the back of this book lops 20 percent off the price (and throws in free shipping).
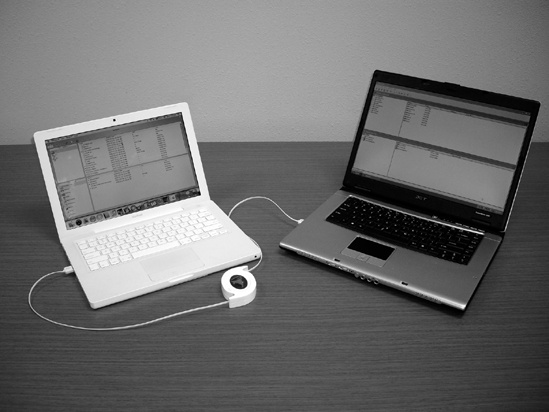
Figure 5-1. The iTornado is a retractable USB cable that doesn’t require you to install any software. As soon as you connect it, you see the contents of both machines in folder-tree formation. You can drag and drop files from one computer to the other, with no fuss, accounts, or setup—only a knowledge of where you’re supposed to put everything. (It works Mac-to-Mac and PC-to-PC, too.)
Another way to transfer Windows files to the Mac is to put them onto a disk that you then pop into the Mac. (Although Windows can’t read all Mac disks without special software, the Mac can read Windows disks.)
This disk can take any of these forms:
An external hard drive or iPod. If you have an external hard drive (USB or IEEE 1394, what Apple calls FireWire ), you’re in great shape. While it’s connected to the PC, drag files and folders onto it. Then unhook the drive from the PC, attach it to the Mac, and marvel as its icon pops up on your desktop, its contents ready for dragging to your Mac’s built-in hard drive. (Most iPods work great for this process, too; they can operate as external hard drives—even the iPod Nano.)
A USB flash drive. These small keychainy sticks are cheap and capacious, and they work beautifully on both Macs and PCs. Like a mini-external hard drive, a flash drive plugs directly into your USB port, at which point it shows up on your desktop just like a normal disk. You copy files to it from your PC, plug it into your Mac, and copy the files off, just like you would for any other disk. And, like an external hard drive, you’re left with a backup copy of the data on the drive itself.
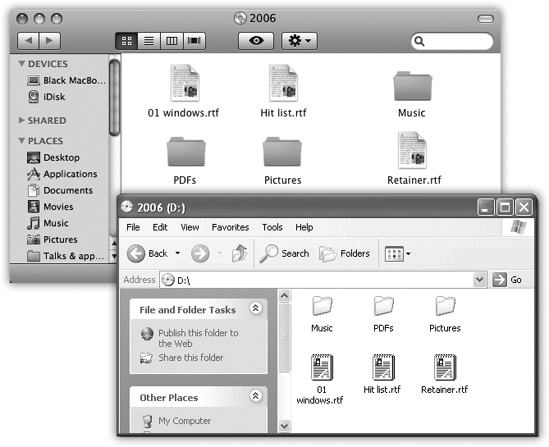
A CD or DVD. If your Windows PC has a CD or DVD burner, here’s another convenient method. Burn a disc in Windows, eject it, and then pop it into the Mac (see Figure 5-2). As a bonus, you wind up with a backup of your data on the disc itself.
Figure 5-2. Burned CDs generally show up with equal aplomb on both Mac and Windows, regardless of which machine you used to burn it. Here’s a CD burned on a Windows XP machine (bottom), and what it looks like on the Mac (top)—same stuff, just a different look and different sorting order. Either way, you can drag files to and from it, rename files, delete files, and so on.
Note
If you’re given a choice of file format when you burn the disc in Windows, choose ISO9660. That’s the standard format that the Macintosh can read.
Move the hard drive itself. This is a grisly, technical maneuver best undertaken by serious wireheads—but it can work. You can install your PC’s hard drive directly into a Power Mac or Mac Pro, as long as it was prepared using the older FAT or FAT32 formatting scheme. (The Mac can handle FAT hard drives just fine, but chokes with NTFS hard drives.)
When you insert a Windows-formatted disk, whatever the type, its icon appears at the upper-right corner of your desktop, where Mac disks like to hang out. (If it doesn’t appear, you or someone you love has probably fiddled with the “Show these items on the Desktop” settings in the Finder→Preferences→General tab.)
Here’s one of the best features of Mac OS X: It can “see” shared disks and folders on Windows PCs that are on the same network. Seated at the Mac, you can open or copy files from a PC. In fact, you can go in the other direction, too: Your old PC can see shared folders on your Mac.
This isn’t a networking book, but Chapter 14 offers a crash course. When it’s all over, you’ll be seated at the Mac, looking at the contents of your Windows PC in a separate window. At that point, you can drag whatever files and folders you want directly to the proper places on the Mac.
There’s a new breed of file-shuttling Web site prowling the Net—and a new option for transferring large amounts of data between machines.
They’re free Web sites, like yousendit.com and sendthisfile.com, that are specifically designed for sending huge files from one computer to another, without worrying about email file attachments or size limits.
On the Windows PC, zip up your files into a great big .zip file. Upload it to one of these free sites, and provide your Mac’s email address.
On the Mac, click the link that arrives by email—and presto, that huge zip file gets downloaded onto your Mac. It’s free, there’s no file-size limit, and you can download the big file(s) within three days of sending them. The only price you pay is a little bit of waiting while the stuff gets uploaded and then downloaded.
Tip
If you have your own Web site—a .com of your own, for example, or a free site through a university—you can also use that Web space as a transfer tool. Follow the uploading instructions that you were given when you signed up for the space. (Hint: It usually involves a so-called FTP program.) Then, once all your files are on the site, download them onto your Mac.
Although sending files as email attachments might seem to be a logical plan, it’s very slow. Furthermore, remember that most email providers limit your attachment size to 5 or 10 megabytes. Trying to send more than that at once will clog your system. If you’ve got a lot of stuff to bring over from your PC, use one of the disk-or network-based transfer systems described earlier in this chapter.
But for smaller transfer jobs or individual files, sending files as plain old email attachments works just fine.
If you have trouble, or if you can’t open the attachments at the other end, consider the following potential snags.
If your Windows PC isn’t in the same building as the Mac, connecting the two using an Ethernet or a wireless network may not be a practical proposition. But even if you can’t connect them into a network, you can still connect them via the network: the Internet.
It turns out that, for $100 per year, Apple will be happy to admit you to a club it calls .Mac (“dot-mac”). It offers a number of handy Internet features that tie in nicely to Mac OS X, as described in .Mac Services.
For many people, the crown jewel of the .Mac services is the iDisk, which appears on your desktop as though it’s a multi-gigabyte hard drive. Anything you drag into the folders inside this “drive” gets copied to Apple’s secure servers on the Internet. (If that’s not enough space for you, Apple will rent you a larger allotment in exchange for more money.)
Because you can use the iDisk as a go-between between Mac and Windows, anywhere in the world, it makes a handy universal transfer disk. Pulling it onto your screen has details for pulling the iDisk onto the Mac’s screen or the PC’s screen.
Bluetooth isn’t really designed to be a networking technology; it’s designed to eliminate cables between various gadgets. But if your Mac and a PC each have Bluetooth adapters, you can share files between them as though there’s no language barrier at all. (Bluetooth is built into all Macs, and is available as a USB or internal card for Windows machines.)
Mac OS X comes with a nondenominational file-exchange program called Bluetooth File Exchange; not all Windows Bluetooth adapters come with such a program. But if yours does (3Com’s adapters do, for example), you should be able to shoot files between the machines with the greatest of ease, if not the greatest of speed.
Just getting your PC files onto the Mac is only half the battle. Now you have to figure out where they go on the Mac.
The short answer: in your Home folder. (Choose Go→Home, or click the Home icon in your Sidebar.)
Some of the more specific “where to put it” answers are pretty obvious:
My Documents. Put the files and folders from the PC’s My Documents folder into your Home→Documents folder. Here’s where you should keep all your Microsoft Office files, PDF files, and other day-to-day masterpieces, for example.
My Music. In recent versions of Windows, a My Music folder is designed to hold all of your MP3 files, AIFF files, WAV files, and other music. As you could probably guess, you should copy these files into your Mac’s Home→Music folder.
After that, you can import the music directly into iTunes. If you used iTunes on your old PC, for example, just open iTunes on your Mac and choose iTunes→Preferences→Advanced. Then click Change, and navigate to the place where you moved your old iTunes library.
If you used some other music program on your PC (like Windows Media Player or MusicMatch), things are a little different. On your Mac, choose iTunes→Import, and navigate to the folder that contains all your music. (In either case, click Choose in the resulting dialog box.)
My Pictures. The latest Windows versions also offer a My Pictures folder, which is where your digital camera photos probably wound up. Mac OS X has a similar folder: the Home→Pictures folder.
Here again, after copying your photos and other graphics faves over to the Mac, you’re only halfway home. If you fire up iPhoto (in your Applications folder), choose File→Import, and choose the Pictures folder, you’ll then be able to find, organize, and present your photos in spectacular ways.
My Videos. The My Videos folder of Windows XP contains the video clips you’ve downloaded from your camcorder (presumably so that you can edit them with, for example, Microsoft’s Movie Maker software). Once you’ve moved them to your Home→Movies folder, though, you’re in for a real treat: You can now edit your footage (if it’s digital footage) with iMovie, which, to put it kindly, runs rings around Movie Maker.
Other elements of your Windows world, though, are trickier to bring over. For example:
You can say whatever you like about Microsoft’s sense of design (and devoted Macintosh fans have plenty to say on this topic). But especially in recent versions of Windows, the desktop pictures, better known in the Windows world as wallpaper, are pretty cool. Fortunately, you’re welcome to bring them over to your Mac and use them on your own desktop.
To find the graphics files that make up the wallpaper choices in Windows XP, Windows Me, or Windows Vista, for example, proceed like this:
Open My Computer, double-click your hard drive’s icon, and open the WINDOWS or WINNT folder.
If you see a huge “These files are hidden” message at this point, or if the window appears empty, click “Show the contents of this folder” or “View the entire contents of this folder” at the left side of the window.
In the Windows or WINNT window, open the Web folder.
You’re looking for a folder inside it called Wallpaper.
Open the Wallpaper folder.
It’s filled with .bmp or .jpg files ready for you to rescue and use on the Mac. In Desktop & Screen Saver for instructions on choosing wallpaper for your Mac.
Note
In Windows 95 or 98, the wallpaper files are in your Program Files→Plus!→Themes folder instead.
The Mac doesn’t let you associate your own sound effects to individual system events, as Windows does (Low Battery Alarm, Maximize, Minimize, and so on). It lets you choose one sound effect for all of its attention-getting purposes, using the Sound pane of System Preferences (Sound).
Still, there’s nothing to stop you from harvesting all of the fun little sounds from your Windows machine for use as the Mac’s error beep.
To find them on the PC, repeat step 1 of the preceding instructions. But in the WINDOWS or WINNT folder, open the Media folder to find the .wav files (standard Windows sound files).
Once you’ve copied them to your Mac, you can double-click one to listen to it. (It opens up in something called QuickTime Player, which is the rough equivalent of Windows Media Player. Press the Space bar to listen to the sound.)
To use these sounds as error beeps, you’ll have to convert them from the PC’s .WAV format into the Mac’s preferred .aiff format. You’ll find step-by-step instructions in the free downloadable Appendix for this chapter, “Converting WAV Sounds to Mac Error Beeps.pdf.”
You can find it on this book’s “Missing CD” page at www.missinmganuals.com.
Moving your Favorites, or browser bookmarks, to a Mac is pretty easy. The hardest part is exporting them as a file, and that depends on which Web browser you’ve been using on the PC.
Internet Explorer. Fire up Internet Explorer; choose File→Import and Export. (In the newer Internet Explorer 7, click the double-star icon in the upper-left corner of the window. From the pop-up menu, choose Import and Export.)
When the Import/Export Wizard appears, click Next; on the second screen, click Export Favorites, and then click Next again.
On the third screen, leave the Favorites folder selected, and click Next. Finally, click Browse to choose a location for saving the exported bookmarks file. For now, save it to your desktop.
Click Next, Finish, and then OK.
Firefox. In Firefox, choose Bookmarks→Manage Bookmarks. In the Bookmarks Manager window, choose File→Export. Save the Bookmarks file to your desktop.
Now you’ve got an exported Bookmarks file on your desktop. Transfer it to your Mac using any of the techniques described earlier in this chapter (network, email, whatever).
Now open the Mac’s Web browser, Safari (it’s in your Applications folder). Choose File→Import Bookmarks. Navigate to, and double-click, the exported Favorites file to pull in the bookmarks.
Tip
Firefox is available for the Mac, too (www.getfirefox.com). If your bookmarks are already in Safari, you can import them by choosing File→Import. If not, you can import them from your exported Windows bookmarks file by choosing Bookmarks→Manage Bookmarks; then, in the Bookmarks Manager window, choose File→Import. Find and select the exported bookmarks file.
See Chapter 6 for details on copying your email, address book, and Outlook calendar information to the Mac.
Most big-name programs are sold in both Mac and Windows flavors, and the documents they create are freely interchangeable.
Files in program-agnostic, standard exchange formats don’t need conversion either. These formats include JPEG (the photo format used on Web pages), GIF (the cartoon/logo format used on Web pages), PNG (a newer image format used on Web pages), HTML (raw Web-page documents), Rich Text Format (a word-processor exchange format that maintains bold, italic, and other formatting), plain text (no formatting at all), QIF (Quicken Interchange Format), MIDI files (for music), and so on.
Part of this blessing stems from the fact that both Windows and Mac OS X use file name extensions to identify documents. (“Letter to the Editor.doc”, for example, is a Microsoft Word document on either operating system.) Common suffixes include:
Kind of document | Suffix | Example |
|---|---|---|
Microsoft Word | .doc | Letter to Mom.doc |
text | .txt | Database Export.txt |
Rich Text Format | .rtf | Senior Thesis.rtf |
Excel | .xls | Profit Projection.xls |
PowerPoint | .ppt | Slide Show.ppt |
FileMaker Pro | .fp5, fp6, fp7... | Recipe file.fp7 |
JPEG photo | .jpg | Baby Portrait.jpg |
GIF graphic | .gif | Logo.gif |
PNG graphic | .png | Dried fish.png |
Web page | .htm | Index.htm |
Note
The latest versions of Microsoft Office for Mac and Windows offer an alternative, more compact file format ending with the letter x. For example, Word files are .docx, Excel files are .xlsx, and so on.
The beauty of Mac OS X is that most Mac programs add these file name suffixes automatically and invisibly—and recognize such suffixes from Windows with equal ease. You and your Windows comrades can freely exchange documents without ever worrying about this former snag in the Macintosh/Windows relationship.
You may, however, encounter snags in the form of documents made by Windows programs that don’t exist on the Mac, such as Microsoft Access. Chapter 7 tackles these special cases one by one.
FireWire Disk Mode is by far the fastest method yet for transferring a lot of data—even faster than copying files over a network—but it works only between two Macs, which is why it occupies this lonely spot at the end of this chapter. FireWire Disk Mode is extremely useful in any of these situations:
You’re traveling with a laptop. You want to copy your life onto it from your main Mac, including your entire 2 GB email folder and project files, before taking it on a trip, and then unload it when you return.
Note
The MacBook Air doesn’t have a FireWire jack, so it can’t do this trick.
You have a new Mac. You want to copy everything off the old one, without having to wait all night.
One Mac won’t start up. You want to repair it, using another Mac as a “front end.”
In the following steps, suppose your main Mac is an iMac, and you want to use a MacBook Pro laptop as an external hard drive for it.
Using a FireWire cable, connect the FireWire jacks of both computers.
For this trick, you need a 6-pin FireWire cable—not the one that connects a camcorder to a Mac. The one you need has the same, large connector on both ends.
Note
If both Macs have Apple’s new FireWire 800 jacks, use a 9-pin FireWire cable instead for much greater speed. If only one Mac has a FireWire 800 jack, use that computer’s traditional FireWire 400 connector instead. Otherwise, you need either a special FireWire 800-to-FireWire 400 cable, or the 400-to-800 adapter that came with your Mac.
UP TO SPEED: Moving Data Within the Mac
Most of this chapter concerns the act of moving files between machines. Once you’ve settled in on the Mac, though, you’ll frequently want to move data between documents.
Fortunately, the Cut, Copy, and Paste commands work almost exactly as they do in Windows. You still can’t paste a Web page into your image editor, and you can’t paste MIDI music information into your word processor. But you can put graphics into your word processor, paste movies into your database, insert text into Photoshop Elements, and combine a surprising variety of seemingly dissimilar kinds of data. All you have to do is get used to the Macintosh keyboard shortcuts, which use the
 key instead of the Ctrl key:
-X for Cut, -C for Copy, and -V for paste.
key instead of the Ctrl key:
-X for Cut, -C for Copy, and -V for paste.You can also drag highlighted text or graphics to another place in the document, into a different window, or into a different application, as shown here—a satisfyingly direct feature that works in even more Macintosh programs than Windows programs. Just note that in some Mac OS X programs (Cocoa programs; in Two Kinds of Programs: Cocoa and Carbon), you must press the mouse button for half a second before beginning to drag.
You can also drag text, graphics, sounds, and even movie clips out of your document windows and directly onto the desktop. Once there, your dragged material generally becomes an icon called a clipping file. (In Windows, it’s called a Scrap file.)
Later, when you drag a clipping from your desktop back into an application window, the material in that clipping reappears. Drag-and-drop, in other words, lets you treat your desktop itself as a giant, computer-wide pasteboard—an area where you can temporarily stash pieces of text or graphics as you work.
On the laptop, choose
 →System
Preferences. Click Startup Disk. Click Target Disk Mode. In the
confirmation box, click Restart.
→System
Preferences. Click Startup Disk. Click Target Disk Mode. In the
confirmation box, click Restart.The MacBook Pro turns off, then on again. A giant, yellow, Y-shaped FireWire icon bounces around the laptop screen.
Now take a look at the iMac’s screen: Sure enough, there’s the MacBook Pro’s hard drive icon on the desktop. You’re ready to copy files onto or off of it, at extremely high speeds, and go on with your life.
When you’re finished working with the laptop, eject it from the iMac’s screen as you would any disk. Then turn off the laptop by pressing the power button.
The next time you turn on the MacBook Pro, it will start up from its own copy of Mac OS X, even if the FireWire cable is still attached. (You can disconnect the cable whenever.)