
Millions of people still connect to the Internet using a modem that dials out over ordinary phone lines. But the balance is rapidly tipping in favor of people connecting over higher-speed wires, using so-called broadband connections that are always on: cable modems, DSL, or corporate networks. This chapter explains how to set up each one (and how to use each with a wireless AirPort system).
In this chapter, you’ll be spending a lot of time in the Network
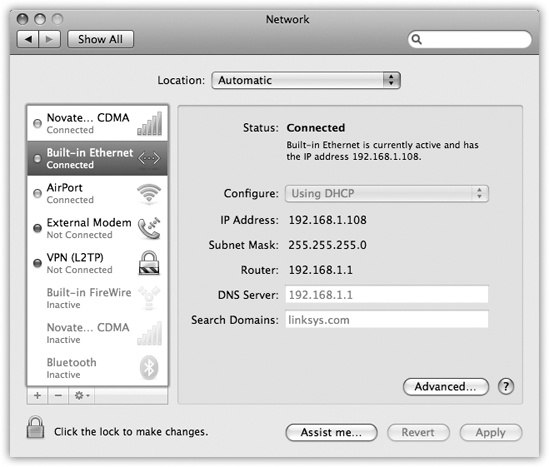
pane of System Preferences (Figure 10-1). (Choose ![]() →System Preferences; click Network.) This list
summarizes the ways your Mac can connect to the Internet or an office
network—Ethernet, AirPort wireless, Bluetooth, FireWire, cellular
modem card, and so on—and how each connection is doing.
→System Preferences; click Network.) This list
summarizes the ways your Mac can connect to the Internet or an office
network—Ethernet, AirPort wireless, Bluetooth, FireWire, cellular
modem card, and so on—and how each connection is doing.
What you may not realize is that the order of the network connections listed here is important. That’s the sequence the Mac uses as it tries to get online. If one of your programs needs Internet access, and the first method isn’t hooked up, the Mac switches to the next available connection automatically.
In fact, Mac OS X can maintain multiple simultaneous network connections—Ethernet, AirPort, dial-up, even FireWire—a feature known as multihoming.
This feature is especially relevant for laptops. When you open your Web browser, your laptop might first check to see if it’s at the office, plugged into a cable modem via an Ethernet cable, which is the fastest, most secure type of connection. If there’s no Ethernet, it looks for an AirPort network. Finally, if it draws a blank there, the laptop reluctantly dials the modem. It may not be the fastest Internet connection, but it’s all you’ve got at the moment.
Here’s how to go about setting up the connection attempt sequence you want:
Open System Preferences. Click the Network icon.
The Network Status screen (Figure 10-1) brings home the point of multihoming: You can have more than one network connection operating at once.
From the
 pop-up menu,
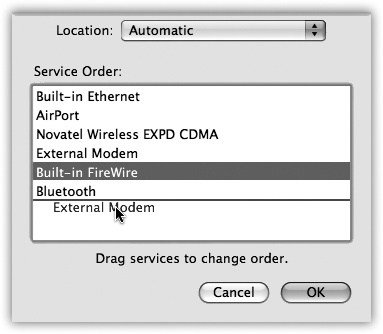
choose Set Service Order.
pop-up menu,
choose Set Service Order.Now you see the display shown in Figure 10-2. It lists all the different ways your Mac knows how to get online, or onto an office network.
Drag the items up and down in the list into priority order.
If you have a wired broadband connection, for example, you might want to drag Built-in Ethernet to the top of the list, since that’s almost always the fastest way to get online.
Click OK.
You return to the Network pane of System Preferences, where the master list of connections magically re-sorts itself to match your efforts.
Your Mac will now be able to switch connections even in real time, during a single Internet session. If lightning takes out your Ethernet hub in the middle of your Web surfing, your Mac will seamlessly switch to your AirPort network, for example, to keep your session alive.
All right then: Your paperwork is complete. The following pages guide you through the process of setting up these various connections.
If your Mac is connected wirelessly or, um, wirefully to a cable modem, DSL, or office network, you’re one of the lucky ones. You have a high-speed broadband connection to the Internet that’s always available, always on. You never have to wait to dial, disconnect, or download. You’re connected to the Net via your Mac’s Ethernet jack or AirPort antenna, leaving the dial-up era behind.
The real beauty of most broadband connections these days is
that they require no setup whatsoever. Take a
new Mac out of the box, plug in the Ethernet cable to your cable
modem (or choose a wireless network from the ![]() menulet), and you can begin surfing the Web
instantly.
menulet), and you can begin surfing the Web
instantly.
That’s because most cable modems, DSL boxes, and wireless base stations automatically feed all of the necessary configuration settings to the Mac (including techie specs like IP address and DNS Server addresses), courtesy of a glorious feature called DHCP. This acronym means dynamic host configuration protocol, which is tech-ese for: “We’ll fill in your Network pane of System Preferences automatically.”
If, for some reason, you’re not able to surf the Web or check email the first time you try, it’s conceivable that your broadband modem or your office network doesn’t offer DHCP. In that case, you may have to fiddle with the Network pane of System Preferences, preferably with a customer-support rep from your broadband provider on the phone.
On the Network pane, click either AirPort or Built-in Ethernet, depending on how your Mac is connected to the broadband modem. Now you see something like Figure 10-3.
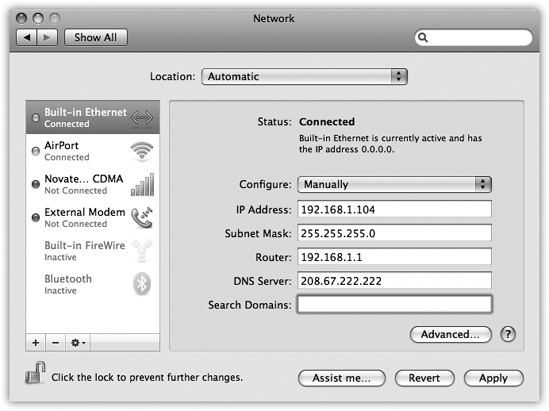
Figure 10-3. Don’t be alarmed by the morass of numbers and periods—it’s all in good fun. (If you find TCP/IP fun, that is.)
In this illustration, you see the setup for a cable-modem account with a static IP address, which means you have to type in all of these numbers yourself, as guided by the cable company. The alternative is a DHCP server account, which fills most of it in automatically.
The beauty of Ethernet connections is that they’re super-fast and super-secure. No bad guys sitting across the coffee shop, armed with shareware “sniffing” software, can intercept your email and chat messages, as they theoretically can when you’re on wireless.
As shown in Figure 10-3, clicking the name of an Ethernet connection in the Network pane reveals the geeky settings required for a manual Ethernet setup.
For most people, the correct setting in the Configure pop-up menu is “Using DHCP,” which means “Mac OS X fills in the correct settings for you.”
If, in the unusual circumstance that you can’t get online with “Using DHCP,” then you’ll have to fill in this control panel manually. You’ll have to fill in all the boxes here—Subnet Mask, Router, and so on—with cryptic numbers separated by periods.
To get this information, you can call your Internet provider (cable or TV company) for help—or you can copy your Windows configuration onto the Mac, like this:
If you have Windows XP, choose Start→Control Panel. Open Network Connections. If you have Windows 2000, choose Start→Settings→Network and Dial-up Connections.
Either way, continue by right-clicking the icon for your broadband connection and, from the shortcut menu, choose Properties. Double-click the row that says “Internet Protocol (TCP/IP).”
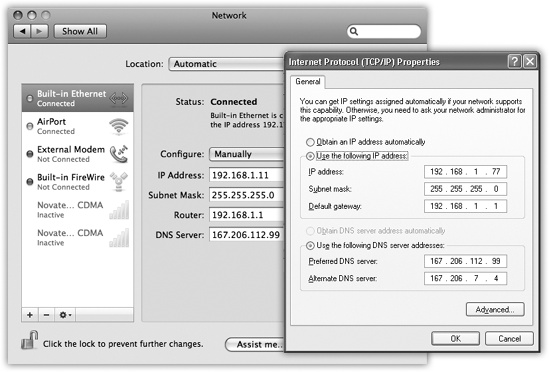
Figure 10-4. Don’t be alarmed by all the numbers and periods—it’s all in good fun. (If you find TCP/IP fun, that is.) Here, you see the setup for a cable-modem account with a static IP address, which means you have to type in these numbers yourself, as guided by the cable company.
If the resulting screen says “Obtain an IP address automatically” (see Figure 10-4), then leave “Using DHCP” selected in the Mac’s Configure pop-up menu; your Mac should teach itself the correct settings automatically.
If the Windows screen says, “Use the following IP address” instead, select Manually from the Mac’s Configure pop-up menu, and copy the relevant numbers into the Mac’s Network panel like this (see Figure 10-4).
Similarly, if the Internet Protocol (TCP/IP Properties) dialog box says, “Use the following DNS server addresses,” type the numbers from the “Preferred DNS server” and “Alternate DNS server” boxes into the Mac’s DNS Servers text box. (Press Return to make a new line for the second number.)
Note
If your Mac plugs directly into the cable modem (that is, you don’t use a router), you’ll have to turn the cable modem or DSL box off and then on again when you’ve switched from the PC to the Mac.
Choose Start→Settings→Control Panel. In the Control Panel window, double-click Network. Double-click the TCP/IP row that identifies how your PC is connected to the broadband modem. (It may say “TCP/IP→3Com Ethernet Adapter,” for example.)
Click the IP Address tab. If it says “Specify an IP address,” copy the IP Address and Subnet Mask numbers into the same ones on the Mac’s Network panel. Then click the Gateway tab, and copy the “Installed gateway” number into the Mac’s Router box.
Finally, click the DNS Configuration tab. Copy the strings of numbers you see here into the Mac’s DNS Servers text box. (Press Return to make a new line for the second number, if necessary.)
AirPort is Apple’s term for the 802.11 (Wi-Fi) wireless networking technology. If you have it, your Mac can communicate with a wireless base station up to 300 feet away, much like a cordless phone. Doing so lets you surf the Web from your laptop in the hotel room, for example, or share files with someone across the building from you.
Sometimes you just want to join a friend’s Wi-Fi network. Sometimes you’ve got time to kill in an airport, and it’s worth a $7 splurge for half an hour. And sometimes, at some street corners in big cities, Wi-Fi signals bleeding out of apartment buildings might give you a choice of 20 or 30 free hot spots to join.
Note
Not all attempts to join Wi-Fi hot spots are successful,
even the unlocked ones. Sometimes the signal is strong enough to
make the hot spot’s name show up in your ![]() menu, but not enough for an actual
connection. Sometimes, for security, hot spots are rigged to
permit only specific computers to join, and
yours isn’t one of them. And sometimes wireless routers are
broadcasting, but their Internet connection is down.
menu, but not enough for an actual
connection. Sometimes, for security, hot spots are rigged to
permit only specific computers to join, and
yours isn’t one of them. And sometimes wireless routers are
broadcasting, but their Internet connection is down.
Either way, your Mac joins Wi-Fi hot spots like this:
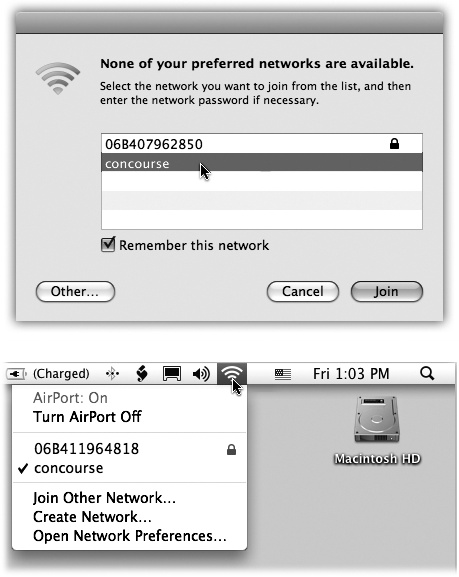
First, it sniffs around for a Wi-Fi network that you’ve used before. If it finds one, it connects automatically. You’re not asked for a password or anything else; you’re just online. For details, see the box in POWER USERS’ CLINIC: The Super-Secret Hot-Spot Management Box.
If the Mac can’t find a previous hot spot, but it detects a new hot spot or two, a message appears on the screen (Figure 10-5), displaying their names. Double-click one to connect.
If you missed the opportunity to join a hot spot when the message appeared, or if you joined the wrong one or a non-working one, then you have another chance. You can always choose a hot spot’s name from the
 menulet, as shown in Figure 10-5 at bottom. A
 icon indicates a hot spot that requires a
password.
icon indicates a hot spot that requires a
password.Tip
If you don’t want your Mac to keep interrupting you with its discoveries of new hot spots—it can get pretty annoying when you’re in a taxi driving through a city—you can shut them off. In System Preferences, click Network, click AirPort, and then turn off “Ask to join new networks.”
Figure 10-5. Left: Congratulations—your Mac has discovered new Wi-Fi hot spots all around you! Double-click one to join it. But if you see a
icon next to the hot spot’s name,
beware: It’s been protected by a password. If you don’t know
it, then you won’t be able to connect. Right: Later, you can
always switch networks using the AirPort menulet.
Choosing the name of the hot spot you want to join is generally all you have to do—if it’s a home Wi-Fi network.
Unfortunately, joining a commercial Wi-Fi hot spot—one that requires a credit card number (in a hotel room or airport, for example)—requires more than just connecting to it. You also have to sign into it before you can send so much as a single email message.
To do that, open your Web browser. You’ll see the “Enter your payment information” screen either immediately or as soon as you try to open a Web page of your choice. (Even at free hot spots, you might have to click OK on a welcome page to initiate the connection.)
Supply your credit card information or (if you have a membership to this Wi-Fi chain, like Boingo or T-Mobile) your name and password. Click Submit or Proceed, try not to contemplate how this $8 per hour is pure profit for somebody, and enjoy your surfing.
If you ask Apple, dial-up modems are dead. Macs don’t even come with built-in modems anymore. You can get an external USB modem for $50, but clearly, Apple is trying to shove the trusty dial-up technology into the recycling bin.
POWER USERS’ CLINIC: The Super-Secret Hot-Spot Management Box
If you open System Preferences→Network, click AirPort in the left-side list, and then click Advanced, you see the cool new dialog box shown here. It lets you manage the list of Wi-Fi hot spots that Mac OS X has memorized on your travels.
For example, you can delete the old ones. You can also double-click a Wi-Fi net’s name to type in and store its password. Finally, you can drag the hot spots’ names up and down the list to establish a priority for making connections when more than one is available.
Ordinarily, Mac OS X memorizes the names of the various hot spots that you join on your travels. It’s kind of nice, actually, because it means you’re interrupted less often by the “Do you want to join?” box.
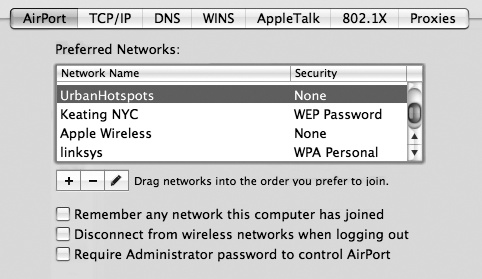
But if you’re alarmed at the massive list of hot spots that Leopard has memorized—for privacy reasons, say—here’s where you turn off “Remember any network this computer has joined.”
Still, millions of people never got the memo. If you’re among them, you need to sign up for Internet service. Hundreds of companies, large and small, would love to become your Internet service provider (ISP), generally charging $20 or so per month for the privilege of connecting you to the great Internet.
Once you’ve selected a service provider, you plug its settings into the Network pane of System Preferences. You get the necessary information directly from your ISP by consulting either its Web page, the instruction sheets that came with your account, or a help-desk agent on the phone.
Note
The following instructions don’t pertain to America Online. It comes with its own setup program and doesn’t involve any settings in System Preferences.
Open System Preferences and click Network. If your modem isn’t already listed, click the + button at lower left; from the Interface pop-up menu that appears, choose External Modem, and then click Create.
Your modem connection now appears in the list at the left side of the pane. Click it. Now fill in the blanks like this:
Configuration. It’s called Default at first, which is fine. If you like, you can choose Add Configuration from this pop-up menu and then name it after your ISP (Earthlink, for example).
Telephone Number. This is the local access number that your modem is supposed to dial to connect to your ISP.
Tip
If you need your Mac to dial a 9 or an 8 for an outside line (as you would from within a hotel), or *70 to turn off Call Waiting, add it to the beginning of the phone number followed by a comma. The comma means “Pause for 2 seconds.” You can also put the comma to good use when typing in the dialing sequence for a calling-card number.
Account Name. This is your account name, as assigned by the ISP. If you’re [email protected], for example, type BillG here.
Password. Specify your ISP account password here. Turn on “Save password” if you’d rather not retype it every time you connect.
One quick way to find out this information is to refer to your old Windows machine, assuming it could get online:
Windows XP. Choose Start→Control Panel. Open Network Connections. Double-click the icon for your dial-up connection.
Windows 2000. Choose Start→Settings→Network and Dial-up Connections. Double-click the icon for your Internet connection.
Windows Me. Choose Start→Settings→Dial-Up Networking. In the Control Panel, double-click the icon for your dial-up connection.
Windows 98. Open My Computer→Dial-Up Networking. Double-click the icon for your Internet connection.
In each case, the Connect dialog box appears, with connection information staring you in the face. Copy this information into the corresponding boxes on the Mac. When you’re finished making your settings, click Apply Now.
Note
Only an administrator can make changes to the Internet dial-up settings. To make a change, therefore, you may have to click the little padlock in the lower-left corner of the dialog box to input an administrator’s name and password.
Incidentally, if you click the Advanced button, you bring up a special dialog box, filled with checkboxes that control your online sessions. On the PPP tab, for example, you can specify how long the Mac waits before hanging up the phone line after your last online activity, and how many times the Mac should dial if the ISP phone number is busy.
One checkbox here that you’ll almost certainly want to turn on is “Connect automatically when needed.” It makes your Mac dial the Internet automatically whenever you check your email or open your Web browser. (Otherwise, you’d have to establish the Internet call manually, using the Modem menulet shown in Figure 10-7.) Only then could you check your email or use your Web browser.)
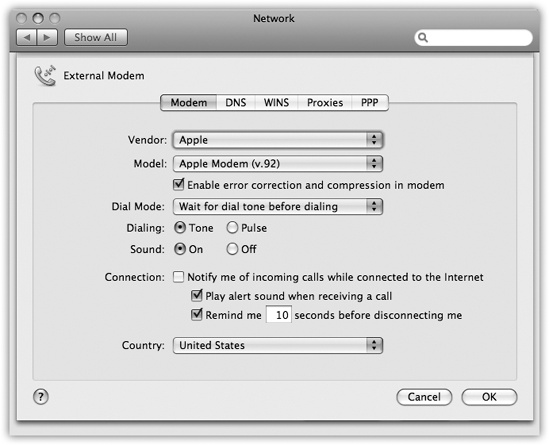
Figure 10-6. Dial-up modems may be fading in the era of high-speed Internet connections, but they’re not dead yet. Mac OS X still offers a full panoply of tweaky settings.
On the Modem tab, some handy settings include:
Wait for dial tone before dialing. This one’s for you, North American laptop owners. Because the dial tones in certain foreign countries sound weird to the Mac, it won’t dial because it’s still listening for that good old North American dial tone. In that case, turning off this checkbox makes the Mac dial bravely even though it hasn’t heard the sound it’s listening for.
Dialing. Specify what kind of phone service you have—Tone or, in a few rural locations, Pulse.
Sound. By clicking Off, you make your Mac dial the Internet silently, sparing sleeping family members or dorm roommates from having to listen to your modem shriek as it connects.
That’s all there is to it. If you’ve turned on “Connect automatically when needed,” your Mac dials and connects to the Internet automatically whenever an Internet-related program tries to connect (a Web browser or email program, for example).
If you didn’t turn on that option, then you can make your Mac dial the Internet in one of two ways:
Use the Network pane. Right here in System Preferences, you can click Connect to make the connection.
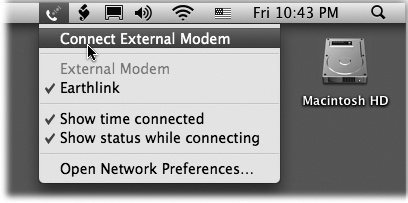
Use the menu-bar icon. If you were smart, however, you turned on “Show modem status on menu bar” in System Preferences→Network. It adds the
 menulet to the upper-right corner of your
screen, which lets you get online with one quick menu choice
(Figure 10-7).
menulet to the upper-right corner of your
screen, which lets you get online with one quick menu choice
(Figure 10-7).
The Mac automatically drops the phone line 15 minutes after your last activity online (or whatever interval you specified on the PPP tab of the Advanced dialog box). In fact, if other people have accounts on your Mac(Chapter 13), the Mac doesn’t even hang up when you log out. It maintains the connection so that the next person can surf the Net without redialing.
Of course, if other people in your household are screaming for
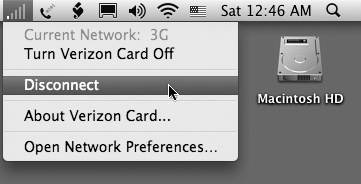
you to get off the line so they can make a call, you can also
disconnect manually. Choose Disconnect from the ![]() menulet.
menulet.
If you travel with a laptop, you know the drill. You’re constantly opening up System Preferences→Network so that you can switch between Internet settings: Ethernet at the office, Wi-Fi at home. Or maybe you simply visit the branch office from time to time, and you’re getting tired of having to change the local access number for your ISP each time you leave home (and return home again).
The simple solution is the ![]() →Location submenu, which appears once you have
set up more than one Location. As Figure 10-8 illustrates, all you have to do is
tell it where you are. Mac OS X handles the details of switching
Internet connections.
→Location submenu, which appears once you have
set up more than one Location. As Figure 10-8 illustrates, all you have to do is
tell it where you are. Mac OS X handles the details of switching
Internet connections.
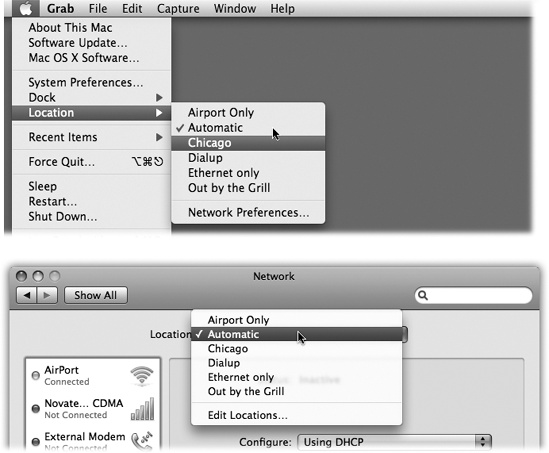
Figure 10-8. The Location feature lets you switch from one “location” to
another just by choosing its name—either from the ![]() menu (top) or from this pop-up menu in System
Preferences (bottom). The Automatic location just means “the
standard, default one you originally set up.” (Don’t be fooled:
Despite its name, Automatic isn’t the only location that offers
multihoming, described earlier in this chapter.)
menu (top) or from this pop-up menu in System
Preferences (bottom). The Automatic location just means “the
standard, default one you originally set up.” (Don’t be fooled:
Despite its name, Automatic isn’t the only location that offers
multihoming, described earlier in this chapter.)
To create a Location, which is nothing more than a set of memorized settings, open System Preferences, click Network, and then choose Edit Locations from the Location pop-up menu. Continue as shown in Figure 10-9.
When you click Done, you return to the Network panel. Take this opportunity to set up the kind of Internet connection you use at the corresponding location, just as described on the first pages of this chapter.
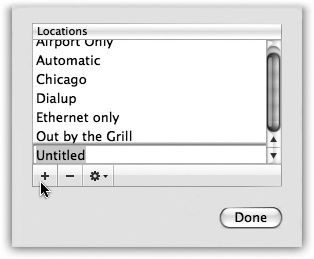
Figure 10-9. When you choose Edit Locations, this list of existing Locations appears; click the + button. A new entry appears at the bottom of the list. Type a name for your new location, such as Chicago Office or Dining Room Floor.
GEM IN THE ROUGH: Cellular Modems
Wi-Fi hot spots are fast and usually cheap—but they’re hot spots. Beyond 150 feet away, you’re offline.
No wonder laptop luggers across America are getting into cellular Internet services. All of the big cellphone companies offer PC cards or ExpressCards that let your laptop get online at high speed anywhere in major cities. No hunting for a coffee shop; with a cellular Internet service, you can check your email while zooming down the road in a taxi. (Outside the metropolitan areas, you can still get online wirelessly, though much more slowly.)
Verizon and Sprint offer the fastest cellular Internet networks, using a technology called EV-DO. AT&T’s and T-Mobile’s offerings are much slower.
So why isn’t the world beating a path to this delicious technology’s door? Because it’s expensive—at this writing, $60 a month on top of your phone bill.
You may also be able to get your laptop online by connecting it to your cellphone with a cable—a lower-priced, slower option. Ask your cellphone carrier.
If you travel regularly, you can build a list of Locations, each of which “knows” the way you like to get online in each city you visit.
A key part of making a new Location is putting the various Internet connection types (Ethernet, AirPort, Modem, Bluetooth) into the correct order. Your connections will be slightly quicker if you give the modem priority in your Hotel setup, the AirPort connection priority in your Starbucks setup, and so on.
You can even turn off some connections entirely. For example,
if you use nothing but a cable modem when you’re at home, you may
want to create a location in which only the
Ethernet connection is active. Use the Make Service Inactive command
in the ![]() pop-up menu.
pop-up menu.
Conversely, if your laptop uses nothing but Wi-Fi when you’re on the road, your Location could include nothing but the AirPort connection. You’ll save a few seconds each time you try to go online, because your Mac won’t bother hunting for an Internet connection that doesn’t exist.
Once you’ve set up your various locations, you can switch
among them using either the Location pop-up menu (in System
Preferences→Network) or the ![]() →Location submenu, as shown in Figure 10-8. As soon as you do so, your Mac is
automatically set to get online the way you like.
→Location submenu, as shown in Figure 10-8. As soon as you do so, your Mac is
automatically set to get online the way you like.
Tip
If you have a laptop, create a connection called Offline. From the Show pop-up menu, choose Network Port Configurations; make all the connection methods in the list inactive. When you’re finished, you’ve got yourself a laptop that will never attempt to go online. You’ve got yourself the laptop equivalent of Airplane Mode on a cellphone.
If you have cable modem or DSL service, you’re a very lucky individual. Not only do you benefit from great speed when surfing the Web or processing email, but your connection is on full-time. You never have to wait for some modem to dial (screeching all the way), and wait again for it to disconnect. Too bad only one computer in your household or office can enjoy these luxuries.
Actually, it doesn’t have to be that way. You can spread the joy of high-speed Internet to every Mac (and PC) on your network in either of two ways:
Buy a router. A router is a little box, costing about $50, that connects directly to the cable modem or DSL box. In most cases, it has multiple Internet jacks so you can plug in several Macs, PCs, and/or wireless base stations. As a bonus, a router provides excellent security, serving as a firewall to keep out unsolicited visits from hackers on the Internet. (If you use a router, turn off Mac OS X’s own firewall in System Preferences→Security.)
Use Internet Sharing. Mac OS X’s Internet Sharing feature is the software version of a router, in that it distributes a single Internet signal to every computer on the network. But unlike a router, it’s free. You just fire it up on the one Mac that’s connected directly to the Internet—the gateway computer. (Windows Me, XP, and Vista offer a similar feature.)
But there’s a downside: If the gateway Mac is turned off or asleep, the other machines can’t get online.
Most people use Internet Sharing to share a broadband connection like a cable modem or DSL. But in fact, Internet Sharing works if the gateway Mac connects to the Internet via dial-up modem or even a Bluetooth cellphone.
The only requirement is that the gateway Mac also has a network connection (Ethernet, AirPort, or FireWire) to the Macs that will share the connection.
To turn on Internet Sharing on the gateway Mac, open the Sharing panel of System Preferences. Turn on Internet Sharing, as shown in Figure 10-10, and then confirm your decision by clicking Start. (In most setups, you’ll want to turn on Internet Sharing only on the gateway Mac.)
To set up sharing, you have to specify (a) how the gateway Mac is connected to the Internet, and (b) how it’s connected to the other Macs on your office network:
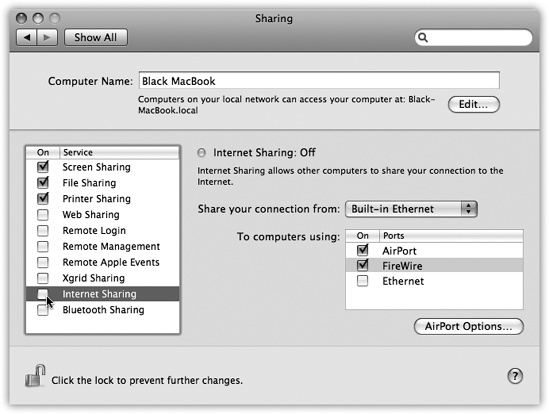
Figure 10-10. Ka-ching! Mac OS X’s Internet Sharing just saved you the cost of a $50 hardware router. In this example, the Mac is connected to a cable modem via Ethernet. But other Macs are connected to it via wireless AirPort and by a FireWire cable. And now they can get online, too, even though they’re not directly connected to the cable modem.
Share your connection from. Using this pop-up menu, identify how this Mac (the gateway machine) connects to the Internet—via Built-in Ethernet, AirPort, or whatever. If you select AirPort, you create the software base station effect described in the next section.
To computers using. Turn on the checkboxes to teach your Mac how the other Macs are connected to it—via what form of networking, in other words.
Note
Which checkboxes appear here depend on which kinds of Internet connections are turned on in the Network pane of System Preferences. If the gateway Mac doesn’t have AirPort circuitry, for example, or if AirPort is turned off in the current configuration, the AirPort option doesn’t appear.
Now visit each of the other Macs on the same network. Open the Network pane of System Preferences. Select AirPort, Built-in Ethernet, or FireWire—whichever reflects how each Mac is connected to your network. Then, from the Configure pop-up menu, choose Using DHCP. Leave everything else blank. Finally, click Apply Now.
As long as the gateway Mac remains turned on, you should find that both it and your other Macs can get onto the Internet simultaneously, all at high speed. (Even Windows PCs on the same network can also get online, as long as you set them up to use DHCP just as you did your “downstream” Macs.)
Note
If you’re like most people, your gateway Mac has only one Ethernet port. How, you may wonder, can you plug in both the cable modem and the local network?
One approach is to install a second Ethernet card. The more economical approach: Connect the cable modem to the Uplink or WAN jack on your Ethernet hub or router. (On some models, an ordinary Ethernet port can be turned into an Uplink port if you flip a tiny switch.) Your gateway Mac plugs into the hub as usual.
If the gateway Mac has AirPort circuitry, turning on Internet Sharing (and “To computers using: AirPort”) has another profound effect: It creates a software base station. The Mac itself is now the transmitter for Internet signals to and from any other AirPort-equipped Macs within range. You just saved yourself the cost of an Apple base station.
Tip
Internet Sharing can create the opposite effect, too: Instead of letting a wireless Mac piggyback on a wired Mac’s connection, you can let a wired Mac share a wireless connection.
Suppose, for example, that you and a buddy both have laptops in a hotel lobby. You’re online, having paid $13 to use the hotel’s Wi-Fi network. If you set up Internet Sharing appropriately, your buddy can connect to yours via an Ethernet cable or even a FireWire cable and surf along with you—no extra charge.
In January 2000, Apple CEO Steve Jobs explained to the Macworld Expo crowds that he and his team had had a mighty brainstorm: Apple controls both ends of the connection between a Mac and the Apple Web site. As a result, Apple should be able to create some pretty clever Internet-based features as a reward to loyal Mac fans. Later that same day, the Apple Web site offered a suite of free services called iTools.
Then the technology bubble burst.
These days, .Mac (as it’s now called) costs $100 a year (Figure 10-11).
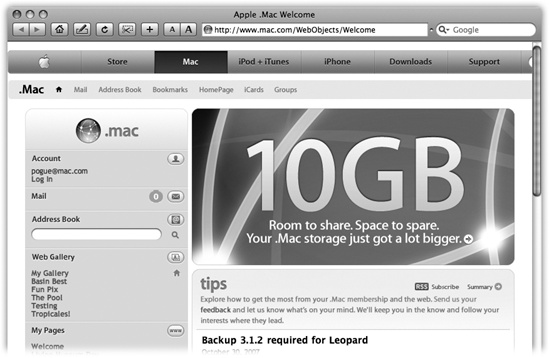
Figure 10-11. The .Mac features appear as buttons on the .Mac Web site. For example, iCards are attractively designed electronic greeting cards that you can send by email. Backup is a basic backup program that you can download from this site. Webmail, HomePage, an antivirus program, and features that synchronize your iCal and iSync data with other computers are the other second-tier features. The best feature, however, is iDisk.
Open System Preferences and click the .Mac icon. Click Learn More. You now go online, where your Web browser has opened up to the .Mac sign-up screen. Fill in your name and address, make up an account name and password, turn off the checkbox that invites you to get junk mail, and so on.
The final step is to return to the .Mac pane of System Preferences. Fill in the account name and password you just composed, if necessary. You’re ready to use .Mac.
The iDisk is an Internet-based hard-drive icon on your desktop, holding up to 10 gigabytes of files. (Your .Mac account comes with 10 gigabytes of storage. In your account settings at www.mac.com, you can decide how to divide up that storage between your iDisk and the other .Mac stuff, like mail and your Web sites. And, of course, you can pay more money for more storage.)
Anything you drag into the folders inside this iDisk icon gets copied to Apple’s secure servers on the Internet. Meanwhile, on your end, it appears to work just like a hard drive.
In other words, iDisk can be a handy pseudo-hard drive. When you’re saving a document from within a program, you can save it directly onto your iDisk. And because this backup disk is offsite, if a fire or thief destroys your office and your backup disks, your iDisk is still safe.
Furthermore, you can pull the iDisk onto any computer’s screen—Mac or Windows—at your office, at your home, at your friend’s house, so you don’t need to carry around a physical disk to transport important files.
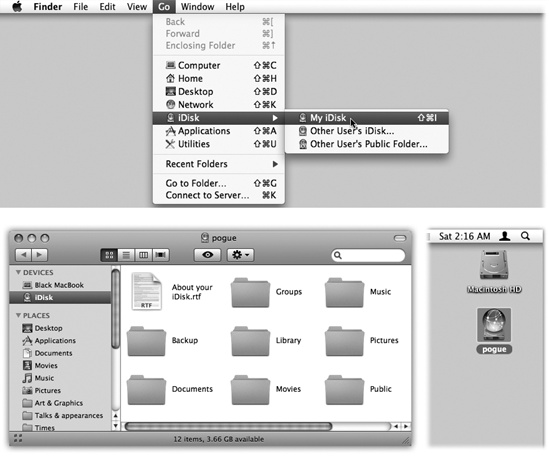
Apple must really love the iDisk concept, because it has devised about 300 different ways to pull the iDisk icon onto your screen (Figure 10-12):
Click the iDisk icon in the Sidebar (of a Finder window or a Save or Open dialog box).
Choose Go→Connect to Server. At the bottom of the resulting dialog box, type http://idisk.mac.com/casey (substitute your actual account name for casey). Press Enter. Type your .Mac name and password, if necessary, and then click Connect. (This is the quickest approach if you’re using somebody else’s Mac.)
Figure 10-12. Choose Go →iDisk →My iDisk (top) or click the iDisk icon in your Sidebar. When the iDisk finally appears (bottom right), double-click it—and wait—to see its contents (bottom left). Note that you can’t create your own folders on this special disk; you must drag your files directly into one of the folders shown here.
Visit www.mac.com and click the iDisk icon. Type in your name and password, and then click Enter. Finally, click Open Your iDisk. (Clearly, this is a lot more work than the one-click methods already described. Use this technique when you’re using a public machine far from home, for example.)
At this point, the iDisk behaves like an external hard drive. You can drag files or folders from your hard drive into one of the folders that appear on the iDisk.
Note
You can’t create your own folders in the iDisk’s main window. You must put your files and folders into one of the folders already on the iDisk, such as Documents or Pictures. If you try to drag an icon directly into the iDisk window, or onto the iDisk icon, you’ll get an error message.
Thereafter, you can retrieve or open whatever you copied to the iDisk. Open one of the folders on it; you can now open, rename, trash, or copy (to your hard drive) whatever you find inside.
In general, whatever you put onto your iDisk is private and password-protected. There’s one exception, however: Whatever you put into the Public folder on any iDisk can be seen, opened, and copied by any other .Mac member. All they need is your member name—not your .Mac password (although you can password-protect it, if you like). Think of the iDisk Public folder as the long-lost twin of the Public folder in your own Home folder.
The Public folder is terrific for storing family photos where anyone who’s interested can look at them. It’s also handy when you’re collaborating; just post the latest drafts of your work in the Public folder for your co-workers to review.
To view someone else’s Public folder, use one of these techniques; suppose the person’s .Mac name is SkiBunny23:
From Mac OS X 10.3, 10.4, or 10.5. Choose Go→iDisk→Other User’s Public Folder. Type in the person’s member name, and hit Return.
Mac OS X 10.1 or 10.2. Choose Go→Connect to Server. At the bottom of the dialog box, type http://idisk.mac.com/skibunny23/Public. Click Connect or press Enter. If a password is required, use public as the user name and, well, the password as the password.
Tip
Actually, there’s a simpler way: Use iDisk Utility, described below.
From Mac OS 9. Choose
 →Chooser, click AppleShare, click the
Server IP Address button, type idisk.mac.com in the Server
Address box, and then click Connect. Type
skibunny23; for the password, use
public (unless the folder really is
password-protected, in which case you should type the password
you were given). Then click Connect. Select the iDisk, and
then click OK.
→Chooser, click AppleShare, click the
Server IP Address button, type idisk.mac.com in the Server
Address box, and then click Connect. Type
skibunny23; for the password, use
public (unless the folder really is
password-protected, in which case you should type the password
you were given). Then click Connect. Select the iDisk, and
then click OK.From Windows. See the box below.
After a minute or so, a new iDisk icon appears on your desktop, bearing that member’s name. Double-click it to view its contents. You can copy these files to your hard drive, or double-click them to open them directly.
If you open System Preferences, click the .Mac icon, and click iDisk, you’re offered a few interesting options, along with a graph that shows how full your iDisk is getting. Here, you can also make these changes:
Let people put stuff in your Public folder. Ordinarily, other people can deposit stuff into your Public folder as well as copy things out. If you’d rather set it up so that only you can drop things in there, click “Read only.”
Password-protect your Public folder. Probably a good idea if you decide to make your Public folder available for deposits.
Note
These functions are available to pre-Panther/Tiger people (and Windows people too) if they visit www.mac.com, click “.Mac Downloads,” sign in, and download the program called iDisk Utility (or iDisk Utility for Windows).
Apple offers an email address to each .Mac member.
Probably anyone who can get to the Apple Web site already has an email account. So why bother? The first advantage is the simple address: [email protected]. And because .Mac is a Mac-only service, the odds are good that you’ll be able to claim the name you want. No longer must you be known as [email protected]. (Cultdom has its privileges.)
Second, Mac.com addresses are integrated into Mac OS X’s Mail program, as you’ll see in the next chapter. And finally, you can read your .Mac email from any computer anywhere in the world, via the www.mac.com Web site.
Creating a Web page (an HTML document) isn’t difficult. Using a program like Dreamweaver, GoLive, Netscape Composer, Keynote, or even Microsoft Word, you can design the text and graphics for a simple Web page in a single afternoon.
It’s much more difficult, however, to figure out how to post that Web page—to hang it on the Internet where the world can see it. To do that, you need special software, several passwords and codes, and a lot of help from your ISP.
The .Mac HomePage feature eliminates all that hassle. All you have to do is drag your Web-page documents and graphics into the Sites folder on your iDisk. Your Web page is instantly available for viewing by everyone on the Internet.
Tip
You can create as many Web pages as you want. When you return to the HomePage screen, a list of your existing Web pages appears (complete with Edit Page and Delete Page buttons).
If you already know how to design Web pages, great; put the HTML documents and graphics you’ve created into the Sites folder of your iDisk.
And if you have no experience designing Web pages, Mac OS X itself can help you:
iPhoto and Image Capture can both turn photos from your digital camera into handsome art-gallery Web pages. After they’ve done so, drag the resulting HTML documents and image folders into your iDisk’s Sites folder. Presto! You’ve got yourself a photo-gallery Web page.
Sign into www.mac.com. If you click HomePage, you’ll find a large gallery of canned Web site design templates that you can easily fill up and post in cyberspace: photo albums, movie players, résumés, baby announcements, and so on.
When you finally click the Publish button at the top of the screen, new Web page (HTML) documents appear in the Sites folder of your iDisk. Also, your screen now displays your page’s URL (Web address), which you can email to anyone who’d be interested.
Finally, your Web page is available for anyone on the Internet to see.
.Mac membership also includes access to a program called Backup, which gives you automatic backups of your most important files. It doesn’t give you as much peace of mind as Time Machine (Chapter 6), which backs up your entire computer, though.
For details on Backup, see this chapter’s free downloadable appendix. It’s on this book’s “Missing CD” page at www.missingmanuals.com.
An Internet location file (Figure 10-13) is like a system-wide bookmark: When you double-click one, your Web browser opens to that page, or your email program generates an outgoing message to a predetermined addressee. You could put a folder full of location files for favorite Web sites into the Dock. Do the same with addresses to which you frequently send email. Thereafter, you save a step every time you want to jump to a particular Web page or send email to a particular person—just choose the appropriate name from the Dock folder’s Stack. (It’s fine to rename them, by the way.)
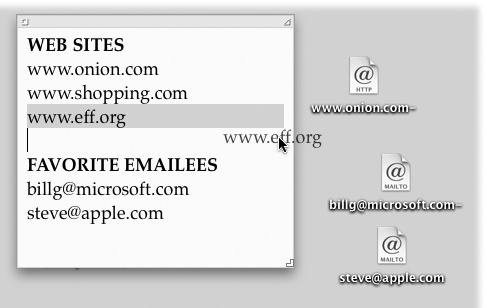
Figure 10-13. To create an Internet location file, drag a highlighted address from a program like TextEdit to your desktop. Although Web and email addresses are the most popular types, you can also create location files for the addresses of newsgroups news://news.apple.com, FTP sites ftp://ftp.apple.com, AppleShare servers afp://at/Engineering:IL5 3rd Floor, AppleTalk zones at://IL5 2nd Floor, and even Web pages stored on your Mac file://Macintosh HD/Website Stuff/home.html.