Most of the discussion in this book so far has covered software—not only the Mac OS X operating system that may be new to you, but also the programs and documents you’ll be using on it. But there’s more to life with a computer than software. This chapter covers the finer points of using Macintosh-compatible printers, cameras, disks, monitors, and keyboards—plus a guide to Time Machine, Leopard’s automatic backup feature.
Printing has always been one of the Mac’s strong suits—and you’re about to find out why.
One beauty of Mac OS X is that setting up a printer for the first time is incredibly easy. The first time you want to print something, follow this guide:
Connect the printer to the Mac, and then turn the printer on.
Inkjet printers usually connect to your USB jack. Laser printers generally hook up to your Ethernet connector.
Open the document you want to print. Choose File→Print. In the Print dialog box, choose your printer’s name from the Printer pop-up menu (or one of its submenus, if any).
Cool! Wasn’t that easy? Very nice how the Mac autodiscovers, autoconfigures, and autolists almost any USB, FireWire, Bluetooth, or Bonjour (Rendezvous) printer.
Have a nice afternoon. The End.
Oh—unless your printer isn’t listed in the Printer pop-up menu. In that case, read on.
From the Printer pop-up menu, choose Add Printer (Figure 9-1, top).
A special setup window opens (Figure 9-1, bottom), which is even better at autodetecting printers available to your Mac. If you see the printer’s name now, in the Printer Browser window, click it, and then click Add (Figure 9-1, bottom). You’ve just designated that printer as the default printer, the one that you’ll print on most of the time.
Figure 9-1. Top: To introduce your Mac to a new printer, try to print something—and then choose Add Printer from this pop-up menu. Bottom: Your Mac should automatically “see” any printers that are hooked up and turned on. Click the one you want, and then click Add.
You’re all set. Have a good time.
Unless, of course, your printer still isn’t showing up. Proceed to step 4.
Click the icon for the kind of printer you have: Windows, Bluetooth, AppleTalk, IP (that is, an Internet printer), or whatever.
Choose AppleTalk if you’re connected to a laser printer via an Ethernet network cable or AirPort wireless network. Choose Windows if there’s a Windows-only printer out there on your office network. And so on.
After a moment, the names of any printers that are turned on and connected appear in the printer list. For most people, that means only one printer—but one’s enough.
Click the name of the printer you want to use.
As an optional step, you can open the Print Using pop-up menu at the bottom of the dialog box. Choose “Select a driver to use,” and then, in the list that appears, choose your particular printer’s model name, if you can find it. That’s how your Mac knows what printing features to offer you when the time comes: double-sided, legal size, second paper tray, and so on.
Click Add.
After a moment, you return to the main Printer Browser window (Figure 9-1, top), where your printer now appears. You’re ready to print.

If you’re lucky enough to own several printers, repeat the steps above for each one. Eventually, you’ll have introduced the Mac to all the printers available to it, so all their names show up in the printer list.
To see the printer list so far, open System Preferences→Print & Fax. You can have all kinds of fun here:
Choose a default printer. As indicated by the Default Printer pop-up menu, Leopard intends, conveniently enough, to use whichever printer you used for the last printout for the next one. Most people, after all, don’t switch printers much.
Still, you can choose one particular printer from this pop-up menu to set it as the default printer—the one that the Mac uses unless you intervene by choosing from the Printer pop-up menu in the Print dialog box (Figure 9-1).
Recover a gig of drive space. You know how Mac OS X comes with the necessary software for hundreds upon hundreds of printers? Unless you’re in Oprah’s tax bracket, you probably don’t own that many printers—but their drivers are taking up nearly a gigabyte of hard drive space!
To clean out the ones you don’t need, open your hard drive→Library→Printers folder. Throw away the folders for printer companies that didn’t make your printer. (Administrator account required.)
The experience of printing depends on the printer you’re using—laser printer, inkjet, or whatever. In every case, however, all the printing options hide behind two commands: File→Page Setup, which you need to adjust only occasionally, and File→Print, which you generally use every time you print. You’ll find these two commands in almost every Macintosh program.
The Page Setup dialog box lets you specify some key characteristics about the document you’re going to print: orientation, paper dimensions, and so on; see Figure 9-2.
The options here vary by program and printer. The Page Setup options for an Epson inkjet, for example, differ dramatically from those for a laser printer. Only your printer’s user manual can tell you exactly what these choices do.
Figure 9-2. Here in Page Setup are the controls you need to print a document rotated sideways on the page, so it prints “the long way.” The Scale control, which lets you reduce or enlarge your document, can be handy if the program you’re using doesn’t offer such a control. And the Paper Size pop-up menu, of course, specifies the size of the paper you’re printing on—US Letter, US Legal, envelopes, or one of the standard European or Japanese paper sizes (A4 and B5).
Although you can grow to a ripe old age without ever seeing the Page Setup dialog box, you can’t miss the Print dialog box. It appears, like it or not, whenever you choose File→Print in one of your programs.
Once again, the options you encounter depend on the printer you’re using. They also depend on whether or not you expand the dialog box by clicking the ▾ button; doing so reveals a lot of useful options, including a handy preview; see Figure 9-3.
Note
The exact layout of this expanded Print dialog box differs by program.
If you expand the box, here’s what you may find:
Printer. If you have more than one printer connected to your Mac, you can indicate which you want to use for a particular printout by choosing its name from this pop-up menu.
Figure 9-3. Top: Most of the time, all you want is one darned copy of what’s on your screen. So the standard Print dialog box is Spartan indeed. Bottom: When you expand the box, you get a new world of options, including a preview that you can page through. The options here depend on the printer model. On the Layout pane, you can save paper by choosing a higher number from the Pages per Sheet pop-up menu.
Presets. Here’s a way to preserve your favorite print settings: Once you’ve proceeded through this dialog box, specifying the number of copies, which printer trays you want the paper taken from, and so on, you can choose Save As from the pop-up menu, and then assign your settings set a name (like “Borderless, 2 copies”). Thereafter, you’ll be able to recreate that elaborate suite of settings simply by choosing its name from this pop-up menu.
Copies. Type the number of copies you want printed. The Collated checkbox controls the printing order for the various pages. For example, if you print two copies of a three-page document, the Mac generally prints the pages in this order: 1, 2, 3, 1, 2, 3. If you turn off Collated, on the other hand, it prints in this order: 1, 1, 2, 2, 3, 3.
Pages. You don’t have to print an entire document—you can print, say, only FREQUENTLY ASKED QUESTION: All About “Leopard” through Log Out.
Tip
You don’t have to type numbers into both the From and To boxes. If you leave the first box blank, the Mac assumes that you mean “from Introduction.” If you leave the second box blank, the Mac understands you mean “to the end.” To print only the first three pages, in other words, leave the first box blank, and type 3 into the second box. (These page numbers refer to the physical pages you’re printing, not to any fancy numbering you’ve set up in your word processor. As far as the Print dialog box is concerned, the first printed page is Introduction, even if you’ve told your word processor to label it Arrangement Tab.)
Paper Size, Orientation. These options also appear in the Page Setup box, but it’s convenient to have them duplicated right in the Print dialog box.
PDF. A PDF file, of course, is an Adobe Acrobat document—a file that any Mac, Windows, Linux, or Unix user can view, read, and print using either Preview or the free Acrobat Reader (included with every PC).
You can easily save any document as a PDF file instead of printing it—a truly beautiful feature that saves paper, ink, and time. The document remains on your hard drive, and the text inside is even searchable using Spotlight.
But that’s just the beginning. Apple has added a long list of additional PDF options (like password-protected PDFs, emailed ones, and so on). It faced a design quandary: How could it offer a new list of PDF-related options without junking up the Print dialog box?
Its solution was a strange little item called a pop-up button, shown in Figure 9-3, top. Use it like a pop-up menu. The command you’ll use most often is probably Save as PDF, which turns the printout into a PDF file instead of sending it to the printer. For details on the other PDF-related options here, in Fonts—and Font Book.
Preview. This button, present only in the collapsed version of the Print dialog box (Figure 9-3, top), provides a print-preview function to almost every Mac OS X program on earth, which, in the course of your life, could save huge swaths of the Brazilian rain forest and a swimming pool’s worth of ink in wasted printouts.
Technically, the Preview button sends your printout to Preview. Preview lets you zoom in or zoom out, rotate, or otherwise process your preview. When you’re satisfied with how it looks, you can print it (File→Print), cancel it (File→Close), or turn it into a PDF file (File→Save as PDF).
Supplies. This feature will strike you either as blissfully convenient or disgustingly mercenary: a button that takes you directly to a Web page where you can buy new cartridges for your specific printer model.
If you examine the unnamed pop-up menu just below the Presets pop-up menu, you find dozens of additional options. They depend on your printer model and the program you’re using at the moment, but here are some typical choices:
Layout. As described in Figure 9-3, you can save paper and ink or toner cartridges by printing several miniature “pages” on a single sheet of paper.
Paper Handling. You can opt to print out your pages in reverse order so that they stack correctly, or you can print just odd or even pages so that you can run them through again for double-sided printing.
Cover Page. Yes, that throwaway info page has made its way from the fax world into the hard-copy world.
Scheduler. This option lets you specify when you want your document to print. If you’re a freelancer, sitting at home with an inkjet on your desk, you might not immediately grasp why anyone wouldn’t want the printouts right now. But try printing a 400-page catalog in a big office where other people on the network might conceivably resent you for tying up the laser printer all afternoon, and you’ll get the idea.
ColorSync. Most color printers offer this panel, where you can adjust the color settings—to add a little more red, perhaps. This is also where you indicate whose color-matching system you want to use: Apple’s ColorSync, your printer manufacturer’s, or none at all.
Then, below the light gray line in this pop-up menu, you’ll find a few options that are unique to the chosen printer or program. Some HP printers, for example, offer Cover Page, Finishing, and other choices. Other likely guest commands:
Quality & Media (inkjet printers only). Here’s where you specify the print quality you want, the kind of paper you’re printing on, and so on. (The name of this panel varies by manufacturer.)
[Program Name]. Whichever program you’re using—Mail, Word, AppleWorks, or anything else—may offer its own special printing options on this screen.
After you’ve used the Print command, you can either sit there until the paper emerges from the printer, or you can manage the printouts-in-waiting. That option is attractive primarily to people who do a lot of printing, have connections to a lot of printers, or share printers with many other people.
Start by opening the printer’s window. If you’re already in the
process of printing, just click the printer’s Dock icon. If not, open
![]() →System Preferences→Print & Fax, click the
printer’s name, and then click Open Print Queue.
→System Preferences→Print & Fax, click the
printer’s name, and then click Open Print Queue.
At this point, you see something like Figure 9-4: The printouts that will soon be sliding out of your printer appear in a tidy list.
Here are some of the ways in which you can control these waiting printouts, which Apple collectively calls the print queue:
Delete them. By clicking an icon, or
 -clicking several, and then clicking the
Delete toolbar button, you remove items from the list of waiting
printouts. Now they don’t print.
-clicking several, and then clicking the
Delete toolbar button, you remove items from the list of waiting
printouts. Now they don’t print.Pause them. By highlighting a printout and then clicking the Hold button, you pause that printout. It doesn’t print out until you highlight it again and then click the Resume button. (Other documents continue to print.) This pausing business could be useful when, for example, you need time to check or refill the printer, or when you’re just about to print your resignation as your boss drops by to offer you a promotion.
Halt them all. You can stop all printouts from a printer by clicking Pause Printer. (They resume when you click the button again, which now says Resume Printer.)
Tip
As you now know, the icon for a printer’s queue window appears automatically in the Dock when you print. Unfortunately, it stays in the Dock for the rest of the day; it doesn’t disappear when the printing is complete.
If you wish it would, right-click) the printer’s Dock icon; from the shortcut menu, choose Auto Quit.t
Figure 9-4. Waiting printouts appear in this window. You can sort the list by clicking the column headings (Name or Status), make the columns wider or narrower by dragging the column-heading dividers horizontally, or reverse the sorting order by clicking the column name a second time. The Supply Level button opens a graph that shows how much ink each cartridge has remaining (certain printer models only).
Printer sharing is for people (or offices) with more than one Mac, connected to a network, who’d rather not buy a separate printer for each machine. Instead, you connect the printer to one Mac, flip a couple of software switches, and then boom: The other Macs on the network can send their printouts to the printer without actually being attached to it—even wirelessly attached, if they’re on an AirPort network.
Note
Of course, this feature is most useful when you’re sharing printers that can hook up to only one Mac at a time, like USB inkjet photo printers. Office laser printers are often designed to be networked from Day One.
Setting up printer sharing is easy; see Figure 9-5, top. Then, to make a printout from across the network, see the instructions in Figure 9-5, bottom.
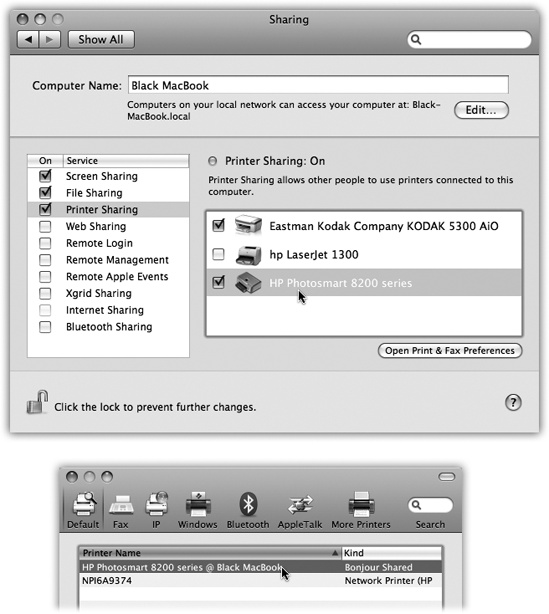
Figure 9-5. Top: On the Mac with the printer, open the Sharing panel of System Preferences. Turn on Printer Sharing. Turn on the checkbox for the printer(s) you want to share. Bottom: To use a shared printer elsewhere on the network, open the document you want to print, and then choose File→Print. In the Print dialog box, choose Add Printer. The shared printer is clearly identified; click it and click Add, just as you’d add any printer (Figure 9-1). From now on, it shows up in the Printer pop-up menu just like any other printer.
If you’re still using your Windows PC, you can install Bonjour for Windows (a free download from this book’s “Missing CD” page at www.missingmanuals.com); then that machine can print to your Mac’s shared printer, too.
Tip
Of course, your Mac (the one attached to the printer) must be turned on in order for the other computers to print. In part, that’s because the documents-in-waiting from other people pile up on your hard drive.
Using the Mac as a fax machine is a terrific idea, for a lot of reasons. It saves money on paper and fax cartridges, and spares you the expense of buying a physical fax machine. Faxing from the Mac also eliminates the silly and wasteful ritual of printing something out just so you can feed it into a fax machine. And because your fax originates directly from the heart of Mac OS X instead of being scanned by a crummy 200-dpi fax-machine scanner, it blesses your recipient with a great-looking document.
Here’s the basic idea: When faxes come in, you can read them on the screen, opt to have them printed automatically, or even have them emailed to you so that you can get them wherever you are in the world. (Try that with a regular fax machine.) And sending a fax is even easier on a Mac than on a regular fax machine: You just use the File→Print command, exactly like you’re making a printout of the onscreen document.
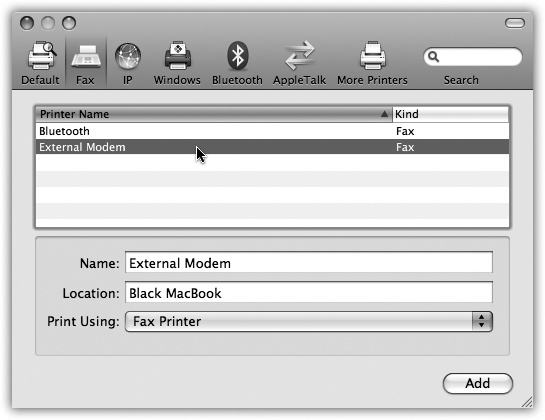
Figure 9-6. When you click the + button, this handy list of fax modems pops up. Chances are, you have only one—and it’s either an old Apple Internal or a USB External model that you bought from Apple. Click its name, and then click Add.
Open System Preferences. Click Print & Fax. Click the + button, and proceed as shown in Figure 9-6.
Note
Unfortunately, Apple no longer builds fax modems into new Macs—not even laptops. You can buy an external dangly Apple USB Fax/Modem for $50, however. As soon as it’s plugged into a USB port, its name appears in the Printers list.
If you intend to send faxes from the Mac, type in your return fax number in the Fax Number box.
Tip
If you’re smart, you’ll also turn on “Show fax status in menu bar.” It installs a fax menulet that lets you monitor and control your fax sending and receiving.
If you intend to receive faxes, click Receive Options, and turn on “Receive faxes on this computer.” Then specify how soon the fax machine should pick up the call (after how many rings—you don’t want it answering calls before you have a chance).
Finally, you can say how you want to handle incoming faxes, as described in Figure 9-7.
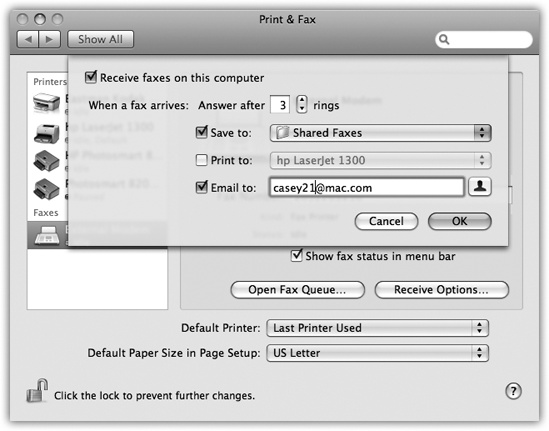
Figure 9-7. When your Mac answers the fax line, it can do three things with the incoming fax. Option 1: Save it as a PDF file that you open with Preview. (The Mac proposes saving these files into the Users→Shared→Shared Faxes folder, but you can set up a more convenient folder.) Option 2: Print it out automatically, just like a real fax machine. Option 3: Email it to you, so you can get your faxes even when you’re not home (and so you can forward the fax easily).
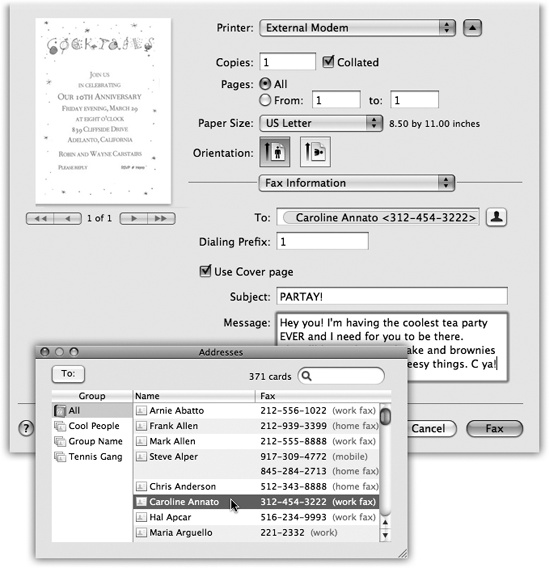
When you’re ready to send a fax, type up the document you want to send. Choose File→Print. In the Print dialog box (Figure 9-3), open the PDF pop-up button and choose Fax PDF.
The dialog box shown in Figure 9-8 appears. Here are the boxes you can fill in:
To. If you like, you can simply type the fax number into the To box, exactly the way it should be dialed: 1-212-553-2999, for example. You can send a single fax to more than one number by separating each with a comma and a space.
If you fax the same people often, though, you’re better off adding their names and fax numbers to the Address Book (Chapter 11). That way, you can click the little silhouette button to the right of the To box and choose the recipient.
Note
At this writing, the Address Book feature doesn’t work when you’re sending from Microsoft Word or Excel. You have to type in the fax number by hand.
Figure 9-8. When you send a fax, you get a modified Print dialog box. Here is where you specify a cover page (and what you want on it). You can type a fax number into the To box, or you can click the silhouette head button to open a miniature version of Address Book. It lets you choose someone’s name by double-clicking. All phone numbers appear here, so look for those identified as fax numbers. (Chances are that these listings don’t include the 1- long-distance prefix, which is why Apple gave you a separate Dialing Prefix box.) If you’ve built groups in your address book, you can send to everyone in a group at once.
Settings. Most of the time, fiddling with the printing pop-up menu isn’t relevant to sending a fax. But the standard printing controls are here for your convenience. You can use the Scheduler pane to specify a time for your outgoing fax, the Layout pane to print more than one “page” per sheet, and so on.
Use Cover Page, Subject, Message. If you turn on this checkbox, you’re allowed to type a little message into the Subject and Message boxes.
Beware! Don’t press the Return key to add a blank line to your message. Mac OS X thinks you intend to “click” the Fax button—and off it goes!
Tip
Choosing Save as PDF from the little PDF pop-up button, at this moment, is your only chance to keep a copy of the fax you’re sending.
When everything looks good, hit the Fax button. Although it may look like nothing is happening, check your Dock, where the icon for your fax/modem has appeared. If you click it, you’ll see a clone of the dialog box shown in Figure 9-4, indicating the progress of your fax. Here you can pause the faxing, delete it, or hold it, exactly as you would a printout. (Your Fax menulet, if you’ve installed it, also keeps you apprised of the fax’s progress.)
Otherwise, you don’t get much feedback on the faxing process. Once the connection sounds are complete, you don’t hear anything, see anything, or receive any notice that the fax was successful.
(If your fax was not successfully sent for some reason, the modem’s window automatically reschedules the fax to go out in five minutes.)
To see the log of all sent and received faxes, choose
![]() →System Preferences→Print & Fax.
Double-click your fax/modem’s name; its fax-management window
appears, but that’s not what you’re interested in. Instead, choose
Jobs→Show Completed Jobs. You get a status window that looks a lot
like the one for a printer.
→System Preferences→Print & Fax.
Double-click your fax/modem’s name; its fax-management window
appears, but that’s not what you’re interested in. Instead, choose
Jobs→Show Completed Jobs. You get a status window that looks a lot
like the one for a printer.
A Mac that’s been set up to answer calls does a very good impersonation of a fax machine. You don’t even have to be logged in to get faxes, although the Mac does have to be turned on. In System Preferences→Energy Saver→Options, turn on “Wake when modem detects a ring” to prevent your Mac from being asleep at the big moment.
When a fax call comes in, the Mac answers it after the number of rings you’ve specified. Then it treats the incoming fax image in the way you’ve specified in System Preferences: by sending it to your email program, printing it automatically, or just saving it as a PDF file in a folder that you’ve specified.
As a PC veteran, you’ve probably run into PDF (portable document format) files already. Many a software manual, Read Me file, and downloadable “white paper” comes in this format. In Windows, you needed the free program called Acrobat Reader to open or print these files, and some not-free-at-all software program to create them.
PDF files, however, are one of Mac OS X’s common forms of currency. In fact, you can turn any document (in any program with a Print command) into a PDF file.
What’s the big deal about PDF in Mac OS X? Consider these advantages:
Other people see your layout. When you distribute PDF files to other people, they see precisely the same fonts, colors, page design, and other elements that you put in your original document. And here’s the kicker: They get to see all of this even if they don’t have the fonts or the software you used to create the document. (Contrast with the alternative. Say you’re sending somebody a Microsoft Word document. If your correspondent doesn’t have precisely the same fonts you have, then he’ll see a screwy layout. And if he doesn’t have Word or a program that can open Word files, he’ll see nothing at all.)
It’s universal. PDF files are very common in the Macintosh, Windows, Unix/Linux, and even Palm and PocketPC organizer worlds. When you create a PDF file, you can distribute it (by email, for example) without worrying about what kinds of computers your correspondents are using.
It has very high resolution. PDF files print at the maximum quality of any printer. A PDF file prints great both on cheapo inkjets and on high-quality image-setting gear at professional print shops. (Right now you’re looking at a PDF file that was printed at a publishing plant.)
You can search it. Although you may be tempted to think of a PDF file as something like a captured graphic of the original document, it has several key differences. Behind the scenes, its text is still text; Spotlight can find a PDF in a haystack in a matter of seconds. That’s an especially handy feature when you work with electronic software manuals in PDF format.
There’s nothing to opening up a PDF file: Just double-click it. Preview takes over from there, and opens the PDF file on your screen.
Opening, schmopening—what’s really exciting in Mac OS X is the ability to create your own PDF files. The easiest way is to click the PDF pop-up button in the standard Print dialog box (visible in Figure 9-3). When you click it, you’re offered a world of interesting PDF-creation possibilities, the most useful of which are these:
Save as PDF. Mac OS X saves your printout-to-be to the disk as a PDF document instead of printing it.
Fax PDF faxes a document instead of printing it, as described on the preceding pages.
Mail PDF generates a PDF, and then attaches it to an outgoing message in Mail. Great for exchanging layout-intensive documents with collaborators who don’t have the same fonts, layout software, or taste as you.
Save PDF to iPhoto creates a PDF version of the document and then exports it to iPhoto. That’s not such a bad idea; iPhoto is great at managing and finding any kind of graphics documents, including PDFs.
Save PDF to Web Receipts Folder is one of the simplest and sweetest features in all of Mac OS X.
You use it when you’ve just ordered something on a Web site, and the “Print This Receipt” screen is staring you in the face. Don’t waste paper and ink (and, later, time trying to find it!). Instead, use this command. You get a perfectly usable PDF version, stored in your Home→Documents→Web Receipts folder, where you can use Spotlight to find it later, when you need to consult or print it because your gray-market goods never arrived.
Edit Menu lets you prune this very list to remove the options you never use.
Mac OS X delivers type that is all smooth, all the time. Fonts in Mac OS X’s formats—called TrueType, PostScript Type 1, and OpenType—always look smooth onscreen and in printouts, no matter what the point size.
Mac OS X also comes with a program that’s just for installing, removing, inspecting, and organizing fonts. It’s called Font Book (Figure 9-9), it’s in your Applications folder, and it’s been much improved in Leopard.
Brace yourself. In Mac OS X, there are three Fonts folders. The fonts you actually see listed in the Fonts menus and Font panels of your programs are combinations of these Fonts folders’ contents.
They include:
Your private fonts (your Home folder→Library→Fonts). This Fonts folder sits right inside your own Home folder. You’re free to add your own custom fonts to this folder. Go wild—it’s your font collection and yours alone. Nobody else who uses the Mac can use these fonts; they’ll never even know that you have them.
Main font collection (Library→Fonts). Any fonts in this folder are available to everyone to use in every program. (As with most features that affect everybody who shares your Macintosh, however, only people with Administrator accounts can change the contents of this folder.)
Essential system fonts (System→Library→Fonts). This folder contains the 35 fonts that the Mac itself needs: the typefaces you see in your menus, dialog boxes, icons, and so on. You can open this folder to see these font suitcases, but you can’t do anything with them, such as opening, moving, or adding to them. Remember that, for stability reasons, the System folder is sealed under glass forever.
With the exception of the essential system fonts, you’ll find an icon representing each of these locations in your Font Book program, described next.
Note
And just to make life even more exciting, Adobe’s and Microsoft’ s software installers may donate even more fonts to your cause, in yet another folder: your Home→Application Support folder.
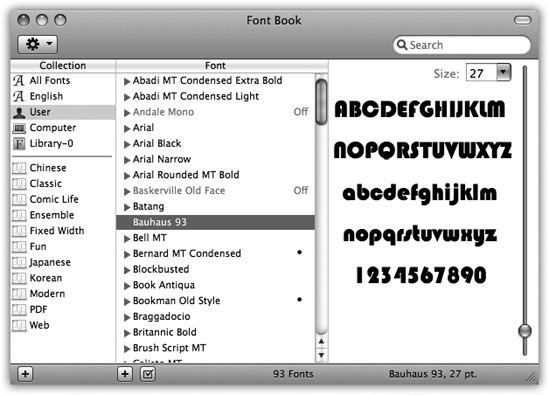
Figure 9-9. Each account holder can have a separate set of fonts; your set is represented by the User icon. You can drag fonts and font families between the various Fonts folders represented here—from your User account folder to the Computer icon, for example, making it available to all account holders.
One of the biggest perks of Mac OS X is its preinstalled collection of over 50 great-looking fonts—“over $1,000 worth,” according to Apple, which licensed many of them from type companies. In short, fewer Mac users than ever will wind up buying and installing new fonts.
But when you do buy or download new fonts, you’re in luck. There’s no limit to the number of fonts you can install.
Right off the bat, Font Book is great for one enjoyable pursuit: looking at samples of each typeface. Click Computer, for example, click the first font name, and then press the down arrow key. As you walk down the list, the rightmost panel shows you a sample of each font (Figure 9-9).
You can also click any font family’s flippy triangle (or highlight its name and then press the right arrow) to see the font variations it includes: Italic, Bold, and so on.
Tip
When you first open Font Book, the actual text of the typeface preview (in the right panel) is pretty generic. Don’t miss the Preview menu, though. It lets you substitute a full display of every character (choose Repertoire)—or, if you choose Custom, it lets you type your own text.
You can print a handy, whole-font sampler of any font. Click its name and then choose File→Print. In the Print dialog box, click the ▾ button to expand the dialog box, if necessary.
As shown in Figure 9-10, you can use the Report Type pop-up menu to choose from three reference-sheet styles: Catalog, Repertoire, or Waterfall. Choose each to view a preview of the report. When everything looks good, click Print.
Since your Mac accesses up to three folders containing fonts, you might wonder what happens in the case of conflicts. For example, suppose you have two slightly different fonts, both called Optima, which came from different type companies, and are housed in different Fonts folders on your system. Which font do you actually get when you use it in your documents?
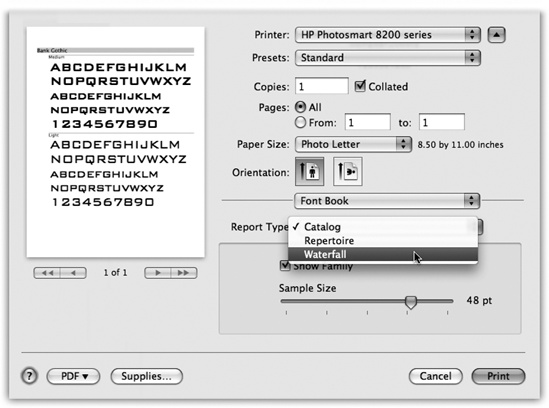
Figure 9-10. From the Report Type pop-up menu, choose the style you want. The preview screen shows you each one before you commit it to paper. Type-size controls always appear in the lower right.
The scheme is actually fairly simple: Mac OS X proceeds down the list of Fonts folders in the order shown in Fonts—and Font Book, beginning with your own home Fonts folder. It only acknowledges the existence of the first duplicated font it finds.
If you’d rather have more control, open Font Book. A bullet (•) next to a font’s name is Font Book’s charming way of trying to tell you that you’ve got copies of the same font in more than one of your Fonts folders. You might have one version of Comic Sans in your own Home→Library→Fonts folder, for example, and another in your Mac’s main Fonts folder.
Click the one that you want to keep, and then choose Edit→Resolve Duplicates. Font Book turns off all other copies, and the bullet disappears.
Here’s what you can do with Font Book:
Install a font. When you double-click a font file’s icon in the Finder, Font Book opens and presents the typeface for your inspection pleasure. If you like it, click Install Font. You’ve just installed it into your account’s Fonts folder, so that it appears in the Font menus of all your programs. (If you’d rather install it so that it appears in all account holders’ Fonts menus, see Figure 9-9.)
Remove a font. Removing a font from your machine is easy: Highlight it in the Font Book list, and then press the Delete key. (You’re asked to confirm the decision.) Before taking such a drastic and permanent step, however, keep in mind that you can simply disable (hide) the font instead. Read on.
Disable a font. When you disable a font, you’re simply hiding it from your programs. You might want to turn off a font so that you can use a different version of it (bearing the same name but from a different type company, for example), or to make your Font menus shorter, or to make programs like Microsoft Word start up faster. You can always turn a disabled font back on if you ever need it again.
Tip
How’s this for a sweet feature? Mac OS X can activate fonts automatically as you need them. When you open a document that relies on a font it doesn’t have, Leopard activates that font and keeps it available until that particular program quits.
Actually, it does better than that. If it doesn’t see that font installed, it actually searches your hard drive on a quest to find the font—and then it asks you if you want it installed, so the document will look right.
To disable a font, just click it (or its family name; see Figure 9-9) and then click the checkbox button beneath the list (or press Shift-
-D). Confirm your decision by clicking
Disable in the confirmation box. (Turn on “Do not ask me
again,” if you’re the confident sort.)
The font’s name now appears gray, and the word Off appears
next to it, making it absolutely clear what you’ve just done. (To
turn the font on again, highlight its name, and then click the
now-empty checkbox button, or press Shift-![]() -D again.)
-D again.)
Note
When you install, remove, disable, or enable a font using Font Book, you see the changes in the Font menus and panels of your Cocoa programs immediately. You won’t see the changes in older Carbon programs, however, until you quit and reopen them.
A font library is a set of fonts outside Font Book that you can install or uninstall on the fly. They don’t have to be in any of your Fonts folders; Font Book can install them from wherever they happen to be sitting on your hard drive (or even on the network). Font Book never copies or moves these font files as you install or remove them from libraries; it simply adds them to your Font menus by referencing them right where they sit.
Tip
That can be a handy arrangement if you periodically work on different projects for different clients. Why burden your day-to-day Font menu with the 37 fonts used by Beekeeper Quarterly magazine, when you need to work with those fonts only four times a year?
Once you’ve added some fonts to a library, you can even set up collections within that library.
To create a library, choose File→New Library; the library appears in the Collection list at the left side of Font Book. Now you can drag fonts into it right from the Finder, or set up collections inside it by highlighting the library’s icon and choosing File→New Collection.
As noted in Chapter 4, some existing Mac programs have simply been touched up—Carbonized, in the lingo—to be Mac OS X-compatible. Choosing fonts in these programs works exactly as it always has on the Mac: You choose a typeface name from the Font menu or a formatting palette.
In many standard programs, though—like TextEdit, iMovie, Pages, Keynote, Numbers, iPhoto, and Mail—you get a standard Mac OS X feature called the Fonts panel. If you’re seated in front of your Mac OS X machine now, fire up TextEdit or Pages and follow along.
Suppose you’ve just highlighted a headline in TextEdit, and now you want to choose an appropriate typeface for it.
In TextEdit, you open the Fonts panel (Figure 9-11) by choosing
Format→Font→Show Fonts (![]() -T). If you’ve ever used Font Book, this
display should look familiar. The first column lists your
Collections, as described above. The second column, Family, shows
the names of the actual fonts in your system. The third, Typeface,
shows the various style variations—Bold, Italic, Condensed, and so
on—available in that type family. (Oblique and Italic are roughly
the same thing; Bold, Black, and Ultra are varying degrees of
boldface.)
-T). If you’ve ever used Font Book, this
display should look familiar. The first column lists your
Collections, as described above. The second column, Family, shows
the names of the actual fonts in your system. The third, Typeface,
shows the various style variations—Bold, Italic, Condensed, and so
on—available in that type family. (Oblique and Italic are roughly
the same thing; Bold, Black, and Ultra are varying degrees of
boldface.)
The last column lists a sampling of point sizes. You can use the size slider, choose from the point-size pop-up menu, or type any number into the box at the top of the Size list.

Figure 9-11. The Fonts panel, generally available only in Cocoa
programs, offers elaborate controls over text color, shadow, and
underline styles. It also contains some of the genetic material
of old-style programs like Suitcase and Font Juggler. See the
handy font sample shown here above the font lists? To get it,
choose Show Preview from the ![]() pop-up menu. Or use the mousy way: Place
your cursor just below the title bar (where it says Fonts) and
drag downward.
pop-up menu. Or use the mousy way: Place
your cursor just below the title bar (where it says Fonts) and
drag downward.
Just like Windows XP and Vista, Mac OS X is extremely camera-friendly. The simple act of connecting a digital camera to its USB cable stirs Mac OS X into action—namely, it opens iPhoto, Apple’s digital-photo shoebox program.
If it’s a digital video camera you plugged in, Mac OS X opens iMovie instead. (Both of these programs are described in this book’s free 85-page iLife Appendix, which you can download from this book’s “Missing CD” at www.missingmanuals.com.)
Floppy drives disappeared from Macs beginning in 1997—and these days, they’re absent from most Windows PCs, too.
In the meantime, there are all kinds of other disks you can connect to a Mac these days: CDs and DVDs, hard drives, iPods, USB flash drives, and so on.
When you insert a disk, its icon shows up in three places (unless you’ve changed your Finder preferences): on the right side of the screen, in the Computer window, and in the Sidebar (Zoom Button). To see what’s on a disk you’ve inserted, double-click its icon.
Note
You can make the Mac work like Windows, if you choose. For example, to open a single window containing icons of all currently inserted disks, choose Go→Computer (which produces the rough equivalent of the My Computer window).
To complete the illusion that you’re running Windows, you can even tell Mac OS X not to put disk icons on the desktop at all. Just choose Finder→Preferences, click General, and turn off the four top checkboxes—“Hard disks,” “External disks,” “CDs, DVDs, and iPods,” and “Connected servers.” They’ll no longer appear on the desktop—only in your Computer window. (You can stop them from appearing in the Sidebar, too, by clicking the Sidebar button in the Finder preferences and turning off the same checkboxes.)
To remove a disk from your Mac, use one of these methods:
FREQUENTLY ASKED QUESTION: The Eject Button That Doesn’t
When I push the ![]() key on my keyboard (or the Eject
button on my CD-ROM drawer), how come the CD doesn’t come
out?
key on my keyboard (or the Eject
button on my CD-ROM drawer), how come the CD doesn’t come
out?
There might be three things going on. First of all, some file on the disc might be open—that is, in use by one of your programs. You’re not allowed to eject the disc until that file is closed.
Second, to prevent accidental pushings, the Eject key on the modern Mac keyboard is designed to work only when you hold it down steadily for a second or two. Just tapping it doesn’t work.
Third, remember that once you’ve inserted a disk, the Mac won’t let go unless you eject it in one of the official ways.
On Mac models with a CD tray (drawer), pushing the button on the CD-ROM door opens the drawer only when it’s empty. If there’s a disc in it, you can push that button till doomsday, but the Mac will simply ignore you.
That behavior especially confuses people who are used to working with Windows. (On a Windows PC, pushing the CD button does indeed eject the disc.) But on the Mac, pushing the CD-door button ejects an inserted disc only when the disc wasn’t seated properly, or the Mac couldn’t read the disc for some other reason, and the disc’s icon never appeared onscreen.
The Eject key on the modern Mac keyboard, however, isn’t so fussy. It pops out whatever CD or DVD is in the drive.
Oh—and if a CD or DVD won’t come out at all (and its icon doesn’t show up on the desktop), restart the Mac. Keep the mouse button pressed as the Mac restarts to make the disc pop out.
And if even that technique doesn’t work, look for a tiny pinhole in or around the slot. Inserting a straightened paper clip, slowly and firmly, will also make the disc pop out.
Hold down the Eject key on your keyboard. Mac keyboards, both on laptops and desktops, have a special Eject key (
 ), usually in the upper-right corner. Hold
it down for a moment to make a CD or DVD pop out.
), usually in the upper-right corner. Hold
it down for a moment to make a CD or DVD pop out.Drag its icon onto the Trash icon. For years, this technique has confused and frightened first-time Mac users. Their typical reaction: Doesn’t the Trash mean “delete”? Yes, but only when you drag file or folder icons there—not disk icons. Dragging a disk icon into the Trash (at the end of the Dock) makes the Mac spit the disk out. (If you’ve dragged a disk image icon or the icon of a networked disk, this maneuver unmounts them—that is, gets them off your screen.)
The instant you begin dragging a disk icon, the Trash icon on the Dock changes form, as though to reassure the novice that dragging a disk icon there will only eject the disk. As you drag, the wastebasket icon morphs into a giant-sized
logo.Highlight the disk icon, and then choose File→Eject (or press
-E). The
disk pops out.Right-click the disk icon. Choose Eject from the shortcut menu.
Use the Sidebar. Click the
 button next to a disk’s name in the
Sidebar.
button next to a disk’s name in the
Sidebar.
Tip
Any of these techniques also work to get network disks and disk images off your screen.
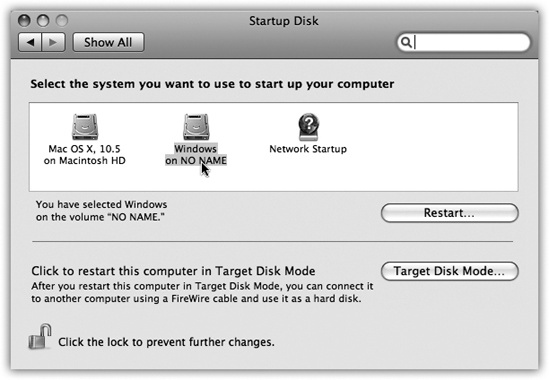
When you turn the Mac on, it hunts for a startup disk—that is, a disk containing a System folder. If you’ve ever seen the dispiriting blinking folder icon on a Mac’s screen, you know what happens when the Mac can’t find a startup disk. It blinks like that forever, or until you find and insert a disk with a viable System folder on it.
By installing the Mac OS onto a disk—be it a hard drive or a DVD—you can create a startup disk. Not all disks are capable of starting up the Mac, but any Leopard Mac can start up from an external FireWire hard drive.
It’s perfectly possible to have more than one startup disk simultaneously attached to your Mac. That’s the deal, for example, whenever you’ve inserted the Mac OS X DVD into your Mac: Both your main hard drive and the DVD contain a System folder, and each is a startup disk. Some veteran Mac fans deliberately create other startup disks—using iPods, for example—so that they can easily start the Mac up from a backup disk, or from a different version of the OS. And if you’ve set up a Boot Camp partition (Chapter 8), of course, you essentially have a Mac startup disk and a Windows startup disk.
Only one System folder can be operational at a time. So how does the Mac know which to use as its startup disk? You make your selection in the Startup Disk pane of System Preferences (Figure 9-12).
Tip
If you’re in a hurry to start the machine up from a different disk, just click the disk icon and then click Restart in the System Preferences window. You don’t have to close the System Preferences window first.
Who misses the floppy drive anymore? A blank DVD holds about 3,250 times as many files!
You can buy blank CDs incredibly cheaply in bulk—$20 for 100 discs, for example—via the Web. Blank DVDs are only slightly more expensive—about $30 for 100.
Burning a CD or DVD is great for backing stuff up, transferring stuff to another computer (like a Windows PC), mailing to somebody, or offloading (archiving) older files to free up hard drive space.
You can burn a disc in either of two ways: with the blank disc inserted or without.
The burn folder is a special folder that you fill up by dragging file and folder icons to it. Then, when you’re ready to burn, you just insert the blank disc and go.
The burn-folder concept has a lot going for it:
No wasted hard drive space. The Mac just sets aside aliases of the files and folders you want to burn. Aliases take up negligible hard drive space. When you finally burn the disc, the designated material is copied directly onto the CD or DVD.
Easy reuse. You can keep a burn folder on your desktop, prestocked with the folders you like to back up. Each time you burn a disc, you get the latest version of those folders’ contents, and you’re saved the effort of having to gather them each time.
Figure 9-13. Top: A burn folder looks like any ordinary folder—except that it has that radioactive logo on it. You can drag files and folders right into its window; Mac OS X displays only aliases for now, but when you burn the disc, the actual files and folders will be there. If you open the burn folder, you find an unusual strip across the top. Its most important feature is the Burn button at the right. Bottom: Ready to proceed, Captain.
Prepare ahead of time. You can get a CD or DVD ready to burn without having a blank disc on hand.
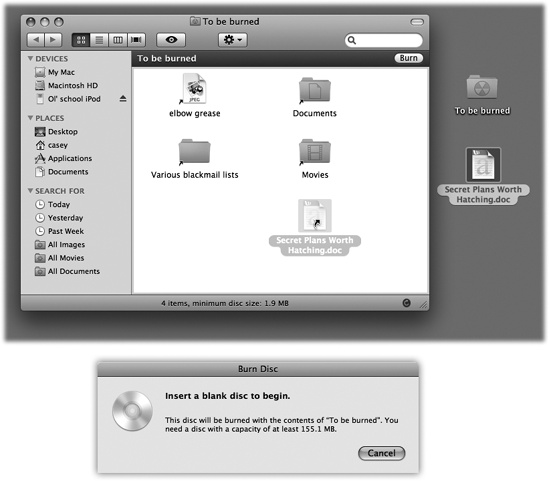
Here’s how you use burn folders:
Create a burn folder.
To make a burn folder appear on your desktop, choose File→New Burn Folder. To create one in any other window, right-click a blank spot inside that window and, from the shortcut menu, choose New Burn Folder.
Either way, a new folder appears, bearing the universal Mac radioactive “burn” symbol (Figure 9-13).
Rename it.
Its name is highlighted, so you can just start typing to rename it. Press Enter when you’re finished.
Load up the folder by dragging files and folders onto it.
If you double-click the burn folder to open its window (Figure 9-13), you’ll notice that you’re not actually copying huge files. You’re simply making a list of aliases.
Tip
To check how many megabytes’ worth of stuff you’ve added so far—so you don’t overflow your CD or DVD—click the Burn button in the upper-right corner of the burn folder’s window. The resulting message, shown at bottom in Figure 9-13, tells you the current total. (Hit the Enter key, or click Cancel, to close the dialog box.)
Decorate the window, if you like.
You can choose list view or icon view; you can drag the icons into an arrangement that you like; you can change the background color of the window; and so on. One nice feature of the Mac is that the look of a window is preserved when you burn it to CD.
Click the Burn button in the upper-right corner of the window, or choose File→Burn Disc.
The message shown at bottom in Figure 9-13 appears.
Insert a blank disc.
If you have a slot-loading Mac, slip the disc into the slot. If your Mac has a sliding CD/DVD tray instead, open it first by pressing the button on the tray, or pressing your
key for about one second.Tip
Once you’ve inserted a CD or DVD into your tray, you can close it either by pushing gently on the tray or by pressing the
key again.One last confirmation box appears, where you can name the disc and choose a burning speed for it.
Click Burn (or press Enter).
The Mac’s laser proceeds to record the CD or DVD, which can take some time. Feel free to switch into another program and continue using your Mac. When it’s all over, you have a freshly minted CD or DVD, whose files and folders you can open on any Mac or Windows PC.
If you have a blank disc ready to go, burn folders are even simpler to use. In fact, you may not even be aware that you’re using them. The whole operation requires fewer steps.
Start by inserting a blank disc. After a moment, the Mac displays a dialog box asking, in effect, what you want to do with this blank disc (unless you’ve fiddled with your preference settings). See Figure 9-14 for instructions.
If you choose Open Finder, you’ll see the disc’s icon appear on the desktop after a moment; its icon also appears in the Sidebar, complete with a round Burn symbol that looks like a radioactivity logo.
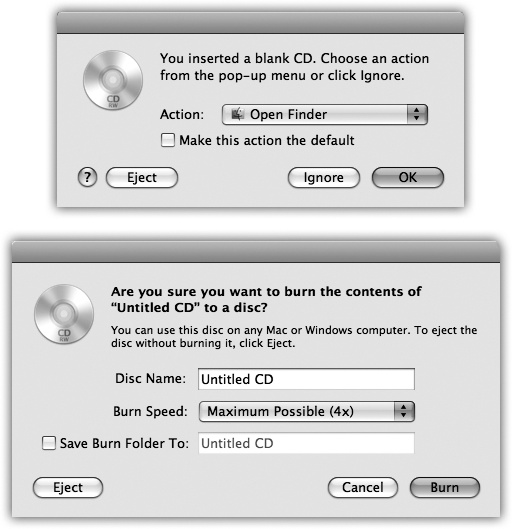
Figure 9-14. Top: Choose Open Finder if you plan to copy regular Mac files onto the CD or DVD, or Open iTunes if you plan to burn a music CD using iTunes. (Click “Make this action the default” if you figure you’ll always answer this question the same way.) Click OK. Drag the disc onto the Burn icon in the Dock, or choose File→Burn Disc. Bottom: Confirm your choice in this box.
At this point, you can begin dragging files and folders onto the disc’s icon, or (if you double-click the icon) into its window. You can add, remove, reorganize, and rename the files on it just as you would in any standard Finder window. All you’re really doing is dragging aliases around; the real files are left untouched on your hard drive. You can also rename the CD or DVD itself just as you would a file or folder.
Tip
The status bar at the bottom of the window gives you a running tally of the disk space you’ve filled up so far. (It may say, for example, “223.2 MB of 702.8 used on disc.”) At last, you have an effortless way to exploit the blank disc’s capacity with precision.
When the disk contains the files and folders you want to immortalize, do one of these things:
Choose File→Burn Disc.
Click the Burn button next to the disc’s name in the Sidebar.
Drag the disc’s icon toward the Trash icon in the Dock. As soon as you begin to drag, the Trash icon turns into that yellow fallout-shelter logo. Drop the disc’s icon onto it.
The dialog box shown at bottom left in Figure 9-14 now appears. Click Burn. When the recording process is over, you’ll have yourself a DVD or CD that works in any other Mac or PC.
Here are a few final notes on burning CDs and DVDs at the desktop:
Not sure what kinds of disks your Mac can burn? Open System Profiler (in your Applications→Utilities folder). Expand the Hardware triangle, and click the Disc Burning category. There it is, plain as day: a list of the formats your machine can read and write (that is, burn). For example, you might see: “CD-Write: -R, -RW. DVD-Write: -R, -RW, +R, +RW.”
If you do a lot of disc burning, a full-fledged CD-burning program like Toast Titanium (www.roxio.com) adds myriad additional formatting options that let you make startup CDs, video CDs, and so on.
When you insert a CD-RW or DVD-RW disc that you’ve previously recorded, the box shown at top in Figure 9-14 doesn’t appear. Instead, the disc’s icon simply appears on the desktop as though it’s an ordinary CD. Before you can copy new files onto it, you must erase it using Disk Utility as described in the previous section.
The discs that your Mac burns work equally well on Macs and Windows (or Linux) PCs. If you plan to insert a CD or DVD into a PC, however, remember that Windows doesn’t permit certain symbols in a Windows file name ( / : * ? " < > |). You’ll run into trouble if any of your file names contain these symbols. In fact, you won’t be able to open any folders on your disc that contain illegally named files.
As a Windows veteran, you may already be familiar with iTunes. This program, which sits in your Applications folder, is the ultimate software jukebox (Figure 9-15). It can play music CDs, tune in to Internet radio stations, load up your iPod music player or iPhone, and play back digital sound files (including the Internet’s favorite format, MP3 files) and other popular audio formats. It can also turn selected tracks from your music CDs into MP3 files, so that you can store favorite songs on your hard drive to play back anytime—without having to dig up the original CDs. iTunes also lets you record your own custom audio CDs that contain only the good songs. Finally, of course, iTunes is the shop window for the online iTunes Store ($1 a song).
iTunes can also burn MP3 CDs: music CDs that fit much more than the usual 74 or 80 minutes of music onto a disc (because they store songs in MP3 format instead of AIFF).
The first time you run iTunes, you’re asked (a) whether you want iTunes to be the program your Mac uses for playing music files from the Internet, (b) whether you want it to ask your permission every time it connects to the Internet, and (c) whether you want the program to scan your Home folder for all music files already on it. (You can decline to have your hard drive scanned at this time. Later, you can always drag it, or any other folder, directly into the iTunes window for automatic scanning.)
Tip
The following pages present a mini-manual on iTunes. For the full scoop, plus coverage of the iPod and the iTunes Store, consult iPod: The Missing Manual.
The iTunes screen itself is set up to be a list—a database—of every song you’ve got in formats like MP3, AIFF, WAV, AAC, and Apple Lossless. iTunes automatically finds, recognizes, and lists all such files in your Home folder→Music→iTunes→iTunes Music folder.
Tip
You can instruct iTunes to display the contents of other folders, too, by choosing File→Add to Library. It promptly copies any sound files from the folder you “show” it into your Home folder→Music→iTunes→iTunes folder.
If you’re not into collecting MP3 files, you can also populate the main list here simply by inserting a music CD. The songs on it immediately show up in the list.
At first, they may appear with the exciting names “Track 01,” “Track 02,” and so on. But after a moment, iTunes connects to the Internet and compares your CD with the listings at www.gracenote.com, a global database of music CDs and their contents. If it finds a match among the thousands of CDs there, it copies the album and song names into iTunes, where they reappear every time you use this particular CD.
Tip
If you connect an iTunes-compatible portable MP3 player to your Mac (the iPod isn’t the only one), its name, too, shows up in the left-side Source list. You can add songs to your player (by dragging them onto its icon), rename or reorder them, and so on.

Figure 9-15. When the Library icon is selected in the Source list, you can click the Browse button (upper-right) to produce a handy, supplementary view of your music database, organized like a Finder column view. It lets you drill down from a performer’s name (left column) to an album by that artist (right column) to the individual songs on that album (bottom half, beneath the browser panes).
Source list
Status/Progress
Browser panes
New Playlist
Shuffle
Repeat
Hide/Show Album Art/Video
Hide/Show Browser
Eject CD
Unless you’re just off the shuttle from Alpha Centauri, you probably already know that the iPod is Apple’s tiny, elegant music player. It, and its cellular pal the iPhone, are designed to integrate seamlessly with iTunes.
All you have to do is connect the iPod or iPhone to the Mac via its USB cable. You’ll see the gadget’s icon show up in the iTunes Source list. Click its icon to view its contents—and click the tabs (Music, TV Shows, Podcasts, and so on) to specify what Mac material you’d like copied over to it.
The iTunes Store is incredibly easy to figure out. Right from within iTunes, you can search or browse for over 8 million pop songs, classical pieces, and even comedy excerpts—and then buy them for $1 apiece. Then there are the TV shows (episodes for $2 a piece, with no ads, from 500 series), movies (2,500), free podcasts (95,000), audiobooks (40,000), music videos (200,000), iPod games, and more. Sure, you may go broke, but at least you’ll be entertained.
Besides, there are no monthly fees, and your downloads don’t go poof! into the ether if you decide to cancel your subscription, as they do with some rival services.
Start by clicking the Store icon in the iTunes Source list. You go online and land on the home page, which looks and works like a Web page. Use the Search Store box (top right corner) to find the songs or performers you’re interested in. Double-click a song or video to hear or view a 30-second excerpt. (For audio books, you get a 90-second excerpt.)
If you decide to buy a song, you need an Apple Account. Click the Account: Sign In button on the right side of the iTunes window to get started. (If you’ve ever bought or registered an Apple product on the company’s Web site, signed up for AppleCare, ordered an iPhoto book, or have a .Mac membership, you probably have an Apple Account already. All you have to do is remember your name—usually your email address—and password.)
When you click the Buy button next to a song’s name, iTunes downloads it into your Home→Music→iTunes Music folder. It also shows up in the Purchased Music “playlist” in the Source list for convenient access.
Most songs from the iTunes Store are copy-protected—gently. For example:
Maximum of five computers. Apple lets you play your Store-bought songs on up to five computers at once. However, to prevent you from becoming a rampant music pirate, you must prove your honesty by authorizing these five machines.
You authorized your first machine when you signed up for an Apple Account for the iTunes store. To authorize a song to play on another computer, copy it over from the first machine. Then, in iTunes, select the song and click the ▸ button. Type your Apple Account user name and password in the box that appears. This second computer is now authorized to play that song—and any other songs you bought using the same Apple Account.
Tip
Thinking of putting that older computer up for sale? Before you wipe the drive clean and send it on its way, be sure to deauthorize it (choose Advanced→Deauthorize Computer), so that you’re not wasting one of your five “authorized computer” slots. Erasing a hard drive, by itself, does not deauthorize a computer.
Maximum of 10 CDs per playlist. You can also burn purchased tracks to blank CDs, so you can listen to them in the car or the big stereo rack in the living room. Here’s another tiny form of copy protection: If you’ve added store-bought songs to a given playlist, you can’t burn more than ten CD copies of it in a row without making at least one change to that list. Changing the song order slightly will do.
Music publisher EMI now offers its songs without any copy protection (at $1.30 instead of $1.00); Apple hopes to score similar deals with other record companies. Well, we can dream, can’t we?
To turn your Mac into a music player, click iTunes’ Play button (▸) or press the Space bar. The Mac immediately begins to play the songs whose names have checkmarks in the main list (Figure 9-15), or the CD that’s currently in your Mac.
Tip
The central display at the top of the window shows not only the name of the song and album, but also where you are in the song, as represented by the diamond in the horizontal strip. Drag this diamond, or click elsewhere in the strip, to jump around in the song.
To view the current music’s sound levels, click the tiny triangle at the left side of this display to see a pulsing VU meter, indicating the various frequencies.
As music plays, you can control and manipulate the music and the visuals of your Mac in all kinds of interesting ways. Some people don’t move from their Macs for months at a time.
Visuals are onscreen light shows that pulse, beat, and dance in sync to the music. The effect is hypnotic and wild. (For real party fun, invite some people who grew up in the Sixties to your house to watch.)
To summon this psychedelic display, choose View→Turn On
Visuals, or just press ![]() -T. The show begins immediately—although
it’s much more fun if you choose View→Full Screen
(
-T. The show begins immediately—although
it’s much more fun if you choose View→Full Screen
(![]() -F) so the show takes over your whole
monitor. True, you won’t get a lot of work done, but when it comes
to stress relief, visuals are a lot cheaper than a hot tub.
-F) so the show takes over your whole
monitor. True, you won’t get a lot of work done, but when it comes
to stress relief, visuals are a lot cheaper than a hot tub.
You can control iTunes’ music playback using its menus, of course, but the keyboard can be far more efficient. Here are a few of the control keystrokes worth noting:
Function | Keystroke |
|---|---|
Play, Pause | Space bar |
Next song/previous song | right arrow, left arrow |
Next source/previous source | down arrow, up arrow |
Louder | |
Quieter | |
Mute | |
Fast-forward, rewind | |
Eject | |
Turn Visuals on | |
Turn Visuals off | |
Full-screen visuals | |
Exit full-screen visuals |
Tip
You can also control CD playback from the Dock. right-click the iTunes icon (or click and hold on it) to produce a pop-up menu offering playback commands like Pause, Next Song, and Previous Song, along with a display that identifies the song currently being played.
If you choose Window→Equalizer, you get a handsome control console that lets you adjust the strength of each musical frequency independently.
Here’s a clever touch: In the iTunes→Preferences dialog box, if you click the Playback icon, you see a checkbox called Sound Check. Its function is to keep the playback volume of all songs within the same basic level, so that you don’t have to adjust the volume to compensate for different recorded levels. (This setting, too, gets transferred to your iPod or iPhone.)
Come to think of it, you could wile away quite a few happy afternoons just poking through the Preferences dialog box. It grows richer with every successive version of iTunes.
iTunes lets you convert your favorite songs from audio CDs into files on your hard drive. Once they’ve been transferred to your Mac, you can play them whenever you like, without needing the original CD.
To rip a CD (as aficionados would say) to your hard drive, make sure that only the songs you want to capture have checkmarks in the main list. Choose a format for the files you’re about to create using the pop-up menu on the iTunes→Preferences→Advanced→Importing tab. Then click the Import CD button at the lower-right corner of the window (see Figure 9-16).
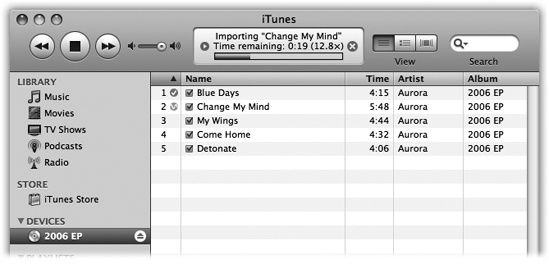
Figure 9-16. Watch the display at the top of the window to see how long the conversion is going to take, and which song iTunes is working on. As iTunes finishes processing each song, you see a small, circled checkmark next to its name in the main list to remind you that you’ve got it on board and no longer need the CD in your machine.
Done
Stop ripping
In progress
When it’s all over, you’ll find the imported songs listed in your Library. (Click the Library icon in the left-side Source list.) From there, you can drag them into any other “folder” (playlist), as described next.
When you click the Music icon in the left-side Source list, the main part of the screen displays every music file iTunes knows about (and even every QuickTime movie file; iTunes will play back soundtracks). It’s organized much like a Finder window, with columns indicating the song length, singer or band, album, and so on. As always, you can rearrange these columns by dragging their headings, sort your list by one of these criteria by clicking its heading, reverse the sorting order by clicking the heading a second time, and so on. To find a particular song, just type a few letters into the Spotlight-ish Search blank above the list. iTunes hides all but the ones that match.
Apple recognizes that you may not want to listen to all your songs every time you need some tunes. That’s why iTunes lets you create playlists —folders in the Source list that contain only certain songs. In effect, you can devise your own albums, like one called Party Tunes, another called Blind Date Music, and so on.
To create a new playlist, click the + button in the
lower-left corner of the window, or choose File→New Playlist
(![]() -N). Alternatively, if you’ve already
highlighted certain songs—by
-N). Alternatively, if you’ve already
highlighted certain songs—by ![]() -clicking them or Shift-clicking them—you
can choose File→New Playlist From Selection.
-clicking them or Shift-clicking them—you
can choose File→New Playlist From Selection.
A new playlist appears as an icon in the Source list. You can rename one by double-clicking it, and add songs to one by dragging them out of the main list.
Tip
Deleting a song from a playlist doesn’t delete it from the Library (or your hard drive). Similarly, it’s fine to add the same song to as many different playlists as you like, since you’re not actually increasing the size of your Library. (You might be starting to pick up a running theme in Apple’s software. Playlists work just like albums in iPhoto, or the Sidebar in the Finder.)
Smart playlists constantly rebuild themselves according to criteria you specify. You might tell one smart playlist to assemble 45 minutes’ worth of songs that you’ve rated higher than four stars but rarely listen to, and another to list your most-often-played songs from the Eighties.
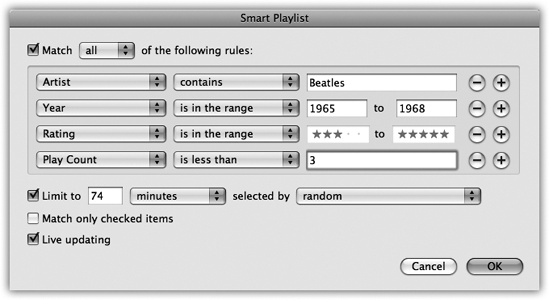
Figure 9-17. A Smart Playlist is a powerful search command for your iTunes database. You can set up certain criteria, like the hunt for particular Beatles tunes illustrated here. The “Live updating” checkbox makes iTunes keep this playlist updated as your collection changes, as you change your ratings, as your Play Count changes, and so on.
Tip
To rate a song, make the window wide enough that you can see the Rating column. (If you don’t see this column, right-click any column heading and choose Rating from the list of options.) Then just click the Rating column for a selected song. The appropriate number of stars appears—one, two, three, four, or five—depending on the position of your click. You can change a song’s rating as many times as you like—a good thing, considering the short shelf life of a pop hit these days.
To make a smart playlist, choose File→New Smart Playlist
(Option-![]() -N)—or just Option-click the + button
beneath the source list. The dialog box shown in Figure 9-17 appears. The
controls here are designed to set up a search of your music
database. Figure 9-17, for example,
illustrates how you’d find up to 74 Beatles tunes released between
1965 and 1968—that you’ve rated three stars or higher and that
you’ve listened to fewer than three times.
-N)—or just Option-click the + button
beneath the source list. The dialog box shown in Figure 9-17 appears. The
controls here are designed to set up a search of your music
database. Figure 9-17, for example,
illustrates how you’d find up to 74 Beatles tunes released between
1965 and 1968—that you’ve rated three stars or higher and that
you’ve listened to fewer than three times.
When you click OK, your smart playlist is ready to show off. When you click its name in the Source list, the main song list updates itself according to your criteria and any changes in your music collection. (Smart playlists get transferred to your iPod or iPhone, but don’t continue to update themselves there.)
iTunes can record selected sets of songs, no matter what the original sources, onto a blank CD. When it’s all over, you can play the burned CD on almost any standard CD player, just as you would a CD from the record store—but this time, you hear only the songs you like, in the order you like, with all of the annoying ones eliminated.
Tip
Use CD-R discs. CD-RW discs are not only more expensive, but may not work in standard CD players. (Not all players recognize CD-R discs either, but the odds are better.)
Start by creating a playlist for the CD you’re about to make. Click its icon in the left-side Source list to see the list you’ve built. Drag songs up or down in the list to reflect their playback order. Keep these points in mind:
The readout at the bottom of the list shows how much time the songs will take.
About 74 or 80 minutes of AIFF audio files fit on one CD. But if you make an MP3 CD instead (choose iTunes→Preferences→Advanced→Burning tab, and then choose MP3 CD as the format), you can fit at least ten times as much. Note, though, that MP3 CDs don’t play on all CD players—only those advertised with this feature. Also note that your MP3 CD can’t include songs you’ve bought on Apple’s iTunes music store; iTunes won’t convert them into the non-copy-protected MP3 format.
You can control how many seconds of silence iTunes leaves between tracks on your custom CD. Choose iTunes→Preferences→Advanced→Burning tab, and make a selection from the Gap Between Songs pop-up menu.
When everything is set up, click the Burn Disc button in the playlist window. Insert a blank CD into the Mac. The burning process takes some time. Feel free to work in other programs while iTunes chugs away.
Using DVD Player, Mac OS X’s built-in DVD-playing software, your Mac can play Hollywood DVDs as though it was born to do so.
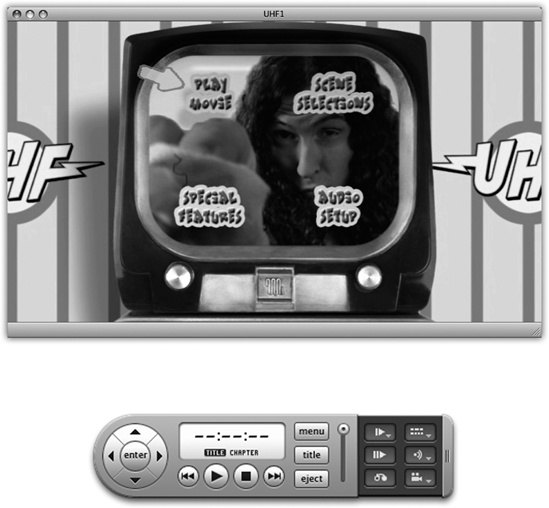
Watching movies on your Mac screen couldn’t be simpler: Just insert the DVD. The Mac detects that it’s a video DVD (as opposed to, say, one that’s just filled with files) and, unless you’ve fiddled with your preference settings, opens the DVD Player program (Figure 9-18). (It can take awhile.)
If DVD Player doesn’t start up automatically when you insert a DVD movie, you can open it yourself. It’s sitting there in your Applications folder. (Then fix the problem, using the CDs & DVDs panel of System Preferences.)
Once DVD Player starts playing your movie, you can use the “remote control,” which is deconstructed in Figure 9-18. Or just use the keyboard controls:
By far the easiest way to start and stop Playback is to press the Space bar—once to start, again to pause, again to start again.
Figure 9-18. Top: DVDs on your screen! Use your mouse to click the buttons, if you like; that’s a lot more direct than having to use the arrow keys on a remote control. Bottom: You can orient this controller either horizontally or vertically on your screen by choosing Controls→Use Vertical Controller. You can also do without this remote control altogether, since all of its buttons have keyboard equivalents.
Slo Mo Frame Advance Return to Movie
Subtitles Language Angle
Previous chapter/Next chapter (Hold to scan backward/forward)
Press Shift-
- to fast-forward; press that combination
repeatedly to cycle from twice to 4, 8, 16, or 32 times normal
speed. (Or just choose a speed from the Controls→Scan Rate
submenu.)
to fast-forward; press that combination
repeatedly to cycle from twice to 4, 8, 16, or 32 times normal
speed. (Or just choose a speed from the Controls→Scan Rate
submenu.)Similarly, press Shift-
- to scan backwards. Click Play (or press
the Space bar) to resume normal playback.
to scan backwards. Click Play (or press
the Space bar) to resume normal playback.You can make the movie louder or quieter by repeatedly tapping
- or -
or - . That’s a good keystroke to remember when
you’ve hidden the remote control itself.
. That’s a good keystroke to remember when
you’ve hidden the remote control itself.
Or, if you prefer a clip ‘n’ save cheat sheet of all the keystrokes, here it is:
Function | Keystroke |
|---|---|
Play, Pause | Space bar |
Fast-forward | |
Rewind | |
Skip back 5 seconds | |
Skip forward 5 seconds | |
Louder | |
Quieter | |
Mute/Unmute | |
Next/previous “chapter” | |
Main menu | |
Full-screen mode | |
Half, normal, maximum size | |
Eject | |
Show/hide remote control | |
Add a bookmark |
Tip
Isn’t that cool how DVD Player automatically displays the subtitles for the dialog (if subtitles exist on the DVD) when you hit the Mute key?
In Leopard, DVD movies begin playing back in in full-screen mode all by themselves (you no longer have to choose View→Enter Full Screen). Even the menu bar disappears. (To make it reappear, move your cursor near the top of the screen.)
As shown in Figure 11-19, though, a new suite of powerful navigation controls is still available, even in full-screen mode.
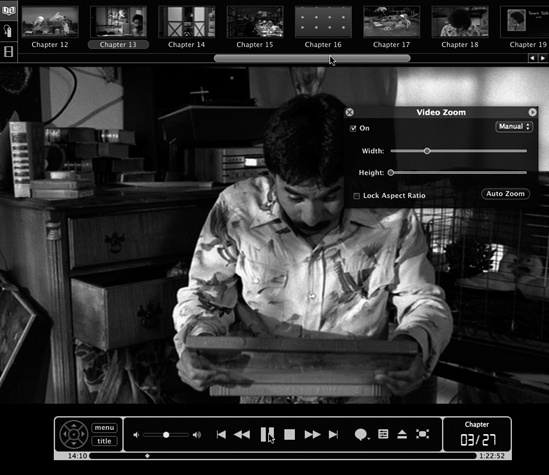
Figure 9-19. Even in full-screen mode, you can control the playback and navigate the disc using the new, translucent, pop-up control bars. The chapter list appears when you move your cursor to the top of the screen. The “remote control” bar appears when the cursor approaches the bottom. One especially cool feature is the new Player Settings button. It opens the Zoom controls window shown here, which gives you manual control over the width and height of the picture on your screen. Don’t miss the scrubber bar at the very bottom, either. It lets you scroll directly to any spot in the DVD.
Most Hollywood DVDs have been programmed with onscreen subtitles to help those with hearing impairments and people sitting in noisy bars. Click the Subtitle button (Figure 9-18) to turn on the subtitles, and click again to hide them. (You can specify the language you want—English subtitles, Spanish subtitles, or whatever the DVD offers—by clicking the same button repeatedly. Or choose DVD Player→Preferences, click the Disc Setup icon, and choose a language from the Subtitle pop-up menu.)
Meanwhile, each time you click the Audio button on the remote, the movie’s soundtrack switches to a different language (if, in fact, alternate soundtrack languages have been provided). You’ll see the name of each language appear briefly in the remote’s “display.” (You can also use the Audio button as a pop-up menu to choose the language you want directly.)
Tip
For real fun, turn on English subtitles but switch the soundtrack to a foreign language. No matter how trashy the movie you’re watching, you’ll gain much more respect from your friends and family when you tell them that you’re watching a foreign film.
Now, watching a movie while sitting in front of your Mac is not exactly the great American movie-watching dream. Fortunately, every recent Mac model has a video-output jack; with the proper cables, you can connect the Mac to your TV for a much more comfortable movie-watching experience.
Just be sure to connect the cable directly to the TV. If you connect it to your VCR instead, you’ll probably get a horrible, murky, color-shifting picture—the result of the built-in copy-protection circuitry of every VCR.
Or what the heck—just ask for an Apple TV for your birthday.
As you know by now, switching to the Mac entails switching your
brain, especially when it comes to the old keyboard shortcuts. All of
those Ctrl-key sequences become, on the Mac, ![]() -key sequences. (Check your Macintosh keyboard:
The
-key sequences. (Check your Macintosh keyboard:
The ![]() key is right next to the Space bar, usually on
both sides.)
key is right next to the Space bar, usually on
both sides.)
But plenty of other Mac keys may seem unfamiliar. For your reassurance pleasure, Keyboard Differences offers a rundown of what they do.
In Windows, you may have grown accustomed to certain common keystrokes for navigating text—key combinations that make the insertion point jump to the beginning or end of a word, line, or document, for example.
Mac OS X programs offer similar navigation keystrokes, as you can see here:
Function | Windows keys | Mac keys |
|---|---|---|
| [a] | ||
Move to previous/next word | Ctrl+arrow keys | Option-arrow keys |
Move to beginning/end of line | Home/End | Home/End[a] |
Move to previous/next paragraph | Ctrl+up/down arrows[a] | Option-up/down arrows[a] |
Move to top/bottom of window | Home/End | Home/End (but see below) |
Select all text | Ctrl+A | |
Select text, one letter at a time | Shift+arrow keys | Shift-arrow keys |
Select text, one word at a time | Ctrl+Shift+arrow keys | Option-Shift-arrow keys |
Undo | Ctrl+Z | |
Cut, Copy, Paste | Ctrl+X, C, V | |
Close window | Alt+F4 | |
Switch open programs | Alt+Tab | |
Hide all windows | F11 | |
[a] in some programs | ||
Incidentally, the keystroke for jumping to the top
or bottom of a window varies widely on the program. You
need ![]() -Home/End in Microsoft Word,
-Home/End in Microsoft Word,
![]() -up/down arrow in TextEdit and Stickies, and
Home/End in iPhoto and Finder list windows.
-up/down arrow in TextEdit and Stickies, and
Home/End in iPhoto and Finder list windows.
As a consolation prize, though, here’s a bit of good news: All Cocoa programs (Two Kinds of Programs: Cocoa and Carbon)—TextEdit, Stickies, iPhoto, iDVD, Safari, Keynote, iChat, iCal, Mail, Address Book, and so on—offer an amazing quantity of consistent, Unix-based navigation keystrokes that should last you the rest of your life. Here they are:
Control-A. Moves your insertion point to the beginning of the paragraph. (Mnemonic: A = beginning of the alphabet.)
Control-E. Deposits your insertion point at the end of the paragraph. (Mnemonic: E = End.)
Control-D. Forward delete. Deletes the letter to the right of the insertion point.
Control-K. Instantly deletes all text from the insertion point to the right end of the line. (Mnemonic: K = Kills the rest of the line.)
Control-O. Inserts a paragraph break, much like Return, but leaves the insertion point where it was, above the break. This is the ideal trick for breaking a paragraph in half when you’ve just thought of a better ending for the first part.
Control-T. Moves the insertion point one letter to the right—and along with it, drags whichever letter was to its left. (Mnemonic: T = Transpose letters.)
Option-Delete. Deletes the entire word to the left of the insertion point. When you’re typing along in a hurry, and you discover that you’ve just made a typo, this is the keystroke you want. It’s much faster to nuke the previous word and retype it than to fiddle around with the mouse and the insertion point just to fix one letter.
Four additional keystrokes duplicate the functions of the arrow keys. Still, as long as you’ve got your pinky on that Control key...
Control-B, Control-F. Moves the insertion point one character to the left or right, just like the left and right arrow keys. (Mnemonic: Back, Forward).
Control-N, Control-P. Moves the insertion point one row down or up, like the down and up arrow keys. (Mnemonic: Next, Previous).
Most USB mice work as soon as you plug them into your Mac—even two-button, scroll-wheel mice. Using System Preferences, you can even program your spare mouse buttons to invoke cool features like Exposé and the Dashboard.
That’s not to say, however, that you shouldn’t install your mouse’s driver software. If your mouse came with such software (or if you find it on the manufacturer’s Web site), you may well find that your mouse learns a few new tricks—making its “back” and “forward” buttons work properly in Safari, for example. Otherwise, a shareware program like USB Overdrive ($20, from www.usboverdrive.com) can unlock those features.
(For more on Mac mice, in On, Off, and Sleep.)
Your Mac can use standard monitors of the type found in the Windows world. Every Macintosh can drive multiple screens at the same time, too, meaning that you can generally use your old PC screen either as your Mac’s main monitor or as a second, external screen.
If one of those arrangements appeals to you, the only complication might be the connector. Most PC screens, of course, have a standard VGA connector (or a more modern DVI connector) at the tip of their tails. Your Mac may or may not have a place to plug in that VGA or DVI cable:
iMacs, Mac laptops, and the Mac Mini come with a short adapter cable. One end clicks into the Mac; the other end mates with your monitor’s VGA cable.
If you have a Power Mac or Mac Pro, you may have both a proprietary Apple monitor connector and a VGA connector, or you may have at least one DVI connector. (If not, you can always buy a second graphics card.)
Tip
It’s even possible to connect both your Mac and your PC to the same monitor, and switch from one to the other at will. If this arrangement appeals to you, you’ll need a so-called KVM switch (which also lets you switch your keyboard and mouse between your two computers). You can find KVM switches for sale at electronics stores, and online from manufacturers like Belkin (www.belkin.com).
In any case, most recent Mac models let you choose either mirror mode (where both screens show the same thing—a handy setup in classroom situations) or desktop extension mode (where one screen acts as additional real estate, an annex to the first). You specify which mode you want using the Displays pane of System Preferences, or using the Displays menu-bar icon.
As the old saying goes, there are two kinds of people: those who have a regular backup system—and those who will.
You’ll get that grisly joke immediately if you’ve ever deleted the wrong folder by accident, made changes that you regret, or worst of all, had your hard drive die. All those photos, all that music you’ve bought online, all your email—gone.
Yet the odds are overwhelming that at this moment, you do not have a complete, current, automated backup of your Mac. Despite a thousand warnings, articles, and cautionary tales a year, guess how many do? About four percent. Everybody else is flying without a net.
If you don’t have much to back up—you don’t have much in the way of photos, music, or movies—you can get by with burning copies of stuff onto blank CDs or DVDs. But that method leaves most of your Mac unprotected: all your programs and settings, not to mention Mac OS X itself.
What you really want, of course, is a backup that’s rock-solid, complete, and automatic. You don’t want to have to remember to do a backup, to insert a tape, to find a cartridge. You just want to know that you’re safe.
That’s the idea behind Time Machine, a marquee feature of Leopard. It’s a silent, set-it-and-forget-it piece of peace of mind. You sleep easy, knowing there’s a safety copy of your entire system: your system files, programs, settings, music, pictures, videos, document files—everything.
Yes, Time Machine has a fabulous, gorgeous, sci-fi, space-themed recovery mode, where it looks like you’re flying back in time to retrieve files, folders, or disks from the past. With luck, you’ll never need it. But if your luck runs out, you’ll be so happy you set Time Machine up.
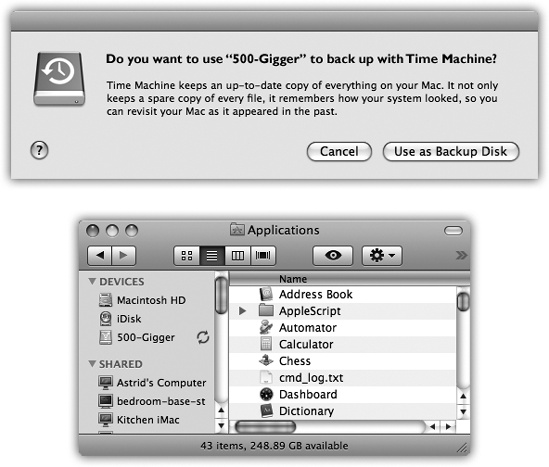
Figure 9-20. Top: The Mac has just encountered a second hard drive. Time
Machine still works if there’s other stuff on the drive, but life is
simpler if you don’t use that drive for anything but Time Machine.
The more space Time Machine has to work with, the farther back in
time you’ll be able to go to recover deleted or mangled files.
Bottom: The backup has begun. You know that because you see both a
progress message and the ![]() symbol that appears next to the backup
drive’s name in your Sidebar.
symbol that appears next to the backup
drive’s name in your Sidebar.
Here’s the bad news: Time Machine requires a second hard drive. That’s the only way to create a completely safe, automatic backup of your entire main hard drive.
That second hard drive can take any of these forms:
An external USB or FireWire hard drive.
Another internal hard drive.
A partition of any one of those drives.
An Apple Time Capsule, which is a Wi-Fi base station and wireless network backup drive in one sleek little case.
The hard drive of another Leopard Mac on the network. You must first mount its drive on your screen (Chapter 14).
Tip
It’s perfectly OK to back up several Macs onto the same external hard drive, as long as it’s got enough room. You can also back up onto a hard drive that has other stuff on it, although of course that means you’ll have less room for Time Machine backups.
In all cases, the backup disk must be bigger than the drive you’re backing up (preferably much bigger).
Here’s what you can’t use as the backup disk: iPods, iDisks, your startup disk, CDs, DVDs, flash drives, or any other kind of removable disk.
Note
If Time Machine doesn’t recognize the drive you’ve given it, the drive might not be a standard Mac-formatted hard drive. That’s a gotcha that befalls many a Mac fan who buys a new hard drive for backup purposes; many new drives come in Windows’s format, which Time Machine doesn’t recognize.
To make a new, empty drive like this ready for Time Machine, open Disk Utility (Disk Utility). Click the drive’s name, click the Erase tab, choose “Mac OS Extended (Journaled)” from the Volume Format pop-up menu, and then click Erase.
Sure, it sounds like an Apple plot to sell more hard drives. But you’d be surprised at how cheap hard drives are. At this writing, you can buy a 300-gigabyte internal hard drive for under $80, for goodness’ sake, or an external 500-gig drive for $120—and hard drive prices-per-gigabyte only go down.
The first time the Mac sees your second hard drive, it invites you to use it as Time Machine’s backup drive (Figure 9-20, top). That could be the moment you connect an external USB or FireWire drive, or the first time you turn on the Mac after installing an internal drive.
If you click Use as Backup Disk, you’re taken immediately to the Time Machine pane of System Preferences (Figure 9-21, bottom). It shows that Time Machine is now on, your backup disk has been selected, and the copying process has begun. The Mac copies everything on your hard drive, including Mac OS X itself, all your programs, and everyone’s Home folders.
Note
Time Machine doesn’t use any compression or encoding; it’s copying your files exactly as they sit on your hard drive, for maximum safety and recoverability. On the other hand, it does save some space on the backup drive, because it doesn’t bother copying cache files, temporary files, and other files you’ll never need to restore.
Your total involvement has been one click. And that, ladies and gentlemen, is the easiest setup for a backup program in history.
Now go away and let the Mac do its thing. The first backup can take a very long time—hours—as the Mac duplicates your entire internal hard drive onto the second drive. The Mac may feel drugged during this time.
From now on, Time Machine quietly and automatically checks your Mac once per hour. If any file, folder, or setting changes, it gets backed up at the end of the hour. These follow-up backups, of course, take very little time, since Time Machine backs up only what’s changed.
So, should disaster strike, the only files you can lose are those that you’ve changed within the last 59 minutes.
FREQUENTLY ASKED QUESTION: The End of Time
What happens when my backup drive gets full?
Good question.
The whole idea of Time Machine is that it preserves multiple backups, so that you can rewind a window or a drive not just to a backup, but to any date in the past. The bigger the hard drive, the farther back those monthly backups are preserved.
Eventually, of course, your backup drive runs out of space. At that point, Time Machine notifies you and offers you a choice.
You can keep using that drive; Time Machine will begin deleting the oldest backups to make room for newer ones.
Or you can install a new Time Machine backup drive. New backups will go on that one; your older backups will still be available on the original drive.
If you ever need to retrieve files or folders from the older disk, rright-click the Time Machine icon in the Dock; from the shortcut menu, choose Browse Other Time Machine Disks. In the list of disks, choose the older one. Then click the Time Machine icon on the Dock to enter the Restore mode.
Tip
And even then, you can force more frequent backups if you want to. Any time you want Time Machine to update its backup before the hour’s up, right-click Time Machine’s icon on the Dock. From the shortcut menu, choose Back Up Now.
You can pause the backup the same way—if you need to use the backup drive for another quick task, for example. Right-click the Dock icon and then choose Stop Backing Up. (Don’t forget to turn the backing-up on again when you’re finished.)
POWER USERS’ CLINIC: Declaring Stuff Off-Limits to Time Machine
The whole point of Time Machine, of course, is to have a backup of your entire hard drive. That’s how most people use it.
It’s conceivable, though, that you might want to exclude some files or folders from the Time Machine treatment. There are two reasons.
First, you might not want certain, ahem, private materials to be part of your incriminating data trail.
Second, you might want to save space on the backup drive, either because it’s not as big as your main drive or because you’d rather dedicate its space to more backups of the essential stuff. For example, you might decide not to back up your collection of downloaded TV shows, since video files are enormous. Or maybe you use an online photo-sharing Web site as a backup for all your photos, so you don’t think it’s necessary to include those in the Time Machine backup.
To eliminate certain icons from the backup, open the Time Machine panel of System Preferences. Click Options.
In the resulting list, click the + button; navigate your hard drive, and then select the files or folders you don’t want backed up. Or just find their actual icons in the Finder and drag them into the list here. (Use the - button to remove items from the list, thereby excluding them from the excluded list.)
If you’re strapped for disk space, one logical candidate to exclude is the System folder on your main hard drive—that is, Mac OS X itself. After all, if you lose your hard drive, you already have a copy of Mac OS X: the original installation DVD. (Of course, it doesn’t have all the Apple updates that may have come out since the original version.)

When you add the System folder to the exclusion list, Time Machine makes another space-saving offer: “Would you like to also exclude other files installed with Mac OS X, such as system applications and UNIX tools?”
Agreeing (by clicking Exclude All System Files) saves you another several gigabytes of backup space.
By the end of the day, you’ll have 24 hourly backups on that second disk, all taking up space. So at day’s end, Time Machine replaces that huge stash with a single daily backup. You can no longer rewind your system to 3:00 p.m. last Monday, but you can rewind to the way it was at the end of that day.
Similarly, after a week, the dailies are replaced by an end-of-week backup; after a month, the weeklies are replaced by a single end-of-the-month backup. Now you can’t rewind to October 24, but you can rewind to November 1. (Apple assumes that it won’t take you a whole month to notice that your hard drive has crashed.)
Tip
You can see these backups, if you want. Open your backup drive, open the Backups.backupdb folder, and open the folder named for your computer. Inside, you’ll find a huge list of backup folders, bearing names like 2007-12-22-155831. That’s the backup from December 22, 2007 at 15:58 (that is, 3:58 p.m.) and 31 seconds.
The point is that Time Machine doesn’t just keep one copy of your stuff. It keeps multiple backups. It remembers how things were in every folder—not just yesterday, but last week, last month, and so on. It keeps on making new snapshots of your hard drive until the backup drive is full.
At that point, the oldest ones get deleted to make room for new ones.
Tip
Ordinarily, Time Machine alerts you when it has to start deleting old backups. If you’d rather have it just do it without bothering you, open System Preferences; click Time Machine; click Options; and finally turn off “Warn when old backups are deleted.”
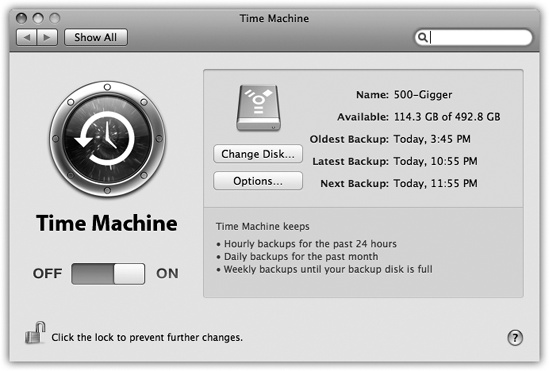
Figure 9-21. Use the big On/Off switch to shut off all Time Machine activity, although it would be hard to imagine why you’d want to risk it. You can click Choose Backup Disk to choose a different hard drive to represent the mirror of your main drive (after the first one is full, for example).
By the way, if a backup is interrupted—if you shut down the Mac, put it to sleep, or take your laptop on the road—no big deal. Time Machine resumes automatically the next time you’re home and connected.
Time Machine has three faces in Leopard. There’s the application itself, which sits in your Applications folder; click it to enter Restore mode. There’s its Dock icon; its shortcut menu has a few commands (like Back Up Now) that aren’t available anywhere else.
And then there’s its System Preferences pane, where you adjust
its settings (Figure 9-21). To see it,
choose ![]() →System Preference, and then click Time
Machine. Or choose Time Machine Preferences from Time Machine’s Dock
icon.
→System Preference, and then click Time
Machine. Or choose Time Machine Preferences from Time Machine’s Dock
icon.
Tip
If your information is especially important, or if you’re especially paranoid, you can rotate among more than one backup hard drive. Keep one offsite so you won’t be hosed in case of fire, flood, or burglary.
All right, you’ve got Time Machine on the job. You sleep easy at night, confident that your life’s in order—and your stuff’s backed up.
Then, one day, it happens: Your hard drive crashes. Or you can’t find a file or folder you know you had. Or you save a document and then wish you could go back to an earlier draft. Some kind of disaster—sunspots, clueless spouse, overtired self—has befallen your files.
This is Time Machine’s big moment.
Start by pinpointing what you’re looking for, in one of these two ways:
Open the disk or folder window where the missing or changed item was.
Type what you’re looking for into the Search box at the top of any Finder window. Click the location button that makes the most sense: “This Mac” or the name of the window you’re in.
In the case of deleted files or folders, the search will probably come up empty; that’s totally OK.
Now click the Time Machine icon on the Dock (or in the Applications folder). Don’t look away; you’ll miss the show.
Your Leopard desktop slides down the screen like a curtain that’s been dropped from above. And it reveals...outer space. This is it, the ultimate Apple eye candy: an animated starry universe, with bits of stardust and meteors occasionally flying outward from the massive nebula at the center.
Front and center is your Finder window—or, rather, dozens of it, stretching back in time (Figure 9-22). Each is a snapshot of that window at the time of a Time Machine backup.
You have four ways to peruse your backup universe:
Click individual windows to see what’s in them.
Drag your cursor through the timeline at the right side. It’s like a master dial that flies through the windows into the past.
Figure 9-22. This is the big payoff for all your efforts. Top: The familiar desktop slides down, dropping away like a curtain. For the first time, you get to see what’s been behind the desktop all this time. Turns out it’s outer space. Bottom: Time Machine shows you dozens of copies of the Finder window, representing its condition at each backup, stretching back to the past.
Click one of the two big, flat, perspective arrows. The one pointing into the past means “Jump directly to the most recent window version that’s different from the way it is right now.”
In other words, it’s often a waste of time to go flipping through the windows one at a time, because your missing or changed file might have been missing or changed for the last 25 backups (or whatever). What you want to know is the last time the contents of this window changed. And that’s what the big flat arrows do. They jump from one changed version of this window to another. (Or, if you began with a search, the arrow takes you to the most recent version backup with a matching result.)
Use the Search box in the corner of the window. You can search for whatever you’re missing in the current backup.
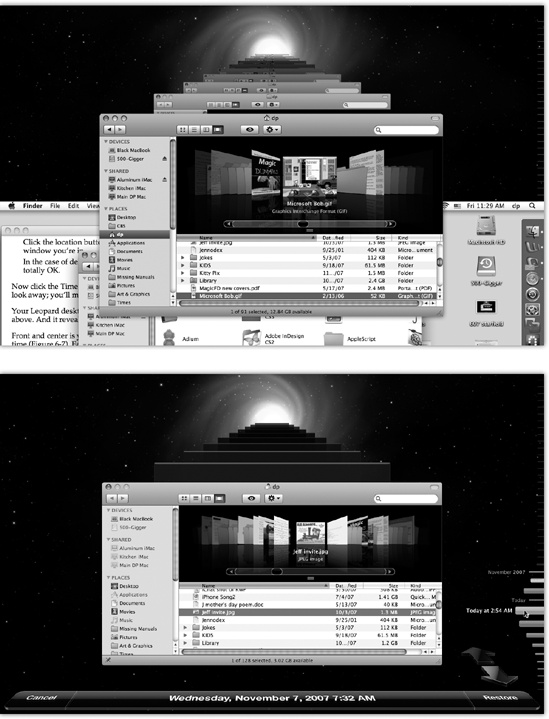
As you go, the very bottom of the screen identifies where you are in time—that is, which backup you’re examining.
In many ways, the recovery mode is just like the Finder. You can’t actually open, edit, rename, or reorganize anything here. But you can use Quick Look (Quick Look) to inspect the documents, to make sure you’ve got the right version. And you can use icon, list, or Cover Flow view, as well as column view, to sort through the files you’re seeing.
If you’re trying to recover an older version of a file or folder, highlight it, and then click the flat arrow button that’s pointing away from you; Time Machine skips back to the most recent version that’s different from the current one.
If you’re trying to restore a deleted file or folder that you’ve now located, highlight it, and then click Restore (lower-right). The Leopard desktop rises again from the bottom of the screen, there’s a moment of copying, and then presto: The lost file or folder is back in the window where it once belonged.
Note
Time Machine prides itself not just on recovering files and folders, but also on putting them back where they belonged.
If you recover a different version of something that’s still there, Mac OS X asks if you want to replace it with the recovered version.
And if you’re recovering a document whose original folder no longer exists, Time Machine automatically recreates the folder so that the recovered item feels at home.
It turns out that the Finder isn’t the only program that’s hooked into Time Machine’s magic. iPhoto ’08, Address Book, and Mail work with Time Machine, too. Other software companies can also revise their own applications to work with it.
In other words, if you want to recover certain photos, addresses, or email messages that have been deleted, you don’t start in the Finder; you start in iPhoto, Address Book, or Mail.
Then click the Time Machine icon on the Dock. Once again, you enter the starry recovery mode—but this time, you’re facing a strange, disembodied, stripped-down copy of iPhoto, Address Book, or Mail (Figure 9-23).
Tip
Alternatively, in iPhoto, you can also choose File→Browse Backups to enter recovery mode.
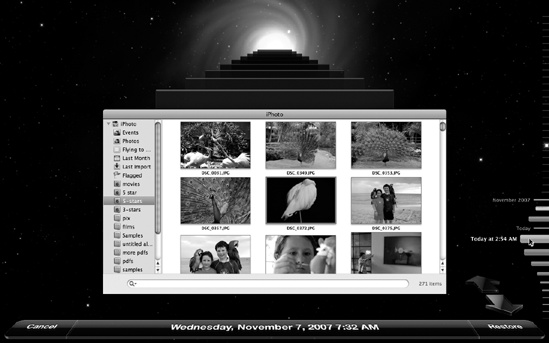
Figure 9-23. The Time Machine version of iPhoto is a weird, simplified, viewing-only version. You can’t do much here besides browse your backups—but when you’re in dire straits, that’s enough.
You’re ready to find your missing data. Click the Jump Back arrow to open the most recent version of your photo library, address book file, or email stash that’s different from what you’ve got now. (You can also use the timeline on the right if you remember the date when things went wrong.)
Tip
If you’re looking for something particular, specify that before you start clicking. For example, select the iPhoto event or album first, or type a name into the Address Book search box.
At this point, you can select individual photos (or albums, or events), address book entries, or email messages to restore; just click the Restore button.
Often, though, you’d rather reinstate the entire iPhoto library, Address Book file, or email collection from the backup. That’s what the Restore All button is for.
If you click it, the experience is slightly different. iPhoto asks if you’re sure you want to replace your iPhoto library. Address Book may discover a lot of duplicate name-and-address entries, and invite you to step through them, deciding which one “wins” (the old or the new).
Note
When you finish restoring in Mail, you’ll find the restored messages in the On My Mac→Time Machine→Recovered folder at the left side of the window.
Every hard drive will die at some point. You just hope it won’t happen while you own the computer.
But the great gods of technology have a mean-spirited sense of humor, and hard drives do die. But you, as a Time Machine aficionado, won’t care. You’ll just repair or replace the hard drive, and then do this:
Connect the Time Machine backup disk to the Mac. Insert the Leopard installation DVD. Double-click the Install Mac OS X icon.
The Mac OS X installer opens up as though it’s going to lead you through the process of putting Leopard on the new, empty hard drive. But don’t fall for it.
At the Welcome screen, choose Utilities→Restore System from Backup.
The Restore Your System dialog box appears.
Click Continue. Click your Time Machine backup disk. In the list of backups, click the most recent one.
The installer goes about copying everything from the backup disk onto your new empty hard drive. When it’s all over, you’ll have a perfect working system, just the way it was before your series of unfortunate events.
Weirdly enough, you can also use Time Machine as a glorified data bucket that carries your world from one computer to another. You can bring over some or part of any Time Machine backup to a totally different Mac.
On the new machine, connect your backup disk. In the Applications→Utilities folder, open the program called Migration Assistant. On the first screen, click “From a Time Machine backup.” The subsequent screens invite you to choose which backup, which Home folder, and which elements (applications, settings, files) you want to bring over. (You can use the Leopard installation DVD for this purpose, too, as described above.)
Time Machine is a very different kind of backup program, and a real departure for longtime Mac addicts. A few questions, therefore, are bound to come up—like these.
Can I back up more than one Mac onto the same disk? Yes. Each Mac’s backup is stored in a separate folder on that disk.
Does the backup disk have to be dedicated to Time Machine? No. It can have other files and folders on it. Of course, the more space is available, the farther back your backup trail can go.
Can I use more than one backup disk—like one at the office and one at home? Yes. Just use the Time Machine panel of System Preferences (or the Time Machine Dock icon’s shortcut menu) to select the new backup drive each time you switch.
Can I delete something for good, from all the backups at once? Yes. Click the Time Machine icon on the Dock to enter the Restore (outer-space) mode. Find and select the file or folder you want to obliterate. From the
 menu, choose Delete From All Backups.
(Sneaky, huh? That command is never in the menu except when
you’re in Time Machine restoring mode.)
menu, choose Delete From All Backups.
(Sneaky, huh? That command is never in the menu except when
you’re in Time Machine restoring mode.)Can Time Machine back up other hard drives besides the main internal one? Yes. Open System Preferences→Time Machine. Click Options. Your secondary drives are listed here on the excluded-items list. If you want them backed up too, remove them from the list (click the drive name and then click the - button.)
Anything else you want to get off your chest? Yes. Time Machine has trouble with three kinds of files:
Figure 9-24. To set up .Mac sync, open System Preferences. Click .Mac, and then click the Sync tab. Turn on the checkboxes for the information you want synchronized. Use the pop-up menu at the top to set up an automatic sync schedule. While you’re at it, turn on “Show status in menu bar,” so you’ll be able to start or stop the syncing manually, too.
First, FileVault (FileVault). If you’ve encrypted your Home folder using FileVault, Time Machine can back up only your Home folder only when you’ve logged out. And when things go wrong, it can recover only your entire Home folder (not individual files or folders). It scarcely seems worth the trouble.
Second, Aperture. Turn off Time Machine backing-up while you’re working in Aperture, Apple’s professional photo-organizing program.
Finally, remember that Time Machine backs up entire files at a time—not pieces of files. If you edit huge, multigigabyte files like video files, therefore, keep in mind that each giant file gets recopied to the backup drive every time you change it. That is, one 2-gig video file that you work on all day could wind up occupying 48 gigabytes on the backup drive by the end of the day. Consider adding these files to the exclusion list, as described above.
Figure 9-25. This message lets you decide how to proceed when data on one of the synced Macs is wildly out of sync with what’s been “published” by another Mac. You can merge the information from the two (a great way to combine address books or calendars), make this Mac’s data wipe out the other’s (“Replace data on .Mac”), or make the Internet-based data replace this computer’s (“Replace data on computer”). You can do this job en masse (top)—or, if you click Options, you can make this choice independently for each data type.
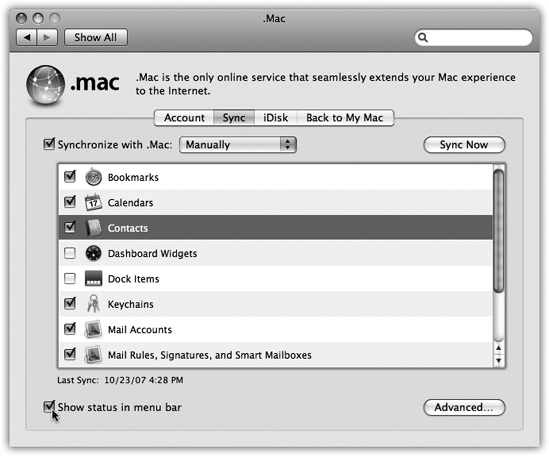
If you’re paying $100 a year for a .Mac account (.Mac Services), Mac OS X has a real surprise in store. In System Preferences, a humble preference pane called .Mac lets you set up automatic syncing between Macs, using the Internet as a conduit to transfer data tidbits like these:
Safari Bookmarks. If a Web site is important enough to merit bookmarking while you’re using your laptop, why shouldn’t it also show up in the Bookmarks menu on your desktop Mac at home?
Calendars, Contacts. This is a big one. There’s nothing as exasperating as realizing that the address book you’re consulting on your home Mac is missing somebody you’re sure you entered—on your Mac at work. This option keeps all your Macs’ Address Books and iCal calendars synchronized. Delete a phone number at work, and you’ll find it deleted on your Mac at home, too.
Dashboard Widgets. Now the configuration and setup of your widgets on Mac A are synced to Macs B, C, and D, so they all match.
Keychains. In other words, your passwords. All your Macs can have the same passwords memorized. Worth its weight in gold.
Mail Accounts, Rules, Signatures, and Smart Mailboxes. These refer to your account settings and preferences from Mac OS X’s Mail programs, not the email messages themselves.
Notes. This option refers to the notes you enter in the Mail Notes feature (Chapter 11). How great to make a reminder for yourself on one Mac, and to have it reminding you later on another one. (If you have Microsoft Office, you’ll see an Entourage Notes option here, too.)
Preferences. All your System Preferences settings.
To set up .Mac syncing, turn on the checkboxes for the items you want synced, as shown in Figure 9-24.
After the first sync, you can turn on the checkboxes on the other Macs, too, in effect telling them to participate in the great data-sharing experiment.
The first time they try, they may get confused. “Hold on. My address book is empty, but the one I’m downloading from the Internet (from the other Mac) is loaded. Who wins?” You get the dialog box shown in Figure 9-25, which lets you decide how to proceed.