If you use your PC for email—hey, it could happen—there’s good news: Switching to a Mac doesn’t mean you have to lose your stash of messages, reconfigure your email accounts from scratch, or manually retype everything in your address book. This chapter covers the secrets of moving your entire email life over to the Mac—messages, addresses, settings, everything—with as little hassle as possible.
As you read this chapter, it’s important to keep straight the two leading Windows email programs, which many people don’t realize are actually two entirely different beasts:
Microsoft Outlook. This program is part of Microsoft Office for Windows. It’s a sprawling, network-based email, contact, and calendar program that’s ubiquitous in corporate offices and many schools. You, or somebody who employs you, paid good money for this software.
Outlook Express. This Windows program is a free, scaled-down version of Outlook. It comes with Microsoft Windows, and is therefore sitting on practically every PC sold. It doesn’t have a calendar, a To Do list, or other bells and whistles of Outlook—but it’s free.
Note
In Windows Vista, Microsoft renamed this program, calling it Windows Mail. Most people moving to the Mac these days are doing so to avoid having to do the whole Vista thing, so in this chapter, let’s just use the old name: Outlook Express.
Unfortunately, each Windows email program requires a different method of exporting its email and addresses. Each Macintosh email program requires a different piece of go-between Windows software to ease the transition, too.
There are so many permutations of the “to/from” issue, in fact, that you’d practically need a table or two to keep them straight. They might look something like this:
From Outlook | From Outlook Express | From Eudora | |
|---|---|---|---|
To Mac OS X Address Book | O2M or Thunderbird | Thunderbird | Thunderbird |
To Entourage | O2M or CSV Method | CSV Method | CSV Method |
To Eudora for Mac | O2M or Eudora for Windows | Eudora for Windows | Copy files |
It’s a complex matrix. But if you know what program you’ve been using on the PC, and which one you want to use on the Mac, you’ll find the steps you need later in this chapter.
Remember: For $50, one of the Geniuses at an Apple store will transfer all your mail, settings, and address-book entries from your old PC into Mac OS X Mail for you. Truth is, the Geniuses use exactly the same methods described in this chapter—but the beauty of this concept is that they do the work, not you.
If Microsoft Outlook has been your Windows address book/email program, you’re in luck: You have two options for importing your stuff.
Both of these methods bring over your entire backlog of existing email—the contents of your Inbox, Sent items, archived mail and, perhaps, even deleted items that are still in your email program’s Trash.
If you value your time, buy O2M (short for Outlook2Mac)—a $10 utility that streamlines the process of bringing Outlook data to your Mac. (You can download it right now from www.littlemachines.com.)
Tip
This, in fact, is the tool that the Geniuses use at the Apple Store when someone pays them to transfer their stuff from a PC to a new Mac.
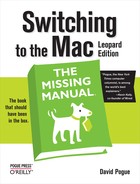
With O2M, you’re spared the lengthy, sometimes tricky steps required by the free conversion methods described in the following pages. The program takes a wizard-like approach to transferring your Outlook data, gently stepping you through the whole process, as shown in Figure 6-1. It saves all the exported data into one folder (called My_Outlook_Files), making it simple to grab the files you need and move them to your Mac.
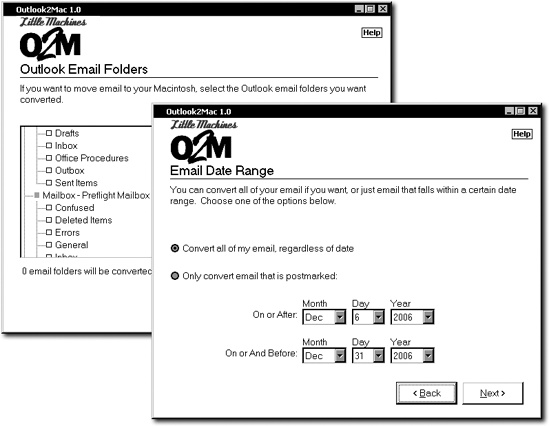
Figure 6-1. O2M’s wizard-like screens take you gently by the hand and walk you step by step through the process of moving mail, contacts, and calendar appointments from Microsoft Outlook to your Mac applications. Options abound. When exporting email, you can select exactly which folder you want included (top) or filter mail based on a specified date range (bottom). O2M even works with iCal, converting Outlook appointments and meetings into entries on an iCal calendar.
O2M also provides far more options than you get using other methods. For example, it lets you choose messages from only a specific date range—the last year’s worth of email, for example, but nothing older. It lets you choose whether or not you want to include attachments with the transferred messages. It can even filter out certain attachments based on type.
O2M’s other selling point is that it can handle more than just your email messages. It can also convert calendar entries and your address book, which can be imported directly into iCal, Entourage, or the Mac’s Address Book.
As a final perk, the program moves email to and from just about any programs: from Outlook 97, 98, 2000, 2002, 2003, or 2007 to Apple Mail, Entourage, MailSmith, PowerMail, or iCal.
If you’re on a very tight budget, too tight for a $10 piece of shareware, you can also transfer your email to the Mac for free. The trick is to import it first into—get this—Thunderbird for Windows.
Thunderbird is to email what Firefox is to Web browsers: a free, open-source, high-quality alternative to the Microsoft behemoths. It was put together by Mozilla.org and a team of volunteer programmers all over the world.
Thunderbird effortlessly imports email and address books from Outlook, Outlook Express, or Eudora. It even preserves any hierarchical folders you may have set up to sort and organize your messages. In other words, your email arrives on your Mac just as well organized as it was when it left your Windows machine.
Download your free copy of Thunderbird from www.getthunderbird.com. It works with Windows 98 or later. (If your machine has Windows 95, opt for the O2M method described earlier.)
Note
You don’t need Thunderbird on the Mac for this process. Furthermore, when installing Thunderbird on Windows, you don’t have to opt for any of the Custom install options—the default installation will give you everything you need.
When you’ve got Thunderbird installed on the PC, you’re ready to follow the three big steps: First, you import your email into Thunderbird. Next, you copy the Thunderbird email to your Mac. You import the mail into Apple’s Mail program—and then, optionally, Microsoft Entourage. Take a deep breath, and read on.
Your first job is to bring your existing Outlook mail into Thunderbird. (This method also works for transferring Outlook Express or Eudora mail.) Here’s how you do it:
Open Thunderbird.
Actually, the very first time you open Thunderbird, it offers to do the importing described here. To avoid having to follow two slightly divergent s executivesof steps, though, decline that invitation. Go ahead into the program and then proceed as written here.
Choose Tools→Import.
A dialog box opens, allowing you to select the type of information you want to import.
Choose Mail. Click Next.
Don’t worry about the Address Books or Settings options at this point. You can move those items over separately.
Select the program from which you want to import messages.
Thunderbird can handle email from Outlook, Outlook Express, Eudora, and easier versions of Netscape Communicator. Pick the appropriate program from among the ones listed.
Click Next to start the import process—and be patient.
Thunderbird now starts doing its thing, obediently sucking every last email message into its own email folder. If you’ve got a hefty stash of email—thousands of messages organized in lots of nested folders—this will take a while. It may even look as if Thunderbird has stalled, but it hasn’t. Wait patiently as the progress bar creeps forward.
When the process is finally over, Thunderbird displays a dialog box listing all the different mailboxes, folders, and subfolders that it has successfully ingested, as shown in Figure 6-2. Click Finish to wrap things up.
Figure 6-2. This is Thunderbird’s way of telling you that everything went OK when it imported all your mailboxes and messages. Review this list before forging ahead with your Mac migration to make sure Thunderbird grabbed all the mail you want brought over to your Mac.
Now you see your imported mailboxes listed in the pane on the left (you might have to expand the Local Folders flippy triangle first). Clicking a mailbox icon displays the corresponding messages in the main window.
Your next task is to transfer Thunderbird’s copy of your mail to your Mac.
Open your Application Data folder.
The steps depend on your version of Windows. For example:
Windows 98 or 98SE: Open the My Computer→your hard drive icon→Win98→Application Data folder.
Windows Me: Open the My Computer→your hard drive icon→WINDOWS→Application Data folder.
Windows 2000: Open the My Computer→your hard drive icon→Documents and Settings→your name→Application Data folder, where your name is your Windows user account name (the name you use to log into Windows at startup).
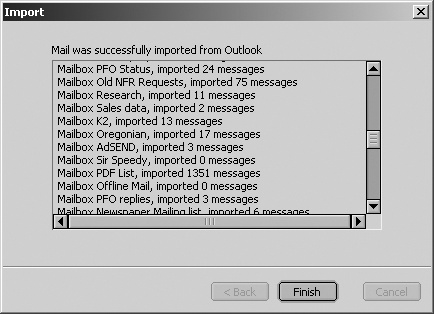
Windows XP: Microsoft’s assumption is that you, the lowly, technically ignorant PC user, have no businesses mucking around in the important operating-system folders—so Windows hides them from you. To expose the hidden files, follow the steps shown in Figure 6-3.
Figure 6-3. You must uncloak the hidden folders lurking in Windows in order to copy your email files. Here’s the trick: In any open folder window, choose Tools→Folder Options. Switch to the View tab, as shown here. In the Advanced settings, turn on “Show hidden files and folders,” and then click OK. Now you can see all the previously hidden folders—including the Thunderbird ones.
Once that’s done, open the My Computer→your hard drive icon→Documents and Settings→your name→Application Data, where your name is your Windows user account name.
Once you’ve opened the Application Data folder, open your Thunderbird→Profiles folder. Finally, open the folder that corresponds with the profile name you chose when you started running Thunderbird. (If you didn’t set up a profile, it’s just called something like “mx11bvdg. default”.)
Inside that folder, you’ll find a folder called Mail. That’s the one you want.
Copy the Mail folder to your Mac.
Once again, Chapter 6 describes various ways to go about it.
Once the mail files are on your Mac, you’re ready to bring them into the program of your choice. Exactly how you do this depends on the email program you’re using; read on.
Mail, the email program that comes free with Mac OS X, does an elegant job of importing the files generated by Thunderbird. (If you plan to use Microsoft Entourage, you have to start with this step, too; that is, you must first bring the mail into Mail.)
Here are the steps for feeding the mail from your PC to the Mail program:
Open Mail.
It’s in the Applications folder, and its icon is probably on the Dock.
In Mail, choose File→Import Mailboxes.
The Import Mailboxes dialog box appears.
Click the Thunderbird/Mozilla radio button.
You can also import mail from a variety of Mac email programs, including Entourage, Outlook Express, and Eudora.
Click the Continue button.
You’re presented with a standard Open dialog box.
Locate and select the Mail folder you brought over from your PC. Click the Choose button.
Mail displays a list of all the Thunderbird mailboxes it finds, as shown in Figure 6-4.
Turn on the checkboxes of the email folders you want to bring into Mail.
All the checkboxes start out turned on, meaning that Mail will grab everything you brought over from Thunderbird (including RSS feeds and even what was in the Trash). But if you decide at this point that you don’t want to include, say, the messages that were in the Trash folder, you can filter them out by turning off the appropriate checkboxes.
Tip
You can use the up and down arrow keys to navigate through a long list of mailboxes and folders in the Import Mailboxes window.
Click Continue to start importing.
The import process now begins. Mail shows you the subject line of each message it brings in.
When the process is complete, your imported mailboxes appear in the Mailboxes column on the left side of the window, in a folder called Import. (See Chapter 11 for more on Mail.) By dragging messages, you can refile them into other mailbox folders, if you like.
If you have Microsoft Office for Macintosh, you may prefer its more powerful Entourage email program. No problem: You can bring the Thunderbird files that you brought over from your PC—and then imported into Mail—into Microsoft Entourage.

Figure 6-4. When importing mail messages from Thunderbird, Mail first shows you all the mailboxes it found, ready for import. Turn off the checkboxes next to any folders that you don’t want included during the import process.
In Entourage, choose File→Import.
The Begin Import dialog box appears.
Click the right arrow. Choose “Import information from a program.”
Since your messages are already stored in Mail—with all the folders and subfolders intact—you can have Entourage go from there. Click the right arrow.
Click the right arrow. Choose “Apple Mail.”
Make sure Messages and Accounts are turned on. (The other two checkboxes are only useful if you’ve started customizing Mail as described in Chapter 11.) Click the right arrow again.
Wait until the import is finished, and then click OK.
If everything went according to plan, your messages now show up in the main pane of Entourage’s window.
O2M—the delightful $10 utility described earlier in this chapter—doesn’t talk to Eudora for Mac.
Here’s the convoluted workaround: Start by importing your Outlook (or Outlook Express) email and addresses into Eudora for Windows. (To import from Outlook Express, choose File→Import; to import from Outlook, choose File→Import and then click Advanced.) Use the most recent Eudora version, if possible.
Now that your mail and contacts are in Eudora for Windows, in Eudora Method (Free) for instructions on getting it all into Eudora for Mac OS X.
If you run Microsoft Outlook on your office PC, you may be able to transfer the contents of your entire mailbox to your Mac without going through any of the import-export pyrotechnics described in this chapter.
On most office networks, Outlook accesses mail through a Microsoft Exchange Server—a central computer that stores all the email moving through the network. When you use Outlook in conjunction with Exchange, your mail, appointments, and contacts actually reside on the Exchange server itself—not on your PC’s hard drive.
The same thing’s possible in Entourage. To set up your Mac so that it checks your Exchange email, proceed like this:
Open Entourage and choose Tools→Accounts.
This is the setup window for all your email accounts.
Click the arrow next to New and choose Mail from the pop-up menu.
That’s how you tell Entourage, “I want to input the settings for an email account.”
Turn on the “My account is on an Exchange server” checkbox.
If you had wanted to set up any other kind of email account—like one given by your Internet Service Provider—you’d leave the checkbox off.
Call your network administrator over and ask her to give you information for all the required fields.
When you’re done inputting everything and Entourage is satisfied, you should see a list of all your network-based email—the same messages you saw in Outlook.
Tip
If Entourage isn’t your thing, you can tap into your network’s Exchange Server with Mac OS X’s built-in Mail program. In Mail, just choose File→Add Account, pick Exchange for the Account Type, and proceed with step 4 above.
Now you can download the contents of your Outlook folders directly to your Mac without having to manually copy them from machine to machine. You won’t be able to see the Exchange Server’s calendar or address book this way, but at least you’ll get the messages.
The contents of your Contacts list may represent years of typing and compiling. The last thing you want to do is leave that valuable info behind or—heaven forbid—manually retype each entry as you set up your Mac email program.
Here are the steps for bringing all those names, phone numbers, email addresses, notes, and other details from Outlook into your favorite Mac contact manager.
If you took the advice in Ways to Move Your Email and bought the O2M program, you’re already done; this ingenious utility brings over both your email and your Outlook addresses to your choice of Mac programs.
Once again, Thunderbird for Windows comes to the rescue. Its address book module can extract contact info directly from the most popular PC email programs—not just Outlook, but also Outlook Express and Eudora. Better yet, it converts that data into a format that Apple’s Address Book understands perfectly.
Note
These steps guide your little-black-book data into Mac OS X’s built-in Address Book program. If your aim is to transfer it into Entourage on the Mac instead, in CSV Method (Free, to Entourage Only).
When you’ve got Thunderbird installed, you’re ready to transfer your contacts, like this:
Import your Outlook contacts into Thunderbird.
Follow the “Phase 1” steps described Phase 1: Import to Thunderbird—but in Step 3, choose Address Books. Along the way, you’ll be asked to choose the name of the email program whose addresses you want to snag (Figure 6-5). You can choose Outlook, Outlook Express, Eudora, or Communicator (an earlier version of the Thunderbird software).
With your contacts safely stored in Thunderbird, you’re halfway home. Next, you need to get these contacts out of Thunderbird and onto your Mac. To do this, you must save them into an LDIF file. LDIF stands for Lightweight Directory Interchange Format—a text format mostly used by network administrators to synchronize directory information across large networks. It’s also a format that Apple’s Address Book recognizes.
Click Address Book on the Thunderbird toolbar to view your imported contacts. Choose Tools→Export.
The Export dialog box appears.
From the “Save as type” drop-down menu, choose LDIF. Type a name for the file, select a destination, and click Save.
Thunderbird writes all your contact data into a single self-contained file with an .ldif extension added to the end of its name.
Copy the LDIF file to your Mac.
You can use any of the techniques described in Chapter 5.
On the Mac, open Address Book (it’s in the Applications folder, and its icon is probably on the Dock). Choose File→Import→LDIF.
The Open dialog box appears.
Locate and open the .ldif file you brought over from Windows.
Moments later, all the contacts you brought over from your Windows machine are converted into Address Book entries (see Figure 6-6).

If your email program of choice on the Mac is Microsoft Entourage, and you can’t find the $10 you need to buy O2M (), the Thunderbird method described above isn’t enough. Entourage can’t import LDIF files.
The best way to transfer contacts into Entourage, then, is to import them in CSV format. CSV is short for Comma-Separated Values, and it’s a format that many contact programs can import and export these days. (In fact, Address Book can attempt to import CSV files, but it’s picky to a fault about formatting—which is why the Thunderbird method described above is a lot more reliable if you use Address Book.)
Here’s the procedure:
On your PC, export your contacts in CSV format.
If you use Outlook Express, for example, choose File→Export Address Book and then select “Text File (Comma Separated Values).” Save the file. (Same goes if you use Outlook.)
If you use Eudora on Windows, you’re in for a bit more fun. Since Eudora can’t directly export CSV files, you have to move your contacts into Thunderbird first, as described above. When you get to step 3 above, however, choose “Comma Separated” for the type of file you’d like to export, rather than LDIF. You now have a CSV file on your PC with your contacts inside, so read on.
Move the CSV file to your Mac.
The file should end in .csv if you did everything right.
Open Entourage and choose File→Import. Click “Import information from a text file.”
Click the right arrow.
Make sure “Import contacts from a tab- or comma-delimited text file” is selected.
Again, click the right arrow.
Select the CSV file you copied to your Mac in step 2.
Press Return to dismiss the dialog box.
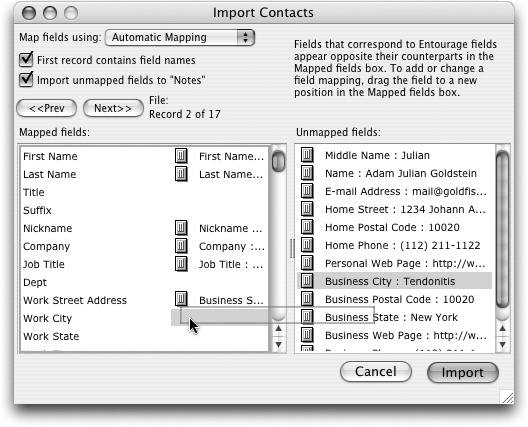
“Map” any information that’s confusing Entourage (Figure 6-7).
Even though Entourage and Outlook are both made by Microsoft, there’s still room for Entourage to get confused by your contacts—and mapping is how you fix it.
For instance, if you exported your contacts from Outlook Express, one field on the right might be called “E-mail Address” which confuses Entourage because it’s not called “Email Address 1.” To eliminate the confusion, drag the gray handle from the E-mail Address line on the right so it’s next to the Email Address 1 line on the left. You’ve just told Entourage, in essence, “‘E-mail’ and ‘Email’ are the same thing, so let me get on with my life.”
Click Import.
Dismiss the dialog box that appears by clicking Don’t Save.
Click Finish.
Your contacts are now ready and waiting in Entourage.
If your aim is to get your contacts into Eudora for Macintosh, see in "Alternative Method (Free, to Eudora Only)“. The instructions transfer your address book exactly the same way they transfer your messages.
If you’ve been using Outlook Express (Microsoft’s free email program) on the Windows PC, you’ll have very little trouble moving into any of the Mac’s email programs.
You can use free Windows software as a go-between—but which Mac address book you’ve adopted will determine which program to use.
To import your Outlook Express addresses into Apple’s Address Book, follow the instructions in "Thunderbird Method (Time-Consuming, Free)“.
To import them into Microsoft Entourage instead, see in "CSV Method (Free, to Entourage Only)“.
Outlook Express is also a pleasant partner when it comes to moving the messages themselves over to the Mac. Here again, you use Thunderbird as a sort of translator. Follow the steps listed under "Thunderbird Method (Time-Consuming, Free),” beginning.
Getting your mail and addresses from Outlook Express (Windows) into Eudora (Macintosh) involves moving it first into Eudora for Windows, and then into Eudora for Macintosh. See in "Alternative Method (Free, to Eudora Only)" for instructions; they cover moving both your messages and addresses out of Outlook Express.
Eudora, an email program written at the University of Illinois in the eighties, used to be wildly popular because it was free and full-featured. Today, this venerable email client, now sold by Qualcomm, is available for both Windows and Mac OS X.
If you’d like your mail to wind up in a Mac email program like Entourage or Mail, it’s good old Thunderbird to the rescue. Follow the steps in "Thunderbird Method (Time-Consuming, Free),” beginning.
If you use Eudora on Windows and want to move your existing messages into the Mac version of Eudora, you can copy them straight over to your Mac. All you need to know is where to find the necessary files and how to set them up on your Mac.
Here’s the most direct path for converting your Eudora mailboxes from Windows to Mac:
Find the Eudora .MBX files on your PC.
The folder names depend on your version of Windows, but here’s the gist:
Windows 98 or 98SE: Open the My Computer→your hard drive icon→Win98 →Application Data→Qualcomm→Eudora folder.
Windows Me: Open the My Computer→your hard drive icon→WINDOWS→Application Data→Qualcomm→Eudora folder.
Windows 2000, Windows XP: Turn on the hidden files, as shown in Figure 6-3. Then open the My Computer→your hard drive icon→Documents and Settings→your name→Application Data→Qualcomm→Eudora.
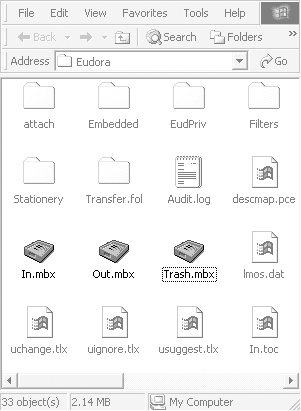
All versions: In the Eudora folder, you’ll find several mailbox files that—depending on your version of Eudora—may end with the filename extension .mbx: In, Out, and Trash, as shown in Figure 6-8. These are the files you want, whether they end in .mbx or not.
Figure 6-8. Drill down into the your PC’s Applications Data folder to find the Eudora folder, where your Eudora mailbox files live. The Trash file contains messages you’ve already thrown into Eudora’s trash can. There’s no need to copy that file over to your Mac unless you want to preserve those trashed messages.
Note
Can’t find an Application Data folder inside your user folder? That’s because Application Data is a hidden folder and you have the “Do not show hidden files and folders” option turned on in Windows. See the instructions for copying Thunderbird files Phase 2: Copy to the Mac to learn how to change this setting.
Copy the files to your Mac.
Don’t worry about all the other stuff in the Eudora folder. The mailbox files contain all your messages, so they’re the only ones you need to convert.
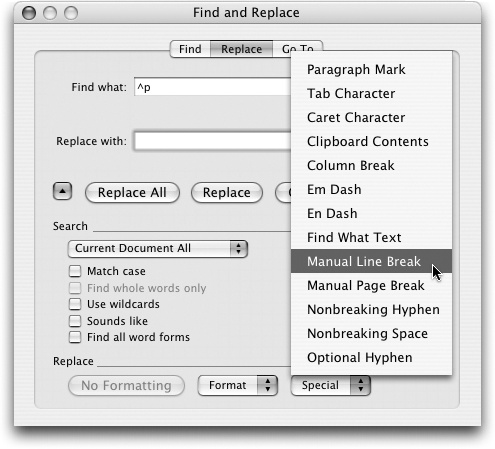
Fix the carriage returns in the .mbx files.
Here’s where things get a little bit ugly. While these mailbox files are really just text files containing your email messages, Windows handles line breaks—the invisible “this is the end of a line!” symbol—differently than the Mac. In order for the Mac version of Eudora to read the files correctly, you have to convert the hard returns in the text files into line breaks. You can accomplish this by doing a simple find-and-replace in a program like Microsoft Word, as shown in Figure 6-9.
Tip
If you don’t have Microsoft Word, you can also run the mailbox files through a shareware conversion program like BBEdit, which is available on this book’s “Missing CD” page at www.missingmanuals.com, among other places.
Figure 6-9. Here’s how you’d use Word to convert Eudora mailbox (.mbx) files from Windows to Mac format. Open a mailbox file and choose Edit→Replace. Search for all paragraph marks and replace them all with manual line breaks—or, to be precise, search for ^p and replace with ^l. (You can also choose these symbols by name from the Special menu, as shown here.) Click Replace All to run the conversion, which may take some time; then save the modified text file.
Remove the .mbx extension from the file names.
On the Mac side, Eudora expects the file to be called In, not In.mbx. Remove the extension, if it exists, from each of the mailbox files you’ve brought over.
Drop the converted mailbox files into Eudora’s Mail Folder folder on your Mac.
Starting from your Home folder, go to Documents→Eudora Folder→Mail Folder, and replace the existing mailbox files with the ones you copied and converted from your PC.
Note
If you don’t see a folder called “Mail Folder” inside the Eudora folder, it’s probably because you’re looking in the Eudora application folder (in the Applications folder) instead of the Eudora folder inside your Documents folder.
Launch Eudora and read your mail.
When you launch Eudora, your converted mail should now be accessible. Unfortunately, the status of each message (read, unread, forwarded, and so on) is not preserved, nor are any labels you may have applied to organize the messages within Eudora. Oh well.
Once again, the steps here depend on which program you’ll be using as your Mac address book.
Fortunately, this one’s easy. The Swiss Army Converter known as Thunderbird can convert your Eudora address book into a Mac-compatible format; see in "Thunderbird Method (Time-Consuming, Free)“.
As noted earlier in this chapter, Thunderbird isn’t enough if the landing site for your contacts is Microsoft Entourage. In that case, you should use the CSV format as a go-between. See in "CSV Method (Free, to Entourage Only)“.
The easiest way to transfer your old Eudora contacts to the Mac is to first get your contacts into Mac OS X’s Address Book program, as described above. Then, once that transfer is complete, open Eudora on your Mac and choose Eudora→Preferences→Address Book. Turn on “Show OS X AddressBook.”
Now all the contacts from your PC are in both Address Book and Eudora, which is extra convenient if you ever decide to switch from Eudora to Mail.
Chapter 10 guides you through the painless process of plugging your Internet settings—whether by dial-up connection, cable modem, DSL, or network connection—from the PC to your Mac.
But even after you’ve done that, you can’t start sending and receiving email on your Mac until you’ve transferred some vital email account settings from your PC.
Fortunately, there’s only a handful of settings you need to grab—and hunting these down and moving them to your Mac is pretty quick work. Here’s all the information you need to gather in order to get yourself set up:
Account name (or user name). This is the name you use when you log into your email account, such as Joe63 or kjackson.
Password. This is the password that you have to enter along with your account name to get into your email account. Passwords can’t be copied and pasted or directly exported, so you’ll need to remember this password and type it in when configuring your Mac email software.
Account type. There are two main kinds of email server protocols—POP (which stands for post-office protocol—by far most common) and IMAP (Internet Message Access Protocol). You’ll need to know which type you’ve been using on your PC, so that you can set up accounts on your Mac the same way.
Note
Exchange servers are another choice popular in big organizations. If your email is stored on an Exchange server, in Alternative Method (Free, to Eudora Only).
Incoming and outgoing mail servers are the names of the computers that route email to and from you, such as mail.earthlink.net or mailserve.photorabbit.com. (The incoming and outgoing servers sometimes have the same address, but they can be two different servers with different names.)
Each of the popular Windows email programs stores these nuggets of email account info differently. Here’s how to find the items you need:
If you’re connected to a Microsoft Exchange Server computer—and you probably are if you’re running Outlook in a corporate workplace—your user name and password are exactly the same as the ones you use to log into the network when you start up your computer. You’ll have to check with your network administrator to get the name of the mail servers being used on the network.
If you’re running Outlook in any other situation—at home, for example—choose Tools→E-mail Accounts. Click “View or change existing e-mail accounts,” click Next, click your account’s name on the E-mail Accounts page, and then click Change. You’ll find your name, email address, incoming and outgoing servers, and other key settings staring you in the face. (Click Cancel after you’ve finished copying it down.)
Choose Tools→Accounts→Mail to open the dialog box containing the list of your current email accounts. Select the name of the account you want, then click the Properties button. In the Properties dialog box, click the Servers tab to reveal the Server Information pane, where you’ll find all the info you need, as shown in Figure 6-10.
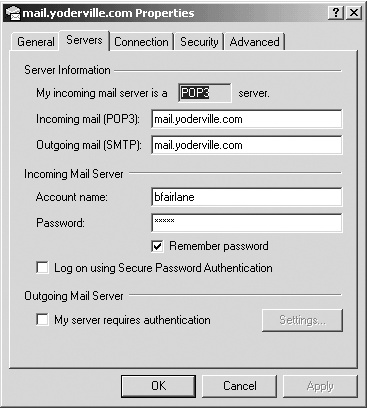
Figure 6-10. Here’s where Outlook Express for Windows keeps all the settings you need to harvest in order to configure your Mac email. Note that you can’t copy the contents of the password field—that’s prohibited for security reasons. You’ll have to type your password in again when moving to your new machines.
Choose Tools→Options. Click the Getting Started icon, if it’s not already selected, to find your incoming and outgoing mail server names. Then click the Incoming Mail icon to display the Server configuration setting—either POP or IMAP—at the top of the window.
Once you’ve found and copied the email settings on your PC, you can plug them into the appropriate places in your Mac email programs:
Once you’ve opened Mail (in the Applications folder), choose File→Add Account. Proceed through the various screens, inputting the information from your old PC.
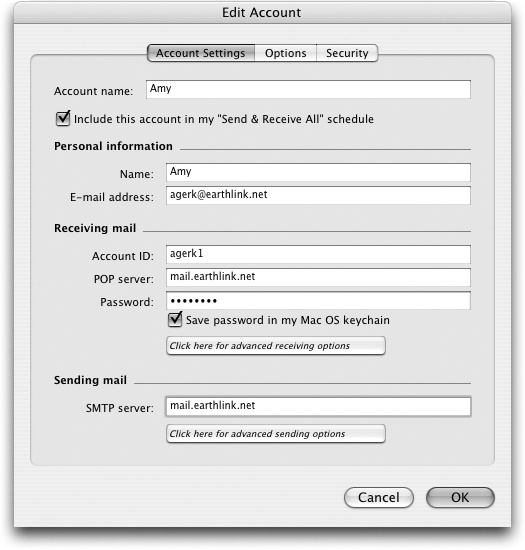
Choose Tools→Accounts. Click the New button in the Accounts window to start the Account Setup Assistant. Follow the screen-by-screen directions to fill in the user name, password, and server information, as shown in Figure 6-11.
Choose Eudora→Preferences and click the Checking Mail icon. Fill in the necessary details here, and then click Sending Mail to fill in the rest.
Note
The methods described in this chapter are the least technical ways to get mail, contacts, and settings from the various Windows email apps onto the Mac. But a quick Google search will reveal more technical ones that you may prefer. For example, if you can convert your email accout t an IMAP account, no biggie: your Mac email program reflects your email stash automatically.