
The hub of Mac customization is System Preferences, the equivalent of the Control Panel in Windows. Some of its panels are extremely important, because their settings determine whether or not you can connect to a network or go online to exchange email. Others handle the more cosmetic aspects of customizing Mac OS X.
This chapter guides you through the entire System Preferences program, panel by panel.
Tip
Only a system administrator (Creating an Account) can change settings that affect everyone who shares a certain machine: its Internet settings, Energy Saver settings, and so on. If you see a bunch of controls that are dimmed and unavailable, now you know why.
A tiny ![]() in the lower-left corner of a panel is the
other telltale sign. If you, a nonadministrator, would like to edit
some settings, call an administrator over to your Mac and ask him to
click the lock, input his password, and supervise your tweaks.
in the lower-left corner of a panel is the
other telltale sign. If you, a nonadministrator, would like to edit
some settings, call an administrator over to your Mac and ask him to
click the lock, input his password, and supervise your tweaks.
You can open System Preferences by choosing its name from the
![]() menu, clicking its “light-switch” icon in the
Dock, or double-clicking its icon in the Applications folder. At
first, the rows of icons are grouped according to function: Personal,
Hardware, and so on (Figure 15-1, top).
menu, clicking its “light-switch” icon in the
Dock, or double-clicking its icon in the Applications folder. At
first, the rows of icons are grouped according to function: Personal,
Hardware, and so on (Figure 15-1, top).
But you can also view them in tidy alphabetical order, as shown at bottom in Figure 15-1. That can spare you the ritual of hunting through various rows just to find a certain panel icon whose name you already know. (Quick, without looking: Which row is Date & Time in?) This chapter describes the various panels following this alphabetical arrangement.
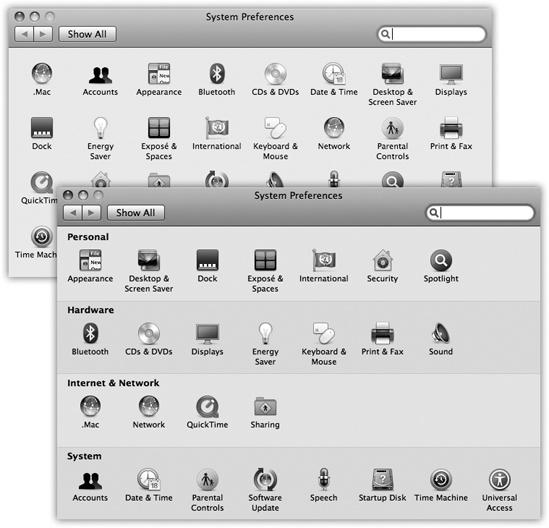
Figure 15-1. You can view your System Preferences icons alphabetically (top), rather than in rows of arbitrary categories (bottom); just choose View→Organize Alphabetically. This approach not only saves space, but also makes finding a certain panel much easier, because you don’t need to worry about which category it’s in.
Either way, when you click one of the icons, the corresponding controls appear in the main System Preferences window. To access a different preference pane, you have a number of options:
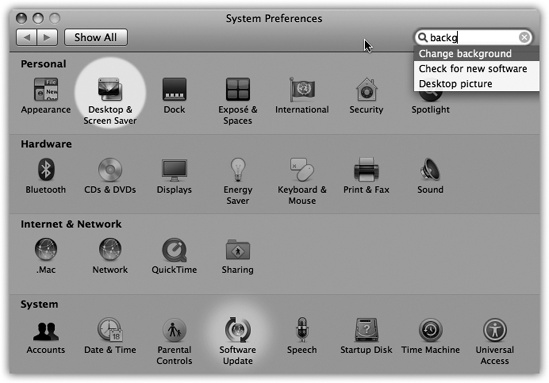
Fast: When System Preferences first opens, the insertion point is blinking in the new System Preferences search box. (If the insertion point is not blinking there, press
 -F.) Type a few letters of volume,
resolution, wallpaper, wireless, or whatever feature
you want to adjust. In a literal illustration of Spotlight’s
power, the System Preferences window darkens
except for the icons where you’ll find
relevant controls (Figure 15-2). Click the
name or icon of the one that looks most promising.
-F.) Type a few letters of volume,
resolution, wallpaper, wireless, or whatever feature
you want to adjust. In a literal illustration of Spotlight’s
power, the System Preferences window darkens
except for the icons where you’ll find
relevant controls (Figure 15-2). Click the
name or icon of the one that looks most promising.Fast: Click the Show All icon in the upper-left corner of the window (or press
-L, a shortcut worth learning). Then click
the icon of the new panel you want.Faster: Choose any panel’s name from the View menu—or, if System Preferences is already open, from the System Preferences Dock icon.
Figure 15-2. Even if you don’t know what System Preferences panel contains the settings you want to change, Spotlight can help. Type into the box at the top, and watch as the “spotlight” shines on the relevant icons. At that point, you can either click the icon, click the name in the pop-up menu, or arrow down the menu and press Enter to choose. (Apple removed the System Preferences toolbar, but it hopes that this Spotlight business is just as useful.)
Fastest: Highlight the first System Preferences icon by pressing Tab. (The highlighting is very faint, but it’s there.) Then type the first couple of letters of the icon you want to highlight—p for Print & Fax, di for Displays, or whatever—and then press the Space bar to open that panel.
This panel is of no value unless you’ve signed up for a .Mac account (.Mac Services). It offers four tabs:
Account. This is where you fill in your member name and password for your .Mac account, if you’ve subscribed.
Sync. Here’s where you tell Leopard which elements of your digital world—calendar, address book, email, and so on—you want synchronized, via the .Mac service, among your various Macs.
iDisk. The Disk Space graph indicates how full your electronic iDisk is.
Back to My Mac. This new Leopard feature of .Mac does just what the description here says: It lets you, on the road with your laptop (for example), connect to your Mac back home—to retrieve a file you left behind, for example. Details are in Chapter 14.
This is the master list of people who are allowed to log into your Mac. It’s where you can adjust their passwords, startup pictures, self-opening startup items, permissions to use various features of the Mac, and other security tools. All of this is described in Chapter 13.
This panel is mostly about how things look on the screen: windows, menus, buttons, scroll bars, and fonts. Nothing you find here lets you perform any radical surgery on the overall Mac OS X look—but you can tweak certain settings to match your personal style.
Two pop-up menus let you crank up or tone down Mac OS X’s overall colorfulness:
Appearance. Choose between Blue or Graphite. Blue refers to Mac OS X’s factory setting—bright, candy-colored scroll-bar handles, progress bars,
 menu, and pulsing OK buttons—and those
shiny red, yellow, and green buttons in the corner of every
window. If you, like some graphics professionals, find all this
circus-poster coloring a bit distracting, then choose Graphite,
which renders all those interface elements in various shades of
gray.
menu, and pulsing OK buttons—and those
shiny red, yellow, and green buttons in the corner of every
window. If you, like some graphics professionals, find all this
circus-poster coloring a bit distracting, then choose Graphite,
which renders all those interface elements in various shades of
gray.Highlight color. When you drag your cursor across text, its background changes color to indicate that you’ve selected it. Exactly what color the background becomes is up to you—just choose the shade you want using the pop-up menu. The Highlight color also affects such subtleties as the lines on the inside of a window as you drag an icon into it.
If you choose Other, the Color Picker palette appears, from which you can choose any color your Mac is capable of displaying (UP TO SPEED: The Color Picker).
These radio buttons control the scroll-bar arrow buttons of all your windows. You can keep these arrows together at one end of the scroll bar, or you can split them up so that the “up” arrow sits at the top of the scroll bar, and the “down” arrow is at the bottom—a much more Windows-like arrangement. (Horizontal scroll bars are similarly affected.)
Tip
For details on the “Jump to the next page” and “Scroll to here” options, in Accounts.
You can also turn on these checkboxes:
Use smooth scrolling. This option affects only one tiny situation: when you click (or hold the cursor down) inside the empty area of the scroll bar (not on the handle, and not on the arrow buttons). And it makes only one tiny change: Instead of jumping abruptly from screen to screen, the window lurches with slight accelerations and decelerations, so that the paragraph you’re eyeing never jumps suddenly out of view.
Minimize when double-clicking a window title bar. This option provides another way to minimize a window. In addition to the tiny yellow Minimize button at the upper-left corner of the window, you now have a much bigger target—the entire title bar.
Just how many of your recently opened documents and
applications do you want the Mac to show using the Recent Items
command in the ![]() menu? Pick a number from the pop-up menus.
For example, you might choose 30 for documents, 20 for programs, and
5 for severs.
menu? Pick a number from the pop-up menus.
For example, you might choose 30 for documents, 20 for programs, and
5 for severs.
The Mac’s built in text-smoothing (antialiasing) feature is supposed to produce smoother, more commercial-looking text anywhere it appears on your Mac: in word processing documents, email messages, Web pages, and so on.
Here, you can control the degree to which text gets smoothed. Use the pop-up menu to choose a setting that suits your eyes—and your monitor. For example, Apple offers Standard for CRT screens (cathode-ray tube—that is, traditional, bulky, television-style screens), and Medium for flat-panel screens like laptops and almost all current desktop Macs. Or just leave the setting at Automatic, which gives text on the main screen the appropriate smoothing.
Either way, the differences are fairly subtle. Furthermore, unlike most System Preferences, this one has no effect until the next time you open the program in question. In the Finder, for example, you won’t notice the difference until you log out and log back in again.
At smaller type sizes (10-point and smaller), you might find that text is actually less readable with font smoothing turned on. It all depends upon the font, the size, your monitor, and your taste. For that reason, this pop-up menu lets you choose a cutoff point. If you choose 12 here, for example, then 12-point (and smaller) type still appears crisp and sharp; only larger type, such as headlines, displays the graceful edge smoothing. You can choose a size cutoff as low as 4 points.
(None of these settings affect your printouts, only the onscreen display.)
This panel, radically redesigned for Leopard, shows up only if your Mac is equipped with a Bluetooth transmitter, either built-in or in the form of an external USB gadget.
Bluetooth is a short-range, low-power, wireless cable-elimination technology. It’s designed to connect gadgets in pairings that make sense, like cellphone+earpiece, wireless keyboard+Mac, Palm organizer+Mac, or Mac+cellphone (to connect to the Internet or to transmit files).
Now, you wouldn’t want the guy in the next cubicle to be able to operate your Mac using his Bluetooth keyboard. So the first step in any Bluetooth relationship is pairing, where you formally introduce the two gadgets that will be communicating. Here’s how that goes:

Figure 15-3. Top: This System Preferences panel reveals a list of every Bluetooth gadget your Mac knows about. Click a Bluetooth device to see details. Middle: The Bluetooth Setup Assistant scans the area for Bluetooth gadgets, and, after a moment, lists them. Click one, and then click Continue. Bottom: Where security is an issue, the Assistant offers you the chance to pair your Bluetooth device with the Mac. To prove that you’re really the owner of both the laptop and the phone, the Mac displays a one-time password, which you have 30 seconds to type into the phone. Once that’s done, you’re free to use the phone’s Internet connection without any further muss, fuss, or passwords.
Open System Preferences→Bluetooth.
Make sure Bluetooth Power is turned on. (The only reason to turn it off is to save laptop battery power.) Also make sure Discoverable is turned on; that makes the Mac “visible” to other Bluetooth gadgets in range.
Click the + button below the list at left.
The Bluetooth Setup Assistant opens, offering a list of typical Bluetooth equipment that your Mac can talk to: Mobile Phone, Headset, Printer, etc.
Click the kind of gear you have, and then click Continue.
The Mac whirs for a moment, and then displays the names of all Bluetooth gadgets that it can sniff out. Usually, it finds the one you’re trying to pair.
Click the name of the phone/headset/keyboard/whatever, and then click Continue.
If you’re pairing a mobile phone or something else that has a keypad or keyboard, the Mac now displays a large, eight-digit passcode. It’s like a password, except you’ll have to input it only this once, to confirm that you are the true owner of both the Mac and the phone. (If it weren’t for this passcode business, some guy next to you at the airport could enjoy free laptop Internet access through the cellphone in your pocket.)
At this point, your phone or palmtop displays a message to the effect that you have 30 seconds to type that passcode. Do it. When the gadget asks if you want to pair with the Mac and connect to it, say yes.
If you’re pairing a phone or palmtop, the Mac now asks which sorts of Bluetooth syncing you want to do. For example, it can copy your iCal appointments, as well as your Address Book address book, to the phone or palmtop.
(Or, if there are no kinds of Bluetooth syncing that your Mac can do with the gadget—for example, there’s nothing an iPhone can accomplish by talking to your Mac, since it doesn’t offer Bluetooth file transfers, for example—an error message tells you that, too.)
Tip
A few Bluetooth phones can even get your laptop onto the Internet via the cellular airwaves. No Wi-Fi required—the phone never even leaves your pocket, and your laptop can get online wherever there’s a cellphone signal.
This is a special setup, however, involving signing up with your cell carrier (and paying an additional monthly fee). If you’ve signed up, then turn on the third option here (“Access the Internet”).
When it’s all over, the new gadget is listed in the left-side panel, in the list of Bluetooth cellphones, headsets, and other stuff that you’ve previously introduced to this Mac. Click the + button to open the Bluetooth Setup Assistant again, or the - button to delete one of the listed items.
And then there’s the ![]() button. On first click, it’s a pop-up menu that
says only, “Show More Info.” If you select that item and then click
button. On first click, it’s a pop-up menu that
says only, “Show More Info.” If you select that item and then click
![]() again, you get a pop-up menu with a few
Bluetooth utility commands.
again, you get a pop-up menu with a few
Bluetooth utility commands.
This handy pane (Figure 15-4) lets you tell the Mac what it should do when it detects you’ve inserted a CD or DVD. For example, when you insert a music CD, you probably want iTunes (Chapter 9) to open automatically so you can listen to the CD or convert its musical contents to MP3 or AAC files on your hard drive. Similarly, when you insert a picture CD (such as a Kodak Photo CD), you probably want iPhoto to open in readiness to import the pictures from the CD into your photo collection.
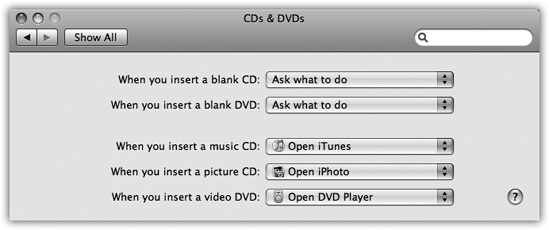
Figure 15-4. You can tell the Mac exactly which program to launch when you insert each kind of disc, or tell it to do nothing at all.
And when you insert a DVD from Blockbuster, you want the Mac’s DVD Player program to open.
For each kind of disc (blank CD, blank DVD, music CD, picture CD, or video DVD), the pop-up menu lets you choose options like these:
Ask what to do. A dialog box appears that asks what you want to do with the newly inserted disc.
Open (iDVD, iTunes, iPhoto, DVD Player...). The Mac can open a certain program automatically when you insert the disc. When the day comes that somebody writes a better music player than iTunes, or a better digital shoebox than iPhoto, you can use the “Open other application” option.
Run script. If you’ve become handy writing or downloading AppleScript programs (Chapter 16), you can schedule one of your own scripts to take over from here. For example, you can set things up so that inserting a blank CD automatically copies your Home folder onto it for backup purposes.
Ignore. The Mac won’t do anything when you insert a disc except display its icon on the desktop. (If it’s a blank disc, the Mac does nothing at all.)
Your Mac’s conception of what time it is can be very important. Every file you create or save is stamped with this time, and every email you send or receive is marked with this time. As you might expect, setting your Mac’s clock is what the Date & Time pane is all about.
Click the Date & Time tab. If your Mac is online, turn on “Set date & time automatically,” and be done with it. Your Mac sets its own clock by consulting a highly accurate scientific clock on the Internet. (No need to worry about Daylight Saving Time, either; the time servers take that into account.)
Tip
If you have a full-time Internet connection (cable modem or DSL, for example), you may as well leave this checkbox turned on, so your Mac’s clock is always correct. If you connect to the Internet by modem, however, turn off the checkbox, so your Mac won’t keep trying to dial spontaneously at all hours of the night.
If you’re not online and have no prospect of getting there, you can also set the date and time manually. To change the month, day, or year, you can click the digit that needs changing and then either (a) type a new number or (b) click the little arrow buttons. Press the Tab key to highlight the next number. (You can also specify the day of the month by clicking a date on the minicalendar.)
To set the time of day, use the same technique—or, for more geeky fun, you can set the time by dragging the hour, minute, or second hands on the analog clock. Finally, click Save. (If you get carried away with dragging the clock hands around and lose track of the real time, click the Revert button to restore the panel settings.)
Tip
If you’re frustrated that the Mac is showing you the 24-hour “military time” on your menu bar (that is, 17:30 instead of 5:30 p.m.)—or that it isn’t showing military time when you’d like it to—click the Clock tab and turn “Use a 24-hour clock” on or off.
Note, however, that this affects only the menu bar clock. If you’d like to reformat the menu bar clock and all other dates (like the ones that show when your files were modified in list views), click the Open International button at the bottom of the Date & Time pane. Once there, click the Formats tab. There you’ll see a Customize button for Times, which leads you to a whole new world of time-format customization. You can drag elements of the current time (Hour, Minute, Second, Millisecond, and so on) into any order you like, and separate them with any desired punctuation.
You’d be surprised how important it is to set the Time Zone for your Mac. If you don’t do so, the email and documents you send out—and the Mac’s conception of what documents are older and newer—could be hopelessly skewed. Teach your Mac where it lives using the Time Zone map, as shown in Figure 15-5.
In the Clock pane, you can specify whether or not you want the current time to appear, at all times, at the right end of your menu bar. You can choose between two different clock styles: digital (3:53 p.m.) or analog (a round clock face). You also get several other options that govern this digital clock display: the display of seconds, whether or not you want to include designations for a.m. and p.m., the day of the week, a blinking colon, and the option to use a 24-hour clock.
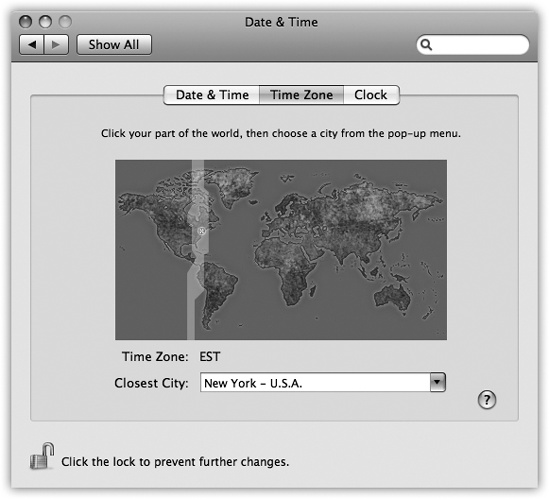
Figure 15-5. To set your time zone the quick and dirty way, just click on a section of the map to indicate your general region of the world. You’ll see the vertical stripe showing your time zone. If you want to teach the Mac more precisely where you are in that time zone, now use the pop-up menu to specify the closest big city in that time zone. (Or, instead of using the pop-up menu with the mouse, you can also highlight the text in the Closest City box. Then start typing your city name until the Mac gets it.)
Tip
At the bottom of the dialog box, you’ll find a feature called “Announce the time.” At the intervals you specify, the Mac can speak, out loud, the current time: “It’s ten o’clock.” If you tend to get so immersed in “working” that you lose track of time, Mac OS X just removed your last excuse.
And by the way, your menu bar clock always shows the current time. When you need to know today’s date, just click the clock. A menu drops down revealing the complete date. The menu also lets you switch between digital and analog clock types and provides a shortcut to the Date & Time preferences pane.
This panel offers two ways to show off Mac OS X’s glamorous graphics features: desktop pictures and screen savers.
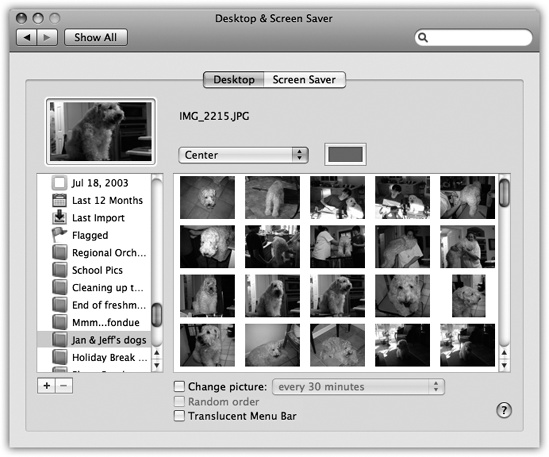
Figure 15-6. Using the list of picture sources at left, you can preview an entire folder of your own images before installing one specific image as your new desktop picture. Use the Choose Folder option to select a folder of assorted graphics—or, if you’re an iPhoto veteran, click an iPhoto album name, as shown here. Clicking one of the thumbnails installs the corresponding picture on the desktop. Bottom: The on/off switch for the transparency of Mac OS X’s menu bar.
Mac OS X comes with several ready-to-use collections of desktop pictures, ranging from National Geographic-style nature photos to plain solid colors. To install a new background picture, first choose one of the image categories in the list at the left side of the window, as shown in Figure 15-6.
Your choices include Apple Images (muted, soft-focus swishes and swirls), Nature (bugs, water, Leopard outer space), Plants (flowers, soft-focus leaves), Black & White (breathtaking monochrome shots), Abstract (swishes and swirls with wild colors), or Solid Colors (simple grays, blues, and greens).
Of course, you may feel that decorating your Mac desktop is much more fun if you use one of your own pictures. You can use any digital photo, scanned image, or graphic you want in almost any graphics format (JPEG, PICT, GIF, TIFF, Photoshop, and—just in case you hope to master your digital camera by dangling its electronic instruction manual in front of you each morning—even PDF).
That’s why icons for your own Pictures folder and iPhoto Albums collections also appear here, along with a button that lets you choose any folder of pictures. When you click one of these icons, you see thumbnail versions of its contents in the main screen to its right. Just click the thumbnail of any picture to apply it immediately to the desktop. (There’s no need to remove the previously installed picture first.)
Tip
If there’s one certain picture you like, but it’s not in any of the listed sources, you can drag its image file onto the well (the miniature desktop displayed in the Desktop panel). A thumbnail of your picture instantly appears in the well and, a moment later, the picture is plastered across your monitor.
No matter which source you use to choose a photo of your own, you have one more issue to deal with. Unless you’ve gone to the trouble of editing your chosen photo so that it matches the precise dimensions of your screen (1280 × 854 pixels, for example), it probably isn’t exactly the same size as your screen.
Tip
The top 23 pixels of your graphic are partly obscured by Leopard’s translucent menu bar—something to remember when you prepare the graphic.
Fortunately, Mac OS X offers a number of solutions to this problem. Using the pop-up menu just to the right of the desktop preview well, you can choose Fit to Screen, Fill Screen, Stretch, Center, or Tile, each of which enlarges the picture (relative to your screen) in a different way.
The novelty of any desktop picture, no matter how interesting, is likely to fade after several months of all-day viewing. That’s why the randomizing function is so delightful.
Turn on “Change picture” at the bottom of the dialog box. From the pop-up menu, specify when you want your background picture to change: “every day,” “every 15 minutes,” or, if you’re really having trouble staying awake at your Mac, “every 5 seconds.” (The option called “when waking from sleep” refers to the Mac waking from sleep, not its owner.)
Finally, turn on “Random order,” if you like. If you leave it off, your desktop pictures change in alphabetical order by file name.
That’s all there is to it. Now, at the intervals you specified, your desktop picture changes automatically, smoothly cross-fading between the pictures in your chosen source folder like a slideshow. You may never want to open another window, because you’ll hate to block your view of the show.
On the Screen Saver panel, you can create your own screen-saver slideshows—an absolute must if you have an Apple Cinema Display and a cool Manhattan loft apartment.
Tip
Of course, a screen saver doesn’t really save your screen. LCD flat-panel screens, the only kind Apple sells, are incapable of “burning in” a stationary image of the sort that originally inspired the creation of screen savers years ago.
No, these screen savers offer two unrelated functions. First, they mask what’s on your screen from passersby whenever you leave your desk. Second, they’re a blast.
When you click a module’s name in the Screen Savers list, you see a mini version of it playing back in the Preview screen. Click Test to give the module a dry run on your full monitor screen.
When you’ve had enough of the preview, just move the mouse or press any key. You return to the Screen Saver panel.
Apple provides a few displays to get you started, in two categories: Apple and Pictures.
Arabesque. Your brain will go crazy trying to make sense of the patterns of small circles as they come and go, shrink and grow. But forget it; this module, new in Leopard, is all just drugged-out randomness.
Computer Name. This display shows nothing more than the Apple logo and the computer’s name, faintly displayed on the monitor. (These elements shift position every few minutes—it just isn’t very fast.) Apple probably imagined that this feature would let corporate supervisors glance over at the screens of unattended Macs to find out who was not at their desks.
Flurry. You get flaming, colorful, undulating arms of fire, which resemble a cross between an octopus and somebody arc welding in the dark. If you click the Options button, you can control how many streams of fire appear at once, the thickness of the arms, the speed of movement, and the colors.
iTunes Artwork. Somebody put a lot of work into the album covers for the CDs whose music you own—so why not enjoy them as art? This module builds a gigantic mosaic of album art from your music collection, if you have one. The tiles periodically flip around, just to keep the image changing. (The Options button lets you specify how many rows of album-art squares appear, and how often the tiles flip.)
RSS Visualizer. Here, buried 43 layers deep in the operating system, is one of Leopard’s most spectacular and useful features: the RSS Visualizer. When this screen saver kicks in, it displays a jaw-dropping, 3-D display of headlines (news and other items) slurped in from the Safari Web browser’s RSS reader. (RSS items, short for Really Simple Syndication or Rich Site Summary, are like a cross between email messages and Web pages—they’re Web items that get sent directly to you. Details in Chapter 12.)
After the introductory swinging-around-an-invisible-3-D-pole-against-a-swirling-blue-sky-background sequence, the screen saver displays one news blurb at a time. Each remains on the screen just long enough for you to get the point of the headline. Beneath, in small type, is the tantalizing instruction, “Press the ’3’ key to continue.” (It’s a different number key for each headline.) If you do, indeed, tap the designated key, you leave the screen saver, fire up Safari, and wind up on a Web page that contains the complete article you requested.
The whole thing is gorgeous, informative, and deeply hypnotic. Do not use while operating heavy equipment.
Tip
Click Options to specify which Web site’s RSS feed you want displayed.
Spectrum. This one’s for people who prefer not to have anything specific on their screens, like photos or text; instead, it’s just a gradually shifting parade of glowing rainbow hues.
Word of the Day. Here’s a parade of interesting words drawn from the Mac OS X Dictionary program. Every minute or so, one of these words stops, parks itself on your screen, and displays its dictionary definition. You’re invited to tap the D key to open the dictionary to that entry to read more. Build your word power!
Tip
Click Options to specify which dictionary you want: the standard Oxford English, or the new Japanese one.
The second category of screen savers are all based on the slideshowy presentation of photos. In Leopard, you can choose from three presentations of pictures in whatever photo group you choose, as represented by the three Display Style buttons just below the screen-saver preview.
Slideshow displays one photo at a time; they slowly zoom and softly cross-fade into each other.
Tip
If you click Options, you get choices like “Present slides in random order” (instead of the order they appear in Apple’s photo folder, or yours); “Cross-fade between slides” (instead of just cutting abruptly); “Zoom back and forth” (that is, slowly enlarge or shrink each photo to keep it interesting); “Crop slides to fit on screen” (instead of exposing letterbox bars of empty desktop if the photo’s shape doesn’t match the screen’s); and “Keep slides centered” (instead of panning gracefully across).
Collage sends individual photos spinning randomly onto the “table,” where they lie until the screen is full.
Tip
This time, the Options button offers the “Present slides in random order” button, plus a “Collage style” pop-up menu that lets you add each photo’s name and date to its white, Polaroid-style border.
Mosaic will blow your mind; see Figure 15-7.
Tip
Click the Options button to specify the speed of the receding, the number of photos that become pixels of the larger photo, and whether or not you want the composite photos to appear in random order.

Figure 15-7. This feeble four-frame representative sample will have to represent, on this frozen page, the stunning animated pullout that is the Mosiac screen saver. It starts with one photo (top); your “camera” pulls back farther and farther, revealing that that photo is just one in a grid—a huge grid—that’s composed of all your photos. As you pull even farther back, each photo becomes so small that it becomes only one dot of another photo—from the same collection! And then that one starts shrinking, and the cycle repeats, on and on into infinity. How could Apple not have mentioned Mosaic in its Leopard advertising?
In any case, all of these photo-show options are available for whatever photo set you choose from the list at left. Your choices include:
Abstract, Beach, Cosmos, Forest, Nature Patterns, Paper Shadow. These sets include Abstract, which features psychedelic swirls of modern art. In the Beach, Cosmos, Forest, and Nature screen savers, you see a series of tropical ocean scenes, deep space objects, lush rain forests, and leaf/flower shots. Paper Shadow is a slideshow of undulating, curling, black-and-white shadowy abstract forms.
Each creates an amazingly dramatic, almost cinematic experience, worthy of setting up to “play” during dinner parties like the lava lamps of the Seventies.
.Mac and RSS. One of the perks for paying $100 per year for a .Mac membership is the ability to create slideshows online, which can play back either on your own Mac or (if you opted to make it public) on anybody else’s.
Yes, that’s right: You can now enjoy a screen saver composed of photos taken by somebody else on the Internet. (“Oh, look, honey, here’s some shots of Uncle Jed’s crops this summer!”)
Click the Options button to specify, by clicking the + button, which member’s slideshow collection you want to view and how you want it to appear. (For example, you can turn off the crossfade between slides, crop the slides so that they fit on the screen, opt to present the slides in random order, and so on.)
As a bonus, in this configuration screen, you can also specify an RSS feed’s address (Viewing an RSS Feed). The idea, of course, is that you’d specify a photo RSS feed’s address here, like the ones generated by iPhoto.
Pictures Folder, Choose Folder. This is one of the coolest modules. It lets you transform your own collection of pictures—whatever you’ve got in your Home→Pictures folder—into a self-playing slideshow, complete with spectacular zooming and dissolving effects. (If you keep your photos elsewhere, click Choose Folder instead.)
Library, Last Roll, Last 12 Months, Events list, Album list. If you’re using iPhoto to organize your digital photos, you’ll see its familiar album and event lists here, making it a snap to choose any of your own photo collections for use as a screen saver.
Use random screen saver. If you can’t decide which one of the modules to use, turn on this checkbox. The Mac chooses a different module each time your screen saver kicks in.
Show with clock. This option, new in Leopard, just superimposes the current time on whatever screen saver you’ve selected. You’d be surprised at how handy it can be to use your Mac as a giant digital clock when you’re getting coffee across the room.
You can control when your screen saver takes over your monitor in a couple of ways:
After a period of inactivity. Using the “Start screen saver” slider, you can set the amount of time that has to pass without keyboard or mouse activity before the screen saver starts. The duration can be as short as three minutes or as long as two hours, or you can drag the slider to Never to prevent the screen saver from ever turning on by itself.
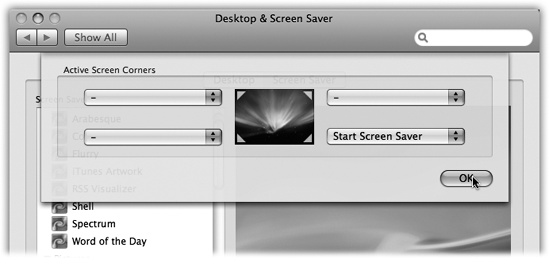
When you park your cursor in the corner of the screen. If you click the Hot Corners button, you’ll see that you can turn each corner of your monitor into a hot corner (Figure 15-8).
Tip
You can find dozens more screen saver modules from Apple at www.apple.com/downloads/macosx/icons_screensavers, and from other people at www.epicware.com/macosxsavers.html.
Displays is the center of operations for all your monitor settings. Here, you set your monitor’s resolution, determine how many colors are displayed onscreen, and calibrate color balance and brightness.
Tip
You can open up this panel with a quick keystroke from any program on the Mac. Just press Option as you tap one of the screen-brightness keys on the top row of your keyboard.
The specific controls you’ll see here depend on the kind of monitor you’re using, but here are the ones you’ll most likely see:
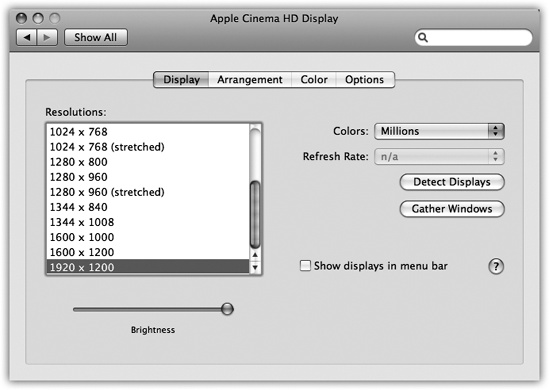
Figure 15-9. In the early days of the Mac, higher color settings required a sacrifice in speed, since the Mac had to compute the color for thousands of individual pixels. Today, there’s little downside to leaving your screen at its maximum depth setting (“Millions” of colors). Photos, especially, look best at higher depth settings. (The Detect Displays button appears primarily on laptops; it means “Check for an external monitor or projector.”)
This tab is the main headquarters for your screen controls. It governs these settings:
Resolutions. All Mac screens today can make the screen picture larger or smaller, thus accommodating different kinds of work. You perform this magnification or reduction by switching among different resolutions (measurements of the number of dots that compose the screen). The Resolutions list displays the various resolution settings your monitor can accommodate: 800 × 600, 1024 × 768, and so on (Figure 15-9).
When you use a low-resolution setting, such as 800 × 600, the dots of your screen image get larger, thus enlarging (zooming in on) the picture—but showing a smaller slice of the page. Use this setting when playing a small QuickTime movie, for example, so that it fills more of the screen. (Lower resolutions usually look blurry on flat-panel screens, though.) At higher resolutions, such as 1280 × 800, the screen dots get smaller, making your windows and icons smaller, but showing more overall area. Use this kind of setting when working on two-page spreads in your page-layout program, for example.
Colors. Today’s Mac monitors offer different color depth settings, each of which permits the screen to display a different number of colors simultaneously. The Colors pop-up menu generally offers only three choices: 256 Colors, Thousands, and Millions.
Tip
You can still make your monitor gray scale (shades of gray), even if no choice for it appears here. The trick is to visit the Universal Access panel, described later in this chapter.
Refresh Rate. This pop-up menu (available for CRT screens only—that is, not flat panels) lets you adjust how many times per second your screen image is repainted by your monitor’s electron gun. Choose a setting that minimizes flicker.
Brightness, Contrast. Use these sliders to make the screen look good in the prevailing lighting conditions. The Contrast control appears only on CRT monitors, and you’ll usually want it all the way up. The Brightness slider is usually best near the middle.
Of course, most Apple keyboards have brightness-adjustment keys, so these software controls are included just for the sake of completeness.
Tip
You can adjust the color depth and resolution of your monitor without having to open System Preferences. Just turn on “Show displays in menu bar,” which adds a Monitors pop-up menu (a menulet) to the right end of your menu bar for quick adjustments.
Automatically adjust brightness as ambient light changes. This option appears only if you have a Mac laptop with a light-up keyboard. In that case, your laptop’s light sensor also dims the screen automatically in dark rooms—if this checkbox is turned on.
From the dawn of the color-monitor era, Macs have had a terrific feature: the ability to exploit multiple monitors all plugged into the computer at the same time. Any Mac with a video-output jack (laptops, iMacs, eMacs), or any Mac with a second or third video card (Power Macs, Mac Pros), can project the same thing on both screens (mirror mode); that’s useful in a classroom when the “external monitor” is a projector.
Tip
The standard video card in a MacPro has jacks for two monitors. By installing more video cards, you can get up to six monitors going at once.
But it’s equally useful to make one monitor act as an extension of the next. For example, you might have your Photoshop image window on your big monitor, but keep all the Photoshop controls and tool palettes on a smaller screen. Your cursor passes from one screen to another as it crosses the boundary.
You don’t have to shut down the Mac to hook up another monitor—just put it to sleep. Or just hook up the monitor or projector and then choose Detect Displays from the Displays menulet.
When you open System Preferences, you see a different Displays window on each screen, so that you can change the color and resolution settings independently for each. Your Displays menulet shows two sets of resolutions, too, one for each screen.
If your Mac can show different images on each screen, your Displays panel offers an Arrangement tab, showing a miniature version of each monitor. By dragging these icons around relative to each other, you can specify how you want the second monitor’s image “attached” to the first. Most people position the second monitor’s image to the right of the first, but you’re also free to position it on the left, above, below, or even directly on top of the first monitor’s icon (the last of which produces a video-mirroring setup). For the least likelihood of going insane, consider placing the real-world monitor into the corresponding position—to the right of your first monitor, for example.
For committed multiple-monitor fanatics, the fun doesn’t stop there. See the microscopic menu bar on the first-monitor icon? You can drag that tiny strip onto a different monitor icon, if you like, to tell Displays where you’d like your menu bar to appear. (And check out how most screen savers correctly show different stuff on each monitor!)
When you click Calibrate, the Display Calibrator Assistant opens to walk you through a series of six screens, presenting various brightness and color-balance settings in each screen. You pick the settings that look best to you; at the end of the process, you save your monitor tweaks as a ColorSync profile that ColorSync-savvy programs can use to adjust your display for improved color accuracy.
See Chapter 2 for details on the Dock and its System Preferences pane.
The Energy Saver program helps you and your Mac in a number of ways. By blacking out the screen after a period of inactivity, it prolongs the life of your monitor. By putting the Mac to sleep half an hour after you’ve stopped using it, Energy Saver cuts down on electricity costs and pollution. On a laptop, Energy Saver extends the length of the battery charge by controlling the activity of the hard drive and screen.
Best of all, this pane offers the option to have your computer turn off each night automatically, and turn on again at a specified time in anticipation of your arrival at the desk.
The Energy Saver controls are very different on a laptop Mac and a desktop.
On a desktop Mac, you see a pair of sliders; on a laptop, you have to click Show Details to see them (Figure 15-10).
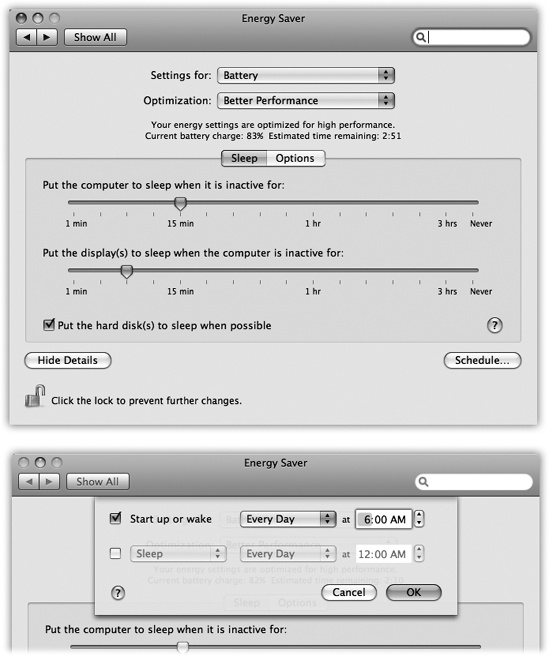
Figure 15-10. Top: Here’s what Energy Saver looks like in its expanded condition on a laptop. (On a desktop machine, it’s far simpler.) In the “Put the display to sleep” option, you can specify an independent sleep time for the screen. Bottom: Here are the Schedule controls—a welcome return of the Mac’s self-scheduling abilities.
In any case, the top slider controls when the Mac will automatically go to sleep—anywhere from one minute after your last activity to Never. (Activity can be mouse movement, keyboard action, or Internet data transfer; Energy Saver won’t put your Mac to sleep in the middle of a download.)
At that time, the screen goes dark, the hard drive stops spinning, and your processor chip slows to a crawl. Your Mac is now in sleep mode, using only a fraction of its usual electricity consumption. To wake it up when you return to your desk, press any key. Everything you were working on, including open programs and documents, is still onscreen, exactly as it was. (To turn off this automatic sleep feature entirely, drag the slider to Never.)
Note
On Macs of old, the beauty of the independent “Put the display to sleep” slider was that you could make the screen go dark before the Mac itself. That way, the Mac would awaken instantly when you touched a key or clicked the mouse.
In Mac OS X, the Mac always wakes almost instantly from sleep—one of the great payoffs of Mac OS X. In other words, there’s only one good reason left to set the screen to sleep independently of the Mac itself: so that your Mac can run its standard middle-of-the-night maintenance routines, even while the screen is off to save power.
GEM IN THE ROUGH: Mysteries of the Battery Menulet
If you’ve got a laptop, don’t miss the checkbox in Energy
Saver called “Show battery status in the menu bar.” It puts a
handy status indicator in the menu bar (![]() ) that keeps you informed of your battery’s
life.
) that keeps you informed of your battery’s
life.
When used as a menu, this menulet lets you choose between displaying the actual number of minutes left until a battery is depleted, the percentage of battery life that remains, or a visual emptying-battery icon. (You can also switch among energy-conservation presets—like Better Energy Savings and Better Performance—from this menulet.)
If you’ve opted to view the numeric version, you may notice that sometimes the number, or the percentage, is in parentheses, like this: (78%). That’s your signal that the laptop is plugged in and charging; you’re seeing the number of minutes left until the battery is fully recharged (or the percentage of full charge you’ve achieved so far). Either way, the readout is counting down (or up) to that joyous moment.
If you’re viewing only the battery icon in the menu bar, here’s what the readouts mean:
Power-cord-in-the-battery: The laptop is plugged in, and the battery is 100 percent charged. Ready to roll, captain!
Lightning-bolt-in-the-battery: The laptop is plugged in, but the battery is still charging.
Superimposed X: The laptop is plugged in, but the battery isn’t in right, it’s missing, or it isn’t getting a charge for some other reason.
Emptying black battery: The laptop is running off of battery power, and has at least 25 percent power left. (The width of the bar reveals how much charge is left.)
Emptying red battery: You’re running off of battery power, and you have less than 25 percent charge remaining.
A nearly invisible red bar means you have less than nine minutes left. Save those documents, buddy.
Finally, “Put the hard disk(s) to sleep when possible” saves even more juice—and noise—by letting your drives stop spinning when not in use. The downside is a longer pause when you return to work and wake the thing up, because it takes a few seconds for your hard drive to “spin up” again.
As noted above, Energy Saver on a laptop offers quite a few additional controls (see Figure 15-10). That’s because power management is ten times more important on a laptop, where every drop of battery power counts.
The pop-up menus at the top of the dialog box, for example, let you create different settings for the two states of life for a laptop, when it’s plugged in (Power Adapter) and when it’s running on battery power (Battery).
Once you’ve indicated which setting you want to adjust, you can then use the Optimization pop-up menu to choose a canned Energy Saver setting, depending on where you want to fall on the speed-vs.-battery-life spectrum. For example, when you’re adjusting the settings for battery-only operation, you can choose Better Battery Life (screen and laptop go to sleep relatively quickly, your processor chip slows down, and the screen brightness dims) or Better Performance (screen sleeps after five minutes, laptop after fifteen, processor runs at top speed).
The Custom option just means “none of the above.” Whenever you adjust one of the sliders or checkboxes, Energy Saver automatically changes the pop-up menu to say Custom. Mac OS X remembers your settings here. If you choose one of the presets and then choose Custom again, your hand-adjusted settings remain in place.
Here’s a cool feature your PC never had: By clicking the Schedule button, you can set up the Mac to shut itself down and turn itself back on automatically (Figure 15-10, bottom).
If you work 9 to 5, for example, set the office Mac to turn itself on at 8:45 a.m., and shut itself down at 5:30 p.m.—an arrangement that conserves electricity, saves money, and reduces pollution, but doesn’t inconvenience you in the least. In fact, you may come to forget that you’ve set up the Mac this way, since you’ll never actually see it turned off.
Note
The Mac doesn’t shut down automatically if you’ve left unsaved documents open onscreen. It will go to sleep, though.
Click the Options tab button to summon a few more controls, including “Wake when the modem detects a ring” (handy if you use your Mac as a fax machine), “Restart automatically after a power failure,” and “Processor Performance.” This last item is the quick fix for the thigh-scalding heat of a PowerBook’s metal case: Choose Reduced from this pop-up menu. Your chip doesn’t run nearly as fast now, but it’s still plenty fast for email, word processing, and so on—and it runs at about half the temperature. (You’ll gain some battery life, too.)
Exposé and Spaces, the two ingenious window- and screen-management features of Mac OS X, are described in detail in Chapter 4—and so is this joint-venture control panel.
The International pane’s primary job is to set up your Mac to work in other languages. If you bought your Mac with a localized operating system—a version that already runs in your own language—and you’re already using the only language, number format, and keyboard layout you’ll ever need, then you can ignore most of this panel.
But at the very least, check it out. When it comes to showing off Mac OS X to your friends and loved ones, the “wow” factor on the Mac’s polyglot features is huge.
In Mac OS X, you can shift from language to language in certain programs on the fly, without reinstalling the operating system or even restarting the computer.
On the Language tab, you see a listing of the different languages the Mac can switch into, in the corresponding languages—Français, Español, and so on. Just drag one of the languages to the top of the list to select it as the target language, as shown in Figure 15-11.
Now launch Safari, TextEdit, or Stickies. Every menu, button, and dialog box is now in the new language you selected! If you log out and back in (or restart) at this point, the entire Finder will be in the new language, too.
Note
Programs differ widely in their “language awareness.” If you use a language beyond the 16 in the list, adding it (use the Edit button) ensures that its relevant features will be available in all programs. (You may still have to add additional language software to make your menus and dialog boxes change.)
Of course, if you’re really French (for example), you’ll also want to make these changes:
On the Formats tab, choose your French-speaking country from the Region pop-up menu, so that time and date formats, number punctuation, and currency symbols also conform to your local customs. (Turn on “Show all regions,” if necessary.)
For example, the decimal and thousands separator characters for displaying large numbers differ from country to country. (The number 25,600.99, for example, would be written as 25 600,99 in France, and as 25.600,99 in Spanish.) And what appears to an American to be July 4 (the notation 7/4), to a European indicates April 7.
If, for some reason, Apple’s preprogrammed settings aren’t right for your region, you’ll see Customize buttons that let you override them.
Choose the French keyboard layout from the Input Menu tab, as explained in Figure 15-11.
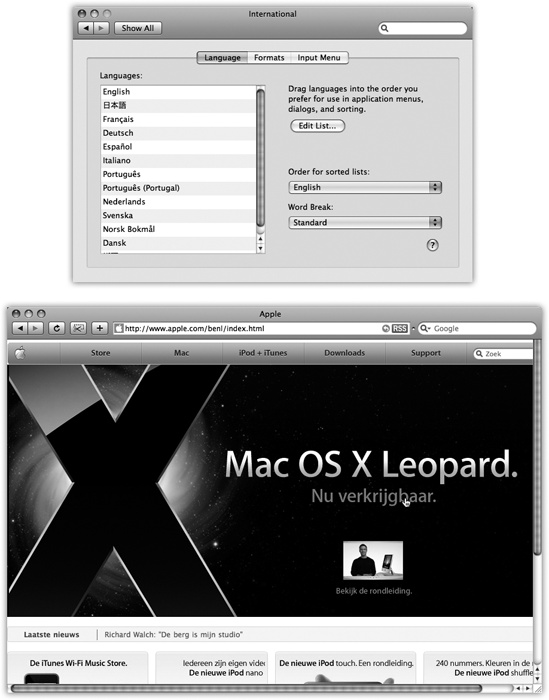
Figure 15-11. Top: This is the list of the 19 “system localizations” that you get with a standard Mac OS X installation. Bottom: Here’s Safari running in Dutch. Actually understanding Dutch would be useful at a time like this—but even if you don’t, it can’t help but brighten up your work day to choose commands like Spraakfunctie or Knip. (Alas, your success with this trick varies by program.)
Tip
Every program capable of switching languages is also clogging up your hard drive with a lot of language files you’ll never use. A program like DeLocalizer can sweep through all your programs and delete those files, leaving your software in perfect condition but more svelte. You can get DeLocalizer from this book’s “Missing CD” page at www.missingmanuals.com.
While the Mac can display many different languages, typing in those languages is another matter. The symbols you use when you’re typing Swedish aren’t the same as when you’re typing English. Apple solved this problem by creating different keyboard layouts, one for each language. Each rearranges the letters that appear when you press the keys. For example, when you use the Swedish layout and press the semicolon key, you don’t get a semicolon (;)—you get an ö.
Apple even includes a Dvorak layout—a scientific rearrangement of the standard layout that puts the most common letters directly under your fingertips on the home row. Fans of the Dvorak layout claim greater accuracy, better speed, and less fatigue.
Use the list in the Input Menu pane to indicate which keyboard layout you want. If you select anything in the list, “Show input menu in menu bar” turns on automatically. A tiny flag icon appears in your menu bar—a keyboard menulet that lets you switch from one layout to another just by choosing its name. (To preview a certain keyboard arrangement, launch the Keyboard Viewer program described next.)
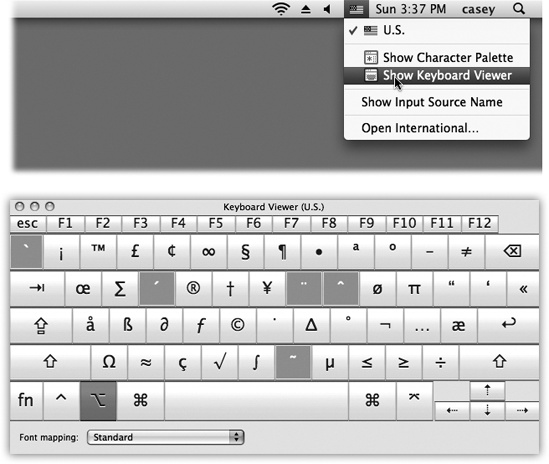
Figure 15-12. How do you make a π symbol? Top: Open Keyboard Viewer by choosing its name from the keyboard (flag) menulet. Bottom: Keyboard Viewer reveals the answer. When you press the Option key, the Keyboard Viewer keyboard shows that the pi character (π) is mapped to the P key. To insert the symbol into an open document, just click it in the Keyboard Viewer window.
Keyboard Viewer consists of a single window containing a tiny
onscreen keyboard (Figure 15-12). When you
hold down any of the modifier keys on your keyboard (like
![]() , Option, Shift, or Control), you can see
exactly which keys produce which characters. The point, of course,
is to help you learn which keys to press when you need special
symbols or non-English characters, such as © or
, Option, Shift, or Control), you can see
exactly which keys produce which characters. The point, of course,
is to help you learn which keys to press when you need special
symbols or non-English characters, such as © or ![]() , in each font.
, in each font.
Note
Keyboard Viewer shows only the symbols you can produce by typing keystrokes. A font may contain thousands of other characters; the Character Palette (see the box below) is the only way to access them.
UP TO SPEED: The Character Palette
There you are, two-thirds of the way through your local matchmaker newsletter, when it hits you that you need a heart symbol. Right now.
You know there’s one in one of your symbol fonts, but you’re not about to type every single key combo until you produce the heart symbol. You can’t help wishing there was an easier way to find those special symbols that hide among your fonts—fancy brackets, math symbols, special stars and asterisks, and so on.
The Keyboard Viewer (described above) is one solution. But there’s a better one: the Character Palette. To make it appear, choose Edit→Special Characters.
Most Cocoa programs have this command. If yours doesn’t, here’s the long way: Open System Preferences, click the International icon, click the Input Menu tab, and turn on the Character Palette checkbox.
You’ve just installed the Keyboard menulet.
Next time you’re word processing or doing page layout, choose Show Character Palette from this menu.
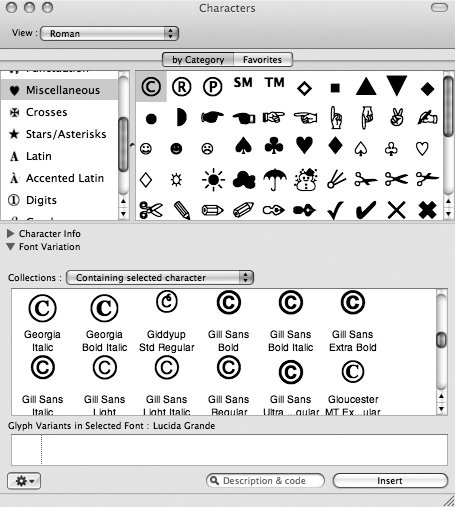
The resulting window rounds up all symbols from all your fonts at once. To find a particular symbol, click the “by Category” tab, and then click the various category headings: Arrows, Stars/Asterisks, Math, and so on. Or, for an even more mind-blowing assortment (musical notes, Braille...), choose All Characters from the View pop-up menu.
You can preview variations of the same symbol by opening the Font Variation triangle. You can also use the Search box to find a symbol by name: “heart” or “yen” or “asterisk,” for example. When you find the symbol you want, double-click it.
If you’re using a Cocoa program, the correct symbol pops into your document. (If not, you may get the correct character in the wrong font. In that case, change the font of the inserted character manually. To find out what font it came from, click the Font Variation flippy triangle to see the font name.)
Here’s how. Open the International panel of System Preferences, click Input Menu, and turn on the Keyboard Viewer checkbox. The window shown at top in Figure 15-12 appears. (Thereafter, you’ll be able to choose its name from the flag menulet at the top of the screen, as shown at top in Figure 15-12.)
To see the effect of pressing the modifier keys, either click the onscreen keys or press them on your actual keyboard. The corresponding keys on the onscreen keyboard light up as they’re pressed.
Note
Keyboard Viewer shows only the symbols you can produce by typing keystrokes. A font may contain thousands of other characters that can’t actually be typed; the Character Palette (UP TO SPEED: The Character Palette) is the only way to access these other symbols.
This panel lets you do some frivolous fine-tuning of your mouse, keyboard, and (for laptops) trackpad. It also unlocks Mac OS X’s strange and remarkable Full Keyboard Access feature, which lets you control your Mac’s menus, windows, dialog boxes, buttons, the Dock, and the toolbar—all from the keyboard (Control the Menus). Here’s a tour of the Keyboard & Mouse tabs.
The changes you make are tiny, but can have a cumulatively big impact on your daily typing routine.
Key Repeat Rate, Delay Until Repeat. You’re probably too young to remember the antique once known as the typewriter. On some electric versions of this machine, you could hold down the letter X key to type a series of XXXXXXXs—ideal for crossing something out in a contract, for example.
On the Mac, every key behaves this way. Hold down any key long enough, and it starts spitting out repetitions, making it easy to type, for example, “No WAAAAAAAY!” or “You go, girrrrrrrrrl!” These two sliders govern this behavior. On the right: a slider that determines how long you must hold down the key before it starts repeating (to prevent triggering repetitions accidentally, in other words). On the left: a slider that governs how fast each key spits out letters once the spitting has begun.
Use all F1, F2, etc. keys as standard function keys. This option appears only on laptops and aluminum-keyboard Macs. It’s complicated, so read slowly.
On Mac laptops, many of the F-keys on the top row perform laptop-related functions. For example, the F1 and F2 keys adjust the screen brightness, F3, F4, and F5 control the speaker volume, and so on. (You have the same setup on the aluminum Apple keyboard. Many of its F-keys have special hardware-control functions, too.)
So what if you want to use those keys for other functions? For example, the F1 key is the Help key in many programs. How can you open Help, if F1 makes the screen dimmer?
In those situations, you’re supposed to trigger the F-key’s second personality by pressing the Fn key simultaneously. So if F1 opens Help on a desktop Mac, Fn-F1 does it on a laptop.
If you find yourself using the software features (like Help) more often than the hardware features (like brightness), you can reverse this logic. Turning on “Use all F1, F2, etc. keys as standard function keys” lets the F-keys be F-keys, so they have no hardware-control functions. Now F1 by itself opens Help. Now, however, you add the Fn key for the hardware functions like brightness and volume.
Illuminate keyboard in low light conditions. This setting appears only if your Mac’s keyboard does, in fact, light up when you’re working in the dark—a showy feature of the high-end Mac laptops. You can specify that you want the internal lighting to shut off after a period of activity (to save power when you’ve wandered away, for example), or you can turn the lighting off altogether.
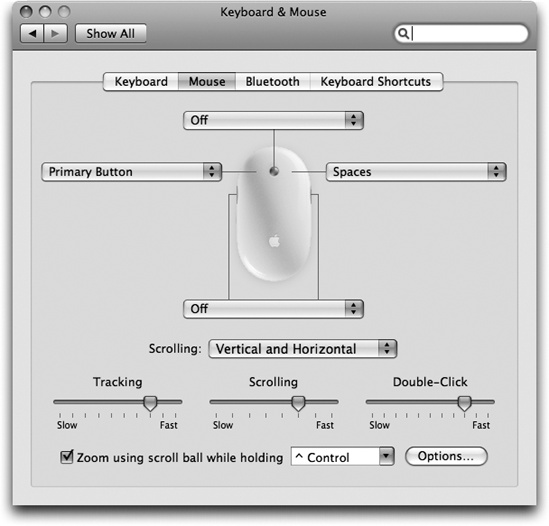
Figure 15-13. This enormous photographic display shows up only if you have the Mighty Mouse, Apple’s “two-button” mouse. The pop-up menus let you program the right, left, and side buttons of this mouse. It offers functions like opening Dashboard, triggering Exposé, and so on. This is also where you can turn the right-clicking feature on (just choose Secondary Button from the appropriate pop-up menu)—or swap the right- and left-click buttons’ functions.
Modifier Keys. This button lets you turn off, or remap, the functions of the Option, Caps Lock, Control, and
keys. It’s for Unix programmers whose
pinkies can’t adjust to the Mac’s modifier-key layout—and for
anyone who keeps hitting Caps Lock by accident during everyday
typing.
It may surprise you that the cursor on the screen doesn’t move five inches when you move the mouse five inches on the desk. Instead, the cursor moves farther when you move the mouse faster.
How much farther depends on how you set the first slider here. The Fast setting is nice if you have an enormous monitor, since you don’t need an equally large mouse pad to get from one corner to another. The Slow setting, on the other hand, forces you to pick up and put down the mouse frequently as you scoot across the screen. It offers very little acceleration, but it can be great for highly detailed work like pixel-by-pixel editing in Photoshop.
The Double-Click Speed setting specifies how much time you have to complete a double-click. If you click too slowly—beyond the time you’ve allotted yourself with this slider—the Mac “hears” two single clicks instead.
If you have an Apple Mighty Mouse—the white mouse that has come with desktop Macs since 2005—then the Mouse tab is a much fancier affair (Figure 15-13).
This panel shows up only if you have a laptop. At the top, you find duplicates of the same Tracking Speed and Double-Click Speed sliders described above—but these let you establish independent tracking and clicking speeds for the trackpad.
You may love your Mac laptop now, but wait until you find out about these special features. They make your laptop crazy better. It turns out you can point, click, scroll, and right-click—all on the trackpad itself, without a mouse and without ever having to move your fingers.
Use two fingers to scroll. This one is sweet. You have to try it to believe it.
When you turn this option in, dragging two fingers across your trackpad scrolls whatever window is open, just as though you had slid over to the scroll bar and clicked there. Except doing it with your two fingers, right in places, is infinitely faster and less fussy. In Leopard, you even get a Scrolling Speed slider.
Tip
You’ll be allowed to scroll only up or down—unless you also turn on “Allow horizontal scrolling.”
Zoom while holding Control. Here’s another irresistible feature. Once you learn it, you’ll never look back.
When this checkbox is turned on, you can zoom into the screen image, magnifying the whole thing, just by dragging two fingers up or down the trackpad while you’re pressing the Control key. You can zoom in so far that the word “zoom” in 12-point type fills the entire monitor.
This feature comes in handy with amazing frequency. It’s great for reading Web pages in tiny type, or enlarging Web movies, or studying the dot-by-dot construction of a button or icon that you admire. Just Control-drag upward to zoom in, and Control-drag downward to zoom out again.
You can customize this feature to within an inch of its life. For example, you can substitute the Option or
key, if Control isn’t working out for
you (use the pop-up menu).Tip
If you don’t have a laptop—and therefore you don’t have a trackpad—you can get the same effect by Control-scrolling using any mouse that has a trackwheel or trackpea on top, like Apple’s standard Mighty Mouse. See "Universal Access" later in this chapter.
If you click Options, you get even more choices. First, you can specify how you want to scroll around within your zoomed-in screen image. The factory setting, “Continuously with pointer,” is actually pretty frustrating; the whole screen shifts around whenever you move the cursor. (“So the pointer is at or near the center of the image” is very similar.) “Only when the pointer reaches an edge” is a lot less annoying, and lets you use the cursor (to click buttons, for example) without sending the entire screen image darting away from you.
Clicking. Under normal circumstances, you touch your laptop’s trackpad exclusively to move the cursor. For clicking and dragging, you’re supposed to use the clicking button beneath the trackpad.
Many people find, however, that it’s more direct to tap and drag directly on the trackpad, using the same finger that’s been moving the cursor. That’s the purpose of this checkbox. When it’s on, you can tap the trackpad surface to register a mouse click at the location of the cursor. Double-tap to double-click.
Dragging. This option lets you move icons, highlight text, or pull down menus—in other words, to drag, not just click—using the trackpad.
Start by tapping twice on the trackpad, then immediately after the second tap, begin dragging your finger. (If you don’t start moving promptly, the laptop assumes that you were double-clicking.) You can stroke the trackpad repeatedly to continue your movement, as long as your finger never leaves the trackpad surface for more than about one second. When you “let go,” the drag is considered complete.
Drag Lock. If you worry that you’re going to “drop” what you’re dragging if you stop moving your finger, turn on this option instead. Once again, begin your drag by double-clicking, then move your finger immediately after the second click.
When this option is on, however, you can take your sweet time in continuing the movement. In between strokes of the trackpad, you can take your finger off the laptop for as long as you like. You can take a phone call, a shower, or a vacation; the Mac still thinks that you’re in the middle of a drag. Only when you tap again does the laptop consider the drag a done deal.
For secondary clicks, place two fingers on the trackpad then click the button. What Apple’s punctuation-challenged programmers are trying to say here is, “You can right-click now!”
And sure enough: If you click with your thumb while your index and middle fingers are resting on the trackpad, you get a right-click (or a Control-click). Right-clicking, of course, opens a shortcut menu filled with useful commands pertaining to whatever you’re clicking.
This technique is a lot more natural than it sounds. But like trackpad scrolling and trackpad zooming, it soon becomes an indispensable skill.
Tip
If you’ve turned on “Clicking,” as described above, then the wording of this option changes to say, “Tap trackpad using two fingers for secondary click.” In this case, right-clicking is even easier: whenever you want a right click, just tap the trackpad with two fingers! It gets addictive fast.
If you have a MacBook Air, this panel contains some additional gesture options—for rotating images in iPhoto or Preview, for example. Let the little embedded movies be your guide.
Ignore accidental trackpad input. This option addresses a chronic syndrome of laptop owners who turn on the Clicking option. When you type along and a finger accidentally brushes the trackpad, it sends the insertion point onto a different line of text. Before you even notice, you’ve typed over, or typed into, some random part of your document.
This ingenious option locks out the click-and-drag trackpad functions when you’re actually typing on the keyboard—an elegantly simple solution.
Ignore trackpad when mouse is present. Here’s another ingenious advance in laptop technology. When you hook up a mouse, trackball, or tablet to your laptop, the trackpad is deactivated. If you’re using a mouse, then you probably won’t want to use the trackpad—and by turning on this checkbox, you’re no longer susceptible to brushing it accidentally.
People have named their Macs for years (Voyager, Li’l Abner, PowerThang G5). Now they can name their keyboards and mice—and, indeed, must—to accommodate Apple’s cordless Bluetooth keyboard and mouse. Here’s where you type in their names (so your Mac knows which wireless keyboard and mouse it’s “listening” to in a room full of them) and monitor their battery levels.
Mac OS X comes loaded with keyboard shortcuts for common tasks—and now you can reassign them to shortcuts you prefer. For a full discussion of the options on this pane, in Control the Menus.
The Network panel is the brain of your Mac’s Internet and local networking connections. See Chapter 10 for the settings you need to plug in.
These controls, new in Leopard, are described at length in Chapter 13.
Chapter 9 describes printing and faxing in detail. This panel’s purpose in life is to offer a centralized list of the printers you’ve introduced to the Mac, to specify the one you use most of the time, and to report on their status.
The settings in the QuickTime panel affect the way movies are played back on your Mac, including movies that stream to you from a Web page and movies that you watch using QuickTime Player (QuickTime Player). Very few of these settings are worth tweaking.
Mac OS X turns out to be one of the most secure operating systems on earth—and this panel helps to explain why. See Chapter 13 for details on locking up your Mac.
Mac OS X is an upstanding network citizen, flexible enough to share its contents with other Macs, Windows PCs, people dialing in from the road, people dialing in from the Internet, and so on. On this totally overhauled panel, you’ll find on/off switches for each of these sharing channels. In this book, many of these features are covered in other chapters:
Screen Sharing, File Sharing. Chapter 14.
Printer Sharing. Chapter 9.
Web Sharing. This single checkbox turns your Mac into a full-fledged Web server—a computer that provides Web pages to any visitors on the Internet.
Place the actual Web pages (in HTML format) into your Home→Sites folder. Then give out the URL at the bottom of the Sharing pane to any prospective visitors: family members, neighbors, and so on.
Note
Unless you have an Internet connection that’s on all the time (like a DSL or cable connection), your visitors will only be able to access the Web site when you are also online.
Remote Login. Warning: This checkbox is for Unix nerds only. When turned on, it enables you to tap into your Mac’s Unix underbelly from anywhere in the world, using a cryptic command called ssh. If you have no aspirations of ever becoming a command-line user, you can safely ignore this checkbox.
Figure 15-14. When Software Update finds an appropriate software morsel, it presents this dialog box that offers to install it automatically. (If you see a smaller version of this dialog box, with no visible list of the new components, click the Details button.) Apple has always created updated and bug-fixing versions of its software components, but they don’t do you any good if you don’t know about them. You no longer have to scour Mac news Web sites to discover that one of these components has been released and then hunt down the software itself.
Remote Management. Lets someone else control your Mac using Apple Remote Desktop, a popular add-on program for teachers.
Remote Apple Events. Lets AppleScript gurus (AppleScript) send commands to Macs across the network.
Xgrid Sharing. Xgrid is powerful software that lets you divide up a complex computational task—like computer animation or huge scientific calculations—among a whole bunch of Macs on your network, so that they automatically work on the problem when they’re otherwise sitting idle. If you’re intrigued, visit http://developer.apple.com/hardware/hpc/xgrid_intro.html.
Internet Sharing. Chapter 10.
Bluetooth Sharing. This pane lets you set up Bluetooth file sharing, a way for other people near you to shoot files over to (or receive files from) your laptop—without muss, fuss, or passwords. Number of Recent Items has the details.

Few operating-system ideas are simpler or better than this one: Whenever Apple improves or fixes some piece Mac OS X or some Apple-branded program, the Software Update program can notify you, download the update, and install it into your system automatically. These updates may include new versions of programs like iPhoto and iMovie; drivers for newly released printers, scanners, cameras, and such; bug fixes and security patches; and so on. It is, in other words, just like Windows Update.
Software Update doesn’t run rampant through your system software, however. It’s quietly respectful. For example, Software Update doesn’t download the new software without asking your permission first and explicitly telling you what it plans to install, as shown in Figure 15-14.
For maximum effortlessness, turn on the “Check for updates” checkbox and then select a frequency from the pop-up menu—daily, weekly, or monthly. If you also turn on “Download important updates in the background,” you’ll still be notified before anything gets installed, but you won’t have to wait for the downloading—the deed will already be done.
(If you’ve had “Check for updates” turned off, you can always click the Check Now button to force Mac OS X to report in to see if new patches are available.)
Using the panes of the Sound panel, you can configure the sound system of your Mac in any of several ways.
Tip
Here’s a quick way to jump directly to the Sound panel of System Preferences—from the keyboard, without ever having to open System Preferences or click Sound. Just press Option as you tap one of the volume-adjustment keys on the top row of your Apple keyboard.
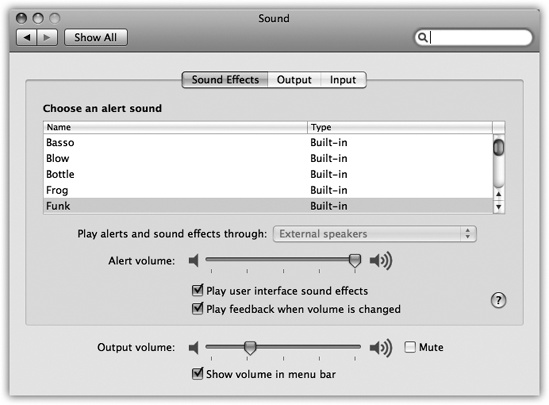
“Sound effects” means error beeps—the sound you hear when the Mac wants your attention, or when you click someplace you shouldn’t.
Just click the sound of your choice to make it your default system beep. Most of the canned choices here are funny and clever, yet subdued enough to be of practical value as alert sounds (Figure 15-15).
As for the other controls on the Sound Effects panel, they include:
Alert volume slider. Some Mac fans are confused by the fact that even when they drag this slider all the way to the left, the sound from games and music CDs still plays at full volume.
The actual main volume slider for your Mac is the “Output volume” slider at the bottom of the Sound pane. The “Alert volume” slider is just for error beeps; Apple was kind enough to let you adjust the volume of these error beeps independently.
Play user interface sound effects. This option produces a few subtle sound effects during certain Finder operations: when you drag something off of the Dock, into the Trash, or into a folder, or when the Finder finishes a file-copying job.
Play feedback when volume is changed. Most Mac keyboards have little volume-adjustment keys on the top row that, when pressed, adjust the overall speaker level. Each time you press one of these keys, the Mac beeps to help you gauge the current volume.
That’s all fine when you’re working at home. But more than one person has been humiliated in an important meeting when the Mac made a sudden, inappropriately loud sonic outburst—and then amplified that embarrassment by furiously and repeatedly pressing the volume-down key, beeping all the way.
If you turn off this checkbox, the Mac won’t make any sound at all as you adjust its volume. Instead, you’ll see only a visual representation of the steadily decreasing (or increasing) volume level.
Tip
If you like the little volume-adjustment clicks most of the time, you can shut them up on a one-shot basis by pressing Shift as you tap the volume keys.
Play Front Row sound effects. You can read about Front Row, which turns your Mac screen into a giant multimedia directory for your entire Mac, in Chapter 16. All this option does is silence the little clicks and whooshes that liven up the proceedings when you operate Front Row’s menus.
“Output” means speakers or headphones. For 99 percent of the Mac-using community, this pane offers nothing useful except the Balance slider, with which you can set the balance between your Mac’s left and right stereo speakers.
This panel lets you specify which sound source you want the Mac to “listen to,” if you have more than one connected: external microphone, internal microphone, line input, USB headset, or whatever. It also lets you adjust the sensitivity of that microphone—its input volume—by dragging the slider and watching the real-time Input level meter above it change as you speak.
Tip
The new “Use ambient noise reduction” is great if you make podcasts or use dictation software. It turns any mike into what amounts to a noise-canceling microphone, deadening the background noise while you’re recording.
Although it may surprise many Mac users, the Mac is quite talented when it comes to speech. Its abilities fall into two categories: reading text aloud, using a synthesized voice; and taking commands from your voice.
The Apple marketing machine may have been working too hard when it called this feature “speech recognition”—the Mac OS feature called PlainTalk doesn’t take dictation, typing out what you say. (For that, you need a program like MacSpeech Dictate, www.macspeech.com, which is based on the same recognition technology as Dragon NaturallySpeaking for Windows.)
Instead, PlainTalk is a command-and-control technology. It lets you open programs, trigger AppleScripts, choose menu commands, trigger keystrokes, and click dialog box buttons and tabs—just by speaking their names.
Few people use PlainTalk speech recognition. But if your Mac has a microphone, PlainTalk is worth at least a 15-minute test drive. It may become a part of your work routine forever. Complete details are in the free downloadable Appendix for this chapter, PlainTalk Speech Recognition.pdf. It’s available on this book’s “Missing CD” at www.missingmanuals.com.
The conversation doesn’t have to be one-way; it’s even easier to make the Mac talk.
The Mac can read almost anything you like: text that you pass your cursor over, alert messages, menus, and any text document in any program. It can speak in your choice of 24 synthesizer voices, ages 8 to 50. Most read with a twangy, charmingly Norwegian accent—all but Alex, who makes his debut in Leopard and sounds scarily like a professional human voice-over artist.
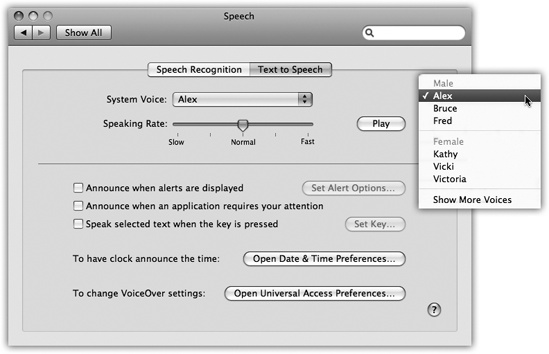
Figure 15-16. At the outset, you see only six voices—the ones that sound the most human. Choose More Voices to see the complete list of 22. Then, for 15 minutes of hilarity, try clicking the voices in turn to hear sample sentences. Drag the slider to affect how fast each one speaks. (Clearly, Apple’s programmers had some fun with this assignment.)
To set this up, click the Text to Speech tab (Figure 15-16), Here, you can control which voice your Mac uses, as well as how fast it should speak. Click “Speak selected text when the key is pressed”; you’ll be asked to press the keys you want to use as a trigger (like Option-S). From now on, the Mac will read aloud any highlighted text, in any program, when you press Option-S!
Here’s how you tell the Mac (a) which categories of files and information you want the Spotlight search feature to search, (b) which folders you don’t want searched, for privacy reasons, and (c) which key combination you want to use for summoning the Spotlight menu or dialog box. Details appear are in Chapter 3.
Use this panel to pick the System Folder your Mac will use the next time it starts up—when you’re swapping between Mac OS X and Windows (running with Boot Camp), for example.
Here’s the master on/off switch and options panel for Time Machine, which is described in Monitors.
The Universal Access panel is designed for people who type with one hand, find it difficult to use a mouse, or have trouble seeing or hearing. (These features can also be handy when the mouse is broken or missing.)
If you have trouble seeing the screen, then boy, does Mac OS X have features for you.
The Mac has always been able to read stuff on the screen out loud. But in Leopard, Apple took this feature light-years farther, turning it into a full-blown screen reader for the benefit of people who can’t see. VoiceOver doesn’t just read every scrap of text it finds on the screen, it also lets you control everything on the screen (menus, buttons, and so on) without ever needing the mouse.
As you can guess, learning VoiceOver means learning a lot of new keyboard shortcuts. (Most of them involve the same two modifier keys pressed together: Control-Option.) Click “Open VoiceOver Utility” to configure this feature’s settings. You’ll want to spend a good deal of time with the online help screens reading about how VoiceOver works (choose Help→Mac Help, and search for voiceover).
Another quick solution is to reduce your monitor’s resolution—thus magnifying the image—using the Displays panel described earlier in this chapter. If you have a 17-inch or larger monitor set to, say, 640 × 480, the result is a greatly magnified picture.
That method doesn’t give you much flexibility, however, and it’s a hassle to adjust. If you agree, then try the Zoom feature that appears here; it lets you enlarge the area surrounding your cursor in any increment.
To make it work, press Option-![]() -8 as you’re working. Or, if the Seeing
panel is open, click On in the Zoom section. That’s the master
switch.
-8 as you’re working. Or, if the Seeing
panel is open, click On in the Zoom section. That’s the master
switch.
No zooming actually takes place, however, until you press
Option-![]() -plus sign (to zoom in) or
Option-
-plus sign (to zoom in) or
Option-![]() -minus sign (to zoom out). With each press,
the entire screen image gets larger or smaller, creating a virtual
monitor that follows your cursor around the screen.
-minus sign (to zoom out). With each press,
the entire screen image gets larger or smaller, creating a virtual
monitor that follows your cursor around the screen.
Tip
If you have a laptop, just using the Control-key trackpad trick described in Mouse Tab is a far faster and easier way to magnify the screen.
And if you have a mouse with a scroll wheel on top (or a scroll-pea, like Apple’s standard Mighty Mouse), you can also zoom in or out by pressing Control while you turn that.
If you click Options, you’ll find acres of options that control when the enlarged screen image pans (all the time, or only when the pointer hits a screen edge), the maximum or minimum degree of enlargement, and so on.
While you’re at it, pressing
Control-Option-![]() -* (asterisk), or clicking the “Switch to
Black on White” button, inverts the colors of the screen, so that
text appears white on black—an effect that some people find easier
to read. (This option also freaks out many Mac fans who turn it on
by mistake, somehow pressing Control-Option-
-* (asterisk), or clicking the “Switch to
Black on White” button, inverts the colors of the screen, so that
text appears white on black—an effect that some people find easier
to read. (This option also freaks out many Mac fans who turn it on
by mistake, somehow pressing Control-Option-![]() -* by accident during everyday work. They
think that the Mac’s expensive monitor has just gone loco. Now you
know better.)
-* by accident during everyday work. They
think that the Mac’s expensive monitor has just gone loco. Now you
know better.)
No matter which color mode you choose, the “Enhance
contrast” slider is another option that can help. It makes blacks
blacker and whites whiter, further eliminating in-between shades
and thereby making the screen easier to see. (If the Universal
Access panel doesn’t happen to be open, you can always use the
keystrokes Control-Option-![]() -< and -> to decrease or increase
contrast.)
-< and -> to decrease or increase
contrast.)
If you have trouble hearing the Mac’s sounds, the obvious solution is to increase the volume, which is why this panel offers a direct link to the Sound preferences pane. (If your Mac doesn’t have external speakers, consider getting some.)
Fortunately, hearing your computer usually isn’t critical (except when working in music and audio, of course). The only time audio is especially important is when the Mac tries to get your attention by beeping. For those situations, turn on “Flash the screen when an alert sound occurs” (an effect you can try out by clicking the Flash Screen button). Now you’ll see a white flash across the entire monitor whenever the Mac would otherwise beep—not a bad idea on laptops, actually, so that you don’t miss beeps when you’ve got the speakers muted.
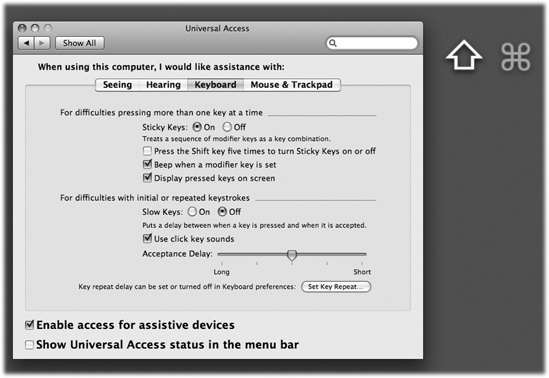
Figure 15-17. Whenever you want to press a multiple-key keystroke like
Shift-![]() -D, press them one at a time. You’ll see
ghost images of these keys superimposed on your screen, as though
to show you which keystrokes you’ve added to your temporary
collection. To “un-press” a key you’ve already pressed, press it
again twice.
-D, press them one at a time. You’ll see
ghost images of these keys superimposed on your screen, as though
to show you which keystrokes you’ve added to your temporary
collection. To “un-press” a key you’ve already pressed, press it
again twice.
This panel offers two clever features designed to help people who have trouble using the keyboard.
Sticky Keys lets you press multiple-key shortcuts (involving keys like Shift, Option, Control, and
) one at a time instead of all
together.To make Sticky Keys work, first turn on the master switch at the top of the dialog box. Then go to work on the Mac, triggering keyboard commands as shown in Figure 15-17.
If you press a modifier key twice, meanwhile, you lock it down. (Its onscreen symbol gets brighter to let you know.) When a key is locked, you can use it for several commands in a row. For example, if a folder icon is highlighted, you could double-press
to lock it down—and then type O (to open
the folder), look around, and then press W (to close the
window). Press the key a third time to “un-press” it.Tip
The checkbox called “Press the Shift key five times to turn Sticky Keys on or off” gives you the flexibility of turning Sticky Keys on and off at will, without even taking a trip to System Preferences. You’ll hear a special clacking sound effect alerting you that you just turned on Sticky Keys. (Repeat the five presses to turn Sticky Keys off again.)
Slow Keys doesn’t register a key press at all until you’ve held down the key for more than a second or so, to screen out accidental key presses.
If “Use click key sounds” is turned on, you’ll hear a little typing sound each time you press a key—but none of these key presses registers unless you hold the key down for a moment. You hear a different sound when the Mac actually accepts the key press—and, of course, you’ll see the letter you typed appear onscreen.
Mouse Keys is designed to help people who can’t use the mouse—or who want more precision in graphics programs. It lets you click, drag, and otherwise manipulate the cursor by pressing the keys on your numeric keypad. (It’s not very useful on keyboards that don’t have separate numeric keypads, including laptops.)
When Mouse Keys is turned on, the 5 key acts as the clicker—hold it down for a moment to “click the mouse,” do that twice to double-click, and so on. Hold down the 0 key to lock down the mouse button, and the period key to unlock it. (The amount of time you have to hold them depends on how you’ve set the Initial Delay slider.)
Move the cursor around the screen by pressing the eight keys that surround the 5 key. (For example, hold down the 9 key to move the cursor diagonally up and to the right.) If you hold one of these keys down continuously, the cursor, after a pause, begins to move smoothly in that direction—according to the way you have adjusted the sliders called Initial Delay and Maximum Speed.
Tip
The checkbox called “Press the Option key five times to turn Mouse Keys on or off” saves you the trouble of opening System Preferences.
The Cursor Size slider is a godsend not only to people with failing vision, but also to anyone using one of Apple’s large, super-high-resolution screens; as the pixel density increases, the arrow cursor gets smaller and smaller. This slider lets you make the arrow cursor larger—much larger, if you like—making it much easier to see.