You know how every copy of Windows comes with Outlook Express, a basic, free email program? Well, every copy of Mac OS X comes with Mail, a slightly fancier email program that’s also free. Mail is a surprisingly complete, refreshingly attractive program, filled with shortcuts and surprises. Together with the high-octane Address Book program included with Mac OS X, you may never pine for your Windows setup again.
Note
This chapter assumes that you’ve already transferred your email, addresses, and email account settings to Mail and the Address Book, as described in Chapter 6.
You get new mail and send mail you’ve already written in any of several ways:
Click Get Mail on the toolbar.
Choose Mailbox→Get All New Mail (or press Shift-
 -N).
-N).Note
If you have multiple email accounts, you can also use the Mailbox→Get New Mail submenu to pick just one account to check for new mail.
Right-click Mail’s Dock icon, and choose Get New Mail from the shortcut menu. (You can use this method from within any program, as long as Mail is already open.)
Wait. Mail comes set to check your email automatically every few minutes. To adjust its timing or turn this feature off, choose Mail→Preferences, click General, and then choose a time interval from the “Check for new mail” pop-up menu.
Now Mail contacts the mail servers listed in the Accounts pane of Mail’s preferences, retrieving new messages and downloading any files attached to those messages. It also sends any outgoing messages that couldn’t be sent when you wrote them.
Tip
The far-left column of the Mail window has a tiny Mail
Activity monitor tucked away; click the square icon at the bottom of
the Mail window to reveal Mail Activity. If you don’t want to give
up window real estate, or you prefer to monitor your mail in a
separate window, you can do that, too. The Activity Viewer window
gives you a Stop button, progress bars, and other useful
information. Summon it by choosing Window→Activity Viewer, or by
pressing ![]() -0.
-0.
Also, if you’re having trouble connecting to some (or all) of your email accounts, choose Window→Connection Doctor. There, you can see detailed information about which of your accounts aren’t responding. If your computer’s Internet connection is at fault, you can click Assist Me to try to get back online.
GEM IN THE ROUGH: The Mighty Morphing Interface
You don’t have to be content with the factory-installed design of the Mail screen. You can control almost every aspect of its look and layout.
For example, you can control the main window’s information columns exactly as you would in a Finder list view window—make a column narrower or wider by dragging the right edge of its column heading, rearrange the columns by dragging their titles, and so on.
You can also control which columns appear using the commands in the View→Columns menu. Similarly, you can sort your email by clicking these column headings, exactly as in the Finder. Click a second time to reverse the sorting order.
The various panes of the main window are also under your control. For example, you can drag the divider bar between the Messages list and the Preview pane up or down to adjust the relative proportions, as shown here. In fact, you can get rid of the Preview pane altogether by double-clicking the divider line, double-clicking just above the vertical scroll bar, or dragging the divider line’s handle all the way to the bottom of the screen. Bring it back by dragging the divider line up from the bottom.
You can also control the Mailboxes pane. Drag its thin
vertical line that separates this tinted column from the white
messages area to make the column wider or narrower. You can even
drag it so tightly that you see only the mailboxes’ icons. You can
make the column disappear or reappear by choosing View→Hide
Mailboxes (or View→Show Mailboxes), or by pressing
Shift-![]() -M.
-M.
Finally, you have full control over the toolbar, which works
much like the Finder toolbar. You can rearrange or remove icon
buttons (by ![]() -dragging them); add interesting new buttons
to the toolbar (by choosing View→Customize Toolbar); change its
display to show just text labels or
just icons—either large or small (by repeatedly
-dragging them); add interesting new buttons
to the toolbar (by choosing View→Customize Toolbar); change its
display to show just text labels or
just icons—either large or small (by repeatedly
![]() -clicking the white, oval, upper-right toolbar
button); or hide the toolbar entirely (by clicking that white button
or using the View→Hide Toolbar command).
-clicking the white, oval, upper-right toolbar
button); or hide the toolbar entirely (by clicking that white button
or using the View→Hide Toolbar command).

Mail, like Outlook Express, lists your various email folders in a column on the left-hand side of the window. In this Mailboxes column, you’ll find the usual suspects, sometimes hidden by flippy triangles: Inbox, Outbox, Sent, Drafts, and so on. Only a few of these mailboxes may be new to you:
Trash works a lot like the Trash on your desktop, in that messages you put there don’t actually disappear. They remain in the Trash folder until you permanently delete them or move them somewhere else—or until Mail’s automatic trash-cleaning service deletes them for you (Method 1: Emptying the Trash folder).
Junk appears automatically when you use Mail’s spam filter, as described later in this chapter.
On My Mac is a folder on your Mac for your mail-filing convenience. You can set these folders up yourself (Filing Messages).
Reminders. Any Notes you’ve jotted down while working in Mail are here. (In Notes for notes on Notes.) To Do items hang out here as well (To Dos).
RSS Feeds. Who needs to bop into a Web browser to keep up with the news? Mail brings it right to you while you’re corresponding. RSS Feeds explains how to set up RSS feeds in Mail.
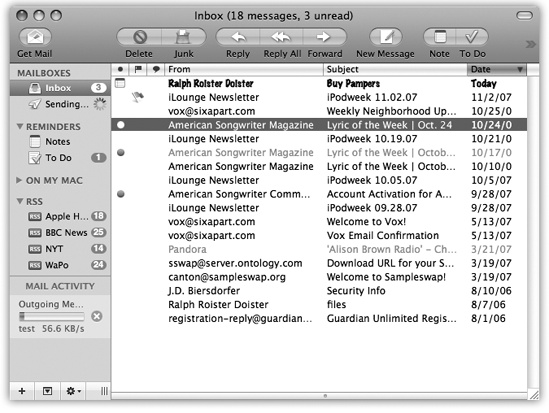
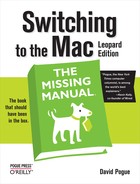
Figure 11-1. If you’ve ever used iTunes, you’ll notice a lot of similarities with the Mail window. All your information sources—mailboxes, notes, To Do items, and RSS Feeds—are grouped tidily in the far left column where you can always see them. Buttons along the top of the Mail window let you create new messages, notes, and tasks with a click. To see what’s in one of these folders, click it once. The list of its messages appears in the top half of the right side of the window (the Messages list). When you click a message name, the message itself appears in the bottom half of the main window (the Preview pane).
To see what’s in one of these folders, click it once. The list of its messages appears in the top half of the main window. Now, when you click a message name, the message itself appears in the Preview pane.
Figure 11-1 shows the idea.
To send email to a recipient, click the New icon on the toolbar. The New Message form, shown in Figure 11-2, opens. If you’ve ever sent email from a Windows PC, this should all feel familiar. Here are a few notes:
To send this message to more than one person, separate their addresses in the “To:” box with commas: [email protected], [email protected], [email protected].
Mail offers Auto-complete. If somebody is in your Address Book (Address Book), just type the first couple letters of his name or email address; Mail automatically completes the address. (If the first guess is wrong, type another letter or two until Mail revises its proposal.)
As in most dialog boxes, you can jump from blank to blank (from the “To:” field to the “Cc:” field, for example) by pressing the Tab key.
Figure 11-2. A message has two sections: the header, which holds information about the message; and the body, the big empty area that contains the message itself. In addition, the Mail window has a toolbar, which offers features for composing and sending messages. The Signature pop-up menu doesn’t exist until you create a signature (Signatures); the Account pop-up menu lets you pick which email address you’d like to send the message from (if you have more than one email address).
A blind carbon copy (“Bcc”) lets you send a message to someone on the sly (none of the “To” and “Cc” recipients will know that you sent the message to the “Bcc” recipients). If you’re sending a message from a different email address than usual, “Reply-to” lets you specify an email address that your recipient should, well, reply to. And a message’s Priority lets you tell your recipients how urgent the message is.
If you would find these fields helpful while composing a message, click the three-lined pop-up menu on the left side of the New Message window. Click Customize. Now just turn on the checkboxes next to whichever fields you want visible, and click OK.
There are two main kinds of email: plain text and formatted (what Apple calls Rich Text). Plain text messages are faster to send and open, universally compatible with the world’s email programs, and greatly preferred by many veteran computer fans. And even though the message is plain, you can still attach pictures and other files.
By contrast, formatted messages (see Figure 11-3) sometimes open slowly, and in some email programs the formatting doesn’t come through at all.
To control which kind of mail you send on a message-by-message basis, choose, from the Format menu, either Make Plain Text or Make Rich Text. To change the factory setting for new outgoing messages, choose Mail→Preferences, click the Composing icon, and choose from the Message Format pop-up menu.
As you type your message, Mail checks your spelling, using a dotted red underline to mark questionable words. To check for alternative spellings for a suspect word, right-click it. From the list of suggestions in the shortcut menu, click the word you really intended, or choose Learn Spelling to add the word to the Mac OS X dictionary shared by all Cocoa programs (Two Kinds of Programs: Cocoa and Carbon).
Tip
To turn off automatic spell check, choose Edit→Spelling→Check Spelling→Never. Or, if you’d rather Mail wait until you’re done composing your messages before spell checking, choose Edit→Spelling→Check Spelling→When You Click Send.
When you click Send (or press Shift-
-D), your Mac connects to the Internet and
sends the message.If you’d rather have Mail place each message you write in the Outbox folder, quietly collecting them instead of connecting to the Net the moment you click Send, choose Mailbox→Go Offline. While you’re offline, Mail will refrain from trying to connect, which is a great feature when you’re working on a laptop at 39,000 feet. (Choose Mailbox→Go Online to reverse the procedure.)
Sending little text messages is fine, but it’s not much help when you want to send somebody a photograph, a sound, or a Word document. To attach a file to a message you’ve written, use one of these methods:
Drag the icons you want to attach directly off the desktop (or out of a folder) into the New Message window. There your attachments appear with their own hyperlinked icons (shown in Figure 11-3), meaning that your recipient can simply click to open them.
Tip
Exposé was born for this moment. Hit the F11 key to make all open windows flee to the edges of the screen, revealing the desktop. Root around until you find the file you want to send. Begin dragging it; without releasing the mouse, press F11 again to bring your message window back into view. Complete your drag into the message window.
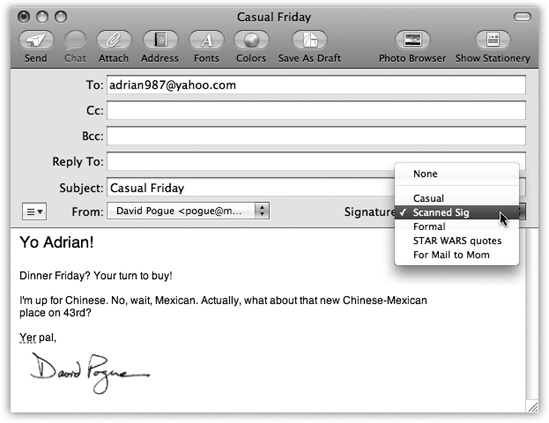
Figure 11-3. If you really want to use formatting, click the Fonts icon on the toolbar to open the Font panel, or the Colors icon to open the Color Picker (UP TO SPEED: The Color Picker). The Format menu (in the menu bar) contains even more controls: paragraph alignment (left, right, or justify), and even Copy and Paste Style commands that let you transfer formatting from one block of text to another.
Mail makes it look as though you can park the attached file’s icon (or the full image of a graphics file) inside the text of the message, mingled with your typing. Don’t be fooled, however; on the receiving end, all of the attachments will be clumped together at the end of the message (unless your recipient also uses Mail).
Drag the icons you want to attach from the desktop onto Mail’s Dock icon. Mail dutifully creates a new, outgoing message, with the files already attached.
Click the Attach icon on the New Message toolbar, choose File→Attach File, or press Shift-
-A. The standard Open File sheet now
appears, so that you can navigate to and select the files you
want to include. (You can choose multiple files simultaneously
in this dialog box. Just -click or Shift-click the individual files
you want as though you were selecting them in a Finder
window.)Once you’ve selected them, click Choose File (or press Enter). You return to the New Message window, where the attachments’ icons appear, ready to ride along when you send the message.
To remove an attachment, drag across its icon to highlight it, and then press the Delete key. (You can also drag an attachment icon clear out of the window into your Dock’s Trash, or choose Message→Remove Attachments.)
If you have a high-speed connection like a cable modem, by the way, have pity on your recipient. A big picture or movie file might take you only seconds to send, but tie up your correspondent’s modem for hours.
Signatures are bits of text that get stamped at the bottom of your outgoing email messages. A signature might contain a name, a postal address, a pithy quote, or even a scan of your real signature.
You can customize your signatures by choosing Mail→Preferences, and then clicking the Signatures icon. Here’s what you should know:
To build up a library of signatures that you can use in any of your accounts: Select All Signatures in the leftmost pane, and then click the + button to add each new signature. Give each new signature a name in the middle pane, and then customize the signatures’ text in the rightmost pane.
Tip
If you ever get tired of a signature, you can delete it forever by selecting All Signatures→[your signature’s name], clicking the - button, and then clicking OK.
To make a signature available in one of your email accounts: Drag the signature’s name from the middle pane onto the name of the account in the leftmost pane. In other words, you can make certain signatures available to only your work (or personal) account, so you never accidentally end up appending your secret FBI contact signature to the bottom of a birthday invitation you send out.
To assign a particular signature to one account: In the left pane, click an account; choose from the Choose Signature pop-up menu. Each time you compose a message from that account, Mail inserts the signature you selected.
Tip
To make things more interesting for your recipients, pick At Random; Mail selects a different signature each time you send a message. Or, if you’re not that much of a risk-taker, choose In Sequential Order; Mail picks the next signature in order for each new message you write.
Remember, that you can always change your signature on a message-by-message basis, using the Signature pop-up menu in any new email message.
To use the signature feature as a prefix in replies: Turn on “Place signature above quoted text.” If you turn on this setting, your signature gets inserted above any of the text that you’re replying to, rather than below. You’d use this setting if your “signature” said something like, “Hi there! You wrote this to me—“.
Tip
If you’re into consistent typographical styling, also turn on “Always match my default font.” That setting makes sure any messages you send contain the signature in the same font as the rest of the message, lending an air of professionalism to your message.
Rich text—and even plain text—messages are fine for your everyday personal and business correspondence. But suppose you have an occasion where you want to jazz up your mail, like an electronic invitation to a bridal shower or a mass-mail update as you get your kicks down Route 66.
These messages just cry out for Mail’s new Stationery feature. Stationery means colorful, predesigned mail templates that you make your own by dragging in photos from your own collection. Those fancy fonts and graphics will certainly get people’s attention when they open the message.
Note
They will, that is, if their email programs understand HTML formatting. That’s the formatting that Mail uses for its stationery. (If the nerd-word HTML rings a bell, it’s because this HyperText Markup Language is the same used to make many Web pages so lively and colorful.)
It might be a good idea to make sure everyone on your recipient list has a mail program that can handle HTML; otherwise, your message may look like a jumble of code and letters in the middle of the screen.
To make a stylized message with Mail Stationery:
Create a new message.
Click File→New Message, press
-N, or click the New Message button on the
Mail window toolbar. The choice is up to you.On the right side of the toolbar on the New Message window, click Show Stationery.
A panel opens up, showing you all the available templates, in categories like “Birthday” and “Announcements.”
Click a category, and then click a stationery thumbnail image to apply it to your message.
The body of your message changes to take on the look of the template.
If you like what you see, click the Hide Stationery button on the toolbar to fold up the stationery-picker panel.
Tip
If you don’t like the background color, try clicking the thumbnail; some templates offer a few different color choices.
Apple’s canned stationery looks fantastic. The only problem is, the photos that adorn most of the templates are pictures of somebody else’s family and friends. Unless you work for Apple’s modeling agency, you probably have no clue who they are.
Fortunately, it’s easy enough to replace those placeholder photos with your own snaps.
Add and adjust pictures.
Click the Photo Browser icon on the message toolbar to open up a palette that lists all the photos you’ve stored in iPhoto, Aperture, and Photo Booth (Figure 11-4).
Tip
If you don’t keep your pictures in any of those programs, you can drag any folder of pictures onto the Photo Browser window to add them.
Figure 11-4. To use Stationery, start by clicking a template, then add your own text in place of the generic copy that comes with the template. Click the Photo Browser button at the top of the message window to open your Mac’s photo collections (shown at right), and then drag the images you want into the picture boxes on the stationery template. You don’t have to know a lick of HTML to use the templates—it’s all drag, drop, and type, baby.
Now you can drag your own pictures directly onto Apple’s dummy photos on the stationery template. They replace the sunny models.
To resize a photo in the template, double-click it. A slider appears that lets you adjust the photo’s size within the message. Drag the mouse around the photo window to reposition the picture relative to its frame.
Select the fake text and type in what you really want to say.
Unless you’re writing to your Latin students, of course, in which case “Duis nonsequ ismodol oreetuer iril dolore facidunt” might be perfectly appropriate.
Once you’ve got that message looking the way you want it, address it just as you would any other piece of mail, and click the Send button to get it on its way.
Tip
You’re not stuck with Apple’s designs for your Stationery templates; you can make your own. Just make a new message, style the fonts and photos the way you want them, and then choose File→Save as Stationery. You can now select your masterwork in the Custom category, which appears down at the end of the list in the stationery-picker panel.
If you decide that the message would be better off as plain old text, click Show Stationery on the message window. In the list of template categories, click Stationery and then Original to strip the color and formats out of the message.
Mail puts all incoming email into your Inbox; the statistic after the word Inbox lets you know how many messages you haven’t yet read. New messages are also marked with light blue dots in the main list.
Tip
The Mail icon in the Dock also shows you how many new messages you have waiting; it’s the number in the red circle.
Click the Inbox folder to see a list of received messages. If it’s a long list, press Control-Page Up and Control-Page Down to scroll. Click the name of a message once to read it in the Preview pane, or double-click a message to open it into a separate window. (If a message is already selected, pressing Return or Enter also opens its separate window.)
Tip
Instead of reading your mail, you might prefer to have Mac OS X read it to you, as you sit back in your chair and sip a strawberry daiquiri. Highlight the text you want to hear (or choose Edit→Select All), and then choose Edit→Speech→Start Speaking. You’ll hear the message read aloud, in the voice you’ve selected on the Speech pane of System Preferences.
To stop the insanity, choose Edit→Speech→Stop Speaking.
Once you’ve viewed a message, you can respond to it, delete it, print it, file it, and so on. The following pages should get you started.
Threading is one of the most useful mail-sorting methods to come along in a long time—and it’s available in Mail. When threading is turned on, Mail groups emails with the same subject (like “Raccoons” and “Re: Raccoons”) as a single item in the main mail list.
To turn on threading, choose View→Organize by Thread. If several messages have the same subject, they all turn light blue to indicate their membership in a thread (Figure 11-5).
Here are some powerful ways to use threading:
Figure 11-5. Threads have two parts: a heading (the subject of the thread, listed in dark blue when it’s not selected) and members (the individual messages in the thread, listed in light blue and indented). Often, the main list shows only a thread’s heading; click the flippy triangle to reveal its members.
View a list of all the messages in a thread by clicking its heading. In the Preview pane, you see a comprehensive inventory of the thread (Figure 11-5). You can click a message’s name in this list to jump right to it.
Move all the members of a thread to a new mailbox simply by moving its heading. You might find this useful, for example, when you’ve just finished a project and want to file away all the email related to it quickly. (As a bonus, a circled number tells you how many messages you’re moving as you drag the heading.) You can even delete all the messages in a thread at once by deleting its heading.
Examine thread members from multiple mailboxes. Normally, threads only display messages held in the same mailbox, but that’s not especially convenient when you want to see both messages (from your Inbox) and your replies (in your Sent box). To work around that problem, click Inbox, and then
-click the Sent mailbox (or any other
mailboxes you want to include). Your threads seamlessly combine
related messages from all of the selected mailboxes.Quickly collapse all threads by choosing View→Collapse All Threads. If your main list gets cluttered with too many expanded threads, this is a quick way to force it into order. (If, on the other hand, your main list isn’t cluttered enough, choose View→Expand All Threads.)
Send someone all the messages in a thread by selecting the thread’s heading and clicking Forward. Mail automatically copies all the messages of the thread into a new message, putting the oldest at the top. You might find this useful, for instance, when you want to send your boss all the correspondence you’ve had with someone about a certain project.
When you choose the Message→Add Sender To Address Book command, Mail memorizes the email address of the person whose message is on the screen. In fact, you can highlight a huge number of messages and add all the senders simultaneously using this technique.
Thereafter, you’ll be able to write new messages to somebody just by typing the first few letters of the name or email address.
Mail recognizes commonly used bits of information that may appear in a message: a physical address, a phone number, a date and time, and so on. With one quick click, you can send that information into the appropriate Mac OS X program, like iCal, Address Book, or your Web browser (for looking an address up on a map).
Here’s how it works. When you spot a name, address, date, or time, point to it without clicking. Mail draws a dotted rectangle around it. right-click inside the rectangle, or right-click, or click the pop-up ▾ at the right side.
As shown in Figure 11-6, a shortcut menu appears. Its contents vary depending on what you’re pointing to:
Figure 11-6. Mail can detect street addresses, phone numbers, dates, and times. When it spots something you may want to add to another program like Address Book or iCal, it draws a dotted line around the info when you point to it without clicking. Click the little ▾ to get a shortcut menu for further options—like automatically adding the address to your Address Book program or seeing the address pinpointed on a Google map.
A mailing address. You can choose Show Map from the shortcut menu; your Web browser opens automatically and shows you that address on a Google map.
Alternatively, you can choose Create New Contact (to add an Address Book entry for this address) or Add to Existing Contact (if the person is in your Address Book—just not the address). Like magic, a little editing box sprouts out of the data-detected rectangle, prefilled with the information from the message, so that you can approve it.
Tip
If you highlight some text in the message and then click the pop-up ▾ menu, Mail also fills in the Notes field in this person’s Address Book entry with the highlighted text. Wicked cool.
A date and time. The shortcut menu offers two useful commands. Create New iCal Event opens Mac OS X’s calendar program and creates a new appointment at the date and time identified in the message. It’s up to you to type a name for the date, set an alarm, and do all the other appointment-setting things described in Chapter 16.
Tip
If, while working in iCal, you ever forget where this event came from, double-click it. In the Info balloon, you’ll see a link that takes you right back to the original Mail message that started it all.
If you choose Show This Date in iCal, though, you go to iCal, which opens directly to the specified date and/or time. The logic of this feature is overwhelming; after all, when someone emails you to ask if you’re free for drinks next Thursday at 10, what’s the first thing you usually want to do? Check your calendar, of course.
Just as you can attach files to a message, so people often send files to you.
Tip
Mail doesn’t ordinarily indicate the presence of attachments in the Messages list. It can do so, however. Just choose View→Columns→Attachments. A new column appears in the email list—at the far right—where you’ll see a paper-clip icon and the number of file attachments listed for each message.
Like Outlook Express for Windows, Mail doesn’t store downloaded files as normal file icons on your hard drive. They’re actually encoded right into Mail’s internal .mbox mailbox database files. To extract an attached file from this mass of software, you must proceed in one of these ways:
Click the Quick Look button in the message header. Instantly, you’re treated to a nearly full-size preview of the file’s contents. Yes, Quick Look has come to email. Its strengths and weaknesses here are exactly as described in Chapter 2.
Click the Save button in the message header to save it to the Mac’s Downloads folder, nestled within easy reach in the Dock.
Tip
If you don’t want to use the Downloads folder, you can choose a new autosave location for attachments by choosing Mail→Preferences→General→Downloads.
Right-click the attachment’s icon, and choose Save Attachment from the shortcut menu. You’ll be asked to specify where you want to put it. Or save time by choosing Save to Downloads Folder, meaning the Downloads folder in the Dock.
Drag the attachment icon out of the message window and onto any visible portion of your desktop (or any visible folder).
Click the Save button at the top of the email, or choose File→Save Attachments. (If the message has more than one attachment, this maneuver saves all of them.)
Tip
The Save button at the top of the Preview pane doubles as a pop-up menu; if you click it and keep the mouse button pressed, you can select from several other options for saving the attachments—like importing them into iPhoto or downloading only one of them.
Double-click the attachment’s icon, or single-click the blue link underneath the icon. If you were sent a document (a photo, Word file, or Excel file, for example), it now opens in the corresponding program.
Note
After the attachment is open, use the File→Save As command to save the file into a folder of your choice. Otherwise, any changes you make to the document won’t be visible except when you open it from within Mail.
Right-click the attachment’s icon. From the shortcut menu, you can specify which program you want to use for opening it, using the Open With submenu.
To answer a message, click the Reply button on the message
toolbar (or choose Message→Reply, or press ![]() -R). If the message was originally addressed
to multiple recipients, you can send your reply to everyone
simultaneously by clicking Reply All instead.
-R). If the message was originally addressed
to multiple recipients, you can send your reply to everyone
simultaneously by clicking Reply All instead.
A new message window opens, already addressed. As a courtesy to your correspondent, Mail places the original message at the bottom of the window, set off by a vertical bar, as shown in Figure 11-7.
![In Rich Text-formatted Mail messages (not to be confused with RTF [Rich Text Format] word processing format, which is very different), a reply includes the original message, marked in a special color (which you can change in Mail→Preferences) and with a vertical bar to differentiate it from the text of your reply. (In plain-text messages, each line of the reply is >denoted >with >brackets, although only your recipient will see them.) The original sender’s name is automatically placed in the “To:” field. The subject is the same as the original subject with the addition of Re: (shorthand for Regarding). You’re now ready to type your response.](http://imgdetail.ebookreading.net/design/5/9780596514129/9780596514129__switching-to-the__9780596514129__httpatomoreillycomsourceoreillyimages2128429.png.jpg)
Figure 11-7. In Rich Text-formatted Mail messages (not to be confused with RTF [Rich Text Format] word processing format, which is very different), a reply includes the original message, marked in a special color (which you can change in Mail→Preferences) and with a vertical bar to differentiate it from the text of your reply. (In plain-text messages, each line of the reply is >denoted >with >brackets, although only your recipient will see them.) The original sender’s name is automatically placed in the “To:” field. The subject is the same as the original subject with the addition of Re: (shorthand for Regarding). You’re now ready to type your response.
Tip
If you highlight some text before clicking Reply, Mail pastes only that portion of the original message into your reply. That’s a great convenience to your correspondent, who now knows exactly which part of the message you’re responding to.
At this point, you can add or delete recipients, edit the Subject line or the original message, attach a file, and so on.
Tip
Use the Return key to create blank lines in the original message. Using this method, you can splice your own comments into the paragraphs of the original message, replying point by point. The brackets preceding each line of the original message help your correspondent keep straight what’s yours and what’s hers.
When you’re finished, click Send. (If you click Reply All in the message window now, your message goes to everyone who received the original note, even if you began the reply process by clicking Reply. Mac OS X, in other words, gives you a second chance to address your reply to everyone.)
Instead of replying to the person who sent you a message, you may sometimes want to pass the note on to a third person.
To do so, click the Forward toolbar button (or choose
Message→Forward, or press Shift-![]() -F). A new message opens, looking a lot like
the one that appears when you reply. You may wish to precede the
original message with a comment of your own, along the lines of:
“Frank: I thought you’d be interested in this joke about your
mom.”
-F). A new message opens, looking a lot like
the one that appears when you reply. You may wish to precede the
original message with a comment of your own, along the lines of:
“Frank: I thought you’d be interested in this joke about your
mom.”
Finally, address it as you would any outgoing piece of mail.
A redirected message is similar to a forwarded message, with one useful difference: When you forward a message, your recipient sees that it came from you. When you redirect it, your recipient sees the original writer’s name as the sender. In other words, a redirected message uses you as a low-profile relay station between two other people.
Treasure this feature. Plenty of email programs, including Outlook and Outlook Express for Windows, don’t offer a Redirect command at all. You can use it to transfer messages from one of your own accounts to another, or to pass along a message that came to you by mistake.
To redirect a message, choose Message→Redirect, or press
Shift-![]() -E. You get an outgoing copy of the
message—this time without any quoting marks. (You can edit
redirected messages before you send them, too, which is perfect for
April Fools’ Day pranks.)
-E. You get an outgoing copy of the
message—this time without any quoting marks. (You can edit
redirected messages before you send them, too, which is perfect for
April Fools’ Day pranks.)
Sometimes there’s no substitute for a printout. Choose
File→Print, or press ![]() -P to summon the Print dialog box.
-P to summon the Print dialog box.
Mail lets you create new mailboxes in the Mailboxes pane. You might create one for important messages, another for order confirmations from Web shopping, still another for friends and family, and so on. You can even create mailboxes inside these mailboxes, a feature beloved by the hopelessly organized.
Mail in Leopard even offers smart mailboxes—self-updating folders that show you all your mail from your boss, for example, or every message with “mortgage” in its subject. It’s the same idea as smart folders in the Finder or smart playlists in iTunes: folders whose contents are based around criteria that you specify (Figure 11-8).
Figure 11-8. Mail lets you create self-populating folders. In this example, the “New Mail from Steve” smart mailbox will automatically display all messages from Steve Jobs at Apple that you’ve received in the past week.
The commands you need are all in the Mailbox menu. For example, to create a new mailbox folder, choose Mailbox→New Mailbox, or click the + button at the bottom of the Mailboxes column. To create a smart mailbox, choose Mailbox→New Smart Mailbox.
Mail asks you to name the new mailbox. If you have more than one email account, you can specify which one will contain the new folder. (Smart mailboxes, however, always sit outside your other mailboxes.) When you click OK, a new icon appears in the mailbox column, ready for use.
You can move a message (or group of messages) into a mailbox folder in any of three ways:
Drag it out of the main list onto the mailbox icon.
In the list pane, highlight one or more messages, and then choose from the Message→Move To submenu, which lists all your mailboxes.
Right-click a message, or one of several that you’ve highlighted. From the resulting shortcut menu, choose Move To, and then, from the submenu, choose the mailbox you want.
Of course, the only way to change the contents of a smart mailbox is to change the criteria that it uses to populate itself. To do so, double-click the smart mailbox icon and use the dialog box that appears.
Sometimes you’ll receive email that prompts you to some sort of action, but you may not have the time (or the fortitude) to face the task at the moment. (“Hi there... it’s me, your accountant. Would you mind rounding up your expenses for 1997 through 2007 and sending me a list by email?”)
That’s why Mail lets you flag a message, summoning a little flag icon in a new column next to a message’s name. These indicators can mean anything you like—they simply call attention to certain messages. You can sort your mail list so that all your flagged messages are listed first; click the flag at the top of the column heading.
To flag a message in this way, select the message (or several
messages) and then choose Message→Mark→As Flagged, or press
Option-![]() -L, or right-click the message’s name in the
list and, from the shortcut menu, choose Mark→As Flagged. (To clear
the flags, repeat the procedure, but use the Mark→As Unflagged
command instead.)
-L, or right-click the message’s name in the
list and, from the shortcut menu, choose Mark→As Flagged. (To clear
the flags, repeat the procedure, but use the Mark→As Unflagged
command instead.)
When you deal with masses of email, you may come to rely on Mail’s dedicated searching tools. They’re fast and convenient, and when you’re done with them, you can go right back to browsing your Message list as it was.
The box in the upper-right corner of the main mail window is Mail’s own private Spotlight. You can use it to hide all but certain messages, as shown in Figure 11-9.
Tip
You can also set up Mail to show you only certain messages that you’ve manually selected, hiding all others in the list. To do so, highlight the messages you want, using the usual selection techniques (Shift-clicking, for example). Then choose View→Display Selected Messages Only. (To see all of them again, choose View→Display All Messages.)
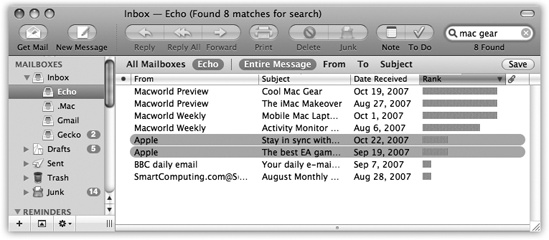
Figure 11-9. You can jump to the search box by clicking or by pressing
Option-![]() -F. As you type, Mail shrinks the list of
messages. You can fine-tune your results using the buttons just
above the list. To return to the full message list, click the
tiny
-F. As you type, Mail shrinks the list of
messages. You can fine-tune your results using the buttons just
above the list. To return to the full message list, click the
tiny ![]() at the right side of the search
box.
at the right side of the search
box.
In Leopard, this search field is more powerful than ever. For example:
You have the power of Spotlight charging up your search rankings; the most relevant messages for your search appear high on the list. And Notes and To Do items show up in the search results now, too.
When you’re searching, a thin row of buttons appears underneath the toolbar. You can use these buttons to narrow your results to only messages with your search term in their subject, for example, or to only those messages in the currently selected mailbox.
When you select a message in the search view, the Preview pane pops up from the bottom of the window. If you click Show in Mailbox, on the other hand, you exit the search view and jump straight to the message in whatever mailbox it came from. That’s perfect if the message is part of a thread, since jumping to the message also displays all the other messages from its thread.
If you think you’ll want to perform the current search again sometime, click Save in the upper-right corner of the window. Mail displays a dialog box with your search term and criteria filled in; all you have to do is give it a name and click OK to transform your search into a smart mailbox that you can open any time.
Sometimes it’s junk mail. Sometimes you’re just done with it. Either way, it’s a snap to delete a selected message, several selected messages, or a message that’s currently before you on the screen. You can press the Delete key, click the Delete button on the toolbar, choose Edit→Delete, or drag messages out of the list window and into your Trash mailbox—or even onto the Dock’s Trash icon.
TROUBLESHOOTING MOMENT: Rebuilding Your Mail Databases
Mail keeps your messages in a series of mailbox database files in your Home→Library→Mail folder.
Over time, as you add and delete hundreds of messages from these database files, some digital sawdust gets left behind, resulting in peculiarities when addressing messages or general Mail sluggishness. You also wind up with massive message files hidden on your hard drive, which can consume hundreds of megabytes of disk space. That’s a particular bummer if you like to copy your message databases to your laptop when you go on a trip.
Fortunately, it’s easy enough to rebuild the message databases. Doing so cleanses, repairs, and purges your message files. As a result, you wind up with a much more compact and healthy database.
To rebuild a mailbox, highlight it in the Mailboxes column
in Mail. (Highlight several by ![]() -clicking, if you like.) Then choose
Mailbox→Rebuild. Mac OS X takes several minutes (or hours,
depending on the size of your mailboxes) to repair and compact
your database—but if you’re experiencing Mail weirdness or
slowness, it’s well worth the sacrifice.
-clicking, if you like.) Then choose
Mailbox→Rebuild. Mac OS X takes several minutes (or hours,
depending on the size of your mailboxes) to repair and compact
your database—but if you’re experiencing Mail weirdness or
slowness, it’s well worth the sacrifice.
All of these commands move the messages to the Trash folder. If you like, you can then click its icon to view a list of the messages you’ve deleted. You can even rescue messages by dragging them back into another mailbox (back to the Inbox, for example).
Mail doesn’t vaporize messages in the Trash folder until you “empty the trash,” just like in the Finder. You can empty the Trash folder in any of several ways:
Click a message (or several) within the Trash folder list, and then click the Delete icon on the toolbar (or press the Delete key). Now those messages are really gone.
Choose Mailbox→Erase Deleted Messages (
-K). (If you have multiple accounts,
choose Erase Deleted Messages→In All Accounts.)Right-click the Trash mailbox icon, and then choose Erase Deleted Messages from the shortcut menu. Or choose the same command from the
 pop-up menu at the bottom of the
window.
pop-up menu at the bottom of the
window.Wait. Mail will permanently delete these messages automatically after a week.
If a week is too long (or not long enough), you can change this interval. Choose Mail→Preferences, click Accounts, and select the account name from the list at left. Then click Mailbox Behaviors, and change the “Erase deleted messages when” pop-up menu. If you choose Quitting Mail from the pop-up menu, Mail will take out the trash every time you quit the program.
UP TO SPEED: All the Little Symbols
The first column of the main email list shows little symbols that let you know at a glance how you’ve processed certain messages. The most common one is, of course, the light-blue dot (
 ), which means “new message.” (After
reading a message, you can mark it once again as an
unread message by choosing
Message→Mark→As Unread [Shift--U]—or by right-clicking the message’s
name and then choosing Mark→As Unread from the shortcut
menu.)
), which means “new message.” (After
reading a message, you can mark it once again as an
unread message by choosing
Message→Mark→As Unread [Shift--U]—or by right-clicking the message’s
name and then choosing Mark→As Unread from the shortcut
menu.)You might also see these symbols, which represent messages that you’ve replied to (
 ), forwarded (
 ), redirected (
 ), or flagged
  ).
).A well-guarded secret, however, is that the “replied to” and “forwarded” symbols aren’t just indicators—they’re buttons. When you see one of these symbols next to your original message, click it to jump straight to your reply (or forwarded message). You’re spared the trouble of having to search through all your mailboxes.
Incidentally, you may have noticed that Mail marks a message as having been read the moment you click it. You can change it back to unread by using its shortcut menu—but there’s also a more permanent workaround.
If you hide the Preview pane by double-clicking the divider bar just above it, Mail no longer marks messages “read” just because you clicked them in the list. (You can bring back the Preview pane by double-clicking just above the vertical scroll bar, or by dragging the divider bar back up from the bottom.)
Mail offers a second—and very unusual—method of deleting messages that doesn’t involve the Trash folder at all. Using this method, pressing the Delete key (or clicking the Delete toolbar button) simply hides the selected message in the list. Hidden messages remain hidden, but don’t go away for good until you use the Rebuild Mailbox command described in the box in TROUBLESHOOTING MOMENT: Rebuilding Your Mail Databases.
If this arrangement sounds useful, choose Mail→Preferences; click Accounts and select the account from the list on the left; click Mailbox Behaviors; and then turn off the checkbox called “Move deleted messages to a separate folder” or “Move deleted messages to the Trash mailbox.” (The checkbox’s wording depends on what kind of account you have.) From now on, messages you delete vanish from the list.
They’re not really gone, however. You can bring them back,
at least in ghostly form, by choosing View→Show Deleted Messages
(or pressing ![]() -L). Figure 11-10 shows the
idea.
-L). Figure 11-10 shows the
idea.
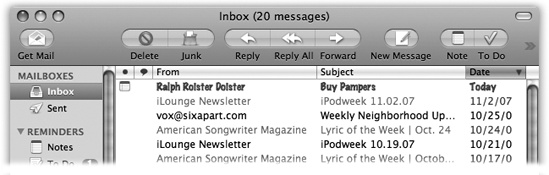
Figure 11-10. To resurrect a deleted message (indicated in light gray type), right-click it and choose Undelete from the shortcut menu.
Using this system, in other words, you never truly delete messages; you just hide them.
At first, you might be concerned about the disk space and database size involved in keeping your old messages around forever like this. Truth is that Mac OS X is perfectly capable of maintaining many thousands of messages in its mailbox databases—and with the sizes of hard drives nowadays, a few thousand messages aren’t likely to make much of a dent.
Meanwhile, there’s a huge benefit to this arrangement. At some point, almost everyone wishes they could resurrect a deleted message—maybe months later, maybe years later. Using the hidden-deleted-message system, your old messages are always around for reference. (The downside to this system, of course, is that SEC investigators can use it to find incriminating mail that you thought you’d deleted.)
When you do want to purge these messages for good, you can always return to the Special Mailboxes dialog box and turn the “Move deleted mail to a separate folder” checkbox back on.
Once you know how to create folders, the next step in managing your email is to set up a series of message rules (filters) that file, answer, or delete incoming messages automatically based on their contents (such as their subject, address, and/or size). Message rules require you to think like the distant relative of a programmer, but the mental effort can reward you many times over. Message rules turn Mail into a surprisingly smart and efficient secretary.
Here’s how to set up a message rule:
Choose Mail→Preferences. Click the Rules icon.
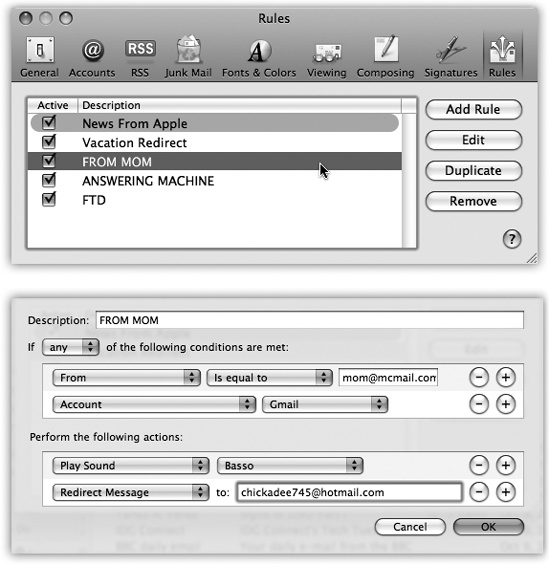
Figure 11-11. Top: Mail rules can screen out junk mail, serve as an email answering machine, or call important messages to your attention. All mail message rules you’ve created appear in this list. (The color shading for each rule is a reflection of the colorizing options you set up, if any.) Bottom: Double-click a rule to open the Edit Rule dialog box, where you can specify what should set off the rule and what it should do in response.
The Rules pane appears, as shown at top in Figure 11-11.
Click Add Rule.
Now the dialog box shown at bottom in Figure 11-11 appears.
Use the criteria options (at the top) to specify how Mail should select messages to process.
For example, if you’d like the program to watch out for messages from a particular person, you would set up the first two pop-up menus to say “From” and “Contains,” respectively.
To flag messages containing loan, $$$$, XXXX, !!!!, and so on, set the pop-up menus to say “Subject” and “Contains.”
You can set up multiple criteria here, so you flag messages whose subjects contain any one of those common spam triggers. (If you change the “any” pop-up menu to say “all,” then all of the criteria must be true for the rule to kick in.)
Specify which words or people you want the message rule to watch for.
In the text box to the right of the two pop-up menus, type the word, address, name, or phrase you want Mail to watch for—a person’s name, or $$$$, in the previous examples.
In the lower half of the box, specify what you want to happen to messages that match the criteria.
If, in Steps 1 and 2, you’ve told your rule to watch for junk mail containing $$$$ in the Subject line, here’s where you can tell Mail to delete it or move it into, say, a Junk folder.
With a little imagination, you’ll see how the options in this pop-up menu can do absolutely amazing things with your incoming email. Mail can colorize, delete, move, redirect, or forward messages—or even play a sound when you get a certain message.
By setting up the controls as shown in Figure 11-11, for example, you’ll have specified that whenever your mother ([email protected]) sends something to your Gmail account, you’ll hear a specific alert noise as the email is redirected to a different email account, [email protected].
In the very top box, name your mail rule. Click OK.
Now you’re back to the Rules pane (Figure 11-11, top). Here you can choose a sequence for the rules you’ve created by dragging them up and down. Here, too, you can turn off the ones you won’t be needing at the moment, but may use again one day.
Tip
Mail applies rules as they appear, from top to bottom, in the list. If a rule doesn’t seem to be working properly, it may be that an earlier rule is intercepting and processing some messages before the “broken” rule even sees them. To fix this, try dragging the rule (or the interfering rule) up or down in the list.
Spam, the junk that now makes up more than 80 percent of email, is a problem that’s only getting worse. Luckily, you, along with Mail’s advanced spam filters, can make it better—at least for your email accounts.
You’ll see the effects of Mail’s spam filter the first time you check your mail: A certain swath of message titles appears in color. These are the messages that Mail considers junk.
Note
Out of the box, Mail doesn’t apply its spam-targeting features to people whose addresses are in your address book, to people you’ve emailed recently, or to messages sent to you by name rather than just by email address. You can adjust these settings in Mail→Preferences→Junk Mail tab.
During your first couple of weeks with Mail, your job is to supervise Mail’s coloring job. That is, if you get spam that Mail misses, click the message, and then click the Junk button at the top of its window, or the Junk icon on the toolbar. On the other hand, if Mail flags legitimate mail as spam, slap it gently on the wrist by clicking the Not Junk button. Over time, Mail gets better and better at filtering your mail; it even does surprisingly well against the new breed of image-only spam.
The trouble with this so-called Training mode is that you’re still left with the task of trashing the spam yourself, saving you no time whatsoever.
Once Mail has perfected its filtering skills to your satisfaction, though, open Mail’s preferences, click Junk Mail, and click “Move it to the Junk mailbox.” From now on, Mail automatically files what it deems junk into a Junk mailbox, where it’s much easier to scan and delete the messages en masse.
Tip
Don’t miss the “Trust Junk Mail headers set by your Internet Service Provider” option in the Junk Mail pane of the preference window. If you turn on that checkbox, Mail takes your ISP’s word that certain messages are spam, giving you a double layer of spam protection.
The Junk filter goes a long way toward cleaning out the spam from your mail collection—but it doesn’t catch everything. If you’re overrun by spam, here are some other steps you can take:
Don’t let the spammers know you’re there. You choose Mail→Preferences, click Viewing, and turn off “Display remote images in HTML messages.” This option saves you time, because graphics are big and slow to download. It also shields you from unexpected free samples of pornographers’ wares.
But it also thwarts a common spammer tactic by blocking graphics that appear to be embedded into a message, but are actually retrieved from a Web site somewhere. Spammers use that embedded-graphics trick to know that their message has fallen on fertile ground—a live sucker who actually looks at these messages—but with that single preference switch, you can fake them out.
Rules. Set up some message rules, as described in Message Rules, that autoflag messages as spam that have subject lines containing trigger words like “Viagra,” “Herbal,” “Mortgage,” “Refinance,” “Enlarge Your”—you get the idea.
Create a private account. If you’re overrun by spam, consider sacrificing your address to the public areas of the Internet, like chat rooms, online shopping, Web site and software registration, and newsgroup posting. Spammers use automated software robots that scour every public Internet message and Web page, recording email addresses they find. (In fact, that’s probably how they got your address in the first place.)
Using this technique, at least you’re now restricting the junk mail to one, secondary mail account. Reserve a separate email account for person-to-person email.
Here are some suggestions for avoiding landing on spammers’ lists in the first place:
Don’t ask for it. When filling out forms online, turn off the checkboxes that say, “Yes, send me exciting offers and news from our partners.”
Fake out the robots. When posting messages in a newsgroup or message board, insert the letters NOSPAM somewhere into your email address. Anyone replying to you via email must delete the NOSPAM from your email address, which is a slight hassle. Meanwhile, though, the spammers’ software robots will lift a bogus email address from your online postings.
Never reply to spam. Doing so identifies your email address as an active one, and can lead to even more unwanted mail. Along the same lines, never click the “Please remove me from your list” link at the bottom of an email unless you know who sent the message.
And for goodness’ sake, don’t order anything sold by the spammers. If only one person in 500,000 does so, the spammer makes money.
The ability to subscribe to those constantly updating news summaries known as RSS feeds in your Web browser (Viewing an RSS Feed) has saved a lot of people a lot of time over the years. After all, why waste precious minutes looking for the news when you can make the news find you?
With Mail, you don’t even have to waste the seconds switching from your Inbox to your browser or dedicated RSS program to get a fresh dose of headlines. They can appear right in the main Mail window. You don’t even have to switch programs to find out which political candidate shot his foot off while it was still in his mouth.
In fact, if you find it too exhausting to click the RSS icon in the Mailboxes list, you can choose instead to have all your RSS updates land right in your Inbox along with all your other messages.
With just a few clicks, you can bring the news of the world right in with the rest of your mail. Choose File→Add RSS Feeds, and then proceed as shown in Figure 11-12.
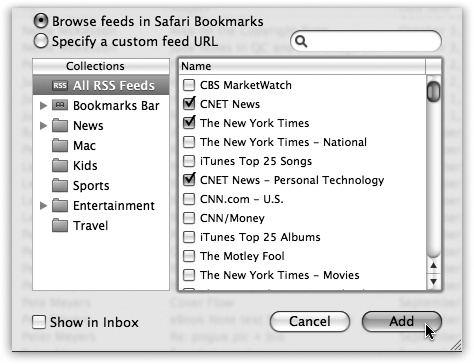
Figure 11-12. In the Add RSS Feeds box, you can click to add sites you’ve already subscribed to in Safari. If you don’t already have the feed bookmarked in Safari, click “Specify a custom feed URL” and paste the feed’s address into the resulting box. If you’ve got a ton of feeds and don’t want to wade through them all, use the search box to seek out the specific feed you need.
If you want the RSS headlines to appear in your Inbox like regular email messages, turn on “Show in Inbox.” Finally, once you’ve chosen the feeds you want to see, click Add. Your feeds now appear wherever you told them to go: either the Inbox or the Mailboxes column.
Now, in the RSS category of your Mailboxes list, the names of your RSS feeds show up; the number in the small gray circle tells you how many unread headlines are in the list. If a feed headline intrigues you enough to want more information, click “Read More...” to do just that. Safari pops up and whisks you away to the Web site that sent out the feed in the first place.
After you’ve read a news item and are done with it, click the Delete button at the top of the window. You can tell Mail to dump all the old articles after a certain amount of time (a day, a week, a month...) in Mail→Preferences→RSS→Remove Articles.
Or, to get rid of an RSS feed altogether, select it and then choose Maibox→Delete Feed. (Right-clicking the name gives you the same option.)
No operating system is complete without Notes. You have to have a place for little reminders, phone numbers, phone messages, Web addresses, brainstorms, shopping-list hints—anything that’s worth writing down, but too tiny to justify heaving a whole word processor onto its feet.
The silly thing is how many people create reminders for themselves by sending themselves an email message.
That system works, but it’s a bit inelegant. Fortunately, Mac OS X now has a dedicated Notes feature. As a bonus, it syncs automatically to the Notes folder of your iPhone’s mail program, or to other computers, as long as you have an IMAP-style email account.
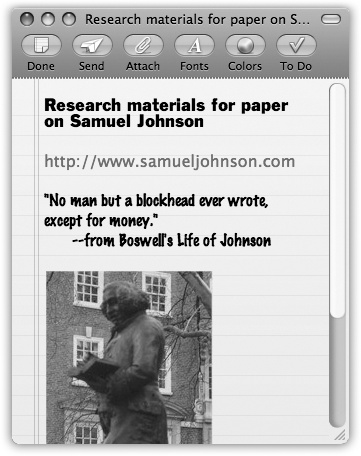
Figure 11-13. They may look like little pads of scratch paper, but Mail Notes let you paste in Web addresses and photos alongside your typed and formatted text. If you want to share, click the Send button to have the entire Note plop into a new Mail message, ready to be addressed.
Notes look like actual yellow notepaper with ruled lines, but you can style ‘em, save ‘em, and even send ‘em to your friends. You can type into them, paste into them, and attach pictures to them. And unlike loose scraps of paper or email messages to yourself that may get lost in your mailbox, Notes stay obediently tucked in the Reminders section of the Mailboxes list so you can always find them when you need them.
Tip
Ordinarily, Notes also appear in your Inbox, at the top. If you prefer to keep your Inbox strictly for messages, though, you can remove the Notes. Choose Mail→Preferences→Accounts→Mailbox Behaviors, and then turn off “Store notes in Inbox.” The Notes will still be waiting for you in the side column, down in the Reminders area.
To create a note, click the Note button on the Mail toolbar. You
can also choose File→New Note or press Control-![]() -N to pop up a fresh piece of onscreen
paper.
-N to pop up a fresh piece of onscreen
paper.
Once you have your Note, type your text and click the Fonts and Colors buttons at the top of the window to style it. To insert a picture, click the Attach button, and then find the photo or graphic on your Mac you want to use. Figure 11-13 shows an example.
Note
You can also attach other kinds of files to a Note—ordinary documents, for example. But you can’t send such Notes to other people—only Notes with pictures.
When you’re finished with your Note, click Done to save it. When you look for it in the Reminders category of the Mailboxes list, you’ll see that Mail used the first line of the Note as its subject.
To delete a Note for good, select it and press the Delete key.
If you’ve worked hard on this little Note and want to share it, double-click it to open the note into a new window. Click the Send button on its toolbar. Mail puts the whole thing into a new Mail message—complete with yellow-paper background—so your pal can see how seriously (and stylishly) you take the whole concept of “Note to self.”
You’ve got all this mail piling up with all sorts of things to remember: dinner dates, meeting times, project deadlines, car-service appointments. Wouldn’t it be great if you didn’t have to remember to look through your mailbox to find out what you’re supposed to be doing that day?
It would, and it is, thanks to Mail’s To Do feature (Figure 11-14). And the best part is that Mail accesses the same To Do list as iCal. The same task list shows up in both programs.
You can use To Dos in several different ways. For example, when you get an email message that requires further action (“I need the photos for the condo association newsletter by Friday”), highlight the important part of the text. Then do any of these things:
Click To Do in the message window’s toolbar.
Figure 11-14. Top: If a message brings a task that you need to complete, you can give yourself an extra little reminder, right in Mail. Highlight the pertinent text and click the To Do button to add a large, colorful reminder to the top of the message. Bottom: Click the arrow next to the first line of the To Do for a quick and easy way to set a due date/time and alarm, and also choose which calendar you want to use for this particular chore.
Choose File→New To Do.
Right-click the highlighted text, and then choose New To Do from the shortcut menu.
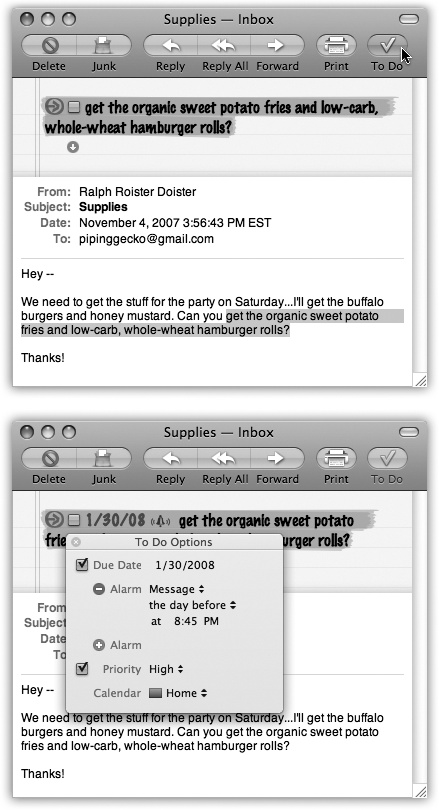
In each case, Mail pops a copy of the selected text into a yellow strip of note-style paper at the top of the message, as shown in Figure 11-14.
That task is also listed in the Reminders area of the Mailboxes list. If you need to see all the tasks that await you from all your mail accounts, click the flippy triangle to have it spin open and reveal your chores. The number in the gray circle indicates how many To Do items you still need to do.
Tip
Right-click any item in this To Do list to open a shortcut menu that offers useful controls for setting its due date, priority, and calendar(that is, iCal category).
When you click the To Do area of the Mailboxes list, all your tasks are listed in the center of the Mail window. Click the gray arrow after each To Do subject line to jump back to the original message it came from.
Tip
Not all of your life’s urgent tasks spring from email messages. Fortunately, you can create standalone To Dos, too. Just click the To Do button at the top of the Mail window when no message is selected. A blank item appears in your To Do list with the generic name “New To Do.” Select the name to overwrite it with what this reminder is really about: Buy kitty litter TODAY (or whatever).
When you complete a task, click the small checkbox in front of the To Do subject line—either in the message itself or in the Reminders list. Once you’ve marked a task as Done this way, the number of total tasks in the Reminders list goes down by one, and that’s one less thing you have to deal with.
To delete a big yellow To Do banner from a message, point to the left side of the banner until a red handwritten-looking X appears. Click the X to zap the To Do banner from the message.
You can delete a To Do item from the Reminders list by selecting it and then pressing Delete, among other methods.
Seeing your To Do items in Mail is great—when you’re working in Mail. Getting them into iCal is even better, though, because you can see the big picture of an entire day, week, or month. As it turns out, Mail and iCal share the exact same To Do list. Create a To Do in one program, and it shows up instantly in the other one.
Tip
You can even set the due date and priority of a task from within Mail. Those controls are in the To Do Options balloon (Figure 11-14). You open this balloon by right-clicking the task and choosing Edit To Do. Later, in iCal, if you double-click a To Do item, and then click “Show in Mail,” you get whisked back to the original message, sitting right there in Mail.
Address Book is Mac OS X’s little-black-book program—an electronic Rolodex where you can stash the names, job titles, addresses, phone numbers, email addresses, and Internet chat screen names of all the people in your life (Figure 11-15). Address Book can also hold related information, like birthdays, anniversaries, and any other tidbits of personal data you’d like to keep at your fingertips.

Figure 11-15. The big question: Why isn’t this program named iContact? With its three-paned view, soft rounded corners, and gradient-gray background, it looks like a close cousin of iPhoto, iCal, and iTunes.
Once you make Address Book the central repository of all your personal contact information, you can call up this information in a number of convenient ways:
You can launch Address Book and search for a contact by typing just a few letters in the Search box.
Regardless of what program you’re in, you can use a single keystroke (F12 is the factory setting, or F4 on aluminum keyboards) to summon the Address Book Dashboard widget (Dashboard). There, you can search for any contact you want, and hide the widget with the same quick keystroke when you’re done.
When you’re composing messages in Mail, Address Book automatically fills in email addresses for you when you type the first few letters.
Tip
If you choose Window→Address Panel (Option-
-A) from within Mail, you can browse all
of your addresses without even launching the Address Book
program. Once you’ve selected the people you want to contact,
just click the “To:” button to address an email to them—or, if
you already have a new email message open, to add them to the
recipients.When you use iChat to exchange instant messages with people in your Address Book, the pictures you’ve stored of them automatically appear in chat windows.
If you’ve bought a subscription to the .Mac service (.Mac Services), you can synchronize your contacts to the Web, so you can see them while you’re away from your Mac (.Mac Sync). You can also share Address Books with fellow .Mac members: Choose Address Book→Preferences→Sharing, click the box for “Share your address book,” and then click the + button to add the .Mac pals you want to share with. You can even send them an invitation to come share your contact list. If you get an invitation yourself, open your own Address Book program and choose Edit→Subscribe to Address Book.
Address Book can send its information to an iPod or an iPhone, giving you a “little black book” that fits in your shirt pocket, can be operated one-handed, and comes with built-in musical accompaniment. (To set this up, open iTunes while your iPod or iPhone is connected. Click the iPod/iPhone’s icon; on the Contacts or Info tab, turn on “Synchronize Address Book Contacts.”)
You can find Address Book in your Applications folder or (in a fresh installation of Mac OS X) in the Dock.
Tip
See Chapter 6 for details on importing addresses from other programs into Address Book.
Each entry in Address Book is called a card—like a paper Rolodex card, with predefined spaces to hold all the standard contact information.
To add a new person, choose File→New Card, press
![]() -N, or click the + button beneath the Name
column. Then type in the contact information, pressing the Tab key
to move from field to field, as shown in Figure 11-16.
-N, or click the + button beneath the Name
column. Then type in the contact information, pressing the Tab key
to move from field to field, as shown in Figure 11-16.
Tip
If you find yourself constantly adding the same fields to new cards, check out the Template pane of Address Book’s Preferences (Address Book→Preferences). There, you can customize exactly which fields appear for new cards.
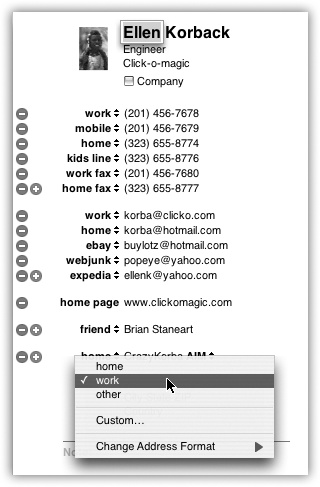
Figure 11-16. If one of your contacts happens to have three office phone extensions, a pager number, two home phone lines, a cellphone, and a couple of fax machines, no problem—you can add as many fields as you need. Click the little green + buttons when editing a card to add more phone, email, chat name, and address fields. (The buttons appear only when the existing fields are filled.) Click a field’s name to change its label; you can select one of the standard labels from the pop-up menu (Home, Work, and so on) or make up your own labels by choosing Custom, as seen in the lower portion of this figure.
Each card also contains a free-form Notes field at the bottom, where you can type any other random crumbs of information you’d like to store about the person (pet’s name, embarrassing nicknames, favorite Chinese restaurant, and so on).
When you create a new address card, you’re automatically in
Edit mode, which means you can add and remove fields and change
the information on the card. To switch into Browse Mode (where you
can view and copy contact information but not change it), click
the Edit button or choose Edit→Edit Card (![]() -L). You can also switch
out of Browse Mode in the same ways.
-L). You can also switch
out of Browse Mode in the same ways.
Tip
Regardless of which mode you’re in—Edit or Browse—you can always type, drag, or paste text into the Notes field of an address card.
You can also make new contacts in the Address Book right in
Mail, saving you the trouble of having to type names and email
addresses manually. Select a message in Mail, then choose
Message→Add Sender to Address Book (or press ![]() -Y). Presto: Mac OS X adds a new card to the
Address Book, with the name and email address fields already
filled in. Later, you can edit the card in Address Book to add
phone numbers, street addresses, and so on.
-Y). Presto: Mac OS X adds a new card to the
Address Book, with the name and email address fields already
filled in. Later, you can edit the card in Address Book to add
phone numbers, street addresses, and so on.
A group is a collection of related address cards, saved under a single descriptive name (as shown in Figure 11-16).
Organizing your contacts into groups can make them much easier to find and use—especially when your database of addresses climbs into the hundreds. For example, if you regularly send out a family newsletter to 35 relatives, you might gather the address cards of all your assorted siblings, cousins, nieces, nephews, uncles, and aunts into a single group called Family. When addressing an outgoing message using Mail, you can type this group name to reach all of your kin at once. A person can be a member of as many different groups as you want.
Tip
When you send an email message to a group en masse, how does Mail know which email address to use for each person?
Because you’ve told it. Choose Edit→Edit Distribution List. A special dialog box appears, listing everyone in each group, along with each person’s complete list of email addresses. (Use the tiny pop-up menu above the list to choose Phone or Address; that way, you can also indicate the preferred phone number and mailing address.)
To create a group, click the + button at the bottom of the
Group column in the Address Book window, or choose File→New Group
(Shift-![]() -N.) Type a name for the newly spawned group
icon in the Group column, and then populate it with address cards by
dragging entries from the Name list into the group. Clicking a group
name automatically locates and displays (in the Names column) all
the names that are a part of that group—and hides any that
aren’t.
-N.) Type a name for the newly spawned group
icon in the Group column, and then populate it with address cards by
dragging entries from the Name list into the group. Clicking a group
name automatically locates and displays (in the Names column) all
the names that are a part of that group—and hides any that
aren’t.
Tip
To turn a set of address cards into a group very quickly,
select multiple entries from the Names column—by either
Shift-clicking the names (to make contiguous selections) or
![]() -clicking (for non-contiguous
selections)—and then choose File→New Group From Selection. You end
up with a new group containing all the selected names.
-clicking (for non-contiguous
selections)—and then choose File→New Group From Selection. You end
up with a new group containing all the selected names.
To take someone out of a group, first click the group name, and then click the person’s name in the Name column and press the Delete key. If you want to remove the person from Address Book itself, click Delete in the resulting dialog box. Otherwise, just click “Remove from Group” or press Return. Address Book keeps the card, but removes it from the currently selected group.
Note
If you selected All in the Group column, rather than a specific group, you don’t get a “Remove from Group” option. Instead, the Mac just asks you to confirm that you do, in fact, want to permanently remove the card.
You can dress up each Address Book entry with a photo. Whenever you’re editing somebody’s address book card, drag a digital photo—preferably 64 pixels square, or a multiple of it—onto the empty headshot square; the image shows up as shown in Figure 11-17. Or double-click the picture well; now you can either browse to a picture on your hard drive by clicking Choose, or, if this person is with you, take a new photo by clicking the camera icon. (Don’t miss the swirly button next to it, which lets you apply nutty Photo Boothish effects.) At that point, you can enlarge, reposition, and crop the new photo.)
You don’t necessarily have to use a photo, of course. You could add any graphic that you want to represent someone, even if it’s a Bart Simpson face or a skull and crossbones. You can use any standard image file in an address card—a JPEG, GIF, PNG, TIFF, or even a PDF.
From now on, if you receive an email from that person, the photo shows up right in the email message.
Tip
If you’ve got snapshots in iPhoto, it’s particularly easy to add a picture to any address card. Just drag a picture directly from the main iPhoto window to the picture frame on the address card to insert it.
You can search for an Address Book entry inside the currently selected group by typing a few letters of a name (or address, or any other snippet of contact information) in the Search box (Figure 11-17). To search all your contacts instead of just the current group, click All in the Group list.
Tip
You can press ![]() -F to jump directly to the search field and
start typing. Your savings: one mouse click.
-F to jump directly to the search field and
start typing. Your savings: one mouse click.
If Address Book finds more than one matching card, use the
![]() and
and ![]() keys, or Return and Shift-Return, to navigate
through them.
keys, or Return and Shift-Return, to navigate
through them.
Once you’ve found the card you’re looking for, you can perform some interesting stunts. If you click the label of a phone number (“home” or “office”, for example), you see the Large Type option: Address Book displays the number in an absurdly gigantic font that fills the entire width of your screen, making it possible to read the number as you dial from across the room. You can also click the label of an email address to create a preaddressed email message, or click a home page to launch your Web browser and go to somebody’s site.

Figure 11-17. With each letter you type, Address Book filters your social circle and displays the number of matches at the bottom. The matching records themselves appear in the Name column, the first of the matching card entries appears in the far-right pane, and the matching text itself appears highlighted in the matching card.
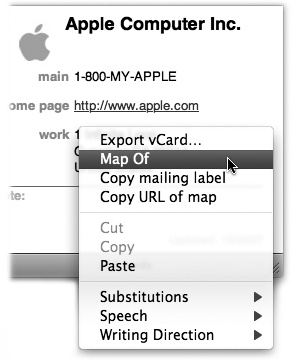
Figure 11-18. The options that become available when you click the field labels on an address card vary according to field type. Pop-up menus let you send email, open a Web page, or view a map, depending on the type of field you’ve clicked.
You can also copy and paste (or drag) address card info into another program.
Tip
Once you find a street address in your Address Book, you can find those coordinates on a map by right-clicking the address part of the card and choosing “Map Of” from the shortcut menu, as shown in Figure 11-18. Your Web browser obediently leaps up to display the address on a Google map.
You can’t do much to customize Address Book’s appearance, but the Preferences pane (Address Book→Preferences) gives you at least a couple of options in the General pane that are worth checking out:
Display Order. Choose to have names displayed with the first name followed by the last name, or vice versa.
Sort By. Sort the entries in Address Book by either first or last name.
Font Size. Choose from Regular, Large, or Extra Large. Unfortunately, you can’t change anything else about the font used in the Address Book; the color, face, and style are all locked down.
When you choose File→Print and click the ▾ to expand the Print box, the Style pop-up menu offers four ways to print whatever addresses are selected at the moment:
Mailing Labels. This option prints addresses on standard sheets of sticky mailing labels—Avery, for example—that you buy at office-supply stores.
Tip
As you manipulate settings, you can see your changes in the preview pane on the left. If the preview is too small for you to see, use the Zoom slider. (It doesn’t affect your printout.)
If you want to access the traditional Print dialog box (to specify paper type, for example), use the unlabeled pop-up menu in the middle of the dialog box top choose Paper Type or whatever. Return to the Labels or Envelopes panes by choosing Address Book from the same pop-up.
Envelopes. This feature is great if you have bad handwriting; rather than hand-addressing your envelopes, you can have Address Book print them out for you. Use the Layout pop-up menu to pick the size of your envelopes—it’s usually listed on the outside of the envelope box.
Note
Both the Mailing Labels and Envelopes options print only the contacts for which you have, in fact, entered physical mailing addresses.
Lists. If all you want is a paper backup of your Address Book entries, use this setting. In the Attributes list, turn on the checkboxes of the fields you want printed—just name and phone number, for example.
Pocket Address Book. This feature prints out a convenient paper address book from your virtual one. If you pick Indexed from the Flip Style pop-up menu, each page’s edge will even list the first letters of the last names listed on the page, making it a cinch to find the page with the address you want. (Here again, you can pick which fields you’d like to include—phone numbers, addresses, and so on.)
As you fiddle with the options presented here, you get to see a miniature preview, right in the dialog box, that shows what you’re going to get.
No matter which mode you choose, the only cards that print are the ones that were selected when you chose File→Print. If you want to print all your cards, therefore, click All in the Group column before you print.
Tip
You can combine the smart-groups feature with the printing features in one clever way: to print yourself a portable phone book when you’re heading off for a visit to a different city. That is, set up a smart group that rounds up everyone you know who lives in Chicago, and then print that as a pocket address book.
When you think about it, the contents of your Address Book may represent years of typing and compiling effort. Losing all that information to a corrupted database or a hard drive crash could be devastating. Here are four ways to protect your Address Book data:
Turn on .Mac syncing. As described in .Mac Sync, having a .Mac account has its privileges—and one of them is automatic synchronizing with other Macs, or just with the .Mac mothership in the Internet cloud.
Back up your entire Address Book database. Open your Home→Library→Application Support folder. Copy the entire Address Book folder to another disk—burn it to a CD, download it to your iPod, or upload it to a file server, for example. Now your contact data is safe even in the event of a hard drive failure.
Back up your whole Mac with Time Machine. Chapter 9 tells you how.