
Apple is obviously intrigued by the possibilities of the Internet. With each new release of Mac OS X, more clever tendrils reach out from the Mac to the world’s biggest network.
But Apple’s most obvious Internet-friendly creation is Safari, a smartly designed window to the Web (available for both Mac OS X and, believe it or not, Windows). This chapter is all about Safari—the compass icon in the Dock points the way to your Internet adventure—and iChat, the unsung superstar of the chat-and-conferencing universe.
If you want to get something done right, you have to do it yourself.
At least that must be what Apple was thinking when it wrote its own Web browser a few years ago, which so annoyed Microsoft that it promptly ceased all further work on the Mac version of its own Internet Explorer.
Safari is beautiful, very fast, and filled with delicious features. It’s not, however, Internet Explorer, and so some Web sites—certain banking sites, for example—refuse to acknowledge its existence. In these situations, you might try the Mac version of Firefox, a free browser available at www.getfirefox.com.
To move your Web bookmarks over from Windows to the Mac, in Bookmarks (Favorites). Then, when you’re ready to get going, read on.
You probably know the drill when it comes to Web browsers. When you click an underlined link (hyperlink) or a picture button, you’re transported from one Web page to another. One page may be the home page of General Motors; another may contain critical information about a bill in Congress; another might have baby pictures posted by a parent in Omaha. Altogether, several billion Web pages await your visit.
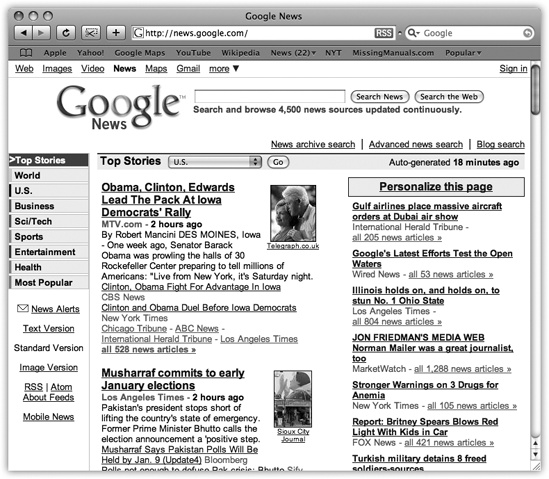
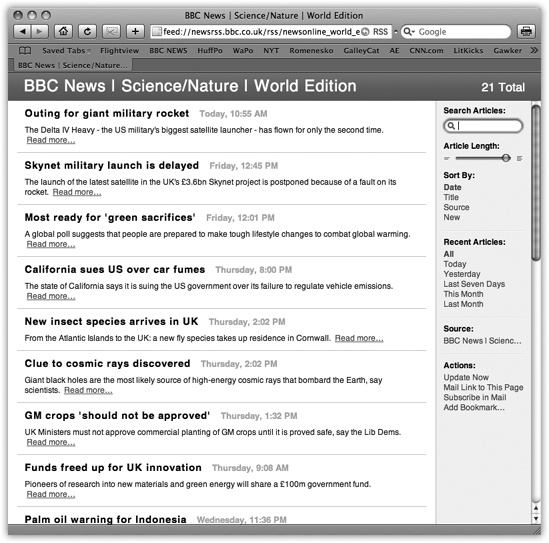
Figure 12-1. The Safari window offers tools and features that let you navigate the Web almost effortlessly. These various toolbars and buttons are described in this chapter. One difference that may throw you if you’re used to other browsers: When you’re loading a Web page, the progress bar appears as a colored stripe that gradually darkens the address bar itself, rather than as a strip at the bottom of the window.
Bookmarks bar
Address bar
Title bar
Form
RSS button
Google search
Text link
Graphic link
Tip
Text links aren’t always blue and underlined. In fact, trendy Web designers sometimes make it very difficult to tell which text is clickable, and which is just text. When in doubt, move your cursor over some text; if the arrow changes to a pointing-finger cursor, you’ve found yourself a link.
Some of the other Safari tips that may not be obvious:
Graphics worth saving. When you see a picture you’d like to keep, right-click it and choose Save Image to Downloads from the shortcut menu. Safari stores it as a new graphics file in Leopard’s Downloads folder on your hard drive. (You can specify where Safari saves downloaded pictures on the Safari→Preferences→General tab. In that case, the shortcut menu’s wording changes to say, for example, “Save Image to ‘Pictures.’”)
Tip
You can also save a graphic to the desktop just by dragging it there, right out of the Safari window. If you’re looking at a picture that you’d like to add to your pictures in iPhoto, right-click the image and choose Add Image to iPhoto Library. Sweet!
Scroll bars. Use the scroll bar to move up and down the page—or to save mousing, press the Space bar each time you want to see more. Press Shift-Space to scroll up. (The Space bar serves its traditional, space-making function only when the insertion point is blinking in a text box or the address bar.)
You can also press your up and down arrow keys to scroll one line at a time. Page Up and Page Down scroll in full-screen increments, while Home and End whisk you to the top or bottom of the current Web page. And if your mouse has a scroll wheel, it works, too. (Hold Shift while you’re rolling the wheel to scroll horizontally.)
Many of Safari’s most useful controls come parked on toolbars and buttons that you summon or hide by choosing their names from the View menu. Here’s what they do:
When you type a new Web page address (URL) into this strip and press Enter, the corresponding Web site appears.
Because typing out Internet addresses is so central to the Internet experience and such a typo-prone hassle, the address bar is rich with features that minimize keystrokes. For example:
You don’t have to click the address bar before typing; just press
 -L.
-L.You can highlight the entire address (so it’s ready to be typed over with a new one) by clicking the very upper or lower edge of the address bar text box. Alternatively, you can click the small icon just to the left of the current address, or triple-click the address bar, or press
-L.You don’t have to type out the whole Internet address. You can omit the http://, www, and .com portions; Safari fills in those standard address bits for you. To visit NYTimes.com, for example, a speed freak might press
-L to highlight the address bar, type
nytimes, and then press Enter.Tip
You’re Web surfing, and you suddenly need to look up an appointment in iCal. What do you do?
The power user opens other programs right from within Safari by typing ical:// in the address bar—or ichat://, addressbook://, or sherlock://—and then pressing Return or Enter. (Unfortunately, those are just about the only Apple programs that work with this URL-launching trick.)
You can also type mailto: to open a new outgoing email message in your default email program, or mailto:[email protected] to preaddress that outgoing message to Steve Jobs. (Of course, remember to replace that email address with someone you’d actually like to contact.)
When you begin to type into the address bar, the AutoComplete feature compares what you’re typing against a list of Web sites you’ve recently visited or that you’ve saved as bookmarks. Safari displays a drop-down list of Web addresses that seem to match what you’re typing. To spare yourself the tedium of typing out the whole thing, click the correct complete address with your mouse, or use the down arrow key to reach the desired listing and then press Enter. The complete address you select then pops into the address bar.
Tip
You might wonder why the View menu even offers you the chance to hide the address bar. If it were hidden, how could you use the Web?
Simple: Even with this bar hidden, you can briefly summon
it by pressing ![]() -L. Type the address you want and then
press Enter to make the bar disappear again. That’s good news
for people with small screens—and for Mac trivia
collectors.
-L. Type the address you want and then
press Enter to make the bar disappear again. That’s good news
for people with small screens—and for Mac trivia
collectors.
You can summon or dismiss a number of individual buttons on the address bar, in effect customizing it (Figure 12-2):
Back/Forward. Click the ◂ button to revisit the page you were just on. Keyboard shortcut: Delete, or
-left arrow, or -left bracket.Once you’ve clicked ◂, you can then click the ▸ button (or press
-right arrow, or -right bracket) to return to the page
you were on before you clicked the Back button. Click and hold
on the ◂button for a drop-down list of
all the Web pages you’ve visited during
this online session.That pop-up menu lists the sites by name, as in “The New York Times—Breaking News, World News & Multimedia.” To view the actual addresses instead, Option-click (and hold the mouse down on) the Back or Forward button.
Tip
Instead of clicking and holding the ◂ or ▸ button for these tricks, you can save half a second of waiting by just right-clicking.
Home. Click to bring up the Web page you’ve designated as your home page (in Safari→Preferences→General tab).
AutoFill. Click this button to make Safari fill in Web order forms with your name, address, and other information. See the box on the facing page.
Text Size. You can adjust the point size of a Web page’s text using these buttons. When you visit a Web site designed for Windows computers—whose text often looks too small on Mac screens—you can use these buttons to bump up the size. Keyboard shortcut:
-plus or -minus.Figure 12-2. You summon or hide these buttons by choosing View→Customize Address bar and dragging buttons onto or off the address bar. Some of them lack text labels, but all offer tooltip labels that you can read by pointing to the button without clicking.
Backward/ Forward
Text Size
Web Clip
Report a bug
Home
Autofill
Reload
Add Bookmark
Stop/Reload. Click the Stop button to interrupt the downloading of a Web page you’ve just requested (if you’ve made a mistake, for instance). Keyboard shortcut: Esc or
-period.Once a page has finished loading, the Stop button turns into a Refresh button. Click this circular arrow if a page doesn’t look or work quite right, or if you want to see the updated version of a Web page (such as a breaking-news site) that changes constantly. Safari redownloads the Web page and reinterprets its text and graphics. Keyboard shortcut:
-R.Web Clip. This scissors-clipping-coupon icon is the key to creating Dashboard Web clips, as described in Web Clips: Make Your Own Widgets. Click this button, and then select the part of the page you want to widgetize.
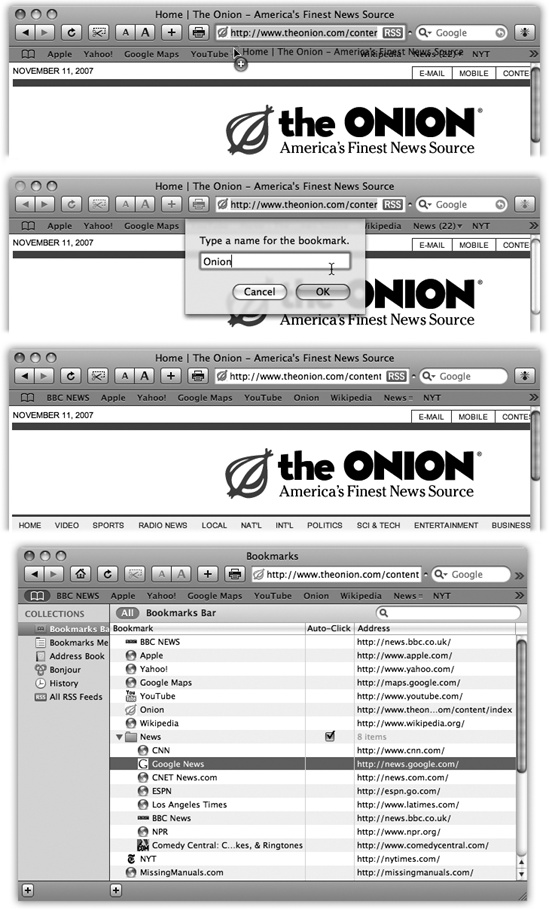
Add Bookmark. When you find a Web page you might like to visit again, click this button. You can also press
-D, or choose Bookmarks→Add Bookmark, or
drag the tiny icon from the address bar directly onto your
Bookmarks bar.As shown in Figure 12-3, Safari offers to add this Web page’s name (or a shorter name that you specify for it) either to the Bookmarks menu or to the Bookmarks bar described below. The next time you want to visit that page, just select its name in whichever location you chose.
Tip
Press Shift-
-D to add the bookmark to the menu
instantly—no questions asked, no dialog box
presented.You can rearrange the names in your Bookmarks menu easily: Choose Bookmarks→Show All Bookmarks (Option-
-B), or click the tiny book icon shown
in Figure 12-3.
In the resulting organization window, drag the bookmarks up
and down.For more dramatic management tasks—to edit, rename, or delete your bookmarks, for example—also see Figure 12-3.
Google Search. Here’s one of Safari’s most profoundly useful features—a Search box that automatically sends your search request to Google.com, the world’s most popular Web search page. Press Option-
-F to deposit your insertion point
inside this rounded text box, type something you’re looking
for—phony baloney, say—and then press
Enter. Safari takes you directly to the Google results
page.Tip
The tiny ▾ at the left end of the Google bar is a pop-up menu of your most recent searches.
Bonus Tip: If you right-click a highlighted word or phrase on a Web page, you can choose Google Search from the shortcut menu to search for that text.
Print. You can add a printer icon to Safari for point-and-click paper action if you don’t want to bother with
-P.Bug. Ladies and gentlemen, this is Apple at its most humble. This insect-shaped button opens a tiny “Dear Apple” box, where you can tell Apple about a Safari feature or Web page that doesn’t work. If you click Options, you can even send Apple a screen illustration of, for example, a screwy Web-page layout that Safari delivered.
Figure 12-3. Top: Once you’ve got a juicy Web page on the screen, you can drag its tiny page-logo icon from the address bar directly onto the Bookmarks bar or menu. Second from top: Safari realizes that you may prefer a shorter name to appear on the space-limited bar, so it offers you the chance to type in a label you prefer. Third from top: When you click OK, the new button appears on the bar, as shown here. (You can also drag any link to the bar, such as a blue underlined phrase from a Web page, or even an icon from your desktop!) To remove a button, drag it off the bar; to rearrange the icons, just drag them. Bottom: Click the little book icon (circled) to open the Organize Bookmarks window. Here, you can drag names up or down to rearrange the list, or drag them into a “folder” that becomes a submenu in the Bookmarks menu. (Create a submenu by clicking the + button below the list.) You can edit a bookmark by clicking once on its name or URL, or delete one by pressing Delete.

The Status bar at the bottom of the window tells you what Safari is doing (such as “Opening page...” or “Done”). When you point to a link without clicking, the Status bar also tells you which URL opens if you click it. For those two reasons, it’s a very useful strip, but it doesn’t appear when you first run Safari. You have to summon it by choosing View→Show Status Bar.
Safari is filled with shortcuts and tricks for better speed and more pleasant surfing. For example:
The little orange SnapBack button (![]() ), which sometimes appears at the right end of
the address bar or Google search bar, takes you instantly back to
the Web page whose address you last typed (or whose bookmark you
last clicked), or to your first Google results page.
), which sometimes appears at the right end of
the address bar or Google search bar, takes you instantly back to
the Web page whose address you last typed (or whose bookmark you
last clicked), or to your first Google results page.
The point here is that, after burrowing from one link to another in pursuit of some Google result or Amazon listing, you can return to your starting point without having to mash the Back button over and over again. (The SnapBack button doesn’t appear until you’ve actually clicked away from the first page you visited.)
The world’s smarmiest advertisers inundate us with pop-up and pop-under ads—nasty little windows that appear in front of the browser window or, worse, behind it, waiting to jump out the moment you close your current window. They’re often deceptive, masquerading as error messages or dialog boxes, and they’ll do absolutely anything to get you to click inside them.
If this kind of thing is driving you crazy, choose Safari→Block Pop-Up Windows, so that a checkmark appears next to the command. It’s a war out there—but at least you now have some ammunition.
Note
This feature doesn’t squelch small windows that pop up when you click a link—only windows that appear unbidden.
Even unbidden windows, however, are sometimes legitimate (and not ads)—notices of new banking features, warnings that the instructions to use a site have changed, and so on. Safari can’t tell these from ads and stifles them too. So if a site you trust says “Please turn off pop-up blockers and reload this page,” you know you’re probably missing out on a useful pop-up message.
Sooner or later, you’ll run into a Web site that doesn’t work in Safari. Why? When you arrive at a Web site, your browser identifies itself. That’s because many commercial Web sites display a different version of the page depending on the browser you’re using, thanks to differences in the way various browsers interpret Web layouts.
But because you’re one of the minority oddballs using Safari, your otherwise beloved Web site tells you: “Sorry, browser not supported.” (Will this problem change now that Apple has released a Windows version of Safari? We can only hope.)
In such times of trouble, you can make Safari impersonate any other browser, which is often good enough to fool the picky Web site into letting you in.
The key to this trick is Safari’s Debug menu, which is generally hidden. You can make it appear using TinkerTool, a free program available on this book’s “Missing CD” page at www.missingmanuals.com. It offers a simple checkbox that turns on the Debug menu.
Most of its commands are designed to appeal to programmers, but the submenu you want—User Agent—is useful to everyone. It lets Safari masquerade as a different browser. Choose User Agent→Mac MSIE 5.22, for example, to assume the identity of Internet Explorer for Macintosh.
As you dig your way down into a Web site, you may wish you could have left a trail of bread crumbs to mark your path. Ah, but Safari has already thought of that. See Figure 12-4.

Graphics are part of what makes the Web so compelling. But they’re also responsible for making Web pages take so long to arrive on the screen. Without them, Web pages appear almost instantaneously—and you still get fully laid-out Web pages with all their text and headlines.
To turn off graphics, choose Safari→Preferences, and then click the Appearance tab. Turn off “Display images when the page opens,” and close the Preferences window. Now try visiting a few Web pages and enjoy the substantial speed boost. (If you wind up on a Web page that’s nothing without its pictures, return to Safari→Preferences, turn the same checkbox on, and then reload the page.)
If the customer-service comment form on that corporate Web site doesn’t give you enough room to rant properly, you can resize the text box right on the page—a new, very welcome feature in Leopard. Figure 12-5 tells all.
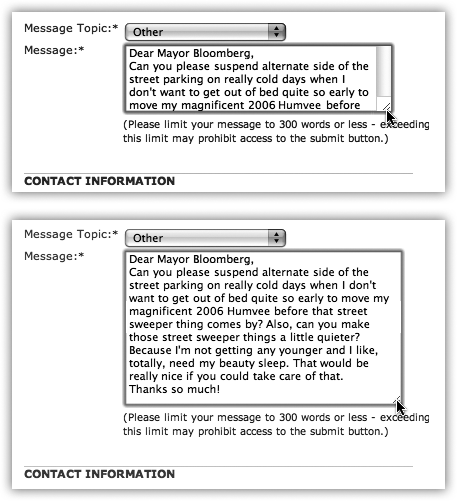
Figure 12-5. This trick works on a Web page’s text fields—comment boxes, forms to send a letter to the mayor, and so on. You can resize such boxes by dragging the three diagonal ribbed lines in the lower-right corner of the text field. The rest of the page adjusts itself to the new text-box size, and you have room to say what you need to say.
You don’t have to be connected to the Net to read a favorite Web page. You can save a certain Web page on your hard drive so that you can peruse it later—on your laptop during your commute, for example—just by choosing File→Save As.
To save the entire page, along with all its images, movies, and so on, choose Web Archive from the Format pop-up menu.
Tip
Whenever you buy something online, don’t waste paper by printing out the final “This is your receipt” page. Instead, choose File→Print and, from the PDF pop-up button, choose Save PDF to Web Receipts folder. Safari saves it as a PDF file into a tidy folder (in your Home→Documents folder) called Web Receipts. Nice touch!
The first Web site you encounter when Safari connects to the Internet is an Apple Web site. This site is your home page. You’ll probably find Web browsing more fun, though, if you specify your favorite Web page as your home page.
To do that, navigate your way to the page you prefer. Google, or its news page, http://news.google.com, is a good starting place. So is your favorite newspaper home page, or www.macsurfer.com, a summary of the day’s Mac news coverage around the world, or maybe www.dilbert.com for today’s Dilbert cartoon.
Then choose Safari→Preferences, click the General tab, and click Set to Current Page (or type the address into the box).
If you can’t decide on a home page, or your mood changes from day to day, use the “New windows open with” pop-up menu to choose Empty Page. Some people prefer this setup, which makes Safari load very quickly when you first open it. Once this empty window opens, then you can tell the browser where you want to go today.
Tip
In the Safari→Preferences→General tab, you can also choose Bookmarks. Then, whenever you open a new window or launch Safari, you can choose exactly which page you want to open by choosing from a list of your bookmarks.
The History menu lists the Web sites you’ve visited in the last week or so, neatly organized into subfolders like “Earlier Today” and “Yesterday.” (A similar menu appears when you click and hold on the Back or Forward button.) These are great features if you can’t recall the URL for a Web site that you remember having visited recently.
Tip
As illustrated in GEM IN THE ROUGH: Menu Help in the Help Menu, the new Help search box searches all of a program’s menus—including Safari’s History menu. You can re-find a site without hunting through all the History submenus manually.
To find a certain word or phrase on a Web page, press
![]() -F and then type your search word into the
Find box. As Safari locates the word or words, it displays them
within a bright yellow box and dims the background of the rest of
the page. The Find bar also tells you how many times the word or
phrase occurs on the page; you can jump to each instance. Click the
-F and then type your search word into the
Find box. As Safari locates the word or words, it displays them
within a bright yellow box and dims the background of the rest of
the page. The Find bar also tells you how many times the word or
phrase occurs on the page; you can jump to each instance. Click the
![]() to start over with new search terms, or click
Done to close the Find bar and return to your normal browsing
activity.
to start over with new search terms, or click
Done to close the Find bar and return to your normal browsing
activity.
PDF files are all over the Web as, among other things, forms to download, online brochures, and scanned book pages. But they aren’t always especially readable in a browser window.
Unless, that is, you’re using Safari and its PDF viewing and saving tools. The next time you’re squinting at a PDF in the window, point to the bottom edge of the document; you’ll see a toolbar appear like the one in Figure 12-6. With these four icons, you can zoom out, zoom in, open the file in Preview, or save the PDF file itself to your Downloads folder.

Beloved by hardcore surfers the world over, tabbed browsing is a way to keep a bunch of Web pages open simultaneously—in a single, neat window. Figure 12-7 illustrates.
Turning on tabbed browsing unlocks a whole raft of Safari shortcuts and tricks, which are just the sort of thing power surfers gulp down like Gatorade:
If there’s a certain set of Web sites you like to visit daily, put the bookmarks into one folder, using Bookmarks→Add Bookmark Folder and the Bookmarks organizer window (Figure 12-3). You can then load all of them at once into a single tabbed window, simply by selecting the resulting “folder” in the Bookmarks menu—or the Bookmarks bar—and choosing Open in Tabs from the submenu.
The beauty of this arrangement is that you can start reading the first Web page while all of the others load into their own tabs in the background.
Tip
Click the
 icon at the left end of the Bookmarks
bar. In the Bookmarks organizer, click the Bookmarks Bar item in
the left-side list. Now you can see an Auto-Click checkbox for
each listed folder.
icon at the left end of the Bookmarks
bar. In the Bookmarks organizer, click the Bookmarks Bar item in
the left-side list. Now you can see an Auto-Click checkbox for
each listed folder.If you turn on this checkmark, then you’ll be able to open all the bookmarks in that folder into tabs, all at once, merely by clicking the folder’s name in the Bookmarks bar. (If you want to summon the normal menu from the folder, just hold the mouse button down.)
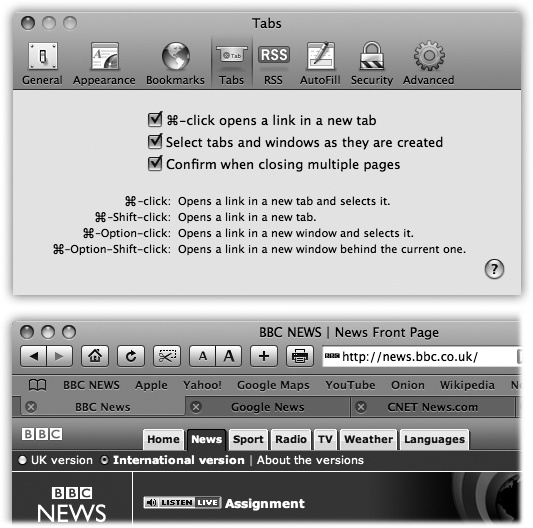
Figure 12-7. Top: First turn on tabbed browsing in Safari’s Preferences→Tabs window. (For best results, also turn on “Select new tabs as they are created.”) Bottom: Now, when you
-click a link, or type an address and
press -Return or -Enter, you open a new tab, not a new
window as you ordinarily would. You can now pop from one open
page to another by clicking the tabs just under your Bookmarks
bar, or close one by clicking its  button (or pressing -W).
A variation on a theme: When you have a bunch of pages open in tabs, you can drag the tabs across the window to rearrange the order. When you have them the way you want them, right-click a tab, and then choose “Add Bookmark for These [Number] Tabs” from the shortcut menu. You can save your saved tabs to the Bookmarks bar and load all those pages with one click.
If you Option-click a tab’s
(close) button, you close all tabs
except the one you clicked. The same thing
happens if you hold down Option and choose File→Close Other Tabs,
or if you press Option--W.If you Option-
-click a link, it opens in a separate
window, rather than a new tab. (When tabbed browsing is turned
off, you just -click a link to open a new window.)If you find yourself with a bunch of separate browser windows all over your screen, you can neatly consolidate them all into one nicely tabbed Safari window by choosing Window→Merge All Windows.
If you Shift-
-click a link, Safari opens that page in a
tab behind the one you’re reading. That’s a
fantastic trick when you’re reading a Web page and see a reference
you want to set aside for reading next, but you don’t want to
interrupt whatever you’re reading.
Tip
Deep in the guts of Safari is a neatly formatted page that lists nearly every keyboard shortcut in Safari. To see it (so you can print it, perhaps), right-click the Safari icon in the Finder. Choose Show Package Contents from the shortcut menu. In the new window, open Contents→Resources. Finally, drag the icon called Shortcuts.html right into the Safari window.
(If you’ve installed the Debug menu as described in Impersonating Internet Explorer, there’s an even easier way: Choose Debug→Keyboard and Mouse Shortcuts.)
In the beginning, the Internet was an informational Garden of Eden. There were no banner ads, pop-ups, flashy animations, or spam messages. Back then, people thought the Internet was the greatest idea ever.
Those days, unfortunately, are long gone. Web browsing now entails a constant battle against intrusive advertising and annoying animations. And with the proliferation of Web sites of every kind—from news sites to personal weblogs (blogs)—just reading your favorite sites can become a full-time job.
Enter RSS, a technology that lets you subscribe to feeds—summary blurbs provided by thousands of sources around the world, from Reuters to Apple to your nerdy next-door neighbor. You use a program like Safari to “subscribe” to updates from such feeds, and then read any new articles or postings at your leisure.
The result: You spare yourself the tedium of checking for updates manually, plus you get to read short summaries of new articles without ads and blinking animations. And if you want to read a full article, you can click its link in the RSS feed to jump straight to the main Web site.
Note
RSS either stands for Rich Site Summary or Really Simple Syndication. Each abbreviation explains one aspect of RSS—either its summarizing talent or its simplicity.
So how do you sign up for these free, automatic RSS “broadcasts?” Watch your address bar as you’re surfing the Web. When you see a blue RSS button appear (identified back in Figure 12-1), Safari is telling you, “This site has an RSS feed available.”
To see what the fuss is all about, click that button. Safari switches into RSS-viewing mode, as shown in Figure 12-8.
At this point, you have two choices:
Add the RSS feed as a bookmark. Use the Bookmarks→Add Bookmark command, and add the feed to your Bookmarks menu, Bookmarks bar, or Mail (RSS Feeds) as you would any Web page. From now on, you’ll be able to see whether the RSS feed has had any new articles posted—without actually having to visit the site.
Close the RSS feed altogether. To do so, just click the RSS button again. You’re left back where you started, at whatever Web page you were visiting.
Figure 12-8. The Length slider controls how much text appears for each RSS blurb; if you drag it all the way to the left, you’re left with nothing but headlines. To change the number and order of the articles being displayed, use the search options on the right. And if you feel a sudden desire to tell your friends about an amazing RSS feed you’ve just discovered, use the “Mail Link to This Page” link in the lower-right section of the window.
News source
Headline
Date/time posted
RSS button
Article count
RSS is a tremendously flexible and powerful technology, especially in Safari. The fun never ends, as these tricks illustrate.
If you create a new bookmark folder (Address bar) and fill it with RSS feeds, you can see the total number of new articles right next to the folder’s name. You might create a folder of Mac news feeds, for instance, so you know whenever there’s a important event in the Mac world.
From then on, by clicking the folder’s name (and opening its
pop-up menu), you can see which feeds have new articles; they’re
the ones with numbers next to their names. If you
![]() -click a bookmark folder’s name—in either
the Bookmarks bar or the Bookmarks menu—Safari shows you
all the feeds, neatly collated into one big,
easily digestible list for your perusing pleasure. (If you’re
billing by the hour, you can also choose View All RSS Articles
from the folder’s pop-up menu to achieve the same
effect.)
-click a bookmark folder’s name—in either
the Bookmarks bar or the Bookmarks menu—Safari shows you
all the feeds, neatly collated into one big,
easily digestible list for your perusing pleasure. (If you’re
billing by the hour, you can also choose View All RSS Articles
from the folder’s pop-up menu to achieve the same
effect.)
Tip
To make the merged list more useful, click New under the Sort By heading. Now Safari displays any new articles at the top of the list, regardless of what site they came from, so you don’t have to hunt through the list for new articles yourself.
Tip
If you find RSS feeds completely addictive in Safari, you’ll love them in Mail—where you can display them right in the program’s window or have them land in your Inbox like regular messages.
FREQUENTLY ASKED QUESTION: Cookie Control
Help! I’m afraid of cookies! The cookies are trying to watch me!
Cookies are something like Web page preference files. Certain Web sites—particularly commercial ones like Amazon.com—deposit them on your hard drive like little bookmarks, so that they’ll remember you the next time you visit. Most cookies are perfectly innocuous—and, in fact, are extremely helpful, because they help Web sites remember your tastes. Cookies also spare you the effort of having to type in your name, address, credit card number, and so on, every time you visit these Web sites.

But fear is widespread, and the media fans the flames with tales of sinister cookies that track your movement on the Web. If you’re worried about invasions of privacy, Safari is ready to protect you.
Once the browser is open, choose Safari→Preferences→Security tab. The buttons in this dialog box are like a paranoia gauge. If you click Never, you create an acrylic shield around your Mac. No cookies can come in, and no cookie information can go out. You’ll probably find the Web a very inconvenient place; you’ll have to re-enter your information upon every visit, and some Web sites may not work properly at all.
A good compromise is “Only from sites you navigate to,” which accepts cookies from sites you want to visit, but blocks cookies deposited on your hard drive by sites you’re not actually visiting—cookies an especially evil banner ad gives you, for example.
Note, too, the Show Cookies button, which reveals the shockingly complete list of every cookie you’ve accumulated so far—and offers you the chance to delete the ones that don’t look so savory.
In System Preferences→Desktop & Screen Saver→Screen Saver tab, you’ll find the RSS Visualizer screen saver, one of the most impressive displays of Mac OS X technology you’ll ever see. When you click Options and select an RSS feed (and enable screen savers), you set up Mac OS X to get news from that feed whenever you’re away from your Mac. When the screen saver comes on, you’re treated to a three-dimensional animation of the news from that site—along with astonished gazes from your co-workers.
If a news story grabs your interest, press the number key mentioned at the bottom of the screen. The screen saver fades out, and Safari comes forward to display the associated article.
Tip
But what if the feed you want isn’t part of Safari’s repertoire? No problem. Add the feed to your Safari bookmarks and relaunch System Preferences.
Somewhere between email and the telephone lies a unique communication tool called instant messaging. Plenty of instant messenger programs run on the Mac, but guess what? You don’t really need any of them. Mac OS X comes with its very own instant messenger program called iChat, built right into the system and ready to connect to your friends on the AIM, Jabber, or GoogleTalk networks.
To start up iChat, go to Applications→iChat, or just click iChat’s Dock icon. It looks like a blue speech balloon with a camcorder inside, which is a clue to one of iChat’s best and most substantially beefed-up Leopard features: live video chats over the Internet.
iChat lets you reach out to chat partners on three different networks:
The AIM network. If you’ve signed up for a .Mac address (the paid kind or the free kind described below) or a free AOL Instant Messenger (AIM) account, you can chat with anyone in the 150-million-member AOL Instant Messenger network.
The Jabber network. Jabber is another chat network, whose key virtue is its open-source origins. In other words, it wasn’t masterminded by some corporate media behemoth; it’s an all-volunteer effort, joined by thousands of programmers all over the world. There’s no one Jabber chat program (like AOL Instant Messenger). There are dozens, available for Mac OS X, Windows, Linux, Unix, Palm and PocketPC organizers, and so on. All of them can chat with each other across the Internet in one glorious frenzy of typing.
And now there’s one more program that can join the party: iChat.
Google Talk. Evidently, Google felt that there just weren’t enough different chat programs, because it released its own chat program in 2005.
Behind the scenes, it uses the Jabber network, so Google Talk doesn’t really count as a different network. But it does mean that you can use iChat to converse with all those Google Talkers, too.
Your own local network. Thanks to the Bonjour network-recognition technology, you can communicate with other Macs on your own office network without signing up for anything at all—and without being online. This is a terrific feature when you’re sitting around a conference table, idly chatting with colleagues using your wireless laptop (and the boss thinks you’re taking notes).
Each network generally has its own separate Buddy List window and its own chat window.
You log into each network separately using the iChat→Accounts submenu, but you can be logged into all of them at once. This is a great option if your friends are spread out among different chat networks.
Otherwise, however, chatting and videoconferencing works identically on all three networks. Keep that in mind as you read the following pages.
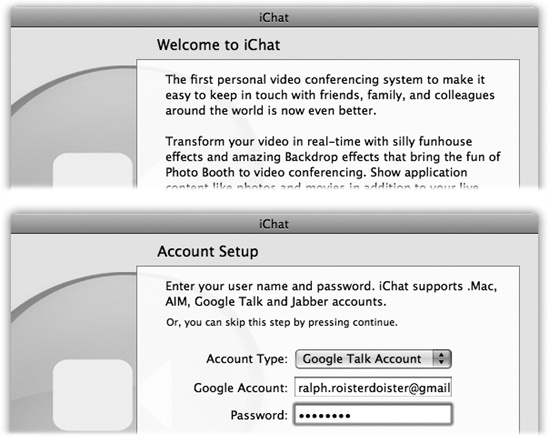
When you open iChat for the first time, you see the “Welcome To iChat” window (Figure 12-9). This is the first of several screens in the iChat setup sequence, during which you’re supposed to tell it which kinds of chat accounts you have, and set up your camera, if any.
An account is a name and password. Fortunately, these accounts are free, and there are several ways to acquire one.
Tip
The easiest procedure is to set up your accounts before you open iChat for the first time, because then you can just plug in your names and passwords in the setup screens.
You can input your account information later, though. Choose iChat→Preferences, click the Accounts button, click the + button, and choose the right account type (Jabber, .Mac, Google Talk, or AIM) from the Account Type pop-up menu.
If you’re already a member of Apple’s .Mac service (.Mac Services), iChat fills in your Mac.com user name and password automatically.
If not, you can get an iChat-only .Mac account for free. To get started, do one of these two things:
Click the “Get an iChat Account” button that appears on the second Setup Assistant screen.
Choose iChat→Preferences, click the Accounts button, click the + button, and click Create New .Mac Account.
Either way, you go to an Apple Web page, where you can sign up for a free iChat account name. You’ll also get 60 days of the more complete .Mac treatment (usually $100 a year) described in Chapter 10. When your trial period ends, you’ll lose all of the other stuff that .Mac provides, but you’ll get to keep your iChat name.
Note
If your .Mac name is missingmanualguy, you’ll appear to everyone else as [email protected]. The software tacks on the “@mac.com” suffix automatically.
Figure 12-9. The iChat setup assistant gives you the chance to input your account names and passwords, if you already have them. Only one of these screens (“Set up iChat Instant messaging”) offers you the chance to create a chat account, in this case a free .Mac account. Otherwise, you’re expected to have a name and password (for AIM, Google Talk or Jabber, for example) already.
You can’t create a Jabber account using iChat. Apple expects that, if you’re that interested in Jabber, you already have an account that’s been set up by the company you work for (Jabber is popular in corporations) or by you, using one of the free Jabber programs.
For example, at www.adiumx.com, you can download a great chat program for Mac OS X that presents you, the first time you open it, with a Preferences:Accounts screen. Click the + button, choose Jabber, type in any screen name and password you like—and when you’re told that your account doesn’t exist, mutter, “I know, I know,” and click Register. Your account is now created (your account name is [email protected], for example), and you can plug that screen name and password into iChat.
Alternatively, you can just sign up for a free Google Talk account, which is the same as having a free Gmail account. (Go to Gmail.com to sign up for one.)
Once you’ve got a Gmail address, choose iChat→Preferences→Accounts, and click the + button. Under Account Type, choose Google Talk and type in your complete Gmail address (like [email protected]) and password. Your Gmail name pops up on iChat’s Jabber list—along with any of your Gmail contacts who are already online and yapping.
You can’t create an AIM account in iChat, either. If you’re an America Online member, your existing screen name and password work; if you’ve used AIM before, you can use your existing name and password.
If you’ve never had an AIM account, you can sign up at https://my.screenname.aol.com. Click “Create one FREE now” to make up an AIM screen name.
Once you’ve entered your account information, you’re technically ready to start chatting. All you need now is a chatting companion, or what’s called a buddy in instant-messaging circles. iChat comes complete with a Buddy List window in which you can house the chat “addresses” for all your friends, relatives, and colleagues out there on the Internet.
Actually, to be precise, iChat comes with three buddy lists (Figure 12-10):
AIM Buddy List. This window lists all of your chat pals who have either .Mac or AIM accounts; they all share the same buddy list. You see the same list whether you log into your .Mac or your AIM account.
Jabber List. Same idea, except that all of your contacts in this window must have Jabber or Google Talk accounts.
Bonjour. This list is limited to your local network buddies—the ones in the same building, most likely, and on the same network. You can’t add names to your Bonjour list; anyone who’s on the network and running iChat appears automatically in the Bonjour list.
When you start iChat, your buddy lists automatically appear
(Figure 12-10). If you
don’t see them, choose the list you want from the Window menu:
Bonjour, Buddy List, or Jabber. (Or press their keyboard shortcuts:
![]() -1,
-1, ![]() -2, or
-2, or ![]() -3.)
-3.)
Adding a buddy to this list entails knowing that person’s
account name, whether it’s on AIM, Mac.com, or Jabber. Once you have it,
you can either choose Buddies→Add Buddy (Shift-![]() -A) or click the + button at the bottom-left
corner of the window.
-A) or click the + button at the bottom-left
corner of the window.
Down slides a sheet attached to the Buddy List window, offering a window into the Address Book program (Chapter 11).
Tip
As you accumulate buddies, your Buddy List may become crowded. If you choose View→Show Offline Buddies (so that the checkmark disappears), only your currently online buddies show up in the Buddy List—a much more meaningful list for the temporarily lonely.
If your chat companion is already in Address Book, scroll through the list until you find the name you want (or enter the first few letters into the Search box), click the name, and then click Select Buddy.
If not, click New Person and enter the buddy’s AIM address, .Mac address, or (if you’re in the Jabber list) Jabber address. You’re adding this person to both your Buddy List and your Address Book.
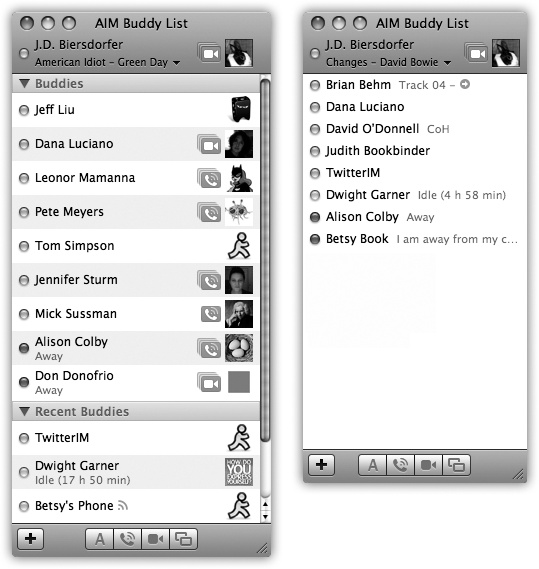
Figure 12-10. Click the + button to add a new buddy, either by choosing from your address book or from scratch (by clicking New Person). If you’ve used AIM before, you may find that you’ve already got buddies in your list. AIM accounts store their buddy lists on AOL’s computers, so that you can keep your buddies even if you switch computers. Right: Is your Buddy List taking up too much screen space? Use the options in the View menu to lose the buddy pictures and other chunky icons to streamline the window.
Announce that you’re available to chat, or display your current iTunes track
Choose your own buddy icon
Buddy’s current iTunes track
Status indicators
Control-click for common commands (like “Invite to Audio Chat”)
Capable of audio chat
Capable of video chat
Add buddy
Invite for text, audio, or video chats (or screen sharing)
Buddy’s Away message
Using the pop-up menu just below your name (Figure 12-11, right), you can display your current mental status to other people’s buddy lists. You can announce that you’re Available, Away, or Drunk. (You have to choose Edit Status Menu for that one; see Figure 12-11, left.)
Better yet, if you have music playing in iTunes, you can tell the world what you’re listening to at the moment by choosing Current iTunes Track. (Your buddy can even click that song’s name to open its screen on the iTunes Store, all for Instant Purchase Gratification.)
For some people, by far the juiciest option is a status called Invisible (available for .Mac and AIM accounts only). It’s like a Star Trek cloaking device for your onscreen presence (Figure 12-11). Great for stalkers!
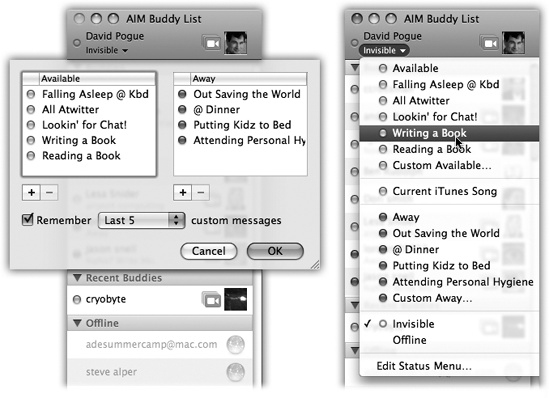
Figure 12-11. Left: Choose Edit Status Menu from the pop-up menu at the top of the iChat buddy list to set up more creative alternatives to “Available” and “Away.” Right: Your edited list of status messages is now available. The most interesting one is Invisible. It lets you see your friends online, but they can’t see you—great when you’re too busy to chat with annoying barely-acquaintances, but want to keep an eye out for a particular pal. You can still exchange messages with anyone on your Buddy List.
In View→Sort Buddies, you can rearrange your buddies as they’re listed in the Buddy lists: by availability, first name, last name, or in a manual order that you determine by dragging names up or down.
As with any conversation, somebody has to talk first. In chat circles, that’s called inviting someone to a chat.
To “turn on your pager” so you’ll be notified when someone
wants to chat with you, run iChat. Hide its windows, if you like,
by pressing ![]() -H.
-H.
When someone tries to “page” you for a chat, iChat comes forward automatically and shows you an invitation message like the one in Figure 12-12. If the person initiating a chat isn’t already in your Buddy List, you’ll simply see a note that says “Message from [name of the person].”
Tip
If you’re getting hassled by someone on your AIM/.Mac buddy list, click his screen name and choose Buddies→Block Person. If the person isn’t online at the time, go to iChat→Preferences→Accounts→Security and click the button for Block specific people. Click the Edit List button, and then type in the screen name of the person you want out of your IM life.
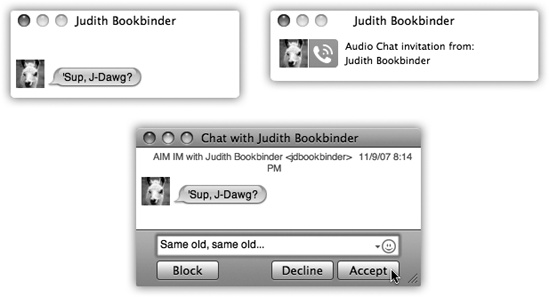
Figure 12-12. You’re being invited to a chat! Your buddy wants to have a typed chat (top left) or a spoken one (top right). To begin chatting, click the invitation window, type a response in the bottom text box if you like (for text chats), and click Accept (or press Enter). Or click Decline to lock out the person sending you messages—a good trick if someone’s harassing you.
To invite somebody in your Buddy List to a chat:
For a text chat, double-click the person’s name, type a quick invite (“You there?”), and press Enter.
Tip
You can invite more than one person to the chat. Each time you click the + button at the bottom of the Participants list, you can choose another person to invite. (Or
-click each name in the buddy list to
select several people at once and then click the A button at
the bottom of the list to start the text chat.)Everyone sees all the messages everyone sends.
To start an audio or video chat, click the microphone or movie-camera icon in your Buddy List (shown in Figure 12-10).
To initiate a chat with someone who isn’t in the Buddy List, choose File→New Chat With Person. Type the account name of the person, and then click OK to send the invitation.
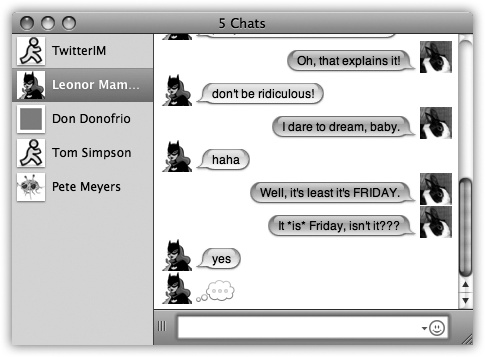
Either way, you can have more than one chat going at once. In the Olden Days (before October 2007), real iChat nerds often wound up with screens overflowing with individual chat windows. Juggling them all, and keeping them all current, was just part of the fun—and still can be.
But in modern times, you can now contain all your conversations in a single window. If you like the idea of a consolidated chatspace, chose iChat→Preferences→Messages and slap a checkmark in the “Collect chats into a single window” Box. Figure 12-13 has the details.
A typed chat works like this: Each time you or your chat partner types something and then presses Enter, the text appears on both your screens. iChat displays each typed comment next to an icon, which can be any of these three things:
A picture they added. If the buddy added her own picture—to her own copy of iChat, a Jabber program, or AOL Instant Messenger—it will be transmitted to you, appearing automatically in the chat window. Cool!
A picture you added. If you’ve added a picture of that person to the Buddy List or Address Book, you see it here instead. (After all, your vision of what somebody looks like may not match his own self-image.)
Generic. If nobody’s done icon-dragging of any sort, you get a generic icon—either a blue globe (for .Mac people), a light bulb (for Google Talkers), or the AOL Instant Messenger running man (for AIM people).
To choose a graphic to use as your own icon, click the square picture to the right of your own name at the top of the Buddy, Jabber, or Bonjour list. From the pop-up palette of recently selected pictures, choose Edit Picture to open a pop-up image-selection palette, where you can take a snapshot with your Mac’s camera or choose a photo file from your hard drive. Feel free to build an array of different graphics to represent yourself—and to change them in mid-chat, using this pop-up palette, to the delight or confusion of your conversation partner.
Tip
When you minimize the iChat message window, its Dock icon displays the icon of the person you’re chatting with—a handy reminder that she’s still there.
Typing isn’t the only thing you can do during a chat. You can also perform any of these stunts:
Format your text. You can press
-B or -I to make your next typed utterance bold
or italic. Or change your color or font by choosing Format→Show
Colors or Format→Show Fonts, which summons the standard Mac OS X
color or font palettes. (If you use some weird font that your
chat partners don’t have installed, they won’t see the same
typeface.)Insert a smiley. When you choose a face (like Undecided, Angry, or Frown) from this quick-access menu of smiley options (at the right end of the text-reply box), iChat inserts it as a graphic into your response.
On the other hand, if you know the correct symbols to produce smileys—that :) means a smiling face, for example—you can save time by typing them instead of using the pop-up menu. iChat converts them into smiley icons on the fly, as soon as you send your reply.
Send a file. Choosing Buddies→Send File lets you send a file to all the participants in your chat.
Better yet, just drag the file’s icon from the Finder into the box where you normally type. (This trick works well with pictures, because your conversation partner sees the graphic right in his iChat window.)
This is a fantastic way to transfer a file that would be too big to send by email. A chat window never gets “full,” and no attachment is too large to send.
This method halves the time of transfer, too, since your recipients get the file as you upload it. They don’t have to wait 20 minutes for you to send the file, and then another 20 minutes to download it, as they would with email or FTP.
Note, though, that this option isn’t available in old versions of the AOL Instant Messenger program—only new versions and iChat.
Send an Instant Message. Not everything in a chat session has to be “heard” by all participants. If you choose Buddies→Send Instant Message, you get a private chat window, where you can “whisper” something directly to a special someone behind the other chatters’ backs.
Send Email. If someone messages you, “Hey, will you email me directions?” you can do so on the spot by choosing Buddies→Send Email. Your email program opens up automatically so you can send the note along; if your buddy’s email address is part of his Address Book info, the message is preaddressed.
Send an SMS message to a cellphone. If you’re using an AIM screen name or .Mac account, you can send text messages directly to your friends’ cellphones (in the United States, anyway). Choose File→Send SMS. In the box that pops up, type the full cellphone number, without punctuation, like this: 2125551212.
Press Enter to return to the chat window. Type a very short message (a couple of sentences, tops), and then press Enter.
Tip
If iChat rudely informs you that your own privacy settings prevent you from contacting “this person,” choose iChat→Preferences, click Accounts, click your chat account, and turn on “Allow anyone.”
Obviously, you can’t carry on much of an interactive conversation this way. The only response you get is from AOL’s computers, letting you know that your message has been sent. But what a great way to shoot a “Call me!” or “Running late—see you tonight!” or “Turn on channel 4 right now!!!” message to someone’s phone.
iChat becomes much more exciting when you exploit its AV Club capabilities. Even over a dial-up modem connection, you can conduct audio chats, speaking into your microphone and listening to the responses from your speaker.
If you have a broadband connection, though, you get a much more satisfying experience—and, if you have a pretty fast Mac, up to 10 of you can join in one massive, free conference call from across the Internet.
A telephone icon next to a name in your buddy list tells you that the buddy has a microphone, and is ready for a free Internet “phone call.” If you see what appear to be stacked phone icons, then your pal’s Mac has enough horsepower to handle a multiple-person conference call. (You can see these icons back in Figure 12-10.)
To begin an audio chat, take your pick:
Click the telephone icon next to the buddy’s name, or
Highlight someone in the Buddy List, and then click the telephone icon at the bottom of the list, or
If you’re already in a text chat, choose Buddies→Invite to Audio Chat.
Once your invitation is accepted, you can begin speaking to each other. The bars of the sound-level meter let you know that the microphone—which you’ve specified in the iChat→Preferences→Audio/Video tab—is working.
Tip
Although the audio is full-duplex (you can hear and speak simultaneously, like a phone but unlike a walkie-talkie), there may be a delay, like you’re calling overseas on a bad connection. If you can’t hear anything at all, check out iChat’s Help system, which contains a long list of suggestions.
If you and your partner both have broadband Internet connections, even more impressive feats await. You can conduct a free video chat with up to four people, who show up on three vertical panels, gorgeously reflected on a shiny black table surface. This isn’t the jerky, out-of-audio-sync, Triscuit-sized video of Windows videoconferencing. If you’ve got the Mac muscle and bandwidth, your partners are as crisp, clear, bright and smooth as television—and as big as your screen, if you like.
People can come and go; as they enter and leave the “videosphere,” iChat slides their glistening screens aside, enlarging or shrinking them as necessary to fit on your screen.
If you see a camcorder icon next to a buddy’s name, you can have a full-screen, high-quality video chat with that person, because they, like you, have a suitable camera and a high-speed Internet connection. If you see a stacked camcorder icon, then that person has a G5 or a faster Mac that’s capable of joining a four-way video chat.
To begin a video chat, click the camera icon next to a buddy’s name, or highlight someone in the Buddy List and then click the camcorder icon at the bottom of the list. Or, if you’re already in a text chat, choose Buddies→Invite to Video Chat.
A window opens, showing you. This Preview mode is intended to show what your buddy will see. (You’ll probably discover that you need some kind of light in front of you to avoid being too shadowy.) As your buddies join you, they appear in their own windows (Figure 12-14).
And now, some video-chat notes:
If your conversation partners seem unwilling to make eye contact, it’s not because they’re shifty. They’re just looking at you, on the screen, rather than at the camera—and chances are you aren’t looking into your camera, either.
Don’t miss the Video→Full Screen command! Wild.
You can have video chats with Windows computers, too, as long as they’re using a recent version of AOL Instant Messenger. Be prepared for disappointment, though; the video is generally jerky, small, and slightly out of sync. That’s partly due to the cheap USB Webcams most PCs have, and partly due to the poor video codec (compression scheme) that’s built into AOL Instant Messenger.
You can capture a still “photo” of a video chat by
-dragging the image to your desktop, or by
choosing Video→Take Snapshot (Option--S).Don’t want to see yourself in the picture-in-picture window during your video chat? Choose Video→Hide Local Video. (That’s new in 10.5.)
Figure 12-14. That’s you in the smaller window. To move your own mini-window, click a different corner, or drag yourself to a different corner. If you need to blow your nose or do something else unseemly, Option-click the microphone button to freeze the video and mute the audio. Click again to resume.
This cutting-edge technology can occasionally present cutting-edge glitches. The video quality deteriorates, the transmission aborts suddenly, the audio has an annoying echo, and so on. When problems strike, iChat Help offers a number of tips; the Video→Connection Doctor can identify your network speed. (iChat video likes lots of network speed.)
Just as you can save your typed transcripts of instant message conversations, you can record your audio and video chats. Once you start a chat, choose Video→Record Chat. Your buddy is asked if it’s OK for you to proceed with the recording (to ward off any question of those pesky wiretapping laws); if permission is granted, iChat begins recording the call.
When you’ve got what you want, click Stop. Your recordings are automatically saved into Home→Documents→iChats (AAC files for audio conversations, MPEG-4 files for video chats). From there, you can drag them into iTunes to play or sync them up with an iPod or iPhoto. Yes, you can now relive those glorious iChat moments when you’re standing in line at the grocery store.

If your video chats look like a bunch of cubicle-dwellers sitting around chatting at their desks, you can liven things up with one of Leopard’s most glamorous and jaw-dropping features: photo or video backgrounds for your talking head. Yes, now you can make your video chat partners think you’re in Paris, on the moon, or even impersonating a four-panel Andy Warhol silkscreen.
Note
The iChat and Photo Booth backdrop effects are serious, serious processor hogs; they require, at minimum, a Mac with a Core 2 Duo processor. And bandwidth, man, serious bandwidth—at least 128 Kbps for both upload and download speeds.
Here’s how to prepare your backdrop for a video chat:
Go to iChat→Preferences→Audio/Video.
Figure 12-15. Top left: You have plenty of backgrounds to choose from for your next video chat. Click an effect to add it to your chat window. Click the small arrows at the bottom of the window to advance or retreat through the various effects styles. Click the Original square in the middle of the window to erase the effect and start again from scratch. Lower right: Let the live bluescreen action begin!
A video window opens so you can see yourself.
Press Shift-
-E (or go to
Video→Show Video Effects).The Effects box appears, looking a lot like the one in Photo Booth (Chapter 16); a lot of the visual backdrops are quite similar. Click the various squares of the tic-tac-toe grid to see how each effect will transform you in real time: making your face bulbous, for example, or rendering you in delicate colored pencil shadings.
The first two pages of effects all do video magic on you and everything else in the picture. If you want one of those, click it; you’re done. There’s no step 3. Your video-chat buddies now see you in your distorted or artistic new getup.
The second two pages of effects, however, don’t do anything to your image. Instead, they replace the background.
This is the really amazing part. In TV and movies, replacing the background is an extremely common special effect. All you have to do is set up a perfectly smooth, evenly lit, shadowless blue or bright green backdrop behind the subject. Later, the computer replaces that solid color with a new picture or video of the director’s choice.
iChat, however, creates exactly the same special effect (Figure 12-15) without requiring the bluescreen or the greenscreen. Read on.
Click the background effect you want.
Suppose, for example, that you’ve clicked the video loop showing the Eiffel Tower with people walking around. At this point, a message appears on the screen that says, “Please step out of the frame.”
Duck out of camera range (or move off to one side).
See, iChat intends to memorize a picture of the real background—without you in it. When you return to the scene, your high-horsepower Mac then compares each pixel of its memorized image with what it’s seeing now. Any differences, it concludes, must be you. And that is how it can create a bluescreen effect without a bluescreen.
Note
To make this work, both the camera and the background must be perfectly still. If the lighting or the visuals shift or change in any way, you may get some weird, glitchy effects where your real background bleeds through.
When the screen says, “Background detected,” step back into the frame.
Zut alors! You are now in virtual Paris. Go ahead and start the video chat with your friends, and don’t forget your beret.

If you want to clear out the background or change it, click the Original square in the middle of the Effects palette and then choose a different backdrop. (You can also change backdrops in mid-chat by choosing Video→Show Video Effects to open the effects palette.)
If things get too weird and choppy onscreen, you can restore the normal background by choosing Video→Reset Background. (That’s also handy if you suddenly have to have a video talk with your boss about your excessive use of iChat while he’s away on his business trip.)
Tip
You can use one of your own photos or video clips as iChat backdrops, too. In the Video Effects box, click the arrows on the bottom until you get to the screen with several blank User Backdrop screens. Next, drag a photo or video from the desktop directly onto one of the blank screens. Click it just like you would any of Apple’s stock shots.
As you’ve seen already in this chapter, iChat lets you share your thoughts, your voice, and your image with the people on your buddy lists. And now, for its next trick, it lets you share...your computer.
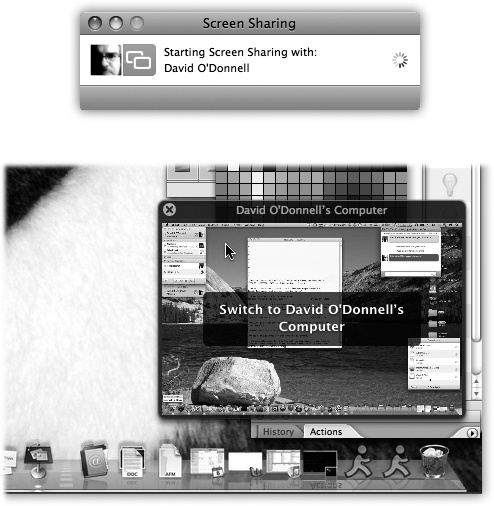
Figure 12-16. Top: You either send or receive an invitation to start sharing your screen, but make sure you know with whom you’re dealing before accepting the offer and starting the sharing process. Bottom: When you’re sharing someone else’s screen, you have the option to click back and forth between the two Mac screens.
Your computer
Desktop of person you’re sharing with
iChat’s screen sharing feature is a close relative of the network screen-sharing feature described in Chapter 14. It lets you not only see what’s on a far-away buddy’s screen, but control it, taking command of the distant mouse and keyboard. (Of course, screen sharing can work the other way, too.)
You can open folders, create and edit documents, and copy files on the shared Mac screen. Sharing a screen makes collaborating as easy as working side by side around the same Mac, except now you can be sitting in San Francisco while your buddy is banging it out in Boston.
And if you’re the family tech-support specialist—but the family lives all over the country—screen sharing makes troubleshooting a heckuva lot easier. You can now jump on your Mom’s shared Mac and figure out why the formatting went wacky in her Word document, without her having to attempt explaining it to you over the phone. (“And then the little thingie disappeared and the doohickey got scrambled...”)
Note
Of course, in these days of Big Scary Internet Security Issues, you want to make sure the person you share your screen with is someone you trust completely, because he or she is going to have the same access to your Mac as you do. Needless to say, do not accept screen-sharing invitations from people you don’t know. Also, be leery of people on your Bonjour list asking you to share your screen, because Bonjour identities can be easily faked.
To make iChat screen sharing work, you and your buddy must both be running Macs with Leopard. On the other hand, you can share over any account type: AIM, .Mac, Google Talk, Bonjour, or Jabber.
To begin, click the sharee’s name in your Buddy List.
If you want to share your screen with this person, choose Buddies→Share My Screen.
If you want to see her screen (because she has all the working files on her Mac), choose Buddies→Ask to Share.
Note
Similar commands are available in the Screen Sharing pop-up button—the one that looks like two overlapping squares at the bottom of the Buddy List window. The commands say “Share My Screen with casey234” and “Ask to Share casey234’s screen.”
Once the invitation is accepted, the sharing begins, as shown in Figure 12-16. To help you communicate further, iChat politely opens up an audio chat with your buddy so you can discuss what you’re doing on the shared machine.
If you’re seeing someone else’s screen, you see his Mac desktop in full-screen view, right on your own machine. You also see a small window showing your own Mac; click it to switch back to your own desktop.
Tip
To copy files from Mac to Mac, drag them between the two windows. Files dragged to your Mac wind up in your Downloads folder.
If something’s not right, or you need to bail out of a shared connection immediately, press Control-Escape on the Mac’s keyboard.
Talk about the next best thing to being there. The new iChat Theater feature lets you make pitches and presentations to people and committees in faraway cities—without standing in a single airport-security line.
That’s because iChat Theater turns the chat window into a presentation screen for displaying and narrating your own iPhoto or Keynote slideshows, QuickTime movie files, and even text documents. Your buddy, on the other end of the iChat line, sees these documents at nearly full size—with you in a little picture-in-picture screen in the corner.

Figure 12-17. Top: You can start an iChat Theater session by choosing File→Share a File with iChat Theater, or as shown here, by simply dropping the file on an open video chat window and going for the iChat Theater option. Bottom: Once you’ve started a Theater show in Chat, the shared file takes center stage so you both can look at it and discuss amongst yourselves.
All you need is a fast Mac, fast Internet connection, and some stuff to show off; iChat Theater can display exactly the same kinds of files that Quick Look (Chapter 2) can display: Word, Excel, and PowerPoint documents, photos, text and HTML files, PDF files, audio and movie files, fonts, vCards, Pages, Numbers, Keynote, and TextEdit documents, and so on.
To get the show running, you can take one of two approaches.
If a video chat is under way, you can just drag the file(s) you want to share into the video window. iChat asks if you want to send the file to the person or share it with iChat Theater (Figure 12-17, top). Click iChat Theater, of course.
If no video chat is in progress, choose File→Share a File in iChat Theater. Locate the file that you want to present on your hard drive. When iChat asks you to start a video chat with the buddy who’s going to be your audience, click the video-camera icon next to that person’s name (or choose Video→Invite to Video Chat).
When your friend accepts, the curtain goes up, as shown the
bottom of Figure 12-17.
The file you’re sharing takes center stage (er, window) and your buddy
appears in a little video window off to the side. Click the
![]() button to expand the view to full
screen.
button to expand the view to full
screen.
If you have iPhoto ’08, sharing picture albums is one menu command away: Choose File→Share iPhoto with iChat Theater. When the Media Browser pops up, pick the album you want to present. The first picture in the selected album appears in the iChat window before iPhoto itself opens, so you can use iPhoto’s nice controls for cruising forward (or backward) through your album.
The same thing happens if you’re running a Keynote presentation in iChat Theater: The first slide shows up in the chat window while the Keynote program launches to provide you with the proper controls to click through the rest of the slides in the presentation.
When the show is over, close the window to end the iChat Theater session.