Just about every Mac ever built is network-ready. Buy a couple of components, and you can connect all the computers in your office together, with or without wires. The process of rigging the hardware and software for a network is somewhat more technical than, say, emptying the Trash, but it’s not exactly rocket science.
Once you’ve got a network, you can copy files from one machine to another—even between Windows PCs and Macs—just as you’d drag files between folders on your own Mac. You can send little messages to each other’s screens. Everyone on the network can consult the same database or calendar. You can play games over the network. You can share a single printer, cable modem, or fax modem among all the Macs in the office. You can connect to this network from wherever you are in the world, using the Internet as the world’s longest extension cord back to your office.
And in Mac OS X 10.5, you can even do screen sharing, which means that you, the wise computer whiz, can see what’s on the screen of your pathetic, floundering relative or buddy elsewhere on the network. You can even seize control of the other Mac’s mouse and keyboard. You can troubleshoot, fiddle with settings, and so on. It’s the next best thing to being there—and often a lot better than being there.
This chapter concerns itself with local networking—setting up a network in your home or small office. But don’t miss its sibling, Chapter 10, which is about hooking up to the somewhat larger network called the Internet.
Most people connect their computers using one of two connection systems: Ethernet or Wi-Fi (which Apple calls AirPort).
Almost every Mac, PC, and network-ready laser printer has an Ethernet jack on the back or side panel (see Figure 14-1). If you connect all of the computers and Ethernet printers in your small office to a central Ethernet hub or router—a compact, inexpensive box with jacks for 5, 10, or even more computers and printers—you’ve got yourself a very fast, very reliable network. (Most people wind up hiding the hub in a closet, and running the wiring either along the edges of the room or inside the walls.) You can buy Ethernet cables, plus the hub, at any computer store or, less expensively, from an Internet-based mail-order house. (Hubs aren’t Mac-specific.)
Ethernet is the best networking system for many offices. It’s fast, easy, and cheap.
Wi-Fi, known to the geeks as 802.11 and to Apple fans as AirPort, means wireless networking. It’s the technology that lets laptops the world over get online at high speed in any Wi-Fi “hot spot.” Hot spots are everywhere these days: in homes, offices, coffee shops (notably Starbucks), hotels, airports, and thousands of other places.
Tip
At www.jiwire.com, you can type in an address or a city and learn exactly where to find the closest Wi-Fi hot spots.
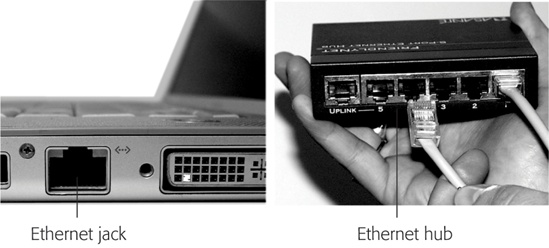
Figure 14-1. An Ethernet jack (left) looks like an overweight telephone jack. It connects to an Ethernet router or hub (right) via an Ethernet cable (also known as Cat 5 or Cat 6), which ends in what looks like an overweight telephone-wire plug (also known as an RJ-45 connector).
Ethernet jack
Ethernet hub
When you’re in a Wi-Fi hot spot, your Mac has a very fast connection to the Internet, as though it’s connected to a cable modem or DSL.
AirPort circuitry comes preinstalled every Mac laptop, iMac, and Mac Mini, and you can order it built into a new Mac Pro.
This circuitry lets your machine connect to your network and the Internet without any wires at all. You just have to be within about 150 feet of a base station or (in Windows terminology) access point, which must in turn be physically connected to your network and Internet connection.
If you think about it, the AirPort system is a lot like a cordless phone, where the base station is, well, the base station, and the Mac is the handset.
The base station can take any of these forms:
AirPort base station. Apple’s sleek, white, squarish or rounded base stations ($100 to $180) permit as many as 50 computers to connect simultaneously.
The less expensive one, the AirPort Express, is so small that it looks like a small white power adapter. It also has a USB jack so you can share a USB printer on the network. It can serve up to 10 computers at once. Another option is Time Capsue, which is both an access point and a hard drive that backs up all your Leopard Macs automatically.
A wireless broadband router. Lots of other companies make less expensive Wi-Fi base stations, including Linksys (www.linksys.com) and Belkin (www.belkin.com). You can plug the base station into an Ethernet router or hub, thus permitting 10 or 20 wireless-equipped computers, including Macs, to join an existing Ethernet network without wiring. (With all due non-fanboyism, however, Apple’s base stations and software are infinitely more polished and satisfying to use.)
Tip
It’s perfectly possible to plug a Wi-Fi base station into a regular router, too, to accommodate both wired and wireless computers.
Another Mac. Your Mac can also impersonate an AirPort base station. In effect, the Mac becomes a software-based base station, and you save yourself the cost of a separate physical base station.
For the easiest AirPort network setup, begin by configuring your Mac so that it can go online the wired way. Once it’s capable of connecting to the Internet via wires, you can then use the Airport Utility (in your Applications→Utilities folder) to transmit those Internet settings wirelessly to the base station itself. From then on, the base station’s modem or Ethernet jack—not your Mac’s—will do the connecting to the Internet.
Whether you’ve set up your own wireless network or want to hop onto somebody else’s, Chapter 10 has the full scoop on joining Wi-Fi networks.
When you’re done wiring (or not wiring, as the case may be), your network is ready. Your Mac should “see” any Ethernet or shared USB printers, in readiness to print (Chapter 9). You can now play network games or use a network calendar. And you can now turn on File Sharing, one of the most useful features of the Mac OS.
In File Sharing, you can summon the icon for a folder or disk attached to another computer on the network, whether it’s a Mac or a Windows PC. It shows up in a Finder window, as shown in Figure 14-3.
At this point, you can drag files back and forth, exactly as though the other computer’s folder or disk is a hard drive connected to your own machine.
GEM IN THE ROUGH: Networking Without the Network
In a pinch, you can connect two Macs without any real network at all. You can create an Ethernet connection without a hub or a router—or an AirPort connection without a Wi-Fi base station.
To set up the wired connection, just run a standard Ethernet cable between the Ethernet jacks of the two Macs. (You don’t need to use an Ethernet crossover cable, as you did in days of old.)
To set up a wireless connection, from your ![]() menulet, choose Create Network. Make up a
name for your little private network, and then click OK. On the
second Mac, choose
menulet, choose Create Network. Make up a
name for your little private network, and then click OK. On the
second Mac, choose ![]() →Join Network, enter the same private network
name, and click Join.
→Join Network, enter the same private network
name, and click Join.
At this point, your two Macs belong to the same ad hoc micro-network. But that doesn’t mean that you’ve started accessing their files yet.
To do that, in the Finder on one of the Macs, choose Go→Connect to Server. The Network window opens, showing the icons for all the computers on the local network. Double-click the one you want, enter the account password, if necessary, and you’re in.
The thing is, it’s not easy being Apple. You have to write one operating system that’s supposed to please everyone, from the self-employed first-time computer owner to the network administrator for NASA. You have to design a networking system simple enough for the laptop owner who just wants to copy things to a desktop Mac when returning from a trip, yet secure and flexible enough for the network designer at a large corporation.
Clearly, different people have different attitudes toward the need for security and flexibility.
That’s why Leopard offers two ways to share files—a simple and limited way, and a more complicated and flexible way:
The simple way: the Public folder. Every account holder has a Public folder. It’s free for anyone else on the network to access. Like a grocery store bulletin board, there’s no password required. Super-convenient, super-easy.
There’s only one downside, and you may not care about it: You have to move or copy files into the Public folder before anyone else can see them. Depending on how many files you want to share, this can get tedious and eat up disk space.
The flexible way: Any folder. You can also make any file, folder, or disk available for inspection by other people on the network. This method means that you don’t have to move files into the Public folder, for starters. It also gives you elaborate control over who is allowed to do what to your files. You might want to permit your company’s executives to see and edit your documents, but allow the peons in Accounting just to see them. And Andy, that unreliable goofball in Sales? You don’t want him even seeing what’s in your shared folder.
Of course, setting up all those levels of control means more work and more complexity.
Inside your Home folder, there’s a folder called Public. Inside everybody’s Home folder is a folder called Public.
Anything you copy into this folder is automatically available to everyone else on the network. They don’t need a password, they don’t need an account on your Mac—they just have to be on the same network.
To make your Public folder available to your network mates,
you have to turn on the File Sharing master switch. Choose
![]() →System Preferences, click Sharing, and turn
on File Sharing (Figure 14-2).
→System Preferences, click Sharing, and turn
on File Sharing (Figure 14-2).
Now round up the files and folders you want to share with all comers on the network, and drag them into your Home→Public folder. That’s all there is to it.
Note
You may notice that there’s already something in your Public folder: a folder called Drop Box. It’s there so that other people can give you files from across the network, as described later in this chapter.
So now that you’ve set up Public folder sharing, how are other people supposed to access your Public folder? In Accessing Shared Files.
If the Public folder method seems too simple and restrictive, then you can graduate to the “share any folder” method. In this scheme, you can make any file, folder, or disk available to other people on the network.
This time, you don’t have to move your files anywhere; they sit right where you have them. And this time, you can set up elaborate sharing privileges (also known as permissions) that grant individuals different amount of access to your files.
This method is more complicated to set up than that Public-folder business. In fact, just to underline its complexity, Apple has created two different setup procedures. You can share one icon at a time by opening its Get Info window; or you can work in a master list of shared items in System Preferences.
The following section covers both methods.
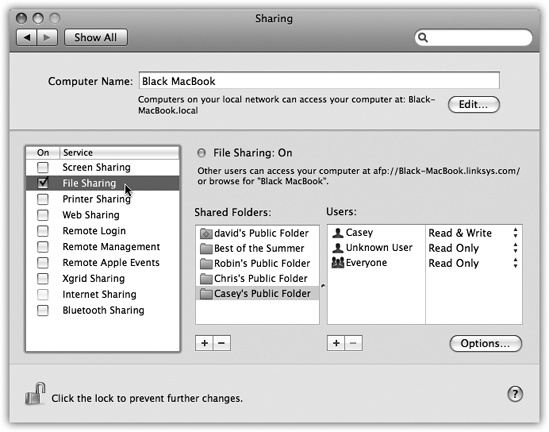
Figure 14-2. Here’s the master switch that makes your Public folder (and any other folders you designate) available to other people on the network. You can edit the Computer Name, if you like. Your Mac will appear on the network with this name. Make it nice and descriptive, such as Front Desk iMac.
Here’s how to share a Mac file, disk, or folder disk using its Get Info window.
The following steps assume that you’ve opened
![]() →System Preferences, clicked Sharing, and
then turned on File Sharing, as shown in Figure 14-2.
→System Preferences, clicked Sharing, and
then turned on File Sharing, as shown in Figure 14-2.
Highlight the file, folder, or disk you want to share. Choose File→Get Info.
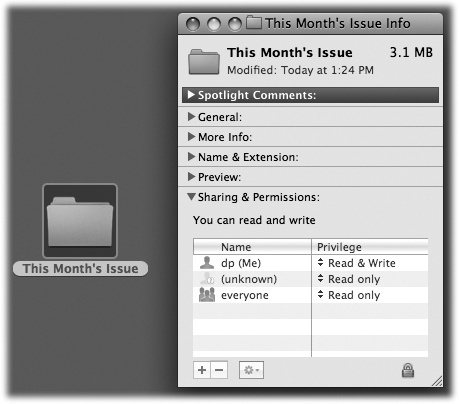
The Get Info dialog box appears (Figure 14-3). Expand the General panel, if it’s not already visible.
Note
Sharing an entire disk means that every folder and file on it is available to anyone you give access to. On the other hand, by sharing only a folder or two, you can keep most of the stuff on your hard drive private, out of view of curious network comrades. Sharing only a folder or two does them a favor, too, by making it easier for them to find files you’ve made available. This way, they don’t have to root through your entire drive looking for the folder they actually need.
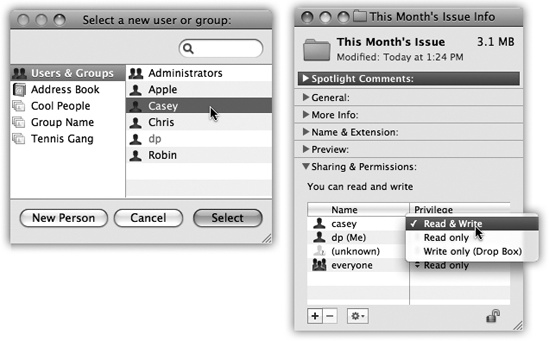
Figure 14-3. The file-sharing permissions controls are back in the Get Info box for any file, folder, or disk—right back where they were in Mac OS 9 in days of old. By the way: If the Finder quits when you click the + button to fiddle with the permissions, you’re not alone. There’s a quick fix, though, awaiting on Apple’s Help Web site. It’s here: http://docs.info.apple.com/article.html?artnum=307128
Turn on “Shared folder.”
Enter your Administrative password, if necessary.
OK, this disk or folder is now shared. But with whom?
Expand the Sharing & Permissions panel, if it’s not already visible. Click the
 icon and enter
your administrator’s password.
icon and enter
your administrator’s password.The controls in the Sharing & Permissions area spring to life and become editable. You wanted individual control over each account holder’s access? You’ve got it.
At the bottom of the Info panel is a little table. The first column can display the names of individual account holders, like Casey or Chris, or groups of account holders, like Everyone or Accounting Dept. The second column lists the privileges each person or group has for this folder.
Now, the average person has no clue what “privileges” means, and this is why things get a little hairy when you’re setting up folder-by-folder permissions.
Edit the table by adding people’s names. Then set their access permissions.
At the moment, your name appears in the Name column, and it probably says Read & Write in the Privilege column. In other words, you’re currently the master of this folder. You can put things in, and you can take things out.
But at the moment, the privileges for “Everyone” is probably “Read only.” Other people can see this folder, but can’t do anything with it.
Now your job is to work through this list of people, specifying how much control each person has over the file or folder you’re sharing. To add the name of a person or group, click the + button below the list. The people list shown in Figure 14-4 appears.
Figure 14-4. This list includes every account holder on your Mac, plus groups you’ve set up (Group), plus the contents of your Address Book. One by one, you can add them to the list of lucky sharers of your file or folder—and then change the degree of access they have to the stuff you’re sharing.
Now click a name in the list. Then, from the Privilege pop-up menu, choose a permissions setting.
Read & Write has the most access of all. This person, like you, can add, change, or delete any file in the shared folder, or make any changes you like to a document. Give Read & Write permission to people you trust not to mess things up.
Read only means “look, but don’t touch.” This person can see what’s in the folder (or file) and can copy it, but can’t delete or change the original. It’s a good setting for distributing company documents or making source files available to your minions.
Write only (drop box) means that other people can’t open the folder at all. They can drop things into it, but it’s like dropping icons through a mail slot: The letter disappears into the slot, and then it’s too late for them to change their minds. As the folder’s owner, you can do what you like with the deposited goodies. This drop-box effect is great when you want students, co-workers, or family members to be able to turn things in to you—homework, reports, scandalous diaries—without running the risk that someone else might see those documents.
No access is an option only for “Everyone.” It means that other people can see this file or folder’s icon, but can’t do a thing with it.
Close the Get Info window.
Now the folder is ready for invasion from across the network.
It’s very convenient to turn on sharing one folder at a time, using the Get Info window. But there’s another way in, too, one that displays all of your shared stuff in one handy master list.
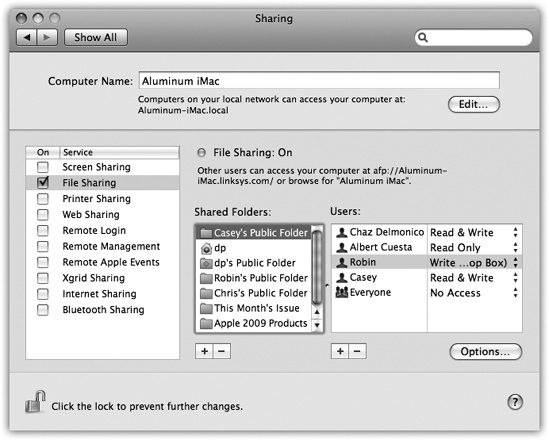
Figure 14-5. Hiding in System Preferences is a list of every file, disk, and folder that you’ve shared. To stop sharing something, click it and click the - button. To share something new, drag its icon off the desktop, or out of its window, directly into the Shared Folders list.
To see it, choose ![]() →System Preferences. Click Sharing. Click
File Sharing (and make sure it’s turned on).
→System Preferences. Click Sharing. Click
File Sharing (and make sure it’s turned on).
Now you’re looking at a slightly different kind of permissions table, shown in Figure 14-5. It has three columns. The first lists the files, folders, and disks you’ve shared. The second shows who gets to work with a certain item from across the network. The third column lets you specify how much access each person in the second column has to this folder, as described in Setup: Sharing Any Folder.
So far in this chapter, you’ve read about setting up a Mac so that people at other computers can access its files.
Now comes the payoff: sitting at another computer and connecting to the one you set up. There are two ways to go about it.
Suppose, then, that you’re seated in front of your Mac, and you want to see the files on another Mac on the network. Proceed like this:
Open any Finder window.
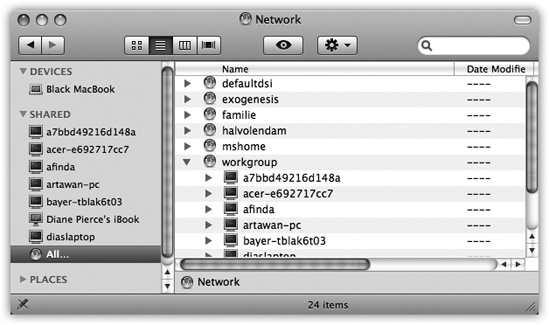
In the Shared category of the Sidebar at the left side of the window, icons for all the computers on the network appear. See Figure 14-6.
Tip
The same Sidebar items show up in the Save and Open dialog boxes of your programs, too, making the entire network available to you for opening and saving files.
Figure 14-6. Macs often appear in the Sidebar with model-specific names (MacBook, iMac, and so on). Other computers (like PCs) have generic blue monitors. When you click All in the Sidebar, you see both the icons of individual computers and the icons of network chunks (like AppleTalk zones and Windows workgroups).
If you don’t see a certain Mac’s icon here, it might be turned off, it might not be on the network, or it might have File Sharing turned off.
If there are more than six icons in the Sidebar, or if you’re on a corporate-style network that has sub-chunks like nodes or workgroups, you also see an icon called All. Click it to see the full list of network entities that your Mac can see: not just individual Mac, Windows, and Unix machines, but also any “network neighborhoods” (limbs of your network tree). For example, you may see the names of AppleTalk zones (clusters of machines, as found in big companies and universities).
Or, if you’re trying to tap into a Windows machine, open the icon representing the workgroup (computer cluster) that contains the machine you want. In small office networks, it’s usually called MSHOME or WORKGROUP. In big corporations, these workgroups can be called almost anything—as long as it’s no more than 12 letters long with no punctuation. (Thanks, Microsoft.)
If you do see icons for workgroups or other network “zones,” double-click your way until you’re seeing the icons for individual computers.
Click the computer whose files you want to open.
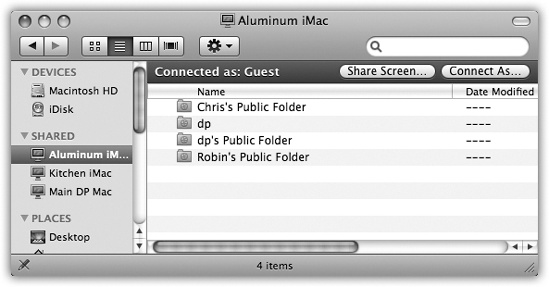
In the main window, you now see the icons for each account holder on that computer: Mom, Dad, Sissy, whatever. If you have an account on the other computer, you’ll see a folder representing your stuff, too (Figure 14-7).
Figure 14-7. Without requiring any name or password on the other Mac, you have full access to anything the other account holders have left in their Public folders. (There’s a Public folder in everyone’s Home folder.) At this point, you’re considered a Guest.
At this point, the remaining instructions diverge, depending on whether you want to access other people’s stuff or your stuff. That’s why there are two alternative versions of step 3 here:
a. If you want to access the stuff that somebody else has left for you, double-click that person’s Public folder.
Instantly, the icon for that folder appears on your desktop, and an Eject button (
 ) appears beside the computer’s name in
the Sidebar. (You can turn off both of those visual signals in
Finder→Preferences.)
) appears beside the computer’s name in
the Sidebar. (You can turn off both of those visual signals in
Finder→Preferences.)In this situation, you’re only a Guest. You don’t have to bother with a password. On the other hand, the only thing you can generally see inside the other person’s account folder is his Public folder.
If you see anything besides the Drop Box folder in the Public folder you’ve opened, then it’s stuff that the account holder has copied there for the enjoyment of you and your network mates. You’re not allowed to delete anything from the other person’s Public folder or make changes to them.
You can, however, open those icons, read them, or even copy them to your Mac—and then edit your copies.
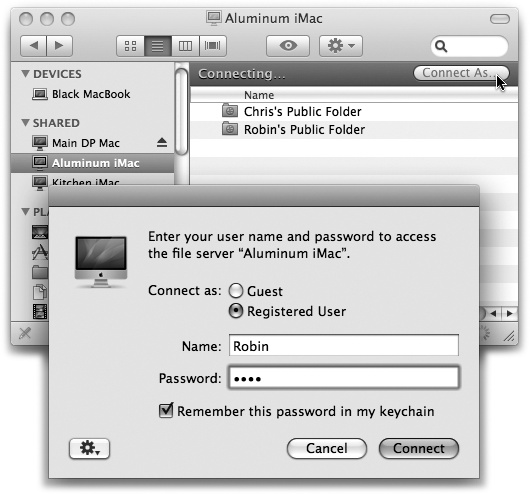
b. To access your own Home folder on the other Mac, click it, and then click the Connect As button (Figure 14-8). Sign in as usual.
When the “Connect to the file server” box appears, you’re supposed to specify your account name and password (from the Mac you’re tapping into). This is the same name and password you’d use to log in if you were actually sitting at that machine.
Figure 14-8. Top: You can sign in to your account on another Mac on the network (even while somebody else is actually using that Mac in person). Click Connect As (top right), and then enter your name and password. Turn on “Remember this password” to speed up the process for next time. The Action (
 ) pop-up menu offers a Change Password
that gives you the opportunity to change your account password
on the other machine, just in case you suspect someone saw
what you typed. Bottom: No matter which method you use to
connect to a shared folder or disk, its icon shows up in the
Sidebar. It’s easy to disconnect, thanks to the little
button.
) pop-up menu offers a Change Password
that gives you the opportunity to change your account password
on the other machine, just in case you suspect someone saw
what you typed. Bottom: No matter which method you use to
connect to a shared folder or disk, its icon shows up in the
Sidebar. It’s easy to disconnect, thanks to the little
button.Tip
The dialog box shown in Figure 14-8 includes the delightful and timesaving “Remember this password in my keychain” option, which makes the Mac memorize your password for a certain disk so you don’t have to type it—or even see this dialog box—every darned time you connect.
When you click Connect (or press Return or Enter), your own Home folder on the other Mac appears. Its icon shows up on your desktop, and a little
button appears next to its name. Click it
to disconnect.
In the meantime, you can double-click icons to open them, make copies of them, and otherwise manipulate them exactly as though they were icons on your own hard drive. Depending on what permissions you’ve been given, you can even edit or trash those files.
The Sidebar method of connecting to networked folders and disks is practically effortless. But it doesn’t let you type in a disk’s network address. As a result, you can’t access any shared disk on the Internet (an FTP site, for example), or indeed anywhere beyond your local subnet (your own small network).
Fortunately, there’s another way. When you choose Go→Connect to Server, you get the dialog box shown in Figure 14-9. You’re supposed to type in the address of the shared disk you want.
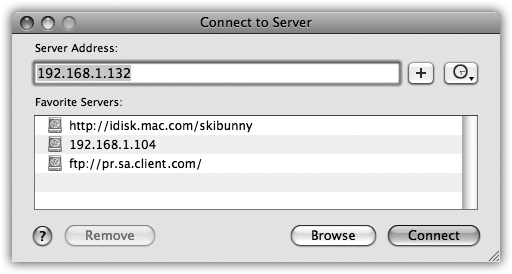
Figure 14-9. The Sidebar method of connecting to shared disks and folders is quick and easy, but it doesn’t let you connect to certain kinds of disks. The Connect to Server method entails plodding through several dialog boxes and doesn’t let you browse for shared disks, but it can find just about every kind of networked disk.
Mac OS X represents a historic moment in Mac-Windows relations: It lets Macs and Windows PCs see each other on the network, with no special software (or talent) required.
In fact, you can go in either direction. Your Mac can see shared folders on the Windows PCs, and a Windows PC can see shared folders on your Mac. Since a huge number of Mac “switchers” are actually Mac “adders” (meaning that you’re keeping the old PC around), you might find these features especially useful.
It goes like this:
Suppose you have a Windows PC and a Mac on the same wired or wireless network. Here’s how you get the Mac and PC chatting:
On your Windows PC, share some files.
Just as on the Mac, there are two ways to share files in Windows. One of them is super-simple: You just copy the files you want to share into a central, fully accessible folder. No passwords, accounts, or other steps are required.
In Windows XP, that folder is Shared Documents, which you can find by choosing Start→My Computer. Share it on the network as shown in Figure 14-10, top.
In Windows Vista, it’s the Public folder, which appears in the Navigation pane of every Explorer window. (In Vista, there’s one Public folder for the whole computer, not one per account holder.)
The second, more complicated method is the “share any folder” method, just as in Leopard. In general, you right-click the folder you want to share, choose Properties from the shortcut menu, click the Sharing tab, and turn on “Share this folder on the network” (Figure 14-10, top). Repeat for any other folders you want to make available to your Mac.
On the Mac, open any Finder window.
The shared PCs may appear as individual computer names in the Sidebar, or you may have to click the All icon to see the icons of their workgroups (network clusters—an effect shown in Accessing Shared Files). Unless you or a network administrator changed it, the workgroup name is probably MSHOME or WORKGROUP. Double-click the workgroup name you want.
Tip
You can also access the shared PC via the Connect to Server command, as described in Connection Method B: Connect to Server. You could type into it smb://192.168.1.103 (or whatever the PC’s IP address is) and hit Return—and then skip to step 5. In fact, using the Connect to Server method often works when the Sidebar method doesn’t.
Figure 14-10. Top: To share a folder in Windows XP, right-click it, choose Properties, and then turn on “Share this folder on the network.” In the “Share name” box, type a name for the folder as it will appear on the network. (No spaces are allowed). Bottom: Back in the safety of Mac OS X, click the PC’s name in the Sidebar. (If it’s part of a workgroup, click All, and then your workgroup name first. And if you still don’t see the PC’s name, see the box in Figure 14-10.) Next, click the name of the shared computer. If the files you need are in a Shared Documents or Public folder, no password is required. You see the contents of the PC’s Shared Documents folder or Public folder, as shown here. Now it’s just like file sharing with another Mac. If you want access to any other shared folder, click Connect As, and see Figure 14-14.
Now the names of the individual PCs on the network appear in your Finder window.
Double-click the name of the computer you want.
If you’re using one of the simple file-sharing methods on the PC, as described above, that’s all there is to it. The contents of the Shared Documents or Public folder now appear onyour Mac screen. You can work with them just as you wouldyour own files.
If you’re not using one of those simple methods, and you want access to individual shared folders, read on.
Note
In Windows XP Pro, the next step won’t work unless you turn off Simple File Sharing. To do that, choose Tools→Folder Options in any Explorer window. Click the View tab and turn off “Use simple file sharing.”
Click Connect As.
This button appears in the top right corner of the Finder window; you can see it at bottom in Figure 14-10, bottom.
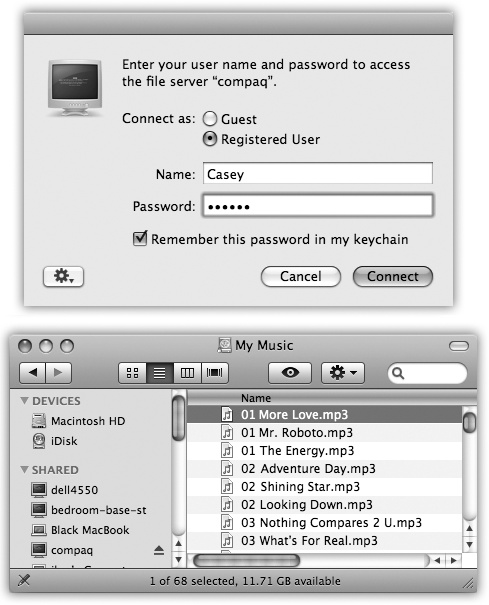
Figure 14-11. Top: The PC wants to make sure that you’re authorized to visit it. If the terminology here seems a bit geeky by Apple standards, no wonder—this is Microsoft Windows’ lingo you’re seeing, not Apple’s. Fortunately, you see this box only the very first time you access a certain Windows folder or disk; after that, you see only the box shown below. Bottom: Here, you see a list of shared folders on the PC. Choose the one you want to connect to, and then click OK. Like magic, the Windows folder shows up on your Mac screen, ready to use!
Now you’ re asked for your name and password (Figure 14-11, top).
Enter the name and password for your account on the PC, and then click OK.
At long last, the contents of the shared folder on the Windows machine appear in your Finder window, just as though you’d tapped into another Mac (Figure 14-11, bottom). The icon of the shared folder appears on your desktop, too, and an Eject button (
) appears next to the PC’s name in your
Sidebar.From here, it’s a simple matter to drag files between the machines, open Word documents on the PC using Word for the Mac, and so on—exactly like you’re hooked into another Mac.

Cross-platformers, rejoice: Mac OS X lets you share files in both directions. Not only can your Mac see other PCs on the network, but they can see the Mac, too.
On the Mac, choose ![]() →System Preferences. Click Sharing, click File
Sharing (make sure File Sharing is turned on), and then click
Options to open the dialog box shown in Figure 14-12.
→System Preferences. Click Sharing, click File
Sharing (make sure File Sharing is turned on), and then click
Options to open the dialog box shown in Figure 14-12.

Figure 14-12. Prepare your Mac for visitation by the Windows PC. It won’t hurt a bit. The system-wide On switch for invasion from Windows is the third checkbox here, in the System Preferences→Sharing→File Sharing→Options box. Next, turn on the individual accounts whose icons you’ll want to show up on the PC. Enter their account passwords, too. Click Done when you’re done.
Your mission now is to turn on “Share files and folders using SMB.” Although Apple can’t bring itself to use the term Windows in this dialog box, that’s what it means by SMB.
Below that checkbox, you see a list of all the accounts on your Mac. Turn on the checkboxes to specify which Mac user accounts you want to be able to access. You must type in each person’s password, too. Click Done to return to the System Preferences pane.
Before you close System Preferences, study the line near the middle of the window, where it says: “Other users can access your computer at afp://MacBook-Pro” (or whatever your computer’s name is). You’ll need this name shortly, although not the “afp://” part.
Now, on Windows XP, open My Network Places; in Windows Vista, choose Start→Network. If you’ve sacrificed the proper animals to the networking gods, your Mac’s icon should appear by itself in the network window, as shown in Figure 14-13, top.
Note
If you don’t see your Mac here, proceed immediately to the box on the facing page.

Figure 14-13. Top: Double-click the icon of the Mac you want to visit from your Windows machine (Vista is shown here). Middle: Type your Mac’s name in all capitals (or its IP address), then a backslash, and then your Mac account short name. (You can find out your Mac’s name on the Sharing pane of System Preferences.) Enter your Mac account’s password, too. Turn on “Remember my password” if you plan to do this again someday. Click OK. Bottom: Here’s your Mac Home folder—in Windows! Open it up to find all your stuff.
Double-click the Mac’s icon. Public-folder stuff is available immediately. Otherwise, you have to sign in with your Mac account name and password; Figure 14-13, middle, has the details.
In the final window, you see your actual Home folder—on a Windows PC! You’re ready to open its files, copy them back and forth, or whatever (Figure 14-13, bottom).
If your Mac’s icon doesn’t appear, and you’ve read the box below, wait a minute or two. Try restarting the PC. In Windows XP, try clicking “Microsoft Windows Network” or “View workgroup computers” in the task pane.
If your Mac still doesn’t show up, you have to add it the hard way. In the address bar of any Windows window, type \macbook-prochris (but substitute your Mac’s actual computer name and your short account name); use backslashes, not normal / slashes. You can also type your Mac’s IP address in place of its computer name.
In the future, you won’t have to do so much burrowing; your Mac’s icon should appear automatically in the My Network Places or Network window.
The prayers of baffled beginners and exasperated experts everywhere have now been answered. Now, when the novice needs help from the guru, the guru doesn’t have to run all the way downstairs or down the hall to assist. Thanks to the new screen-sharing feature of Leopard, you can see exactly what’s on the screen of another Mac, from across the network—and even seize control of the other Mac’s mouse and keyboard (with the newbie’s permission, of course).
GEM IN THE ROUGH: When Macs and PCs Don’t See Each Other
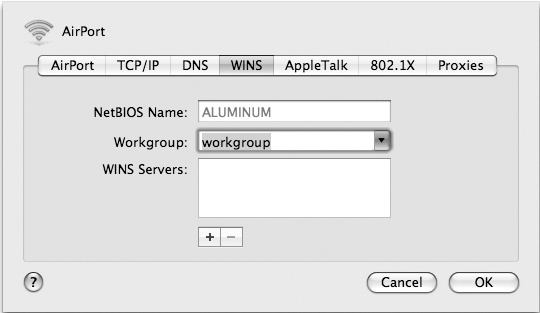
If your Mac’s icon doesn’t show up on the PC at all, or vice versa, it’s probably because the Mac doesn’t know anything about Windows workgroups. And even a lowly home PC is part of a workgroup (a corporate cluster), whether it knows it or not. And until your Mac is part of that very tiny club, it won’t be able to see your PCs, and they won’t be able to see it.
So if you’re having no luck with this whole Mac-PC thing, try this. Open System Preferences. Click Network. Click whatever connection you’re on right now (like AirPort or Ethernet). Click Advanced. Click WINS.
Now you see the peculiar set of controls shown here. The Workgroup pop-up menu already lists the workgroups that your Mac sees. Choose “workgroup” from the pop-up menu. Click OK, and then click Apply.
And marvel as your Windows PCs’ names show up in the Sidebar, where they didn’t before.
(Of course, your workgroup name might not be “workgroup,” but that and mshome are the two most common Windows home-network workgroup names.)
(Anyone who’s ever tried to help someone troubleshoot over the phone knows exactly what this means.)
Nor is playing Bail-Out-the-Newbie the only situation when screen sharing is useful. It’s also great for collaborating on a document, showing something to someone for approval, or just freaking each other out. It can also be handy when you are the owner of both Macs (a laptop and a desktop, for example), and you want to run a program that you don’t have on the Mac that’s in front of you. You might want to adjust the playlist selection on the upstairs Mac that’s connected to your sound system, for example. Or maybe you just want to keep an eye on what your kids are doing on the Macs upstairs in their rooms.
The controlling person can do everything on the controlled Mac, including running programs, messing around the folders and files, and even shutting down the controlled Mac.
Note
Leopard is crawling with different ways to use screen sharing. You can do it over a network, over the Internet, and even during an iChat chat.
That method, described in Chapter 12, is much simpler and better than the small-network method described here. It doesn’t require names or passwords, it’s easy to flip back between seeing the other guy’s screen and your own, and you can transfer files by dragging them from your screen to the other guy’s (or vice versa).
Then again, the small-network method described here is built right into the Finder, doesn’t require logging into iChat, and doesn’t require Leopard running on both computers.
As always, trying to understand meta concepts like seeing one Mac’s screen on the monitor of another can get confusing fast. So in this example, suppose that you want to take control of Mac #1 while seated at Mac #2.
It would be a chaotic world (although greatly entertaining) if any Mac could randomly take control of any other Mac. Fortunately, though, nobody can see your screen without your explicit permission.
To give such permission, choose ![]() →System Preferences→Sharing, and then turn on
Screen Sharing.
→System Preferences→Sharing, and then turn on
Screen Sharing.
Note
If a message appears to the effect that “Screen Sharing is currently being controlled by the Remote Management service,” turn off the Remote Management checkbox and then try again.
At this point, there are three levels of security to protect your Mac against unauthorized remote-control mischief:
Secure. If you stop here, anyone with an account on your Mac will be able to tap in and take control any time they like, even when you’re not around. They’ll enter the same name and password they’d use if they were sitting at your machine.
If “anyone” means “you and your spouse” or “you and the other two fourth-grade teachers,” then that’s probably perfectly fine.
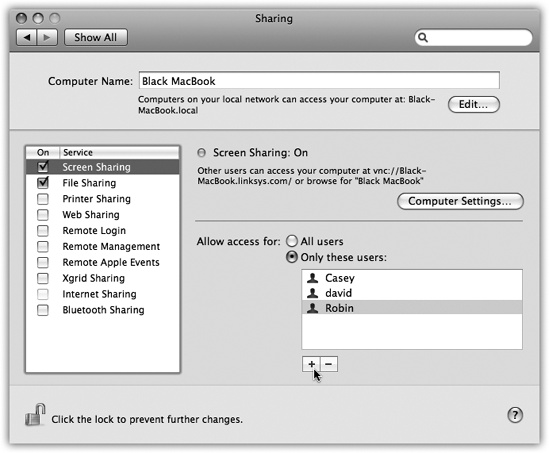
Securer. For greater security, though, you can limit who’s allowed to stop in. Click “Only these users” and then click the + sign. A small panel appears, listing everyone with an account on your Mac. Choose the ones you trust not to mess things up while you’re away from your Mac (Figure 14-14).
Securest. If you click “Only these users” and then don’t add anyone to the list, then nobody can tap into your screen.
Alternatively, if you’re only a little bit of a Scrooge, you can set things up so that they can request permission to share your screen—as long as you’re sitting in front of your Mac at the time and feeling generous.
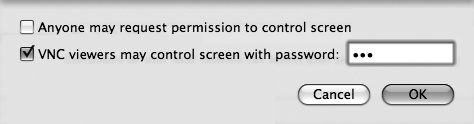
To set this up, click Computer Settings and turn on “Anyone may request permission to share screen.” Now your fans will have to request permission to enter, and you’ll have to grant it (by clicking OK on the screen), in real time, while you’re there to watch what they’re doing.
All right, Mac #1 has been prepared for invasion. Now suppose you’re the person on the other end. You’re the guru, or the parent, or whoever wants to take control.
Sit at Mac #2 elsewhere on your home or office network. Open a Finder window. Expand the Sharing list in the Sidebar, if necessary, so that you see the icon of Mac #1.
When you click that Mac’s icon, the dark strip at the top of the main window displays a button that wasn’t there before: Share Screen. Proceed as shown in Figure 14-15.
If you signed in successfully, or if permission is granted, then a weird and wonderful sight appears. As shown in Figure 14-16, your screen now fills with a second screen—from the other Mac. You have full keyboard and mouse control to work with that other machine exactly as though you’re sitting in front of it.
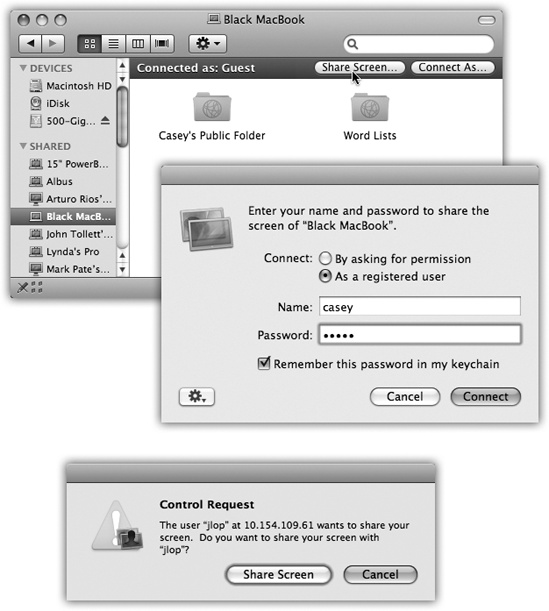
Figure 14-15. Top: Start by clicking Share Screen in the strip at the top of the other Mac’s window. Middle: If you’ve been pre-added to the V.I.P. list of authorized screen sharers, as described above, you can sign in with your name and password. If not, you can request permission to share Mac #1’s screen. You’ll be granted permission only if Mac #1’s owner happens to be sitting in front of it at the moment, and has opted to accept such requests. Bottom: If you request permission, the other person (sitting at Mac #1) sees your request in this form.
Believe it or not, you can actually copy and paste material from the remote-controlled Mac to your own—or the other way—thanks to a freaky little wormhole in the time-space continuum.
Just make the toolbar visible (you can see it in Figure 14-16). Click the second button on it to copy the faraway Mac’s clipboard contents onto your Clipboard. Or click the third button to put what’s on your Clipboard onto the other Mac’s Clipboard. Breathe slowly and drink plenty of fluids, and your brain won’t explode.
Note
Unfortunately, there’s no way to transfer files while screen sharing—only material you’ve copied out of documents.
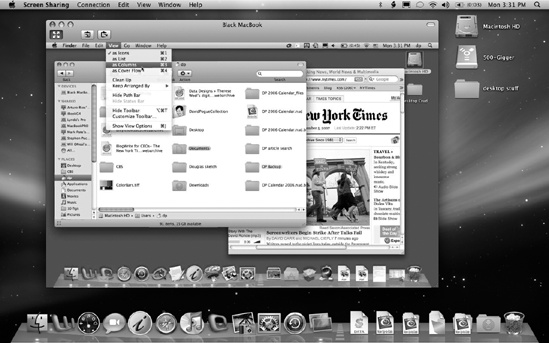
Figure 14-16. Don’t be alarmed. You’re looking at the other Mac’s desktop in a window on your Mac desktop. You have keyboard and mouse control, and so does the other guy (if he’s there); when you’re really bored, you can play King of the Cursor. (Note the Screen Sharing toolbar, which has been made visible by choosing View→Show Toolbar.)
“Back to My Mac” is a Leopard feature that’s intended to simplify the nightmare of remote networking. It works only if you’re a .Mac member, and you have at least two Macs, both running Leopard. On each one, you’ve entered your .Mac information into the .Mac pane of System Preferences, and logged in.
Once that’s all in place, your Macs behave exactly as though they’re on the same home network, even though they’re thousands of miles apart across the network.
To set it up, open System Preferences on the first Mac. Click .Mac, and then click Back to My Mac. Click Start. Close System Preferences. Repeat on each Mac, making sure that they all have the same .Mac account information.
Now, on each Mac you’ll want to “visit” from afar, open the System Preferences→Sharing pane and turn on File Sharing and/or Screen Sharing.
Then, on your laptop in New Zealand, you’ll see an entry for Back to My Mac in the Sharing section of your Sidebar. Click to see the icon of your Mac back at home. At this point, you can connect to it for file sharing by clicking Connect As (Mac #2: Take Control), or take control of it by clicking Share Screen (Figure 14-15).
In theory, Back to My Mac spares you an awful long visit to networking hell, because Apple has done all the configuration work for you.
Note
Lots of people can’t get Back to My Mac to work. Apple says that the problems are related to (a) this being a new service with some kinks to be worked out, (b) firewall problems, and (c) router incompatibilities.
All the technical details are available online. Go to http://search.info.apple.com and do a search for 306672. (That’s the article number that explains the Back to My Mac issues.)
GEM IN THE ROUGH: Screen Sharing with Windows and Other Oddball Machines
The beauty of Leopard’s screen-sharing technology is that it isn’t Leopard’s screen-sharing technology. It’s a popular, open standard called VNC (Virtual Network Computing).
Once you’ve turned on Screen Sharing on your Leopard Mac, any computer on earth with a free VNC client program—sort of a viewer program—can pop onto your machine for a screen share. VNC clients are available for Windows, Linux, pre-Leopard Macs, and even some cellphones.
To prepare your Leopard Mac for invasion, open the Sharing pane of System Preferences. Click Screen Sharing, and click Computer Settings. Turn on “VNC viewers may control screen with password,” and make up a password. (VNC doesn’t know anything about Mac OS X account passwords, so you’re making up one password for sharing your whole Mac.)
Give that password to the lucky few who have your trust. Let them plug your Mac’s IP address into their VNC clients—or let them connect over your office network, using the address displayed on the Screen Sharing pane (”vnc://Black-MacBook,” for example)—and let the sharing begin.