
Sound in games is one of the most important tools that you can leverage to enhance the immersion and enjoyment a player has with your title. UE offers a very easy-to-use sound toolset that we are going to be learning how to utilize. We will be learning how to create 3D sound queues, how to trigger sound effects based off of animation ques, and how to add global sound volumes to your game scenes.
The first thing we need to do is import the sounds that we will be using to create our ques. All raw sound assets must be added to your content folder then used to create a Sound Cue object. Sound cues allow you to play sounds from within Blueprints, codebase, and animations at runtime. These objects also allow you to apply any modifications to how our raw sound file is played back during runtime. This means we can perform sound modifications such as modulation, oscillation, attenuation, Doppler effects, and much more from within the engine.
We are going to utilize these sound cues and other UE4 sound functionalities to add explosions to our barrels, footsteps to our character, background noise to our scene, and a groan for when our character kicks the bucket. Import the sounds deathsound.wav and footstep.wav provided with this textbook (ensure to create the appropriate organizational folders to contain the new sounds). Then create two sound ques objects titled BH_Footstep and BH_Death. We can create sound ques by right-clicking in the content browser and selecting Sounds | Sound Cue.
Like many of the UE objects, sound cues feature a graph-like workspace that you can drag and drop nodes into, which will be linked via some path. In a similar way that animation graphs have an output pose node, sound cues have an output sound node that looks like this:
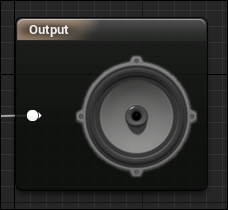
Unlike most graphs you encounter when working with Unreal, there will only be one type of pin. This means that all nodes that you work with will take in the same type for input and output. In this case the pins are of type sound. While working with sound cues you will pass this sound reference through nodes that perform the sound modification mentioned previously.
Open the BH_Footstep sound cue now. You will be presented with an empty graph featuring the previous node. You will notice that the layout for this workspace is much simpler than what we have encountered previously. You have a Viewport panel that shows you the sound ques workspace. A Details panel on the left-hand side of the window shows you any properties of the currently selected node. A Palette panel on the right-hand side of the window acts as a search directory for sound cue modification nodes.
Again you are presented with a Toolbar at the top of the window that provides you with Sound Cue-specific functionality. This time you are presented with three new buttons, Play Cue, Play Node, and Stop. Play Cue will play the cue in its entirety, taking into account the entire sound modification chain up to and including the output node. The Play Node button will allow you to play the sound modification chain up to a specific node. This is a very powerful debugging tool as you will be able to test how a sound plays before being parsed into the next modification node.
We need to summon a node that allows us to play the footstep.wav sound file we imported earlier. This is very similar to the way we played animations from our state machine earlier in the chapter. Right-click in the graph somewhere and search for a node titled Wave Player. This is the node that will play the raw sound file specified in the Details panel. Select this new Wave Player node and address the Details panel, change the Sound Wave element to footstep by selecting/searching for the appropriate asset via the dropdown menu provided. Plug the output of this node into the output node and press the Play Cue button. You will hear a sound similar to that of someone walking on the ground. Now if you press that play cue button multiple times you will notice that the sound always plays the same way. As we are creating a footstep sound cue, we need this sound to vary slightly each time it is played otherwise the player may find the sound to be monotonous and repetitive.
We can now utilize one of the aforementioned sound modification nodes. From the Pallet on the right-hand side of the window, find the Modulator node. This node will take a sound input then randomly vary the pitch and volume of this sound so the output of this node sounds slightly different every time it is played. How much modulation takes place is dependent on the ranges specified in the Details panel of the modulator node. I used 1.0 as a minimum and 1.5 as a maximum for both pitch and volume.
Ensure that all of the connections between nodes have been made, and repeatedly press the Play Cue button. You will notice that the sound varies slightly each time it is played. If this is not immediately apparent, select the wave player node, then use the Play Node button instead to hear the sound again without modification. The difference will be immediately noticeable.
Our death sound cue can remain very simple. No modification is required as the sound will be played only at the point of the player's death, which will happen far less frequently than the player's footsteps. Simply summon the wave player node, select the death.wav asset via the Details panel, and parse the output to the Output node.
Now that we have created our sound cues we need to play them at the correct time. For our footstep sound we are going to use an animation notify to determine when the sound is played. This means we can perfectly sync the sound cue to the foot striking the floor in the animation. To do this we are going to need to add a play sound notify to the animation asset that we are using for our run. We are going to have to add a similar notify to our walk animation as well, as both feature in the Blendspace we are using to drive the locomotion of the character.
Open the ThirdPersonRun animation, you will be presented with a window arrangement very similar to that of the Blendspace we made earlier. The main difference is the information that is presented in the ThirdPersonRun tab in the middle-bottom of the screen. You will notice that there is a new set of information being presented here and it looks like this:
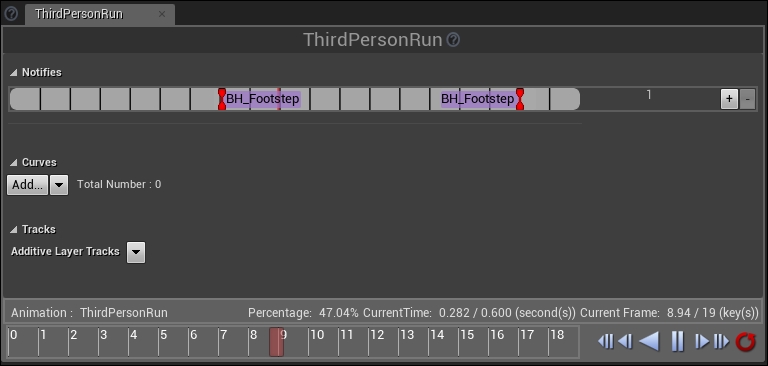
The section at the top of the panel titled Notifies is where you can place notify markers along a time bar. These markers will enact some form of functionality when the animation reaches the specified point along the presented bar during runtime. The vertical lines on the bar represent the key frames of the animation. While the animation is playing, a small red line indicates the current play position of whatever animation is being previewed. This means you can play or scan the animation until a desired visual pose is seen (in our case, the moment the character's foot hits the floor), then address the notifies bar for the position of the red line, this is where you should place the notification.
Animation Notifies can be of three different types; play sound notify, play particle effect notify, or custom notify, which will be associated with a similarly named event that can be summoned in the event graph of an Animation Blueprint. The two notifies seen in the previous example are play sound notifies titled by the sound cue that is used at that notify point.
The next section titled Curves allows you to create something called a data curve. By default, the curves value progresses as the time of the animation progresses. For example, address the following image:
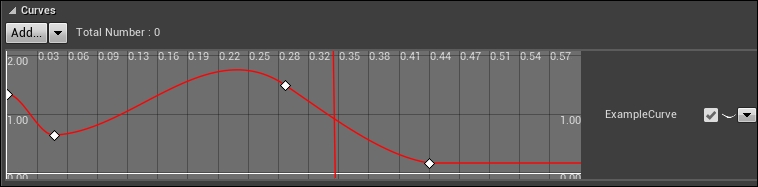
The previous curve shows that, as the animation plays, the value of ExampleCurve will vary between roughly 1.6 and 0.3 with a maximum value of about 1.9. The vertical red line represents the position at which time point the preview animation has reached. If we were to retrieve the value of this curve at this point, it would return around .99. These curves can be useful to generate meaningful data based on the progression of an animation. A great example would be if there were a sweet spot within a combat animation. You could use these curves to affect the damage amount that is received by an enemy. As the animation approaches the sweet spot in time, the curve's value would increase, then decrease as the animation progresses past this sweet spot. You could then use this value as a scalar when calculating attack damage.
The next section Additive tracks allow you to modify the current animation from inside UE as part of an Additive Layer. This means that you can take the existing animation and use an additive layer to produce an adjusted version of the animation. You can also create a separate, new animation with its own motion that is based on an original, utilizing the record animation button in the Toolbar.
Note
Implementation of these additive layers is not within the scope of this book; however you can address the online documentation at https://docs.unrealengine.com/latest/INT/Engine/Animation/AnimHowTo/LayerEditing/index.html for more information.
At the very bottom of the animation panel is a statics bar that shows you in-depth metrics for the given animation. This panel can be very useful to ascertain animation data at a given point so you may record the metrics to be used in logics. This bar also boasts the buttons that you can use to navigate the animation that you are working with. You can play in forward time and in reverse. You can also traverse the animation frame by frame via the buttons immediately next to the play/reverse buttons. There is also a red loop button that lets you turn looping on and off within the preview. These are preview controls and will have no effect on the animation during runtime.
We need to add two notifies to your current Notify bar for the ThirdPersonRun animation. To do this we are going to navigate the animation using the frame-by-frame buttons at the bottom of the panel. We need to find the frames that each foot falls on the floor, it is at these key frames that we will be placing the play sound notifies. Navigate to Frame 6 of the animation by either scrubbing the red bar along the animation timeline or by pressing the To Next button in the controls.
You should see this in the preview window:

Now address the Notifies bar, you will see the vertical red line is overlapping one of the black dividing lines. Right-click on the red line now and select PlaySound from the AddNotify dropdown. This will add a new notify to the track titled PlaySound. With this notify selected (the notify marker will go from red to yellow), address the Details panel in the top right-hand side of the window. Here you can choose whether you want to modify the pitch or volume of the sound, whether you wish the sound to follow the parent, namely have the sound follow the character as it moves, and whether you would like to attach the sound emitter to a bone.
Select the Sound dropdown and search for the BH_Footstep cue we created earlier, then set the volume multiplier to 0.1 as we do not wish for the footsteps to dominate the sound scape. Then set the pitch multiplier to 1.8 as we want the footfalls to sound light. Create the exact same notify at key frame 16 for the other foot. When you play the animation within the preview panel you will hear sounds playing as the player's feet hit the ground! As we also use the ThirdPersonWalk animation in our running Blendspace, we need to add the same notification to the footfalls of the walk animation. They key frames are 8 and 24.
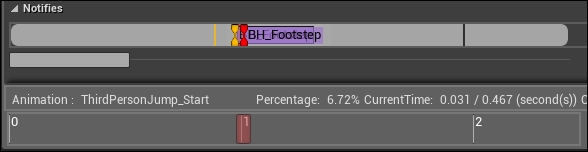
You may also add the footstep sounds to the ThirdPersonJump_Start animation at frame 1. To make the effect more prominent and punchier, you can set the Volume multiplier to 0.5 and have two notifies staggered directly after each other as seen in the following:
We need to do a few more things before the soundscape of Barrel Hopper is finished. We need to have the barrels play an explosion noise when they detonate, we need to have the player groan when they die, and we need to have some music looping in the background. These are all fairly easy to establish and will take simple world objects or calls to the sound queues.
Thanks to the starter content being included in our blank project, we have access to a couple of the Unreal provided assets, one them being an explosion sound cue. We simply have to play this sound cue when the barrel object receives its OnDestroyed event. Navigate to the BH_Barrel Blueprint. We are going to append to the functionality following the Event Destroyed node. From the Set Active node, drag a new execution path and search for Play Sound at Location. This node takes in a vector location and a reference to the cue we wish to use. For the Sound parameter, search in the dropdown menu for Explosion Cue, and for the Location parameter use GetWorldLocation with the BarrelScene component as the target. Your new functionality should appear as follows:
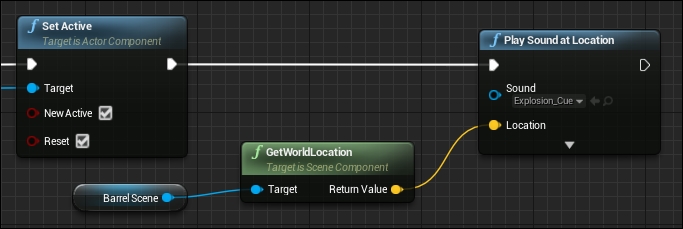
This functionality will play the Explosion_Cue at an emitter positioned at the same place as the BarrelScene component.
Now we need to create similar functionality for our BH_Death cue from within our BH_Character Blueprint. Navigate to the blueprint and find the OnDestroyed event. Append a PlaySoundAtLocation node to the existing functionality. For the sound input, search for BH_Death from the dropdown menu, and for Location input use the GetActorLocation function with self as the target. This will mean that, when the play is destroyed, the death sound cue we created earlier will play.
Creating persistent looping level sound is much easier to implement than it is for your sound designer to create non-pervasive background sound. All we need to do is create an Ambient Sound object, place it somewhere in the scene, and inform the object which que to play. We can do this by searching for the Ambient Sound object in the Modes Panel of the Editor window. Click and drag this object into the scene and, with it selected, address the Details Panel. Here you can change Sound parameter under the Sound section to Start_Music_Cue. This will use the ambient sound track that Unreal uses for the starter content level.
Now play the game, interact with the world, and behold the glorious soundscape we just created.