
Now we have a player character and we have a cross hair, all we need now is something to shoot! We need to create an object that can be fired forward and act the same way a weighted projectile would under the effects of gravity, similar to a grenade or small cannon ball. We can do this by utilizing another movement-based component. This one is called a ProjectileMovementComponent and can be used alongside the physics engine to dictate how a projectile will move through space. Using the C++ class wizard create a class that inherits from Actor called BMProjectile.
Let's start by defining the ABMProjectile class. We can begin with the private members of the class, navigate to BMProjectile.h and add the following code to the class definition under GENERATED_BODY():
/** Sphere collision component */
UPROPERTY(VisibleDefaultsOnly, Category = Projectile)
class USphereComponent* ProjCollision;

UPROPERTY(BlueprintReadWrite, EditAnywhere, Category = Projectile, meta = (AllowPrivateAccess = "true"))
class UParticleSystemComponent* ProjParticle;

UPROPERTY(BlueprintReadWrite, EditAnywhere, Category = Projectile, meta = (AllowPrivateAccess = "true"))
class UStaticMeshComponent* ProjMesh;

/** Projectile movement component */
UPROPERTY(VisibleAnywhere, BlueprintReadOnly, Category = Movement, meta = (AllowPrivateAccess = "true"))
class UProjectileMovementComponent* ProjMovement;
Here we have added a sphere component we will use for projectile collision, a particle system component we will play when the projectile hits something, a static mesh component so we can display the projectile, and a projectile movement component that we will be using to define how the projectile moves.
As you can see, we have again declared that the particle system, static mesh, and projectile movement components allow private access. This is so we can have these components read from or accessed via the editor and blueprint, but remain encapsulated within the codebase.
Next we can add our public methods to the class definition with the following:
// Sets default values for this actor's properties
ABMProjectile();

    /** called when projectile hits something */
    UFUNCTION()
    void OnHit(AActor* OtherActor, UPrimitiveComponent* OtherComp, FVectorNormalImpulse, const FHitResult& Hit);

UFUNCTION()
void OnDestoyedProjectile();
Here we have defined a default constructor, an OnHit()method we will use for custom collision functionality, and an OnDestroyedProjectile()method that we will call when the projectile is destroyed.
Ok, now we can begin to set up how this projectile is going to behave. Let's begin by defining the default constructor add the following code to BMProjectile.cpp:
// Sets default values
ABMProjectile::ABMProjectile()
{
    // Use a sphere as a simple collision representation
    ProjCollision = CreateDefaultSubobject <USphereComponent>(TEXT("SphereComp"));

    ProjCollision->InitSphereRadius(10.0f);
    ProjCollision->
    BodyInstance.SetCollisionProfileName("BlockAll");

    ProjCollision->OnComponentHit.AddDynamic(this, &ABMProjectile::OnHit);

    OnDestroyed.AddDynamic(this, &ABMProjectile::OnDestoyedProjectile);
Here we are initializing the sphere component and setting its initial radius to be 10.0f. We then set the collision profile name to BlockAll. We will be changing this later to a custom collision profile so we do specific checks on projectiles. We then ensure that the OnComponentHit and OnDestroyed delegates are bound to the methods we declared earlier. We then add the following code to ensure the player cannot walk on these projectiles:
    ProjCollision->
    SetWalkableSlopeOverride(FWalkableSlopeOverride(
    WalkableSlope_Unwalkable, 0.f));

    ProjCollision->CanCharacterStepUpOn =ECB_No;

    	RootComponent = ProjCollision;
We do this so that, if there are any projectiles that have not been destroyed lying on the ground, the player will not be able to set up onto these projectiles, resulting in unreasonable movement behavior and camera jitter. We also set this collision component to be the root component for this object.
Next we must initialize the mesh and particle components:
    ProjMesh = CreateDefaultSubobject <UStaticMeshComponent>(TEXT("MeshComp"));

    ProjMesh->AttachTo(ProjCollision);
    ProjMesh->SetCollisionProfileName(TEXT("NoCollision"));

    ProjParticle = CreateDefaultSubobject <UParticleSystemComponent>(TEXT("ParticleComp"));

    ProjParticle->bAutoActivate = false;
    ProjParticle->AttachTo(ProjCollision);
Here we ensure that no collisions are carried out on the mesh and that the particle component will not auto activate. If we did not specify this, the particle effect would play immediately when we spawn the projectile. Note that we are not associating any assets with these components as we will be doing that from an abstracted blueprint.
Now we can finally begin to work with our ProjectileMovementComponent. As stated before, this component will control how the projectile moves upon being spawned. Add the following code to the constructor:
    // Use a ProjectileMovementComponent to govern this projectile's movement
    ProjMovement = CreateDefaultSubobject<UProjectileMovementComponent> (TEXT("ProjectileComp"));

    ProjMovement->UpdatedComponent = ProjCollision;
    ProjMovement->InitialSpeed = 3000.f;
    ProjMovement->MaxSpeed = 3000.f;
    ProjMovement->bRotationFollowsVelocity = true;
We initialize the component as we always do with CreateDefaultSubobject(). We then bind the sphere collision component as the UpdatedComponent. This means the ProjectileMovementComponent will update the transform of the sphere component, thus all attached child components as well. We have set the collision component as our root therefore all other components will update appropriately.
We then specify that at spawn we wish this projectile to be moving at 3000 cm/s. We do this via the InitialSpeed property of the projectile movement component. This will dictate the launch velocity of the projectile upon spawn. We then say that this is also the maximum speed this projectile can reach via MaxSpeed. We then state that the projectile's rotation should follow the velocity, meaning that if we were to use an arrow mesh for the projectile, the arrow will always point in the direction of the projectile movement.
We also need to set the life span of the actor so that if it exists for too long, it will delete itself automatically. The member InitialLifeSpan can do this for us. This member is part of the AActor base class:
// Die after 3 seconds by default
InitialLifeSpan = 3.0f;
Now we can add a simple function definition to the OnHit method so we can have some meaningful response when the projectile hits something. We wish for the particle component to play, the mesh to stop drawing, and the projectile to cease collision with other objects. We need to ensure we detach the particle component from the object as well, otherwise the particle effect will continue to move with the invisible projectile! The following code can achieve this:
void ABMProjectile::OnHit(AActor* OtherActor, UPrimitiveComponent* OtherComp, FVector NormalImpulse, const FHitResult& Hit)
{
    if (!OtherActor->GetClass()->IsChildOf(this->StaticClass()))
    {
        ProjCollision->
        SetCollisionProfileName(TEXT("NoCollision"));
        ProjCollision->bGenerateOverlapEvents = false;
        ProjMesh->SetVisibility(false);

        ProjParticle->Activate();
        ProjParticle->DetachFromParent(true);
    }
}
We first ensure that we are not colliding with an object of our own type (meaning projectiles will not collide with each other) via an if statement based on the result of the ISChildOf() method. We then stop drawing the mesh of the projectile and set its collision profile to NoCollision. This effectively renders the projectile useless and invisible until it is de-spawned after three seconds.
We then activate the particle component and detach it from the parent. We will be coming back to this function in the next chapter. We will be modifying it so we may detect collisions with the Boss object and deal damage using UE4's damage system!
Finally, all we need to do is add an empty definition for the OnDestroyedProjectile() method we created earlier:
void ABMProjectile::OnDestoyedProjectile()
{

}Before we can fire our projectile we need to add the projectile class to the BMCharacter we made earlier. Instead of using a naked UClass* pointer like we have been previously, we are going to utilize a more secure type of class association. We are going to use the TSubclascOf template object. This object allows us to define a class type that is bound within the hierarchy of the provided template type. In other words, when we declare this template with a class type of ABMProjectile, only ABMProjectiles and other objects that inherit from ABMProjectile may be assigned to the member.
We need to add two public members to the BMCharacter, the first is the aforementioned TSubclassOf template object and the second is a USceneComponent we will use to act as a location when spawning the projectile objects. Add the following public members to the ABMCharacter class definition:
// Projectile class to use
UPROPERTY(EditDefaultsOnly, Category = Projectile)
TSubclassOf<ABMProjectile> ProjectileClass;
// Projectile Spawn
UPROPERTY(BlueprintReadWrite, EditAnywhere, Category = Projectile)
class USceneComponent* ProjSpawn;
As you can see, we have declared the TSubclassOf projectileClass member to be of type ABMProjectile. We have used the UPROPERTY() specifier EditDefaultsOnly so we may set the class this member holds from the Blueprint abstraction FPCharacter so we can avoid asset associations in code. Unfortunately we are unable to forward declare the ABMProjectile class type as we are referencing it via a whole type as opposed to a pointer type. Add #include "BMProjectile.h" to the include list of BMCharacter.h now.
The next thing we need to do is add a method we can bind to the Fire action mapping we created earlier. Add a protected method to the ABMCharacter class definition called OnFire() that returns void:
protected:
    /** Fires a projectile. */
    void OnFire();
With all of this in place, let's modify our method definitions to accommodate for spawning the projectiles. Add the following lines of code to the end of the ABMCharacter default constructor:
ProjSpawn = CreateDefaultSubobject<USceneComponent>(TEXT("ProjectileSpawn"));
ProjSpawn->AttachTo(FPGunMesh);
This will initialize the scene component that will act as the projectile spawn location and rotation. We attach this location to the gun mesh as we want the position to remain relative to the gun as it moves about the level. We will be defining the position of this scene component in Blueprint. Now add a new input binding to the SetupPlayerInputComponent() method definition:
InputComponent->BindAction("Fire", IE_Pressed, this, &ABMCharacter::OnFire);This will call the new OnFire()method when either the left mouse button is pressed or the left trigger of a game pad is pressed.
Now we can define the on fire function as follows:
void ABMCharacter::OnFire()
{
    // Attempt to fire Projectile
    if (ProjectileClass != nullptr)
    {
        if (GetWorld() != nullptr)
        {
            GetWorld()->SpawnActor<ABMProjectile>(ProjectileClass,
            ProjSpawn->GetComponentLocation(),
            ProjSpawn->GetComponentRotation());
        }
    }
}
Here we are ensuring that a projectile class has been set. We then simply spawn a new projectile by passing the ProjectileClass member and the transform details of the ProjSpawn scene component to SpawnActor(). The result will be a projectile that is of the type that we specify in blueprint at the location of the ProjSpawn scene component.
We do not need to do any more than this, as the moment we spawn the projectile, the projectile movement component will come into effect. Our projectile will launch off along its forward vector at 3,000 cm/s. If this projectile collides with anything, particle effect will play and the rest of the projectile will disappear.
Now we simply need to abstract our base class into blueprint and ensure we assign it in the FPCharacter Details panel as the ProjectileClass member we created earlier.
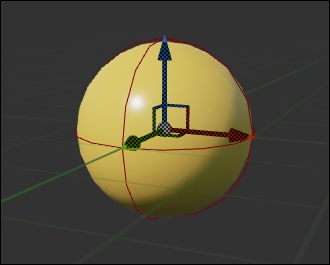
Let's begin by making the Blueprint. Navigate to your Content browser and create a new blueprint class that inherits from BMProjectile. Call this FPProjectile. We need to make some asset associations so that our projectile appears as we desire. First, select the ProjMesh component and under the Details panel change the StaticMesh property of the StaticMesh section to be FirstPersonProjectileMesh. Then set the RelativeScale3D property of the Transform section to 0.06 on all axis.
Once that is done we can then assign the particle effect to ProjParticle. Select the ProjParticle component and under the Particles section in the Details panel set the Template property to P_Explosion. You should now see something similar to this:
The last things we have to do are assign the projectile class in the FPCharacter Blueprint and position the ProjSpawn scene component so the projectiles will spawn in the correct place. First off, select the FPCharacter (Self) reference in the Components Panel, under the Projectile section of the Details panel change the Projectile Class property to the FPProjectile Blueprint we made earlier. As you can see, only objects that inherit from BMProjectile are shown.
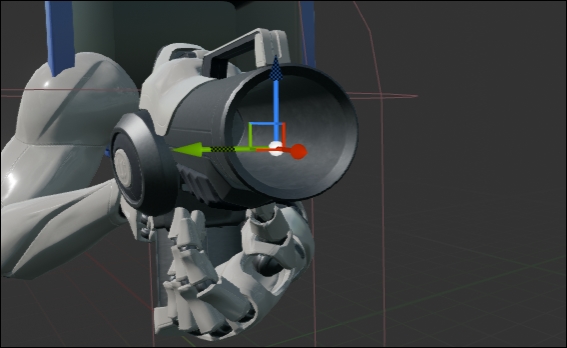
Next, select the new ProjSpawn scene component in the Components panel then position this component so that it sits inside the barrel of the gun mesh, as follows:
With all that in place, run the project! We can now fire our projectile and watch it detonate on the ground.
