
Ok, now that we have a rough idea of the workings of a behavior tree, let's work with one directly so we can solidify that knowledge and understanding. The purpose of this tree is to provide AI behavior to our boss character. We can start by simply getting our boss to identify the player as a target and track to the player. If the player runs far away from the boss or is occluded by blocking geometry, the AI will begin to path between a home location and last location the player was seen.
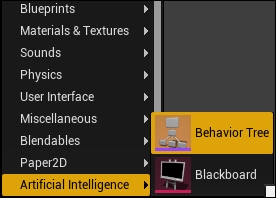
Start by creating a new behavior tree asset by right-clicking in the Content browser and selecting Behavior Tree from the Artificial Intelligence section of the provided list, as follows:
Call this new behavior tree BossBT. Then create a new Blackboard asset from the same category. Call this BossBB. We will start by adding the blackboard keys we are going to be utilizing in BossBT. Open the BossBB asset we just created and you will be presented with the blackboard editor.
The blackboard editor is quite simple; it contains two panels, the first is Blackboard. Through this panel you can manage your existing keys by selecting them from a drop-down list or adding new keys by pressing the large New Key button located at the top of the panel. The second is Blackboard Details. It is through this panel that you will be able to change the details of each blackboard key. You will be able to modify things such as Key Name, Key Type, and whether the key is synced across all instances of the blackboard asset.
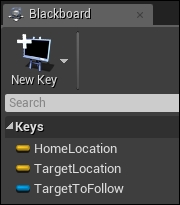
Start by adding three new keys. The first two are going to be of type vector and named HomeLocation and TargetLocation. We will use these keys to hold the location our AI was at when it found the target, and the location of the target the AI is going to track to. The third key is to be of type Object and called TargetToFollow. This key will be used as a direct reference to the player object the AI will be following.
You add keys to the blackboard by selecting the Add Key button then choosing the appropriate type from the provided dropdown. If you ever need to make adjustments to a key, you can select it from the Blackboard Panel and modify it within the Blackboard Details panel. Once you have added the three keys, your blackboard should appear as follows:
With our blackboard keys in place we can begin to craft the behavior tree for the AI. Open BossBT now.
We are now presented with another GUI editor. As you can see, the behavior tree editor is quite simple. It consists of four panels and they are responsible for the following:
- Toolbar: This panel is used to house the control buttons for the BT. Here we are able to create new services, tasks, and decorators on the fly. Selecting one of the new buttons will create a blueprint of the corresponding type and open up the blueprint editor. We will be using these buttons ourselves shortly.
- Behavior Tree: Within this panel is the node graph you will be working with to create the main node structure of a behavior tree. Navigation of this graph is very similar to that of the Blueprint editor.
- Details: The details panel will provide you with access to any exposed properties of a selected BT node or object. This allows us to tweak the default values of our tasks, services, and decorators easily.
- Blackboard: This panel will show the state of any keys we have created in the associated blackboard asset. This is very useful as we are able to debug the state of the given blackboard's variables at runtime.
The first thing we need to do is create an association between BossBT and BossBB. We can do this by clicking in any blank area of the BT node graph. This will update the Details panel with one property, BlackBoard Asset. Via the dropdown of this property found within the Details panel, select BossBB. You will notice this updates the Blackboard panel with the keys we created earlier.
Currently our BT graph only contains a root node. As described earlier, the root node is simply the entry point to the behavior tree. The first thing we are going to do is create a selector node. This node will be used to choose between branches of the tree based on decorators that will check the state of one of our blackboard keys. Simply put, the AI will do one thing if there is an available target, and another if there is not.
We can create a selector node by right-clicking in the BT graph, expanding the Composites section within the provided dropdown, and selecting Selector. Nodes such as selectors, sequences, and simple parallels are all grouped under the Composites section. Once you have created your selector node you can connect the Root node and Selector node together by clicking and dragging from the dark section of the root node, to the dark section of the selector node as follows:
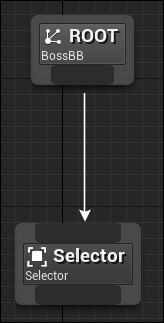
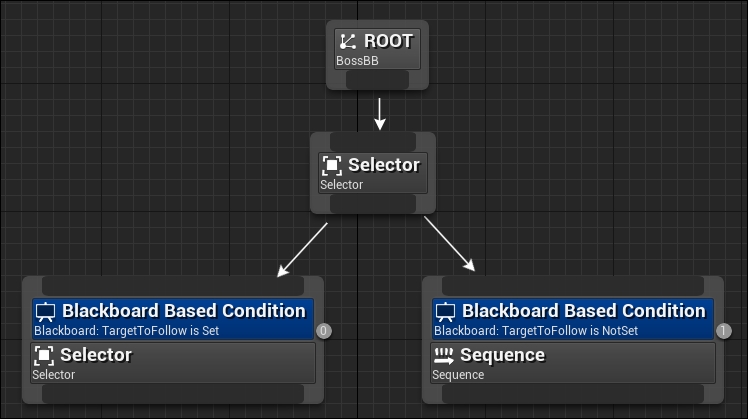
The white arrow denotes the flow of logic between the two nodes. The Selector node is now a child of the root node (as all nodes will be). From this selector node, we are going to be adding two children. One will be another selector node and the other a sequence node. This will effectively create a branch in the tree. The parent selector node will have to choose between either of its children based on any attached decorator nodes. Begin by creating and parenting the selector and sequence nodes to the previous selector node. Your graph should appear as follows:
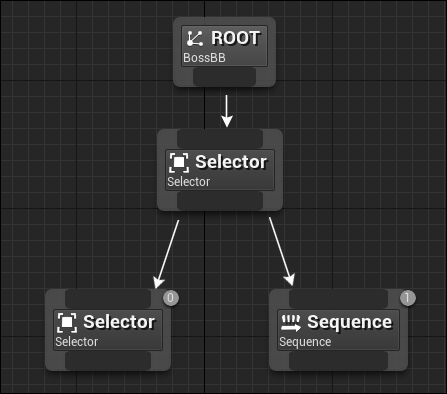
You may have noticed small grey circles containing a number have appeared on these nodes. This number is the child ID of that node and represents the order in which the nodes will be executed. As the parent is a selector, it will check whether child 0 is available for execution before it checks child 1. If child 0 succeeds in execution, child 1 will not be executed.
Currently, our parent selector node has no way of determining which of the two children to execute so it will always execute child 0. To remedy this, we are going to be adding decorators to the child selector and sequence nodes. As stated previously, decorators perform a check that can resolve to either true or false. If a decorator resolves to be false, the node will fail. For example, if child 0 had an attached decorator that resolved to false, the parent selector node would then attempt to run child 1 instead, much like an if statement in C++.
We wish the behavior tree to cause the AI to move towards a tracked player if there is a valid target. Otherwise patrol between the location the AI was situated when it found the target and the last known target location. The first action is a single task that will be executed if a target is found, therefore this should be appended to the selector child node.
The second will be a series of events that need to take place in order, thus we will attach that functionality to the sequence node. The child order now becomes very important as we do not wish for the patrolling functionality to take place if there is a valid target. This is why the selector is at child index 0 and the sequence node is at child index 1.
Ok, enough talk, let's attach these decorators! To attach a decorator right-click on the node you wish to execute if the decorator passes. In our case, right-click the selector node at child index 0. This will open a dropdown menu of all of the available actions we can perform on this node. From this dropdown, hover over Add Decorator… this will provide you with a list of available decorators and a search bar for this list.
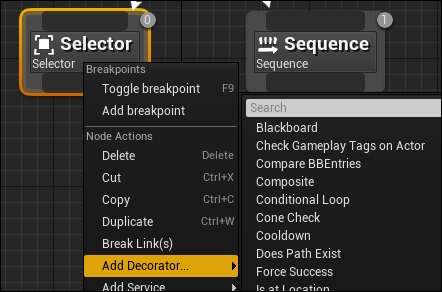
From this list of decorators, select Blackboard. This decorator type allows us to query the state of a blackboard key. This will make the node appear like this:
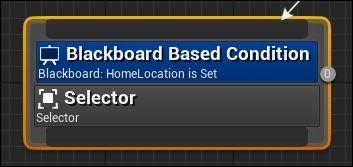
The decorator is represented as another section to the node. As you can see, the subtext of the decorator states Blackboard: HomeLocation is Set. That means if the HomeLocation key is set, the decorator will pass and the node will execute. We need to modify this so that, instead, it checks whether TargetToFollow is set. We can do this by adjusting the decorator properties in the Details panel. Each element of a single node can be selected, do this now by clicking on the blue part of the node. The selection is denoted by a thin red border around the selected node element.
With the decorator selected, address the Details panel and modify the settings so they appear as follows:
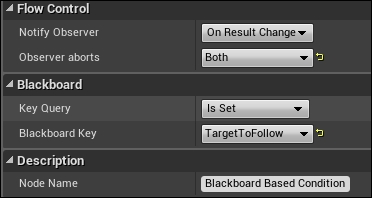
Here we have changed the Blackboard Key property to be TargetToFollow. It is important to note the other properties that can be seen here. Firstly, the Key Query property can be changed to adjust what check we are performing on the variable. If the key in question is of type float, the Key Query list will update to include options such as Is Greater than or Is Equal To. This again provides us with more power to dictate how the AI will behave.
Another important property set is the Flow Control section. Here we have stated that we wish this decorator observer (the selector node) to be notified when the result of this decorator changes. This is only meaningful when we address the second property of the Flow Control section Observer Aborts. This property can be set to three different states. Self, Lower Priority, and Both. Setting this property to Self will result in the node the decorator is attached to abort when the state of the decorator changes. This abort will cause the selector to fail (thus all of its children to fail as well). Lower Priority will result in all BT nodes with a greater child index to abort. For example, if a decorator on a node at child index three with this state set changes, all child nodes of the BT with an index greater than three will abort.
The last state Both is self-explanatory, as both the node and all lesser nodes will abort. With this tool we are able to abort an AI task based off of the result of a decorator. This is very useful as some tasks will halt tree execution until the task is complete. In our case, if the decorator result is changed, we wish to abort both this node and any lower priority nodes (which will be the sequence node and children). Do this now by setting the Observer aborts property of the new decorator node to Both.
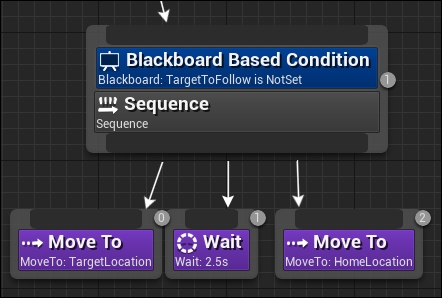
Next we can add a similar decorator to the sequence node that checks whether the TargetToFollow key is not set. Do this now by adding a new decorator to the sequence node and adjusting the properties in the Details panel accordingly. This ensures that either branch will only execute if the desired state of TargetToFollow is met. Your graph should currently look like this:
Now we can add tasks to the sequence node. These tasks will be in the form of child nodes. Task nodes cannot have any children; thus we require a sequence node to execute a series of tasks. From the sequence nodes bottom bar, click and drag an arrow; upon releasing an arrow you will be presented with a search menu for any available actions. Within this action, search for the task MoveTo.
Simply put, this will move the AI towards a specified location via the AI controller. Select this new MoveTo node and address the Details panel. Here we can set some properties for this task. Under the Node section of the Details panel we are presented with the ability to dictate when the node will stop executing via the Acceptable Radius and Stop on Overlap properties. We need to set the Blackboard Key property of the Blackboard section to TargetLocation as this is where we wish the AI to move to. You will notice that the subtext of the move to node created will also update when these properties are changed.
The sequence of tasks we wish to execute should result in the AI patrolling between two points. We can do this by adding two more child tasks to the sequence node. The first is a Wait node, which will simply wait a specified time before registering a success, the second is another MoveTo node. Select the Wait node and, via the Details panel, set the WaitTime under the Wait section to be 2.5. Next, ensure the Blackboard Key for the second Move To node is set to HomeLocation (it should be set to this by default). When you are finished, your tree should look similar to this:
We aren't done yet though, this previous node arrangement could be prone to bugs and undesirable behavior. We need additional decorators for the sequence node before we can safely execute the tasks. We have specified that the AI needs to move to TargetLocation, therefore we should ensure that a value for this location has been set. Add another blackboard decorator to the sequence node and adjust the details so that it queries whether the target location is indeed set.