
Ok, now it is time to retrofit the AI on our boss so that we update the behavior. We need the boss to exist in three states. The first will be the state we have already created for it, idle and tracking. The next will have the boss stop tracking the player and begin to act like a turret, looking at the FPCharacter the whole time while firing a salvo of tracking projectiles. The last state will have the boss randomly path around the player within the NavMesh area, also while firing projectiles.
To do this we are going to have to do the following:
- Add Health to
BMBossCharacterand explore UE4's damage system so the player projectiles do damage to the boss - Add an
EBossStateenum so that we may gauge what AI state the boss is in based on its current hit points - Modify the
ABMAIControllerto include functionality for looking at the player and firing missiles at the player - Update the
BossBTto support the three behaviors mentioned previously
Let's start by explaining the health and the ability to take damage to ABMBossCharacter. Remember how we modified the ABMBossCharacter class definition to match the following:
public:
    // Sets default values for this character's properties
    ABMBossCharacter();

    virtual float TakeDamage(float Damage, struct FDamageEvent const& DamageEvent, AController* EventInstigator, AActor* DamageCauser) override;

    UFUNCTION(BlueprintPure, Category = AI)
    const float GetHealth();

    UPROPERTY(EditAnywhere, Category = Pawn)
    class UBehaviorTree* BehaviourTree;

private:

    UPROPERTY()
    float Health;

};
Here we have added a virtual TakeDamage() method that is inherited from the AActor interface. This function takes in a damage amount, a FDamageEvent struct that details the damage event, a Controller object that will be the instigator of the damage event, and a handle to the actor that caused the damage. It is with this function we will be transferring damage from collided bullets to the boss. We also added a private Health property and an accessor method for the health. The accessor method GetHealth() has been specified as BlueprintPure so we may retrieve the variable in blueprint without having to provide an execution path to the function.
Now navigate to the BMBossCharacter.cpp and add the following code to the constructor:
Health = 100.0f;
This simply ensures the boss always starts with 100 health. Now add the following definition for the TakeDamage() method:
float ABMBossCharacter::TakeDamage(float Damage, struct FDamageEvent const& DamageEvent, AController* EventInstigator, AActor* DamageCauser)
{
    Super::TakeDamage(Damage, DamageEvent, EventInstigator, DamageCauser);

    Health -= Damage;

    return Damage;
}
This function is very simple, all it does is take the damage amount that is parsed to the function and subtracts that from the health pool. The last thing we need to do is add the accessor method for the health:
const float ABMBossCharacter::GetHealth()
{
    return Health;
}
Alright! Now we can send some damage to our boss's character. Let's do this via the collision function we created in the BMProjectile in the last chapter. Navigate to the BMProjectile.cpp and add the following code to the OnHit() method above our previous functionality:
if (OtherActor->GetClass()-> IsChildOf(ABMBossCharacter::StaticClass()))
{
    FDamageEvent DamageEvent(UDamageType::StaticClass());
    OtherActor->TakeDamage(10.0f, DamageEvent, GetWorld()->
    GetFirstPlayerController(), this);
}
You will need to add #include "BMBossCharacter.h" to the include list as well.
Here we check that the object the bullet has collided with is a child of ABMBossCharacter. If so, we then create a damage event that is based off of the UDamageType class. We then call TakeDamage on the other actor. Given that we just overrode that function in ABMBossCharacter, we can guarantee that our custom TakeDamage() functionality will be called. To this method we pass 10.0f as the damage amount, the damage event we just created, the first player controller as the instigator, and a handle to the projectile itself as the damage causer. I would strongly suggest looking at the parameters of the FDamageEvent struct so that you may familiarize yourself with the amount of information you can parse within a damage event.
Ok, now our boss will be taking damage! The next thing we need to do is create an enum that will represent the boss's current state and update that enum depending on the boss's current health. We do this so we can make decisions in the BossBT based off of the value of the enum.
Now we can create the enum that we will use to gauge the state of our boss from blackboard. Navigate to BMAIController.h now. Above the class definition, add the following code:
UENUM(BlueprintType)
enum class EBossState : uint8
{
    BS_FOLLOW = 0 UMETA(DisplayName = "Follow"),
    BS_TURRET = 1 UMETA(DisplayName = "Turret"),
    BS_FINAL = 2 UMETA(DisplayName = "Final")
};
This is creating a strongly typed enum class. A typed enum class simply means that the enum can only occupy the size specified by the type, in this case 8bits. We have used the UENUM macro to specify this enum as a BlueprintType, meaning that this enum will be picked up by the UBT and usable in our blueprints. We have created three states here, BS_FOLLOW, BS_TURRET, and BS_FINAL. We have used the UMETA macro to specify the display name for each of these states. The display name will be how we see the enum values in Blueprint.
Next we need to add a few things to the BMAIController class definition. First, add the following public method:
virtual void Tick(float DeltaTime) override;
We will use this to specify our own custom tick functionality. Next, add the following private members:
class ABMBossCharacter* ControlledChar;
FBlackboard::FKey BossStateBlackboardKey;
The first is a reference to the boss's character that is being controlled by this AI controller. The second is an object we can use to hold blackboard key IDs so we may access blackboard keys from C++.
Now we can add code to the .cpp that will update the blackboard key with the right state. First though, we need to add the following to the .h include list:
#include "BehaviorTree/Blackboard/BlackboardKeyAllTypes.h"
The object information contained within this header file will let us set the key value properly. Navigate to BMAIController.cpp now. Modify the OnPosses() function definition to match the following:
ControlledChar = Cast<ABMBossCharacter>(InPawn);

if (InPawn != nullptr)
{
    BlackboardComp->InitializeBlackboard(*(ControlledChar->
    BehaviourTree->BlackboardAsset));

    BehaviourTreeComp->StartTree(*(ControlledChar- >BehaviourTree));

    BossStateBlackboardKey = BlackboardComp->GetKeyID("BossState");
}
Here we are populating the ControlledChar handle we made earlier and then populating the blackboard key ID we just declared using the GetKeyID method of the blackboard component. This method takes in a string name of the key we wish to retrieve the ID from. Here we have passed BossState, which is a key name we have yet to create. We will later populate a blackboard key of the appropriate type with this name. Next we define the Tick method as follows:
void ABMAIController::Tick(float DeltaTime)
{
    EBossState bossState;

    if (ControlledChar->GetHealth() > 66.0f)
    {
        bossState = EBossState::BS_FOLLOW;
    }
    else if (ControlledChar->GetHealth() > 33.0f)
    {
        bossState = EBossState::BS_TURRET;
    }
    else
    {
        bossState = EBossState::BS_FINAL;
    }

BlackboardComp-> SetValue<UBlackboardKeyType_Enum>(BossStateBlackboardKey, (uint8)bossState)
}
For now, all our tick function is doing is checking the current health value of the controlled boss's character and then ensuring that we set the boss state blackboard key to the correct enumerated value. As you can see, we are using the blackboard key we created earlier and casting the bossState variable to a uint8 and setting it via the SetValue template function. We can make this conversion safely as we typed the EBossState class enum to be of uint8. We are using UBlackboardKeyType_Enum as the type for the template, this ensures that the value is set appropriately. This method of setting and getting variables from blackboard with C++ is a more efficient alternative than the string method we used in the BMAgroCheck service in the previous chapter.
Now that we have implemented our damage and boss state logic in C++, we now need to prepare our Behavior Tree and Blackboard to utilize the EBossState enum. Unfortunately, our blackboard will not know of our C++ side enum type. Thankfully one of the properties exposed to use for blackboard keys that are of the enum type can handle this for us.
Open BossBB and press NewKey. Call this key BossState and set its type to be enum, then address the Blackboard Details panel. We need to change the type of this enum to be that of the EBossState. We can do this by typing the code side name of our enum into the Enum name property. Set this to EBossState now. The panel should appear as follows:
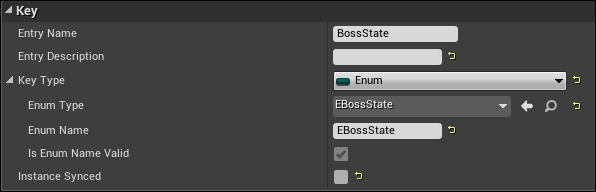
With this in place, the code we wrote in ABMAIController, which set the value of this blackboard key to be that of the appropriate EBossState, will function as intended and we will be able to affect behavior tree decisions.
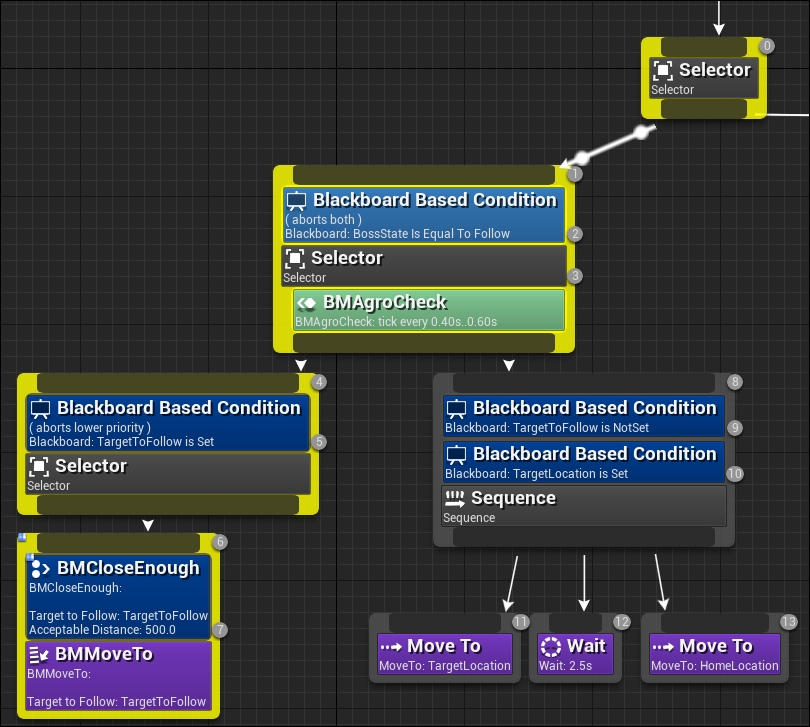
Now that we have our boss state enum established, let's work with the BossBT to begin creating the framework for our different boss behaviors. Open the BossBT now. We are going to modifying our tree so that the first node in the tree, after the root, is a selector node. This node will act as the gate that will determine which set of BT functionality is executed based off of the current BossState value. From this node, connect one path to the selector we made in the last chapter for following and patrolling. Then create two more selector nodes and connect those to the first selector node. You should see something similar to this:
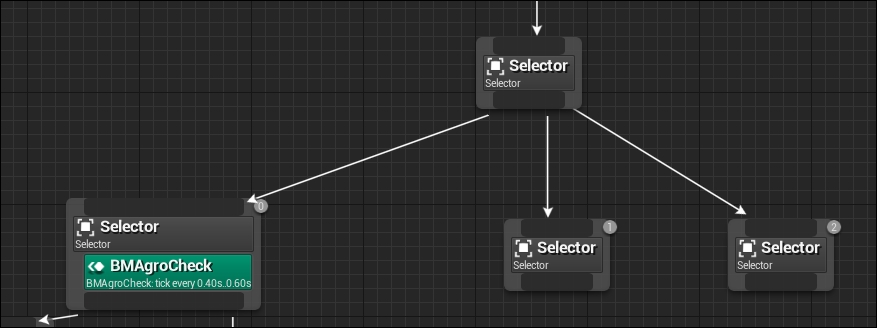
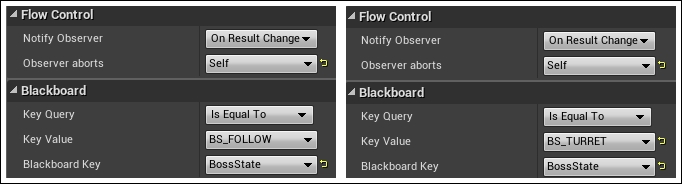
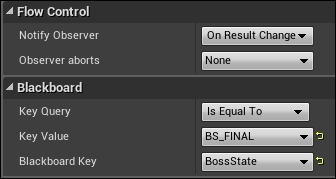
Each of the child selectors will be used to drive the behavior for the three AI states. First we need to add Blackboard type decorators to the child selectors so that we can ensure that the parent selector will choose the right behavior set. Blackboard decorators allow us to check the state of a blackboard key to determine whether a node will succeed, and thus be chosen for execution. Do this by right-clicking a node, selecting Add Decorator… from the dropdown, and searching for/selecting the Blackboard option. Ensure that the properties for these three blackboard decorators appears as follows:
The selectors in your graph should appear as follows:

As you can see, we are starting to form the BT structure for our boss state-based behavior. With the current setup, the tracking and patrolling behavior will only happen if the blackboard key BossState is set to BS_FOLLOW, the middle behavior when the BossState is BS_TURRET, and the right-hand behavior when BossState is BS_FINAL. Before we begin to create the functionality and nodes for our next two behaviors, let's quickly ensure that our current setup will work by debugging our BossBT!
With the BossBT open in one window and the level editor open in another. Run the project by pressing the Play button. While the game is running, navigate back to the BossBT window and address the Toolbar panel. There will be a dropdown button that reads No Debug Object Selected. It is with this dropdown you can select an in-game AI controller to debug so that you may see the current state of that controller's behavior tree and blackboard variables. From this dropdown select BMAIController_0 (it may be BMAIController_# where # is the number of times you have run the project since compilation).
Now run into the boss's area of detection with the BossBT editor window in sight and you will see certain nodes in the behavior tree go yellow and their connecting paths pulse! This shows the nodes that are currently firing within the tree. You will see something similar to this:
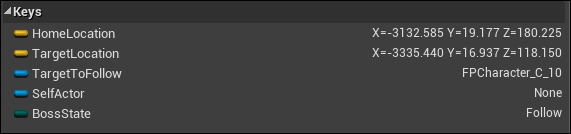
You will also notice that the blackboard panel has also updated with the current variable states of each key. This is a very powerful feature for AI debugging. While looking at this panel, shoot the boss multiple times and, as the boss's health decreases, the state of BossState will change! The blackboard panel should appear as follows after you have shot the boss four times:
We can now finish implementing ABMAIController. We are going to be adding functionality that will rotate the boss to always look towards its current target and provide the ability to fire salvos of missiles at the player. We could create these as services or tasks to be used in behavior trees but this functionality will be very specific to the BossAI, therefore we are including it in the ABMAIController.
Navigate to BMAIController.h now. We are going to be adding two new methods for tracking and two new members that will be used during the tracking logic. Add the following public methods to the class definition:
UFUNCTION(BlueprintCallable, Category = Behaviour)
void TrackToTarget();

UFUNCTION(BlueprintCallable, Category = Behaviour)
void StopTrack();
The previous methods have both been declared as BlueprintCallable so that we can call them from blueprint-based tasks. Now add the following private members:
FBlackboard::FKey TargetBlackboardKey;
class ABMCharacter* Target;
bool bIsTracking;
Here we have declared a blackboard key ID that we will use to retrieve the TargetToFollow blackboard variable. We also declared an ABMCharacter handle that we will use to save the tracking target, and a Boolean flag that we will be checking against to see whether we wish the boss to rotate towards the target.
These variables will be utilized so that we can inform the ABMAIController to start tracking and it will handle all tracking logic internally via its own tick method. This saves us from having to call a service at a given frequency from the BossBT. Now navigate to BMAIController.cpp. As we just prototyped the ABMCharacter object, add #include "BMCharacter.h" to the include list at the top of the .cpp.
The first thing we need to do is retrieve the key ID for our target. Add the following to the Possess() method underneath where we retrieve the BossState key:
TargetBlackboardKey = BlackboardComp->GetKeyID("TargetToFollow");Next we need to modify the Tick() method so that it supports tracking. Underneath where we determine and set the boss state, add the following code:
if (bIsTracking && Target != nullptr)
{
    FVector CharLoc = ControlledChar->GetActorLocation();

    FVector dirToTarget = Target->GetActorLocation() - CharLoc;
    FRotator rotToTarget = dirToTarget.Rotation();

    ControlledChar->SetActorRotation(FMath::Lerp(ControlledChar->
    GetActorRotation(), rotToTarget, DeltaTime * 5));
}
Here we are simply checking that we both have a target to track and that we wish the AI to track. We then get a vector between the boss and the target, then based off of this vector we create a rotator. We then use FMath::Lerp() to interpolate between this desired rotator and that of the current rotator of the ControlledChar. FMath::Lerp() takes in a current FRotator, a desired FRotator, and an interpolation value. For the lerp value we have specified five times the delta tick. You may have noticed that this is an override of the lerp function that we used in Bounty Dash. Lastly, we need to provide definitions for the TrackToTarget() and StopTrack() methods, they appear as follows:
void ABMAIController::TrackToTarget()
{
    Target = Cast<ABMCharacter>(BlackboardComp->
    GetValue<UBlackboardKeyType_Object>(TargetBlackboardKey));

    if (Target != nullptr)
    {
        bIsTracking = true;
    }
}

void ABMAIController::StopTrack()
{
    bIsTracking = false;
    Target = nullptr;
}
In the TrackToTarget() method we are retrieving the Target via the templated GetValue() method. Unlike earlier when we set the boss state key, we are using UBlackboardKeyType_Object as the template type, this ensures that the GetValue() method returns the appropriate type. We then cast the return of this function to an ABMCharacter handle so we can use it for tracking. We do a quick sanity check to ensure the target is valid then set the bIsTracking flag to true. StopTrack() simply sets the flag to false and the target handle to nullptr.
Before we can test this functionality we have to inform the AI controller when to start and stop tracking. We can do this in the BMAgroCheck C++ service we created in the previous chapter. Navigate to BMAgroCheck.cpp now and the find the code where we assign values to the blackboard if the sweep test was successful. Once there, add ThisController->TrackToTarget(); to the true scope of if(bResult), and ThisController->StopTrack(); to the false/else scope.
Ok, now let's test what have put in so far. Upon entering the boss's agro check radius, the AI should start to follow the player and constantly look towards the player's location. If we leave the agro radius it should start its patrolling and stop looking towards the player. Alternatively, because of the adjustments we made to the BossBT with regards to boss state, if we are to damage the boss to the point that its state swaps into BS_TURRET, it will stop tracking to the player but it will continue to look at the player. Compile the code and run the project now to ensure this is the case. If everything goes well, the boss should be staring right at you!
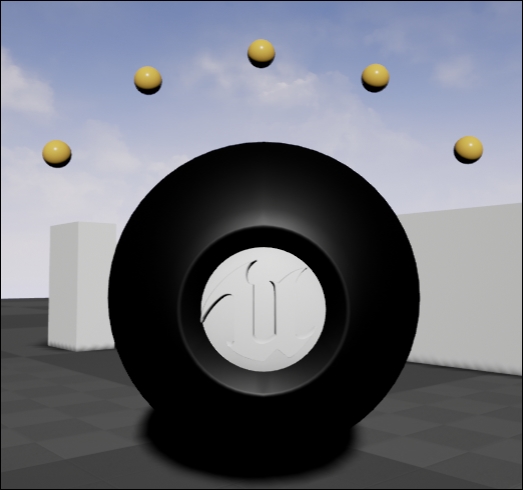
Now that we have our tracking functionality in place, we can arm the boss with a salvo of missiles. We will be using the same projectile objects that we use for our player. But this time we don't want just one rocket to fire, we want five rockets to fire. We wish for each of the five rockets to spawn above the boss, like so:
To do this we are going to have to do some quick sphere mathematics to figure out the launch position of each bullet. Navigate to the BMAIController.h and add the following public method to the class definition:
UFUNCTION(BlueprintCallable, Category = Behaviour)
void FireMissles();
We will call this method from a blueprint side service when it is time for the boss to fire missiles. Navigate to the BMAIController.cpp now, we are going add the following code as the definition for this method:
void ABMAIController::FireMissles()
{
    if(Target){
        // Find Launch points (5)
        for (int i = 1; i <= 5; ++i)
    {
            float fAngle = 16 + i * 26;
            FVector circlePoint;
            circlePoint.Y = (FMath::Cos(PI / 2) *
            FMath::Sin((fAngle * PI / 180.0f)));

        circlePoint.Z = (FMath::Sin(PI / 2) *
        FMath::Sin((fAngle * PI / 180.0f)));

            circlePoint.X = (FMath::Cos((fAngle * PI / 180.0f)));
Here we find five launch points. We do this by setting up a for loop as an iteration structure that will iterate five times. Each iteration we are finding a point on a unit sphere by utilizing the basic formula:
- x = r * cos(s) * sin(t)
- y = r * sin(s) * sin(t)
- z = r * cos(t)
Where r is the radius of the sphere, s is the angle, and t is the height angle measured down from the z axis. These angles all have to be in radians, thus we have done so by multiplying our angle in degrees by PI / 180.0f. For our angle, we have specified for it to be 16 + i * 26. This is so that our missiles are spaced 26 degrees apart, starting 16 degrees off axis. The result will be five unique points that are of unit length (as we have not specified a radius, thus assuming a radius of 1.0f) from origin. This is important as it means we can translate and scale these points according to the current world position and rotation of the controlled AI character. Underneath this code, add the following:
FRotator charRot = ControlledChar->GetActorRotation();
charRot.Yaw = charRot.Yaw + 90.0f;
circlePoint = charRot.RotateVector(circlePoint);
This ensures the unit vector we have found is rotated so that the fan of all five points will be so that they are facing the player, as seen in the previous image of the boss firing. Following this, add:
FVector SpawnLoc = ControlledChar->GetActorLocation() + circlePoint * 180.0f;
ABMProjectile* pThisProj = GetWorld()->
       SpawnActor<ABMProjectile>(Target->
ProjectileClass,
SpawnLoc,
ControlledChar->GetActorRotation());

pThisProj->GetProjectileMovement()->HomingTargetComponent =
Cast<USceneComponent>(Target->
GetComponentByClass(USceneComponent::StaticClass()));
} <-- closing if(Target)
} <-- closing for(int i = 1; i < 5; ++i)
} <-- closing FireMissles()
The first line simply translates and scales the unit vector we found via our point on sphere calculation, so that the final 3D spawn location of the projectile is updated with that of our boss. Next we spawn a boss mode projectile at this location and then we set the tracking target of the projectile to be that of Target inherits USceneComponent.
Navigate back to the project content browser and open the BossBT we are going to be adding the nodes for our second boss state. Start by creating a new task by clicking the New Task button. Choose BTTask_BlueprintBase from the dropdown as the base class. Be sure to rename this task in the content browser to FireMissiles. Add the following nodes to the event graph of this task:

Here we have summoned the Event ReceiveExecute node in the same way we did in the previous chapter. We then cast the input from this node to be of type BMAIController from this cast, we then call the FireMissiles() method we made earlier. We finish the node graph by calling FinishExectute() and reporting a successful execution.
With this task in place we can now create the node structure for the Turret boss state. Navigate back to the BossBT. Under the child selector we created with the Blackboard decorator waiting for BS_TURRET, summon two task nodes, the first is FireMissiles the blueprint task we just created, and the second is Move To. Ensure the Move To target is set to be the HomeLocation blackboard key. The first will call the FireMissiles method we just created, the second will ensure that the boss stops any previous move commands. To finish this behavior, we need to add a Cooldown decorator to the FireMissiles task. Do this now by right-clicking the FireMissiles node and selecting Cooldown from the decorator list. In the Details panel for this decorator, set the Cool Down Time property to be three seconds. Cooldown decorators only allow a node to succeeded once the cooldown time has passed since last execution. This will ensure that the boss only fires missiles every three seconds. Once you are done, this node section should appear as follows:
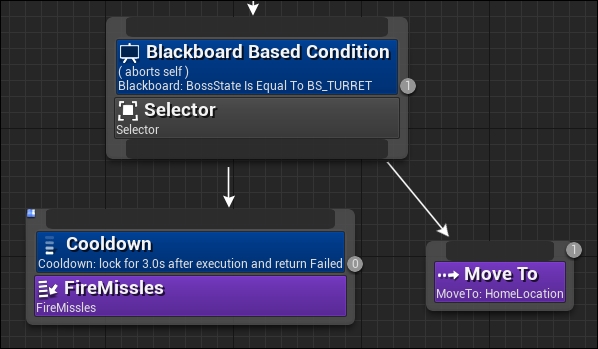
Nice! We are done adding the functionality for this behavior state. Run the project and damage the boss until it enters the BS_TURRET state. You will notice that the boss will stop moving towards you and will immediately start firing projectiles at you!
We are nearly done with the BossBT! We have one more state to add, the final state. This state will see the boss's fire rate increase as well as have the boss randomly patrol around the navigation area while firing continuously at the target. This will take some simple nodes and a new task that we can create, this time in C++!
We will start by creating the C++ BT Task. The purpose of this task is to have the AI path to a random point within the NavMesh area constrained to a given radius. Open the class wizard and create a new class called BMRandomMoveTo that inherits from BTTaskNode. Once the code generation is finished, navigate to BMRandomMoveTo.h and modify the class definition to match this:
UCLASS()
class BOSSMODE_API UBMRandomMoveTo : public UBTTaskNode
{
    GENERATED_BODY()

    virtual EBTNodeResult::Type ExecuteTask(UBehaviorTreeComponent& OwnerComp, uint8* NodeMemory);

private:
    UBehaviorTree* ThisTree;
    class ABMAIController* ThisController;

};
This definition is very simple, we are virtually overriding the ExecuteTask() method that takes in a UBehaviorTreeComponent reference and unit8 pointer to the node memory. It is important to note that the return type for this method is EBTNodeResult. It is with this return type that we will report the success or failure of the task. You will also note that we have added two private members, one is a handle to the behavior tree and the other is a handle to the AI controller. Now navigate to BMRandomMoveTo.cpp and add the following definition for the ExecuteTask() function we are overriding:
EBTNodeResult::Type UBMRandomMoveTo::ExecuteTask(UBehaviorTreeComponent& OwnerComp, uint8* NodeMemory)
{
    if (ThisTree == nullptr || ThisController == nullptr)
    {
        ThisTree = OwnerComp.GetCurrentTree();

        ThisController = Cast<ABMAIController>(OwnerComp.GetAIOwner());

            if (ThisTree == nullptr || ThisController == nullptr)
        {
           UE_LOG(LogTemp, Warning, TEXT("Task assigned to incorrect AI type"));

               return EBTNodeResult::Failed;
        }
    }
Here we are simply checking the states of our handles and populating them with the relevant objects. If the handles are unable to be retrieved, it means this task was included in a behavior tree that is owned by the wrong type of AI controller. If this is the case, we log a warning and return a failed node result status from the function. Next add:
    FNavLocation RandomPoint;
    if (GetWorld()->GetNavigationSystem()->
        GetRandomPointInNavigableRadius(ThisController->GetPawn()->
        GetActorLocation(), 5000.0f, RandomPoint))
    {
        ThisController->MoveTo(RandomPoint.Location);
        return EBTNodeResult::Succeeded;
    }

    return EBTNodeResult::Failed;
}
Here we are querying the navigation system for a random point within a radius within the NavMesh area. We are doing this by calling GetRandomPointInNavigableRadius(). This function takes in an origin location, a radius to search within, and a FNavLocation object that will be populated with the results of the function. We have parsed the location of the boss a radius of 5000 and a temporary FNavLocation object we created previously. If a point is successfully obtained, the function will return true. We check the result of this function, if it resolves to be true, we tell the AI to move to the generated point and report a success. If not, we report a failure.
As we prototyped the ABMAIController class in the .h file for this object, ensure you add #include "BMAIController.h" to include list of .cpp at the top of the file.
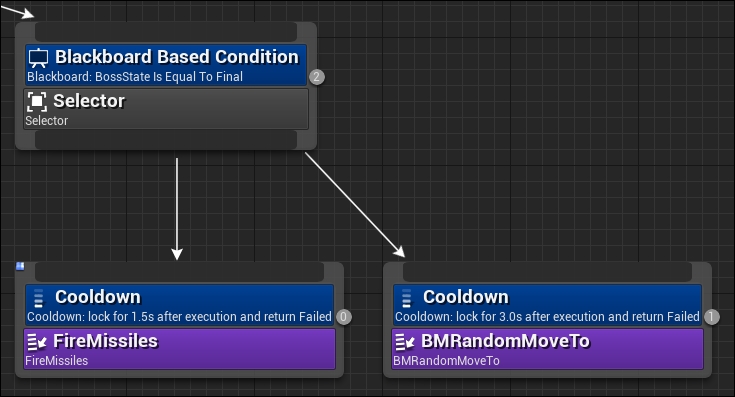
We are so close to finishing the boss AI, all we have to do now is create the node setup for the BS_FINAL state. Open the BossBT now. Under the last childless selector node, summon the FireMissiles task and the BMRandomMoveTo task we just created. Add Cooldown decorators to both. To the FireMissiles decorator, set the cooldown time to be 1.5 seconds and, for the BMRandomMoveTo, set it to 3 seconds. This will double the rate of fire for the boss and have it patrol around the map. This means the player will have to keep up with the boss while dodging its bullets and firing back all at the same time! This section of BossBT should appear as follows:
Nice! We are done with the boss AI! Going forward, feel free to tweak the various values in the CharacterMovementComponent of the FPBossCharacter Blueprint to manipulate how the AI moves. You don't have to stop here though! You can keep growing the boss into a complicated compelling boss fight. However, I think it is time we put down AI and start talking about rendering!