
Chapter 7. Class Fundamentals
In your everyday life, you perform all sorts of activities using objects. You use a fork to eat; you drive your car to reach your office; and you spend money to buy things. Each of these objects has its own characteristics. There are hundreds of car models; they have different colors, different engines, and different accessories, but they all are cars. Object-oriented programming (OOP) is similar to this view of life. In fact, OOP relies on objects; for example, you can have an object that enables working on files or another object that enables managing pictures. In .NET development of an object is typically represented by a class. Structures are also objects, but their purpose is to represent a value more than to take actions. For car characteristics, objects have their own characteristics known as properties. But they also have some members that enable taking actions, known as methods. In this chapter you learn how classes in .NET development are structured and how to create your own classes, implementing all members that the .NET Framework enables in the context.
Declaring Classes
Classes in Visual Basic 2012 are declared with Class..End Class statements. Classes support the following visibility modifiers: Public, Protected, Friend, Private, and Protected Friend. Classes with Public can be reached from other assemblies, whereas classes with Friend visibility can be reached from within the assembly that defines them. Both modifiers are the only valid ones for non-nested classes, as you will see later in this chapter.
The following are the only acceptable class declarations:
Public Class Test
End Class
Friend Class Test
End Class
If you omit the qualifier (that is, Public or Friend keyword), the Visual Basic compiler assigns Public by default. Classes can define members, such as fields, properties, and methods (all covered in this chapter), but also other classes and structures. The next section covers members that can be defined within classes so that you can have a complete overview about creating your custom classes.
Class Libraries
You can define classes in whatever code file you like. Usually developers assign a single code file to one class. If you plan to develop a reusable assembly, exposing classes or types’ definitions only, you can use the Class Library project template that enables you to build a .dll assembly that can be referenced by other projects and applications, which is particularly useful for the modular development. Also, Visual Studio 2012 introduces the Portable Class Library project template that enables you to create class libraries that can be successfully reused across multiple platforms such as .NET Framework, Silverlight, Silverlight for Windows Phone, and .NET for Metro. The Portable Class Library template is discussed later in Chapter 17, “Creating Objects: Visual Tools and Portable Libraries,” because it requires a deeper knowledge of concepts about OOP.
Nested Classes
You can organize classes within other classes. The following code snippet shows how you can define a nested class:
Public Class Test
Friend Class NestedClass
End Class
End Class
Nested classes can also be marked as Private, and this is the only situation in which the qualifier is enabled. If you make a class private, you cannot use that class outside the class that defines it. Continuing with the preceding example, if the NestedClass class were marked as Private, you could use it only within the Test class. If a nested class is not private, you can invoke it the usual way; you need to write the full name of the class as follows:
Dim nc As New Test.NestedClass
Typically, classes are organized within namespaces (as described in Chapter 9, “Organizing Types Within Namespaces”), but there can be situations in which you need to organize small frameworks of classes, and then nested classes are useless without the parent class.
Fields
Fields are the places in which you store information to and read information from. They are declared in the form of class-level variables and differ from local variables in that they are declared at the method or property level. The following code shows how simple it is to declare fields:
Class FieldsDemo
'a private field
Private counter As Integer
'a public field
Public publicCounter As Integer
Public Sub DoSomething()
'a local variable
Dim localVariable As Integer = 0
End Sub
End Class
Fields can be reachable from within the class and its members, and if you specify one of the appropriate qualifiers (such as Public), they can also be reached from the external world. Inside fields, you store the actual information your custom objects need.
Using Fields
With the introduction of auto-implemented properties (see next section) since Visual Basic 2010, fields are now typically used to store information at the class level. They lose part of their purpose regarding properties, although you can still use fields as a repository for property information when auto-implemented properties are not enough for your needs.
You can also provide inline initialization of fields, as in the following snippet:
Private counter As Integer = 2
'With reference types
Public inlineDemo As Person = New Person
Assigning a field inline or not is something that depends exclusively on your needs. Probably you will initialize fields at runtime when you receive an input from the user or with a value received from the constructor, whereas you might prefer inline initialization when you need to start from a certain value. Fields can also be read-only. When you need to provide a field with an immutable value, you can use read-only fields as follows:
'read-only fields
Private ReadOnly counter As Integer = 3
Private ReadOnly testReference As Person = New Person
A read-only value requires inline initialization. If not, zero will be assigned to value types and Nothing assigned to reference types. Read-only fields work similarly to constants with one big difference: Constants are evaluated at compile time; in contrast, read-only fields are evaluated at runtime, meaning that their initial value can be the result of a method call or value coming from some other runtime derived object.
Scope
Fields, as much as properties, have scope. To understand how you can limit or grant access to fields and properties using the appropriate qualifiers, see the “Scope” section in this chapter.
Avoiding Ambiguities with Local Variables
As previously mentioned, fields are at class level, unlike local variables which are at the method/property level. There could be situations in which a local variable has the same name of a field. For example, consider the following code in which two items are named counter: a class-level field and a local variable:
Public Class AvoidingAmbiguities
Private counter As Integer
Public Sub DoSomething()
'a local variable
Dim counter As Integer
counter = CInt(Console.ReadLine)
End Sub
End Class
The code will be correctly compiled; no conflict exists between the two counter members because the second one is enclosed within a method and has no external visibility. This also means that the assignment performed within the DoSomething method will not affect the counter private field. If you instead need to assign such a field, you need to use the Me keyword as follows:
Public Sub DoSomething()
'a local variable
Dim counter As Integer
'Will assign the class level field
Me.counter = CInt(Console.ReadLine)
End Sub
Properties
Properties are the public way that callers have to access data stored within fields. With properties, you decide the type of permissions users can have to read and write the actual information. Properties are typically used as fields, but they act as methods. Starting from Visual Basic 2010, properties have been completely revisited; in fact, until Visual Basic 2010, a typical property was implemented as follows:
Private _firstName As String
Public Property FirstName As String
Get
Return _firstName
End Get
Set(ByVal value As String)
_firstName = value
End Set
End Property
You had a private field in which you stored an incoming value and whose value you returned to the callers. Starting from Visual Basic 2010, the same property can be defined as follows:
Public Property FirstName As String
This feature is known as auto-implemented properties. You just need to specify the name and the type for the property. The Visual Basic compiler handles read-and-write operations for you. The resulting code is much cleaner, and you can avoid the need of writing several lines of code. If you had 10 properties, until Visual Basic 2010 you had to write 10 of the previously shown code blocks. Now, though, you need to write 10 lines of code-defining properties. Auto-implemented properties and fields might sound similar, but actually properties are definitely more robust and can be used in data-binding scenarios, while fields cannot. An interesting thing is that if you try to define a private field as in the old code and then an auto-implemented property, you receive this code:
'Error: field matching implicit
'auto-generated identifier
Private _firstName As String
Public Property FirstName As String
The Visual Basic compiler throws an exception because, behind the scenes, it creates a private field with the same name for handling read/write operations on the property. Of course, you can change the identifier if you need a private field for your purposes.
Auto-Implemented Properties in this Book
Except when specifically needed, you should always use auto-implemented properties when providing code examples that require properties. This is because they provide a much cleaner way for writing code; moreover, code samples seldom need customizations of the read/write actions.
Auto-implemented properties are useful if you need a default behavior for your properties that store and return a value. In some situations you need to perform manipulations over a value before you return it; you store a value provided by the user (property Setter) and then return the value with some edits (property Getter). In this case, you cannot use auto-implemented properties, but you can still write properties the old-fashioned way. The following code snippet shows an example:
Public Class Woman
Private Const Prefix As String = "Mrs."
Private _firstName As String
Public Property FirstName As String
Get
Return Prefix & Me._firstName
End Get
Set(ByVal value As String)
Me._firstName = value
End Set
End Property
End Class
In the preceding code, the value stored by the property is edited before it is returned by adding a prefix. Because the default Visual Studio’s behavior is all about auto-implemented properties, you do not gain a great advantage from IntelliSense in this scenario. To write code faster, if you do not need auto-implemented properties, follow these steps:
1. Write an auto-implemented property.
2. On the following line of code, type the End Property delimiter.
3. The Visual Basic compiler throws an error and Visual Studio suggests adding the missing getter and setter as a solution. Click this action and you’re done.
As an alternative, you can type Property and then press Tab so that Visual Studio will add a property stub using a predefined code snippet.
In addition, sometimes you cannot use auto-implemented properties: read-only properties and write-only properties.
Read-Only Properties
It’s not unusual to give a class the capability of exposing data but not of modifying such data. Continuing the example of the Person class, imagine you want to expose the FirstName and LastName properties plus a FullName property that returns the full name of the person. This property should be marked as read-only because only the FirstName and LastName properties should be editable and FullName is the result of the concatenation of these two properties. You can therefore define a read-only property as follows:
Public Class Person
Public Property FirstName As String
Public Property LastName As String
Public ReadOnly Property FullName As String
Get
Return Me.FirstName & " " & Me.LastName
End Get
End Property
End Class
The ReadOnly keyword marks properties as read-only. As you can easily understand, auto-implemented properties cannot work here because you need a space to write code for returning a value.
Write-Only Properties
Opposite to read-only properties, you can also implement write-only properties. In real-life applications, write-only properties are uncommon, so you will probably never implement such members. It makes much more sense to provide read-only members than members that you can only write to but not read from. Anyway, you can implement write-only properties marking your properties with the WriteOnly keyword as demonstrated in the following code snippet:
Private _fictitiousCounter As Integer
Public WriteOnly Property FictitiousCounter As Integer
Set(ByVal value As Integer)
_fictitiousCounter = value
End Set
End Property
You have different options here; one is storing the value received by the setter within a field that you can then eventually reutilize. Otherwise, you can perform some tasks directly within the setter.
Exposing Custom Types
Properties can expose both reference and value types, and they are not limited to built-in .NET types. Thus, you can expose your custom classes and structures through properties. The following code shows an Order class that exposes a property of type Customer; such type is another custom class representing a fictitious customer of your company:
Public Class Customer
Public Property CompanyName As String
Public Property ContactName As String
End Class
Public Class Order
Public Property CustomerInstance As Customer
Public Property OrderID As Integer
End Class
You can use the same technique for exposing custom structures. After all, you do nothing different from when you expose strings and integers. Remember that if you do not initialize properties with values, value types returned by properties will have a default value while reference types could result in null references causing runtime errors.
Accessing Properties
Accessing properties is a simple task. You access properties for both reading and writing information that a type needs. The following code demonstrates this:
Dim p As New Person
'Properties assignment (write)
p.FirstName = "Alessandro"
p.LastName = "Del Sole"
'Properties reading
If p.LastName.ToLower = "del sole" Then
Console.WriteLine(p.LastName)
End If
Default Properties
Visual Basic language enables defining default properties. A default property is a property marked with the Default keyword that enables assignments to the objects defining the property without the need of invoking the property itself. Default properties are strictly related to data arrays and collections of objects because they provide the ability of managing an index. For example, imagine you have an array of strings defined within a class as follows:
Private listOfNames() As String = _
{"Alessandro", "Del Sole", "VB 2012 Unleashed"}
A default property enables easy access to such an array, both for reading and writing. The following code demonstrates how you can implement a default property:
Default Public Property GetName(ByVal index As Integer) As String
Get
Return listOfNames(index)
End Get
Set(ByVal value As String)
listOfNames(index) = value
End Set
End Property
Parameter Types
The preceding example shows the most common use of default properties, where they accept a numeric index. By the way, default properties can accept any data type as the parameter, not only numeric types. The only rule is actually that the default property must have a parameter.
Notice the Default keyword and how the property accesses the array taking advantage of the index argument to return the desired item in the array. Supposing the preceding definition was contained within a class named TestDataAccess, the following code demonstrates how you can access the default property:
Dim t As New TestDataAccess
t(2) = "Visual Basic 2012 Unleashed"
Console.WriteLine(t(1))
Console.WriteLine(t(2))
As you can see, you do not need to specify the property name when performing assignments or invocations. The preceding code would produce the following result:
Del Sole
Visual Basic 2012 Unleashed
Visual Basic default properties can be compared to Visual C# indexers. It’s important to know this terminology because you will often hear about indexers.
Types and Members Visibility: Scope
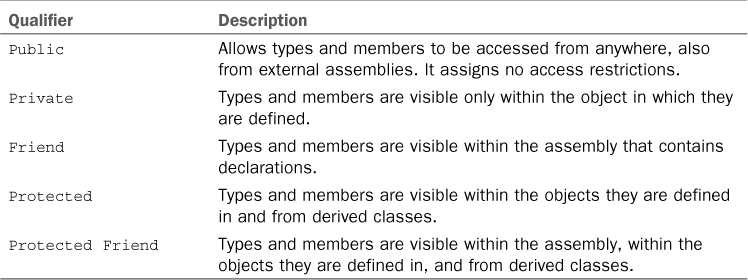
All .NET types and their members have scope, which represents the level of visibility and accessibility that a type or its members can have. For example, the public scope enables members of classes or structure within a class library to be reachable by other classes or assemblies. On the other hand, the private scope can prevent members of classes or structures to be reached from outside the class or structure in which they are defined. You assign scope to your objects or members via qualifiers, which are special keywords or combination of keywords that establish how an object or its members can be reached from outside the object. Table 7.1 summarizes scope levels in Visual Basic 2012.
Table 7.1. Scope Levels in Visual Basic 2012
The following code snippet gives you an alternative view of scope:
'The class is visible to other
'external assemblies.
Public Class ScopeDemo
'This field is visible only
'within the class
Private counter As Integer
'Visible within this assembly, this class,
'derived classes, other assemblies: no restrictions
Public Property FirstName As String
Public Property LastName As String
'Only within this class and derived classes
Protected Property Age As Integer
'Within this assembly
Friend Property ReservedInformation As String
'Within this assembly, this class and derived classes
Protected Friend Function ReturnSomeInformation() As String
Return FirstName & " " & LastName
End Function
End Class
Public and Private qualifiers are self-explanatory, so you probably need some more information about the other ones. To make things easier, let’s create a new class that derives from the preceding ScopeDemo, as in the following code snippet:
Public Class InheritedScopeDemo
Inherits ScopeDemo
End Class
If you try to reach the base class’s members, you notice that only the ones marked with Friend, Protected Friend, and Protected are visible to the new class (other than Public, of course). But this happens until you are working with one assembly—more precisely, with the assembly that defines all the preceding members. What about another assembly referencing the first one? If you have created a Visual Basic solution for testing the preceding code, add a new Visual Basic project to the solution, and to the new project add a reference to the previous one. In the new project, write the following code:
Dim testScope As New Scope.InheritedScopeDemo
If you try to invoke members of the testScope object, you can see only the FirstName and LastName properties because they were marked as Public. This qualifier is the only one allowing members to be reached from external assemblies. As you might imagine, establishing the appropriate scope is fundamental. For example, you might need a field for storing some data that you do not want to share with the external world; marking a field as Private prevents derived classes from reaching the field. So you should instead mark it as Protected or Protected Friend according to the access level you want to grant. Particularly when working with inheritance, scope is important.
Executing Actions with Methods
In the .NET terminology, method is the word that represents procedures in other programming languages; basically a method is a member that performs an operation. Methods are of two kinds: Sub (which does not return values) and Function (which returns a value). The following are minimal examples of methods:
Sub DoSomething()
If IO.File.Exists("C:SomeFile.txt") = False Then
Throw New IO.FileNotFoundException
Else
Console.WriteLine("The file exists")
End If
End Sub
Function DoSomethingElse() As Boolean
Dim result As Boolean = IO.File.Exists("C:SomeFile.txt")
Return result
End Function
This book makes intensive use of methods, so detailed descriptions on implementations are provided across chapters.
Scope
Methods’ visibility within types can be assigned using one of the qualifiers listed in Table 7.1. If no qualifier is specified, Public is assigned by default.
Invoking Methods
To invoke a method, you call its name. Continuing with the preceding example, you can invoke the DoSomething method by typing the following line:
DoSomething()
If the method is a Function, you should assign the invocation to a variable as follows:
Dim targetOfInvocation As Boolean = DoSomethingElse()
This is important if you need to evaluate the value returned by the method. If you do not need to evaluate the result, you can invoke Function as if it were Sub:
'Allowed
DoSomethingElse()
You can invoke functions anywhere you need a value. Continuing with the preceding example, the following code is acceptable:
Console.WriteLine(DoSomethingElse())
In the preceding examples, we act as if the method were defined within a module. If the method is exposed by a class, you need to add a dot symbol after the class name and then type the name of the method, as follows:
Public Class Person
Public Sub DoSomething()
End Sub
End Class
...
Dim p As New Person
p.DoSomething()
The Visual Basic grammar also provides the Call keyword, which enables invoking methods. This keyword is obsolete and deprecated, so you are strongly discouraged from using it; it is part of the language grammar, so this is the reason we mention it. You can use it as follows:
Call DoSomething()
Methods Arguments: ByVal and ByRef
Methods can receive parameters and can then work with data provided by parameters. In the .NET terminology, parameters are also known as arguments. We use the word arguments more often because it’s the one that you typically find within the documentation about topics related to.NET development. The following code shows a simple sample of a method definition receiving an argument and subsequent invocation of that method passing an argument:
Public Sub PrintString(ByVal stringToPrint As String)
Console.WriteLine(stringToPrint)
End Sub
Sub RunTest()
PrintString("Visual Basic 2012 Unleashed")
End Sub
Arguments can be passed by value and by reference. Arguments are passed by value by adding the ByVal keyword, whereas they are passed by reference by specifying the ByRef keyword. In the previous versions of Visual Basic, if you did not specify either keyword, the code editor automatically added a ByVal keyword passing arguments by value as a default. Now in Visual Basic 2012, if you do not specify either ByVal or ByRef, the code editor does not add any keyword but the compiler assumes ByVal by default. So in Visual Basic 2012, the PrintString method of the preceding code snippet can be rewritten as follows:
Public Sub PrintString(stringToPrint As String)
Console.WriteLine(stringToPrint)
End Sub
So, in this code the compiler assumes that the stringToPrint argument is passed by value. In this book we use both syntaxes. This will be useful to avoid confusion in case you have existing code that you want to analyze while reading this book. There are differences between passing arguments by value and by reference. Before providing code examples for a better understanding, these differences are all related to the variables you pass as arguments and can be summarized as follows:
• If you pass a value type by value, the compiler creates a copy of the original value so changes made to the argument are not reflected to the original data. If you pass a value type by reference, changes made to the argument are reflected to the original data because, in this case, the argument is the memory address of the data.
• If you pass a reference type by reference, the compiler passes in the memory pointer. If you pass a reference type by value, the compiler passes a copy of the memory pointer. In both cases, the original object will be modified regardless of how the parameter is passed.
Listing 7.1 shows how value types can be passed by value and by reference.
Listing 7.1. Passing Arguments by Value
Module ByValByRefDemo
Dim testInt As Integer = 10
'Creates a copy of the original value(testInt)
'and does not change it. Outputs 10
Sub ByValTest(ByVal anInt As Integer)
anInt = 20
Console.WriteLine(testInt)
End Sub
'Gets the reference of the original value (testInt)
'and changes it. Outputs 20
Sub ByRefTest(ByRef anInt As Integer)
anInt = 20
Console.WriteLine(testInt)
End Sub
Sub Main()
ByValTest(testInt)
ByRefTest(testInt)
Console.ReadLine()
End Sub
End Module
Both the ByValTest and ByRefTest methods receive an argument of type Integer. Such an argument is the testInt variable. In the ByValTest method, the argument is passed by value, so the compiler creates a copy of the original data and changes made to the argument variable are not reflected to the original one—in fact, the code returns 10, which is the original value for the testInt variable. In the ByRefTest method, the argument is passed by reference. Thus, the compiler gets the memory address of the original value and changes made to the argument variable are also reflected to the original data—in fact, this code returns 20, which is the new value for the testInt variable. Now consider the following code that provides a similar demonstration for passing reference type both by value and by reference:
Dim testString As String = "Visual Basic 2012"
Sub ByValStringTest(ByVal aString As String)
aString = "Visual Basic 2012 Unleashed"
Console.WriteLine(testString)
End Sub
Sub ByRefStringTest(ByRef aString As String)
aString = "Visual Basic 2012 Unleashed"
Console.WriteLine(testString)
End Sub
Invoking the ByValStringTest method, passing the testString variable as an argument will not change the original value for the reasons previously explained. Invoking the ByRefStringTest method, still passing the testString variable as an argument, will also change the original value of the testString variable that now becomes Visual Basic 2012 Unleashed.
Passing Arrays
When passing arrays as arguments, these will be affected by any modifications to their members, because they are reference types, regardless of whether you pass the array by value or by reference. As for other reference types, the most important thing to care about is that when you set the variable’s reference in the method to Nothing, the original reference is not destroyed if the array is passed by value, whereas it is destroyed if the array is passed by reference.
ParamArray Arguments
Another way of supplying arguments to a method is the ParamArray keyword. As its name implies, the keyword enables specifying an array of a given type to be accepted by the method. Each item in the array is then treated as a single argument. The following example shows how to implement ParamArray arguments:
Sub ParamArrayTest(ByVal ParamArray names() As String)
'Each item in the array is an
'argument that you can manipulate
'as you need
For Each name As String In names
Console.WriteLine(name)
Next
End Sub
You can then invoke the method as follows:
ParamArrayTest("Alessandro", "Del Sole", "Visual Basic 2012 Unleashed")
This method produces the following result, considering that each string is an argument:
Alessandro
Del Sole
Visual Basic 2012 Unleashed
ParamArray arguments are always the last argument of a method definition and are always passed by value, and because they are real arrays, they are reference types. So in reality, arrays are passed by reference (and changes to the array values will persist). You can first declare an array and then pass it to the method invocation, like so:
Dim args() As String = {"Alessandro", "Del Sole",
"Visual Basic 2012 Unleashed"}
ParamArrayTest(args)
Because of being arrays, you can perform any other operations that these objects support. You can pass to methods an array as an argument or an arbitrary number of single arguments that, behind the scenes, are turned into an array. Finally, remember that you cannot pass an array with empty fields. The following code will not be compiled:
ParamArrayTest("Alessandro", , "Visual Basic 2012 Unleashed")
The Visual Basic background compiler shows an error message saying Omitted Argument Cannot Match ParamArray Argument.
Optional Arguments
Methods can receive optional arguments. Therefore, methods modify their behavior according to the number of arguments they received. Optional arguments are defined with the Optional keyword. The following code snippet shows how you can define optional arguments:
'Returns the full name of a person
Function FullName(ByVal FirstName As String,
Optional ByVal LastName As String = "",
Optional ByVal Title As String = "") As String
'Assumes that the optional Title parameter
'was not passed by comparing the default value
If Title = "" Then Title = "Mr. "
Dim result As New System.Text.StringBuilder
result.Append(Title)
result.Append(LastName)
result.Append(FirstName)
Return result.ToString
End Function
The purpose of the preceding FullName method is simple (and simplified). It should return the full name of a person, but the LastName and Title arguments are optional, meaning that the caller must provide at least the FirstName. Optional arguments must be assigned with a default value; in the preceding code, the default value is an empty string.
Default Values
Default values for optional arguments must be constant expressions. This is the reason I did not assign a String.Empty object but assigned a = "" value. The compiler provides the appropriate warnings if the default value is not good.
Default values are important for at least one reason: there are no other ways for understanding whether an optional argument were passed. A default value is therefore needed for comparison. Moreover, there could be situations in which a default value would be necessary—for example, for object initializations. In the preceding code, to check whether the optional Title parameter were passed, a comparison is performed against the Title’s value. If its value equals the default value, we can assume that the argument was not supplied. This example provides a custom value in case the argument was not passed. If we write the following invocation
Console.WriteLine(FullName("Alessandro"))
we would get the following result: Mr. Alessandro. Behind the scenes, the Visual Basic compiler generates a new invocation that includes all optional parameters with a default value, as follows: FullName("Alessandro","",""). Although useful, optional arguments are not always the best choice, and we do not recommend their usage. This is because other .NET languages implement them differently and so they are not compliant with Microsoft’s Common Language Specifications. So if you produce class libraries, you should be aware of this. Instead, the .NET Framework provides a cleaner way for handling methods with different arguments and signatures that is powerful; it’s known as overloading and is discussed next.
Optional Nullable Arguments
Visual Basic 2012 allows passing nullable types as optional arguments. The following code demonstrates this:
Sub NullableDemo(ByVal firstArgument As String,
Optional ByVal secondArgument As _
Nullable(Of Integer) = Nothing)
If secondArgument Is Nothing Then
'We can assume that the
'optional argument was not supplied
End If
End Sub
As you can see, nullable arguments are supported, but you are still required to provide a default value, which can also be null. Remember that optional nullable arguments can only go after nonoptional ones in the argument list. They are particularly useful when dealing with scenarios like Microsoft Office automation, where optional arguments are common.
Overloading Methods
One of the most powerful features in the object-oriented development with the .NET Framework is the capability of overloading methods. Overloading means providing multiple signatures of the same method, in which signature is the number and types of arguments a method can receive. The following code snippet demonstrates overloading:
Private Function ReturnFullName(ByVal firstName As String,
ByVal lastName As String) As String
Return firstName & " " & lastName
End Function
Private Function ReturnFullName(ByVal firstName As String,
ByVal lastName As String,
ByVal Age As Integer) As String
Return firstName & " " & lastName & " of age " & Age.ToString
End Function
Private Function ReturnFullName(ByVal title As String,
ByVal firstName As String,
ByVal lastName As String) As String
Return title & " " & firstName & " " & lastName
End Function
Private Function ReturnFullName(ByVal title As String,
ByVal firstName As String,
ByVal lastName As String,
ByVal Age As Integer) As String
Return title & " " & firstName & " " & lastName & _
" of age " & Age.ToString
End Function
As you can see, there are four different implementations of one method named ReturnFullName. Each implementation differs from the others in that it receives a different number of arguments. The preceding example is simple, and the arguments are self-explanatory; each implementation returns the concatenation of the supplied arguments. You might wonder why you would need overloading and to provide four different implementations of a single method when you would obtain the same result with optional arguments. The answer is that this approach is the only accepted method by the Microsoft Common Language Specification and ensures that every .NET language can use the different implementations, whereas optional arguments are not supported from other .NET languages. Another good reason for using overloads is that you can return strongly typed results from methods. If you need to work with specific data types, you can use overloaded signatures instead of providing one signature that returns Object. The Visual Basic grammar defines an Overloads keyword as one that can be used to define overloaded signatures; the following example is an excerpt of the previous one, now using Overloads:
Private Overloads Function ReturnFullName(ByVal firstName As String,
ByVal lastName As String) As String
Return firstName & " " & lastName
End Function
Private Overloads Function ReturnFullName(ByVal firstName As String,
ByVal lastName As String,
ByVal Age As Integer) As String
Return firstName & " " & lastName & " of age " & Age.ToString
End Function
There’s no difference in using the Overloads keywords. If you decide to use it, you must decorate it with all other definitions. To support overloading, signatures must differ from each other in some points:
• Signatures cannot differ only in ByVal or ByRef arguments. If two signatures have two arguments of the same type, the arguments cannot differ only in ByVal/ByRef even though they consist of different types.
• In the case of Function, overloaded implementations can return the same type or different types. If they return different types but have exactly the same arguments, the code cannot be compiled. This means that different implementations must have different arguments.
You invoke methods defined in this way as you would normally with other methods. Moreover, IntelliSense provides a great help on finding the most appropriate overload for your needs, as shown in Figure 7.1.
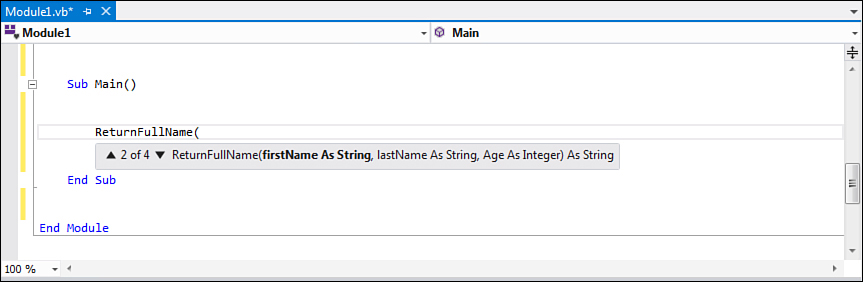
Figure 7.1. IntelliSense helps you choose among overloads.
Coercion
It can happen that an invocation to an overloaded method supplies a compliant type but not the same type established in the signature. Consider the following overloaded method:
Private Sub CoercionDemo(ByVal anArgument As Double)
Debug.WriteLine("Floating point")
End Sub
Private Sub CoercionDemo(ByVal anArgument As Integer)
Debug.WriteLine("Integer")
End Sub
The Visual Basic compiler can decide which signature is the most appropriate according to the argument passed. This is particularly important when working with numeric types. Moreover, the compiler can also handle coercion, meaning that it can perform conversion when there’s no loss of precision. Consider the following code:
Dim testValue As Byte = 123
CoercionDemo(testValue)
The CoercionDemo overloads do not support Byte—only Double and Integer. Because Byte is basically an integer type, the Visual Basic compiler converts the object into an Integer type because this expansion conversion will always be successful. The compiler can also decide the best overload to fit the scenario.
Overload Resolution
Visual Basic 2012 introduces new rules in managing the precedence of the invocation of generic methods’ overloads, where the generic type is an IEnumerable(Of T).
What are Generics?
Generic types are .NET types that can adapt their behavior to different kinds of objects without the need of defining a separate version of the type. Generics are discussed further in Chapter 14, “Generics and Nullable Types.” If you already have experience with Visual Basic (since version 2005), you might already know about them. What you need to know about them here is that they are types that can represent a lot of other types.
For example, consider the following code:
Sub Demo()
Dim x As New List(Of Integer)
x.Add(1)
x.Add(2)
x.Add(3)
Calculate(x.AsEnumerable)
End Sub
Sub Calculate(Of T)(x As T)
'Perform your calculation here
End Sub
Sub Calculate(Of T)(x As IEnumerable(Of T))
'Perform your calculation here
End Sub
We have two overloads of the Calculate method, and both can accept an IEnumerable(Of T) as the generic type. In this case, then, the compiler must be intelligent enough to understand which of the two overloads must be invoked from the Demo method. Until Visual Basic 2010, such a situation would cause some conflicts. Now in Visual Basic 2012, the compiler automatically invokes the overload where the generic parameter is more deeply nested; in this case it invokes the second overload (the one with a generic parameter of type IEnumerable(Of T)). You can easily verify this by placing a breakpoint on the second overload of the Calculate method and stepping into the code by pressing F11. Actually, this is one of those improvements required to make the compiler work better with the asynchronous programming patterns, but it is important that it exists.
Declaring Optional Parameter Overloads
Another new feature in Visual Basic 2012 is the possibility of defining optional arguments for method overloads. The following code, which would not work in Visual Basic 2010, is now legal in Visual Basic 2012:
Sub MyMethod(x As Integer)
End Sub
Sub MyMethod(x As Integer, Optional y As Integer = 0)
End Sub
You can specify an optional parameter inside a method overload; this solves a previous conflict that caused the second method to be exactly like the first one if the second argument were not passed. To make sure the correct method is selected, you add the comma for the optional parameter but provide no value. This is another improvement introduced for better supporting asynchronous programming, but it can be useful in different scenarios as well.
Overloading Properties
Now that you know what overloading is, you need to know that the technique is not limited to methods but can also be applied to properties. The following code snippet shows an example:
Property Test(ByVal age As Integer) As Integer
Get
End Get
Set(ByVal value As Integer)
End Set
End Property
Property Test(ByVal name As String) As String
Get
End Get
Set(ByVal value As String)
End Set
End Property
Because of their different implementations, in this scenario you cannot use auto-implemented properties, mainly because overloads cannot differ only because of their return type. To provide overloaded properties, you need to remember the same limitations listed for methods.
Exit from Methods
Methods execution typically completes when the End Sub or End Function statements are encountered. You often need to break methods execution before the execution completes. In the case of Sub methods, you can accomplish this using the Exit Sub statement. The following example checks the value of an integer and immediately breaks if the value is greater than 10. If not, it loops until the value is 10 and then breaks:
Sub TestingValues(ByVal anInteger As Integer)
If anInteger > 10 Then
Exit Sub
ElseIf anInteger < 10 Then
Do Until anInteger = 10
anInteger += 1
Loop
Exit Sub
End If
End Sub
You can also use the Return keyword without a value instead of Exit Sub. For Function methods, things are a little different because they return a value. When the methods execution completes regularly, you return a value via the Return keyword. Until now, you found several examples of methods returning values.
Avoid Visual Basic 6 Style
If you migrate from Visual Basic 6, you probably return values from functions assigning the result to the name of the function itself. In .NET development, this is deprecated, although it will be compiled. The Return keyword is optimized for returning values and all .NET languages have a specific keyword, so you should always use this approach.
When you instead need to break the method execution, you can use the Exit Function statement, as shown in the following code snippet:
Function TestingValue(ByVal anInteger As Integer) As Boolean
Dim result As Boolean
If anInteger < 10 Then
Do Until anInteger = 10
anInteger += 1
Loop
result = True
'Returns False
ElseIf anInteger = 10 Then
Exit Function
Else
result = False
End If
Return result
End Function
Keep in mind that Function methods always have to return something. Because of this, Exit Function returns the default value of the return data type. In the preceding example, the method returns Boolean, so Exit Function returns False. If the method returned Integer or another numeric type, Exit Function would return zero. If the method returned a reference type, Exit Function would return Nothing. Another best practice in returning value is to assign the result of the evaluation to a variable (result in the preceding example) and then provide a single invocation to the Return instruction because this can optimize the compilation process, as well as make coding easier.
Partial Classes
You can split the definition of a class across multiple parts using the partial classes feature. You do not actually create different classes; you create one class implemented within multiple parts, typically across multiple files. This feature was first introduced in Visual Basic 2005 for separating Visual Studio’s auto-generated code from developer’s code, but it is useful in various scenarios. To see a practical implementation of partial classes, create a new Windows Forms project. Then click the Show All Files button in Solution Explorer, expand the Form1.vb item, and double-click the Form1.designer.vb file. Inside this file you can find the definition of the Form1 class, as shown in Listing 7.2.
Listing 7.2. Visual Studio Auto-Generated Partial Class
Partial Class Form1
Inherits System.Windows.Forms.Form
'Form overrides dispose to clean up the component list.
<System.Diagnostics.DebuggerNonUserCode()> _
Protected Overrides Sub Dispose(ByVal disposing As Boolean)
Try
If disposing AndAlso components IsNot Nothing Then
components.Dispose()
End If
Finally
MyBase.Dispose(disposing)
End Try
End Sub
'Required by the Windows Form Designer
Private components As System.ComponentModel.IContainer
'NOTE: The following procedure is required by the Windows Form Designer
'It can be modified using the Windows Form Designer.
'Do not modify it using the code editor.
<System.Diagnostics.DebuggerStepThrough()> _
Private Sub InitializeComponent()
components = New System.ComponentModel.Container()
Me.AutoScaleMode = System.Windows.Forms.AutoScaleMode.Font
Me.Text = "Form1"
End Sub
End Class
As you can see, the class definition includes the Partial keyword. This indicates to the compiler that elsewhere in the project another piece of the class is defined within a different code file. In this case, the other piece is the Form1.vb file whose code is simple when you create a new project:
Public Class Form1
End Class
Both files implement one class. By the way, this approach makes your code much cleaner. In this example, partial classes help developers to concentrate on their own code, ensuring that auto-generated code will not be confusing. The Visual Studio IDE makes a huge usage of partial classes; LINQ to SQL and ADO.NET Entity Framework are just a couple examples. Following is a custom example of partial classes. Imagine you have this implementation of the Person class within a code file named Person.vb:
Public Class Person
Public Property FirstName As String
Public Property LastName As String
Public Property Age As Integer
Public Overrides Function ToString() As String
Return String.Concat(FirstName, " ", LastName)
End Function
Public Sub New(ByVal Name As String, ByVal SurName As String,
ByVal Age As Integer)
Me.FirstName = Name
Me.LastName = SurName
Me.Age = Age
End Sub
End Class
Then you decide to implement the ICloneable interface to provide a custom implementation of the Clone method, but you want to separate the implementation from the rest of the class code. At this point, you can add a new code file to the project and write the following:
Partial Public Class Person
Implements ICloneable
Public Function Clone() As Object Implements System.ICloneable.Clone
Return Me.MemberwiseClone
End Function
End Class
This last code will be still part of the Person class; it has been defined in another place.
You can split your classes within multiple files. Generally, you create partial classes within just two files, but you have to know that you are allowed to create them within two or more files. Partial classes also take whatever scope you define in one of the partial class definitions.
Also notice how IntelliSense can improve your coding experience by showing a list of the partial classes you can complete (see Figure 7.2).
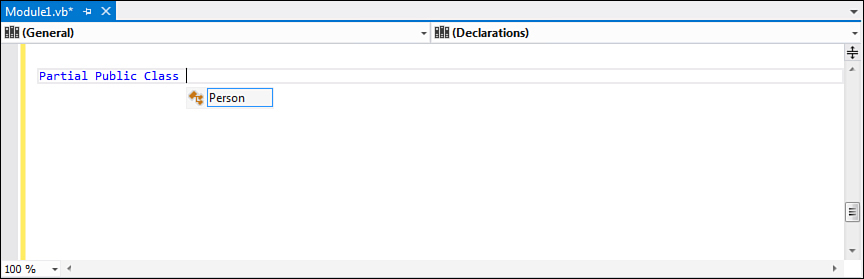
Figure 7.2. IntelliSense helps choose the available partial classes.
A partial approach can also be applied to Structures as follows:
Partial Structure Test
End Structure
Partial Classes How-To
Partial classes can be split across multiple parts—parts, not files. This is because one Visual Basic code file can contain the implementation of theoretically infinite types, so you can split a class definition within the same code file using partial classes. You can, but you probably will not. Partial classes are particularly useful for splitting definitions across multiple files, which is covered when discussing LINQ to SQL and the ADO.NET Entity Framework.
Partial classes indeed have a limitation: You cannot define them within other classes. For example, the following code will correctly be compiled, but it does not implement partial classes even though it creates two different classes:
Class TestPartial
'Compiles, but creates a new partial class
'instead of extending the previous Person
Partial Class Person
End Class
End Class
Partial Methods
Another interesting feature is partial methods. This feature has been introduced in LINQ to ADO.NET, but it can be used in different scenarios for other language features. The concept behind partial methods is the same as partial classes: Method implementations can be split across multiple parts. Partial methods have three particular characteristics: They must be Private methods, they cannot return values (that is, only Sub methods are allowed), and their bodies must be empty in the class in which methods are defined. Consider the following code, in which a class named Contact is split across partial classes and a partial method is defined:
Public Class Contact
Public Property FirstName As String
Public Property LastName As String
Public Property EmailAddress As String
Public Sub New(ByVal Name As String,
ByVal LastName As String, ByVal Email As String)
Me.FirstName = Name
Me.LastName = LastName
Me.EmailAddress = Email
End Sub
Partial Private Sub Validate(ByVal Email As String)
End Sub
End Class
A partial method is marked with the Partial keyword. It has a Private scope, it returns no value, and its definition’s body is empty. Suppose you want to implement the actual code for your method. For example, we could verify whether the Email address provided by the user is a valid address; to accomplish this, we can use regular expressions.
About Regular Expressions
Regular expressions are an advanced way to work with text. The .NET Framework provides the System.Text.RegularExpression namespace that exposes classes for managing regular expressions with .NET languages.
The following code shows how you can implement a partial class in which the actual code for a partial method is provided:
Partial Public Class Contact
Private Sub Validate(ByVal Email As String)
Dim validateMail As String = _
"^([w-.]+)@(([[0-9]{1,3}." &
"[0-9]{1,3}.)|(([w-]+.)+))" &
"([a-zA-z]{2,4}|[0-9]{1,3})(]?)$"
If Text.RegularExpressions.
Regex.IsMatch(Email, validateMail) _
= False Then
Throw New _
InvalidOperationException _
("The specified mail address is not valid")
End If
End Sub
End Class
When you effectively implement the partial method, you do not need to mark it again as Partial. This qualifier must be added only in the empty method definition. The preceding code checks whether the specified email address is valid; if it is not, it throws an InvalidOperationException.
Practical Implementations
Partial methods are mentioned when discussing LINQ to SQL so that you can get an overview of practical implementations of partial methods, which are particularly useful when you need to provide custom validation techniques.
To describe partial methods in another way, the concept is “to accomplish this particular task, you do need this particular method. But the implementation of the method is left to your choice.”
Constructors
A constructor is a method you invoke to create a new instance of a class that is represented by the New keyword in Visual Basic. For instance, if you have the following Contact class
Public Class Contact
Public Property FirstName As String
Public Property LastName As String
Public Property Email As String
Public Property Address As String
Public Sub New()
End Sub
End Class
you can then create a new instance of the Contact class as follows:
'First syntax
Dim aContact As Contact
aContact = New Contact
'Second syntax
Dim aContact As New Contact
'Third syntax
Dim aContact As Contact = New Contact
All the three preceding syntaxes are enabled, so you can use the one you prefer. (I use the second one for better readability.) In other words, creating an instance means giving life to a new copy of the object so you can use it for your purposes, such as storing data or performing tasks. All classes must have a constructor. If you do not provide a constructor, Visual Basic provides one for you. The default constructor is hidden in the code editor, but it has public visibility and contains no code; it serves just for instantiating the object. If you want to make it visible, click the Declaration combo box in the code editor and select the New method, as shown in Figure 7.3.
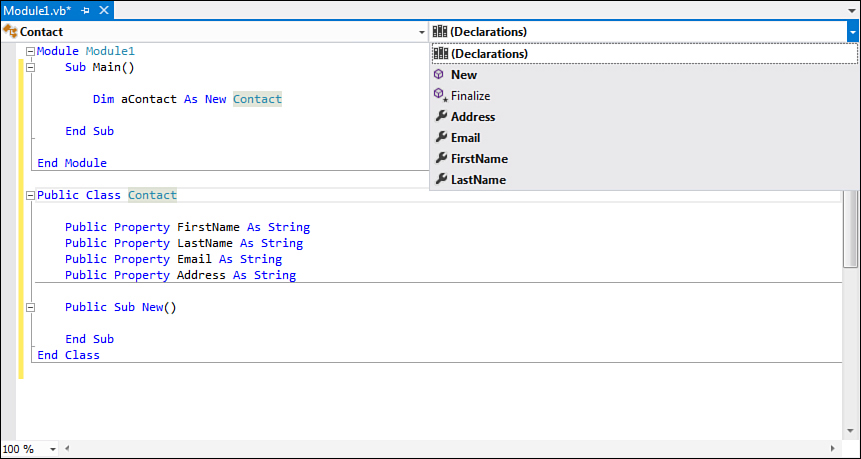
Figure 7.3. Making the default constructor visible.
Constructors are useful for initializing objects’ members. Because of this, and because constructors are basically methods, they can receive arguments. For example, you could implement the constructor in a way that receives appropriate arguments for initializing the Contact class’s properties:
Public Sub New(ByVal name As String,
ByVal surName As String,
ByVal emailAddress As String,
ByVal homeAddress As String)
Me.FirstName = name
Me.LastName = surName
Me.Email = emailAddress
Me.Address = homeAddress
End Sub
In this way you can easily assign members of the class. You invoke the parameterized constructor as follows:
Dim aContact As New Contact("Alessandro",
"Del Sole",
"[email protected]",
"5Th street")
At this point, your object is ready to be used and is populated with data. You might also want to add simple validations for arguments received by the constructor. This is important because, if you need data initialization, you also need valid data. You can throw an ArgumentException if arguments are invalid, as shown here:
Public Sub New(ByVal name As String,
ByVal surName As String,
ByVal emailAddress As String,
ByVal homeAddress As String)
If surName = "" Then _
Throw New ArgumentException("surName")
Me.FirstName = name
Me.LastName = surName
Me.Email = emailAddress
Me.Address = homeAddress
End Sub
Continuing the discussion about members’ initialization, you might have members (typically fields) with inline initialization. In this scenario, when you invoke the constructor, members’ initialization is also performed even if the constructor contains no code about initialization. This is demonstrated by the following code snippet:
Public Class Contact
Private ReadOnly InitializationDemo As Integer = 100
'Just for demo purposes!
Public Sub New()
Console.WriteLine(InitializationDemo.ToString)
Console.ReadLine()
End Sub
End Class
The constructor does not perform any initialization, but when the class gets instantiated, the value is assigned. The preceding code produces 100 as the output. Another interesting thing is that constructors are the only place in which you can initialize read-only fields. We can rewrite the preceding code as follows:
Public Class Contact
Private ReadOnly InitializationDemo As Integer
'Just for demo purposes!
Public Sub New()
InitializationDemo = 100
Console.WriteLine(InitializationDemo.ToString)
Console.ReadLine()
End Sub
Notice that the code is correctly compiled and the produced output is 100. This technique is important if you plan to expose read-only members in your classes.
Overloading Constructors
Because constructors are effectively methods, they support the overloading feature. You can therefore provide multiple implementations of the New method, taking care of the limitations described for methods. You cannot use the Overloads keyword; the compiler does not need it. Continuing the example of the Contact class, we can provide different implementations of the constructor as follows:
Public Sub New()
Me.FirstName = "Assigned later"
Me.LastName = "Assigned later"
Me.Email = "Assigned later"
Me.Address = "Assigned later"
End Sub
Public Sub New(ByVal surName As String)
If String.IsNullOrEmpty(surName) Then _
Throw New ArgumentException("surName")
Me.LastName = surName
'Will be assigned later
Me.FirstName = ""
Me.Email = ""
Me.Address = ""
End Sub
Public Sub New(ByVal name As String,
ByVal surName As String,
ByVal emailAddress As String,
ByVal homeAddress As String)
If surName = "" Then _
Throw New ArgumentException("surName")
Me.FirstName = name
Me.LastName = surName
Me.Email = emailAddress
Me.Address = homeAddress
End Sub
The first overload receives no arguments and provides a default members’ initialization. The second overload receives just an argument, initializing other members with empty strings. The last overload is the most complete and provides initialization features for all the properties exposed by the class.
Nested Invocations
Overloads are useful, but when working with constructors, you might want to consider a common place for initializing members. To accomplish this, you can invoke constructors’ overloads from another overload. Consider the following code snippet:
Public Sub New(ByVal LastName As String)
Me.New(LastName, "")
End Sub
Public Sub New(ByVal LastName As String, ByVal Email As String)
Me.LastName = LastName
Me.Email = Email
End Sub
The first overload can invoke the second overload, passing required arguments. In the preceding example, only an empty string is passed, but according to your scenario you could make a different elaboration before passing the argument. The good news in this technique is that you need to provide initialization code only once (in this case, in the second overload). By the way, take care about the hierarchical calls; the first overload can invoke the second one because this receives more arguments, but not vice versa. This kind of approach can be used because both overloads have an argument in common. For instance, say you instead had a ContactID property of type Integer that you wanted to initialize via the constructor and you had the following overloads:
Public Sub New(ByVal LastName As String)
End Sub
Public Sub New(ByVal ContactID As Integer)
End Sub
In this case the two overloads have no arguments in common; because of this, if you want to provide a common place for initializations, you need to implement a private constructor as follows:
Private Sub New()
'Replace with your
'initialization code
Me.ContactID = 0
Me.LastName = "Del Sole"
End Sub
Then you can redirect both preceding overloads to invoke a private constructor:
Public Sub New(ByVal LastName As String)
Me.New()
Me.LastName = LastName
End Sub
Public Sub New(ByVal ContactID As Integer)
Me.New()
Me.ContactID = ContactID
End Sub
Private Constructors
There is a little bit more to say about private constructors that is discussed later in this chapter in the section “Shared Members.” At the moment, you need to remember that if you place a private constructor, you must remove the public one with the same signature. For example, if you have a Private Sub New(), you cannot also have a Public Sub New().
Object Initializers
Starting from Visual Basic 2008 and .NET 3.5, the Visual Basic grammar offers another feature, named object initializers, that enables inline initialization of objects’ members when creating an instance, without the need of providing specific constructors’ overloads. For a better understanding, let’s provide a practical example. We can implement the Contact class without implementing a constructor overload that receives any arguments for initialization:
Public Class Contact
Public Property FirstName As String
Public Property LastName As String
Public Property Email As String
Public Property Address As String
End Class
To instantiate the class and initialize its members, according to the classical, old-fashioned syntax, we should write the following code:
Dim aContact As New Contact
With aContact
.FirstName = "Alessandro"
.LastName = "Del Sole"
.Email = "[email protected]"
.Address = "5Th street"
End With
The recent Visual Basic syntax instead enables the object initializers way, which works as in the following snippet:
Dim aContact As New Contact With {.LastName = "Del Sole",
.FirstName = "Alessandro",
.Email = "[email protected]",
.Address = "5Th street"}
You add the With keyword after the instance declaration. The keyword is followed by a couple of brackets. Within the brackets, you can easily assign members by writing members’ names preceded by a dot symbol and separated by commas. This code demonstrates how you can provide inline initialization of members even if no constructor’s overloads receive an appropriate number of arguments for the purpose of initialization. I will often write code using object initializers; this feature is important for advanced language features, which are covered in the next part of the book.
You might wonder why this feature has been introduced to the .NET languages, considering that there were already several ways for providing initialization. The reason is LINQ. As you see later in the book, object initializers provide a way for initializing objects within queries; another important feature known as anonymous types takes advantage of object initializers. Chapter 20, “Advanced Language Features,” discusses anonymous types.
Shared Members
Classes can expose instance and shared members. Until now, all discussions used instance members for examples. It’s important to understand the difference between instance and shared members because you can successfully use both of them in your classes. When you create a new instance of a class, you create a copy of that class with its own life and its own data. On the other hand, with shared members, you work with only one copy of a class and of its data. Classes can support different situations, such as all shared members or just a few shared members. For example, if you have a class exposing only shared members, you work with exactly one copy of the class. If you have only a few shared members within a class, all instances of that class access only one copy of the data marked as shared.
Shared/Static
In Visual Basic we talk about shared members. This is because these members are marked with the Shared keyword. In other programming languages, such behavior is represented by the “static” definition; shared and static mean the same thing. Typically, the static definition is better when talking about interoperability with other .NET languages; both definitions refer to the same thing and we use the shared definition for consistency.
You expose only shared members in two main circumstances: with mere methods libraries or with classes that can exist in only one copy (known as singleton), such as the Application class in Windows Forms applications. Now we cover how to implement shared members within classes.
Shared Classes
Visual Basic, different from other .NET languages such as Visual C#, does not provide the capability of creating shared classes. To accomplish this, you have two alternatives: You can create a class the usual way and mark all members as shared, or you can create a module. Modules are a specific Visual Basic feature that work almost as shared classes (see Chapter 10, “Modules”).
Shared Fields
Shared fields are useful to store information that is common to all instances of a class. For example, imagine you have a class named Document that represents a text document. You could implement a shared field acting as a counter of all the documents opened in your application:
Public Class Document
Private Shared _documentCounter As Integer
Public Sub New()
_documentCounter += 1
End Sub
End Class
The code in the example increments the counter each time a new instance is created. The documentCounter field is common to all instances of the Document class because it is marked with the Shared keyword.
Shared Properties
In an object-oriented approach, fields should be wrapped by properties that gain access to fields. This also happens with shared members. Continuing with the preceding example, a shared property would be implemented as follows:
Private Shared _documentCounter As Integer
Public Shared ReadOnly Property DocumentCounter As Integer
Get
Return _documentCounter
End Get
End Property
In this case, the property is also marked as read-only because its value is incremented only when a new instance of the class is created, passing through the related field. However, shared properties support both Get and Set. Because the preceding code offers a read-only property, you cannot take advantage of the new auto-implemented properties feature. If you do not need a read-only property, you can declare a shared property as follows:
Public Shared Property DocumentCounter As Integer
By doing so, you can avoid the implementation of private shared fields.
Shared Methods
Shared methods can be invoked without the need of creating an instance of the class that defines them. As in the previous members, shared methods are decorated with the Shared keyword. A common use of shared methods is within class libraries that act as helper repositories of functions. For example, you can have a class that provides methods for compressing and decompressing files using the System.IO.Compression namespace. In such a scenario, you do not need to create an instance of the class; in fact, shared methods just need to point to some files and not to instance data. The following code snippet provides an example of shared methods:
Public Class CompressionHelper
Public Shared Sub Compress(ByVal fileName As String,
ByVal target As String)
'Code for compressing files here
End Sub
Public Shared Sub Decompress(ByVal fileName As String,
ByVal uncompressed As String)
'Code for decompressing files here
End Sub
End Class
...
Sub Test()
CompressionHelper.Compress("Sourcefile.txt", "Compressedfile.gz")
CompressionHelper.Decompress("Compressedfile.gz", "Sourcefile.txt")
End Sub
As you can see, you invoke shared methods by writing the name of the class instead of creating an instance and invoking methods onto the instance. This approach is useful for organizing functions in libraries according to their purpose (established via the class name). If you try to invoke shared methods from an instance, the Visual Basic compiler throws a warning message advising that such invocation might be ambiguous and will offer an autocorrect option to change the instance name to the class name, removing the potential ambiguity. Of course, you can remove such warnings by editing the Instance Variable Accesses Shared Member option in the Compiler tab within My Project. I suggest you leave the default setting unchanged because it can help you avoid ambiguous code. Shared methods also support overloading, so you can take advantage of this feature if necessary. When implementing shared methods, you should be aware of some considerations. First, you cannot work with instance members from within shared methods. For instance, the following code throws a compilation error:
'Instance field
Private instanceField As Integer
'Cannot refer to an instance member
Public Shared Function testSharedInstance() As Integer
Return instanceField
End Function
To solve this error, you should mark as Shared the member you are working with (instanceField in the preceding example):
'Shared field
Private Shared sharedField As Integer
'Correct
Public Shared Function testSharedInstance() As Integer
Return sharedField
End Function
The alternative is to change the method from shared to instance, removing the Shared keyword from the method definition. But this is not a game. You need to evaluate how your methods will behave and how they will use members exposed by your classes. According to this, you can decide whether methods can be shared or must be instance ones. Another consideration is related to classes exposing only shared methods. Because in this scenario the class does not need to be instantiated, a private empty constructor must be supplied as follows:
Private Sub New()
'No code
End Sub
This constructor contains no code (but it could for initialization purposes) and is just necessary to prevent instance creation.
Shared Sub Main
In all code examples shown to this point, you saw how console applications provide a module containing the entry point for applications, which is the Sub Main. Because modules are basically shared classes, you can supply a class containing shared members with a Shared Sub Main that works as in modules. Although modules are suggested instead of shared classes, because they cause less confusion and are a Visual Basic-specific feature, you need to know how to implement the Shared Sub Main within classes. If you ever use conversion tools from Visual C# to VB (or if you get code examples translated into VB by Visual C# folks), you will typically find a class named Program containing the previously mentioned shared entry point.
Shared Constructors
Classes can implement shared constructors, as shown in the following code:
'Private visibility
Shared Sub New()
'Initialization of shared
'members
instanceField = 10
End Sub
Shared constructors are particularly useful for initializing shared members or for loading data that is common to all instances of a class. A shared constructor is invoked immediately before the normal constructor that creates a new instance of the class. With that said, the following code is appropriate and accepted by the compiler:
Shared Sub New()
'Initialization of shared
'members
instanceField = 10
End Sub
Sub New()
End Sub
Another important thing to take care of is that shared constructors have Private visibility, and they are the only point in the class in which you can initialize a read-only field.
Common Language Specification
One of the most important features of the .NET Framework is the CLR, which offers a common infrastructure for various .NET languages. You might also remember from Chapter 1, “Introducing the .NET Framework 4.5,” that all .NET compilers produce Intermediate Language (IL) code. Because of this, .NET languages can interoperate: An assembly produced with Visual Basic can be used by an application written in Visual C#, and vice versa. But different languages have, of course, different characteristics; so if developers use specific features of a language, the risk is that another language cannot use that produced assembly because they might encounter several errors. This can occur when companies produce reusable components, such as class libraries or user controls that you should be able to use from whatever .NET application written in whatever language you want without problems. To provide a common set of rules that developers should follow to ensure interoperability, Microsoft wrote the Common Language Specification (CLS) that are a set of rules that every developer has to follow to produce reusable assemblies. This chapter provides an overview of the CLS and gives you information about applying such rules to the topics discussed in this chapter. Each time a new topic is covered, tips for making code CLS-compliant are provided.
Common Language Specification Website
Microsoft offers a dedicated page to CLS on the MSDN portal that you should look at: http://msdn.microsoft.com/en-us/library/12a7a7h3(v=vs.110).aspx
Where Do I Need to Apply?
CLS is important when producing reusable components, such as class libraries or user controls. Because only public classes and public members from public classes can be used from other applications also written in different languages, the CLS applies only to
• Public members exposed by public classes, such as methods or properties, and members that can be inherited
• Objects used by public members, such as types passed as arguments to methods
In all other cases, such as private members, applying CLS is ignored by the compiler. Another situation when you do not need to apply CLS is when you do not produce reusable components. For example, the UI side of a Windows application (Win Forms or WPF) is not required to be CLS-compliant because external applications will not invoke the UI.
Marking Assemblies and Types as CLS-Compliant
Chapter 2, “Getting Started with the Visual Studio 2012 IDE,” and Chapter 3, “The Anatomy of a Visual Basic Project,” offer an overview of assemblies. When you produce a reusable component such as a class library or a user control such as a .dll assembly, you need to ensure that it is CLS-compliant. You can add the following attribute to the assembly definition:
<Assembly: CLSCompliant(True)>
This attribute tells the compiler to check whether a type used in your code is CLS-compliant. If the compiler finds a non–CLS-compliant type, it throws a warning message. Assembly members should also be marked as CLS-compliant if you plan that they will be. A class is defined CLS-compliant as follows:
<CLSCompliant(True)> Public Class Person
You might wonder why you should add this attribute at the class level if you specified one at the assembly level. The reason is that you might implement non–CLS-compliant classes (therefore assigning False to the CLSCompliant attribute). This is useful for communicating to both the compiler and code analysis tools that a non–CLS-compliant class should not be checked.
Code Analysis
There are different code analysis tools for checking whether code is CLS-compliant. The first one is the well-known Microsoft FxCop. The second one is the code analysis instrumentation available in Visual Studio 2012, which is covered in Chapter 55, “Advanced Analysis Tools.” Both tools are important for finding errors about CLS compliance of your code.
Naming Conventions
Assigning comprehensible identifiers to types and members is a best practice in every development environment. This becomes a rule in .NET development, especially if you want your code to be CLS-compliant. To understand this, you need to first know that the Common Language Specification enables only two notations, Pascal and camel. If you are an old Visual Basic 6 or Visual C++ developer, you might be familiar with the Hungarian notation that is not supported by .NET rules. An identifier is Pascal-cased when the first letter of each word composing the identifier is uppercase. The following identifier is Pascal-case: FirstName. An identifier is instead defined as camel-case when the first character of the first word composing the identifier is lowercase. The following identifier is camel-cased: firstName. It’s important to know this difference to understand where and when you should use one notation or the other one. You use the Pascal notation in the following situations:
• Namespaces’ identifiers
• Identifiers of all public members within an assembly, such as classes, properties, methods, and custom types
Instead, use the camel notation in the following situations:
• Identifiers of all private members within an assembly, such as fields, methods, and so on. This is not actually a requirement (because private members are not affected by CLS in terms of naming conventions), but it’s a good programming practice.
• Arguments’ names for methods, both public and private.
No other naming notation is enabled in the Common Language Specification.
Using an Underscore with Private Variables
As a commonly accepted convention, often the name of private variables starts with an underscore (_). This is useful when you declare properties the extended way and need a backing field that holds the property value. Different from Visual C#, which is case-sensitive, in Visual Basic you cannot have two identifiers with the same name but with different casing, so an underscore at the beginning of the private variable’s name solves the problem and is a standardized practice.
Obviously, if you do not plan to write CLS-compliant code, you can use any notation you like. However, it’s preferable to use a .NET-oriented notation. Another important rule about naming conventions is in methods’ names. You should first place the name of the verb and then the target of the action. For example, CompressFile is correct, whereas FileCompress is not. The following code shows an example of a well-formed class:
'Public members of an assembly
'are pascal cased
Public Class NamingConventionsDemo
'private fields are camel-cased
Private documentCounter As Integer = 0
'public properties are pascal-cased
Public Property FirstName As String
'public methods are pascal-cased
'arguments are camel-cased
Public Function CompressFile(ByVal sourceFile As String,
ByVal targetFile As String) As Boolean
End Function
'private methods are camel-cased
'arguments are camel-cased
Private Sub checkForFileExistance(ByVal fileName As String)
End Sub
End Class
Because of their importance, this book follows the preceding naming conventions, even for CLS-incompliant code.
Rules About Classes
The CLS influences classes’ implementation with basically a few rules. The most rules are related to inheritance as much as for methods. Because inheritance hasn’t been covered yet (discussed in Chapter 12, “Inheritance”), the only rule mentioned here is that if a class exposes only shared members, it must have an empty private constructor and must be marked as NotInheritable, as follows:
<CLSCompliant(True)> Public NotInheritable Class GzipCompress
'Empty private constructor
Private Sub New()
End Sub
Public Shared Sub Compress(ByVal fileName As String,
ByVal target As String)
End Sub
Public Shared Sub Decompress(ByVal fileName As String,
ByVal source As String)
End Sub
End Class
The other rules about classes are described in Chapter 12.
Rules About Properties
The CLS provides a couple of rules about properties implementation:
• All properties exposed by a class must have the same access level, meaning that they must be all instance properties or all shared properties or all virtual properties. Virtual properties (that is, marked with the MustOverride keyword) are described in Chapter 12.
• Get, Set, and the property itself must return and receive the same type; the type must also be CLS-compliant. If the property returns String, both Get and Set must handle String, too. The type must be passed by value and not by reference.
Rules About Methods
CLS influences methods both for inheritance implementations and for declarations. You need to know that arguments with a nonfixed length must be specified only with the ParamArray keyword.
Rules About Arrays
For arrays, CLS rules are simple:
• Items within arrays must be CLS-compliant types.
• Arrays must have a fixed length greater than zero.
• Arrays must be zero-based. (This is mostly a rule for compilers.)
Summary
In this chapter, you learned several important concepts about object-oriented programming with Visual Basic 2012. You saw how classes are the most important item in the object-oriented programming; you also learned how to declare classes and how to expose members from classes, such as methods, properties, and fields. Summarizing these features, you might remember that fields are the real state of objects and properties are a way for ruling access to fields from the external world. You can also remember that methods are procedures that take actions. Methods are flexible due to the overloading technique that enables implementing different signatures of the same method. A special method known as constructor creates an instance of a class and gives the class the real life. Each time you create an instance of a class, you create a new copy of an object with its own life and data. But there are situations in which you need only one copy of an object and data, and that is where shared members come in. You also took a tour of interesting features such as partial classes and partial methods that enable a better organization of your classes’ infrastructure. But as in all fantastic worlds, the risk of doing something wrong is always there, especially if you consider the CLR infrastructure that enables .NET languages to interoperate. Because of this, a set of rules named the Common Language Specification has been created to ensure that all classes and their members can be used from all .NET languages with the minimum risk of errors. After this overview of classes, it’s time to understand how they live within memory.