
Chapter 26. Introducing ADO.NET Entity Framework
In This Chapter
• Introducting Entity Framework
• Understanding Entity Data Models
• Insert/Update/Delete for Entities
• Querying EDMs with LINQ to Entities
• Querying EDMs with Entity SQL
• Introducing Code First
• Compatibility with the Past and with Other Technologies
Most applications require accessing data. This is a sentence that you already read in this book and probably in many other places, but it is so important. Before the .NET Framework 3.5, developers had to access data using DataSets or they were required to work directly against the database; then they had a new opportunity with LINQ to SQL. This was revolutionary because it proposes a conceptual object model that enables you to work with managed objects, being responsible for whatever is necessary in managing also the underlying database. But it has some limitations. It supports only SQL Server databases; it does not support many-to-many relationships; and it does not provide support for modeling data before creating a database. To provide a modern data platform based on the idea of the conceptual object model, Microsoft created the ADO.NET Entity Framework that was first introduced as a library in .NET Framework 3.5 SP 1 and that has become part of the .NET Framework since version 4.0. In this chapter you get started with the Entity Framework by learning to perform the most common operations on data and understanding the basics of such a platform, also learning some new APIs that change the way data models are generated and that make code much cleaner and simpler.
Introducing Entity Framework
ADO.NET Entity Framework is a modern data platform included in .NET Framework 4.5, also known as EF 5. It is an object relational mapping engine, but it is powerful, absolutely more flexible and powerful than LINQ to SQL. It enables you to create conceptual object models, known as Entity Data Models (EDMs) that provide a high level of abstraction from the underlying data source. Abstraction means that tables and tables’ columns within a database are mapped into .NET classes and properties, meaning that you do not work against the database but with .NET objects that represent the database so that you can take advantage of manipulating .NET objects under the Common Language Runtime (CLR) control, with IntelliSense support and the background compiler check. You do not need to have knowledge of the database infrastructure, although this is always suggested because the Entity Framework is responsible for communications between the object model and the data source. It provides the entire necessary infrastructure so that you can focus only on writing code for manipulating and querying data. Working with an abstractive object model means taking advantage of all the .NET Framework’s power and all available Visual Studio instrumentation. The .NET Framework 4.5 introduces new programming patterns to the Entity Framework, more specifically it introduces the so-called Code First approach, which enables you coding your model independently from the database, that can be generated later. Differently from its predecessor, Visual Studio 2012 now generates Entity Data Models based on Code First’s APIs. In the next section, you start with the EF by understanding Entity Data Models and the new classes provided by the .NET Framework 4.5. In the second part of this chapter, you will see how to code your data models and you will get a recap about the previous APIs. In fact, these are still important in scenarios like the WCF RIA Services for Silverlight.
Understanding Entity Data Models
The best way to understand EDMs is to create one. First, create a new Visual Basic project for the Console and name it EntityFramework. Save the new project immediately, so that all references required by the EF are updated. The next steps require the Northwind database that you installed in Chapter 21, “Introducing ADO.NET and DataSets.” Right-click on the project name in Solution Explorer and select Add New Item. When the Add New Item dialog box appears, move to the Data Node, select the ADO.NET Entity Data Model item template, and name it Northwind.edmx, as shown in Figure 26.1.
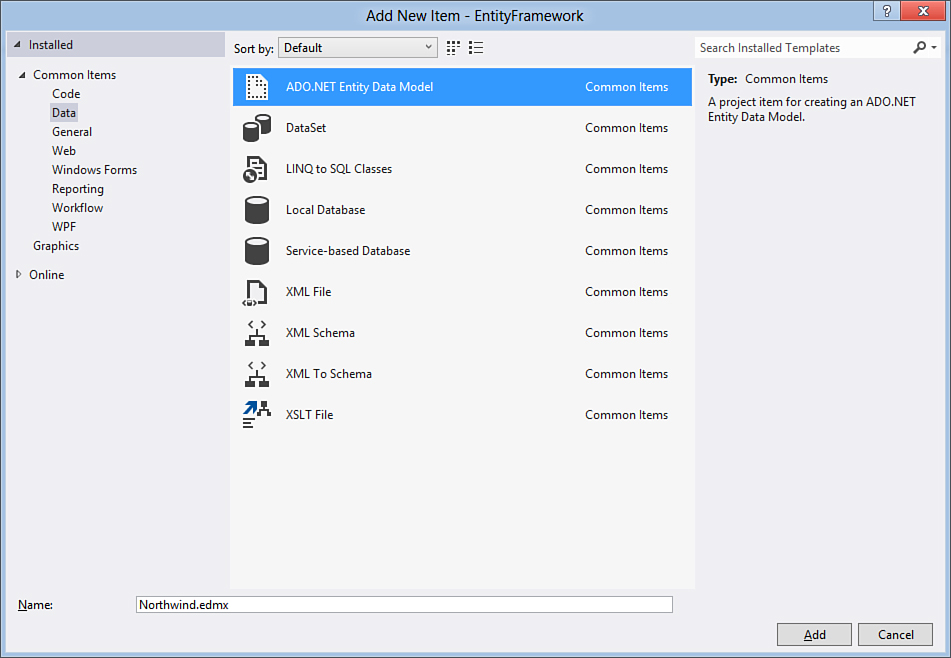
Figure 26.1. Adding a new Entity Data Model.
When you click Add, the Entity Data Model Wizard starts. In the first screen you need to specify the source for the EDM. With EF 4 and EF 5, you can create EDMs starting from an existing database or modeling custom EDMs from scratch. Select the existing database options, as shown in Figure 26.2. This is also known as Database First.
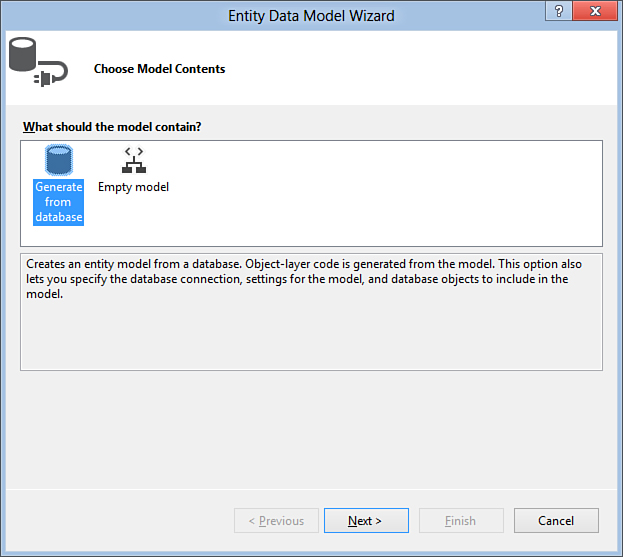
Figure 26.2. Creating an EDM from an existing database.
The next screen is important because it requires the specification of the database. You can click New Connection or select one of the favorite connections from the appropriate combo box. Figure 26.3 shows how on my machine the connection points to Northwind as it is available on SQL Server.
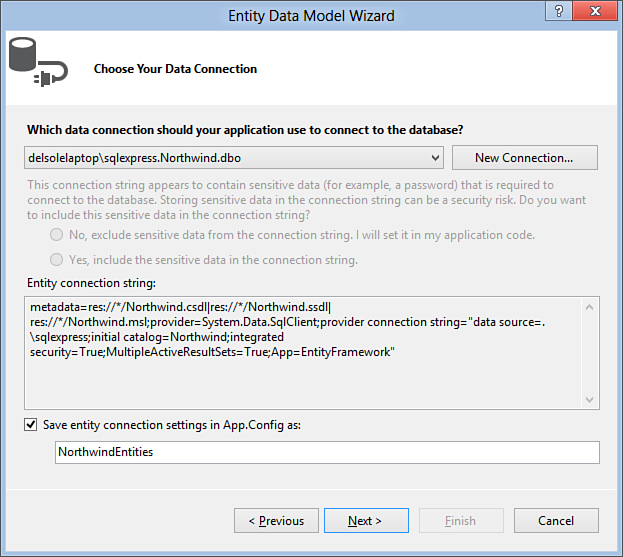
Figure 26.3. Choosing the database and connection settings.
Notice how the connection string is represented in the dialog box. Also notice that this is not the usual connection string because it contains metadata information that will be clearer when the EDMs’ infrastructure is explained. You decide whether to save the string in the configuration file. The next step is crucial because you have to select what database objects you want to be mapped into the EDM. Figure 26.4 shows the dialog box.
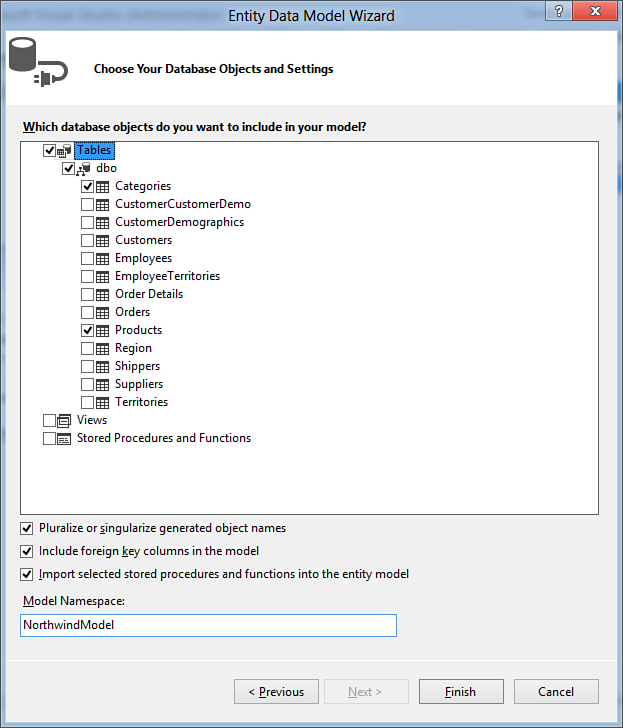
Figure 26.4. Selecting objects for the new EDM.
The ADO.NET Entity Framework supports mapping foreign keys from the database into the model. This is the reason you find a check box in the Entity Data Model wizard, as shown in Figure 26.4. Select the check box to add the foreign key’s support.
Also notice how you are required to specify a model namespace. This is important because the namespace stores Visual Basic definitions for objects that are mapped to database objects, which are explained later. You can write your own or leave the default identifier unchanged. At the moment, just choose the Categories and Products tables and then Click Finish. After a few moments, when Visual Studio generates the code for the object model, the EDM Designer opens as shown in Figure 26.5.
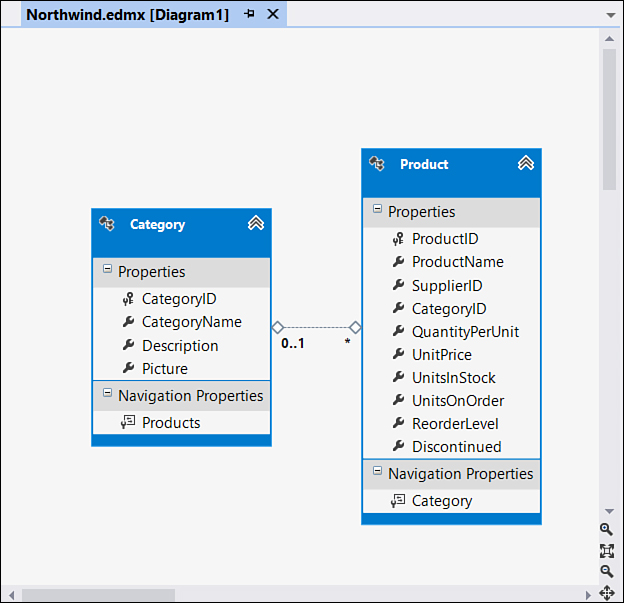
Figure 26.5. The EDM Designer for Visual Studio.
The object model available in the Visual Studio designer is, behind the scenes, defined by a new XML document that is the schema for the Entity Data Model. This XML file is the one with the .edmx extension, in our case Northwind.edmx. The schema is divided into three sections that are summarized in Table 26.1.
Table 26.1. Sections of the Entity Data Model
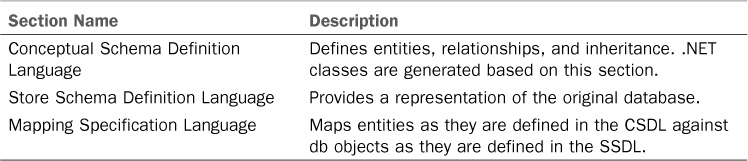
To understand how an EDM is composed, in Solution Explorer right-click the Northwind.edmx file; then select Open With, and when the Open With dialog box appears, double-click the XML editor option. At this point, Visual Studio shows the content of the EDM as an XML file instead of the designer. The file contains three sections as described in Table 26.1. Listing 26.1 shows the CSDL definition (which is actually the second section in the XML file).
Listing 26.1. Conceptual Schema Definition Language
<!-- CSDL content -->
<edmx:ConceptualModels>
<Schema Namespace="NorthwindModel" Alias="Self" p1:UseStrongSpatialTypes="false" xmlns :annotation="http://schemas.microsoft.com/ado/2009/02/edm/annotation" xmlns:p1="http
://schemas.microsoft.com/ado/2009/02/edm/annotation" xmlns="http://schemas.microsoft.com /ado/2009/11/edm">
<EntityContainer Name="NorthwindEntities" p1:LazyLoadingEnabled="true">
<EntitySet Name="Categories" EntityType="NorthwindModel.Category" />
<EntitySet Name="Products" EntityType="NorthwindModel.Product" />
<AssociationSet Name="FK_Products_Categories" Association="NorthwindModel.FK_Products_Categories">
<End Role="Categories" EntitySet="Categories" />
<End Role="Products" EntitySet="Products" />
</AssociationSet>
</EntityContainer>
<EntityType Name="Category">
<Key>
<PropertyRef Name="CategoryID" />
</Key>
<Property Name="CategoryID" Type="Int32" Nullable="false" p1:StoreGeneratedPattern="Identity" />
<Property Name="CategoryName" Type="String" Nullable="false" MaxLength="15" Unicode="true" FixedLength="false" />
<Property Name="Description" Type="String" MaxLength="Max" Unicode="true" FixedLength="false" />
<Property Name="Picture" Type="Binary" MaxLength="Max" FixedLength="false" />
<NavigationProperty Name="Products" Relationship="NorthwindModel.FK_Products_Categories" FromRole="Categories" ToRole="Products" />
</EntityType>
<EntityType Name="Product">
<Key>
<PropertyRef Name="ProductID" />
</Key>
<Property Name="ProductID" Type="Int32" Nullable="false" p1:StoreGeneratedPattern="Identity" />
<Property Name="ProductName" Type="String" Nullable="false" MaxLength="40" Unicode="true" FixedLength="false" />
<Property Name="SupplierID" Type="Int32" />
<Property Name="CategoryID" Type="Int32" />
<Property Name="QuantityPerUnit" Type="String" MaxLength="20" Unicode="true" FixedLength="false" />
<Property Name="UnitPrice" Type="Decimal" Precision="19" Scale="4" />
<Property Name="UnitsInStock" Type="Int16" />
<Property Name="UnitsOnOrder" Type="Int16" />
<Property Name="ReorderLevel" Type="Int16" />
<Property Name="Discontinued" Type="Boolean" Nullable="false" />
<NavigationProperty Name="Category" Relationship="NorthwindModel.FK_Products_Categories" FromRole="Products" ToRole="Categories" />
</EntityType>
<Association Name="FK_Products_Categories">
<End Role="Categories" Type="NorthwindModel.Category" Multiplicity="0..1" />
<End Role="Products" Type="NorthwindModel.Product" Multiplicity="*" />
<ReferentialConstraint>
<Principal Role="Categories">
<PropertyRef Name="CategoryID" />
</Principal>
<Dependent Role="Products">
<PropertyRef Name="CategoryID" />
</Dependent>
</ReferentialConstraint>
</Association>
</Schema>
</edmx:ConceptualModels>
Entities (EntityType) are defined along with scalar properties (Property), relationships (Association), entity sets (EntitySet), and a container named NorthwindEntities. The next section that we consider is the SSDL, which is constituted by the XML markup code shown in Listing 26.2 and which is actually the first section in the XML file.
Listing 26.2. The Store Schema Definition Language
<edmx:StorageModels>
<Schema Namespace="NorthwindModel.Store" Alias="Self" Provider="System.Data.SqlClient"ProviderManifestToken="2008" xmlns:store="http://schemas.microsoft.com/ado/2007/12/ edm/EntityStoreSchemaGenerator" xmlns="http://schemas.microsoft.com/ado/2009/11/ edm/ssdl">
<EntityContainer Name="NorthwindModelStoreContainer">
<EntitySet Name="Categories" EntityType="NorthwindModel.Store.Categories" store:Type="Tables" Schema="dbo" />
<EntitySet Name="Products" EntityType="NorthwindModel.Store.Products" store:Type="Tables" Schema="dbo" />
<AssociationSet Name="FK_Products_Categories" Association="NorthwindModel.Store.FK_Products_Categories">
<End Role="Categories" EntitySet="Categories" />
<End Role="Products" EntitySet="Products" />
</AssociationSet>
</EntityContainer>
<EntityType Name="Categories">
<Key>
<PropertyRef Name="CategoryID" />
</Key>
<Property Name="CategoryID" Type="int" Nullable="false" StoreGeneratedPattern="Identity" />
<Property Name="CategoryName" Type="nvarchar" Nullable="false" MaxLength="15" />
<Property Name="Description" Type="ntext" />
<Property Name="Picture" Type="image" />
</EntityType>
<EntityType Name="Products">
<Key>
<PropertyRef Name="ProductID" />
</Key>
<Property Name="ProductID" Type="int" Nullable="false" StoreGeneratedPattern="Identity" />
<Property Name="ProductName" Type="nvarchar" Nullable="false" MaxLength="40" />
<Property Name="SupplierID" Type="int" />
<Property Name="CategoryID" Type="int" />
<Property Name="QuantityPerUnit" Type="nvarchar" MaxLength="20" />
<Property Name="UnitPrice" Type="money" />
<Property Name="UnitsInStock" Type="smallint" />
<Property Name="UnitsOnOrder" Type="smallint" />
<Property Name="ReorderLevel" Type="smallint" />
<Property Name="Discontinued" Type="bit" Nullable="false" />
</EntityType>
<Association Name="FK_Products_Categories">
<End Role="Categories" Type="NorthwindModel.Store.Categories" Multiplicity="0..1" />
<End Role="Products" Type="NorthwindModel.Store.Products" Multiplicity="*" />
<ReferentialConstraint>
<Principal Role="Categories">
<PropertyRef Name="CategoryID" />
</Principal>
<Dependent Role="Products">
<PropertyRef Name="CategoryID" />
</Dependent>
</ReferentialConstraint>
</Association>
</Schema>
</edmx:StorageModels>
This schema is similar to the previous schema, except that it represents the database structure as you can see from type definition within Property elements. The last schema is the Mapping Definition Language that is illustrated in Listing 26.3.
Listing 26.3. Mapping Definition Language
<edmx:Mappings>
<Mapping Space="C-S" xmlns="http://schemas.microsoft.com/ado/2009/11/mapping/cs">
<EntityContainerMapping StorageEntityContainer="NorthwindModelStoreContainer" Cd mEntityContainer="NorthwindEntities">
<EntitySetMapping Name="Categories">
<EntityTypeMapping TypeName="NorthwindModel.Category">
<MappingFragment StoreEntitySet="Categories">
<ScalarProperty Name="CategoryID" ColumnName="CategoryID" />
<ScalarProperty Name="CategoryName" ColumnName="CategoryName" />
<ScalarProperty Name="Description" ColumnName="Description" />
<ScalarProperty Name="Picture" ColumnName="Picture" />
</MappingFragment>
</EntityTypeMapping>
</EntitySetMapping>
<EntitySetMapping Name="Products">
<EntityTypeMapping TypeName="NorthwindModel.Product">
<MappingFragment StoreEntitySet="Products">
<ScalarProperty Name="ProductID" ColumnName="ProductID" />
<ScalarProperty Name="ProductName" ColumnName="ProductName" />
<ScalarProperty Name="SupplierID" ColumnName="SupplierID" />
<ScalarProperty Name="CategoryID" ColumnName="CategoryID" />
<ScalarProperty Name="QuantityPerUnit" ColumnName="QuantityPerUnit" />
<ScalarProperty Name="UnitPrice" ColumnName="UnitPrice" />
<ScalarProperty Name="UnitsInStock" ColumnName="UnitsInStock" />
<ScalarProperty Name="UnitsOnOrder" ColumnName="UnitsOnOrder" />
<ScalarProperty Name="ReorderLevel" ColumnName="ReorderLevel" />
<ScalarProperty Name="Discontinued" ColumnName="Discontinued" />
</MappingFragment>
</EntityTypeMapping>
</EntitySetMapping>
</EntityContainerMapping>
</Mapping>
</edmx:Mappings>
The content of the MDL is quite simple, in that each ScalarProperty represents an entity’s property and establishes mapping between the property and the related column name in the database table.
Understanding the DbContext Class: The Visual Basic Mapping
Schemas in the Entity Data Model have a Visual Basic counterpart that enables you to write code to work against entities. To understand this, enable the View All Files view in Solution Explorer and expand the Northwind.edmx file. You will see two files with a .tt extension, Northwind.Context.tt and Northwind.tt. Files with a .tt extension are templates that Visual Studio uses for code generation and that are useful to the IDE to generate classes that allow developers to interact with the object model. Regardless of their content, which you are not required to understand for this chapter, start expanding the Northwind.Context.tt file, which contains another file called Northwind.Context.vb. Similar to the DataContext class in LINQ to SQL, the ADO.NET Entity Framework provides a class named System.Data.Entity.DbContext. This class, also referred to as the object context, is new in the Entity Framework 5 and is also the basis of the Code First pattern; It acts as a reference to the Entity Data Model and encapsulates the entities’ definition so that you can work with entities. It is also responsible for opening and closing connections, persisting data, keeping track of changes, and persisting data back to the database. DbContext is just the base class (as the DataContext is in LINQ to SQL) that every entity data model inherits from. Listing 26.4 shows how the object context is defined in our specific scenario.
Listing 26.4. DbContext Definition
Imports System
Imports System.Data.Entity
Imports System.Data.Entity.Infrastructure
Partial Public Class NorthwindEntities
Inherits DbContext
Public Sub New()
MyBase.New("name=NorthwindEntities")
End Sub
Protected Overrides Sub OnModelCreating(modelBuilder As DbModelBuilder)
Throw New UnintentionalCodeFirstException()
End Sub
Public Property Categories() As DbSet(Of Category)
Public Property Products() As DbSet(Of Product)
End Class
The code is easy to understand. There is only one constructor that creates an instance of the object model. Next, notice the Categories and Products properties: DbSet(Of Category) and DbSet(Of Product). A System.Data.Entity.DbSet(Of T) represents an entity set and provides several methods and members for manipulating entities, such as the Add or Remove methods. Properties of type DbSet handle references to a series of objects. Such objects are defined in separate code files, one for each entity, all nested inside the Northwind.tt file. For the sake of simplicity, Listing 26.5 shows only the definition of the Category class in the Category.vb file whereas the Product class is left out, being substantially defined using the same concepts.
Listing 26.5. The Category Entity Definition
Imports System
Imports System.Collections.Generic
Partial Public Class Category
Public Property CategoryID As Integer
Public Property CategoryName As String
Public Property Description As String
Public Property Picture As Byte()
Public Overridable Property Products As _
ICollection(Of Product) = New HashSet(Of Product)
End Class
Each entity class represents a database object, but differently from the previous versions of the Entity Framework, the entity definition is now made of only a few lines of code and relies on the Plain Old CLR Object (POCO) definition. This means that there is no platform-specific code, but normal classes that you could use not only inside an object model definition. You can easily compare the example shown in the previous edition of this book with the current example to see how much cleaner the code now is.
Navigation Properties in Code
Finally, notice how those things named Navigation Properties in the EDM are also defined within entity classes. A navigation property is a .NET property of type ICollection(Of T), in the case of the “many” part of the relationship, or of the entity type that the current entity is associated with for the “one” part of the relationship (in the case of the Product entity, the navigation property is of type Category). Navigation properties typically represent foreign keys in the database.
Now that you have a clearer idea of what Visual Basic requires behind the scenes, you are ready to understand the usage of some interesting design-time tools.
Entity Designer Tool Windows
When the EDM designer is active, you notice that some new tool windows appear in the IDE. The first one is the Mapping Details tool window, which shows how database objects are mapped to .NET types. Figure 26.6 shows the Mapping Details window.
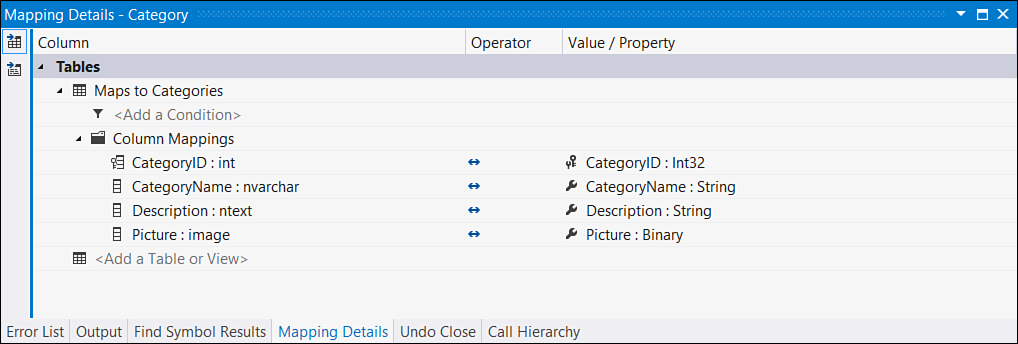
Figure 26.6. The Mapping Details tool window.
As you can see in Figure 26.6, on the left side of the window, you can find the original SQL definition and on the right side of the window, you can find the .NET type utilized to map SQL types into the EDM. You can manually edit such mapping, but the suggestion is you leave unchanged what the IDE proposes by default unless you understand that a bad mapping from SQL to .NET has been performed. The second tool is the Model Browser, which provides a hierarchical graphical view of the object model so that you can easily browse both the conceptual model and the store model. Figure 26.7 shows the tool window.
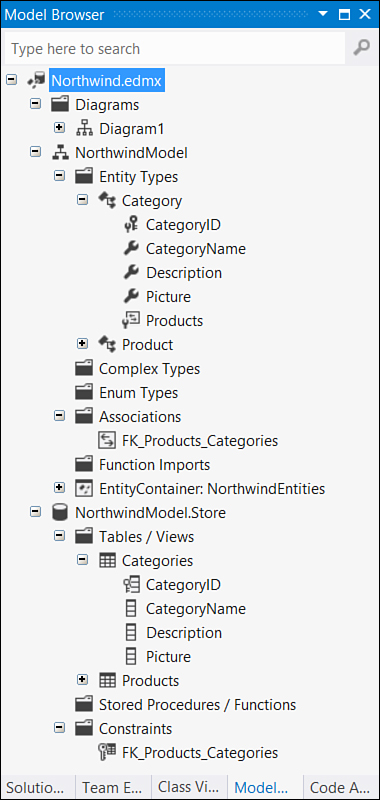
Figure 26.7. The Model Browser tool window.
Such a tool window also simplifies performing operations on the entity data model, such as updating the model itself, as explained later in this chapter with regard to stored procedures. Other than these tool windows, you can take advantage of the Properties window for getting information on the objects that compose the entity data model. For example, if you click the blank space in the designer, the Properties window shows high-level information on the EDM, such as the database schema name, the entity container name (that is, the object context), or the model namespace. Figure 26.8 provides an overview.
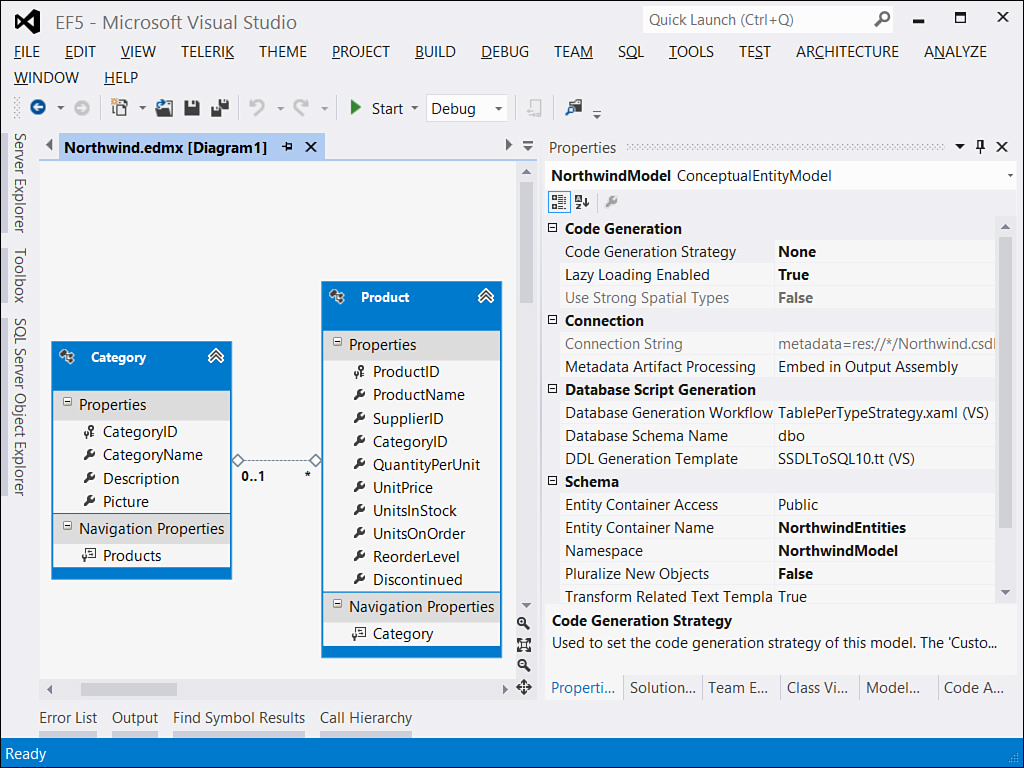
Figure 26.8. Getting model information via the Properties window.
Similarly, you can get information on the entities’ definition by clicking the desired entity name in the designer. Figure 26.9 represents the Properties window showing information about the Category entity.

Figure 26.9. Getting entity information with the Properties window.
The window shows information about the class implementation, such as the class name, the inheritance level, or the access level other than the related entity set container name. If you instead try to click a navigation property, the Properties window provides information on how relationships are handled. For example, the name of the foreign key, the return type, and multiplicity type is shown in a human-readable fashion, as demonstrated in Figure 26.10.
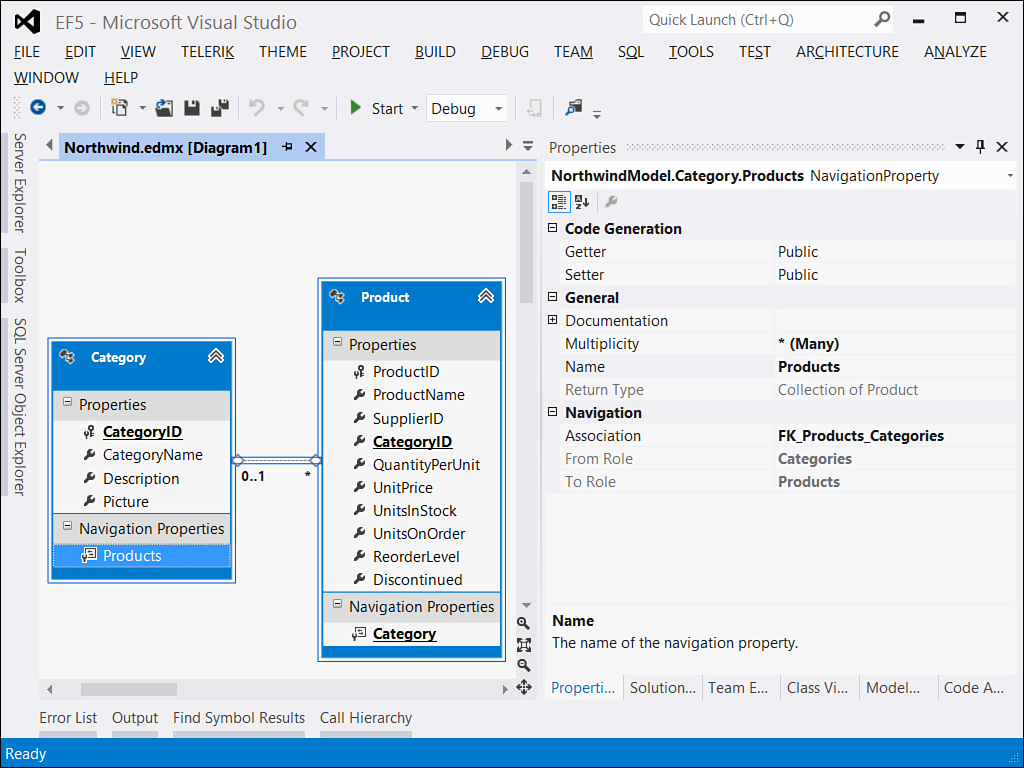
Figure 26.10. Getting information on navigation properties with the Properties window.
Useful information can also be retrieved on relationships. If you click the association line that conjuncts entities in the designer, the Properties window not only shows how the relationship is defined, but also enables you to choose custom behavior when deleting entities (for example, Cascade). Of course, this must be supported (or just enabled) in the underlying database. In the case of SQL Server databases, you can modify associations’ behaviors using SQL Server Management Studio. Figure 26.11 shows such a scenario.
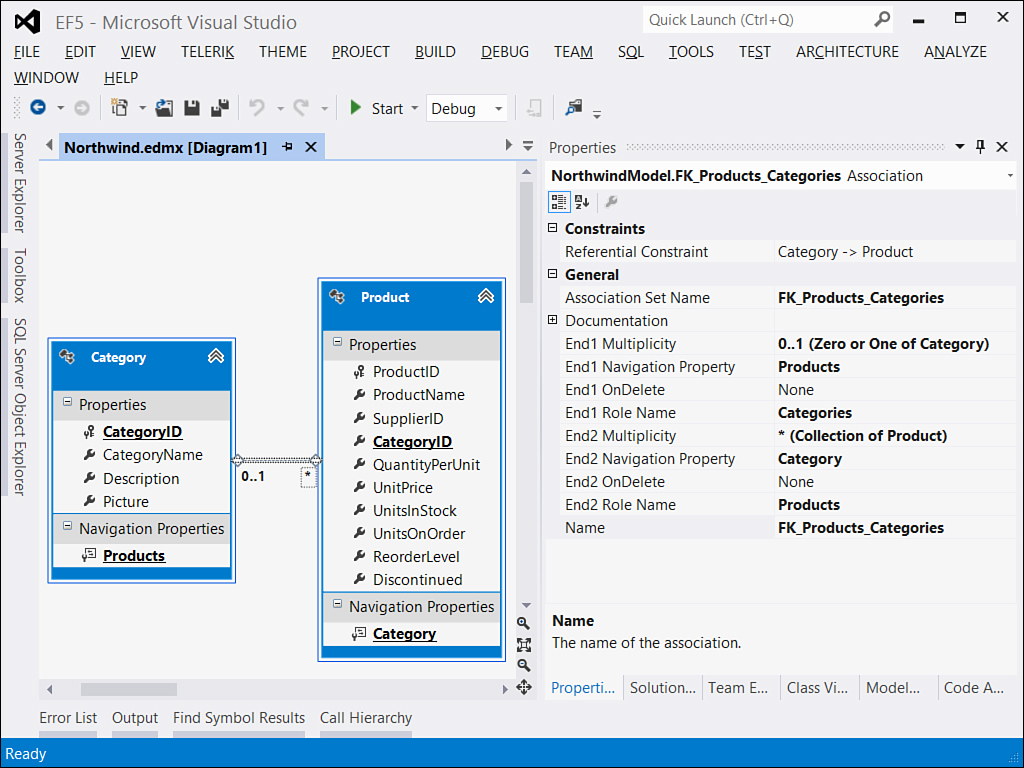
Figure 26.11. Getting associations information via the Properties window.
The last use of the Properties window is getting and setting values for scalar properties. For example, click the QuantityPerUnit property in the Product entity. Figure 26.12 shows how the Properties window displays.
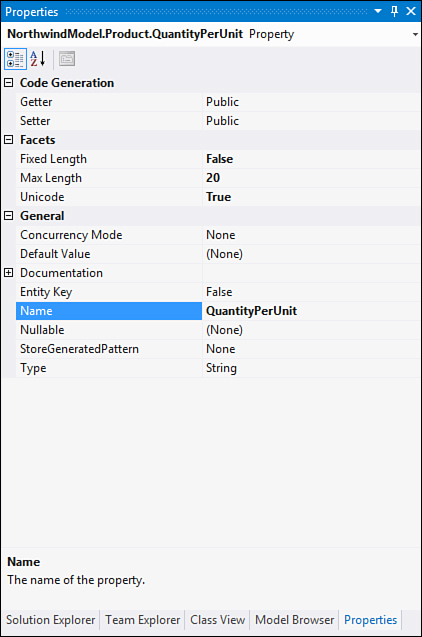
Figure 26.12. Getting information on scalar properties.
Properties are self-explanatory, and you can get more information by clicking the property you are interested in; the tool window will be updated with information. Consider two properties: Entity Key, which establishes whether the scalar property represents a primary key, and StoreGeneratedPattern, which provides the ability to autogenerate the column in the database during insert and update operations. This tooling is particularly useful because here you can manually change the entities’ behavior without the need to edit the autogenerated Visual Basic code; this job belongs to Visual Studio and you should always let it do this for you.
Insert/Update/Delete Operations for Entities
The ADO.NET Entity Framework offers a complete infrastructure for manipulating data, meaning that it offers the ability to add, update, and remove data to and from the object model and subsequently from the database. Let’s discover these features.
Instantiating the DbContext
The first task you need to accomplish when working with the ADO.NET Entity Framework in code is to get an instance of the DbContext class. At the beginning of this chapter you were told to create a new Visual Basic project for the Console, so let’s continue on this path. At module level (or class level, in most common scenarios), declare a variable of type NorthwindEntities that represents our object context as follows:
Private northwindContext As NorthwindEntities
Within the Sub Main (or in the constructor if you work with classes), create the actual instance:
Sub Main()
Try
northwindContext = New NorthwindEntities
Catch ex As SqlClient.SqlException
'Handle a SqlException here...
Catch ex As Exception
'Handle general exceptions here...
End Try
End Sub
Notice how a System.Data.SqlClient.SqlException general exception is handled in case of problems.
Coding Tips on the Object Context
It is usually a good idea to provide a class-level declaration for a variable that holds the instance of the DbContext class, so that the variable can be reached by all code in your class (or classes if the variable is Friend) but also for another reason: you can handle exceptions when creating the actual instance within the code block that performs this action. I do not personally like code examples in which the instance is generated at the class level, but this is just a suggestion.
When you have the object context instance, you can read and write data on your object model.
Adding Entities
Adding entities against an entity data model requires you to pass the instance of the entity to the Add method exposed by the entity set. For example, in our demonstration scenario we have a Products entity set exposing an Add method. The following code shows how you can programmatically create a new product and add it to the object model:
Sub AddProduct(ByVal categoryReference As Category)
Try
Dim check = northwindContext.Products.
Single(Function(p) p.
ProductName = "Italian spaghetti")
Catch ex As InvalidOperationException
Try
Dim prod As New Product
With prod
.ProductName = "Italian spaghetti"
.QuantityPerUnit = "10 packs"
.Discontinued = True
.SupplierID = 4
.UnitPrice = 0.5D
.UnitsInStock = 100
.UnitsOnOrder = 50
.Category = categoryReference
End With
northwindContext.Products.Add (prod)
northwindContext.SaveChanges()
Catch e As Exception
'Exception handling when saving changes
End Try
Catch ex As Exception
'Handle general exceptions here
End Try
End Sub
First, the code checks whether the product already exists based on the specified condition. This is accomplished by invoking the Single extension method. It is something that you already saw in LINQ to SQL and is not discussed thoroughly here. Notice how you set properties for the new product. The custom method receives a Category instance as an argument. This is necessary for setting a one-to-many relationship between the new product and the desired category. Setting the relationship just requires you to assign the Category property with the category instance. When done, you invoke the northwindContext.Products.Add method by passing the new product and then invoke the SaveChanges method for sending changes to the database.
Tracking Changes
Remember that the DbContext instance can keep track of changes during the application lifetime, so its SaveChanges method will persist all pending changes.
In Chapter 24, you saw how to use Visual Studio to inspect the database for checking if changes were correctly submitted to the database. The good news is that the same technique can be also used when working with EDMs.
Deleting Entities
Deleting entities is also a simple task. You first need to get the instance of the entity you want to remove and then invoke the DbSet(Of T).Remove method. The following code shows how to get the instance of the specified product and then to remove it first from the model and then from the database:
Sub DeleteProduct()
Try
Dim check = northwindContext.Products.
Single(Function(p) p.
ProductName = "Italian spaghetti")
northwindContext.Products.Remove(check)
northwindContext.SaveChanges()
'Does not exist
Catch ex As InvalidOperationException
End Try
End Sub
Same as in previous code, we take advantage of the Single method that throws an InvalidOperationException if the object does not exist.
Deleting Entities with Relationships
In this chapter you see simplified examples focusing on the technology. In some situations you need to delete entities with relationships; for example, imagine you have an Order class with associated OrderDetails. When you delete the order, you probably want to remove associated details. To accomplish this, you need to work at the database level and enable it to cascade the deletion. For SQL Server databases, you can accomplish this within SQL Server Management Studio, changing properties for the foreign key related to the relationship.
Updating Entities
Updating entities is a little bit different from adding and deleting in that there is no Update method in either the DbContext or the DbSet classes. You get the instance of the object you want to update, change its properties, and then invoke SaveChanges. The following code demonstrates this:
Sub UpdateProduct()
Try
Dim check = northwindContext.Products.
Single(Function(p) p.
ProductName = "Italian spaghetti")
check.Discontinued = True
check.UnitsInStock = 30
northwindContext.SaveChanges()
'Product does not exist
Catch ex As InvalidOperationException
Catch ex As UpdateException
End Try
End Sub
Just remember to check whether the product exists before trying an update. Notice also how an UpdateException is caught; this is thrown when there is some problem in sending updates to the data source.
Handling Optimistic Concurrency
Of course, the ADO.NET Entity Framework provides the ability to handle optimistic concurrency exceptions. You need to intercept eventual System.Data.Entity.Infrastructure.DbUpdateConcurrencyException instances. When intercepted, you need to determine what entries were not updated in the database by using the Entries property of the exception instance and make an appropriate decision. The following code revisits the UpdateProduct custom method described in the “Updating Entities” subsection, providing the first example:
Sub UpdateProduct()
Try
Dim check = northwindContext.Products.
Single(Function(p) p.
ProductName = "Italian spaghetti")
check.Discontinued = True
check.UnitsInStock = 30
northwindContext.SaveChanges()
'Product does not exist
Catch ex As InvalidOperationException
'Handle optimistic concurrency
Catch ex As DbUpdateConcurrencyException
ex.Entries.Single.Reload()
Catch ex As UpdateException
End Try
End Sub
If an DbUpdateConcurrencyException is thrown, you can invoke the Reload method on the instance of the entity that was not updated and reload original values from the database, overwriting the current entity values. This is the first possible way to solve concurrency blocks and is known as database wins. The second possibility is known as client wins and is the opposite, which means that you can force to overwrite database values with the current entity’s values. This requires a particular technique, which will set the original values for the entity with values from the database.
The following code demonstrates this:
Catch ex As DbUpdateConcurrencyException
Dim entry = ex.Entries.Single
entry.OriginalValues.SetValues(entry.GetDatabaseValues)
The OriginalValues.SetValues method takes an argument of type DbPropertyValues, which is a collection of properties for an entity. The GetDatabaseValues returns a collection of current properties from the database. What you have to keep in mind when working with optimistic concurrency is that you handle the Entries property and retrieve the instance of the entity that could not be updated; of course there are additional techniques that the MSDN documentation describes in more detail at: http://msdn.microsoft.com/en-us/data/jj592904.aspx.
Note About Current and Original Values
When an entity is attached to the object context, the Entity Framework keeps track of two values for each property: The current value that is the current value of the property in the entity. The original value is instead the value that the property had when the entity was queried from the database or attached to the context. The MSDN documentation shows additional ways to work with entity properties at: http://msdn.microsoft.com/en-us/data/jj592677.
Of course, in this book it is not possible to reproduce a real concurrency scenario, but now you know what the main objects are for handling this situation.
Validating Data
Differently from the past, with Entity Framework 5 and the new APIs you no longer need to use partial methods in order to validate the data. Data validation now consists in decorating entities and their properties with some attributes from the System.ComponentModel.DataAnnotations and System.ComponentModel.DataAnnotations.Schema namespaces (from the System.ComponentModel.DataAnnotations.dll assembly). Each attribute provides additional information or validation rules to types. This is not new: if you have developed Silverlight applications with WCF RIA Services in the past, you used data annotations frequently. The following code demonstrates how to add some validation rules to the Product entity using data annotations:
Imports System.ComponentModel.DataAnnotations
Partial Public Class Product
Public Property ProductID As Integer
'The product name length must be at least 5 and no more than 15 characters
'A custom error message is provided
<StringLength(15, ErrorMessage:="String length not within the expected range",
ErrorMessageResourceName:=Nothing,
ErrorMessageResourceType:=Nothing,
MinimumLength:=5)> Public Property ProductName As String
<Required> Public Property SupplierID As Nullable(Of Integer)
Public Property CategoryID As Nullable(Of Integer)
'QuantityPerUnit is now a mandatory field, minimum length is 4
<Required>Public Property QuantityPerUnit As String
Public Property UnitPrice As Nullable(Of Decimal)
Public Property UnitsInStock As Nullable(Of Short)
Public Property UnitsOnOrder As Nullable(Of Short)
Public Property ReorderLevel As Nullable(Of Short)
Public Property Discontinued As Boolean
Public Overridable Property Category As Category
End Class
The Required attribute marks a property as mandatory, so the user must supply a value for it. The StringLength attribute allows specifying a minimum and a maximum length for a string, including a custom error message and resources. Notice that all values are optional except the first argument, which is the maximum length. Useful attributes are also MaxLength and MinLength which instead determine the maximum and the minimum length of an array of String respectively. The validation mechanism can run in two ways. The first way is automatic and is when the runtime executes the DbContext.SaveChanges method. This causes the runtime to check if an entity adheres to validation rules; If not, a DbEntityValidationException is thrown. The second way is checking for validation errors programmatically, before attempting to save changes. You can check for all validation errors in the current object context, or you can check a single entity or a single property. The following code demonstrates how to check for any validation errors in the model instance by invoking the DbContext.GetValidationErrors method:
If northwindContext.GetValidationErrors.Any Then
'There is at least one validation error
End If
This method returns a collection of DbEntityValidationResult objects, each containing detailed information on the error. You can also validate a single entity on demand, by invoking the DbEntityEntry.GetValidationResult method on the specified entity like in the following code:
'Validate an entity
Dim result As DbEntityValidationResult = _
northwindContext.Entry(prod).GetValidationResult
For Each validationError In result.ValidationErrors
Console.WriteLine("Property {0} raised the following message: {1}",
validationError.PropertyName,
validationError.ErrorMessage)
Next
The method returns an object of type DbEntityValidationResult, whose ValidationErrors property contains a list of validation errors pending on the specified entity instance. Notice that such an instance must be attached to the current context. Each error is represented by an instance of the DbValidationError class, which exposes two properties: PropertyName and ErrorMessage; the first property stores the name of the entity property that raised the validation error, whereas the second one contains a descriptive error message. Finally you can validate a single property of an entity, like in the following example:
'Validate a single property
Dim productNameProperty As DbPropertyEntry = _
northwindContext.Entry(prod).Property(Function(p) p.ProductName)
For Each validationError In productNameProperty.GetValidationErrors
Console.WriteLine("Property {0} raised the following message: {1}",
validationError.PropertyName,
validationError.ErrorMessage)
Next
You first retrieve the property you want to validate via the DbEntityEntry.Property method. You need to pass the property name you want to validate and this can be done by passing the property name as a string or via a lambda expression, like in the above code, which takes advantage of the background compiler and IntelliSense to determine the property name correctly. GetValidationErrors and its results remain the same as in the previous example. Actually the System.ComponentModel.DataAnnotations namespace provides additional attributes that are instead useful when using the Code First approach to create the model and to generate the database. These are discussed in the section called “Using Data Annotations” later in this chapter.
Querying EDMs with LINQ to Entities
LINQ to Entities is the standard LINQ provider for querying entities within an Entity Data Model. You use the same LINQ syntax for querying entities, too, so you will not encounter particular difficulties.
Using Standard Query Operators
LINQ to Entities supports standard query operators described in Chapter 23, “LINQ to Objects,” to perform complex query expressions.
The one big difference is about eager loading, which is explained after showing the code. As in LINQ to SQL, LINQ to Entities queries return an IQueryable(Of T), unless you convert the result into a different type using extension methods at the end of the query. The following code returns the list of products for the specified category, taking only those products that are not discontinued and sorting the result by unit price:
Sub LINQtoEntitiesDemo(ByVal CategoryName As String)
Dim query = From prod In northwindContext.Products.
Include("Category")
Where prod.Category.CategoryName = CategoryName _
And prod.Discontinued = False
Order By prod.UnitPrice
Select prod
Console.WriteLine("Category: {0}",
CategoryName)
For Each prod In query
Console.WriteLine("Product name: {0}, Unit price: {1:c}",
prod.ProductName, prod.UnitPrice)
Next
End Sub
As you can see, the LINQ syntax works similarly to other LINQ providers except that here the Include method has been invoked on the entity set instance. This method requires an argument of type String, which is the name of the navigation property mapped to the entity being queried—that is, the name of the entity set with which the queried entity has a relationship. Include performs that technique known as eager loading that enables you to load related entities. This is necessary if you want to perform comparisons as in the preceding example, where an evaluation must be done on the category name to which the current product belongs. In other words, if you do not invoke Include, you will have available only Products information but not Categories information while you need this to perform the comparison. You can take advantage of standard query operators described in Chapter 23 to accomplish complex LINQ queries against entities as well. You can also use iterators for efficient code in long running query operations. For instance, you can rewrite the last code example as follows:
Sub LINQtoEntitiesDemo(ByVal CategoryName As String)
Console.WriteLine("Category: {0}",
CategoryName)
For Each prod In GetProducts(CategoryName)
Console.WriteLine("Product name: {0}, Unit price: {1:c}",
prod.ProductName, prod.UnitPrice)
Next
End Sub
Iterator Function GetProducts(categoryName As String) As IEnumerable(Of Product)
Dim query = From prod In northwindContext.Products.
Include("Category")
Where prod.Category.CategoryName = categoryName _
And prod.Discontinued = False
Order By prod.UnitPrice
Select prod
For Each prod In query
Yield prod
Next
End Function
Querying EDMs with Entity SQL
LINQ to Entities is not the only way to query data exposed by EDMs. An important alternative named Entity SQL enables you to query entity data models by providing both the ability to send SQL instructions to the data source and to treat query results as managed entities. To accomplish this, the DbSet class exposes a method named SqlQuery that queries the EDM via the specified set of SQL instructions. The following example shows how you can retrieve a list of products for the Grains/Cereals category in Northwind, sorting the result by the product name:
Sub EntitySQLDemo()
Try
Dim grainProducts = northwindContext.Products.
SqlQuery("SELECT * FROM PRODUCTS WHERE " & _
"CATEGORYID='5' ORDER BY PRODUCTNAME")
Catch ex As EntitySqlException
Console.WriteLine("An error occurred in column: {0}",
ex.Column.ToString)
Catch ex As Exception
Console.WriteLine(ex.ToString)
End Try
End Sub
SqlQuery returns a DbSqlQuery object that represents a strongly typed query against entities. As with any other LINQ query, Entity SQL queries are executed when they are effectively used, for example in For..Each loops, when converting to collections. By default, entities returned by the method are tracked by the instance of the DbContext class. You can change this by invoking the AsNoTracking method on the returned collection.
Mapping Stored Procedures
The Entity Framework enables you to import stored procedures from a SQL Server database into the object model and Visual Studio 2012 makes thing easier than its predecessor. In this section you learn to add stored procedure mappings to the entity data model. To accomplish this, first open the Visual Studio designer by double-clicking the Northwind.edmx file in Solution Explorer. When ready, right-click the designer and select the Update Model from Database command. This launches again the wizard that enables you to select database objects not included yet in the entity data model. Now, expand the Stored Procedures item and select the Ten Most Expensive Products stored procedure, as shown in Figure 26.13.
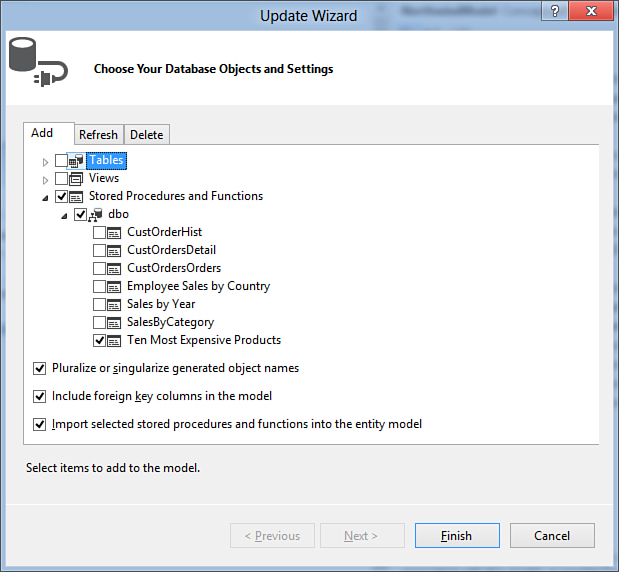
Figure 26.13. Adding a stored procedure to the EDM.
You can follow these steps to add database objects to the EDM if you did not do it before. This operation provides mappings for the stored procedure. The mapping lets the stored procedure to be mapped into a .NET method that returns a value; therefore, you need to know which kind of value such methods must return. To accomplish this, open either the Server Explorer or the SQL Server Object Explorer tool window, expand the Northwind database structure, and then expand the Stored Procedures folder (if you use the SQL Object Explorer this folder is under Programmability); finally double-click the Ten Most Expensive Products stored procedure. Now the Visual Studio 2012 IDE shows the SQL instructions for the previously selected stored procedure, as shown in Figure 26.14.
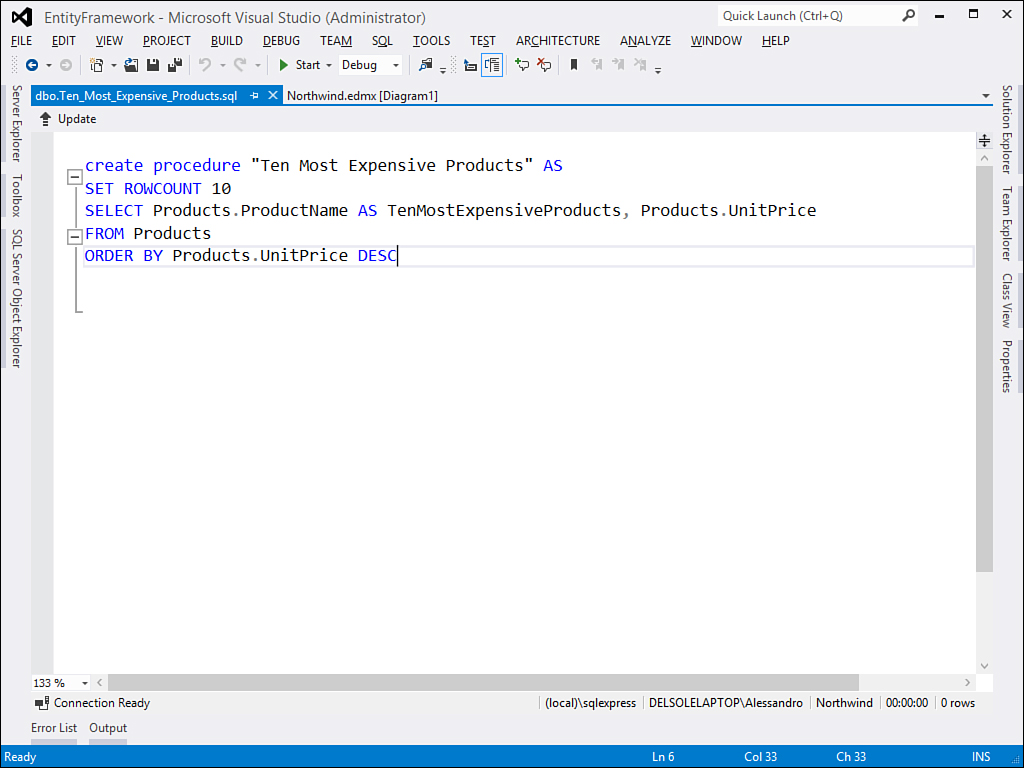
Figure 26.14. Examining SQL instructions for the stored procedure.
Script Files
When Visual Studio shows SQL code for database objects, it also generates a .sql script file that can be saved for your later reuse. The SQL code editor points in fact to a newly generated script file that contains the code you see on screen.
Examining the SQL code, you can see that the stored procedure returns a list of product names. Now switch back to the EDM designer so that the Model Browser tool window becomes active. Inside the window expand the NorthwindModel, Function Imports item. You will notice the presence of an element called Ten_Most_Expensive_Product (see Figure 26.15 for a reference). This is nothing but a .NET method that Visual Studio 2012 has automatically generated to map the requested stored procedure. Because it is a method that returns a set of records, it must also have a return type. Visual Studio 2012 automatically generated a complex type (which means neither a scalar type like String, Integer, and so on, nor an entity type like Product or Category, but a specific type that includes information from specific columns) called Ten_Most_Expensive_Product_Result, as you can see by expanding the NorthwindModel, Complex Types node in the Model Browser (see Figure 26.15).
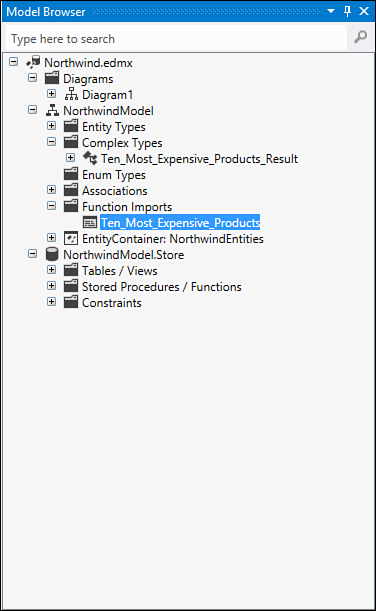
Figure 26.15. The method mapping the stored procedure and its return type.
The Ten_Most_Expensive_Products_Result complex type is a class exposing two autogenerated properties, one called TenMostExpensiveProducts of type String that stores the product name and one called UnitPrice of type Nullable(Of Decimal). You are now ready to invoke your stored procedure as a .NET method being part of the entity data model, exposed by the NorthwindEntities class. For example, if you want to retrieve the list of the ten most-expensive products, you can write something like this:
For Each prod In northwindContext.Ten_Most_Expensive_Products
'Print the names of the ten most expensive products
Console.WriteLine(prod.TenMostExpensiveProducts)
Next
Behind the scenes, mapping a stored procedure is something that Visual Basic accomplishes by adding the following invocation to the ExecuteFunction(Of T) method to the NorthwindEntities class definition:
Public Overridable Function Ten_Most_Expensive_Products() As _
ObjectResult(Of Ten_Most_Expensive_Products_Result)
Return DirectCast(Me, IObjectContextAdapter).
ObjectContext.ExecuteFunction(Of Ten_Most_Expensive_Products_Result) _
("Ten_Most_Expensive_Products")
End Function
By completing this, you have the basic knowledge for working with the ADO.NET Entity Framework; you can learn more from the MSDN documentation.
Modifying Auto-Generated Function Imports and Complex Types
You might want to make some edits over autogenerated function imports or complex types. In the Model Browser window you can right-click the function import name (such as Ten_Most_Expensive_Products of the current example) and then select Properties in the pop-up menu. The Properties window will provide an opportunity of changing the function name and of editing the complex type as well, by clicking the buttons with three dots near the Return Type property. This enables the Edit Function Import dialog box, where you can rename the function and assign a new complex type as the return type. To accomplish this, you first need to click Get Column Information and then Create New Complex Type.
Introducing the Code First Approach
So far, you have seen how the Entity Framework enables you to create applications that access data based on a model-centric approach, in which an abstraction layer enables you to map to .NET objects an existing database (Database First), via convenient tools and designers. Back in Visual Studio 2010, Microsoft also introduced the so-called Model First approach, which enables you to generate an empty model without having a database; here you design your entities and associations in the Entity Framework designer and can finally generate a database with the Generate Database from Model command that is available when you right-click the designer. You can easily experiment with Model First on your own by selecting the Empty Model option when adding a new Entity Data Model. Both approaches are well made and can take advantage of a convenient designer, but they have the following limitations:
• Database First requires an existing database. You can still model your entities in the designer, but you must be sure of the perfect correspondence between a managed environment (the Entity Framework) and the data store (SQL Server).
• Model First enables you to model your entities in a convenient designer, but this can be difficult and tiring when the model gets complex.
• Both have dependencies on the EDMX file.
To make things faster and to avoid dependencies, Microsoft introduced a new approach called Code First with Entity Framework 4.3.1 and that is still available in version 5—the one that we discuss in this chapter. As its name implies, with Code First you model your data only writing code; the IntelliSense and the power of the Visual Studio’s code editor will help you write your entities quickly and all the power of the Entity Framework will remain unchanged. Before providing some examples, it is necessary to install some components.
Downloading Additions to the Entity Framework 5
The .NET Framework 4.5 includes Entity Framework 5, and Visual Studio 2012 provides support for this version. At the time this chapter was written, the core of the Entity Framework 5 is included in the .NET Framework but some additions like Code First are not included by default, so you need to download specific packages from the Internet. Such additions are available via NuGet, the famous library manager included in Visual Studio 2012 that enables you to download libraries and all the necessary dependencies. The requirement is for you to have a project before downloading required libraries, so first create a new Console application called CodeFirst. Then follow these steps:
1. Select Project, Manage NuGet Packages.
2. When the Manage NuGet Packages dialog box appears (see Figure 26.16), select the Online node on the left.
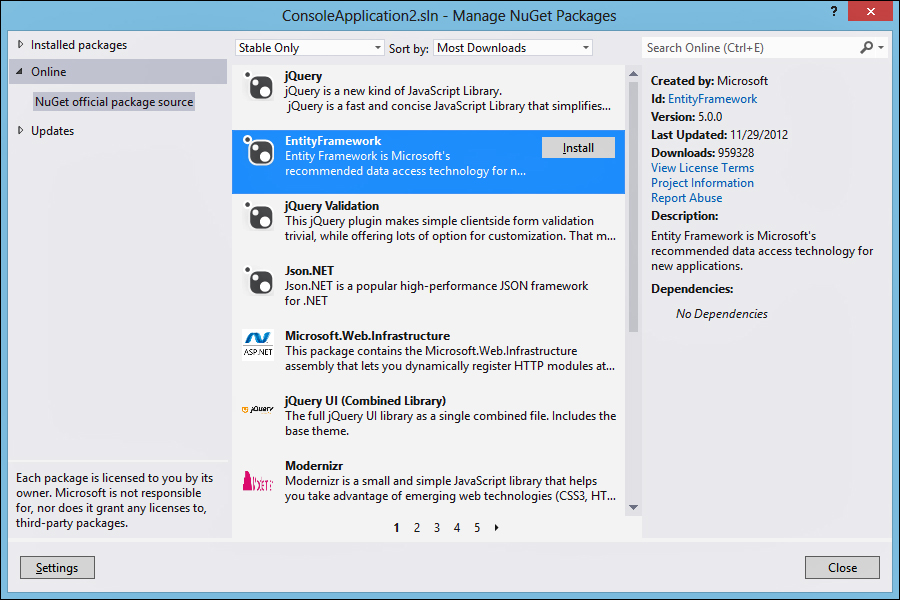
Figure 26.16. Searching for Entity Framework 5 additions with NuGet.
3. In the search box in the upper-right corner, type Entity Framework 5.
4. When the Entity Framework 5 package appears in the list, click Install and accept the license agreement when the download completes.
At this point, Visual Studio 2012 adds a reference to a new assembly called EntityFramework.dll assembly, as you can easily verify in Solution Explorer. Now that you have set up the environment, you are ready to start with Code First.
Automatic References with Entity Data Models
When you create an EDM, like in the first part of this chapter, Visual Studio automatically adds a reference to the NuGet package for the Entity Framework. This can be easily demonstrated by enabling the View All Files view in Solution Explorer and inspecting the References folder. In all other cases, you will need to add the reference manually, like in the current example.
Coding Your Model
As you learned previously, with the Code First approach you define entities and associations in code. Let’s provide a simple example, in which we implement business objects like an Author class and a Book class representing two entities. Listing 26.6 shows how to define both entities.
Listing 26.6. Coding Two Entities in Code First
Public Class Author
Public Property AuthorId As Integer
Public Property FirstName As String
Public Property LastName As String
Public Property Books As ICollection(Of Book)
End Class
Public Class Book
Public Property BookId As Integer
Public Property Title As String
Public Property Author As Author
Public Property ISBN As String
Public Property Price As Decimal
End Class
There is nothing difficult in Listing 26.6 because it is a normal class definition and you are probably now remembering the definition of the Product and Category classes generated by Visual Studio in the example about the Northwind database. Notice how the Author class exposes a Books property of type ICollection(Of Book). The ICollection(Of T) type is typical in Code First to represent a navigation property for the “many” part of a one-to-many relationship. In this example, we are in fact simulating a one-to-many relationship in which an author has multiple books. In real-world applications, you should implement a many-to-many relationship for a scenario like this (because multiple authors can write many books), but for making it easier to understand how Code First works, a one-to-many is enough. The next step is defining a context class. In Code First, you still have the System.Data.Entity.DbContext class described previously. So you have to define a class that inherits from DbContext like the following:
Public Class BookStoreContext
Inherits DbContext
Public Property Books As DbSet(Of Book)
Public Property Authors As DbSet(Of Author)
End Class
The BookStoreContext class inherits from DbContext all the necessary infrastructure for working with data, plus it exposes two properties of type DbSet(Of T), each representing a collection of entities as defined in Listing 26.6. So now you have a basic model definition (that will be extended later). Before using the model and entities, you need to supply a connection string to the database. Because Code First’s main goal is simplicity, the connection string must be supplied in the simplest form possible. The new connection string must be added in the ConnectionStrings section of the application configuration file, so open App.config in the code editor (when adding the Entity Framework package, Visual Studio 2012 automatically adds the configuration file if not found). By convention, the name of the new connection string should match the name of the context class—in our example BookStoreContext. This is not mandatory but is a good practice. The following code demonstrates how to specify a connection string:
<connectionStrings>
<add name="BookStoreContext"
connectionString="data source=SERVERNAME;
initial catalog=BookStoreDatabase;Integrated Security=SSPI"
providerName="System.Data.SqlClient" />
</connectionStrings>
Inside the connectionString attribute, you must first specify the server name (which can be a local engine like LocalDB or SQL Express or a production server) and the name of the database that will be used, in this case BookStoreDatabase. Both the model and the connection string are ready, so you can now perform operations against data.
Generating the Database and Executing Data Operations
So far, you have created your data model in code, but you do not have a database yet. The power of Code First is that the Entity Framework checks whether the database exists and, if not, it automatically creates one for you with the name specified in the connection string, without writing a single line of code. After the database is ready, data operations can be performed. The goal is now to generate some Author and Book entities and populate the database. This is an Insert operation. The DbSet(Of T) class is a collection, and therefore it exposes Add and Remove methods for adding and removing entity instances—that is, data into and from the database. You will use the same techniques learned previously with EDMs. Listing 26.7 demonstrates how to add a new author and two books per that author; finally the code demonstrates how you still use LINQ to Entities for querying the data model.
Listing 26.7. Querying the Model and Executing Insert Operations
Sub Main()
Using db As New BookStoreContext
Dim _author As New Author With {.FirstName = "Alessandro",
.LastName = "Del Sole"}
db.Authors.Add(_author)
Dim LSBook As New Book With {.Title = "Visual Basic LightSwitch Unleashed",
.Author = _author,
.ISBN = "978-0672335532",
.Price = 31.49D}
db.Books.Add(LSBook)
Dim VB2010Book As New Book With {.Title = "Visual Basic Basic " _
+ " 2010 Unleashed",
.Author = _author,
.ISBN = " 978-0672331008",
.Price = 31.49D}
db.Books.Add(VB2010Book)
db.SaveChanges()
Dim authorInstance = db.Authors.
Single(Function(a) a.LastName = "Del Sole")
Console.WriteLine(authorInstance.FirstName + " " + authorInstance.LastName)
For Each item In authorInstance.Books
Console.WriteLine(" published ""{0}"", ISBN: {1}",
item.Title,
item.ISBN)
Next
End Using
Console.ReadLine()
End Sub
You can notice in Listing 26.7 how you perform Insert operations by generating new entity instances and sending such instances to the model with the Add method of the desired collection. In this particular example, we use the Single extension method to retrieve the specified Author instance and then iterate the Books collection. If you run the code, you will get the result shown in Figure 26.17.
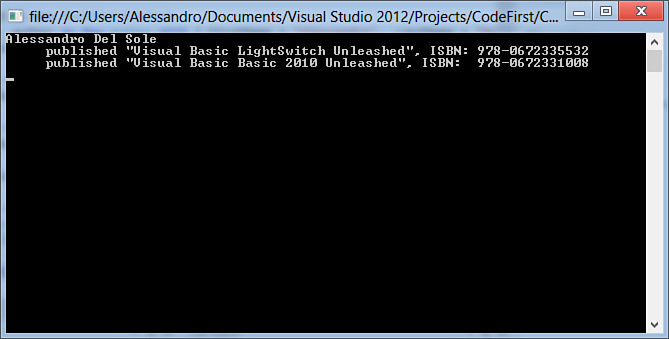
Figure 26.17. Adding and querying data against the database.
It is really interesting to see how data has been sent somewhere, even if we did not create a database. As you were told previously, the Entity Framework created the database for you at the moment in which the code started and determined that the database did not exist yet. You can either use Server Explorer or SQL Server Object Explorer to see how the database was created and attached to the instance of the server that was specified in the connection string. Figure 26.18 shows how the database appears in SQL Server Object Explorer.
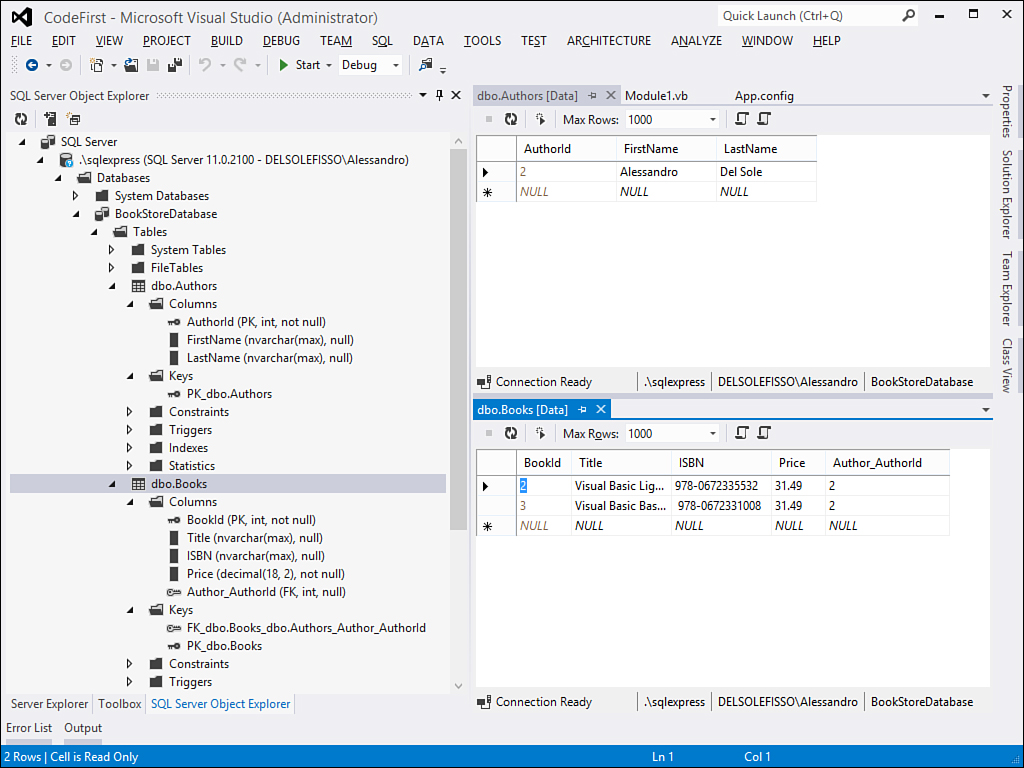
Figure 26.18. The structure of the autogenerated database, with data.
If you expand the structure of the database, you can see how Books and Authors tables have been created based on our Code First approach, including columns and keys for relationships. You can also show the tables’ content (see Figure 26.18) to demonstrate that the code has sent data to the database correctly.
The Magic of Conventions
You might wonder how Entity Framework was also capable of generating primary keys if we did not decorate the code in any manner. The Author entity has an AuthorId property, and the Book entity has a BookId property, both property names contain the Id suffix. By convention, EF 5 considers an entity property named Id or containing the Id suffix or prefix as the primary key. Similarly, EF behaves for foreign keys. The relationship between Author and Books is defined via an ICollection object whose generic type is an entity. Based on this, it generates the appropriate keys.
You have seen how convenient the Code First approach is for working with data, but it has some limitations as it is. For example, you cannot specify some primary validation rules or you cannot customize the mapping to meet specific database requirements. Fortunately, the EF 5 provides two ways to make this possible: Data Annotations and the Fluent APIs.
Introducing Data Annotations
Data Annotations consists in decorating entities and their properties with some attributes from the System.ComponentModel.DataAnnotations and System.ComponentModel.DataAnnotations.Schema namespaces (from the System.ComponentModel.DataAnnotations.dll assembly). You already saw a particular usage of data annotations when talking about data validation previously, but you can also provide additional information to types, not just validation rules. The following code demonstrates how to rewrite the Book entity using data annotations:
<Table("OneBook")>
Public Class Book
'Primary key
<Key> Public Property BookNumber As Integer
'Forced to be mandatory,
'minimum length is 20 characters,
'maximum length is 150
<Required> <MinLength(20)> <StringLength(150)>
Public Property Title As String
'Determine the name of the foreign key
'for the relationship
<ForeignKey("Books_Author")> Public Property Author As Author
'Force the type in SQL Server to be 'char(10)'
<Column(TypeName:="char"), StringLength(10)> Public Property ISBN As String
'Force the type in SQL Server to be 'money'
<Column(TypeName:="money")> Public Property Price As Decimal
End Class
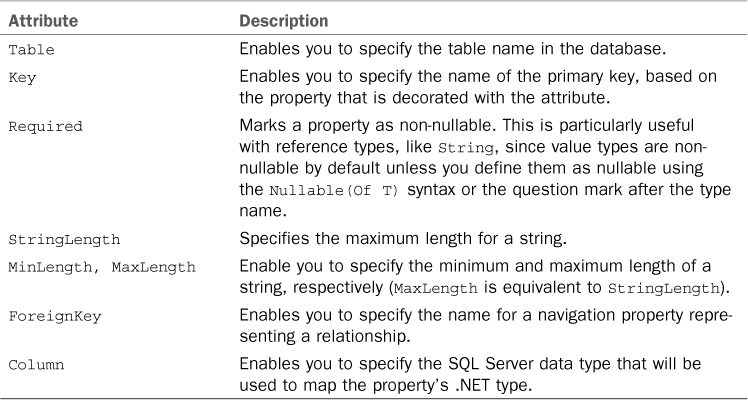
By reading the comments in the code, you can understand how attributes enable you to better customizations over the model and, consequently, over the database. For instance, using the Table attribute to mark the class will cause the database to contain a table called OneBook instead of Book, but in your code you will still use Book. The Key attribute marks a property as a primary key and is useful if you do not want to use a conventional name (that is, containing the Id literal). It is worth mentioning that you can force the mapping of a .NET type into a SQL type in the data store by using the Column attribute and then specifying the SQL type, like for ISBN and Price properties in the previous code. Table 26.2 summarizes the most common data annotations attributes.
Table 26.2. Data Annotations Attributes
Using Data Annotations will not change the way the EF 5 checks for the database existence and creation if not found. Data Annotations are very useful but rely on a huge amount of attributes. You have an alternative for manipulating entities without using attributes, based on the Fluent APIs.
Handling Changes on the Database Schema
If you use the Code First approach and let the Entity Framework generate the database for you the first time you run the code that defines your model, the next time you make edits to your model you might also need to re-create your database. This is a common situation at development time and of course should never occur with production data. The reason is that the database schema could no longer match the model in some situations like adding/removing relationships, changing table definitions, and so on. In fact it might happen that you encounter an InvalidOperationException if you attempt to let EF 5 access the database after breaking changes in your model, which means you need to re-create the database. You can delete the database manually—for example, using Server Explorer or SQL Server Object Explorer in Visual Studio 2012—but you can also take advantage of the Database class that Entity Framework provides to decide in code how and when the database should be re-created. You have two options. The first option is re-creating the database every time you run the code; the second option is re-creating the database only when some differences exist between the database and classes that constitute the model. To accomplish this, you use the Database.SetInitializer shared method. The following code snippet demonstrates both options:
'Recreate the database only in case of changes
'between the model and the database schema
Database.SetInitializer(New DropCreateDatabaseIfModelChanges(Of BookStoreContext))
'Always recreate the database
Database.SetInitializer(New DropCreateDatabaseAlways(Of BookStoreContext))
The method’s parameter can be either a new instance of the DropCreateDatabaseIfModelChanges class or a new instance of the DropCreateDatabaseAlways class. Both are generic classes, and the type parameter is the name of the context class.
The line of code that establishes how to re-create the database must come before the initialization of the context class. Remember to remove the line of code when the application goes to production. There is another class called CreateDatabaseIfNotExists, which is the default behavior and that you can omit.
Code First Migrations
The ADO.NET Entity Framework Team at Microsoft realized that making changes on the model and then sending those changes to the database schema is in most cases a complex task. For this reason, they are offering a migration mechanism called Code First Migrations that is available via NuGet and that is explained in the MSDN Library at the following page: http://msdn.microsoft.com/en-US/data/jj591621 http://msdn.microsoft.com/en-us/library/hh770484(v=vs.110).aspx
Introducing the Fluent APIs
There is an interesting alternative for customizing the model mapping in code, based on the Fluent APIs. As the name implies, this technique enables customizations only writing fluent code, without additional attributes or external mapping files. To use the Fluent APIs, you need to override the OnModelCreating method in the context class and, inside the method body, apply edits via lambda expressions. The following code demonstrates how to rewrite the Book class using fluent code:
Public Class BookStoreContext
Inherits DbContext
Public Property Books As DbSet(Of Book)
Public Property Authors As DbSet(Of Author)
Protected Overrides Sub OnModelCreating(modelBuilder As DbModelBuilder)
'Define the primary key
modelBuilder.Entity(Of Book).HasKey(Function(b) b.BookNumber)
'Define a one-to-many relationship
modelBuilder.Entity(Of Book).HasRequired(Function(b) b.Author).WithMany()
modelBuilder.Entity(Of Book)() _
.Property(Function(b) b.Title).
IsRequired.HasMaxLength(150)
modelBuilder.Entity(Of Book)() _
.Property(Function(b) b.ISBN).HasColumnType("char").
HasMaxLength(10).IsFixedLength()
modelBuilder.Entity(Of Book)() _
.Property(Function(b) b.Price).
HasColumnType("money")
End Sub
End Class
Following is a list of interesting notes:
• The method’s argument is an instance of the DbModelBuilder class, which is responsible to translate .NET code into a database schema.
• The generic Entity(Of T) method of the DbModelBuilder class takes the entity you want to edit as the type parameter.
• Entity(Of T) exposes a method called Property, whose argument is a lambda expression in which you specify the entity property you want to edit.
• You can set the primary key using the HasKey method, passing to the lambda expression the property that you want to be the primary key.
• You can set foreign keys using the HasRequired method, passing to the lambda expression the type that you want to be the other part of the relationship. You specify WithMany to create a one-to-many relationship (see the previous example).
• You can use multiple mapping methods over the specified properties, method names are self-explanatory, and IntelliSense helps you choose the appropriate methods.
The same rules for the database recreation apply to the Fluent APIs.
Additional Fluent Methods
Because the goal of the Fluent APIs is making it possible to write cleaner code, the Entity Framework provides specific members that make data manipulation easier. All members are exposed by the DbSet(Of T) class. The Find method enables you to retrieve the specific entity instance based on its primary key:
Dim anAuthor = db.Authors.Find(1)
The Local property enables you to work against in-memory data, which is the data currently stored in the model (except for those objects marked for deletion) without querying the database again:
Dim myBooks = From aBook In db.Books.Local
Select aBook
Order By aBook.Price Descending
The Include method, that you saw against EDMs, in Code First offers a generic implementation so that you no longer need to type the name of the entity. You use it with a lambda expression like this:
Dim myBooks = db.Authors.Include(Function(b) b.Books)
Finally, the Load extension method immediately executes a query against the database, avoiding the deferred execution. This is the equivalent of writing code to use a query at least once to make its result available. You use it like this:
db.Authors.Load()
All these members provide additional efficient ways to work with data in the Code First approach. You can also use the Object Browser and IntelliSense to see other members exposed by the DbContext and DbSet classes, and you will discover that most of them have a similar behavior of counterparts exposed by ObjectContext and ObjectSet classes that you met when talking about Entity Data Models. This makes migrating from one approach to another definitely easier.
More About Code First in Entity Framework
This chapter provided an overview of Code First, so you might want to check out the Data Developer Center at http://msdn.microsoft.com/en-us/data/aa937723, where you can find additional information and learning resources about Entity Framework and related development techniques. Also, the Entity Framework team at Microsoft has released a free extension for Visual Studio 2012 called Entity Framework Power Tools, which adds design-time functionalities for generating DbContext classes. At the time in which this chapter is being written, it is available for C# only and as a beta, but you can check out the following page for future updates: http://visualstudiogallery.msdn.microsoft.com/72a60b14-1581-4b9b-89f2-846072eff19d
Compatibility with the Past and with Other Technologies
Before .NET 4.5 and Visual Studio 2012, Entity Data Models were generated with a different code generation strategy, so the context class and entities were very different and more complex if compared to the result that you get now with the new APIs. However, the previous code generation strategy and the related APIs have not been deprecated, so not only can they be a good alternative, but also they are required in specific scenarios. So it is a good idea to summarize the most important points in the previous code generation strategy:
• The context class is System.Data.Objects.ObjectContext(Of T) and the constructor allows specifying a connection string in code other than in the configuration file.
• Collection of entities are represented by the System.Data.Objects.ObjectSet(Of T) class.
• Classes defining entities are much more complex because of a number of attributes used for mapping database objects.
• Adding and removing items in a collection is performed via the AddObject and DeleteObject from the ObjectSet(Of T) class.
• Optimistic concurrency is handled by intercepting the System.Data.OptimisticConcurrencyException.
• Data validation is performed via partial methods declared in the entity definition.
• The .edmx had only one Visual Basic code file related, whose name finishes with .designer.vb.
It is not the goal of this chapter to provide a full explanation of the aforementioned objects, because the goal is instead introducing the new APIs, but it is very important to know that you can still convert Entity Data Models generated with the new code generation strategy so that they can use the old approach. To accomplish this, follow these steps:
1. Open the Entity Framework designer in Visual Studio 2012.
2. Right-click the designer and select Properties.
3. Change the value of the Code Generation Strategy property from None to Default.
4. In Solution Explorer, remove both the .tt files under the .edmx file.
5. Save and recompile the project.
By doing so you will be able to use the old code generation strategy and, consequently, the old APIs. The reason why this is useful is that not all of the platforms shipping with the .NET Framework 4.5 support the DbContext class. As an example, WCF RIA Services still need to use the ObjectContext class, as also shown in Chapter 36, “Building Rich Internet Applications with Silverlight 5.”
Summary
In this chapter you got a high-level overview of ADO.NET Entity Framework in .NET 4.5, also known as EF 5. Entity Framework is a modern data platform providing a high abstraction layer from the database that enables you to work with a conceptual model instead of working directly with the data source. Database objects are mapped to the .NET equivalent into an Entity Data Model object model. Entities are a key concept in the EF and are classes representing database tables, as much as scalar properties represent tables’ columns and navigation properties represent relationship. The DbContext class is responsible for managing the EDM lifetime, including the execution of Insert/Update/Delete operations that can be performed by invoking specific methods from entities. Querying data is instead accomplished via LINQ to Entities, a specific LINQ provider for the EF, and Entity SQL. You also saw how Visual Studio 2012 makes it easier to map stored procedures to the object model. Finally, you got started with the new Code First approach, which requires you to write some more code but which also enables you to maintain code cleaner and provides more controls over the generated data model.