5
Shooting Webcam Videos
There are three ways to record a video for YouTube. If you have a big budget, you can go with a professional recording, complete with lights, sound, professional-grade video cameras, and the like. If that’s outside your budget, and it probably is, you can record with a consumer-grade camcorder. And if even that sounds pricey to you, you can record your videos with a standard computer webcam.
In fact, recording YouTube videos with a webcam has some benefits, chief among them the immediacy and flexibility that come from the format. And it’s a low cost solution: You can purchase a webcam for as little as $30.
Should you record your business videos with a webcam? And if so, how do you do it? That’s what we cover in this chapter.
Understanding Webcam Video
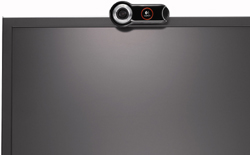
A webcam is a small camera, typically with an accompanying miniature microphone, which attaches to any computer via USB port. As you can see in Figure 5.1, most webcams fit on top of your monitor screen; some notebook PCs come with a webcam built in.
Figure 5.1 Logitech’s QuickCam Pro 9000 webcam, mounted on top of an LCD monitor.
Given the webcam’s small footprint, it is a relatively unobtrusive way to shoot YouTube videos. Also, when attached to a notebook PC operating on battery power, a webcam lets you shoot videos just about anywhere—a truly portable solution.
Webcams, however, do not produce the highest-quality video and audio. Typical lower-priced webcams shoot video at a resolution of 640×480, but with a lower-quality lens that neither works well in darkened conditions nor reproduces especially sharp images. Higher-priced webcams, such as Logitech’s QuickCam Pro 9000, can capture images at 1600×1200 high definition resolution, and also include a higher-quality lens. Still, if you want broadcast-quality video, a webcam is the least satisfactory of the three different shooting options.
The audio you get with a webcam is not the best either. In most instances, you’ll be speaking into a small microphone embedded within the webcam itself; the farther away you are from the webcam, the less clear your voice recording will come out. (Some webcams include a separate clip-on microphone, for just this reason.) And, let’s be honest, this isn’t studio-quality audio here; webcam audio is barely satisfactory for voice, and not for much of anything else.
With that said, the lower-quality picture and sound inherent in webcam capture lends your webcam videos a sense of immediacy; the effect is one of raw, “you are there,” citizen journalism. The effect is also one of directness, a one-on-one communication between the speaker and the viewer, with little in the way of fancy production in between.
Figure 5.2 shows a screenshot from a webcam video I shot in my local coffeehouse. As you can see, the raw nature of the webcam makes for a personal effect. As you can also see, shooting with a webcam puts you at the mercy of your environment; in this instance, a bright side light coming from a nearby window. You might not have this problem when you’re shooting in your office, but it is something to watch out for when shooting on the go.
Figure 5.2 A webcam video shot “in the field” at a local coffeehouse.

Webcams can capture video and audio to your hard drive, typically in AVI (Audio Video Interleave) file format, using the software that comes with most webcam packages. Webcams can also stream live video over the Internet, which is common when using the webcam to chat via instant messaging or in chat rooms—but is also useful when you want to upload videos directly from your webcam to YouTube, a process we discuss later in this chapter.
When a Webcam Makes Sense
So, when might you want to shoot your business videos with a webcam? Let’s look at some of the different types of videos that benefit from webcam capture.
Creating a Video Blog
The most common use of webcam video is in the creation of video blogs or vlogs. Think of a video blog as a video version of a traditional text blog—an opportunity for you or someone from your company to offer regular personal insights into business trends and events.
With a video blog, the low-quality immediacy of a webcam works to your advantage. If you shoot a vlog in a professional recording studio, the result is often too slick for the viewer to take seriously. You almost need the nonprofessional nature of a webcam to give your vlog legitimacy.
In addition, if you’re vlogging on a frequent basis, it’s a lot easier to plug in a webcam than it is to set up a camcorder, lights, and an external microphone. When you have something to say, just plug in, turn on, and start talking. The ease-of-use alone should encourage more frequent vlogging—which is a good thing.
Reporting from the Road or Special Events
A webcam is essential when you’re traveling and still need to contribute to your company’s vlog or YouTube videos. It doesn’t matter where you are; all you need is a webcam and a notebook computer, and you’re good to go.
This makes sense, of course, if you’re a traveling salesperson or an executive with a busy travel schedule. It’s also great when you’re attending special events: trade shows, conferences, seminars, and the like. With your webcam and notebook PC in tow, you can contribute up-to-the-minute reporting from just about anywhere, including the convention floor or conference room. Your equipment does not limit you at all.
Responding to Immediate Issues
In the unfortunate event of a serious event hitting your company, you can immediately address the issue with the use of a quick-and-dirty webcam video. When disaster strikes, you want to get in front of the issue and minimize the bad PR. What better way than a personal response from the company president, recorded live to webcam?
This is another instance where a professionally produced video would be counterproductive. It would appear too impersonal and take too long to create. You can create a webcam video a lot faster, and the results speak more directly to interested viewers.
Capturing Customer Testimonials
Finally, if you’re using customer testimonials as part of your online marketing mix, there’s no better way to capture those testimonials than via webcam. First, you get the immediacy effect; your customers will appear more “real” on webcam than they might in a studio. Second, it’s an inexpensive approach because customers can create their own videos! Just send them a complimentary webcam, have one of your tech support folks talk them through installation and operation, and let your customers shoot themselves at their convenience. Instead of laying out tens of thousands of dollars in travel expenses and professional video production, you’re out about a hundred bucks for a webcam. What’s not to like?
Tips for Shooting an Effective Webcam Video
If you decide to use webcam video as part of your YouTube video mix, how do you best take advantage of the medium? In other words, how do you make the best-looking and most-effective webcam video possible?
Make It Immediate
Webcam video works best when it conveys immediacy. That means you don’t want it to look tooprofessional. It’s okay to make a few verbal mistakes and leave them in the video. Make it look as if you’re speaking off the cuff, even if you are working from a script. You want your video to have the feel of a deskside chat, just you talking directly to the audience. Nothing fancy, nothing too polished. Just you and the webcam, one-to-one.
Keep It Simple
Webcam video is typically of lower quality than other types of video you might shoot. You need to keep the picture simple; fiddly details are lost in the lower-resolution picture.
What works best? Just you, close to the webcam, and talking directly to the camera. Don’t try to fit two people into the frame; doing that on a webcam just looks silly. And don’t even think about moving around: Sit still, directly in front of the camera, and keep your movements to a minimum. Action captured via webcam often looks jerky.
Simplicity counts in terms of visual composition. Sit in front of a plain background of either white or light gray; a busy background is distracting on YouTube. You should also avoid overly bright background colors, which can also be distracting.
In terms of composition, move up close to the camera. Although you might be tempted to show yourself from the waist up, that shot makes your face too small for the YouTube viewing window. Go for a head-and-shoulders shot or move even closer for a pure headshot. Remember, it’s you talking directly to the viewer—so make sure the viewer can see you!
Watch the Lighting
Most webcams don’t handle extremes in lighting very well. For example, you’ll get a lousy picture if the room light is too dark. So, you want lots of light—as long as it’s shining on your face. What you don’t want is back-light shining from behind you, which tricks the webcam into darkening the picture and throwing your face into shadow. You need good lighting on your face, even if that means moving around some room lights or using an external photoflood positioned behind the webcam.
Tip |
If you’re not sure whether you have the right light, shoot a test video and see how it looks—before you upload your real video to the YouTube site. |
Minimize the Background Noise
Most webcams don’t include a high-quality microphone, which means that the sound you get on a webcam video is often of lower quality than you might want. You can compensate by sitting as close to the webcam as possible and speaking loudly and clearly. Don’t mumble and don’t whisper; enunciate as if you’re speaking to an auditorium full of people.
You should also know that the webcam will pick up any background noise in the room, which can be distracting to YouTube viewers. Turn off any noisy mechanical or electronic devices, including fans, coffee machines, printers—you name it. (Air conditioners are particularly noisy, with their low humming.) And make sure that anyone else in the room with you stays quiet!
Uploading Webcam Video to YouTube
Another nice thing about shooting with a webcam is that YouTube makes it easy to upload webcam videos. You can save your webcam video to a standard video file and then upload it, or you can use YouTube’s Quick Capture feature to upload a video as you record it, in real time. The latter method is quite easy to use, even if it doesn’t allow you the luxury of editing the videos you record.
Uploading Webcam Video Files
The standard approach to uploading webcam video is to take your time while recording, using multiple takes if necessary, and then to save your results in an AVI or similar format file. Most webcams come with software for capturing video in this fashion; follow the instructions to save your video files.
From there, you can edit the webcam video files using a video-editing program and then upload the resulting file to the YouTube site. We cover this method of uploading in more detail in Chapter 9, “Uploading Your Videos to YouTube”; turn there for more information.
Note |
Learn more about editing your webcam videos in Chapter 8,“Editing and Enhancing Your Videos.” |
Uploading Live Webcam Video
An alternative to uploading video files is to upload your webcam video as you shoot it, live from your webcam. This second method of uploading webcam videos utilizes YouTube’s Quick Capture feature. Here’s how it works.
Note |
When you use Quick Capture to upload live webcam videos to YouTube, you don’t have the opportunity to edit those videos. Whatever you record is what YouTube shows, warts and all. |
With your webcam connected and running, click the Upload Videos link on any YouTube page. When the Video Upload page appears, as shown in Figure 5.3, enter a title, description, video category, and tags for the video. With this basic information added, click the Use Quick Capture button.
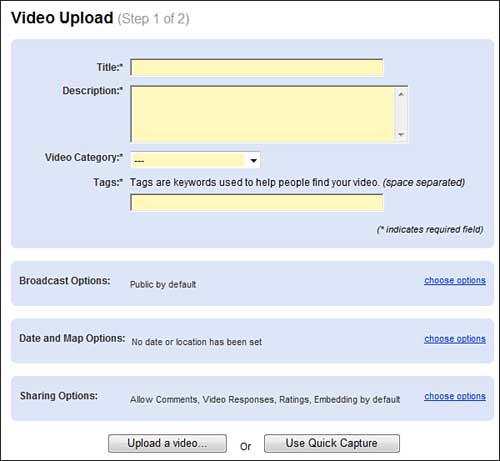
Figure 5.3 Entering information about a webcam video.
This displays the Quick Capture page, shown in Figure 5.4. Pull down the list boxes at the top of the Record Video window to select your webcam video and audio options; you should now see the picture from your webcam in the Record Video window.
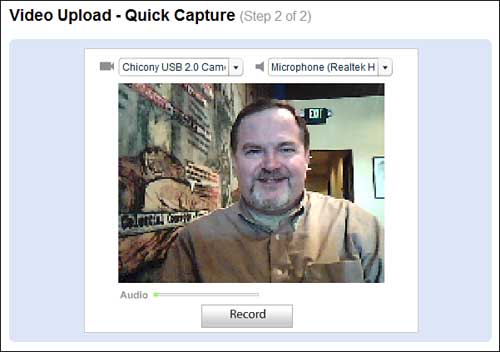
Figure 5.4 Recording a live webcam video with Quick Capture.
Note |
If, when you first access the Quick Capture page, you see an Adobe Flash Player Settings dialog box, click the Allow button. |
To start recording, click the Record button. When you finish recording your video, click the Stop button. At this point you have the option of clicking Cancel to delete your recording, Preview to view a preview of the video you just recorded, or Save to save your video to the YouTube site. When you click Save, YouTube automatically uploads the video to the site and displays the Upload Complete page. Your video will be available for viewing in a few minutes.
Tip |
If you don’t like what you just recorded, click the Cancel button and start over. |