8
Editing and Enhancing Your Videos
Few videos are YouTube-ready out of the box, even those produced by professionals. No, you probably want to cut out the boring parts, trim the whole thing down to no more than 10 minutes (less is probably better), and convert the video to a YouTube-friendly 320×240 MPEG-4 file. You might even want to add titles, onscreen graphics, scene transitions, and other special effects.
Does that sound like a lot of work? It doesn’t have to be—assuming that you have a well-powered personal computer and the right video-editing software.
Choosing a Video-Editing Program
In the not-so-distant past, if you wanted to edit a video, you had to use an expensive dedicated video-editing console, such as the ones found in local and network television studios. Not so today—any moderately powered personal computer, equipped with the right software, does the job quite nicely and at a much lower cost. Today’s video-editing software lets you cut and rearrange scenes, add fancy transitions between scenes, add titles (and subtitles), and even add your own music soundtrack. The results are amazing!
There are four tiers of video-editing programs available, easily identifiable by price. The first-tier programs are free, the second-tier programs cost around $100, the third-tier programs run between $200 and $600, and the top tier costs $800 or more. We examine each tier separately.
Tier One: Free Programs
The first tier of video-editing programs is one of the most popular— because the software is free! In reality, these programs come bundled with your computer’s operating system, which means there’s one version for Windows and another for the Mac.
For the typical YouTube video producer, these programs do a good job. They include basic editing features, as well as scene transitions, titles, and other similar capabilities. They’re not quite as high powered or flexible as the higher-priced programs, but how much power and flexibility do you need when creating videos for YouTube?
Note |
You might also have received a video-editing program when you purchased a camcorder. Some manufacturers offer their own video-editing programs or “lite” versions of other popular programs. |
Windows Movie Maker
If your computer is running either Windows XP or Windows Vista, you have a full-featured video-editing program already installed on your PC. That program is Windows Movie Maker, and although it’s not as sophisticated as some of the other video-editing programs, it includes all the features you need to do basic home video editing.
Like more expensive programs, Windows Movie Maker enables you to import videos in a variety of formats, edit your videos on a scene-by-scene basis, and add elements such as scene transitions, static or animated titles and credits, secondary audio tracks, and other special effects. You can save your video in Windows Media and AVI formats or burn it directly to DVD.
As shown in Figure 8.1, you edit in either a Storyboard or Timeline view. In Storyboard view, the project appears as a filmstrip, with each scene as a separate element on the strip; use this view to add transitions between scenes or to apply special effects to specific scenes. In Timeline view, you can edit the video on a second-by-second basis and stretch elements to fill a specific timeslot.
Figure 8.1 Windows Movie Maker—a free video editor ideal for YouTube use.
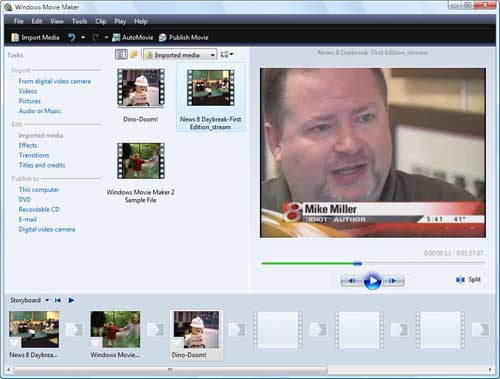
To create a video project, simply drag individual clips (scenes) onto the storyboard or timeline. You apply transitions and special effects in the same way: by dragging and dropping them onto the desired scene. Or if you like, you can use the program’s AutoMovie option to apply predefined styles to your video for quick project creation.
In short, Windows Movie Maker is an easy-to-use, completely free program and is available to anyone running Windows XP or Vista. It’s an ideal solution for those with modest editing needs—like most YouTube content creators.
Apple iMovie
Windows Movie Maker is exclusively for Windows users, but if you’re a Macintosh user, you have a similar preinstalled solution. Apple includes its iLife software with all Macs, and the iLife suite includes the iMovie video-editing program. Like Windows Movie Maker, iMovie is a surprisingly full-featured video-editing program, quite easy to use, and completely free.
iMovie includes a variety of useful features, including transitions, titles, and special effects. Also useful are the powerful color correction tools, a tool for cropping and zooming video clips, and the capability to rotate videos.
To create a project, simply drag a clip (scene) into the project area, as shown in Figure 8.2. You can then drag and drop transitions, effects, titles, and even an optional audio soundtrack into the project as desired. You can upload completed videos directly to YouTube from the iMovie interface.
Figure 8.2 iMovie—Apple’s free video-editing program.

Note |
For a short time, YouTube offered its own free online video-editing program, dubbed YouTube Remixer. The program proved to be a disappointment, however, and YouTube subsequently took it off the site. |
Tier Two: Inexpensive Programs
Windows Movie Maker and iMovie are ideal for many YouTube video creators, but they’re not the most-sophisticated programs around. (What do you expect at no charge?) If you find yourself wanting more or different special effects, or greater control over your video editing, it’s time to invest in a freestanding video-editing program.
This second tier of video-editing programs consists of a multitude of relatively inexpensive programs. Prices on these programs run from about $50 to $150—certainly affordable for most businesses.
Adobe Premiere Elements
Adobe is the premier producer of digital photography and video-editing programs, and the company’s main video-editing product is Adobe Premiere. The company makes two versions of Premiere: the full-featured Premiere Studio CS, which we discuss later in this chapter, and the more affordably priced Premiere Elements, which is a Windows-only program.
Premiere Elements got its name because it includes key elements from the more expensive Premiere Studio CS product. It’s the product of choice for many amateur video makers, priced at just $99.99. You can learn more about the program at www.adobe.com/products/premiereel/.
The latest version (4) of Premiere Elements, shown in Figure 8.3, includes a sleek interface that includes a video preview window, a task panel that includes various content and effects controls, and a timeline/sceneline along the bottom. Different tabs enable you to perform different types of editing (Media, Themes, Effects, Transitions, and Titles), most of which occurs via convenient drag-and-drop functionality. Predesigned themes let you jump-start the video-editing process.
Figure 8.3 Adobe Premiere Elements—an affordable video-editing solution.
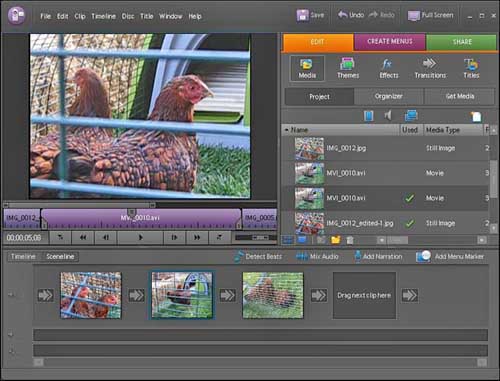
You can create multiple video and audio tracks for your video. This lets you easily transition from one clip to another or mix background music and sound effects into your video. Naturally, the program includes a variety of animated titles and transitions. The program features automatic formatting and uploading for YouTube.
ArcSoft ShowBiz DVD
ShowBiz DVD from ArcSoft is an easy-to-use program that includes video editing and DVD creation. It’s a Windows-only program and is available from www.arcsoft.com/en/products/showbiz/for $99.99.
The video-editing part of the program features the obligatory Storyboard view for arranging various video clips, as well as a more advanced Timeline view that gives you more control over your clips, audio tracks, transitions, and special effects. You can also use the program to create photo slideshow videos.
CyberLink PowerDirector
CyberLink’s PowerDirector is another easy-to-use video-editing/DVD creation program. It’s a Windows-only program and is available from www.cyberlink.com/for $89.95.
Like most of these programs, PowerDirector provides a selection of transitions, titles, and special effects. You also get some neat enhancement tools to fix and improve less than perfect videos. It imports high definition video and publishes videos direct to YouTube.
MoviePlus
MoviePlus offers digital video editing and DVD creation. It’s a Windows-only program, and is available from www.serif.com/movieplus/movieplus5/ for $79.99.
The program’s feature set is similar to other competing programs. It imports high definition video and includes a variety of transitions and special effects; it also lets you easily create photo slideshow videos.
Nero Ultra Edition
Nero Ultra Edition is actually a suite of digital multimedia-editing tools. In addition to video editing, you get photo editing, audio editing, and similar functionality. The program also offers CD and DVD burning and sells for $99.99 from www.nero.com. As with most of the other low price programs, it’s for Windows only.
For the video-editing part of the suite, Nero offers a user-friendly interface, supports high definition video, and provides easy exporting and uploading to YouTube. It can also save videos to DVD or to an iPod or PSP (PlayStation Portable).
Pinnacle Studio
Pinnacle offers three different versions of its Pinnacle Studio video-editing program: Pinnacle Studio ($49.99), Pinnacle Studio Plus ($99.99), and Pinnacle Studio Ultimate ($129.99). All three versions of this Windows-only program enable you to combine video clips with still photos and MP3 audio tracks and then add your own transitions and effects. The Plus version, shown in Figure 8.4, adds HD editing, whereas the Ultimate version adds a full complement of professional audio- and video-editing tools. More information is available at www.pinnaclesys.com/.
Figure 8.4 Pinnacle Studio—a video-editing program chock-full of special effects, such as picture-in-picture.
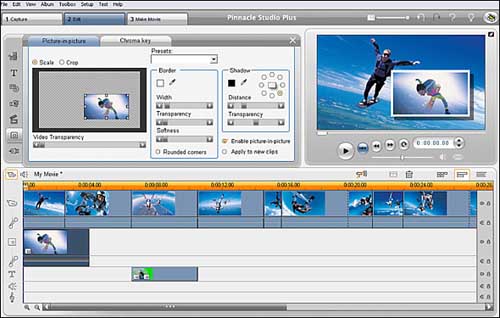
The Ultimate version might be the best choice for some users because it includes SoundSoap audio-cleaning tools for reducing noise on sound-tracks, and video panning and scanning effects via the StageTool MovingPicture add-in. More special effects are available via the Vitascene add-in, which lets you add sparkle effects, a binocular mask, a soft white vignette, and old-film effects. You can even use a chroma key greenscreen backdrop for professional behind-the-subject effects.
Roxio VideoWave
Roxio VideoWave is one of the lowest priced second-tier video-editing programs. Priced at just $49.99, it offers easy-to-use operation and basic editing and effects. More information on this Windows-only program is available at www.roxio.com/.
Like many of these programs, VideoWave is a combination video editor and CD/DVD creator. It features easy importing of camcorder video, scene- and timeline-based editing, and a CineMagic feature that automates the addition of transitions and other special effects. It also supports high definition video and Dolby Digital sound.
Sony Vegas Movie Studio
Sony’s Vegas Movie Studio is a surprisingly powerful video-editing program. Priced at $74.95, you can purchase this Windows-only software at www.sonycreativesoftware.com/products/vegasfamily.asp.
Note |
Vegas Movie Studio is also available in a $114.95 Platinum Edition that adds high definition video (HDV) capability, 5.1-channel surround sound, color correction tools, and direct export to the PSP/iPod video format. |
Vegas Movie Studio is a combination video editor and DVD-authoring program. The video-editing component includes more than 185 professional transitions and nearly 300 customizable special effects—including a greenscreen feature and something called the “Ken Burns Effect,” which makes for more interesting photo slideshow videos. Editing is via a familiar drag-and-drop interface.
Note |
Ken Burns is the PBS documentary filmmaker known for his panning and scanning and zooming of archival photographs. |
Ulead VideoStudio
Another popular video-editing/DVD authoring program is Ulead VideoStudio. This Windows-only program is available from www.ulead.com/vs/ for $89.99.
VideoStudio features three different ways to create a video. The DV-toDVD Wizard burns your camcorder’s video directly to DVD (not great for YouTube); the Movie Wizard helps to automate the video creation process; and the VideoStudio Editor gives you complete control over your video’s editing. You get useful auto color and tone filters, as well as DeBlock and DeSnow filters to clean up the recorded video.
Note |
Ulead VideoStudio is also available in a $129.99 Plus version, which adds support for high definition video, Dolby Digital 5.1 surround sound, and the iPod/PSP H.264 video format, as well as multiple overlay tracks for picture-in-picture and montage effects. |
Tier Three: Mid-Range Programs
Most of the second-tier programs offer similar features and similar functionality; they all work in pretty much the same fashion, using a combination of clip or scene views and timeline views. If you want more powerful editing and fancier special effects, you have to move up to the third tier of programs, those priced from $200 to $500 or so. There are three programs in this class: Apple Final Cut Express, Sony Vegas Pro, and Ulead MediaStudio Pro.
Apple Final Cut Express
Let’s start by discussing Apple’s Final Cut Express. This is a slightly stripped down version of the company’s full-featured Final Cut Pro software and a big step up from the free iMovie program. It’s available for $199 from www.apple.com/finalcutexpress/. As you might suspect, this is a Mac-only program.
As you can see in Figure 8.5, Final Cut Express offers an assortment of sophisticated transitions, filters, and effects, including dynamic animated text. You can also use multiple audio tracks, utilize automatic audio levels, and employ various advanced audio filters.
Figure 8.5 Final Cut Express—big-time video editing at a small-time price.
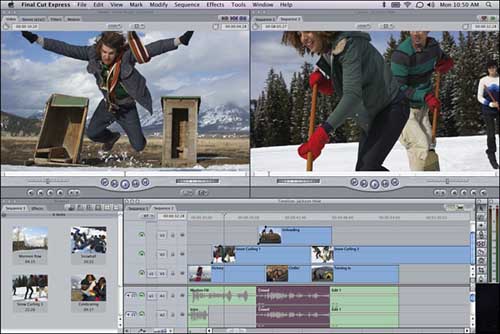
The program works with both standard and high-resolution video from any digital camcorder. You can mix and match video formats in the program’s timeline, using traditional drag-and-drop editing. You have a comprehensive set of editing options, including insert, overwrite, fit-to-fill, and such; you can fine-tune your edits with a variety of trim options, such as ripple, roll, slip, slide, extend, and shorten. Final Cut Pro even lets you create professional-quality L cuts, where the audio and video start at different times.
Sony Vegas Pro
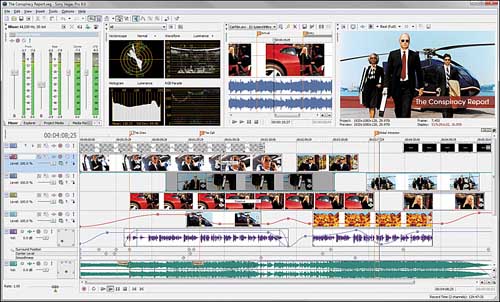
A tad more on the expensive side, Sony’s Vegas Pro is actually a suite of related products. For $549.95, you get the Vegas video editor, the DVD Architect DVD-authoring program, and Dolby Digital (AC-3)–encoding software. More information on this Windows-only solution is available at www.sonycreativesoftware.com/products/vegasfamily.asp.
Vegas Pro’s editing tools for both standard and high definition video use both mouse and keyboard trimming. You get ProType Titling technology, tools to edit multicamera shoots, auto-frame quantization, and other pro-level tools. On the audio front, Vegas Pro lets you use unlimited audio tracks with punch-in recording, 5.1-channel surround mixing, and real-time automation for various audio effects, including equalization (EQ), reverb, delay, and more. As you can see in Figure 8.6, all these tools are combined in a busy but easily navigable interface—just what you’d expect from a semi-pro level program like this.
Figure 8.6 Vegas Pro—a sophisticated interface for a powerful video-editing program.
This is a powerful program, offering many of the professional editing functions and effects as found on the top-tier programs, but at a slightly lower price.
Ulead MediaStudio Pro
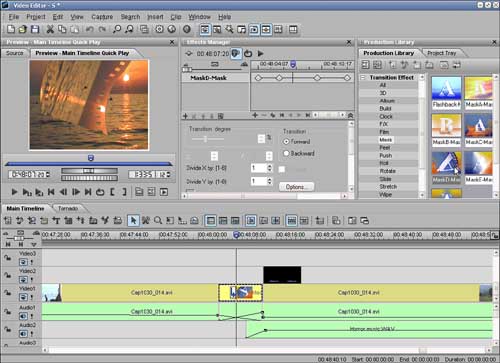
Our final semi-pro video-editing program is Ulead MediaStudio Pro, a Windows-only program that sells for $399.99 from www.ulead.com/msp/. As you can see in Figure 8.7, the program features a traditional timeline-editing mode, but with a separate Effects Manager for adding transitions and other special effects. The program is a good compromise between price and performance if you’re on a budget.
MediaStudio Pro edits both standard and high definition video with Dolby Digital 5.1-channel sound. It includes a “smart compositor” that lets you easily create professional-quality sequences and segues, with premade masks, frames, and moving paths. You can choose from a variety of pre-designed themes, which helps to speed up the production task. The editing functions include real-time audio mixing, two types of color correction, and a dynamic title tool.
Figure 8.7 Ulead MediaStudio Pro—a semi-pro video-editing solution.
Tier Four: High-End Programs
If you want true professional-quality editing and effects, and money is no object, these final two programs are worth considering. Both Adobe Premiere Pro CS3 and Apple Final Cut Studio are true pro-level video-editing programs, with much more sophisticated features and functionality than the other programs previously discussed—including multi-track editing, advanced audio editing, and a greater number of more sophisticated titles, transitions, and special effects.
Adobe Premiere Pro CS
For many video creators, the ultimate video-editing suite is Adobe Premiere Pro CS. At $799, the program isn’t cheap; for the price, however, you get a variety of different software programs that help you create truly professional videos. (More information is available at www.adobe.com/products/premiere/; the program is available in both Windows and Mac versions.)
Figure 8.8 gives you a flavor of what Adobe Premiere Pro CS offers. The interface changes a bit depending on what type of editing you’re doing at the time, but you have the expected timeline editor, video window, and a bevy of available editing, audio, and video effects.
Figure 8.8 Adobe Premiere Pro CS—a pro-level video-editing suite.
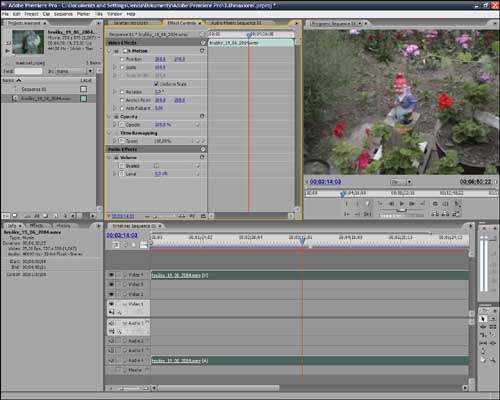
Adobe Premiere Pro CS works seamlessly with professional video equipment from Panasonic and Sony, with native editing for both companies’ proprietary media formats. You can generate a variety of high-quality video effects, including slow motion and other time-remapping effects. Also available are professional-caliber color correction, lighting effects, audio filters, and more. The program also makes it easy to edit footage from multicamera shoots.
Naturally, Premiere Pro works with both standard and high definition video. It integrates seamlessly with other Adobe applications, including Photoshop and After Effects.
Apple Final Cut Studio
Adobe’s chief competitor in the high-end video-editing space is Apple Final Cut Studio, a Mac-only suite that retails for $1,299. The suite includes the Final Cut Pro video editor, along with Color (professional color grading), Motion (3D motion graphics), Soundtrack Pro (audio post production), Compressor (encoding for different video formats), and DVD Studio Pro (DVD authoring). You can find more information at www.apple.com/finalcutstudio/.
Apple claims more than one million users of its Final Cut software; it’s definitely the first choice of professional video editors worldwide. Final Cut Studio works with virtually any video format, including high-definition and professional formats. You can easily combine clips of different formats on the program’s timeline.
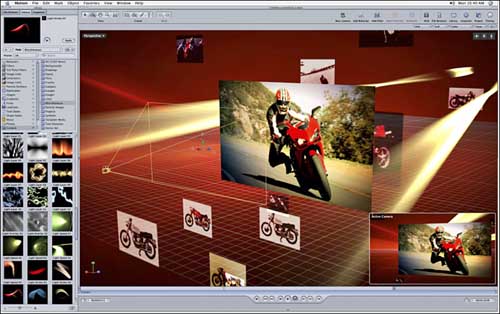
As you can see in Figure 8.9, Final Cut Studio offers a wide variety of sophisticated video special effects—including the ability to create 3D multiplane environments. Even better than all the cool transitions and special effects is the Color component, which enables you to create a consistent look and feel for shots from different sources; this elevates the quality of any production to a truly professional level. Also useful in this regard is the program’s SmoothCam feature that automatically stabilizes shaky shots while preserving the original camera moves.
Figure 8.9 Apple Final Cut Studio—complete with sophisticated 3D video effects.
Using a Video-Editing Program
Whether you use a free video-editing program or one that costs $1,000 or more, you use the program to do pretty much the same tasks: edit together multiple scenes, add titles and transitions before and between scenes, and apply any desired special effects. If the program allows it, you can also choose to clean up your audio and video, using various color correction and noise reduction tools.
How do you perform these essential tasks? Obviously, the specific steps vary from program to program, but the general approach remains the same. Read on to learn more.
Note |
For the examples in this section, we use Windows Movie Maker, the free video-editing program included with both Windows XP and Windows Vista. Similar features are available in other programs and work in similar ways. |
Editing Together Different Shots
Unless you shot your video in a single continuous take, you probably have multiple takes and shots to work with. To create an interesting video, you need to edit these various clips together into a cohesive whole so that the video flows from shot to shot and scene to scene.
In most video-editing programs, you have the ability to work in some sort of clip view. This involves dragging and dropping individual clips onto the program’s storyboard. As you can see in Figure 8.10, the storyboard is a filmstrip-type area in the interface. You can easily change the order of clips on the filmstrip and delete clips that you don’t want in the final video. Just keep rearranging clips until your video is in the order that you want.
Figure 8.10 Arrange multiple video clips into a single storyboard.

The key to effective editing is to tell a cohesive story. Don’t jump around from topic to topic; more importantly, don’t jump around temporally. Tell a linear story from start to finish; don’t make the viewer work hard to figure out what’s going on. Make sure one shot leads logically and directly to the next without any glaring gaps. If you’re not sure whether the scene order works, just watch the video from start to finish—if you can’t follow the threads, re-edit!
Inserting Transitions Between Scenes
There are numerous ways to move from one clip or shot to another within a video. The most direct approach is to use a jump cut where one scene abruptly cuts to the next, with no fancy transition. Although this can sometimes be jarring, it’s a commonly used technique.
Another approach is to ease the flow from scene to scene by using a transition of some sort. This might be a fade, a wipe, or something fancier, such as some sort of revolving or rotating effect. The key is to match the transition with the onscreen action. For example, if one scene ends with the subject punching forward into the camera, cutting to the next scene via some sort of shatter or “breaking glass” transition might work well.
Caution |
Avoid overusing some of the fancier transitions. The more animated the transition, the more attention it draws to itself—and away from the video itself. |
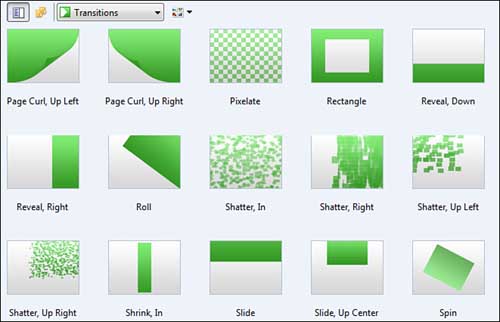
In most programs, you add a transition by dragging the icon for that transition onto either a clip in the storyboard or a specific area between clips. Figure 8.11 shows just some of the transitions available in the Windows Movie Maker program.
Figure 8.11 Add transition effects between video clips.
When deciding what transitions to use, less is more. That is, fancy transitions tend to draw attention to themselves—kind of like, “Hey! Look at this gee-whiz transition effect!” So, it’s best to avoid spins and whirls and shatters and the like. Simple old school transitions, such as fades, dissolves, and iris ins/outs are best, even if you think they’re a tad boring. Ultimately, the transition should go unnoticed by the viewer; what’s important is moving seamlessly from one scene to the next.
In addition, know that transitions are less effective in the small YouTube video window, solely due to the size of the thing. Fancy transitions can also “choke” video playback, especially for viewers with slower Internet connections. So, especially where YouTube is concerned, simpler transitions are definitely better.
Inserting Titles and Credits
Just as important as scene transitions are the titles and credits you add before and after the main body of your video. The main title, like the one shown in Figure 8.12, introduces the video to YouTube viewers. The credits provide more information, direct the viewer to your website, and provide proper credit to the individuals that worked to create the video.
Figure 8.12 Insert a title sequence before the start of your main video.

Most video-editing programs let you choose from various styles of titles and credits. You can choose the font type, size, and color; the background pattern or color; and the transition effect between the title and the main video. In most instances, this is as easy as typing your text into the program and then selecting the desired style or theme.
Creating Other Onscreen Graphics
Titles and credits don’t have to be the only onscreen text in your video. You can also superimpose other text and graphics on your picture, anywhere in the course of the video.
For example, Figure 8.13 shows a subtitle added to a piece of video. In this instance, it identifies the speaker (your humble author). You can typically choose from a number of different colors, themes, and effects for these onscreen graphics.
Figure 8.13 Add onscreen graphics to identify what’s happening onscreen.

Adding Background Music
Many video-editing programs let you enhance the video you shoot with background music. This is typically added as a separate track to the program’s timeline or storyboard, as shown in Figure 8.14; just drag and drop the chosen music file (typically in MP3 format) into the proper position. You can then adjust the sound level of the music track to best blend the background music with the foreground speaking.
Figure 8.14 Add background music via a separate audio track in the timeline.

When choosing background music, make sure the music you choose is the right length for the accompanying video—you don’t want the music to end before the video or scene is over. The background music should complement the onscreen action, not overpower it in terms of volume level, lyrical content, and beat/feel. For example, you don’t want to accompany an emotional confessional video with an up-tempo hip-hop beat. Select carefully and sympathetically and remember, that it’s the main content that matters, not the music in the background.
Caution |
Make sure you have permission to use the chosen background music. Most music you hear on the radio or CD has a copyright, and you cannot use it for any purpose without express permission. For this reason, you might want to use the public domain music supplied with many video-editing programs—no copyright problems! |
Getting Creative with Other Special Effects
Most video-editing programs let you add a plethora of other special effects. For example, you might be able to decolorize the entire video, add an old-timey sepia tone effect, or make the video look like well-worn film stock. Some programs even let you play around with the video’s time perspective by speeding up the video or slowing it down into slow motion.
Tip |
For most business-oriented videos, you want to keep it simple—keep the fancy special effects to a minimum. |
You typically add special effects one scene at a time. In most programs, that means dragging and dropping a special effects icon onto a specific clip in the program’s storyboard or timeline. The program adds the effect to that clip as it processes the video. To apply the same effect to multiple clips, just do more dragging and dropping.
Although some special effects can be useful in special situations, most business videos need a straight-ahead approach that argues against the more creative of these effects. Remember, you want the viewer to pay attention to your video’s content and not to the way it looks or the special effects you use. Use special effects minimally to keep them special.
Converting and Saving Video Files
When you finish all your editing and apply all your transitions and special effects, it’s time to save your work. In most video-editing programs, this is a two-step process: First you save the project, and then you process or publish the final video. This second step involves a lot of computer processing because it compiles all the clips and effects you select into a single video file.
When compiling your final video, save it as an AVI or a MPG file, at 640×480 resolution, and with MP3 audio. These specs ensure the best quality playback on the YouTube site—after YouTube converts your file to its own Flash format, of course.
Note |
Videos all converted and edited? Learn how to upload your videos in Chapter 9, “Uploading Your Videos to YouTube.” |