9
Uploading Your Videos to YouTube
You determined how YouTube fits into your online marketing mix. You decided what type of YouTube video to produce. You even made the video, edited it, and converted it to the proper video. Now it’s time to upload your video to the YouTube site and put your message in front of millions of YouTube viewers.
Uploading Videos from Your Computer
Let’s start at the top. Assuming that you shot your video with a camcorder, you transferred the video from your camcorder to your computer’s hard disk, where you performed any necessary editing. The final video file you create is what you upload to YouTube.
Starting the Upload Process
To upload a video file, it must be in a YouTube-approved format, be less than 10 minutes long, and be smaller than 100MB. If your video meets these requirements, you’re ready to upload.
Note |
Learn more about YouTube-approved video formats in Chapter 4, “Understanding Audio/Video Technology.” |
To upload a video, start by clicking the Upload button near the top-right corner of any YouTube page, as shown in Figure 9.1. This displays the Video Upload page; you now have a little paperwork to do.
Figure 9.1 Click the Upload button to start uploading your video.

Entering Information About Your Video
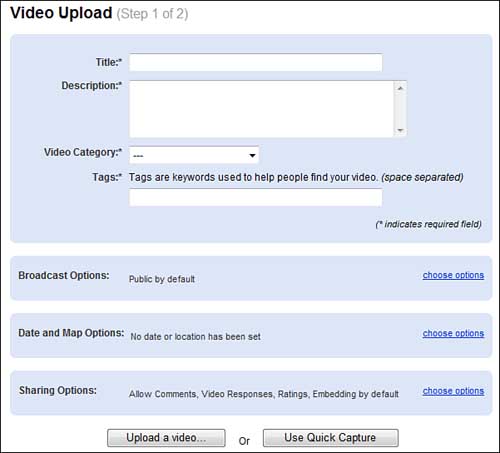
When the Video Upload page appears, as shown in Figure 9.2, you must enter several bits of information about your video. After you enter the information requested on the Video Upload page, scroll to the bottom of the page and click the Upload a Video button.
Figure 9.2 Entering information before you upload your video.
Note |
If you’re capturing a video live from a webcam, click the Use Quick Capture button instead. Learn more in Chapter 5,“Shooting Webcam Videos.” |
Let’s look at each type of information requested by YouTube.
Title
Start by entering a title for your video. The title should be descriptive without being overly long, as catchy as a traditional advertising headline. In fact, that’s the best way to think of the title—like an ad headline.
Description
You now enter a description for the video. This can and should be longer and more complete than the shorter title. The description is also where you include the information that drives viewers to ask for more information or purchase what you’re selling. That means including all or some of the following:
• Website address (URL)
• Toll-free telephone number
• Email address
• Mailing address (postal)
Although subtlety is important within the video itself, don’t be quite so subtle when soliciting customers. Include all the information necessary for viewers to contact you about your product or service; don’t be shy about asking for further contact.
Category
Next, select a category for your video from the pull-down list. From the following list, pick the category that best fits your video:
• Autos & Vehicles
• Comedy
• Education
• Entertainment
• Film & Animation
• Howto & Style
• Music
• News & Politics
• Nonprofits & Activism
• People & Blogs
• Pets & Animals
• Sports
• Travel & Events
Tags
Following the category selection, enter one or more tags for the video, separating each tag by a space. A tag is a keyword that viewers enter when searching the YouTube site. The tags you enter should be keywords that viewers might enter if they’re looking for products or services like yours.
You can use as many tags as necessary to capture all possible search words. Your tags should include your company name, the topic of the video, and any other descriptive words or phrases.
Broadcast Options
The next three parameters are typically set in advance, although you can change any of the defaults by clicking the appropriate Change Options link. The first of these parameters are the broadcast options and determine whether the video is public (viewable by any YouTube user) or private (viewable by selected users only). The default option is public.
Tip |
Most videos for businesses should be set for public unless you have a private presentation or real estate walk-through you want to share with only selected clients. |
Date and Map Options
These options, when enabled, display the date of the video’s recording and the location of your business. This latter option lets users map your video—that is, display where your business is, geographically.
Sharing Options
These options enable you to allow or disallow text comments, video responses, viewer ratings, and embedding.
Note |
Learn more about sharing options in the “Dealing with Viewers and Viewer Comments” section of Chapter 10,“Creating a YouTube Presence.” |
Selecting the Video to Upload
Page two of the video upload process, shown in Figure 9.3, is where you specify the file to upload.
Figure 9.3 Page two of the video upload process.

Click the Browse button to open the Choose File dialog box, shown in Figure 9.4. Navigate to and select the file you want and then click Open. This loads the filename into the Select a Video to Upload box on the Video Upload page.
Figure 9.4 Selecting a video to upload.

Uploading the Video
When all of that is done, the final step is to click the Upload Video button. YouTube finds the video on your hard disk and starts uploading it; the Video Upload page shows the file’s progress.
After you click the button, you need to be patient; it can take several minutes to upload a large video, especially over a slow Internet connection. There is additional processing time involved after the upload is complete, while YouTube converts the uploaded video to its own format and adds it to the YouTube database.
Note |
Videos you upload are not immediately available for viewing on YouTube. They must first be processed and approved by the site, which can take anywhere from a few minutes to a few hours. |
When the video upload finishes, YouTube displays the Upload Complete page, shown in Figure 9.5. To view your video, click the My Videos link on any YouTube page and then click the thumbnail for your new video.
Figure 9.5 Congratulations—your upload is complete!

Tip |
The Upload Complete page includes the HTML code necessary to embed the video on your own web page or blog. Just copy and paste the code into your page’s raw HTML to make the addition. |
Editing Video Information
After you uploaded your video to YouTube, you can edit all information about your video. All you have to do is click the My Videos link on the YouTube home page. This displays a list of all the videos you’ve uploaded, as shown in Figure 9.6. From here, click the Edit Video Info button beside the video you want to edit.
Figure 9.6 Click the Edit Video Info button to edit information for a specific video.

The fun begins when the Edit My Video page appears. As you can see in Figure 9.7, this page looks almost identical to the original Video Upload information page. You can edit all information fields listed here, including the video’s title, description, category tags, and so on. Click the Update Video Info button when you finish making changes.
Figure 9.7 Editing information about your video.

Tip |
What can you do if you don’t like the thumbnail image that YouTube chooses for your video? Just go to the Edit My Video and choose one of the three preselected thumbnail images at the top of the page. |
Removing a Video from YouTube
When a video has run its course, you can remove it from the YouTube site; otherwise, it stays online forever (or until YouTube goes out of business, whichever comes first).
To remove a video from YouTube, click the My Videos link on the YouTube home page to display the list of all your videos; click the Remove Video button below the video you want to delete. It’s that simple.
Caution |
Think twice before you click the Remove Video button. YouTube permanently deletes all the videos you remove. You have to re-upload the video if you click the Remove Video button by mistake. |