6
Shooting Semi-Pro Videos
As you learned in the previous chapter, the easiest and most affordable way to create a YouTube video is to use a computer webcam. But webcam video is low quality and limiting, not ideal for all business uses. How, then, can you shoot a more professional-looking YouTube video without spending the bucks for truly professional production?
For many businesses, the best bang for the buck comes from using consumer-grade video equipment, but in a professional manner. We’re talking about the kinds of video camcorder you can find at your local Best Buy or Circuit City, augmented by sophisticated video editing software and the appropriate accessories. The resulting videos can look almost identical to professionally made videos but without expensive professional involvement.
Understanding Consumer Video Equipment
When I was a kid, my dad shot home movies using a Super 8 film camera. The movies were about what you would expect—lots of cute, little kids mugging about in a dark, shaky, poorly focused little film.
Well, all that’s changed. Thanks to today’s digital video technology, you can now shoot videos in high resolution and edit them on your home computer. The results are often indistinguishable from what you’d get from a professional video production house, complete with sophisticated editing and special effects. And the costs are no more, in today’s terms, than what my dad spent back when I was a youth.
It’s amazing: Digital video recording lets you use your PC as a movie-editing studio to create sophisticated videos for YouTube distribution.
How Camcorders Work
The key to successful semi-pro video production is to start with a digital camcorder. Fortunately, now that older analog VHS camcorders have been relegated to the garbage bin or to eBay auctions, virtually every cam-corder sold today records in a digital format.
The nice things about today’s digital camcorders are that they’re easy enough for even an executive to use and produce high-quality results. Just point the camcorder, press the Record button, and zoom into the shot. Some higher-end camcorders feature image stabilization technology, so shaky pictures are a thing of the past. And, with today’s digital recording formats, the movies you shoot are at professional-quality levels.
Note |
The best camcorders available today feature 16:9 aspect ratio picture, interchangeable lenses, a variety of scene effects, and high definition recording. These camcorders are comparable to the ones the pros use, but they’re available to regular consumers—albeit at high prices. |
Let’s start with the basics. As you can tell from its name, a camcorder is actually two devices in one, combining a video camera and video recorderinto a single unit. The camera part of the unit senses the image, and the recorder section records it.
In the camera part of the camcorder, the process starts when the image is seen through the camera’s lens. The higher quality the lens, the more light that passes through it without distortion of the image.
The image as seen by the lens is beamed onto a charge-coupled device(CCD), which is an electronic chip that captures the light falling on it and converts the light to electrical signals. Most consumer-level camcorders use a single CCD to capture the video image. Some high-end camcorders, however, use three CCDs, one for each of the primary colors (red, green, and blue), which provides better detail and color. Most professional video cameras use a three-CCD design.
The CCD generates the digital signal transmitted to the camcorder’s recording section. Depending on the type of camcorder, this might be a tape-based recorder (typically in the MiniDV format), a recordable DVD, recordable flash memory, or even a hard disk like the one found in your computer.
Because the audio and video signals are recorded digitally, you can transfer them (via either an IEEE 1394 FireWire or USB connection) to any personal computer and then edit them using digital movie-editing software. When you record digitally, edit digitally, and then transfer the digital files to YouTube, you keep a fully digital signal path, which results in extremely high-quality picture and sound.
Examining Camcorder Formats
If you used a camcorder a decade or so ago, chances are it used either the VHS or VHS-C tape format. Both of these formats were analog formats with limited image resolution. Today, however, virtually every camcorder records in a digital format, capable of much better picture quality than was delivered in the past.
There are several recording formats available for you to choose from today. The most common formats include the following:
• MiniDV —This is the most common and lowest-priced digital cam-corder format available today. It records broadcast-quality (500+ lines of resolution) digital video in the DV format, using small, low price cassettes that are about 1/12 the size of a standard VHS tape. Use MiniDV for optimal compatibility with video-editing programs and other equipment.
• HDV —This is a high definition version of the MiniDV format and is found on some higher-priced high definition camcorders. HDV uses either standard MiniDV cassettes or special HDV cassettes but produces either 720p or 1080i resolution along with Dolby Digital surround sound.
• DVD —DVD camcorders don’t use tape at all; they record directly to DVDs, using small (8cm diameter) discs that record in the DVD-R, DVD-RW, or DVD+RW format. Depending on the picture quality level you select, each disc can hold between 20 to 60 minutes of video. Assuming that your home DVD player can accept these mini discs, the advantage of this format is that you don’t have to bother transferring your movies from tape to DVD at a later point. DVD camcorders record video in MPEG-2 format.
• HDD —In this instance, HDD stands for hard disk drive. HDD camcorders record directly to a built-in miniature hard disk drive, just like the kind you have on your personal computer. Current models incorporate hard drives from 30GB to 120GB in size. It takes about 4GB of storage for one hour of standard definition video at the highest quality setting, whereas the lower-quality “economy” setting needs less than 1GB for each hour of video. HDD camcorders record video in MPEG-2 format.
• Flash memory —These camcorders record directly to a CompactFlash, SD/MMC, or Memory Stick flash memory device in MPEG-2 format. Because of the small size of the storage card, these are typically compact camcorders.
Which is the best recording format to use? If you’re intending to transfer your videos to a PC for editing, I recommend an HDD camcorder. It’s easy to transfer digital video files from a camcorder’s hard drive to a PC’s hard drive via either a FireWire or USB connection.
Note |
Other, now obsolete, digital video formats include Digital8 and MicroMV. |
Choosing a Camcorder
You don’t have to spend a lot of money to buy a camcorder. As it always does, developing technology helps to bring you better performance at a significantly lower price than you would have paid just a few years ago. The challenge is picking the right camcorder for your needs.
Even the lowest-priced camcorders, like the JVC HDD model shown in Figure 6.1, take surprisingly good pictures. Most of the picture quality is in the file format itself, rather than in the additional features in a particular camcorder. This means that many people shooting videos for YouTube can get by with a simple $250 camcorder, no problem. But higher-priced models are available and worthy of your consideration.
The more money you spend on a camcorder, the more bells and whistles you get. In particular, a bigger budget buys you one or more of the following: compact size, ease of use, bigger zoom lens, special features (such as transition effects, night-vision shooting, and so on), and higher-quality performance.
Figure 6.1 JVC’s affordable GZ-MG330 hard disk camcorder.

After you get beyond budget camcorders, you should look for a model that includes a good quality zoom lens, image stabilization (to keep your pictures steady, even if your hands aren’t), various automatic exposure modes, and some sort of built-in video editing. This last feature lets you perform in-camera edits between scenes, including audio dubbing, fade in and out, and other special effects.
You should also pay particular attention to the camcorder’s image-sensing system. Most lower-priced camcorders use a single CCD to capture the video image. Higher-priced models use a three-CCD system that optically splits the image and feeds color-filtered versions of the scene to three CCD sensors, one for each color: red, green, and blue. Naturally, a three-CCD camera delivers better color than a single-CCD model.
In addition, a bigger CCD reproduces a better quality picture: 1/3” CCDs are better than 1/6” CCDs. For even better picture quality, look for a cam-corder with progressive scan technology and true 16:9 framing for film-like results.
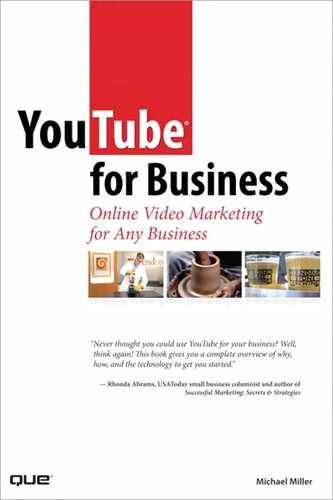
Prosumer and High Definition Camcorders
Most consumer-level camcorders are small enough to hold in the palm of your hand. But if you’re interested in independent filmmaking or just want higher performance, you have to move to a larger model. These camcorders, called prosumer models, are often big enough to require a shoulder rest. The Canon XL2 in Figure 6.2 is one example of a prosumer camcorder. They look, feel, and perform just like the type of camcorder you see TV news crews or independent filmmakers lugging around.
Figure 6.2 Canon’s XL2 prosumer camcorder.
Many prosumer camcorders let you use interchangeable lenses for more shooting versatility and shoot in the 16:9 widescreen format. More importantly, they come with a bevy of automatic recording modes and manual adjustments that enable you to custom-tailor your movies to a variety of shooting styles and situations. Their picture quality is second to none, especially under difficult lighting conditions.
The best camcorders today move beyond the traditional standard definition format to record movies in true high definition video. An HDV cam-corder, such as the Sony model shown in Figure 6.3, offers all the features of a similar-level standard definition camcorder, but with the capability of recording high definition signals onto a MiniDV tape or hard disk. Depending on the camera, recording is in either the 720p or 1080i format, both of which should be playable on any HDTV-capable television.
Figure 6.3 Sony’s HDR-CX7 high definition HDD camcorder.

Naturally, an HDV camcorder shoots in the 16:9 aspect ratio, which is part of the high definition format. You can also record Dolby Digital surround sound, although you’ll probably need an external surround sound microphone to do so.
Selecting Essential Accessories
One of the keys to shooting more professional videos is to take advantage of available accessories such as tripods, lighting kits, and the like. For example, you get a better-quality picture when you put more light in the lens, so it makes sense to use auxiliary lighting via either a single camera-mounted light, such as the one shown in Figure 6.4, or a full multiple-flood setup. Using professional-quality lighting is one of the easiest ways to make your videos look more professional.
Figure 6.4 The Sunpak Readylite camera-mounted video light.

You can enhance the quality of your sound by using a better microphone than the one in the camcorder. It’s an unfortunate fact that most camcorders include a low-quality mic. In addition, your subject is typically half a room away, which does not bode well for quality sound.
To enhance the audio in your videos, look for a camcorder that lets you connect an external microphone. You can choose from boom mics, stereo mics, surround sound mics, and even lavaliere or lapel mics (such as the one shown in Figure 6.5)—just like the pros use. Just make sure that the mic you choose has the same connector as found on your camera— they’re not all the same.
Tip |
If you have a large crew, my recommendation is to use a boom mic. Otherwise, go with a wireless lavaliere mic that clips onto the front of the speaker’s shirt or tie. |
And don’t forget stability. Only amateur movies (and professional movies trying for an artsy “shaky cam” effect) bounce around like a monkey on caffeine. You need a way to steady your camera when you shoot, which can be as simple as a monopod or tripod (such as the one shown in Figure 6.6) or a fancy shoulder mount with some sort of motion-stabilization rig.
Figure 6.5 Audio-Technica’s ES943C lavaliere microphone.
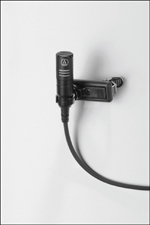
Figure 6.6 The sturdy DV-6000 video tripod from Velbon.

Put it all together, and you end up with a steady, well-lit video with intelligible sound. That’s a far cry from the dark, shaky Super 8 movies of my youth—and a good reason to invest in all these fun, little gadgets.
Building a Computer for Video Editing
The other essential component in creating a semi-pro video is the personal computer you use to edit your videos. It’s important, then, to build a computer system that has the horsepower necessary for this demanding task.
Video editing is the second-most demanding operation you can do on your PC. (The most demanding activity is playing games, believe it or not.) It takes a lot of processing power, memory, and hard disk storage to edit and process full-motion video, and most older and lower-priced PCs simply aren’t up to the task. It might mean, depending on your unit, that you have some upgrading to do.
So, what kind of PC do you need for video editing? If you’re an Apple user, there’s no better computer for video editing than a Mac Pro. This machine has all the horsepower and features you need to do all sorts of fancy video editing without even breaking a sweat. If you’re a Windows user, you have a lot more choices. To start with, you want to go with the fastest, most powerful processor you can afford—at least 3GHz, faster if you can get it.
Memory is an important part of the equation, too. The bare minimum required for video editing today is 2GB, although you should go for more if you can.
You also need lots of hard disk space with a fast hard disk. Perhaps the best way to go is to add a dedicated external hard disk just for your video editing. Make sure the hard drive connects via FireWire because FireWire is faster for this type of data transfer than USB.
When it comes to hard disk storage, bigger is better. For example, if you shoot a standard definition video at 5:1 compression, you need 3.6MB for every second of video you shoot. That’s almost 13GB for a full hour of video. After you have a few videos (or even a few differently edited versions of the same video) on your hard disk, the space used starts getting big. For this reason, consider a 500GB or 1TB (terabyte) drive for your video storage. You can’t have too much hard disk space.
Obviously, your computer needs to have a FireWire connection because that’s how most digital camcorders connect. Your camcorder manufacturer might use the consumer electronics term iLink or the more technical IEEE 1394, but it’s still FireWire.
Finally, consider what type of monitor you’ll be using. Here again, bigger is better—at least 20” diagonal. Although it might seem like overkill to use a big widescreen monitor to edit little 320×240 YouTube videos, all the components of your video-editing program take up a lot of screen space. Plus, you want to produce your videos for a future 640×480 YouTube environment, which requires a bigger screen to edit at full size.
When a Semi-Pro Video Makes Sense
We’ve spent a lot of time discussing how to assemble the right equipment to shoot a semi-pro YouTube video. But just when does this type of video make sense for your business?
Video Blogs
In the previous chapter, we discussed using a webcam to create your video blog (called a vlog). Even though webcam video has the immediacy that defines such a vlog, the webcam’s lower-quality picture and sound might work against any professional image you’re trying to impart.
You can create much better looking, and better sounding, videos with a low-cost consumer camcorder and still maintain the immediacy necessary for a legitimate vlog. The key here is to keep your set—what’s in front of and behind the subject in the video—spare and functional. No elaborate decorations, no fancy lighting, just the subject speaking into a camcorder. The result is a clearer, less jerky picture than what you can accomplish with a webcam but still with the personal one-to-one effect.
To shoot a video blog, all you need is a camcorder and a tripod. If you don’t have a separate camera operator, make sure your camcorder has a wireless remote control so that you can turn it on and off from in front of the camera. You can shoot under natural light or augment the room light with a camcorder-mounted external light. It might be a good idea to use a lavaliere microphone for better sound, if your camcorder has a mic input.
Tip |
When you’re shooting yourself with a camcorder, swivel the LCD viewfinder 180° so that you can watch yourself from in front of the camera while you’re recording. (But make sure you look into the lens when you’re recording, not into the viewfinder!) |
Executive Messages
Messages to consumers or employees from the executive office look more professional, and thus more authoritative, when shot with a camcorder versus the less professional look of a webcam video. With a quality cam-corder, the executive doesn’t have to venture into a professional recording studio to say his piece; recording the message can take place in the executive’s office or corporate boardroom.
Although some executives might think that they deserve professional video production, complete with flattering lighting and a makeup person, the reality is that you can achieve similar results with a well-conceived semi-production. The key here is to make the executive think it’s a professional production, which also helps to improve your overall production values. Invest in some external lighting (which improves the video’s look), hook up a wireless lavaliere microphone (which improves the video’s sound), and have an assistant dab some pancake on the exec’s shiny forehead (which improves the executive’s look). Mount the camcorder on a tripod, have enough staffers nearby to handle any contingencies, and use a laptop computer near the camera lens as a teleprompter. The exec should feel pampered enough, and the resulting video quality should be good enough to please everyone involved.
Product Demonstrations
You don’t need a fancy video recording studio to shoot effective product demonstrations. All you need is a quality consumer-grade camcorder, an adequate lighting setup, a boom or lavaliere mic, and the patience to shoot the same sequence from multiple angles. The equipment should give you a quality video, and the multiple shots give you choices to use when you edit the video.
One of the common pitfalls of semi-pro product demonstrations is the sound. It’s easy to get a quality picture (assuming that you’re not shooting under straight room lighting), but the sound trips up a lot of inexperienced producers. The mistake is to think the camcorder’s built-in microphone can do the job, which it probably can’t; it captures all the sounds in the room, including the ancillary sounds of the crew and the product itself. You’ll get much better sound by using multiple external microphones: a lavaliere mic to isolate the demonstrator’s voice and a boom mic to capture product sounds. You can mix the two soundtracks for optimal effect when you edit the video.
On-the-Scene Reports
Let’s not forget the portable nature of a camcorder: A handheld model can shoot practically anywhere. This, of course, makes a camcorder ideal for shooting outside the office, in just about any location.
Consider, for example, shooting an on-the-road video, with a cameraman accompanying the host to various locations. Perhaps you need an outdoor demonstration of your product, or want to file a report from a trade show or conference, or document a visit to a remote office. You can shoot any of these videos with a simple camcorder, no optional equipment necessary—although an external mic and camera light might be useful if the situation allows.
Shooting a Semi-Pro Video
What’s the best way to shoot a semi-pro video? It depends on your situation, but basic techniques hold in any instance.
Shooting in the Office
When you’re shooting indoors in familiar surroundings, you have a nice home court advantage—and a lot of control over the situation. You can take advantage of this situation to shoot extremely high-quality videos. All you need is the right equipment, a little preparation, and a lot of patience.
As to equipment, here’s what I recommend:
• High-quality camcorder with external microphone input
• Tripod
• Lavaliere or boom microphone
• External video light—either a camera-mounted light or a set of separate photofloods
Set up your equipment in front of the subject. Set the subject in front of a plain, nondistracting background; if you can, choose a background color that contrasts with the subject’s clothing or the color of the product you’re shooting. Mic the subject with a lavaliere mic or, if you have a dedicated sound person, use a boom mic positioned above and to the front of the subject.
Tip |
If you have the space and budget, consider investing in a roll or two of seamless photographic background paper and accompanying stands. Also good are patterned muslin or cloth backdrops, all of which you can find at better photo retailers. |
If your subject is reading from a script, enter the script into a notebook computer and position the computer either just below or to the side of the camera lens. I like to use PowerPoint as a makeshift teleprompter. Make sure the display font is large enough for the subject to comfortably read it from across the room, and that you have someone to scroll down the text in the program as the subject reads it.
After everything is set up (and take your time doing this; rushing things can create unsatisfactory results), run through the shoot a few times for practice. When everyone—including both the subject and the camera-man—is ready, shoot the video for real. If something goes wrong, stop the shoot and do another take. In fact, you should shoot several takes and use the best of the bunch in your final video.
You might also want to shoot the video again from another angle, or with close-ups on the product, the demonstrator’s hands, or whatever. This gives you a library of shots to use during the editing process; cutting away to a close-up, for example, helps to increase the visual interest of the video. The key is to give yourself enough options to best edit the final video. Don’t paint yourself into a box with a single take of a static shot.
Shooting Outside the Office
When you’re shooting a video in the field, you’re operating under less than ideal conditions. That isn’t necessarily a bad thing, but something you need to be prepared for.
The first thing you need to know is that you probably can’t use all your fancy equipment. In the worst case scenario, all you’ll have is your cam-corder, which means using available light and recording audio directly into the camcorder’s built-in microphone. You might, under certain conditions, be able to use a camera-mounted video light or an external microphone. (In outdoor shots, I recommend a wireless lavaliere microphone to cut down on background and wind noise.) But if all you get to use is the camcorder itself, be prepared to work under those conditions.
Working in the field means making the most of what you have available. Examine your surroundings to find an appropriate background for your subject. Unlike an in-office shot, going with a plain background might not be the best approach; you might want to capture some of the local flavor in your video, which means shooting with some sort of identifying landmark in the background. Make sure the background doesn’t distract from the subject and that you properly frame the subject and the background.
You also need to consider the lighting—both the type of lighting and its originating direction. Indirect lighting is better than direct lighting, which is often harsh and unflattering, and side lighting is better than overhead lighting. You definitely don’t want the light to shine directly on the subject’s face; it will make him squint. Light directly behind the subject is also bad because you get a backlight effect that puts the subject’s face in shadow. The best light comes from the side and is slightly diffused—like what you get on a cloudy day. (Alternatively, use a reflector to bounce sunlight onto the subject from below or from the side.)
Tip |
If you’re shooting outdoors, try to shoot in the early morning or late afternoon—those so-called golden hours when the sun is low on the horizon and has a warmish cast. |
Finally, if you have a tripod handy, use it—unless you want the “you are there” type of shaky cam effect. Get everything set up, do a run through or two if time and conditions permit, and then start shooting!
Transferring Videos to Your PC for Editing
After you shoot your video, you need to transfer it to a PC for editing and uploading to YouTube. How you do this depends on the type of camcorder you have and precisely what it is you want to do.
Transferring from a Digital Camcorder
If you have a digital camcorder, connecting your camcorder to your PC is a snap. All you need is an IE1394 FireWire port on your PC. This type of connection is fast enough to handle the huge stream of digital data pouring from your DV recorder into your PC.
Note |
Many low-end camcorders now connect via USB instead of FireWire. |
Transferring a video from your camcorder to your PC is typically as easy as pushing a button on your camcorder. Each movie is stored in a separate digital file. When you transfer the movie, you’re actually copying the digital file from your camcorder to your PC, just as you would any other digital file from any storage device. When copied to your PC’s hard drive, you can edit the file or upload it to YouTube.
Transferring from an Analog Camcorder
If you have an older VHS, VHS-C, SVHS, 8mm, or Hi8 recorder, the connection isn’t as simple. That’s because you have to convert the analog video from your camcorder to the digital format used by your PC.
To do this, you need to purchase and install an analog-to-digital video capture card in your PC—you can buy one at most computer stores. Plug your camcorder into the jacks in the card, typically using standard RCA connectors, and the card converts the analog signals from your recorder into the digital audio and video your computer understands.
Tip |
If you don’t want to install a new card in your PC, you can get the same functionality from an external video capture device, such as Pinnacle Systems’ Dazzle Digital Video Creator unit. These devices have standard audio and video input jacks to connect to your camcorder and connect to your PC via USB. |
To transfer a movie from your analog camcorder to your PC, you actually play the movie on your camcorder and record it on your PC. This means that the transfer takes place in real time as the movie plays. (This is a lot slower than simply copying a file from a digital camcorder.) As the video transfers to your PC, the analog signals from your camcorder convert into digital audio and video.
Tips for Shooting an Effective Semi-Pro Video
Do you want to shoot a better semi-pro video, one that truly looks professional? Then pay attention to the following tips—they’ll help you avoid producing amateurish videos with your new equipment.
Shoot Digitally
This one should go without saying, but I’ll say it anyway. I don’t care if you are on a tight budget, and your uncle, or the guy down the hall, or whoever has an old camcorder he’s willing to let you borrow at no cost. You don’t want to shoot on analog tape; the best results come from keeping an all-digital chain. That means using a newer digital video cam-corder, period. It doesn’t matter whether you shoot on MiniDV tape or hard disk, what does matter is that the video is digital.
Keep the Proper Resolution in Mind
Even if your camcorder is capable of shooting in high definition widescreen video, there’s little point in doing so. As you recall from Chapter 4, “Understanding Audio/Video Technology,” standard YouTube videos display at substandard 320×240 resolution, with the newer “high quality” videos at a slightly better 480×360 resolution. As such, shooting at anything higher than 640×480 is just a waste of pixels; you would need to substantially downconvert higher-quality video to match YouTube’s resolution.
Likewise, shooting in widescreen (16:9) mode merely results in a letterbox video in YouTube’s standard aspect ratio (4:3) video player window, which wastes valuable space in the YouTube video window. Shoot at 4:3 ratio to fill the entire YouTube video window.
Use a Tripod
One of the easiest ways to turn a good video into a mediocre one is to shoot it without a tripod. I know, handheld cameras are designed to be handheld, but that doesn’t mean they should be. When you hold a camera in your hand, it moves; it’s impossible for you to hold the camera perfectly still for the three minutes or so of the entire video. The result is a jerky, jumpy picture that looks more like a home movie than a professional video production. That’s not what you want.
You obtain better results when you invest in a tripod. Mount the camera on the tripod, and it won’t move around anymore. Your picture stays stable and clear, with a much more professional look. A tripod is the first and best investment you can make in your video production capabilities!
Lighting Matters
I’ve already said it multiple times in this chapter, but it bears repeating: Shooting in available light seldom achieves acceptable results. You can dramatically improve the look of your videos by adding light—augmenting the available light with some sort of external light. This can be a camera-mounted video light, freestanding photofloods, or a full-blown video lighting kit, such as the one shown in Figure 6.7. The key is to get more—and better—light into the shot.
Figure 6.7 Smith-Victor’s K76 professional studio lighting kit.

Better lighting, by the way, isn’t just to get rid of lingering shadows. Most indoor lighting isn’t quite white; the color of white varies from light source to light source. Some types of lighting produce a cooler (bluer) white, and others produce a warmer (redder) white. And when the light itself is colored, it affects all the other colors in the shot.
For example, candlelight casts a warm light, almost orange. Incandescent bulbs are also slightly warm, whereas florescent bulbs are cooler—to the point of having a slightly greenish cast. In contrast, studio lighting has a more neutral cast, which is what you want for your videos.
Note |
You might be able to compensate for different types of lighting in your cam-corder. Look for a white balance or color correction control and follow your camcorder’s directions for setting a true white level. |
Use an External Microphone
All camcorders have a built-in microphone. With most lower-end camcorders, that’s the only option you have; you have to use the camcorder’s mic for all your audio needs. In contrast, higher-end camcorders come with an external microphone jack to which you can connect most any type of external mic. This is a good thing.
There are two bad things about using a camcorder’s internal microphone. First, it’s typically not a high-quality mic; the sound quality is mediocre at best. Second, the microphone is on the camcorder, not on the subject— who is often on the other side of the room. That means the subject has to yell just to be picked up by the mic, which also picks up any other sounds between the subject and the camcorder—not the best situation for capturing quality audio.
It’s far, far better to mic the subject directly, using a handheld mic, lava-liere mic, or even a boom mic. The keys are to get the mic closer to the subject and to isolate the subject from all other background sounds. You want to clearly hear what the subject is saying, and only what the subject is saying—and the only way to do that is with an external microphone.
Watch the Background
Did you ever notice the background in a professionally shot video? Probably not, and that speaks to the care in which it was chosen. You’re not supposed to notice the background; your attention is supposed to focus on the main subject.
The point is that you need to pay particular attention to what’s behind the subject in your shot. Don’t just point your camera at an executive sitting behind her desk without also examining what’s behind that executive. If the background is too busy, it distracts from the subject; the viewer’s eyes drift to the background instead of to the person who’s talking.
What kinds of backgrounds do you want to avoid? The list includes things such as open windows (especially with people walking by outside!), busy wallpaper, cluttered bookshelves, and just general clutter. It’s much better to shoot in front of a plain wall, if you have no other choice.
Even better is to use some sort of professional background. Any good photography store sells seamless background paper, as well as cloth and muslin backgrounds with various unobtrusive patterns. If you do a lot of corporate videos, consider creating your own unique patterned background that incorporates your company’s logo, either large or in a smaller repeating pattern.
By the way, the patterned message background is the one favored by politicians, who think it’s somehow subliminal to repeat the message du jour behind them at every photo or video opportunity. (Figure 6.8 shows President Bush in front of a typical repeated-logo background; in this instance, for a speech at the National Institutes of Health.) Politicians around the world like to stand in front of their country’s flag.
Figure 6.8 President Bush in front of a repeated logo for the National Institutes of Health—get the message?

A Little Movement Is Good…
Not all semi-pro videos need to be static. One of the advantages of using a camcorder is that, unlike a webcam, you can move it. Get your subject out of her chair and capture her walking across the room, or moving back and forth between props. Use the camera in a handheld fashion or, even better, turn it on the tripod to follow the speaker’s movement. Even in a small YouTube window, it’s okay to have a little action in the shot.
…But Too Much Movement Is Bad
With that said, one sure way to make your video look amateurish is to show off your camera technique by zooming in and out, panning back and forth, and otherwise moving your camera too much. Although some camera movement is good, too much is bad. Don’t overuse the zoom and pan; it just makes your video difficult to watch.
This is particularly so when your video plays in a small video window in a web browser, as it is with YouTube. On the Web, extraneous motion is your enemy. Even well-crafted motion can sometimes detract from the message. When creating video for the Web, you want to eliminate all unnecessary motion from both the camera and from the subject.
Worse is high-motion action, such as when capturing sporting events. When each new frame of your video holds substantially different information from the previous frame, you end up unnecessarily increasing the size of your video file. In addition, someone viewing your video on a slow Internet connection might see the action as jerky and disconnected, which is not the effect you want.
For this reason, many video producers try to keep their subjects as stationary as possible in the frame. They also try to keep camera movement to a minimum—no unnecessary zooming, panning, or tilting when a static shot works just as well.
Shoot from Different Angles
Another way to introduce visual interest in your videos is to cut between multiple shots. You might show the presenter speaking directly to the camera and then cut to a short shot of the presenter from the side. This sort of rapid cutting is simply more interesting than a static front-on shot held for three minutes.
You can accomplish this in a number of ways. The easiest way is simply to shoot the video twice: once from the first angle and once from a second angle. You can then intercut shots from both takes in the editing process.
Another approach is to shoot the video only once, but using two cameras, each at a different position. Again, you can intercut shots from both videos during the editing process. The advantage of the two-camera approach is that the two videos are perfectly in sync, which is unlikely using a single-camera approach.
Close-Ups Are Good
While we’re talking about using different shots in a video, consider the use of close-ups as one of your alternatives. Let’s say you’re shooting a product demonstration, which you shoot from an appropriate distance to capture both the presenter and the product. At some point, the presenter presses a particular button on the product, which is difficult to see from several feet away. The solution is to shoot a separate close-up shot of the presenter’s finger on the button. You can then cut to this shot at the appropriate point in the video; doing so not only adds visual interest, it better demonstrates that facet of the product.
Don’t Center the Subject
When shooting a video for YouTube, it’s tempting to place your subject dead center in the video frame. Avoid the temptation.
A much better compositional approach is to use a technique called the rule of thirds. With the rule of thirds, you divide the frame into three vertical strips and three horizontal strips, as with a game of tic-tac-toe. You do this by drawing two equidistant vertical lines and two equidistant horizontal lines, as shown in Figure 6.9. This creates nine segments in the frame.
You want to avoid placing the main subject dead center in any of the nine segments. Instead, you want to position the focal point on or close to one of the four points where the vertical and horizontal lines intersect— the small circles in Figure 6.9. Alternatively, for a little more flexibility, you can position the focal point on one of the grid’s horizontal or vertical lines. Which intersection point you choose is entirely up to you.
By the way, when you position your subject at one of the rule of thirds intersection points, make sure you have the subject looking into the center of the frame, as shown in Figure 6.10. The alternative is to have your subject staring out of the frame, which is a trifle disconcerting.
Figure 6.9 Composing your shot via the rule of thirds.

Figure 6.10 Position your subject to the side, looking into the center of the frame.

Shoot to Edit
We get into video editing in Chapter 8, “Editing and Enhancing Your Video.” But for better editing, you need to do a little preparation in advance.
The easiest way to make your videos easier to edit is by shooting to edit, which means thinking about your final production before and during the shoot. This lets you capture appropriate shots during the process and keeps the shoot somewhat efficient by shooting only what you need. Not only do you speed up the shooting process, you also can edit much faster when you get to that phase of the operation.
Tip |
Consider creating a shot list—literally, a list of each shot you make—so you can remember exactly what you captured. A shot list, created in advance, is also helpful when working with a crew, because it lets them know what’s coming up. |
Use a Teleprompter
Unless your subject is a natural extemporaneous speaker, and few people are, he’ll probably speak from some sort of script. That’s fine, as long as he can actually read the thing without having to hold a distracting piece of paper in front of him.
The solution to this problem is to use a teleprompter or some semblance of one. A teleprompter is simply a device that displays the script, in large type, on a screen mounted next to the camera lens. The speaker can read the script while appearing to look directly into the camera. It’s what all the pros and politicians use.
Note |
Although I use the term teleprompter in a generic fashion, there is an actual device called a TelePrompTer, manufactured by the TelePrompTer Company, which first developed the device in the 1950s. |
Although you could purchase an expensive professional teleprompter device, a better semi-pro solution is to turn a notebook computer into an impromptu teleprompter. There are a number of ways to do this, but all involve inputting the speech into a software program that displays the text in large type on the notebook screen. Position the notebook next to or directly below the camera lens, and you’re good to go.
If you’re looking for a dedicated teleprompter program, consider Prompt! (www.movieclip.biz/prompt.html), which imports text from other programs and converts it into a format ideal for teleprompting. You can also simulate a teleprompter by using speaker notes and Presenter mode in Microsoft PowerPoint.
For a speaker, working with a teleprompter takes a bit of practice; using one for the first time can be tricky. The presenter sees only a few lines of the speech at a time, and there’s no way to back up when he passes a particular point. And he’s wedded to the speech as written; going off-topic can confuse the teleprompter operator, who must follow along and manually scroll through the speech, line by line. The operator follows the pace of the speech so that the scrolling text follows the speaker as he delivers it. If the speaker slows down, the operator slows down the scroll so that the words scroll slower on screen. If the speaker speeds up, the scrolling speeds up. And if the speaker goes off-topic, the operator doesn’t know what to do, which means it’s time for another take.
Therefore, it helps to rehearse with the teleprompter ahead of time so that the speaker can get used to reading and speaking at the same time. Fortunately, that’s not as hard as it sounds. The key is for the speaker to always speak at his own pace, and trust the teleprompter to follow him. The speaker should never let the scrolling words dictate how fast he talks.
Dress Appropriately
We finish these tips with a word about how the subject of your video should be dressed. The key word is appropriately because there’s no single right or wrong for every possible type of video.
If your company appeals to young people with a hip and trendy image, don’t dress the speaker in a Brooks Brothers suit and tie; khakis and a polo shirt (or jeans and a t-shirt, depending) might be more appropriate. Likewise, you probably don’t want to shoot a video for an investment bank using a spokesmodel in a bikini. That wouldn’t be appropriate.
You should also consider how the chosen clothing looks onscreen. Avoid clothing with tight or busy patterns; plain shirts are better than striped ones. Don’t let the color or brightness of the presenter’s clothing conflict with or blend in too much with the shot’s background color or pattern. You want the subject to stand out from the background, but not glaringly so.
Here are some additional tips on choosing the most appropriate clothing for your subject:
• Choose clothing that reflects the subject’s taste and personality, as well as the image you want to convey for your company or product. Unless you’re deliberately striving for a particular effect, avoid clothing that isn’t natural for the subject.
• Simplicity is best; go with solid colors or simple patterns. Avoid wild checks, stripes, and busy patterns that tend to draw attention to themselves or that “scream” on camera.
• Clothing should complement the subject’s face, not be in conflict with it, which again argues for simplicity.
• The subject should dress comfortably, especially if it’s going to be a long shooting session. Although a suit and tie are de rigueur for many corporate videos, more casual videos might call for turtlenecks, V-necks, open-collared shirts, and sweaters.
• For fancier videos, it’s a good idea for the subject to have at least one change of clothes. This provides some flexibility and offers more choices when it comes to choosing the final shot.
• Women should generally avoid showing bare arms; it’s better to wear long-sleeved shirts and blouses instead. (And the no-bare-arms rule goes double for men!)
• Similarly, women in full-length shots should almost always wear slacks, a long skirt, or dark stockings. It’s not a good idea to show a lot of skin that draws attention away from the subject’s face.
• In terms of color, darker colors are generally better than lighter ones. The best colors are medium shades of blue, green, rust, and burgundy.
• White, yellow, pink, and similar colors tend to overpower the subject’s face and make her look pale.
• You should avoid bright reds and oranges. They draw attention away from the subject’s face and from any product he’s demonstrating!
But these are just general guidelines, not hard and fast rules. Go for what works best in your particular shot. Remember to envision the shot as it will look in YouTube’s small 320×240 resolution video window!