10
Creating a YouTube Presence
YouTube is more than just a source of videos; it’s a community. The community aspects of the site help you build viewership and a customer base, and establish your own unique business presence. That’s right, being successful on YouTube isn’t just about creating a great video; you also have to take advantage of the social nature of the YouTube site to build a community of friends and subscribers.
Working with Channels
The most common way to participate in the YouTube community is by using YouTube’s channels. On YouTube, channel is just a fancy name for a user’s profile. As soon as you post your first video, you create your own YouTube channel. At that point, other users can access your channel to see all the videos you’ve uploaded; users can also subscribe to your channel to receive notification when you upload new videos to the YouTube site.
Viewing a Channel Profile
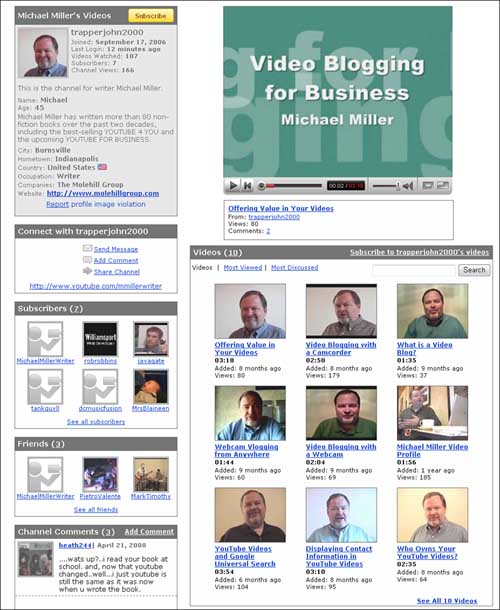
YouTube viewers access your channel page to learn more about you and to connect with your business. A viewer accesses your channel by clicking your business’s name wherever it appears on the YouTube site. Although each profile page is unique, all pages contain the same major elements, as shown in Figure 10.1:
• Information about the user, including a link to subscribe to this channel
• Videos uploaded by this user
• Links to connect to the user, via email, comments, and so on— including a link to the user’s non-YouTube website
• Links to the user’s favorite videos, playlists, groups, friends, and the like
• Subscribers to the user’s channel
• Comments on this user’s channel
• The user’s favorite videos
• Channels the user is watching
Figure 10.1 A typical YouTube channel page.
If a viewer likes what he sees on your channel page, he can subscribe to that channel. When a viewer subscribes to you channel, he is automatically notified (via email) when you upload new videos.
Note |
To subscribe to your channel, all a viewer has to do is go to your channel page and click the Subscribe button. |
Personalizing Your YouTube Channel
Because a YouTube channel page is actually a profile page, you want to customize your page to reflect your business’s image and brand. It’s easy to do.
As for creating your channel page, there’s nothing to do; YouTube creates a profile page for you when you subscribe to the site. The default channel page is a little bland, however, which is why you want to customize it.
You personalize your channel page from your My Account page. Just click the Account link at the top of any YouTube page, and when the My Account page appears, scroll to the My Channel section, shown in Figure 10.2.
Figure 10.2 Getting ready to personalize your channel profile page.
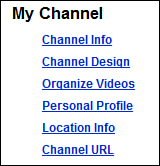
From here you can edit the following channel elements:
• Channel Info —As shown in Figure 10.3, you can enter a new title and description for your channel page. You can also configure how to handle comments and bulletins, as well as the channel type.
• Channel Design —As shown in Figure 10.4, this is where you change the overall look and feel of your channel page. You can select a new color scheme for your page; opt to show or hide various page elements; and choose custom colors for selected page elements, as well as a background image for your page.
Figure 10.3 Customizing your channel info.

Figure 10.4 Personalizing the design of your channel page.

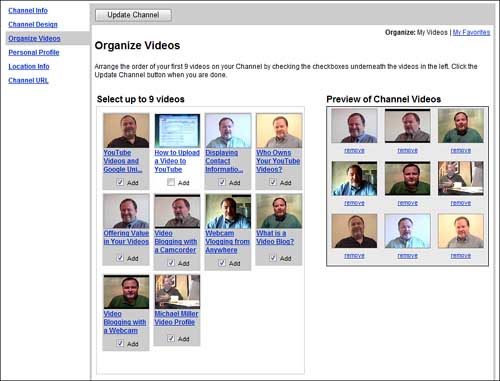
• Organize Videos —As shown in Figure 10.5, this page lets you organize the order of the first nine videos shown on your channel page.
Figure 10.5 Customizing the order of the videos shown on your channel page.
• Personal Profile —As shown in Figure 10.6, this page lets you enter personal or business information to be displayed on your channel page, such as your business name, description, link to your outside website, and so on. You can also choose a picture or video still to display at the top of your channel page.
• Location Info —As shown in Figure 10.7, this is where you enter your hometown, current city, ZIP code, and country.
Figure 10.6 Adding relevant information to your channel page.
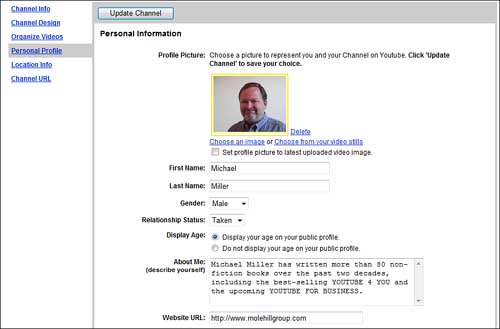
Figure 10.7 Adding your location to your channel page.

• Channel URL —As shown in Figure 10.8, this page displays the URL for your channel page.
Figure 10.8 Viewing your channel URL.

As you make changes to any page element, make sure you click the Update Channel button, or you’ll lose the changes you made.
Managing Your Channel’s Video Log
One cool feature that you can add to your channel page is a video log or vlog. A vlog is an easy way for you to create a personal video journal accessible to anyone visiting your channel.
To create a vlog, go to the YouTube home page and click the My Playlists link in the My box. When the Playlists page appears, you can choose to select an existing playlist as your vlog or create a new playlist to hold new vlog entries. To use an existing playlist, select the playlist and then click the Set as Video Log button. To create a new vlog playlist, click the Create Playlist button to create the new playlist and make sure you check the Use This Playlist as Video Log in My Channel option.
Your vlog now appears on your channel profile page. The individual videos in the vlog playlist stack on top of each other; visitors can click a video to view it.
YouTube Channel Marketing
YouTube thrives on social networking—and your channel and videos get more viewers if you fully participate in the YouTube community. You can’t just post some videos and expect to get viewers automatically; you have to make your presence known to inform viewers of the videos you posted.
In reality, this means being an active viewer as well as a poster. You become a member of the community when you view and subscribe to a lot of other channels; you become even more noticed when you leave comments with those videos and users that best serve your needs.
How does this work in reality? It takes time and effort. You want to search the YouTube site for videos like yours, or users who have something in common with your business. After you find a sympathetic user, view his videos and leave some comments. You might want to mention that you have similar videos in your channel and encourage friends of this user to head over to your channel to see more. At the very least, you want to spark interest in your videos from the person whose videos you’re viewing. If you view his videos, he’ll view yours, and hopefully tell other viewers about what he saw.
What goes around comes around; the more comments you leave, the more people see your name and channel and the more views your videos receive. To get people interested in your channel, you have to show interest in theirs.
Working with Groups
Another form of community on YouTube is the YouTube groups feature. A group is a social forum where users interested in a given topic can share videos and conduct online discussions.
Groups are useful in a marketing context because they formalize a virtual community. If you find a group that focuses on the type of product or service you offer, that group is a natural conduit for viewers and future customers. In fact, you can recruit some loyal and vocal customers from YouTube’s groups; these folks are among the most rabid fans you’re likely to encounter!
Joining an Existing Group
To find YouTube groups, click the Community tab on the home page and then click the Groups link located toward the top of the page. This displays a list of featured groups and contests.
When you access a group page, like the one shown in Figure 10.9, you see links to group videos, members, and discussions. The page displays recent videos and the most recent group discussions.
To join a group, simply click the Join This Group link. After you join a group, you can participate in group discussions, add videos to the group, and so forth.
One of the most addictive features of a YouTube group is its discussion pages. This is where group members meet to discuss the topic at hand; it’s a great way to get face-to-face contact with potential customers. To join a group discussion, just click the Discussions link on the group page; this displays a discussion page, such as the one shown in Figure 10.10. You can then read comments within that discussion or add your own comment from the Add New Comment section at the bottom of the page.
Figure 10.9 A YouTube group page for Listerine’s FreshBurst Surprise brand.

Figure 10.10 Joining in the discussion at the White Castle Craver Video Contest group.

Creating a New Group
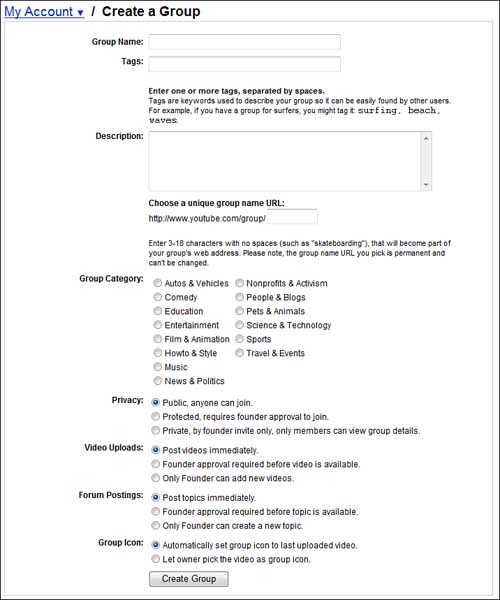
Another marketing ploy is to create your own YouTube group, focused on a topic related to the products or services you offer. YouTube lets anyone create a group—just click the Accounts link to go to your My Accounts page, click the Groups link, and then click the Create a Group button. When the Create a Group page appears, as shown in Figure 10.11, enter a name and description for the group, along with identifying tags, a custom URL for the group, a category, the type of group (public or private), and how you want to handle video uploads, forum postings, and the group icon. Click the Create Group button when you finish, and your group launches into the YouTube community.
Figure 10.11 Creating a new YouTube group.
After you create your group, you need to recruit members to it—ideally, other users that share the group interest. Click the Invite Members link at the top right of the group page to invite others to join your group. This displays the page shown in Figure 10.12; you can invite members of your Friends list or invite other members by entering their member names in the New Friends list. Click the Send button to send your invitations.
Tip |
You can find potential group members via searching or from their membership in other similar groups. |
Figure 10.12 Inviting other YouTubers to join your group.

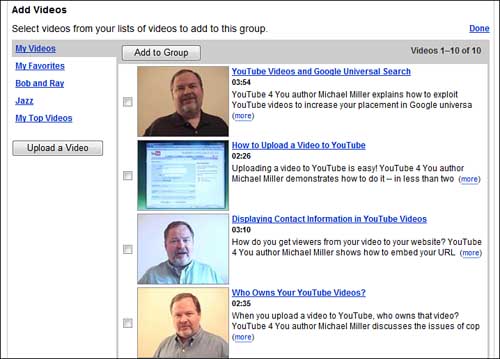
Click the Add Videos link at the top right of the group page to add videos to your group. This displays a page with links to your current favorite videos and playlists, as shown in Figure 10.13. Check any video you want to add; then click the Add to Group button. Alternatively, you can click the Upload a Video button to upload a new video and add it to your group.
Figure 10.13 Adding videos to your new group.
There are many ways to use a YouTube group in your marketing mix. One of the most popular approaches is to create some sort of contest revolving around your brand or product, and then create a group to support that contest. This lets you keep your main channel free and clear for your ongoing brand or product message; you handle the short-term contest purely through the group mechanism. And, of course, contests are great ways to involve your customer base—especially when they involve the creation of videos about your brand or product, all uploaded to YouTube!
Tip |
If you advertise on the YouTube site (outside of the videos you upload), you can feature your contest in YouTube’s official Contests section. To learn more about advertising on YouTube, email [email protected]. |
Working with Friends and Contacts
You don’t have to create a group to mingle with potential customers on YouTube. That’s because YouTube lets you create lists of users with whom you can share your videos. YouTube’s Friends list is kind of like a buddy list in AOL Instant Messenger; one click on a YouTube list lets you share your videos with everyone on your list.
You can think of YouTube’s Friends list as a kind of high-tech customer mailing list. When you have something portentous to announce to your customers (such as a new video or a product introduction), you can send out a message to your list. Unlike traditional customer mailings, however, sending electronic messages to your YouTube friends list is completely free.
Adding a Friend to Your List
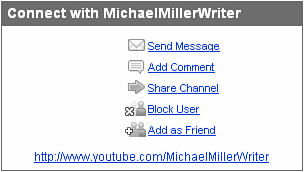
Adding an existing YouTube member to your friends list is relatively easy. Just go to that member’s channel or profile page, scroll to the Connect With box, shown in Figure 10.14, and click the Add as Friend link. YouTube now sends an invitation to this person to be your friend; if he accepts, YouTube adds him to your Friends list.
Figure 10.14 Adding an existing YouTube member to your Friends list.
You can also add friends who aren’t yet YouTube members. Just click the Account link at the top of any YouTube page to display the My Account page; then scroll down to the Contacts & Subscribers section, shown in Figure 10.15, and click the Invite Friends button.
Figure 10.15 Managing friends and contacts from your My Account page.

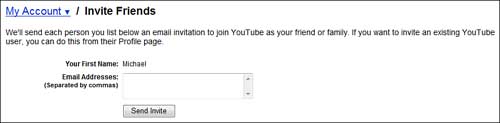
When the Invite Your Friends page appears, as shown in Figure 10.16, enter the email addresses of those folks you want to invite (separate each address with a comma), and then click the Send Invite button. The friends you entered receive official email invitations; they can click the link in the email message to join YouTube and add themselves to your Friends list.
Figure 10.16 Inviting a non-YouTuber to join your Friends list.
Sending Messages to Your Friends
When you want to send a message to someone in your Friends list, go to your My Account page, scroll down to the Contacts & Subscribers section, and click the My Contacts link. As you can see in Figure 10.17, this lists all your contacts. Click the Send Message link next to a friend’s name; this displays the Compose Message page shown in Figure 10.18. Enter a subject for your message and the text of the message itself. If you want to attach a YouTube video to this message, pull down the Attach a Video list and choose a video from your favorites. Click the Send Message button to send the message on its way.
Figure 10.17 Viewing all your YouTube contacts.

Figure 10.18 Sending a message to a friend.

Tip |
You’re not limited to sending messages to only existing friends and contacts. To send a message to any YouTube user, go to your inbox and click the Compose New Message button; from there you can enter any member’s username for the message you compose. |
Reading Messages from Other Users
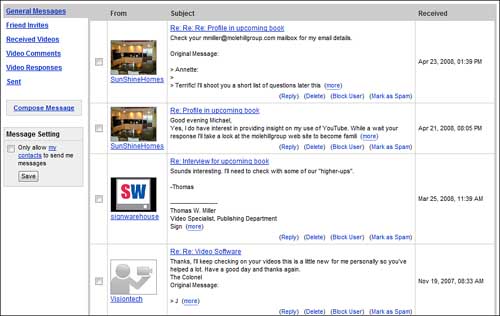
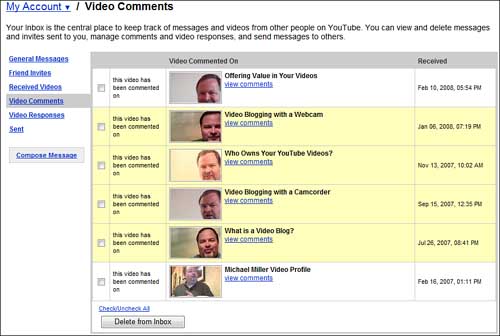
YouTube also lets you receive messages from your viewers and customers; these messages end up in your YouTube inbox. You access your inbox by going to YouTube’s home page and clicking the My Inbox link in the My box. As you can see in Figure 10.19, your inbox lists, under the General Messages link, all email messages you’ve received. You can view other types of messages by clicking the Friend Invites, Received Videos, Video Comments, Video Responses, and Sent links.
To read a message, just click it in your inbox; the message displays onscreen. You can delete the message, mark it as spam, or send a reply to the message by using the Your Reply box and the Send Message button.
Figure 10.19 Waiting messages in your YouTube inbox.
Dealing with Viewers and Viewer Comments
One of the fun things about marketing via YouTube is that you get to immediately see the comments and responses from people who view your videos. Although this can be fun, it isn’t always pleasant, which is why YouTube lets you manage these comments.
Enabling Comments, Video Responses, Ratings, Embedding, and Syndication
Viewers can leave both text comments and video responses to your videos—if you let them. At your discretion, you can allow, disallow, or allow with prior approval either comments or video responses for any individual video you upload. (This means you can allow comments for one video and disallow comments for another.)
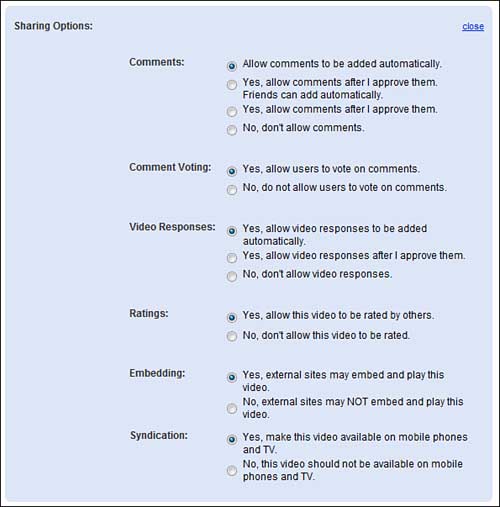
To control comments and video responses, click the My Videos link on the YouTube home page to display the list of all your videos. Then click the Edit Video Info button below the video you want to control. When the Edit My Video page appears, scroll down to the Sharing Options section, and then click the Choose Options link; this expands the section, as shown in Figure 10.20. You can configure six options, as discussed next.
Figure 10.20 Enabling or disabling comments and video responses.
Comments
By default, anyone viewing your video can leave text comments about the video. The options you have for accepting comments include the following:
• Allow Comments to Be Added Automatically —Viewers can submit text comments, which appear immediately on your video page.
• Yes, Allow Comments After I Approve Them. Friends Can Add Automatically —Viewers can submit text comments, but you have to approve each comment before it appears on your video page—unless the viewer is part of your preapproved Friends list.
• Yes, Allow Comments After I Approve Them —All comments, even those from friends, have to be preapproved.
• No, Don’t Allow Comments —The Comments section does not appear on your video page.
Tip |
Allowing video comments might be desirable if you want your customers to copy, edit, remix, enhance, or even make fun of your videos—all of which are valid ways to encourage customer interaction. |
Comment Voting
This feature lets viewers vote on comments left by other viewers. Select Yes to allow comment voting or No to disallow it.
Video Responses
When you enable this option, viewers can make and upload their own videos in response to your video. You can choose from the following options:
• Yes, Allow Video Responses to Be Added Automatically —Viewers can upload their video responses, which appear immediately on your video page.
• Yes, Allow Video Responses After I Approve Them —Any video responses have to be approved by you before they appear on your video page.
• No, Don’t Allow Video Responses —The video response option does not appear on your video page.
Ratings
In lieu of (or in addition to) detailed text comments, you can also allow your video to be rated by viewers. Viewers can rate videos on a scale of one to five stars, with five stars being the best and one star being the worst.
Tip |
To view the rating for your video, go to that video’s page and scroll to the options box below the video player; the current star rating displays there. |
You have the option of not allowing viewers to rate your video. This might be desirable if you don’t want your business’s videos perceived in a negative fashion. On the other hand, if you have a popular video, you probably want to enable ratings—highly rated videos rank higher in YouTube search results than do poorly rated ones.
Your option in regard to ratings is simple: Check Yes to allow ratings or No to disallow them.
Embedding
YouTube makes it easy for any user to embed your video in his or her own website or blog. If you want wider exposure for your video, check Yes to display the embeddable HTML code. If, on the other hand, your lawyers tell you that you need to keep complete control over where and how users view your video, click No to hide the embeddable code.
Tip |
I can think of no good reason not to allow embedding, unless you have a legal staff paranoid about copyright and fair usage. If you want to create a truly viral video, you have to allow fans to embed the video across the Web. |
Syndication
You can achieve even wider viewership by making your video accessible to viewers on mobile phones and TV. YouTube dubs this added exposure syndication, and you can turn it on or off for any specific video.
Approving Comments and Video Responses
If you choose the “with approval” option for comments or video responses, you have to manually approve any comments or responses viewers post to this video. When a viewer posts a comment or response, YouTube sends you an email like the one in Figure 10.21. Thus notified, go to the YouTube site and click the email link at the top of any YouTube page, and then click the Text Comments link or the Video Responses link.
As you can see in Figure 10.22, clicking the respective link displays a list of all pending comments/responses in your inbox.
Figure 10.21 YouTube sends an email notification when you receive a comment or response to your video.
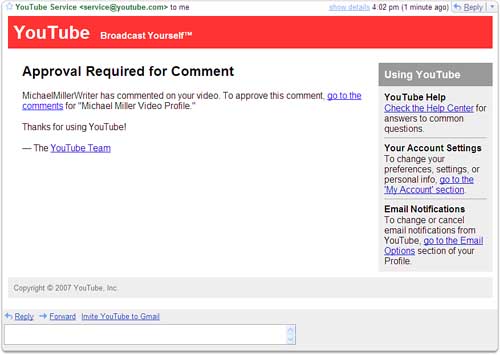
Figure 10.22 Pending comments and responses in your YouTube inbox.
Click the message link to display the comment, as shown in Figure 10.23.
Figure 10.23 Responding to a viewer comment.
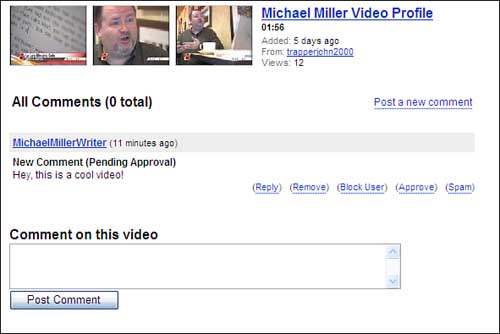
From here you can choose from the following options:
• Reply —Click to post a reply to a viewer comment.
• Remove —Click to disallow a pending comment or remove a previously approved comment.
• Block User —Click to block a user from posting future comments.
• Approve —Click to approve and post this specific comment to your video page. Available only if you choose the Allow Comments After I Approve Them option in your video setup.
• Spam —Click to report this comment to YouTube as spam.
To approve a comment or response to your video, click the Approve link. To not approve a comment, click the Remove link.
Dealing with Negative Comments
When you let viewers comment on your videos, you’re opening a Pandora’s Box. Yes, you’ll receive some positive comments from satisfied viewers, but you’ll also receive some negative comments—some of which might be downright nasty.
Some companies want to see only positive comments, which is valid. Other companies don’t mind the negatives because they feel it presents a forthright, warts-and-all image to the market. There’s no right or wrong here. Just know that if you enable comments, you will receive some negative ones. How you respond to those negative comments depends on how your company deals with criticism.
Removing Viewer Comments and Responses
One way to deal with negative comments is simply to remove them. As you previously learned, you can remove viewer comments and responses from the Text Comments and Video Responses sections of your YouTube inbox. You can also remove comments from the video page, which might be an easier thing to do if you have a ton of comments on a particular video.
To remove a comment in this fashion, go to the video page, find the comment or video response you want to remove, and then click the Remove link beneath that comment or response, as shown in Figure 10.24. Easy!
Figure 10.24 Removing an unwanted comment—click the Remove link.

Blocking Members from Leaving Comments
Every now and then you run into a virtual stalker, a disgruntled customer (or perhaps a competitor) who delights in leaving negative comments on all your videos. Although you can manually remove all of this user’s comments, a better approach is to keep him from leaving those comments in the first place.
To this end, YouTube enables you to block individual members from leaving comments and responses (and from flooding your YouTube inbox with negative messages). To block a user, all you have to do is click that member’s name to access his channel page, scroll to the Connect With box, and click the Block User link. This blocks the user from commenting on your videos and contacting you.
Tip |
You can also block a user directly from the video page. Just click the Block User link under that user’s comments. |
Unsubscribing Users from Your Channel
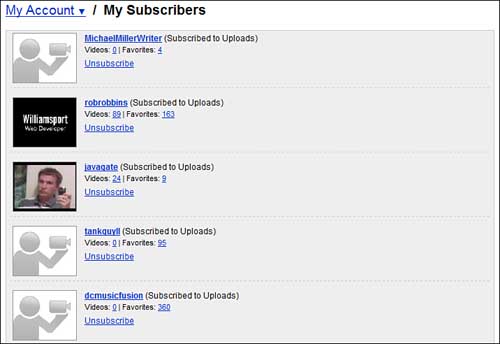
In addition to blocking user comments, you might also want to get rid of unwelcome subscribers to your video channel. You do this by clicking the Account link at the top of any YouTube page; when the My Account page appears, scroll down to the Contacts & Subscribers section and click the My Subscribers link. This displays a list of members subscribed to your videos, as shown in Figure 10.25. To remove a subscriber, simply click the Unsubscribe link under the subscriber’s name.
Figure 10.25 Removing a subscriber to your video channel.
Responding to Negative Comments
Another way to deal with negative comments is to deal with them head on by responding directly. YouTube lets you add your own responses to any comments left about your videos; this can be a good forum for exchanging views and opinions with your customer base.
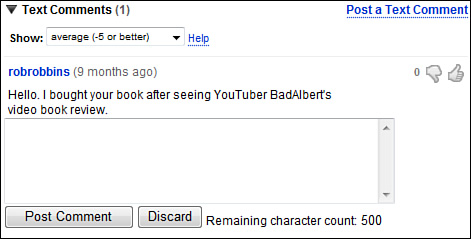
To respond to a message, go to the video page and scroll down to the Commentary section under the video window; you should see a list of all viewer comments. Find the comment to which you want to reply and then click the Reply link. This displays a reply box, as shown in Figure 10.26. Enter your reply into this box, and then click the Post Comment button. Your reply displays directly beneath the comment in question.
Figure 10.26 Replying to a viewer’s comments.
Caution |
Your best recourse might be not to respond to a negative comment. When you enter your reply, you run the risk of fanning the fires of a burgeoning flame war, from which neither the disgruntled viewer nor you might come off looking good. |