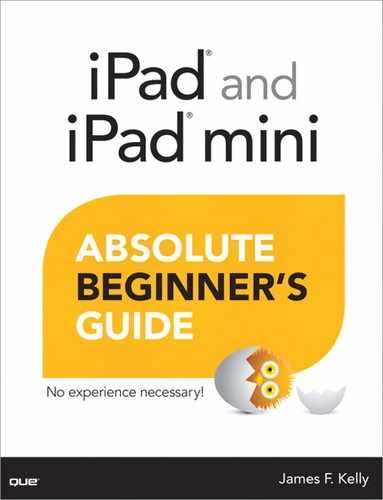
8. The Safari App
In This Chapter
• The Safari app
These days, having an Internet connection provides a lot of distractions—movies, games, and socializing (via Facebook, for example), are just a few things I can think of where I’ve used my Internet connection. But if I tracked my time spent with the iPad and monitored carefully what I use its connection to the Internet for the most, it would be a tie between email and web browsing.
When the iPad was released in 2010, it was promoted as a content-providing device; that is, it was designed to download and present information (content) to its user. Since the iPad’s release, however, the device has proven itself to be much more than a simple device for watching video, browsing the Web, and checking email. iPad owners now use the tablet to create content and send it out in the world—videos, artwork, games, and much more.
But, ultimately, the iPad still is a content-providing device. Most of the apps that iPad owners use (including those apps downloaded from the App Store) are still primarily focused on delivering something to the iPad user—a video, a game, an email, a reminder, and so on.
Although the iPad isn’t as small or lightweight as a mobile phone, it’s still fairly easy to carry with you. And it has one advantage over its mobile phone cousin when it comes to checking email, viewing a website, and playing a game (to name a few tasks). What is it? It’s the larger viewing area.
Whether you have the 9.7" iPad or the 7.9" iPad mini, reading an email, scanning a favorite blog or website, and playing a game are much easier on the eyes due to the larger displays. You can certainly use a mobile phone to do most of the same tasks you’d perform on an iPad (assuming you have an Internet connection and/or data plan), but I’ve found that most tasks that involve typing more than a sentence or two (such as typing a fast reply email or sending a text message) are easier on the iPad.
I do a lot of technology research via the Web, and I can tell you that browsing a website, reading technical specifications, and trying to click on links using my mobile phone is frustrating. The text is small, so I have to enlarge the screen, thus reducing the amount of information that can be displayed at one time. Tapping a link is a cross-your-fingers event, especially if there are a lot of links on the page (my fingers just aren’t that accurate when I’m trying to tap a link that is the size of a rice grain).
Nope, when it comes to web browsing on a mobile device, I reach for my iPad. (I’ll use my laptop when it’s available, but I love the iPad because it frees me from carrying my laptop everywhere I go.)
And the iPad is ready to go for web browsing the moment you turn it on and have an Internet connection established. It has a great built-in app called Safari, and I’m going to show you how to use it in this chapter.
 Note
Note
There are a ton of web browsers available for the iPad, and many of them have added features that are missing in Safari. You may choose later to investigate a new browser or two, but the Safari app actually benefits from the simplicity of its design—fewer features mean a more streamlined, less cluttered app. You’ll also find that the iPad is designed to open the Safari app by default whenever you click a web link embedded in an email or text message, for example. Apple isn’t offering a way to change the default browser at the moment, so it’ll benefit you to learn how Safari works and how to use its basic features.
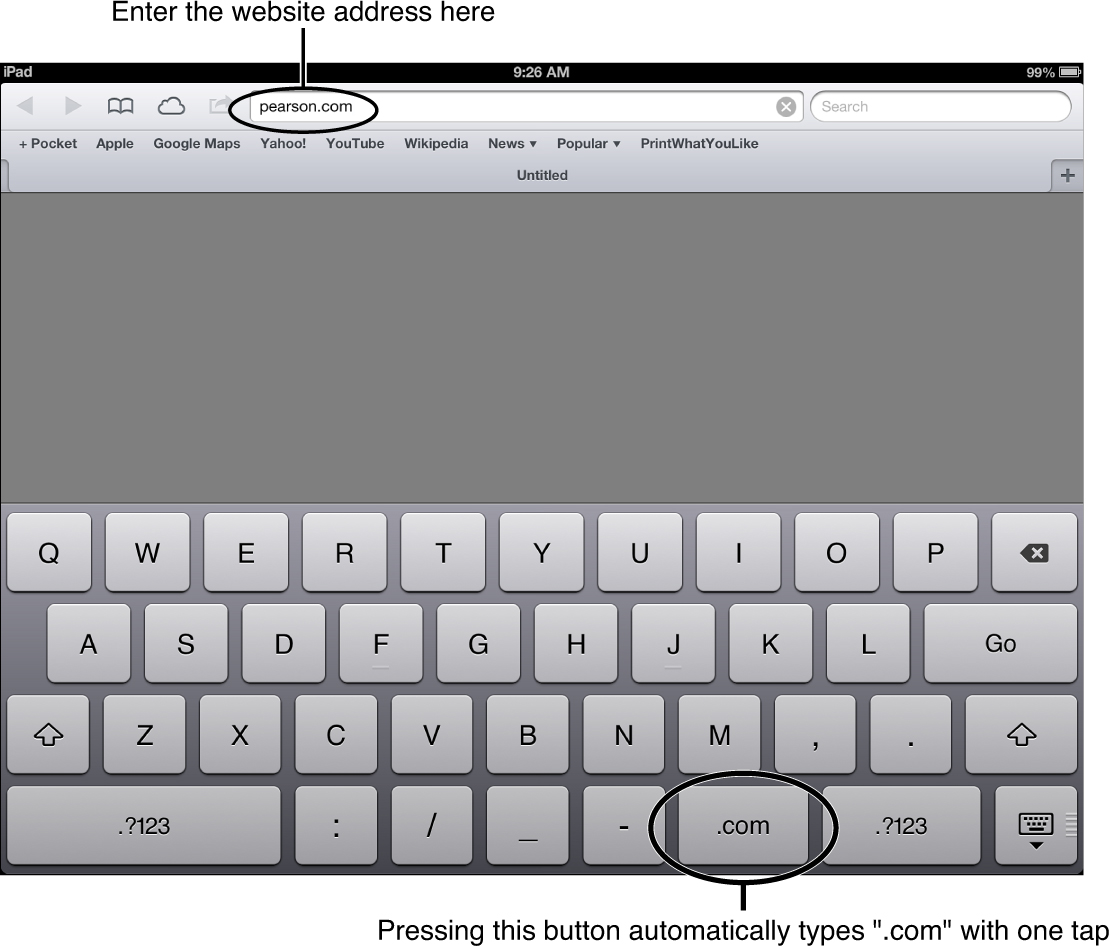
When Safari opens, you’ll see a blank screen. What I like best about Safari is how simple it looks. But don’t let the uncluttered screen fool you—it has plenty of features tucked away. You’ll notice that some of the buttons on the toolbar along the top edge of the screen are grayed out (disabled). That’s because there isn’t a web page displayed. Let’s go ahead and change that before I explain all the various toolbar items.
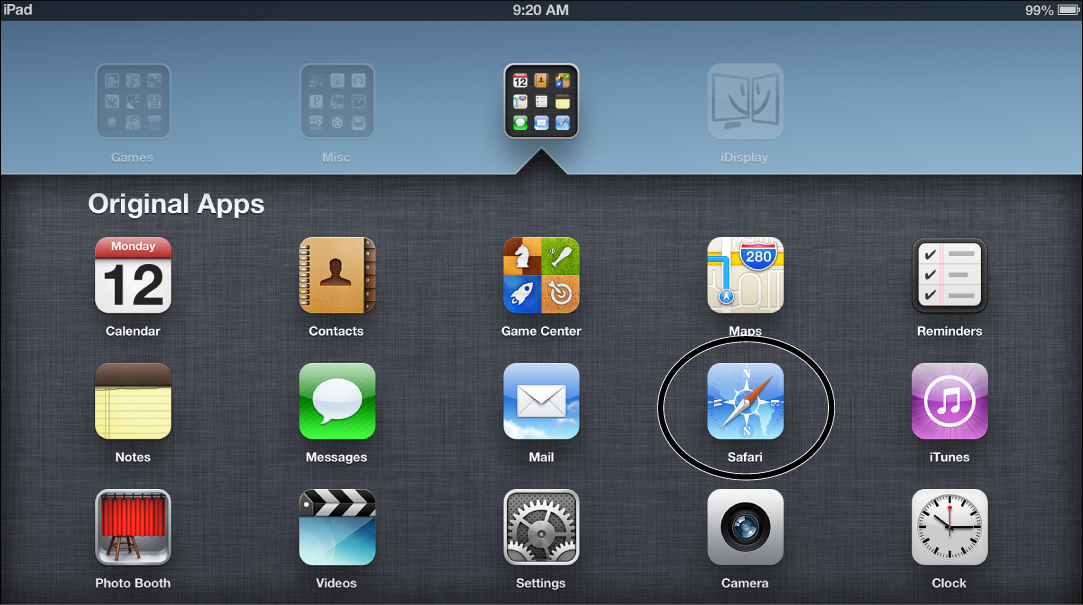
Tap your finger in the large text box that reads “Go to this address” and enter any web address you like. Figure 8.2 shows the onscreen keyboard that appears when I tap in the text box.
 Tip
Tip
I love the .COM button that appears at the bottom of the onscreen keyboard. Yes, it saves you only four keystrokes, but when you’re doing a lot of browsing from site to site, that little shortcut can really add up in saved typing time. Type in the first part of your address (and remember, you don’t have to type www) and, assuming the address ends in .com, you can save yourself four keystrokes by tapping the .COM button to add the period and COM. Obviously, if the address ends in .net, .edu, .mil, or anything else, you’ll have to type it longhand.
Tap the Go button on the keyboard, and the website will be loaded. Figure 8.3 shows Pearson.com’s website. Notice also that some of the toolbar buttons that were previously disabled are now available.
Note
If the website you typed in doesn’t load, check the spelling and try to load the page one more time. If it still doesn’t load, type in a different web address. If you’re unable to load any web page, be certain to check the Settings app to confirm you have a valid Internet connection. Refer to Chapter 3, “iCloud and Settings,” for steps on joining a Wi-Fi network or your provider’s data network.
As with any app you use on your iPad, the Safari app supports gestures, so you’ll find that swiping up or down will move the web page up or down, allowing you to view all its content. (Some websites do not have scrollable home pages, so swiping may not work because the entire home page is visible on the iPad’s screen.)
Before we move on, go ahead and tap in the web address box again. A small gray circle with an X inside will appear to the right of the address.
Tap the X and the web address will disappear. Go ahead and type in a new address and tap the Go key to load the new page. I’m having you load a second web page so we can demonstrate one of the tools on the Safari toolbar shortly.
Now that you have a new web page open, let’s take a look at Safari’s toolbar and some of its tucked-away features.
Touring Safari
With a web page open, take a look at the Safari toolbar, starting in the upper-left corner of the screen. The triangle pointing to the left is the Back button, and if you’ve never used Safari on your iPad before, the triangle pointing to the right (the Forward button) is grayed out.
Tap the Back button, and you should see the first web page you entered in the text box reopen. That’s the function of the Back button—it takes you back to the previous web page you were viewing.
After you tap the Back button, you’ll see that the Forward button is now available. Tap it and you’ll move forward one web page, and the second website you entered will be reopened. You can use the Forward and Back buttons to move quickly between web pages you’ve already opened and viewed.
Tip
If you tend to open a lot of web pages like I do, there’s a better way to move between pages you need to switch between often—it involves using tabs, which I’ll introduce to you shortly. The Back and Forward buttons are best used for one or two jumps at most. Anything more and you’ll quickly start forgetting where a website is in the queue—is it ahead or behind of the currently viewed page?
Notice in Figure 8.4 that a small plus sign (+) appears to the right of the gray bar displaying the web page’s name.
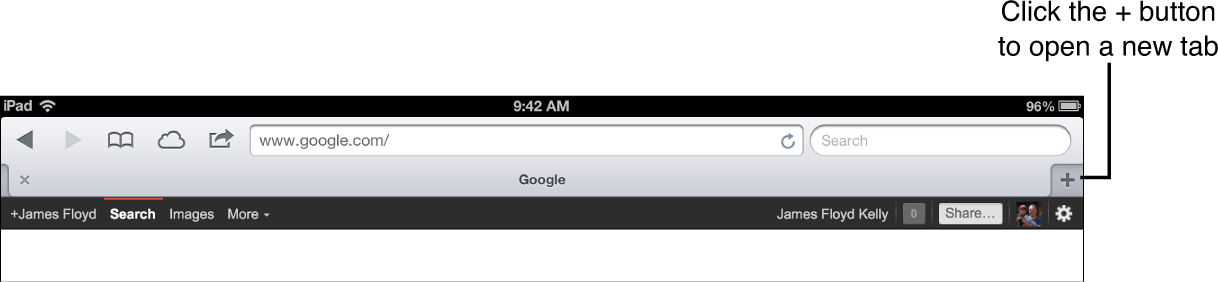
Go ahead and tap the plus button, and you’ll see an interesting visual effect happen. First, the web page you were previously viewing is shrunk and its name is pushed to the left side of the screen. Second, the onscreen keyboard appears again and a blank web address text box is provided to you. All of this is shown in Figure 8.5.
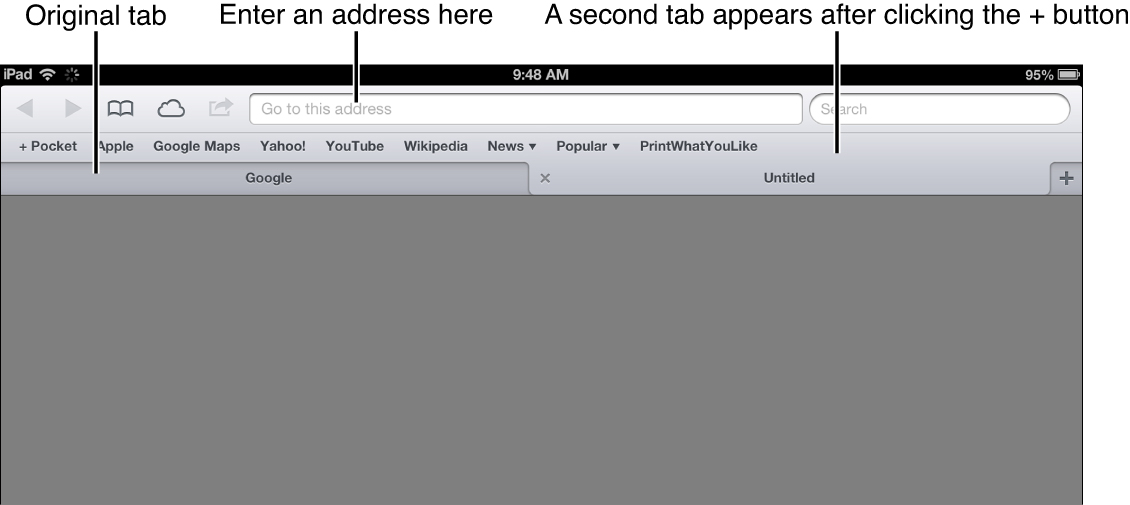
Enter a new web address (I’m going to enter bing.com) and tap the Go button. Now you can see in Figure 8.6 that I have two tabs—one showing Google.com and the other showing Bing.com.

Each of these web pages is being stored on a tab, and all it takes to move between the two web pages is a single tap on either of the tabs. Rather than using the Back and Forward buttons, you can now keep multiple web pages open simultaneously. (When I say open, I mean they are available by tapping the tabs rather than retyping in a web address—any information on those screens is not visible on the iPad’s screen but the website is sitting idle, ready for you to view again with a single tap of the tab.)
Notice also in Figure 8.6 that the currently viewed page has its tab displayed in a lighter shade of gray and has a small X on the left of the tab. Tapping this X will close the currently viewed tab.
What happens if you tap on the plus sign again to the right of the new tab? Not surprisingly—a third tab opens. The two current tabs are squeezed to the left to allow the third tab to fit onscreen (and the keyboard appears as well).
You may continue opening tabs, though eventually, you will run out of room on screen. The tabs are still there, though you will need to swipe the tab bar to the right in order to see them.
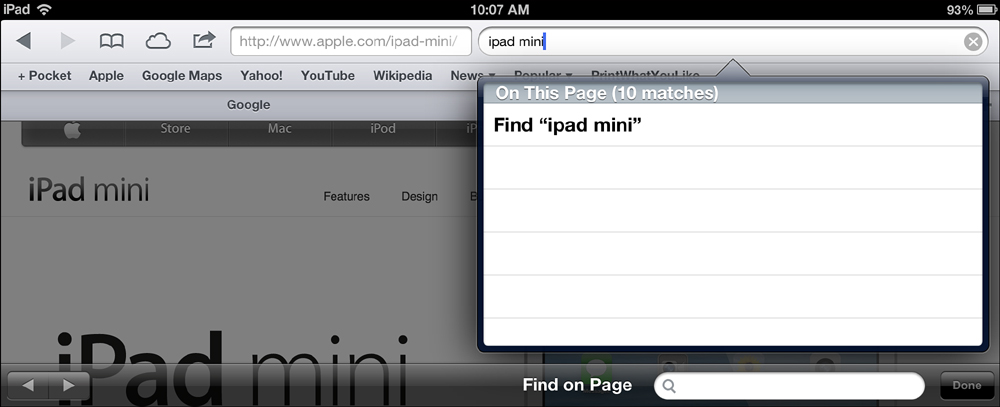
As you saw in Figure 8.6, a small box is labeled Search. Clicking it opens the keyboard as shown in Figure 8.7.
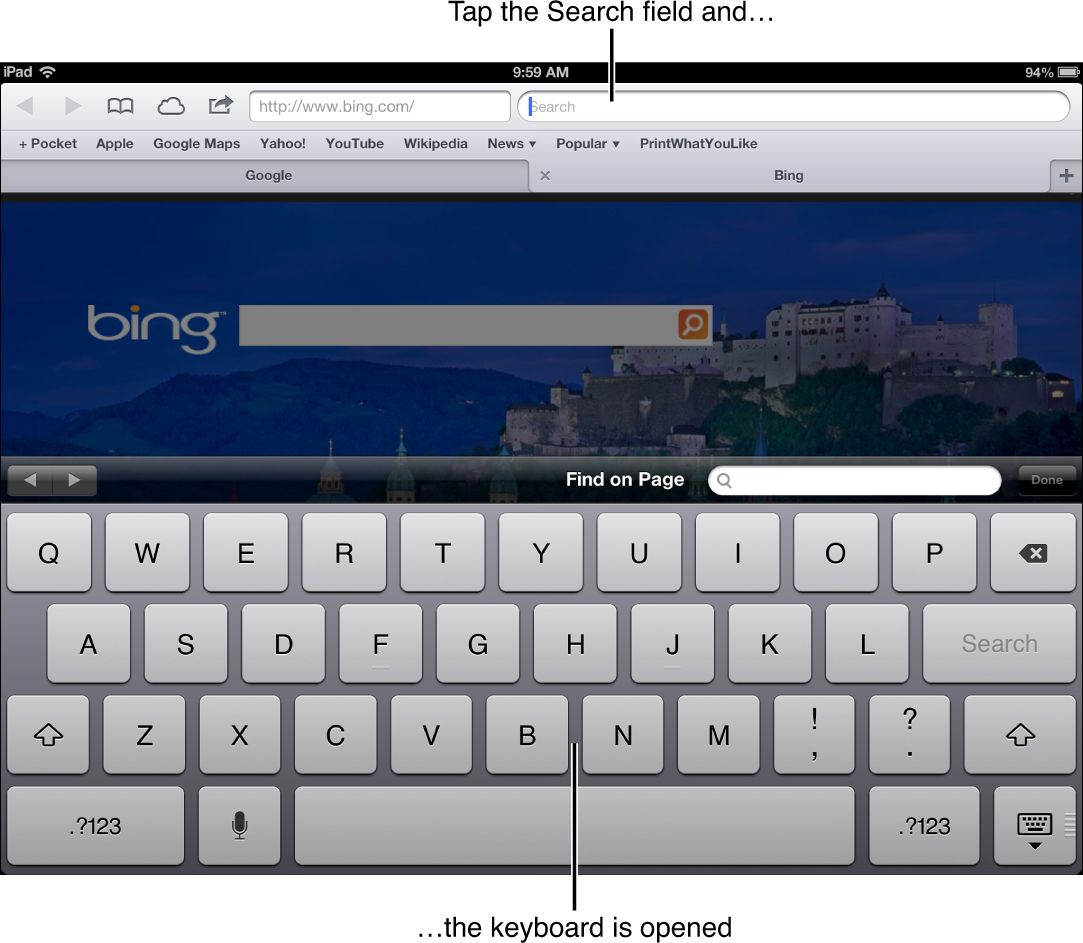
When you tap in the Search box, two things happen. First, the onscreen keyboard allows you to type in one or more keywords to use in your web search. Second, just above the keyboard you’ll see another Search box that allows you to search only on the currently viewed page. This is useful if you’re looking for a specific word or maybe a part number or some other unique piece of information that exists on a dense, text-filled web page.
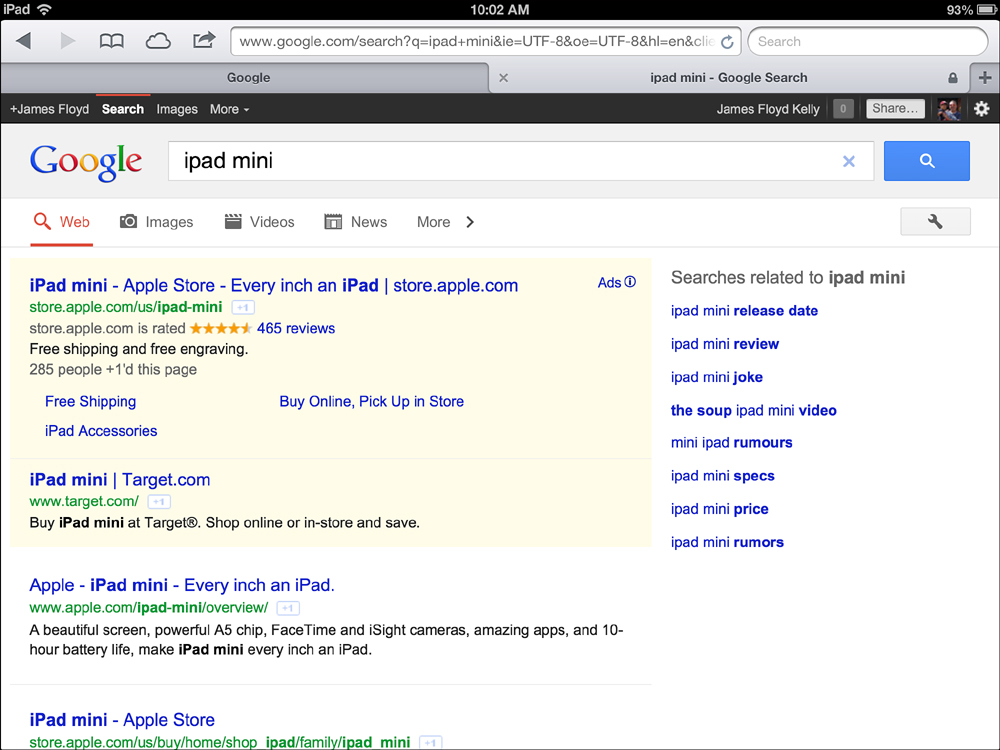
Figure 8.8 shows the results I get for my search on “iPad Mini” after tapping the Search button on the keyboard.
Note
Did you happen to notice that the web page I was viewing was Bing.com? And did you also notice in Figure 8.8 that the search results for “iPad Mini” were returned using Google.com? You can configure the default search engine used in Safari by opening the Settings app, tapping the Safari option in the left column, and selecting your preferred search engine on the right side by tapping the Search Engine option—your options are Google, Yahoo!, and Bing.
I can swipe up or down to view the search results and then tap a link if I wish to open it. Figure 8.9 shows that the Search tool will provide you with the number of matches found for the text typed into the Search bar.
Tapping a link in the search results doesn’t open a new tab—instead, the link you tap is opened in the existing tab, replacing anything previously viewed.
If you’d rather not have search results replace the current tab, be certain to tap the plus sign to open a blank tab and then use the Search box provided on that tab.
If you chose to use the Search box that searches only the currently displayed web page, type in your search term. Safari will automatically move the web page to the first occurrence of your search term, as shown in Figure 8.10.
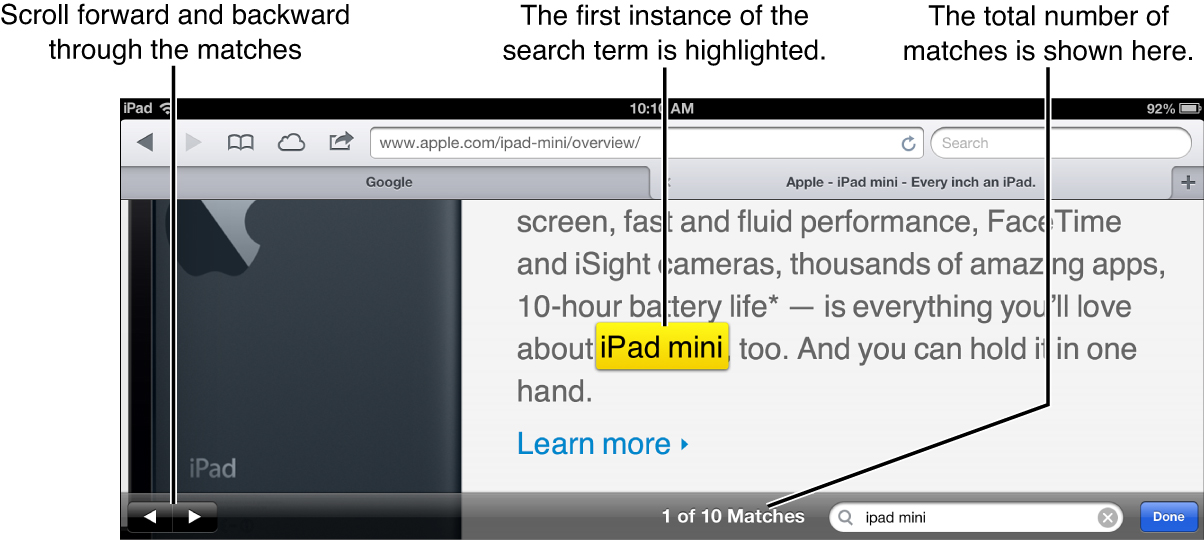
Take a look again at Figure 8.10, and you’ll see a few other bits of information. You can see that there are ten instances (matches) of the term “iPad mini” on the current page. You use the left/right arrow buttons to move forward and backward through the instances. Each instance where the search term is found will be slightly enlarged and highlighted in yellow.
Using the Share Feature
Now let’s return to the left side of Safari’s toolbar. Tap the Share button and you’ll see a small window open with a number of options inside, as shown in Figure 8.11.
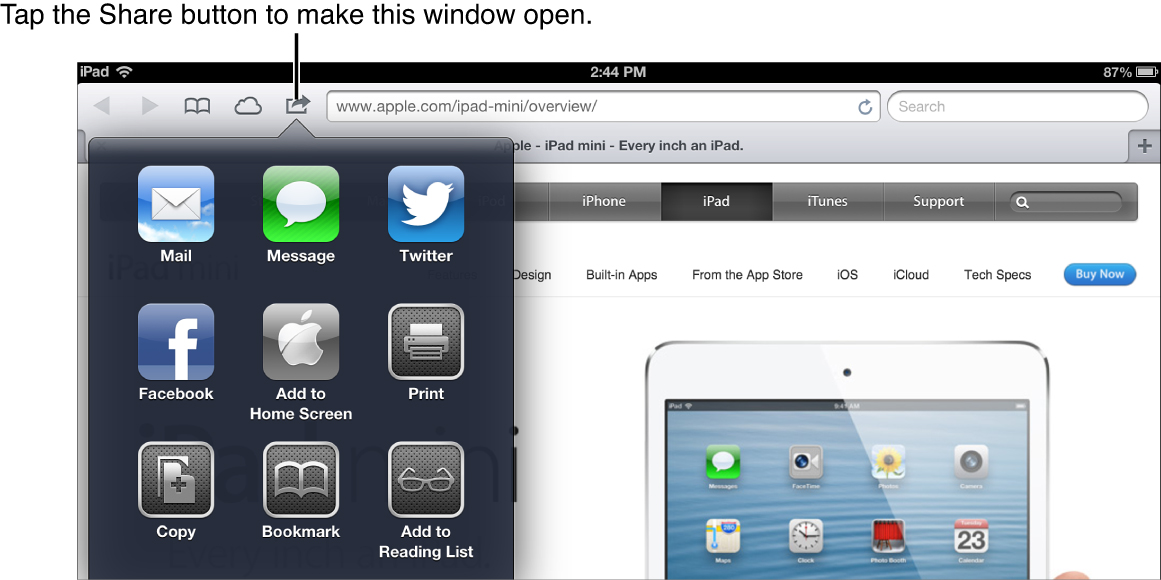
If you tap the Mail icon, a blank email message will open with the web page included as an attachment. You can then type in a recipient’s email address to share that website with him. (When he receives it, if he taps on the attachment, the web page will open in his default web browser.)
The Message, Twitter, and Facebook buttons allow you to share the website using these three social tools. I cover the Messages app in Chapter 10, “Apps for Instant Communication” and Twitter and Facebook apps in Chapter 11, “Social Apps.”
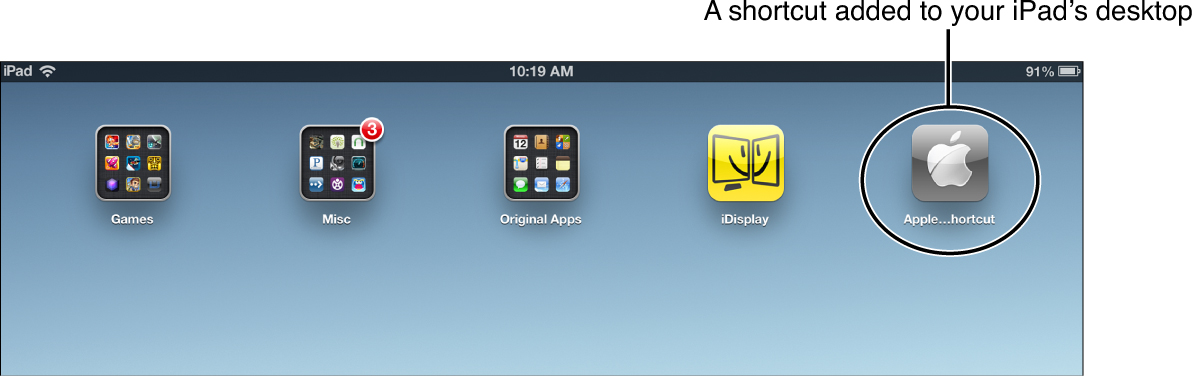
If you tap the Add to Home Screen button, you’ll be asked to give the shortcut a name (using the onscreen keyboard), as shown in Figure 8.12.
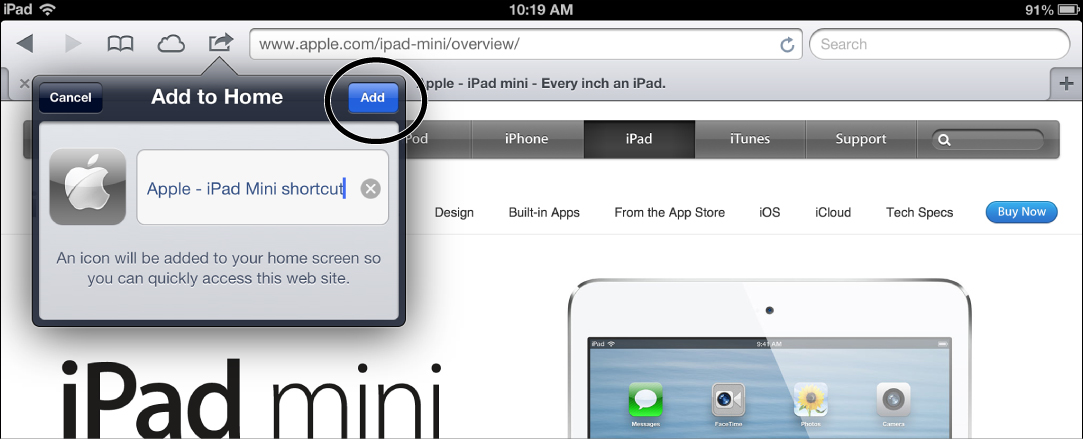
Tap the Add button (in Figure 8.12), and the shortcut will be added to the home screen, as shown in Figure 8.13. Note that although the shortcut looks like an app icon, when it’s tapped it will simply open the Safari app and display the web page you added as a shortcut.
Returning to the Share button’s options, if you tap the Print button, you can print the web page to any printer that supports AirPlay.
The Copy button copies the web page address to the iPad’s clipboard so you can use the Paste command in any app that supports it.
The next two buttons, Bookmark and Add to Reading List, perform two interesting actions. The Bookmark button adds the web page address to a saved list of web pages called Bookmarks. The Add to Reading List adds the web page to a list you can view at any time—this list holds web pages you wish to view (and read) at a later time, not necessarily right now. Tap the Add to Reading List button when you find a web page you want to come back to later, but you don’t necessarily want to bookmark and keep indefinitely.
Tap the Bookmark button and you’ll see a screen like the one in Figure 8.14.
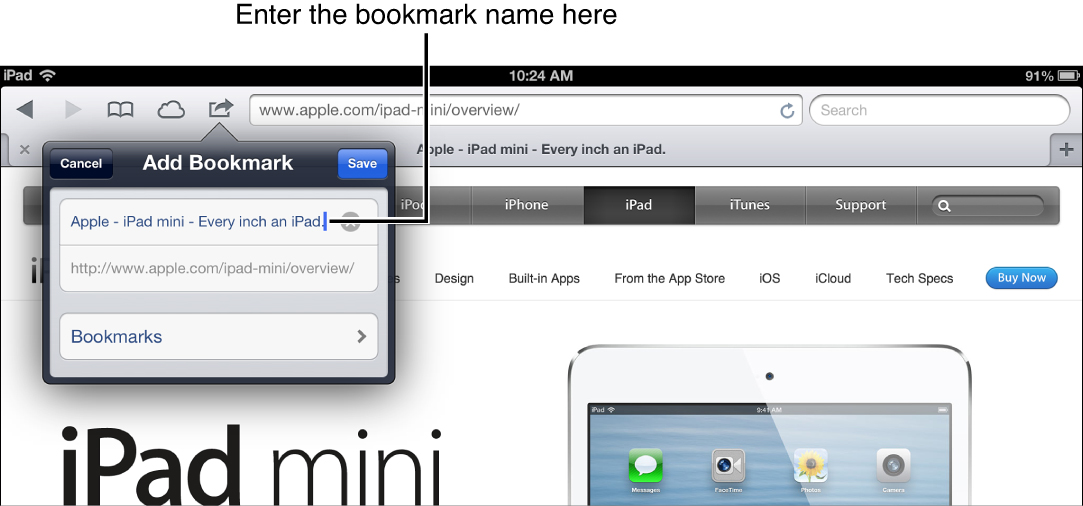
You can use the onscreen keyboard to change the title assigned to the bookmark—I suggest you shorten it as best you can. Also, the Bookmark tool can organize your saved web pages in categories (folders) that you create. I’ll show you how to do this in the next section, but if you have created new categories, you can tap the button at the bottom of Figure 8.14 and select the category where you wish to file away the bookmarked web page. Tap the Save button when you’re done, and the web page will be stored.
As for the Add to Reading List, go ahead and tap the Share button again and then tap the Add to Reading List button. Unlike adding a bookmark, no window appears; instead, the web page is filed away to the Reading List.
Now that you’ve added a bookmark and a web page to the Reading List, let’s take a quick look at how you use those two features.
Bookmarks and Reading List
Tap the button on the Safari toolbar that looks like an open book, and you’ll see the Bookmarks menu appear, as shown in Figure 8.15.
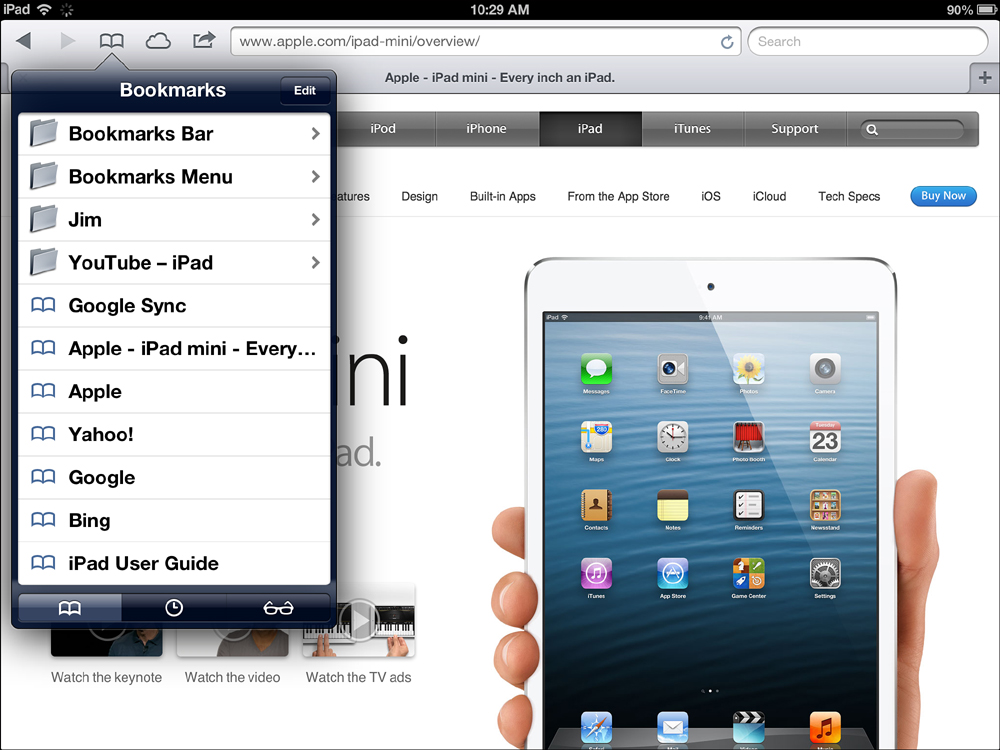
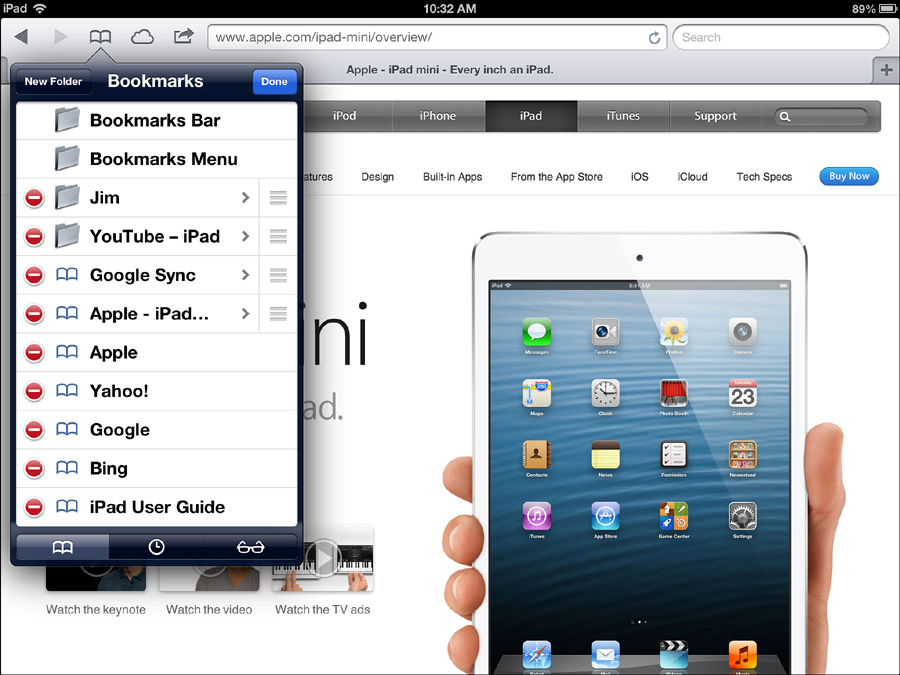
The Bookmarks menu has a number of features that aren’t always obvious. First, tap the Edit button at any time to delete a folder or saved bookmark. Folders look like, well, folders (in Figure 8.15, Jim is a folder), and bookmarks have a small book icon to the left of their title. When you tap the Edit button, you can delete any item (except for the Bookmarks Bar and Bookmarks Menu folders) by tapping the small red circle with the minus sign inside, as shown in Figure 8.16. You can also tap the New Folder button (also shown in Figure 8.16) to add a new folder, which is useful for filing away bookmarks by category such as Home or Work. Tap the Done button to close the Edit feature.
Tap on a folder to open it and view any saved bookmarks inside, or tap a bookmark not filed away in a folder to immediately open that web page in Safari.
At the bottom of the Bookmarks menu, you’ll see three icons. Left to right, they are Bookmarks, History, and Reading List. Tapping the History button will show you a list of recently viewed web pages.
The History tab is useful because it also saves a week’s worth of browsing history.
Tip
If you don’t want someone viewing your browsing history, you can use the Clear History button at the top of the History window. Keep in mind that any web pages you haven’t bookmarked are gone for good when you use the Clear History option.
Tap the Reading List button (it looks like a pair of eyeglasses) and you’ll now be given a list of all the web pages you’ve saved using the Add to Reading List button. Notice that two buttons are shown in Figure 8.17—the All button and the Unread button.
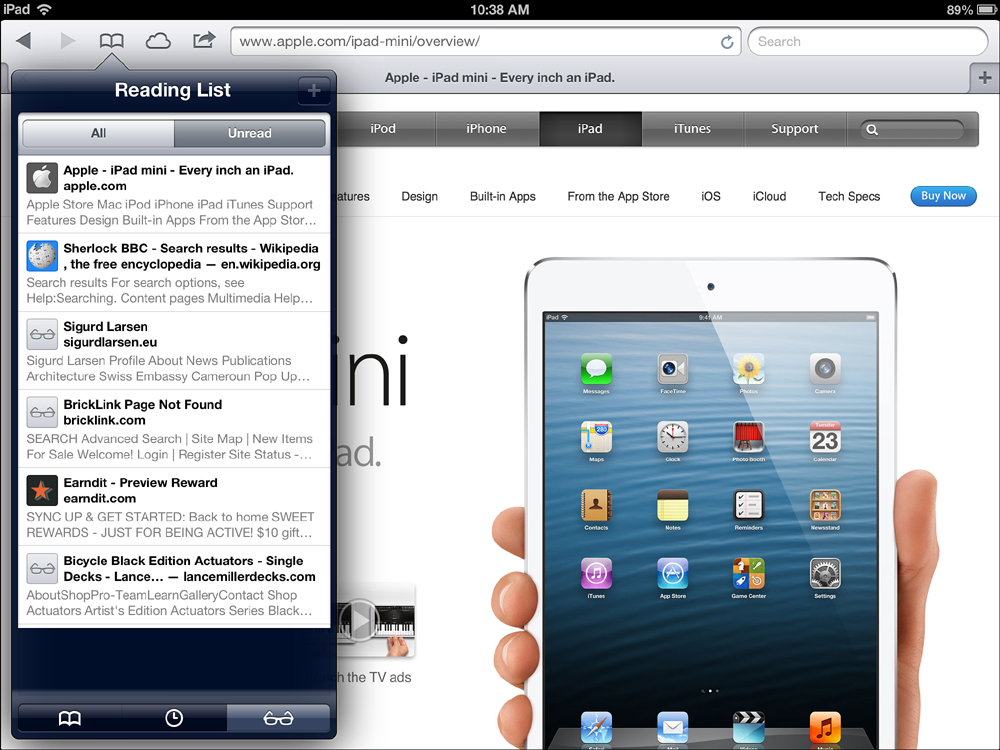
Tap the Unread button and then tap a web page to view it. Once you’ve viewed a web page stored in the Reading List, it is marked as Read and moved to the All list. When you’re viewing the All list, a left swipe on any web page in the Reading List box will offer up a Delete button so you can remove the web page from the Reading List.
There’s also a fast way to add a web page to the Reading List. While the Reading List is open, tap the plus sign in the upper-right corner and the web page that is currently displayed in Safari will automatically be added to the Unread list.
Tip
The Unread button is a great way to track those web pages you’ve saved for later reading but haven’t yet had time to read. Just be sure to occasionally purge the All list; otherwise, it will be time consuming to search through it. If you find a web page that you absolutely must keep, consider adding it as a bookmark and then remove it from the Reading List.
iCloud Tabs
The last button on the Safari toolbar is the iCloud Tabs button, shown in Figure 8.18. As you can see, I’ve not yet synced my web browsing between my iPad and my other iOS devices.
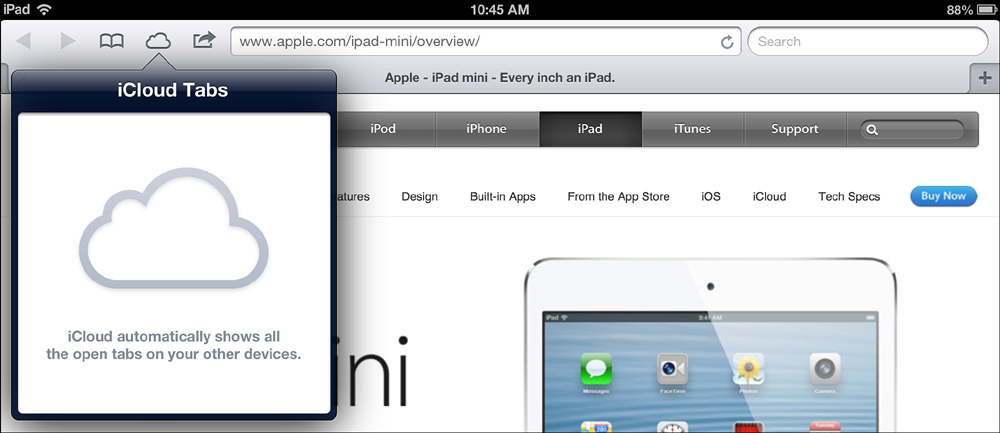
The way iCloud Tabs works is simple. If you have an iPhone, iPod touch, or any other device running iOS that is also configured to use iCloud with your Apple ID (refer to Chapter 3 for more details), any open tabs you have in Safari can be shared between devices.
Put simply, if I’m viewing the Peachpit.com web page on my iPhone while standing in line for a movie and I’ve configured iCloud to sync with Safari, then when I get home and pick up my iPad I can immediately pick up where I left off on my iPhone by tapping the iCloud Tabs button. The page I was viewing while standing in line will be visible.