6. The Calendar App
In This Chapter
I mentioned in Chapter 5, “Notes and Reminders,” how I use my iPad as my own personal assistant; I can’t afford a living, breathing human personal assistant, but a number of apps on my iPad provide me many of the same functions. Take the Reminders app I covered in Chapter 5, for example. I used to ask my wife and friends to “remind me to return this book” or “don’t let me forget about the phone call this afternoon.” Now I let my iPad do it for me.
Going hand-in-hand with the Reminders app is the Calendar app. This is the app I use to schedule appointments, create regularly occurring events (such as changing the air filters in my house), and find holes in my schedule to squeeze in phone calls with editors, dental appointments for the kids, and important dates such as birthdays and anniversaries. (If you’ve added those dates to any contacts in the Contacts app, however, you’ll love that they’re automatically added to the Calendar app!)
With iCloud, your Calendar app also synchronizes with any device running iOS or OS X. If you have an iPhone or a Mac laptop or desktop computer, you’ll find it easy to access your calendar no matter which device you happen to have on hand at the moment.
Some of you might be concerned because you’ve gotten used to using a different calendar such as Google Calendar or the one in Microsoft’s Outlook. Well, you’ll be happy to know that it’s super-easy to synchronize a variety of other calendars with the Calendar app, and I’ll show you how to do so later in this chapter.
The Calendar app is only useful, however, if you actually use it. This means developing a habit of checking it in the morning to see what your day looks like or when you’re speaking to someone on the phone who is offering up a day and time for a possible new event (such as a doctor’s appointment). Before I developed a habit of using the Calendar app, I would frequently double-schedule myself, accepting a conference call invitation at the same time I was scheduled to meet with a client.
But that rarely happens anymore. The Calendar app is also able to give me pop-up reminders just like the Reminders app—I can even pick how early I want that alert, such as an hour, a day, or even a week in advance.
Let me show you the Calendar app now; you’ll see that it’s just as easy and intuitive to use as the other iOS apps, especially with the touch screen.
 Note
Note
You’ll find that the Calendar app is ideally designed to be used in Landscape view. It can be used in Portrait view, but any text on the screen (along with times) tends to get cramped. That said, there are no hidden buttons or features when in Portrait view, so what you see in Landscape you’ll also see in Portrait.
Check Your Schedule
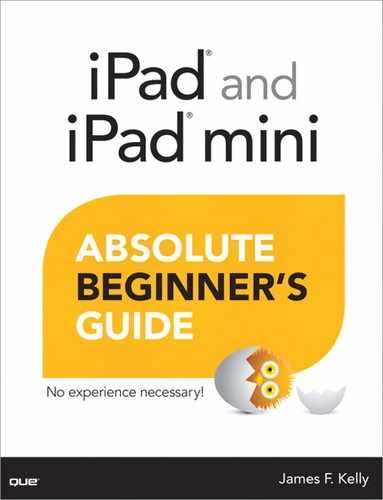
The Calendar app is pretty easy to spot. Figure 6.1 shows the icon you’ll need to tap to open the Calendar app.
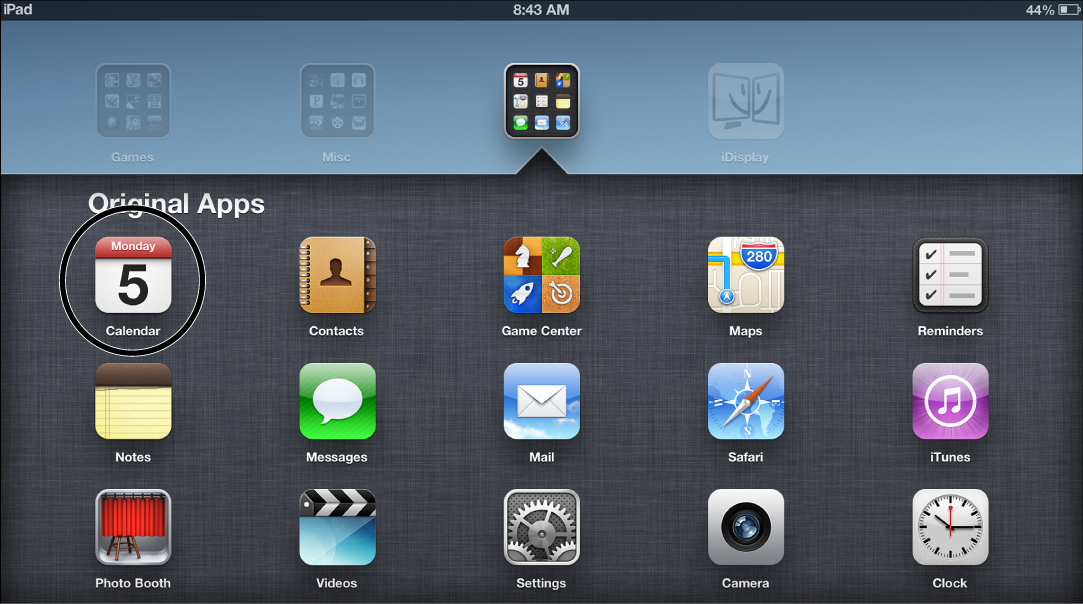
Tap the Calendar icon to open the app and you’ll see a similar screen to the one shown in Figure 6.2—the only difference being the Month and Year views. I’m writing this sentence on November 5, 2012, and you can see in Figure 6.2 that the current date is labeled “Today” and highlighted in blue.
You’ll also notice in Figure 6.2 a number of other items, including a birthday, some chapter due dates, and some appointments (doctor, dentist, and haircut). Some have times assigned to them (Dentist 10 a.m.) and others do not. Each of these is called an event, and they can have reminders set, or you can choose to have the event represented as only a bit of text on the calendar page.
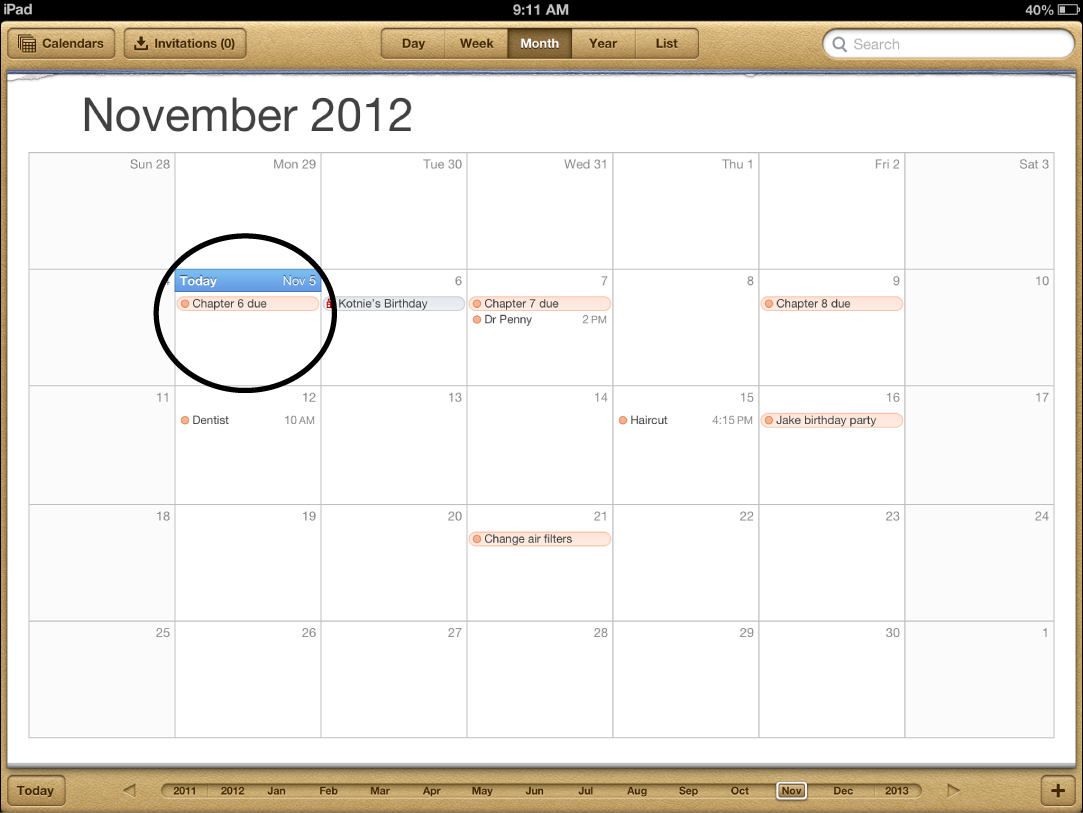
At the top of the screen is a selection bar that allows you to change the view of the calendar. The options include Day, Week, Month, Year, and List. If I tap the Day button, for example, I get an hourly breakdown for the day, as shown in Figure 6.3.
A quick tap on the Week button changes the view to show only the current week’s schedule of events, as shown in Figure 6.4.

The default view is the Month view, but if you change to a different view and close down the Calendar app, the next time you open it the app will remember the last view you selected and use it.
Depending on the view you select, you’ll also have some different options displayed along the bottom edge of the screen. For example, in Figure 6.4 where the Week view is displayed, you can tap any of the other weeks (such as Nov 11–17) to jump ahead or back to a different week of events.
If you tap the Year view that’s shown in Figure 6.5, for example, you can view every month in the current year; scheduled events are represented as colored boxes on a particular month. But notice at the bottom of the screen that the viewing options have changed and now you can tap a previous year or a future year for viewing. If a previous or future year isn’t available on the bar (or a previous week, month, or day), you can use the left- or right-pointing arrow to shift the displayed options ahead or back.

No matter how far or back you go in a calendar, you can always tap the Today button in the lower-left corner to jump right to the current day in whatever view you have selected. For example, if you’re in the Day view and are looking a day from next month’s schedule, you can tap the Today button and the Day view will show today’s schedule. Just remember, the Today button doesn’t change your selected view (Day, Week, Month, Year, List). Instead, it just moves the view to include the current day.
I’ve shown you four of the five views, so you’re probably wondering about the List option. Tap it and you’ll see a screen similar to the one in Figure 6.6.
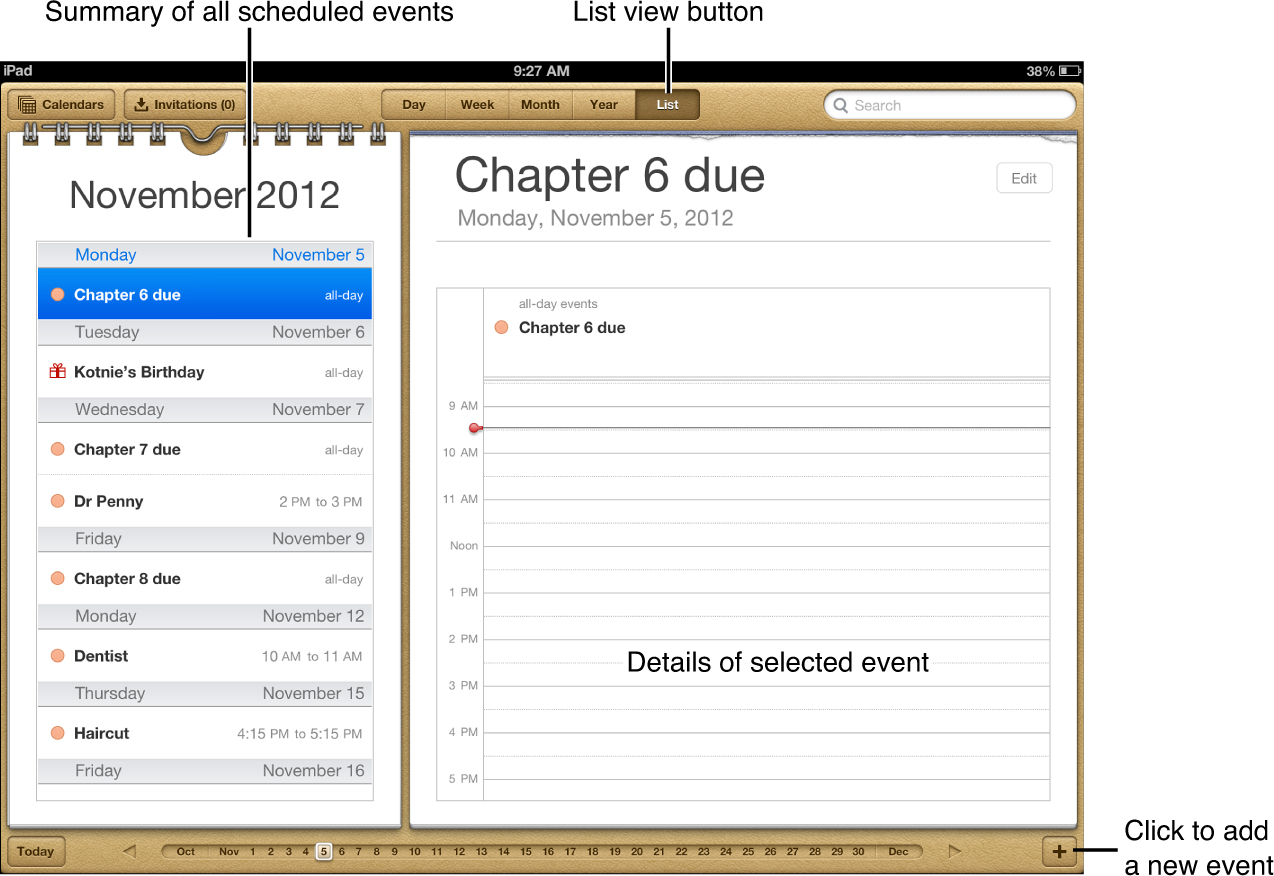
The List view summarizes all of your scheduled events on the left side of the screen. A single tap on any event in that list will display it’s Day view on the right side of the screen.
The list is also scrollable. Figure 6.6 shows events up to November 16, but a quick swipe up with my finger and I can easily view more events.
The last two items I want to point out before we move to the next section are the two buttons in the upper-left corner of the screen: Calendars and Invitations.
Calendar—The Calendar app can display multiple types of events on a calendar. You can color-code your events so that those related to work are displayed in one color (orange, for example) and personal events are displayed in another color. You can pick the color, and you can turn a calendar on or off to hide its events from the current view. The events aren’t deleted but are instead hidden until you turn them back on. You can even create new calendars (maybe one for each member of your family, for example). I’ll explain these features and a few more later in this chapter.
Invitations—As for the Invitations button, you’ll see later in this chapter how to invite others to an event you’ve created. When you invite someone to an event (such as a birthday party), those invitees will receive an email asking whether they can attend. The results of this poll will be displayed when you tap the Invitations button. More on the Invitation option shortly.
Create an Event
The Calendar app is all about events, so it makes sense that the key task you need to learn is how to create events. Creating an event is easy, and the Calendar app gives you two different ways to do so. The first and easiest is to tap on a day or time shown on the on-screen calendar. An Add Event window will appear like the one in Figure 6.7.

The first method is found in the lower-right corner of the screen. If you tap the plus sign previously shown in Figure 6.6, you get the Add Event window along with the onscreen keyboard, as shown in Figure 6.7.
You can tap the Cancel button in the upper-left corner of the Add Event window at any time to cancel any work you’ve done on creating a new event. Likewise, after you’ve entered a title and maybe selected some of the other options, you can tap the Done button in the upper-right corner to save your event.
Let’s walk though the Add Event window now and look at the options available to you. To add an event, follow these steps:
1. Type in a short description of your event in the Title field, as shown in Figure 6.8. This step is required.
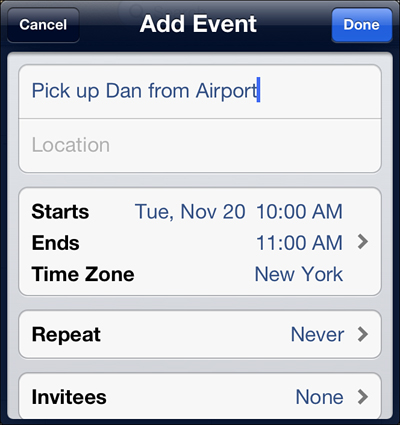
2. Add some text in the Location box if that will help you when viewing the event in the calendar. This could be useful, for example, if you live in a city with two airports (such as Houston, Texas) and need to remember which airport to pick up a friend from.
 Caution
Normally, the time zone doesn’t need to be changed. Most of us make events that are in our current time zone, but if you know you’ll be traveling to a different time zone for the new event, make certain to tap the Time Zone line and select the one that matches the event’s time. Otherwise, you may find yourself being reminded of an event at 1 p.m. Central Time when you’re in New York at 2 p.m. Eastern Time.
3. Tap on the Starts line and you’ll see a screen like the one shown in Figure 6.9. It contains the familiar wheels at the bottom that let you dial in the day, month, and time (including a.m. or p.m.).
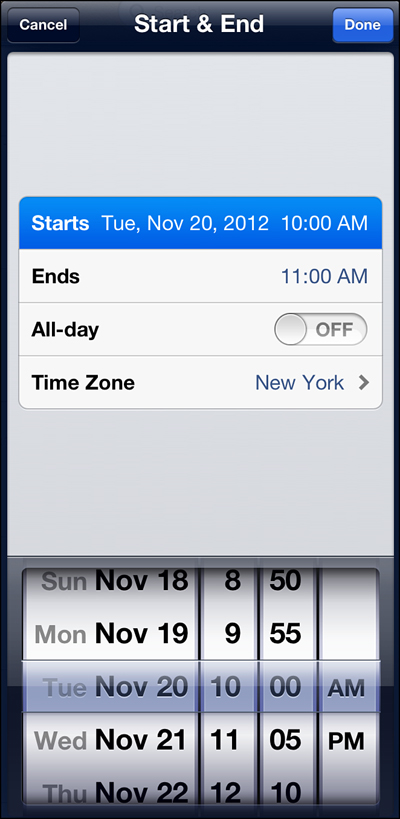
4. If you don’t want to create an all-day event, skip to step 5. If you do want to create an all-day event, tap the Off button shown in Figure 6.9. It will change to On and the dials for setting the time (not the date) at the bottom will disappear.
5. Use your finger to dial in the start date and time.
 Tip
Tip
When setting a start time, remember that you need to account for your travel time and so on. In this example, I need to pick up Dan at the airport at 3 p.m., but it takes me an hour to get there, so I’ve set the start time accordingly.
6. You can tap the Ends option to use the dials to set the event’s end time. If you’ve set the event as an all-day event, the Ends option only offers the ability to dial in the end date, not the time.
7. You need to finish setting the start and end times before you can gain access to additional options, so go ahead and tap the Done button to return to the Add Event window shown in Figure 6.10.

Create a Recurring Event
Earlier I mentioned that you can create a repeating event. Follow these steps to do so:
1. Tap the Repeat option shown in Figure 6.10 to display a list of repeat schedules, as shown in Figure 6.11.
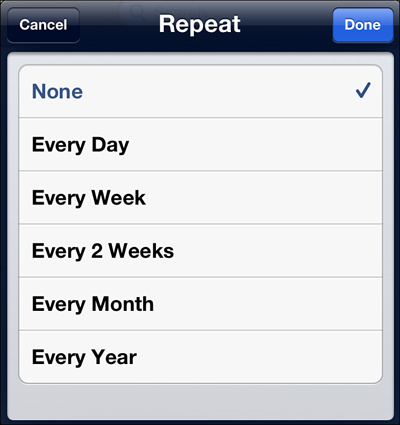
2. You can select from Every Day, Every Week, Every 2 Weeks, Every Month, and Every Year. Let’s assume I’ll be picking my friend Dan up at the airport every month on the same date and time. Tap the Every Month option (a check mark will be placed next to this option) and tap the Done button.
3. When you select a repeating option other than None, you are also given the ability to select when to end the repeat action, as shown in Figure 6.12.
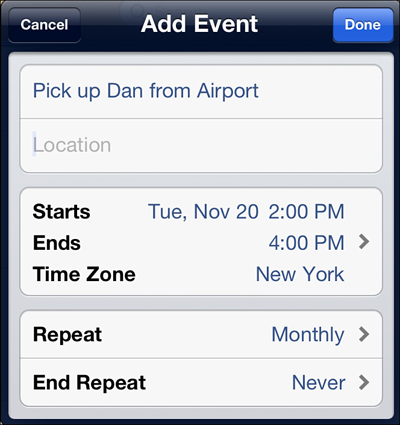
4. The End Repeat option is automatically set to Never, but if you tap it, the familiar set of dials appears, which allows you to dial in the month, date, and year you wish to end the repeating event. As you can see in Figure 6.12, if I set the date to January 20, 2013, I will be reminded on February 20, 2013, March 20, 2013, and so on. Tap the Done button to return to the Add Event window.
5. Scroll down the Add Event window to view additional options. As you can see in Figure 6.13, these options include Invitees, Alert, Calendar, and Availability.

6. Tap the Invitees button to select people from the Contacts app. For each person you want to add, tap the plus (+) button, as shown in Figure 6.14.
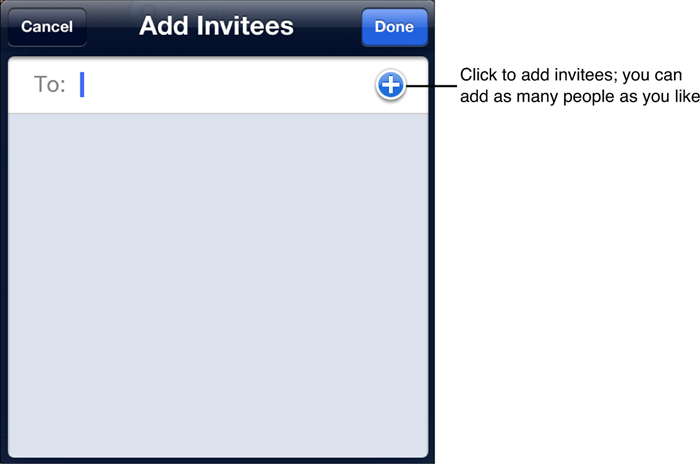
7. Select those you wish to invite to your event, and they will be emailed an invitation to which they can respond Yes or No. A numbered counter will alert you to how many people have been invited. (Likewise, tap on an invitee’s name to select it and then tap the Backspace key on the keyboard to delete that invitee.)
8. The Alert button lets you select how much time ahead of the event’s start time you wish to have an alert pop up on the screen. The maximum amount of time is “2 days before” and the minimum is “At time of event.”
Tip
For those of you who favor your alarm clock’s snooze button, you can also tap the Second Alert option to configure a second reminder. But that’s all you get! Note that some users may not have the ability to set a Second Alert—it depends on the type of calendar account you are using. I have a Google account for Gmail and Calendar, and the Google Calendar allows for two reminder alerts. Some services do not, so a Second Alert may not be available to you.
9. Below the Alert section, you’ll find the Calendar option. This lets you assign your new event to a category such as Home or Work or other category. (I’ll show you in a bit how to create new categories.)
10. Below the Calendar option is the Availability option. You can toggle between either Busy and Free.
11. Below the Availability option is the URL text field. Here, you can easily enter a web address for a company you’ll be visiting or maybe the link to the online map.
12. Below the URL field is the Notes field. Add any kind of additional information you like here.
13. Now that we’ve completed the Add Events window, tap the Done button to add this event to your calendar.
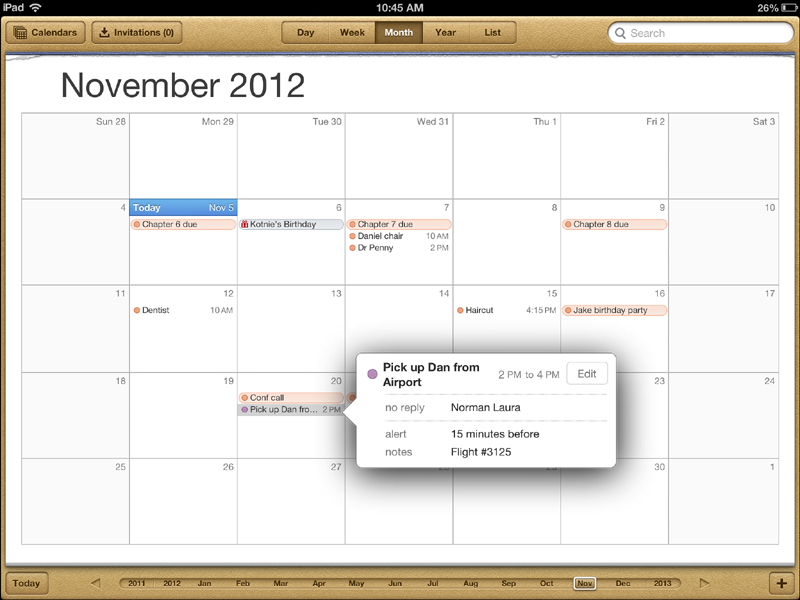
14. After you tap the Done button, the new event is added to the calendar, along with a small window that contains the details so you can verify you entered everything correctly. You can see this small window in Figure 6.15.
Tip
Did you make a mistake? If you have set the start or end time improperly, or maybe forgot to configure an alert, you can tap the Edit button to return to the Add Event window to make the necessary changes. You can edit any event by tapping it and then tapping the Edit button on the small window that appears.
Add a New Calendar Category
I mentioned earlier that you can file events into specific categories that are color-coded. For example, I have my work-related items (Work) displayed with purple dots and my personal items (Home) shown with orange dots.
If you want to create a new category, simply tap the Calendars button and you get a pop-up window like the one shown in Figure 6.16.
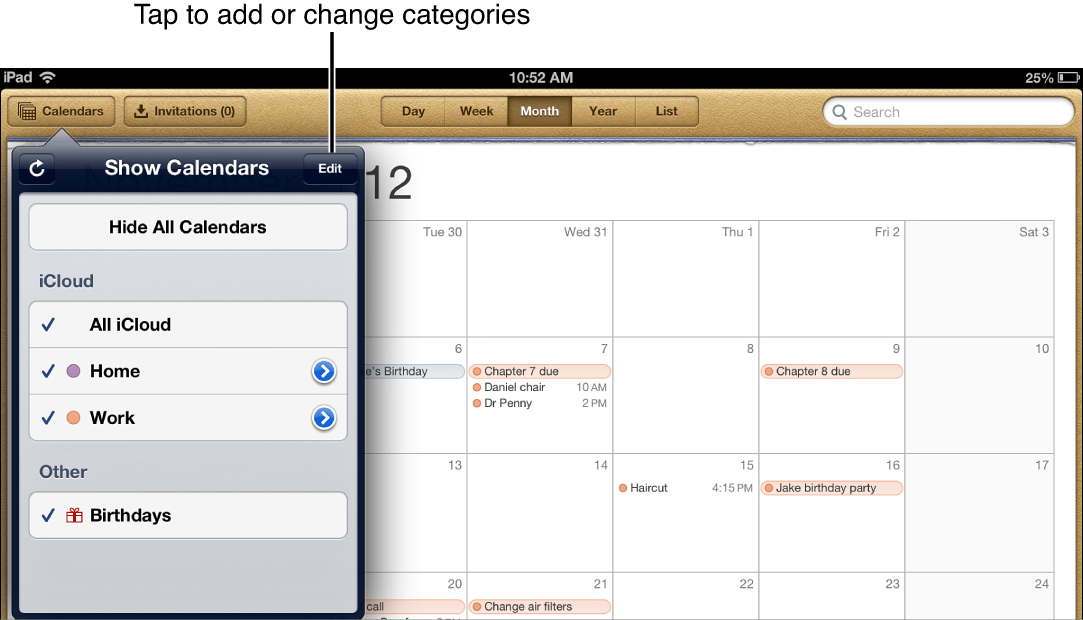
Notice in Figure 6.16 that I have the Home and Work calendars visible (they have check marks to the left of their names). I can tap on a calendar category to remove the check mark and those events will be hidden until I tap the calendar category again. I can also tap the small blue circle to the right of a category to change the color of the category or even rename it.
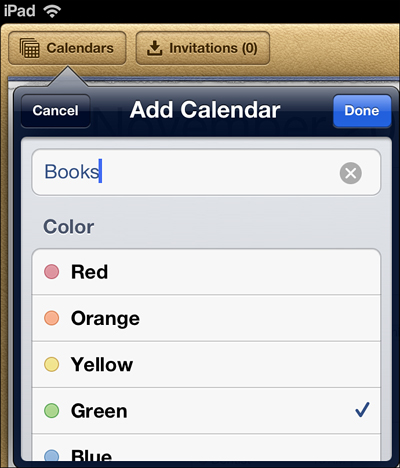
If you want to create a new category, tap the Edit button shown in Figure 6.16 and then tap the Add Calendar option shown in Figure 6.17. As you can see, I’ve created a new category named Books and given it the color green. I can now create events related to my writing (such as “Chapter 3 due”) by assigning them to the Books category.
As for the Invitations button, you may have noticed in Figure 6.15 that I invited Laura to ride along when I pick up Dan from the airport. She received the email invite and declined. I can tap the Invitations button as shown in Figure 6.17 to see her response. Your invitees will always be listed here along with their response to any invites you’ve extended.
Importing Other Calendars
Although I use the Calendar app on my iPad quite often, I don’t always have access to it. If I’m sitting at my laptop computer, I tend to favor using my Google Calendar, a free calendar tool that requires a Google ID. My wife, on the other hand, uses the calendar that comes with the Microsoft Outlook application. And many other calendar tools are out there. Fortunately, the Calendar app with iOS works with many other calendars, pulling in their events and even pushing out events you create using the Calendar app so they exist on your other calendar(s).
I cannot cover every calendar option available, so instead I’ll point you in the direction you need to go to get your calendars synced with the iOS Calendar app.
If you use Google Calendar, be sure to visit the following link for instructions on synchronizing Google Calendar with the iOS Calendar app:
http://support.google.com/mail/bin/answer.py?hl=en&answer=139206
Here’s another option for enabling your Google-related services (Gmail, Google Calendar, and so on) that also works for Microsoft Outlook calendar users, but it’s a bit different:
1. Open up the Settings app and tap the Mail, Contacts, Calendars option.
2. On the right side of the screen, tap the Add Account button and you’ll see a list of different services, such as Gmail, Hotmail, and Yahoo!, as shown in Figure 6.18.

3. Tap the appropriate option and then follow the onscreen instructions.
For example, if you’re a Microsoft Outlook user, you’ll want to tap the Microsoft Exchange option and follow the onscreen instructions to have your Outlook mail and calendars made available on your iPad. Tap the Gmail option and provide your Google ID username and password to have email and calendar information passed to the relevant app (Mail or Calendar, respectively).
For other calendar types, I suggest a simple Google search such as “Sync calendar X with iOS Calendar app” and see if any online instructions are available. Often, no answer is provided by Apple, but someone else has figured out a workaround or trick to make it happen. A Google search is your friend if you’re using another calendar option you wish to sync with the iPad’s Calendar app.