3. iCloud and Settings
Customization and Backup
Both the iPad and the iPad mini are pretty much ready to go right out of the box. However, using certain features on these devices, you can perform some minor customizations to your iPad, making it feel a bit more like, well, your iPad.
One of the most important apps that comes preloaded on all iDevices is the Settings app, which I’ll introduce you to in this chapter. The Settings app lets you tweak a setting here and tweak a setting there, further pushing the device to behave as you desire it to and less like a clone of every other iPad tablet out there.
And while the Settings app is specific to your iPad, there’s another service I want to introduce to you that allows you to not only back up certain information from your iPad, but also allows you to move seamlessly between iDevices (such as your iPad and iPhone) when you’re using certain apps. It’s called iCloud, and you’re going to want to use it, I’m certain.
Settings, Settings, Settings
Believe it or not, just after you turn on your iPad and follow the onscreen wizard that walks you through connecting it to the Internet, your iPad still has hundreds of settings you can tweak to customize your tablet. Fortunately, most of these settings aren’t critical to your using and enjoying your iPad. Even better, many of the settings that relate to security are set to the more “locked down” option, making your device secure immediately—it’ll be up to you to turn on or off certain settings that may or may not make your iPad more susceptible to risks.
All of these settings related to security are found in the Settings app, but hundreds more are not necessarily related to security, as you’re about to find out.
 Note
Note
When you first turn on your iPad, you’re going to want to have either a data service subscription from a carrier (such as Verizon or AT&T, for example) or access to a Wi-Fi connection. When you first turn on your iPad, it will try to connect to the Internet—but don’t worry if you don’t have a connection because you’ll be able to connect at a later time using the Settings app.
Take a look at Figure 3.1 and you’ll see the Settings app icon.
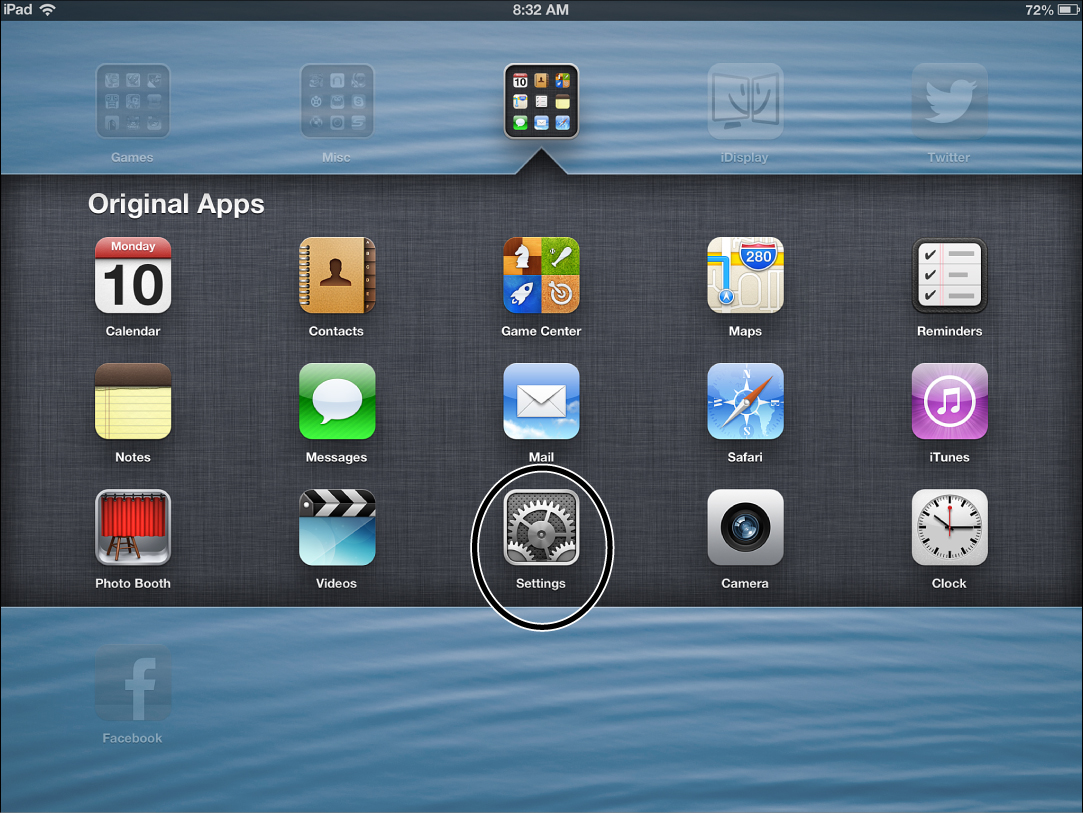
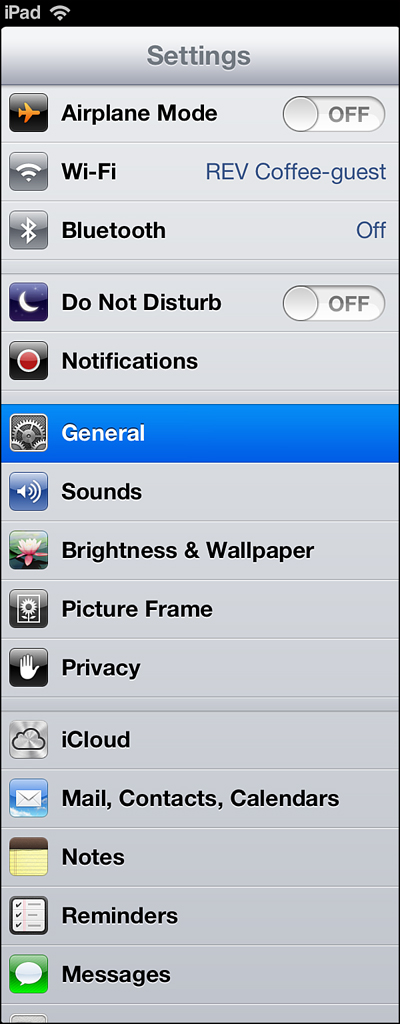
When you tap the Settings app icon, it opens up the app immediately, and you’ll see a screen similar (but not identical) to the one in Figure 3.2.

Your screen won’t look exactly like this because it’s possible you have a 3G/4G/LTE version of the iPad that allows you to access the Internet using a data service provided by a mobile carrier such as Verizon or AT&T. As you can see, I have the Wi-Fi–only iPad, and I’m connected to my favorite coffee shop’s free Wi-Fi.
Note
As I show you around the Settings app, keep in mind that you may see an occasional item in the figures that you don’t see on your screen. This could be due to an update to iOS or an app that I have installed on my iPad that you currently do not have. The Settings screen is an ever-changing tool.
In the Settings app, you’ll find all sorts of strange, unusual, and eye-catching items just begging to be touched and examined. Feel free to do so! Very few options in the Settings app cannot be undone; reversing a setting is often as easy as tapping it again (such as flipping a toggle switch from On to Off).
Often what I find works best when dealing with the various items that can be configured in the Settings app is to make a single change and then see how it affects the iPad. One example of this is turning on or off the clicking sound the keyboard makes as you type. Yet another example is a simple On/Off button that allows the Auto-Brightness feature to brighten or dim the screen based on the surrounding lighting conditions.
Other settings cannot be reversed with a simple tap of a button. For example, if you turn on the Auto-Lock (allowing you to set a screen password to gain access to the iPad’s apps) and then set a password, you’ll also need to enter that password to turn the Auto-Lock feature off again. So don’t forget your password!
As I mentioned earlier, the Settings app has hundreds of settings you can tweak, and there’s simply no way I can cover them all in this chapter. Instead, I want to first explain how to navigate Settings and then I’ll show you some of the more popular or useful settings you can configure.
Take a Tour of Settings
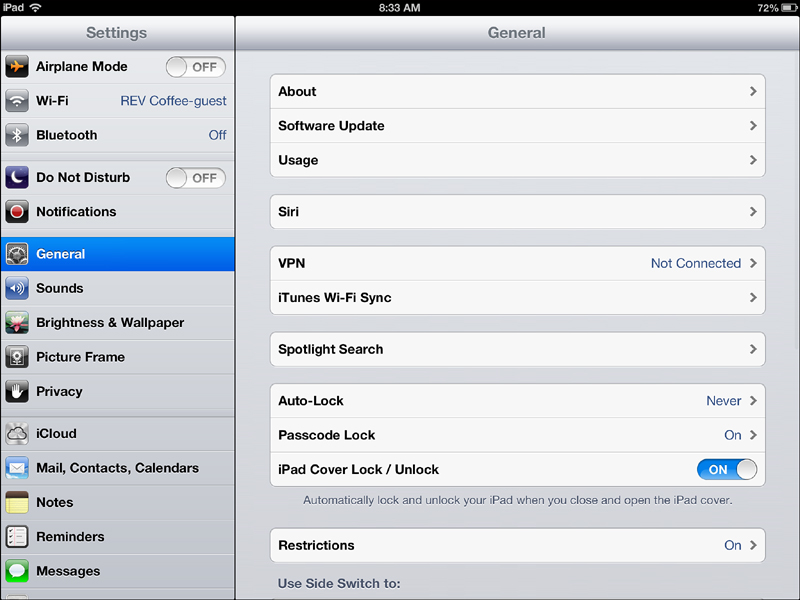
The first thing I want to point out to you is how the Settings app is organized. Open your own Settings app and you’ll notice that whether the iPad is in Portrait or Landscape view, the left column of items never changes. Figure 3.3 shows that the General option is currently selected (indicated by the blue bar that highlights it), but you can see many more options, such as Privacy, Notes, and Reminders.
This list is scrollable; a simple swipe of your finger up or down will let you see additional options not currently visible. You’ll see more of the list in Portrait view, but I prefer Landscape view.
Note
The remaining figures in this chapter are shown in Landscape view, so if you don’t see an option on your screen that is referenced in the book, try scrolling up or down a bit.
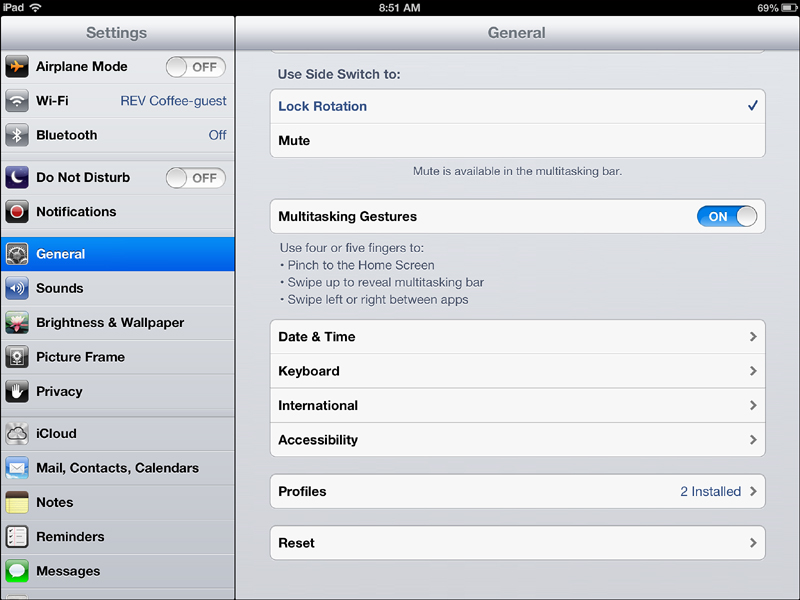
When you tap an option in the left column, the right column will change to display items related to the settings option you selected. Figure 3.4 shows some of the options I can configure on the right side of the screen that are related to the General option I tapped in the left column.
Just as with the list of settings options on the left, the right side of the screen is often scrollable, so swipe a finger up or down to see if any configuration options are hidden just off the screen. As you can see in Figure 3.5, I scrolled down a bit for the General option (by swiping a single finger up—don’t worry, you’ll get the hang of this real quick) and there are even more configurable options available.
As you explore the Settings app, you’ll notice a small number of methods for tweaking settings. For instance, you can see the slider bar at the top of Figure 3.2. Tap and hold your finger on the small ball and drag it left or right to make an adjustment. Dragging the slider to the left decreases the volume of the ringers and alerts, and dragging the slider to the right increases the volume.
Figure 3.6 shows the Picture Frame option settings on the right and offers three other methods for making changes.

First is the simple check mark seen in the Transition section. The check mark is on the Dissolve option, but a tap on the Origami option will move the check mark to that transition option. With a check mark, one option must always be selected within each group of options. If you look at the bottom group of options shown in Figure 3.6, you’ll see a check mark next to All Photos. If you don’t want the selected transition (Dissolve) to be applied to All Photos, tap the Photo Stream or Albums option to place the check mark there, but one of those three options must have the check mark next to it. (You’ll learn all about photos, Photo Stream, and albums in Chapter 9, “Apps for Photos and Videos.”)
Second is the On/Off toggle switch, which is also shown in Figure 3.6. If it’s set to On, a single tap of your finger will move the switch to the Off position (and vice versa).
Figure 3.7 shows the final method for configuring options in Settings. It’s the right-pointing arrow (or chevron).
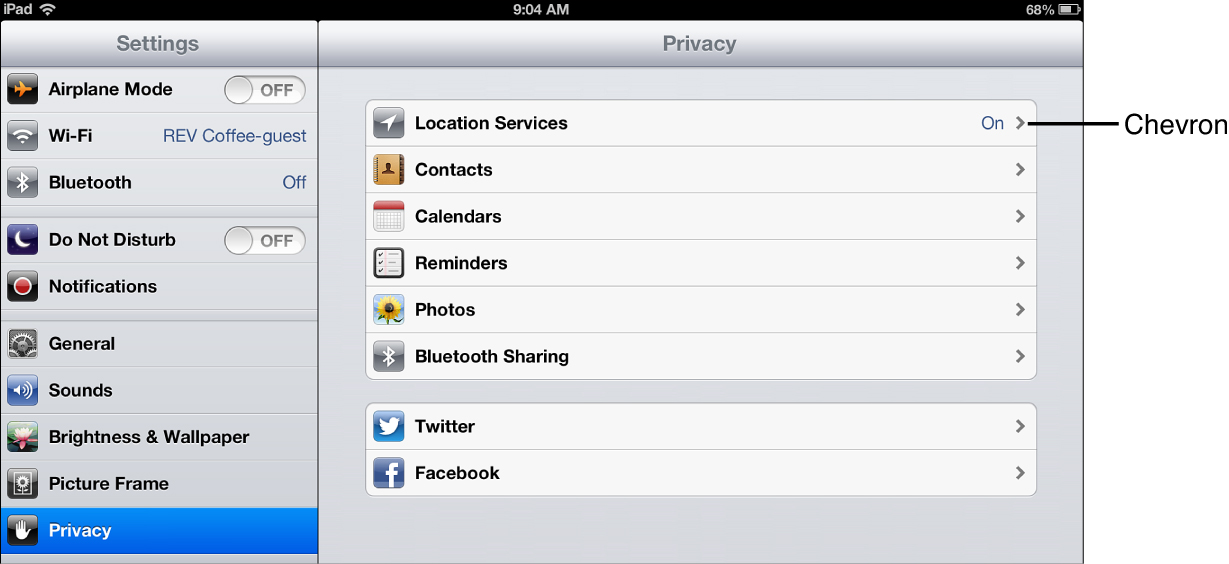
Here, I’ve selected the Privacy setting in the left column; the various options that can be tweaked are visible on the right side of the screen. Tap any right-pointing arrow (chevron), and you’ll be taken to another page that has additional options that can be configured.
Now let’s return to the left column for a moment. I want you to scroll down a bit until you see the list of apps that come preinstalled on your iPad, as shown in Figure 3.8.
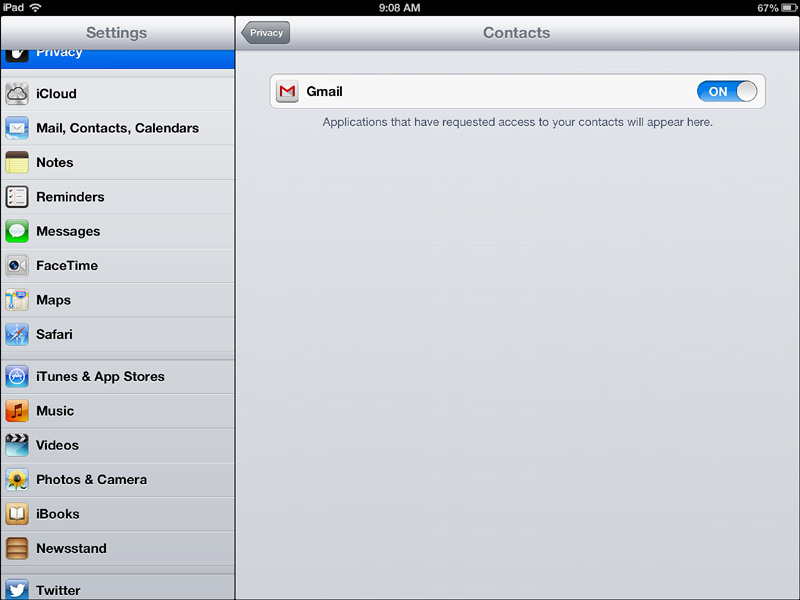
Your list may look different (especially if there has been an update to iOS since I wrote this chapter), but the ones you’ll most likely see are iCloud, Reminders, Messages, Safari, Music, and Photos & Camera, among others.
The list of options near the top of the left column are what you might call iOS-specific options. These settings are related to the operation of your iPad and are always in effect. The options for a preinstalled app are for making changes that only affect the specific app selected.
If I select In Kilometers instead of In Miles in the Distances option section, other apps I open may still show distances in miles; in other words, this setting is specific only to the Maps app.
At this point, you’ve probably not installed any additional apps on your iPad. (You’ll learn how to do this in Chapter 12, “Apps for the iPad.”) But once you start installing more apps, you’ll find that many of them add a listing in the left column.
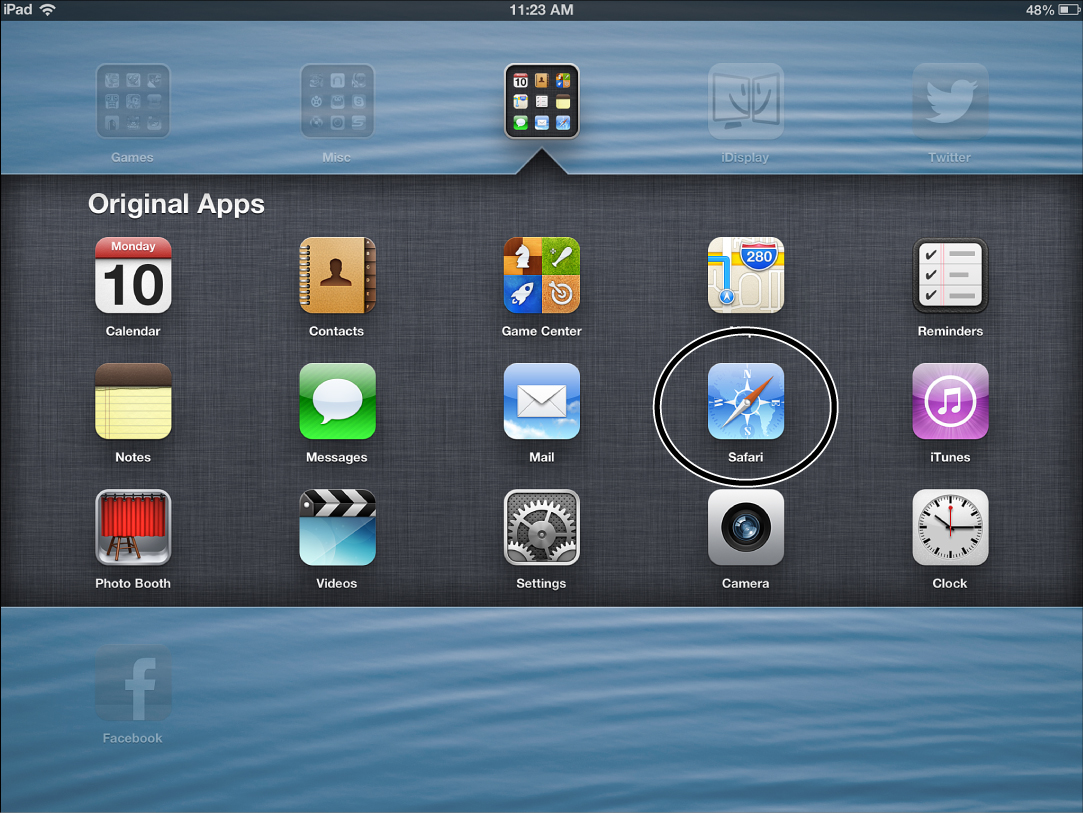
I haven’t covered the Safari app yet (jump to Chapter 8, “The Safari App,” for more details), but for now, just tap the Safari app icon shown in Figure 3.9.
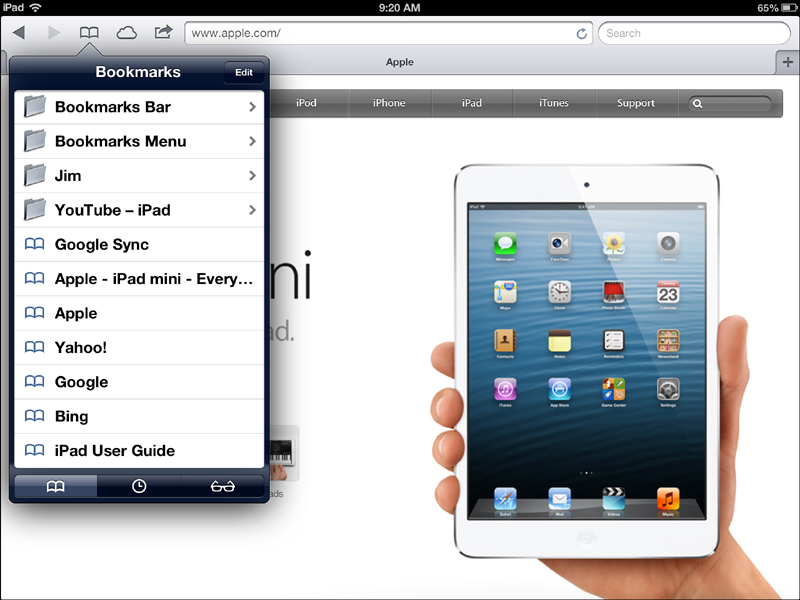
Don’t worry about all the stuff you see on your screen at the moment; instead, I want you to tap the Bookmarks button indicated in Figure 3.10 and then tap the iPad User Guide option in the menu that appears.
When you tap the iPad User Guide, it opens as shown in Figure 3.11. Scroll down the list on the left. When you tap on an item in that list, you’ll find everything you need to know about configuring it on the right side of the screen.
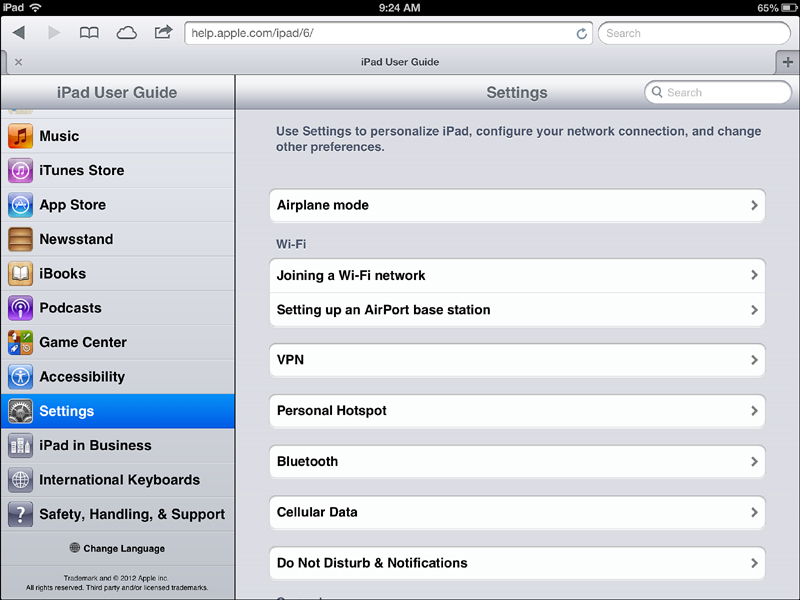
You’ll find details for every one of the preinstalled apps on your iPad, including much more coverage of the Settings app than I can provide in this chapter.
 Tip
Tip
For third-party apps, you may have to visit the company’s website for help. If you’re lucky, the app developer has included documentation inside the app that may be accessed with a Help button or menu option. Look around or just contact the app developer and ask where you can get additional help if you need it.
Fun and Easy Settings to Tweak
I’m going to start at the top of the left column in the Settings app and mention some settings you might want to investigate. I won’t be able to show all of them to you with figures, but they’re not difficult to figure out. Remember, most settings are not destructive! You can undo almost any setting with ease.
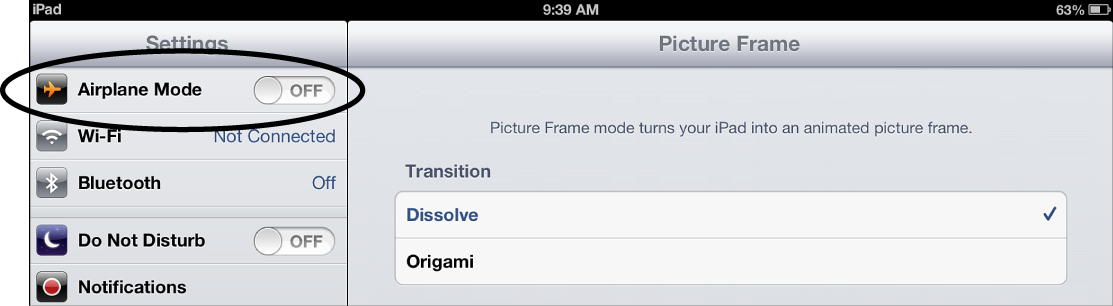
Do you fly often? If so, the Airplane Mode button is your fast way to disable the wireless data feature on your iPad. Tap the button shown in Figure 3.12 to toggle it between On and Off. It’s a quick method for disabling your electronic device, including Wi-Fi, Bluetooth, and cellular/mobile data signals. Any apps that depend on these signals won’t work until you turn the Airplane Mode toggle switch back to the On position.
If you’re like me and you frequent coffee shops or other places where free Wi-Fi exists, you’ll want to tap the Wi-Fi option and select the name of the Wi-Fi network (and provide a password, if necessary) so your iPad will have Internet access.
Tip
I cover the Do Not Disturb and Notifications options in Chapter 17, “The Two iPad Centers,” but for a quick way to disable your iPad’s beeps and boops, tap the Do Not Disturb toggle switch to turn it to the Off position. This is very useful when you’re heading into meetings, and I also like it when it’s time for bed and I just don’t feel like walking my iPad downstairs to charge it; I won’t have to worry about a reminder or incoming email waking me up with a loud ding!
Tap the Brightness & Wallpaper option and then tap the image shown on the right to select a new wallpaper for your iPad. You can choose some images provided by Apple, or you can even choose an image from the Camera Roll, which contains photos you’ve taken with your iPad. (More on using the Camera app in Chapter 9.)
The Picture Frame options are fun to tinker with. When you first turn on your iPad, you’ll see the Slide to Unlock slider, but look to the right and you’ll see a small icon of a flower, as shown in Figure 3.13.

Tapping this icon will turn your iPad into the most expensive Picture Frame you’ve ever owned (maybe). But rather than display a single photo, the Picture Frame feature cycles through all the photos you’ve saved on your iPad in the Camera Roll album. (Again, refer to Chapter 9 for more details on the Camera Roll album.)
Tip
The iCloud option is covered in the next section, but just know that the Settings app is the only place where you can configure iCloud options.
You’ll be learning about the various preinstalled apps throughout the remainder of this book, so just remember to tap each of those apps in the left column and examine the options available on the right side of the screen.
You can easily spend an hour or two looking through every option in the Settings apps. Fortunately, you don’t have to do this all at once. Instead, I recommend an occasional visit to the Settings app when you have a moment and picking a setting on the left and examining its options on the right. There are some options in the Settings app that I’ve never used, but I do know where they are located. The only way you’ll know about all the options available is to take the time and investigate.
The Power of iCloud
Before I get into the features of iCloud, you may actually be wondering just what is iCloud? Good question! I could go into a detailed, technobabble-filled explanation of cloud-based storage, but I’d rather just give you a clear, easy-to-follow explanation by telling you what iCloud can do for you. So here goes...
You’re probably familiar with how your computer stores files on a hard drive; the hard drive is installed in your computer and has a certain amount of storage space—250 gigabytes (250GB) or 500 gigabytes or maybe event 1 terabyte (1,000 gigabytes!). Your iPad or iPad mini also has a certain amount of storage built in to it—8GB, 16GB, 32GB, or 64GB. If you have a photo stored on your computer or iPad, that photo is taking up some of that storage space. With me so far?
Let me stick with the photo for a few moments, but all of the following discussion relates to any data you use—email, contacts, music, video, and so on.
Now, that photo stored on your iPad can be shared with your family and co-workers, but only if they’re sitting with you and only if you’ve got your iPad with you. In other words, that photo is “location locked.”
Here’s another problem with that photo (and all the other photos stored on your iPad)—if your iPad is lost, stolen, or damaged, that photo is gone. Unless you are able to recover your iPad, that photo is unrecoverable (unless you made a backup somewhere).
And here’s yet another problem—photos start to really add up in terms of storage space. If you have 4GB of free storage space left on your iPad mini, it only takes about 1,250 photos to wipe that out! (My photos average about 3MB–4MB each, so 1,000 photos equals 4,000MB, or 4GB.) Once you’ve reached your iPad’s storage limit, you’ll have to start deleting photos, songs, videos, and apps.
Three big limitations or problems! Wouldn’t it be nice if you had a way to circumvent these three issues? Imagine if you could share a photo with someone, even if you didn’t have your iPad handy. Imagine knowing that your photos were backed up and available should the worst happen to your iPad. And imagine not having to worry about storage limitations. Sound good? Well, you’re going to love iCloud.
iCloud is a service offered by Apple that makes the preceding problems disappear. And there are many more benefits to it that I’ll explain shortly. In a nutshell, iCloud is a service offered by Apple that allows you to access photos, videos, contacts, and much more from any iOS or Mac computing device that also supports iCloud. iCloud also allows you to store your photos, contacts, and other items with Apple, reducing the demand on your iPad’s storage space. Apples gives you an automatic 5GB of free storage space, and you can buy more if you need it with a yearly subscription fee. And by using iCloud, you reduce the risk to your data by storing it with Apple; if your iPad is stolen, for example, you can easily download your data right back onto a new iPad—photos, contacts, calendar events, and anything else you choose to back up to iCloud.
 Caution
iCloud uses your Apple ID and password to recognize, provide, and back up your data. This means you’re going to want to create a strong password that isn’t easy to figure out. Don’t use “password” or “123456,” for example.
Figure 3.14 shows the iCloud settings options in the Settings app.

First, you’ll always see your Apple ID account name at the top. If you never created an Apple ID, you’re going to have to create one if you want to use iCloud (it’s also required if you wish to download third-party apps to your iPad or buy music, videos, and eBooks).
If you need help creating an Apple ID, visit Apple.com/itunes for more information. Apple does just about everything via iTunes, and it’s the easiest way to create an account and password. Please note also that iCloud does not require that you have a credit card stored on file with Apple, but for any purchases you make with your iPad (music, eBooks, videos, apps, and so on), Apple will require you to provide credit card information or have iTunes credit on file. (You can get iTunes gift cards that can be redeemed for credit to be used for purchases from Apple.)
Tip
For assistance on creating an Apple ID without a credit card on file, point your web browser to http://support.apple.com/kb/HT2534.
As you can see on the right side of Figure 3.14, a number of apps can be turned on or off for iCloud. Options include Mail, Contacts, Calendars, Reminders, Safari, Notes, Photo Stream, Documents & Data, and Find My iPad.
Any app that is turned on will have its data sent to iCloud. This creates a backup of that app’s information as well as makes it available on other iDevices. For example, I have an iPhone with the Contacts app turned on in iCloud. This means that if I add a contact to the Contacts app on my iPad (see Chapter 4, “Contacts“), that contact will be stored with iCloud, and that update will be pushed to my iPhone’s Contacts app as well.
The process works in the other direction, too. If I take a photo with my iPhone, that photo is sent to iCloud. When my iPad is connected to the Internet, that photo will be pulled down from iCloud and stored on my iPad because I have the Photo Stream service turned on (see Figure 3.14).
Want another example? Sometimes I don’t have my iPad with me when I’m out running errands. If I open the Safari web browser app on my iPhone to check Amazon.com for the price on a book and then close down the app, when I get home and open the Safari app on my iPad, guess what happens? Yep, because I have the Safari app backing up its data to iCloud, when I open the Safari app, the last web page I was viewing on my iPhone (in this case, Amazon.com) will appear on my iPad. It’s seamless, and it makes moving from one iDevice to another extremely easy. I’m using a MacBook Air laptop, and because I have iCloud running on it as well, I can move between my iPhone, iPad, and MacBook with ease. My contacts list is always updated and synchronized across all devices. Any new songs I purchase with iTunes (see Chapter 14, “Movies, Music, and More“) will be visible on all three devices. If I buy an eBook, it is available on all three devices so I can read no matter which device I have in my hands at the moment.
iCloud is amazingly easy to use, but it does have some limitations.
First, obviously, is the 5GB of storage space provided to you. Believe it or not, that space runs out quickly, especially when you start adding new apps that can store their data on iCloud. As you can see in Figure 3.14, I don’t have the Mail app backing up to iCloud because it quickly eats up my 5GB of space. I choose to use iCloud for my Contacts, Calendar, Reminders, Safari web browser, photos, and the Find My iPad option (which I’ll explain shortly).
What do you do if you find you need more storage space from iCloud? Tap on the Storage & Backup button, shown in Figure 3.14, and you’ll be taken to a screen like the one in Figure 3.15.
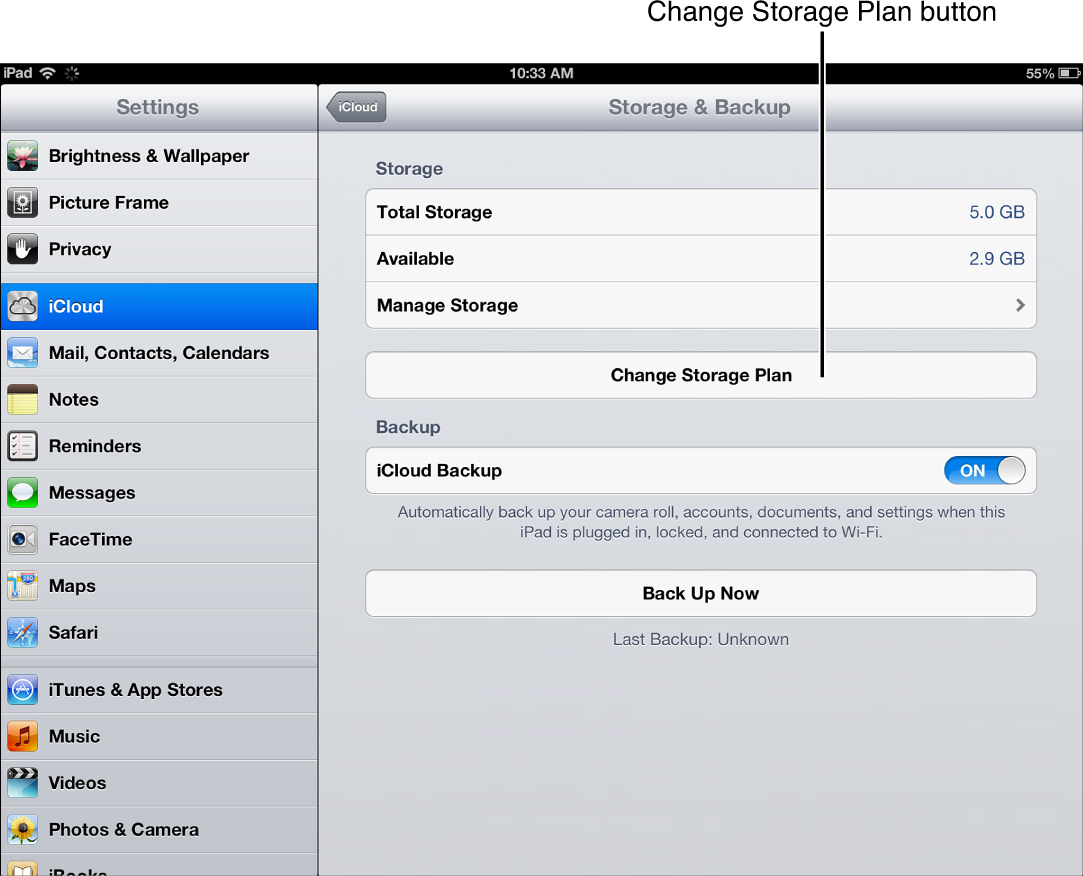
I’ll explain a few items of interest on this screen. First, you can view how much storage space you currently have access to (I have 5.0GB) and how much is currently available (I have 2.9GB left). I can tap the Manage Storage option if I wish to view a more detailed breakdown of just how much data each app is using.
Tap the Change Storage Plan button to purchase additional iCloud storage.
Keep in mind that this purchase is good for 1 year—you’re not buying this extra storage space permanently. Tap the Buy button and follow the instructions if you wish to purchase additional storage space.
Tip
You may have noticed that music isn’t an option for backing up to iCloud. That’s because Apple does not charge you storage space for songs you purchase from iTunes. This means if you only have 3GB of iCloud storage space left and you purchase 8GB of music from iTunes, you’re still left with 3GB of free space because Apple will store your 8GB of iTunes music for you at no charge. Nice!
Notice the iCloud Backup toggle button set to On in Figure 3.15. I can turn that to the Off position and disable the automatic backup that occurs whenever my iPad connects to the Internet. I prefer to leave it on, but you might prefer to manually back up your iPad’s data to iCloud.
Note
If you wish to disable the automatic backup of your data to iCloud, toggle this button to Off and your iPad will only back up to iCloud (and grab any updates from another iDevice) when you synchronize your iPad with iTunes by connecting it to your computer with a USB cable.
You can also tap the Back Up Now button to immediately send any updates (such as a new contact in your Contacts app) to iCloud. The option is waiting for iCloud to automatically start the synchronizing process, which can take anywhere from 15 minutes to a few hours, depending on the size and quantity of data you need to back up.
I mentioned earlier that iCloud offers more services than just backing up your data, and the Find My iPad option is one great example. Should your iPad get lost or stolen, you’ll want to open a web browser and point it to iCloud.com, tap the big Find my iPhone button shown in Figure 3.16, and then log in with your Apple ID and password.
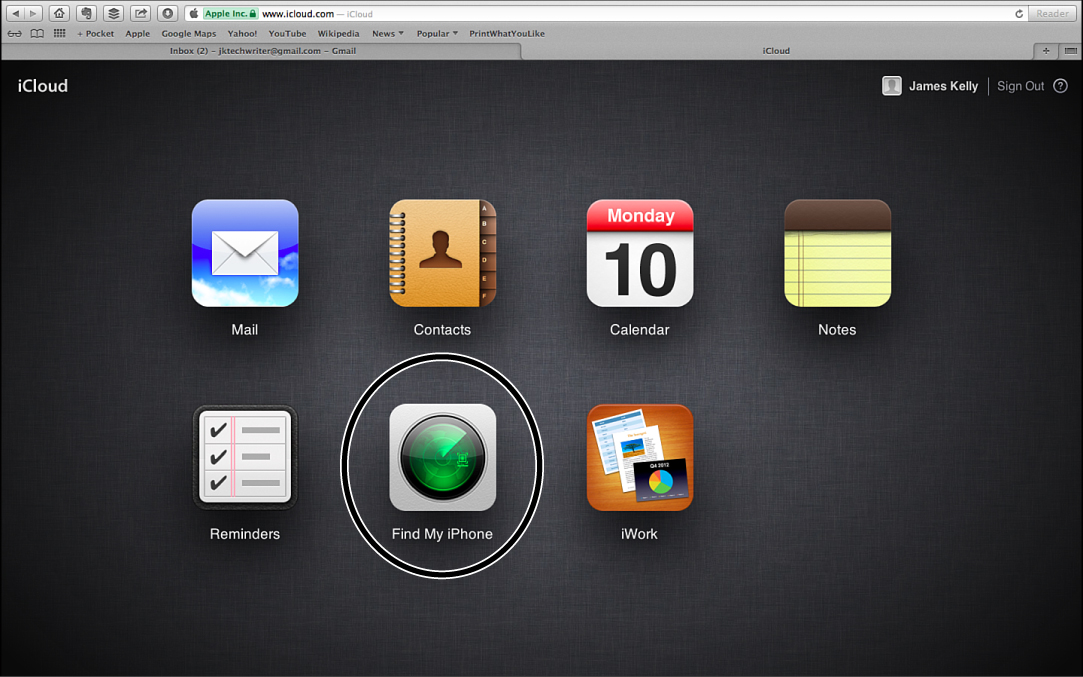
Don’t worry—the Find My iPhone service will also find your iPad (and you may not even own an iPhone).
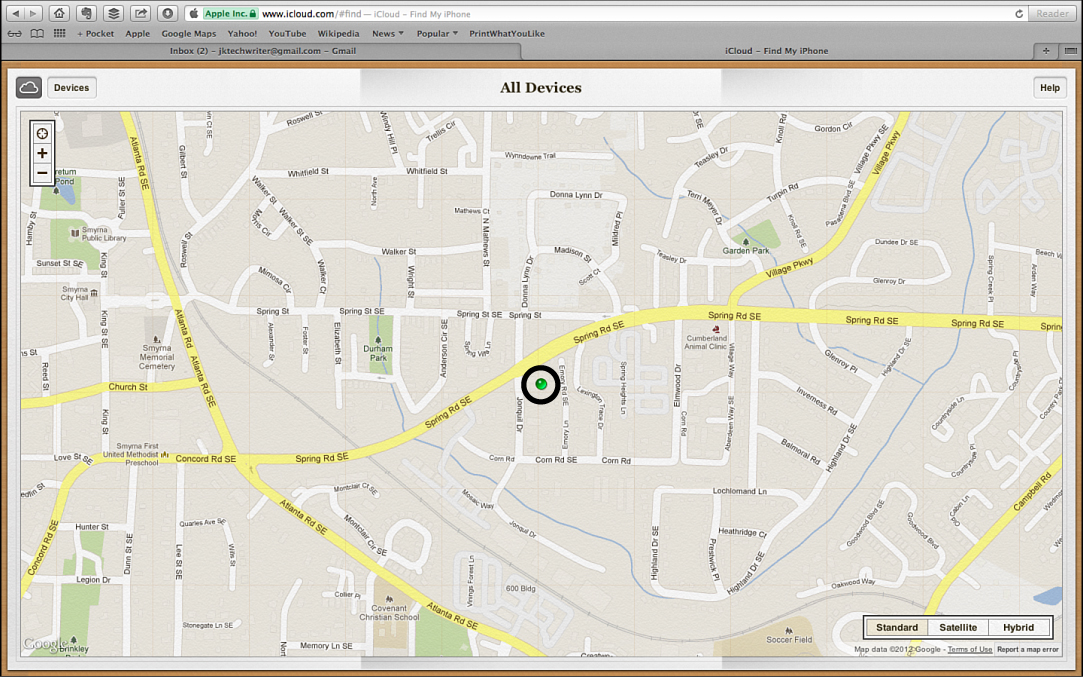
Figure 3.17 shows the map and the location of my iPad. (Fortunately, that’s exactly where I happen to be at the moment.)
If I tap the Devices button in the upper-left corner of the screen, I can select my iPhone or my iPad. When I tap on one of the devices, I’m given three options, as shown in Figure 3.18.

I’ve used the first option, Play Sound, more times than I can count. I have two small boys, and occasionally my iPad finds itself under a couch or into another room. When I tap the Play Sound button, as long as my iPad has Internet connectivity (and it does when it’s at home), a minute or two later I’ll hear a loud and distinct pinging sound.
The Lost Mode button will immediately lock your iPad so that it can only be unlocked with your Apple ID password. This is useful if you think your iPad has been lost or stolen. If you truly suspect your iPad is stolen and you don’t have a password lock on it, you can use the Erase iPad button to wipe it clean. This is not reversible, so use this option with care!
Tip
Why aren’t you using a password lock on your iPad? Open the Settings app, tap the General option on the left, and on the right side of the screen turn on the Passcode Lock option and create one! Yes, you’ll have to type it in every time you turn on your iPad, but should a bad guy get your iPad, that password lock will keep your data secure.
I cannot recommend iCloud strongly enough. Even if you don’t wish to back up your data (such as contacts and photos) to iCloud, do use the Find My iPad feature, if only to find your tablet should it become lost or stolen. It’s such an easy feature to use, and you can find all sorts of stories on the Internet that will validate its use (google “Find My iPad success story” to read some great tales of recovered iPads, including stolen ones).
Remember, you get 5GB of free iCloud storage. Music, videos, and eBooks that you purchase from Apple are not charged against that 5GB of space. If you have an iPhone or Mac computer, enabling iCloud on these devices will allow you to share and synchronize data across all devices. And, should you run out of space, Apple is happy to sell you some more.