
11. Social Apps
There are a lot of social apps and services out there, but the two you’ve most likely heard of (even if you don’t use them) are Facebook and Twitter. These two services have taken the world by storm. Entire books have been written on both Facebook and Twitter, and there’s simply no way I could do either service justice by attempting to cover every aspect of how it is used in a single chapter.
Instead, I’m going to point you to some online resources that can provide you with help and guidance on using these two services to their full potential and just focus on showing you how to install and use their built-in integration.
If you’ve already tried both services and they’re just not your cup of tea, feel free to jump to the next chapter. Facebook and Twitter have fans and non-fans, and what’s interesting about the iOS versions of these apps is that they’re not automatically installed on your iPad—you’ll have to make the decision to install them (and if you want them, it’s extremely simple to install the apps, as you’ll see shortly).
Facebook and Twitter are ideally suited for iPad and iPad mini users, however. Both services typically don’t involve lengthy paragraphs, so the onscreen keyboard is really all you need to take advantage of these two apps. What’s more, the touchscreen makes it easy to attach photos, post responses and comments, and perform many other Facebook and Twitter tasks. As you’ll see, the apps are simple to install and simple to use.
 Tip
Tip
To learn more about Facebook, check out Easy Facebook by Michael Miller (Que Publishing).
Installing Facebook and Twitter
Open the Settings app and scroll down the left column until you see the Twitter and Facebook options shown in Figure 11.1.
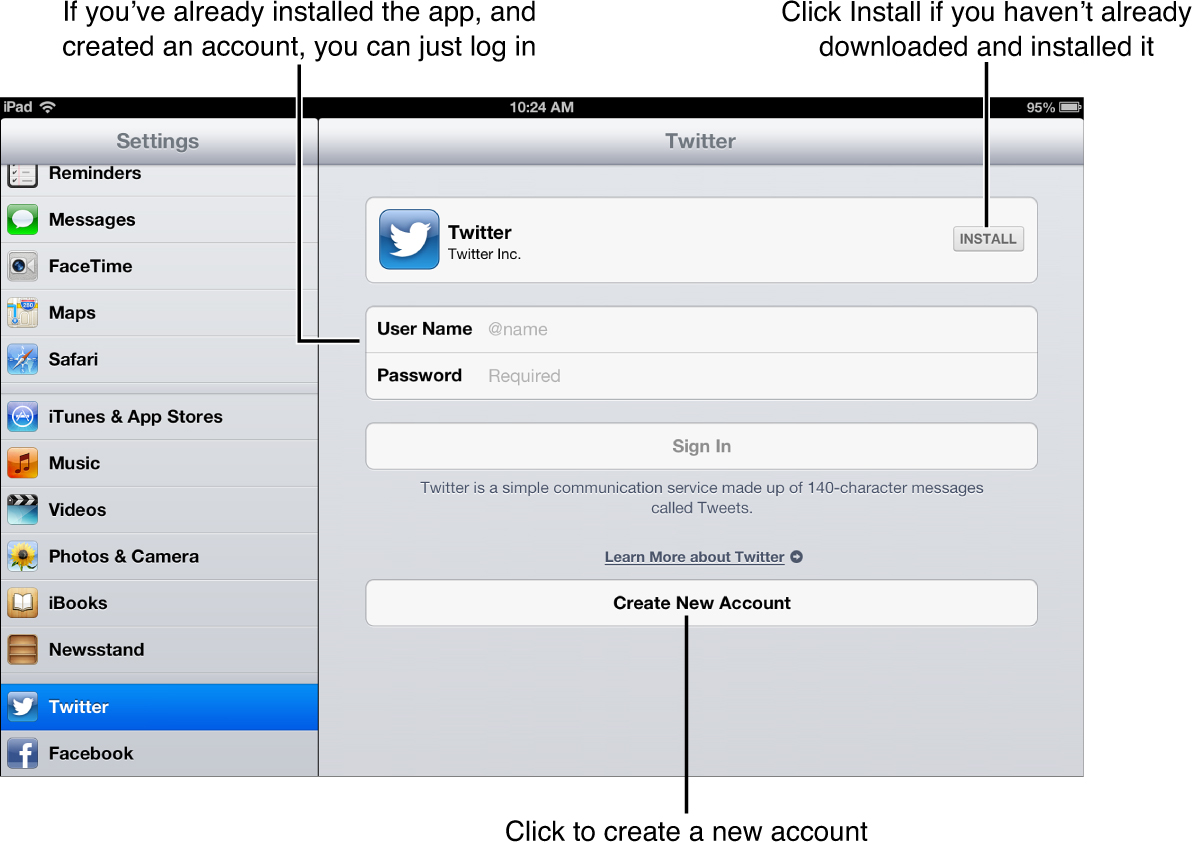
Figure 11.1 shows the Twitter app settings selected. Notice the Install button in the upper-right corner of the screen. You’ll tap that button and enter your Apple ID password to install the app. If you already have a Twitter account created, you can enter your Twitter username and password into the fields, as shown in Figure 11.1, prior to installing the app. Tap the Sign In button below the username and password fields and a window will appear asking if you’d like to go ahead and install the Twitter app. Choose Later if you want to delay installing Twitter.
 Note
Note
You do not have to provide the login credentials until after the Twitter app is installed. I provided my login information so that after the Twitter app is installed, I won’t have to return to the Settings app. If you do not already have a Twitter account, when you open the Twitter app for the first time, you’ll be given a chance to create an account.
After Twitter finishes installing, tap its icon to open it, and you’ll see buttons for Signing Up and Signing In to Twitter. Tap the Sign Up button if you do not already have a Twitter account, or tap the Sign In button to provide your existing username and password.
If you tap the Sign Up button, you’ll see a screen like the one in Figure 11.2. Fill in your name, your email address, and provide a Twitter username and password. All Twitter usernames start with the @ symbol, so don’t let that disturb you—leave the @ symbol in place and type a username. If the name appears in red, that means the username is already taken, so you’ll need to try something else.
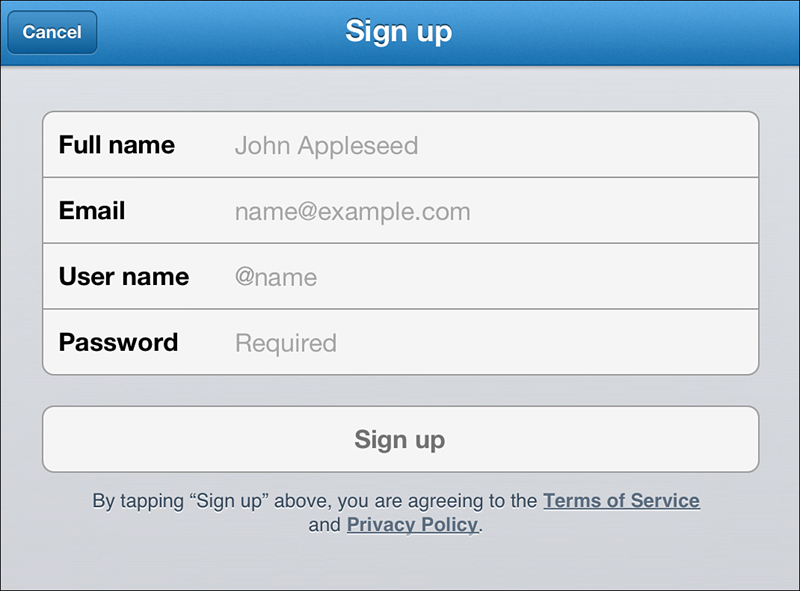
After you provide the required information, tap the Sign Up button and the Twitter app will open. If you’re using a new account, the screen will be mostly empty. Existing Twitter users will see a screen full of their Twitter friends and contacts.
To install Facebook, open the Settings app, scroll down to Facebook, and tap it. Enter your Facebook username and password.
Once again, if you provide your login credentials and tap the Sign In button, a window will appear asking if you’d like to install the Facebook app. Install it or tap Later to postpone the install.
If you don’t have a Facebook account, tap the Install button, provide your Apple ID password, and you’ll see the new app installed.
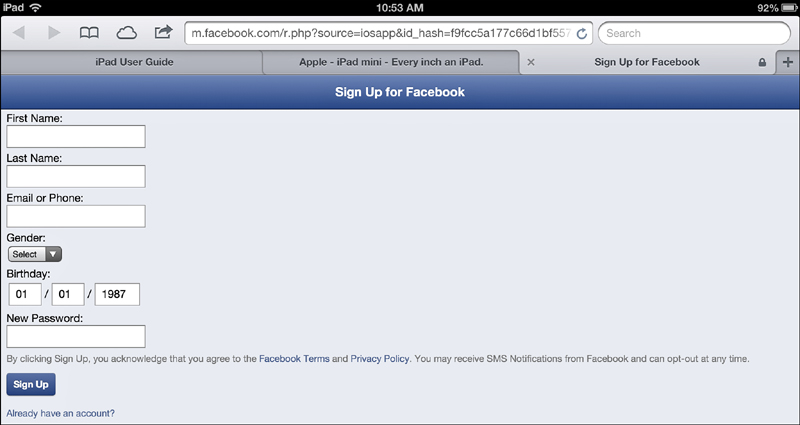
Tap the Facebook icon to open the app—you’ll see a login screen, where you can log in with your existing Facebook account or tap the Sign Up for Facebook button at the bottom of the screen.
If you tap the Sign Up for Facebook button, Safari will open to an account creation website, shown in Figure 11.3. Fill in the required information and tap the Sign Up button. Then, when the account is created, tap the Home button and tap the Facebook app to log in.
Built-in Integration
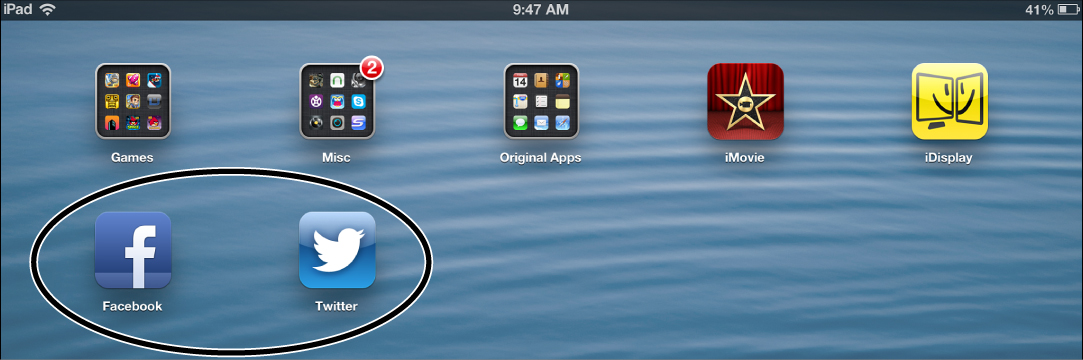
Once you have installed Twitter and Facebook, you can open them by tapping the icon on the home screen, as shown in Figure 11.4. As I stated earlier, you can find a lot of help online for both of these apps, and I’ll point you to some great websites later in this chapter as well as a couple of books that you’re sure to find useful.
We’ll now discuss how the Facebook and Twitter apps, once installed, are integrated into other tasks you perform on your iPad. Find an interesting website you’d like to share with your Facebook friends? It’s easy to do so and doesn’t require closing down the web browser and opening up Facebook. Take a great photo you want to tweet? You can tweet the photo along with a comment from inside the Photos app—you don’t have to open up the Twitter app and then browse the photos to find the one you wish to share.
Yep, you’ll find Facebook and Twitter integration in a number of apps. For example, take a look at Figure 11.5, which shows a photo in the Photos app we can share with Facebook friends.

If you tap the Share button in the upper-right corner, you see that two of the options are Facebook and Twitter, as shown in Figure 11.6.

When you tap the Facebook option, a window pops up, like the one in Figure 11.7.
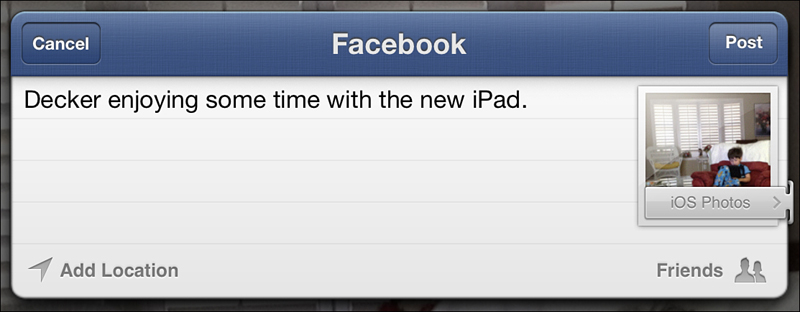
This is called posting a status update. Although most status updates are just text (such as “I just finished writing a book—taking a week off!”), this one also includes a photo.
As you can see, I’ve typed in a comment to go along with the photo. Now, if I tap the Post button, the update is added to my Facebook page. Notice in Figure 11.7 that I can choose to add the location where the photo was taken by tapping the Add Location link in the lower-left corner of the pop-up window. I don’t normally like to advertise where my photos are taken, so we won’t use that feature.
In the lower-right corner of the pop-up window, you can see the security setting that defines who can read the status update and view the photo. Right now, it’s set to Friends, but if you tap that button, you get a menu like the one in Figure 11.8.

This menu allows you to specify other options such as Public (anyone in the world can view—not recommended) and Only Me (totally private and only viewable while logged in to your Facebook account). Other options that might appear include any schools you’ve attended and added to your Facebook account, your place of work (if they have a Facebook page that you’ve joined), and the loosely defined “Acquaintances,” which means friends-of-friends.
Tapping the Post button in the upper-right corner of the pop-up window will add these updates to my Facebook page for all my friends to view.
Now, refer back to Figure 11.6 and the Twitter option. If you tap the Twitter option, you get a similar pop-up window like the one shown in Figure 11.9.

With Facebook, you can type quite a lengthy post, but with Twitter, you’re limited to a certain number of characters. For a blank tweet with no photo or link, that limit is 140 characters. But when you attach a link or photo, that reduces the number of characters. Look in the lower-right corner of Figure 11.7 and you’ll see the number 119. This means only 119 characters are left to type a message in the text box—21 of those have been taken up by the link that will point to the photo we’re attaching.
 Caution
As with the Facebook pop-up window, you can choose to tag the tweet with a location by tapping the Add Location button in the lower-left corner. This would be useful, for example, if I were tweeting a photo I just shot of the Grand Canyon or maybe if I wanted to include the location of a new restaurant I’d discovered while walking around downtown Atlanta. But for personal photos, be careful when using this option.
Let’s take another look at Facebook and Twitter integration. Figure 11.10 shows the Safari app with a nice article on the iPad mini and how it’s poised to become the de facto iPad for most users.
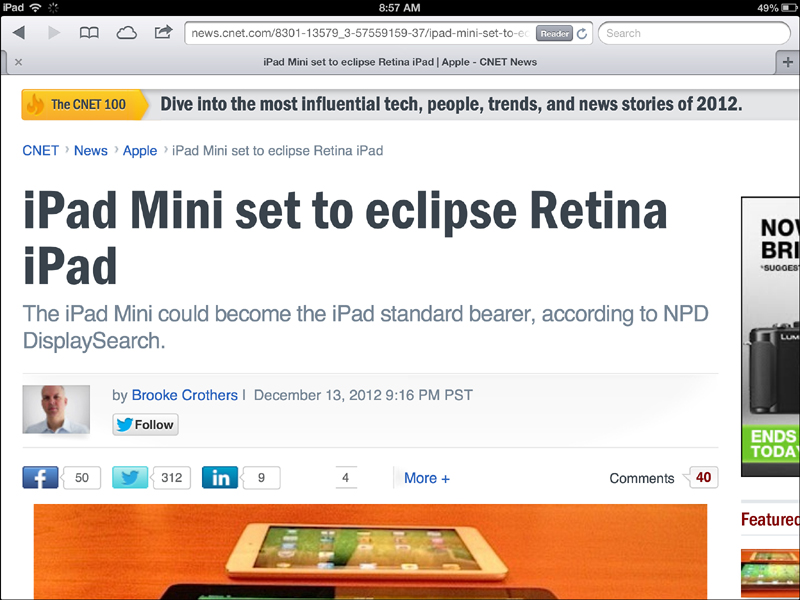
After reading this article, I’d like to share it with my Twitter followers. To do this, I tap the Share button in the upper-left corner and there they are—Facebook and Twitter, as shown in Figure 11.11.
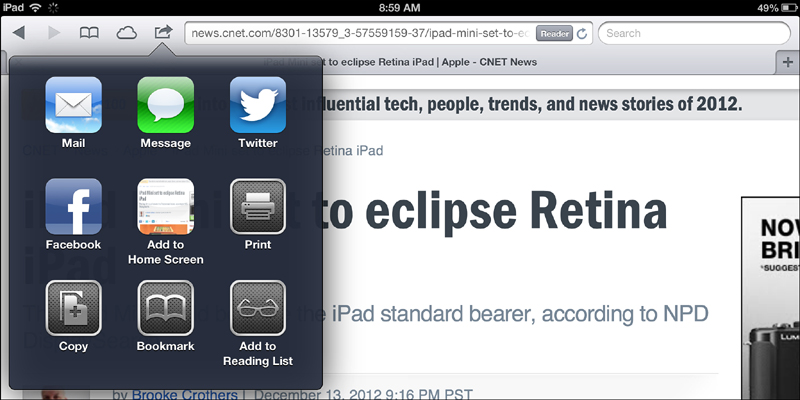
Tapping either the Facebook or Twitter option will open the basic pop-up window you saw earlier in this section—tweet a link to the website or post a status update to your Facebook page. Easy!
I use Twitter and Facebook integration to occasionally recommend apps to friends and followers. With the Share option in the App Store, I can easily share a link to an app in a tweet or a status update.
Look at Figure 11.12, and you’ll see that I’ve tapped the Share button in the upper-right corner of an app’s information page. There’s Facebook and Twitter, ready for me to tap and share a link to this app with my friends and followers.
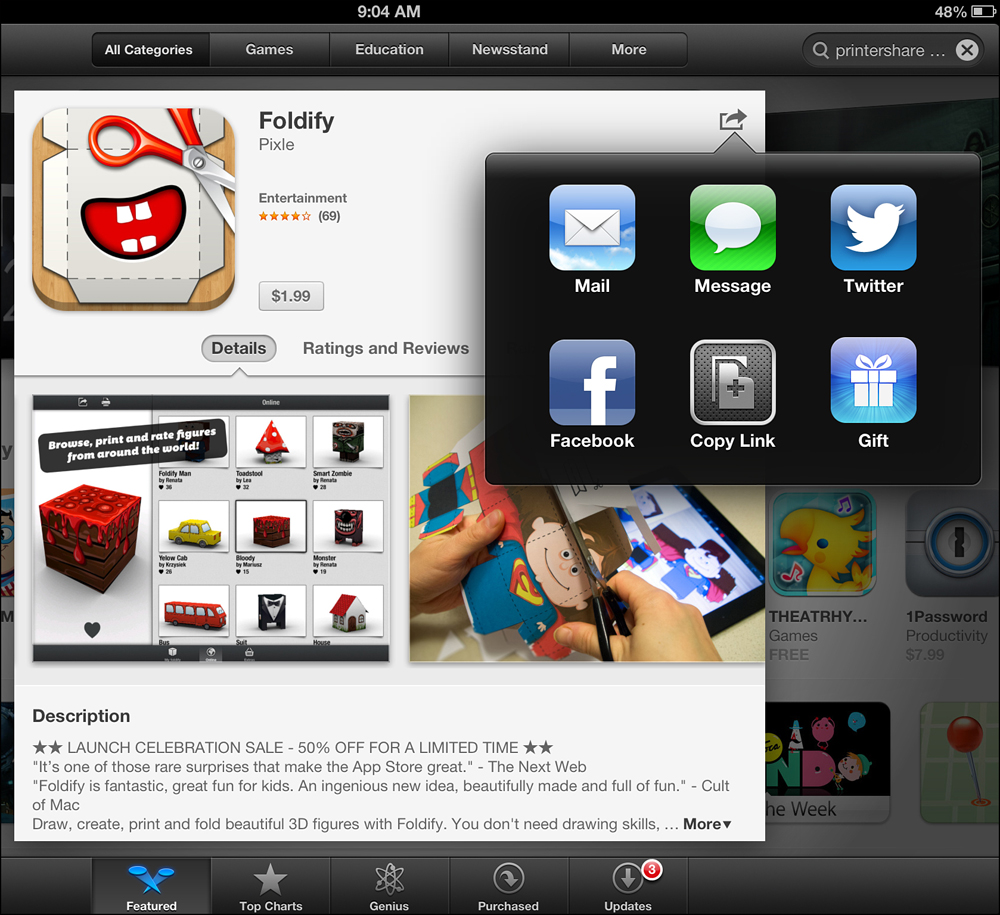
Not every service on an app will have Facebook and Twitter integration; about the only way you’ll know for certain is to find the Share button, tap it, and see if Facebook and Twitter are available options. As far as I can tell, the current Facebook and Twitter integration only works with the native apps provided by Apple that come preinstalled on your iPad when you purchase it. But maybe this will change down the road.
Twitter and Facebook Resources
I didn’t want to leave this chapter without first pointing you to some excellent sources on Facebook and Twitter. Obviously, you can always visit Facebook.com or Twitter.com and search through the sites’ help files and FAQs. But if you’re looking for some online resources or books, here’s a list of some places to start.
• Mashable.com online guidebook: http://mashable.com/guidebook/facebook/
• GCFLearnFree.com resource: http://www.gcflearnfree.org/facebook101
• Que/Pearson book(s): http://www.facebook.com/groups/23806107424/
• Official Twitter help page: https://support.twitter.com
• Mashable.com online guidebook: http://mashable.com/guidebook/twitter/
• GCFLearnFree.com resource: http://www.gcflearnfree.org/twitter101
• Que/Pearson book(s): https://twitter.com/QuePublishing