7. The Mail App
Back in the early days, kings would send messengers to deliver communications to and from cities and even countries. These messengers moved by ship, by horse, and sometimes by the power of their own two legs. Communication was slow, especially if you wanted to deliver a message with the hand-painted portrait of the king congratulating the recipient on the purchase of their new castle and giving them something to hang over the fireplace.
Fortunately, those days are over. We have all sorts of methods for communicating with others, including phone, video conferencing, instant messaging, email, and, yes, the old reliable postal carriers.
Although I doubt you’ll be giving your iPad to the mailman to deliver its saved messages and photos to your sister across the country, you can use it to make calls, do instant messaging, and send and receive email. And that’s what this chapter is all about—email.
The app that comes with the iPad is called Mail. Not eMail or EMail, and definitely not iMail. Just Mail. And I’m going to show you how to set it up and use it in this chapter.
 Note
Note
Some email services have their own apps. Google’s email service, Gmail, for example, has its own app that supports many of the special features that are built in to Gmail. If you use Gmail or another email service, be sure to read Chapter 12, “Apps for the iPad,” where I cover using the App Store to search for apps. You’ll want to search to see if there’s a specialty app made just for your email service.
Configuring the Mail App
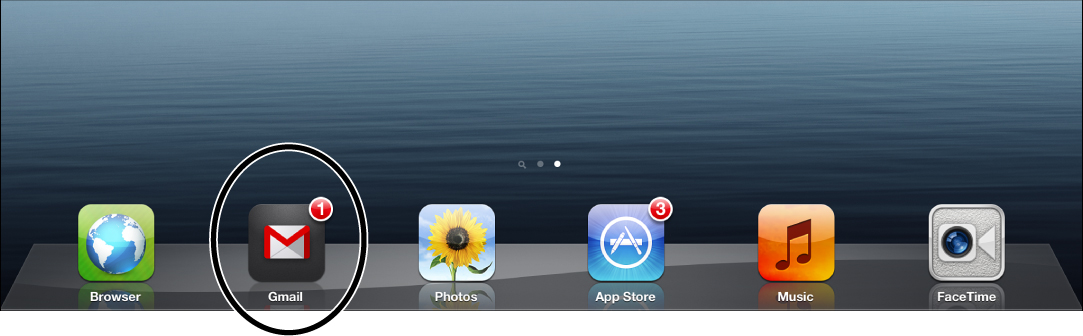
The icon for the Mail app is shown in Figure 7.1. Go ahead and tap it to open the Mail app.

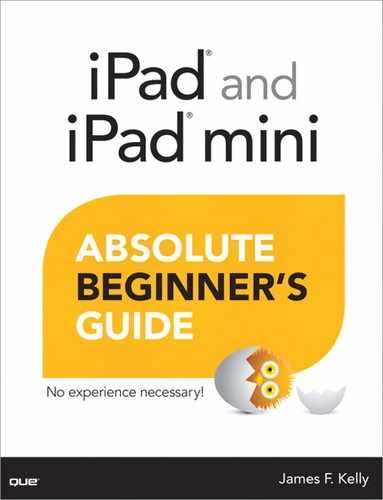
The first time you open the Mail app, you’ll be given a list of email services that the Mail app supports, as shown in Figure 7.2.
If you don’t see your email service in this list, don’t worry—the Other option at the very bottom covers just about all other options.
 Caution
If you use Outlook at work, there’s a good chance you are using a Microsoft Exchange Server to handle email in your workplace; you may need to ask someone (an IT department employee or someone who just seems to know these kinds of things) because the Microsoft Exchange option requires some additional information, such as a domain name. The Microsoft Exchange option in Figure 7.2 is the only one I don’t recommend trying to configure yourself, unless you understand the security risks posed by using an iPad that has access to a company email server. This is one of those times when it’s best to ask your company its policy on using iPads for email access.
I’m going to set up the Mail app with my Hotmail email address, but the procedure is identical for just about every email service—you’ll need to provide your email address and password, and the Mail app will handle the rest. Follow these steps:
1. Start by tapping the Hotmail option in the list shown in Figure 7.2. You’ll see the screen shown in Figure 7.3.

Note
Hotmail has been replaced by Outlook.com, but the Mail setup still shows it as Hotmail. This may change down the road, but right now if you have an Outlook.com email address from Microsoft, it’ll work just fine.
2. Enter your Hotmail email address, enter a password, and tap the Next button.
3. Select whether you want your contacts, calendars, and reminders from Hotmail to be imported. You can toggle these on and off by tapping the button to the right of each feature.
4. Tap the Save button.
5. Your account is added and you are taken to the Mail app’s home screen.
Touring Mail
If you’ve just created a new email address, it’s likely that the Mail app will be completely empty. Services such as Gmail and Hotmail, however, will often send you a welcome email. Regardless of whether you have a welcome email, let’s review the various parts of the Mail app.
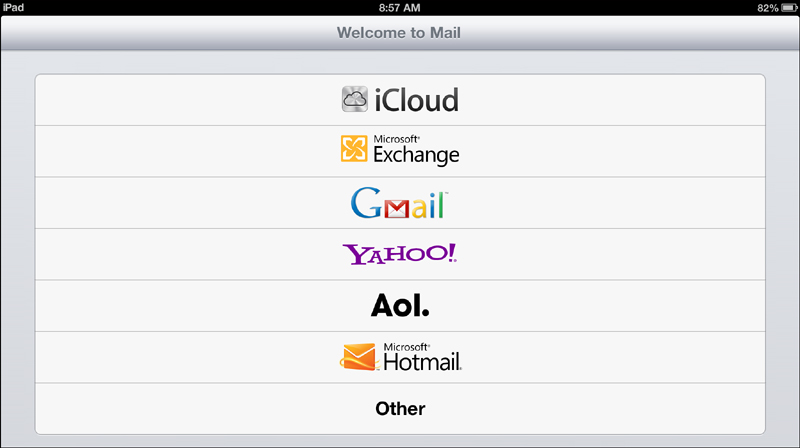
First, the left side of the screen displays the contents of whatever mailbox you have selected—these mailboxes include Inbox, Sent, Trash, Drafts, and more. When you first open Mail, it displays the Inbox, empty or not. Tap the Mailboxes button in the upper-left corner of the screen and you’ll be given a list of all the mailboxes available. These are shown in Figure 7.4.
The number to the right of the Inbox indicates how many unread emails you have in that mailbox. The VIP mailbox, when tapped, displays only those emails you have starred. (I’ll show you how to star an email shortly.)
The Sent mailbox contains an archive of all the email messages you’ve sent, the Trash mailbox contains deleted emails, the Drafts folder holds your email messages that you’ve begun but haven’t yet sent out, and the Junk folder holds emails you receive that the Mail app determines are spam/junk. Occasionally a valid email will get sent here because the Subject line contains a word or phrase that the Mail app considers typical of spam, so you might check this mailbox if you’re expecting an email and it never arrives. (Otherwise just do as I do and ignore the Junk mailbox altogether.)
Adding New Mailboxes
Tap the Edit button (shown in Figure 7.4) and at the bottom of the list of mailboxes you’ll see a New Mailbox button. Perform these steps to add a new mailbox:
1. Tap the New Mailbox button.
2. Enter the name of your new Mailbox.
3. Tap the Save button to create your new Mailbox.
4. You can create sub-mailboxes (tucked into existing mailboxes) by tapping on the Mailbox Location button and choosing which existing Mailbox you wish to use to hold your new mailbox.
I’ll show you in a moment how to move messages around, including into any new mailbox you might create. For example, I could create two new folders: Archive and Pearson. The Archive folder would be where I place messages I don’t want kept in the Inbox but also don’t want to send to the Trash. The Pearson folder would hold emails from my book publisher.
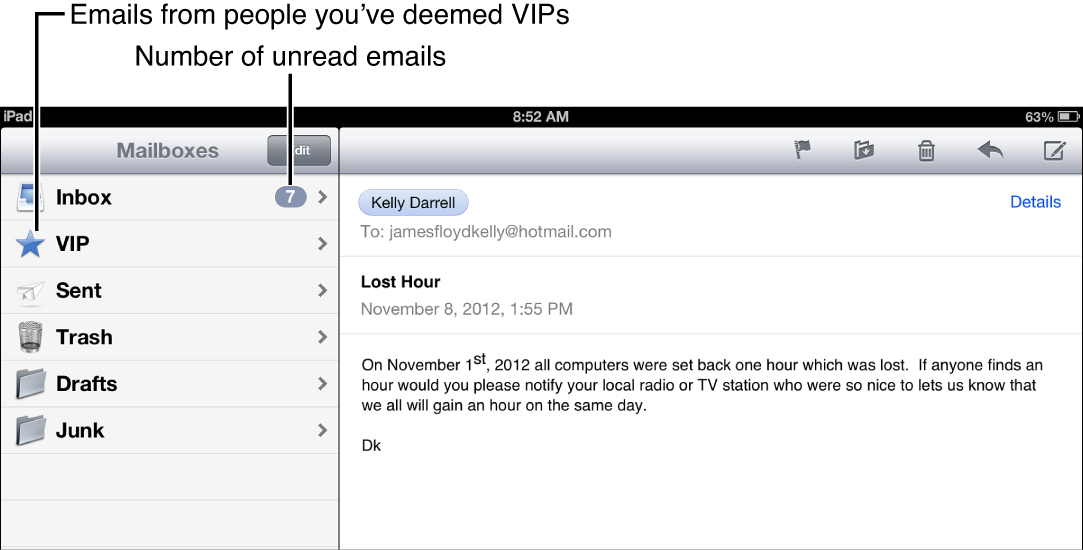
Tap the Inbox to return to your email messages. In Figure 7.5, you can see that new emails not yet opened have a small blue dot visible in the left column.
Tap an email, and the contents of that email will appear on the right side of the screen.
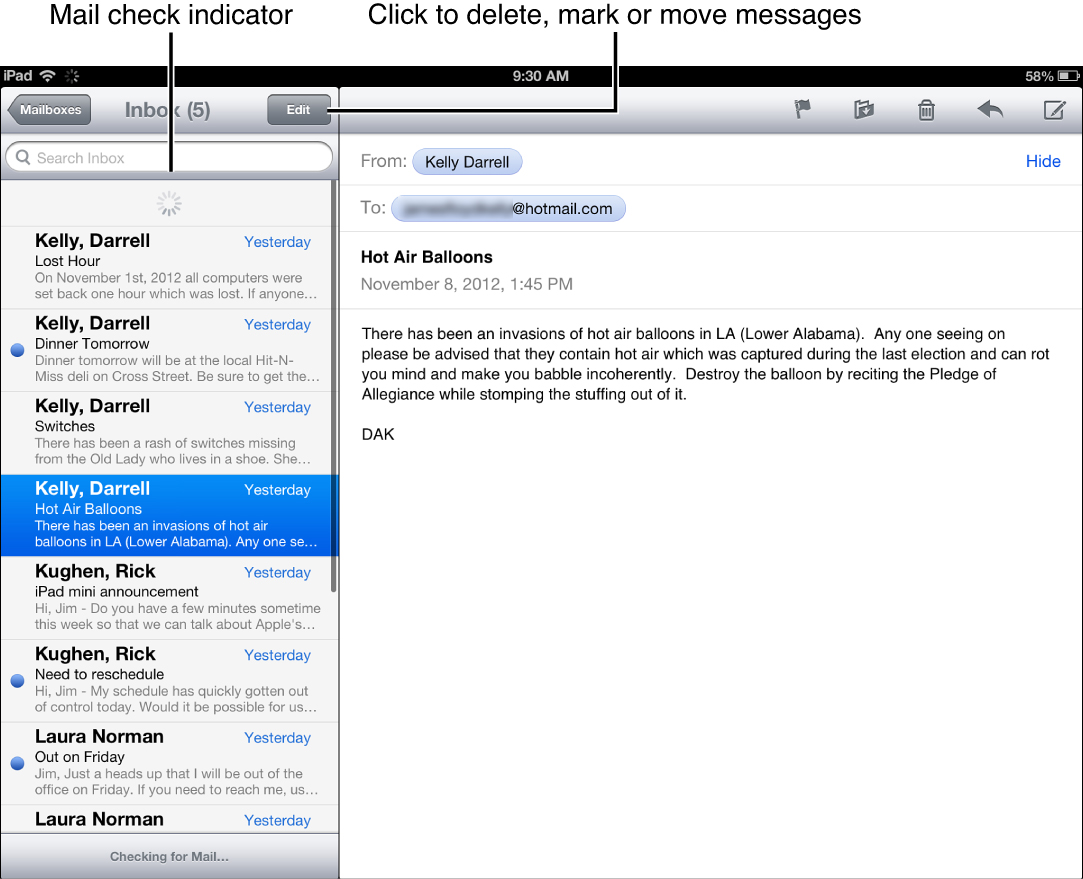
Now let’s focus on the right side of the screen. First, along the upper-right corner of the screen are five icons: Flag, Archive, Trash, Reply, and Compose.
Flagging Emails
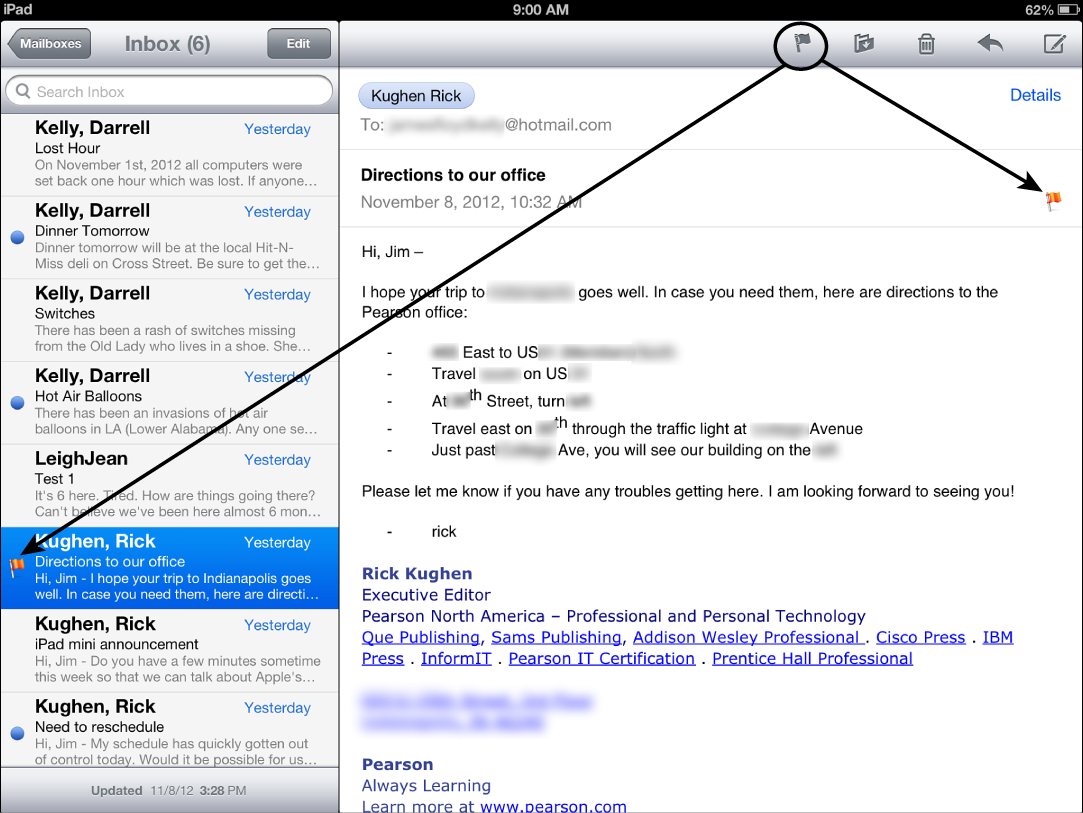
If you tap the Flag icon, you’ll get two options: Flag and Mark as Unread. Selecting the Flag option places a small flag to the left of the message in the mailbox column, as shown in Figure 7.6. (A flag is also placed at the top right of the opened email message itself.) The flag is meant to serve as a visual reminder to you—maybe you intend to respond to the email or maybe it contains important information such as a phone number that you need to quickly find later.
Marking an Email as Unread
When you tap an email to view its contents, the blue dot disappears. If you wish to reset the email to appear as if it hasn’t been read, tap the Flag icon in the top-right corner of the open message and select the Mark as Unread option and the blue dot will reappear. I use this often when I find that an email’s content is quite lengthy and I don’t have time to read it at the moment—I mark it as unread and will return to it later. I could use the flag, but I use it to indicate messages I wish to respond to at a later time. You’ll find your own uses for the Flag and Mark as Unread options.
Archiving and Trashing Email
The Archive button shrinks the message you are viewing and offers up a list of all the mailboxes, as shown in Figure 7.7. Tap a mailbox to move the current email to that location. This is useful for putting an email in the Junk folder should you discover it’s actually spam or in a custom folder you created with the New Mailbox button.
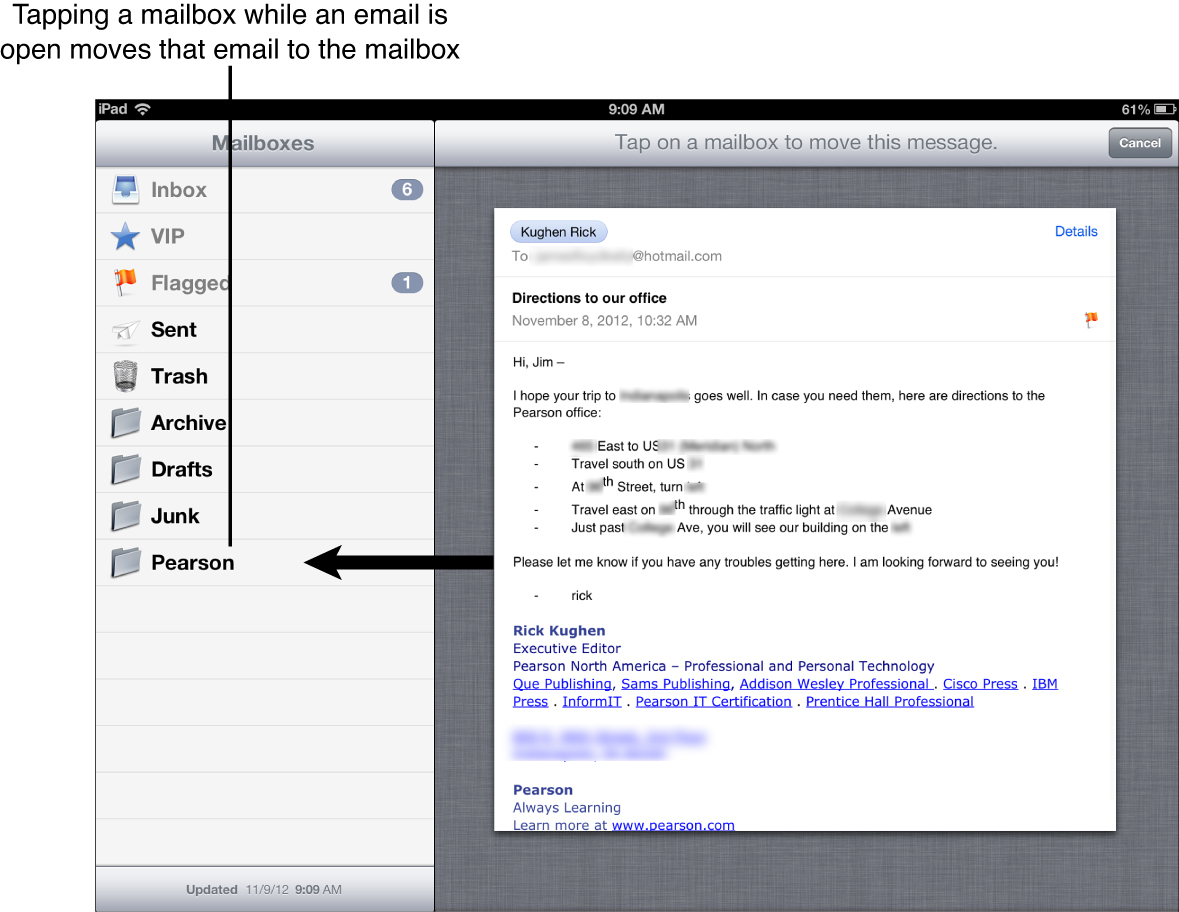
If I simply tap on the Pearson mailbox, this current message (from my editor, Rick) will be moved to there and disappear from my Inbox.
The Trash button is fairly self-explanatory—the current email you are viewing will be moved immediately to the Trash mailbox. When an email is sent to the Trash mailbox, that message disappears from the left side of the screen and the contents of the next message (below the one that was just deleted) are displayed on the right side.
Replying, Forwarding, and Printing
The Reply button offers three options: Reply, Forward, and Print. A fourth option, Reply to All, appears if there are two or more recipients who received the message.
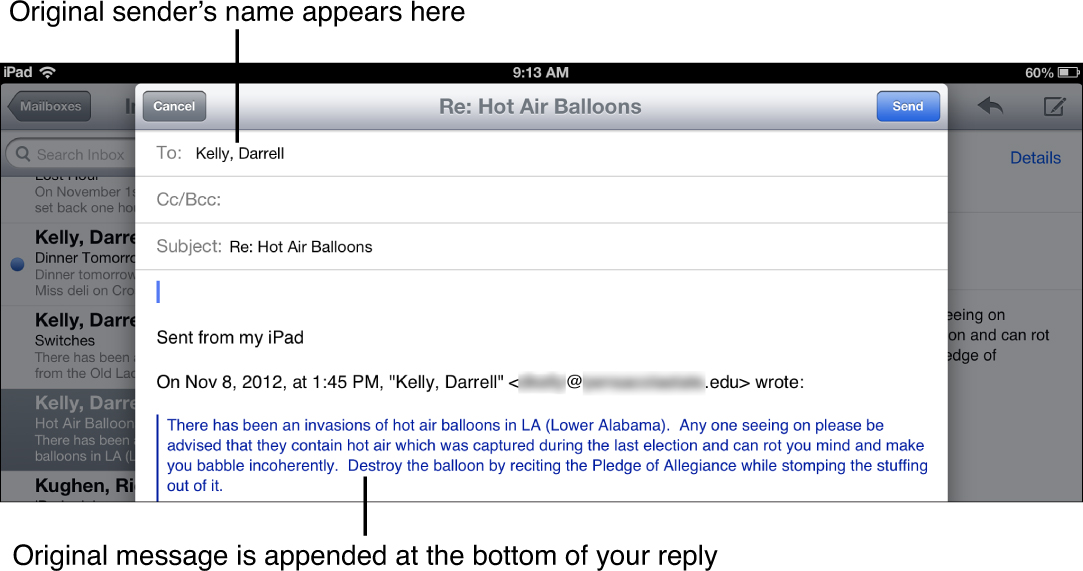
If you tap the Reply button, the original message is appended to the end of the new email, as shown in Figure 7.8. Notice that the original sender’s name is now in the To: box, and the original subject is retained. Use the onscreen keyboard to type your response and then tap the Send button to send the email on its way.
The Forward button opens a screen similar to the one in Figure 7.8, but the To: field is left blank, allowing you to type in an email address or select one from the Contact app by tapping the blue dot with the plus sign inside. Notice that the original message is appended to the end of the response you will send and the subject is retained; you can change the subject line if you wish and you can also completely delete the original message—tap and hold your finger anywhere in the message and then tap the Select All option that appears, as shown in Figure 7.9.

After the text is completely selected, tap the Backspace/Delete key or the Cut option on the toolbar, and the text will disappear.
Finally, the Print option allows you to print the contents of an email if you have a printer that supports AirPrint.
Writing a New Email
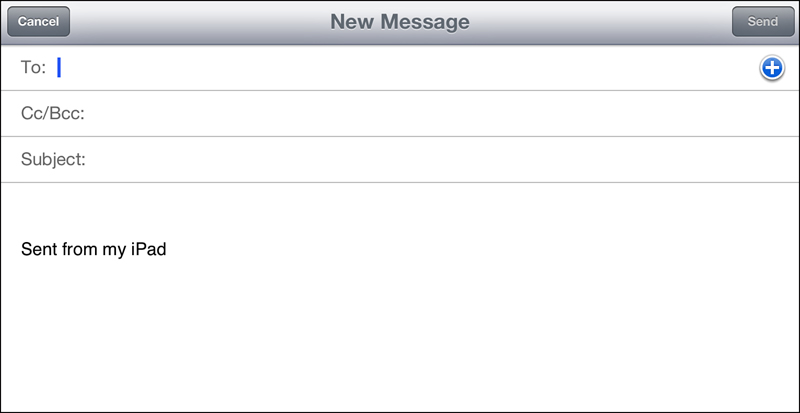
The last icon in the upper-right corner of the screen is the Compose button. Tap it, and you’ll be given a completely blank email message screen, as shown in Figure 7.10.
If you don’t like the “Sent from my iPad” signature that gets added to every email you create, you can get rid of it easily enough. Go into the Settings app, tap on the Mail, Contacts, Calendars option in the left list, and then scroll down on the right side of the screen until you find the Signature option. Tap it and delete any text that appears in the text box or create a different signature. Return to the Mail app and tap the Send button when you’re ready to send that message.
Extra Features
The Mail app is an extremely simple email tool, and that’s why I like it—not a lot of bells and whistles to get in the way. Still, Mail has a variety of other features that aren’t so obvious, so let’s look at how they work.
First, at any time you can force the Mail app to check for new email messages. Normally email is pushed out to the Mail app from the email provider (such as Hotmail). This seems to happen about every 5 minutes or so, but some services may do so every 15 minutes or maybe even just once an hour. If you wish, you can manually check for new messages by changing to the Inbox mailbox and then tapping and holding on the left side of the screen as you pull down. As you can see in Figure 7.11, a small spinning wheel appears at the top of the list to let you know the Mail app is checking for new email.
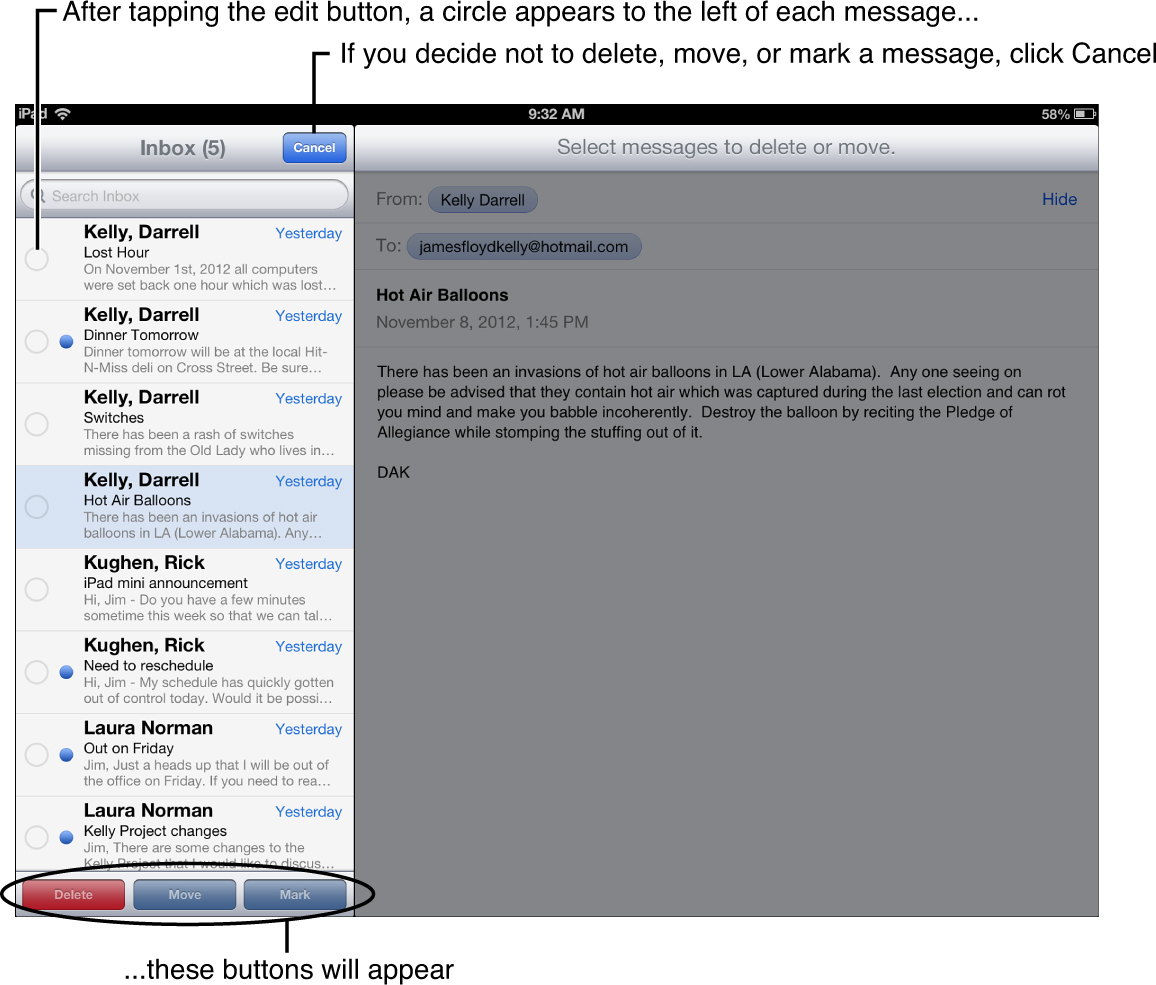
You might have also noticed the Edit button just above the current mailbox (and to the right of the Mailboxes button). If you tap it, the list of emails shifts slightly to the right and a small circle appears next to each message, as shown in Figure 7.12. Three buttons also appear at the bottom of the list: Delete, Move, and Mark.
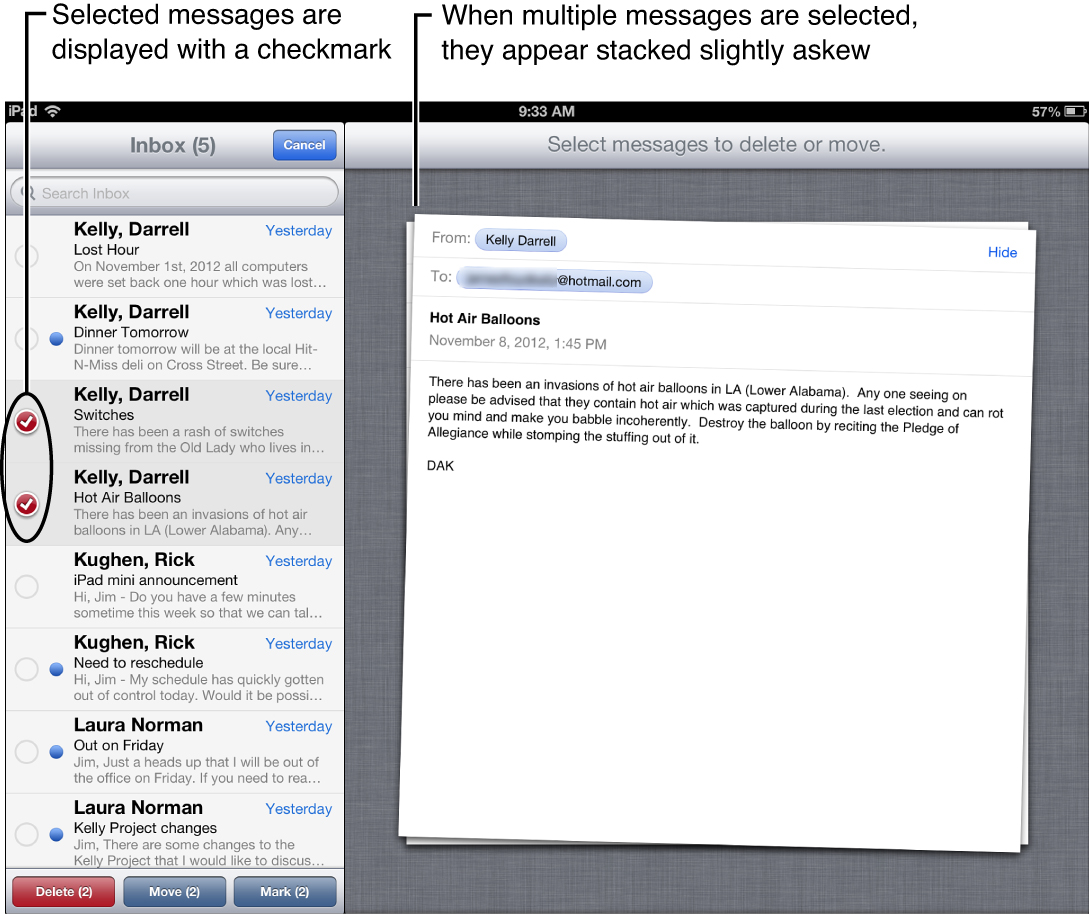
Tap the circle to the left of an email, and a check mark will appear inside, as shown in Figure 7.13. Selecting multiple messages is allowed, and this is indicated by the small stack of messages that appear on the right side of the screen.
After you’ve placed a check mark in the box next to one or more email messages, you can perform the same task on all selected emails by tapping the Delete, Move, or Mark button:
• Delete—Tapping the Delete button moves all emails with a check mark to the Trash mailbox immediately.
• Move—Tapping the Move button displays all existing mailboxes; tap a mailbox to move the emails with check marks to the selected mailbox.
• Mark—Tap the Mark button either to add the Flag icon described earlier or to mark the selected messages as Unread.
Finally, tap an email in the list on the left and view its contents on the right. Notice that the sender’s name is highlighted in blue. If you tap the blue button containing the sender’s name, you’ll see a window appear like the one in Figure 7.14 (if that person is not already in the Contacts app).
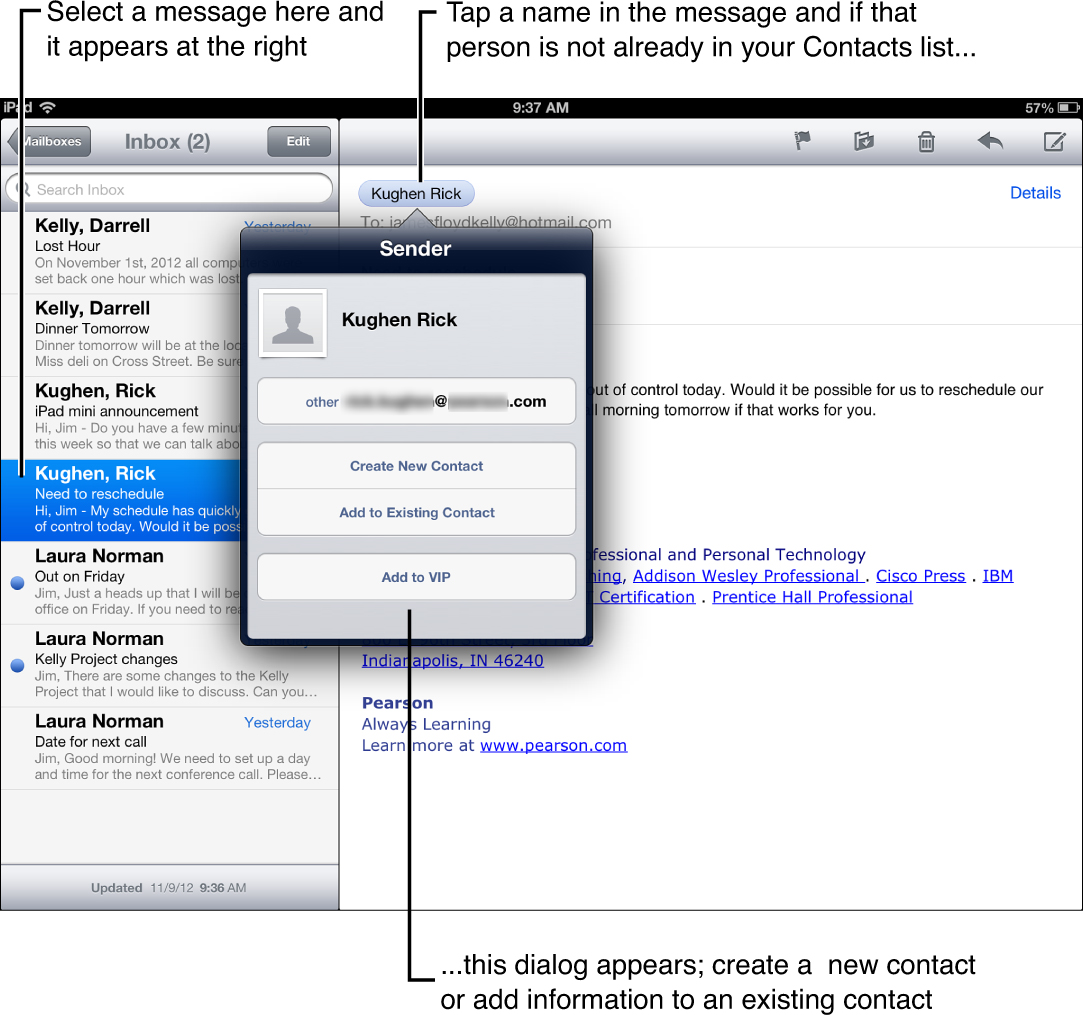
First, you’ll see the sender’s email address below his or her name. Because the sender is not already in your Contacts app, you may tap the Create New Contact button to add him or her, along with any other information you wish to include. (Refer to Chapter 4, “Contacts,” for details on adding new contacts.)
If this person’s name is already in the Contacts app but you know that the email address is not part of that contact’s information, tap the Add to Existing Contact button and you can select that person from the scrollable list that appears. Tap the contact’s name in the list, and that email address will be added to the contact information page.
If the sender is already in your Contacts app when you tap his or her name in an email, you’ll see a different window that offers the following options:
• Send Message—Tap the Send Message button and a blank message box will open with this person’s name in the To: box. Fill in a subject, type the body of your email, and click Send.
• FaceTime—If you’d like to have a video chat with this person, tap the FaceTime button.
• Share Contact—If you’d like to send this person’s contact information to someone else, click Share Contact.
• Add to Favorites—Choosing Add to Favorites will place this person in the FaceTime Favorites list so you can always contact him or her with FaceTime by just opening that app.
• Add to VIP—Tap the Add to VIP button to add someone to your list of VIPs. When you open the VIP mailbox only emails from those you’ve added as VIPs will be displayed.
 Tip
Tip
Don’t use the Add to VIP button too often. I suggest flagging less than 10 people with the VIP status so you can quickly view messages in the Inbox folder by filtering out everyone else. Tap the sender’s name again to get the Sender info box back so you can tap the Remove from VIP if you wish to remove a contact from the VIP mailbox.
The ability to add someone to the Contacts app or to the VIP mailbox isn’t limited to the sender of the email either. Take a look at Figure 7.14 and you’ll see to the right of the sender’s name an option called Details. Tap the Details item and any recipients in the message will have their name also highlighted in a blue button. Tap the blue button, and you can add recipients to the Contacts app and make them VIPs, just as you did with the sender.
When you tap the Details item, it changes to Hide. Tap the Hide item to hide the recipients to an email message.
Sending Attachments
If you’re familiar with email, you’re probably familiar with attachments. Attachments are files you send along with an email message for the recipient to open. Attachments can include music files, photos, documents, and much more.
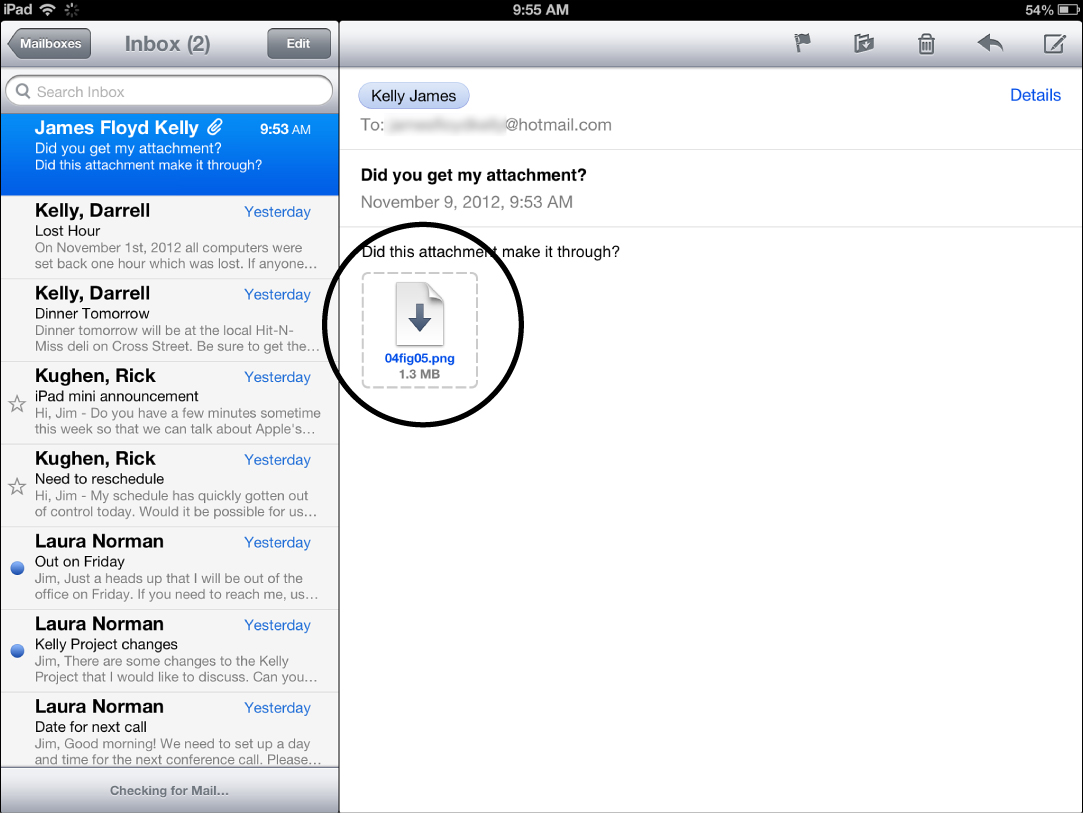
Notice in Figure 7.15 that I’ve attached an image to this email.
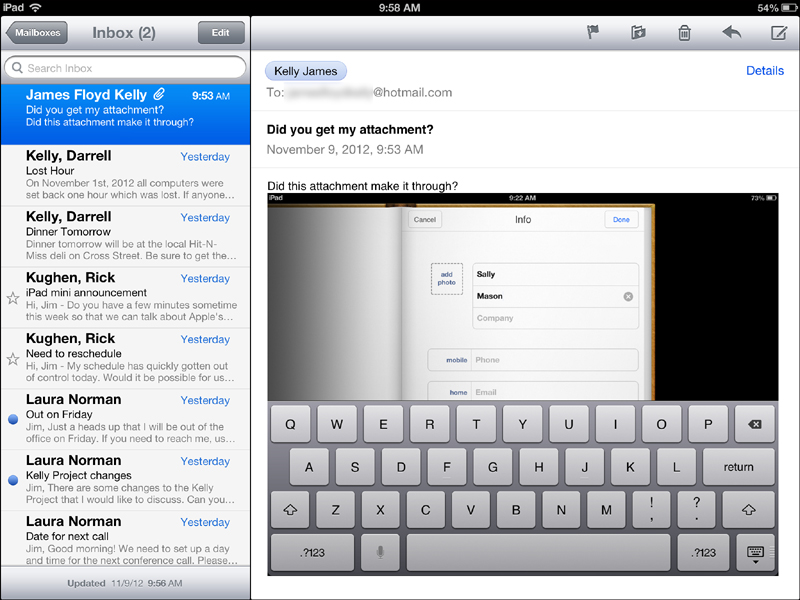
To open an attachment that someone has sent to you, simply tap it. If the attachment can be opened with any of the iPad’s apps, the contents of the attachment will be displayed, as shown in Figure 7.16.
It’s important to note that not every attachment can be opened on the iPad until you download the proper application. Sometimes, however, no app will be available to open the attachment, meaning that you will be forced to open it on a computer running the proper app.
Typically if an app is installed on your iPad that can open a special attachment, that app will launch automatically when you tap the attachment to view it—but not always.
As for sending your own attachments, unfortunately the Mail app limits you to sending only photos and videos. Photos and videos are stored in the Photos app, which I cover in Chapter 9, “Apps for Photos and Videos.” Once you have some photos or videos stored on your iPad, it’s quite easy to send them to others in an email message.
First, tap the Compose button or Reply/Reply to All and type up your message. Then, when you’re ready to add your attachment, simply tap and hold your finger on any blank space in the message until the toolbar shown in Figure 7.17 appears.
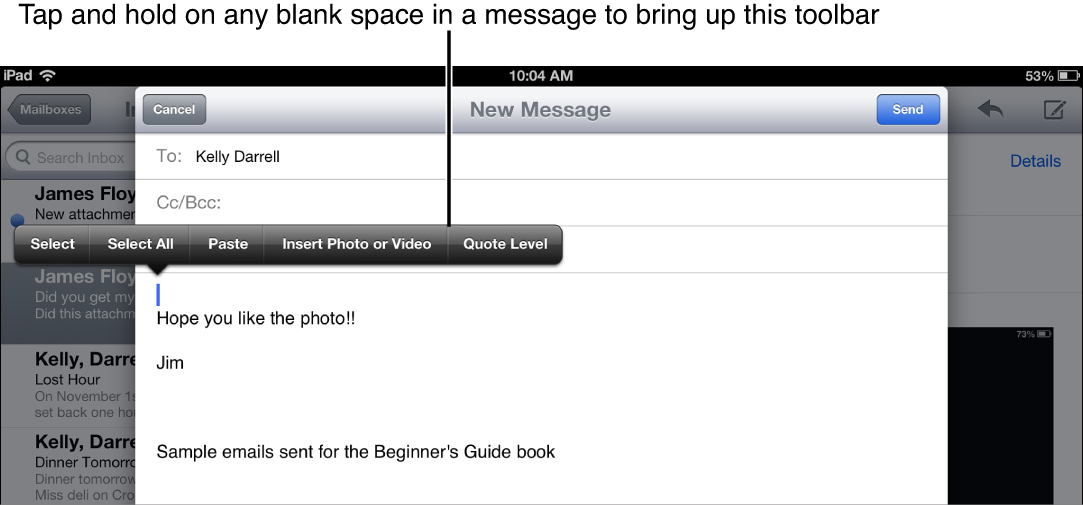
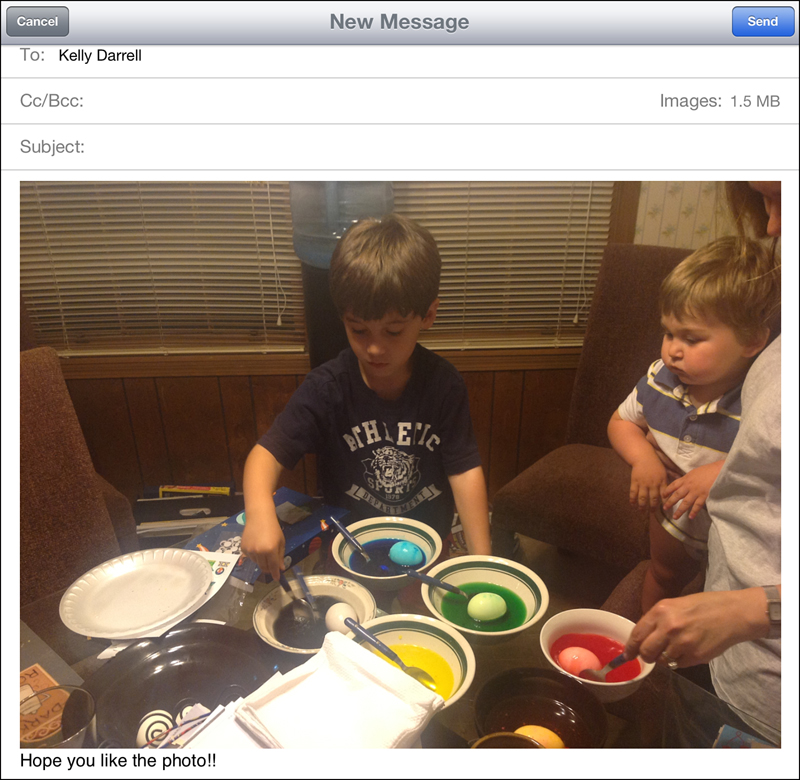
Tap the Insert Photo or Video button and then select the image or video from the pop-up window that appears. The photo or video will be inserted as shown in Figure 7.18. Tap the Send button to get the message and attachment moving on their way.
Other Email Apps
I told you earlier in the chapter that some email services have their own apps. You’ll learn about the App Store in Chapter 12 and how you can use it to search for other types of apps to install on your iPad.
One of these apps, for example, is the Gmail app shown in Figure 7.19. Although the Mail app can send and receive email from a Gmail account, it doesn’t support some of the power features that Gmail offers, such as labels and filtering support. (If you’re not familiar with these features, visit Gmail.com to learn all about Gmail.)
Other services may have their own app for the iPad, but the only way to know for certain is to visit their website or email them and ask.
Caution
A search in the App Store might find you something that sounds like it will work with your email service, but these apps aren’t the “official” ones and are instead created by a third party. Although I think you can usually trust these apps, I tend to stick with the official ones released by the service I wish to use.
One reason that Gmail users might wish to use the Gmail app instead of the Mail app is if they’ve enabled Gmail’s 2-Step Verification process. This process prevents someone from obtaining your password and using it to access your email account. When you use the Gmail app, every 30 days or so, you’ll get a pop-up window that asks you to type in a verification code that is sent to your mobile phone. The thinking is that if someone steals your email password, they probably don’t have your mobile phone. Only someone with the phone number on file can obtain the text message that contains the code required to access the Gmail app.
Note
Not all services offer two-step verification, and it’s not required by Google for Gmail users. Still, it’s a nice security feature if you want it. Just be aware that it does require using the Gmail app and not the Mail app if you enable 2-Step Verification. For more information on this process, visit http://support.google.com/accounts/bin/answer.py?hl=en&answer=180744.
Email Access with a Web Browser
Some of you may access your email from a web browser. Users of Gmail and Hotmail/Outlook.com are already familiar with opening a web browser to Gmail.com or Outlook.com and logging in. Email is visible onscreen and stored by the service provider and not on the user’s computer.
The iPad does support this, especially for Gmail and Hotmail/Outlook.com users.
Using the web browser to access my Hotmail account is a lot different from using it with the Mail app. Additional menu items, buttons, and features are available that I cannot cover in this chapter. If you want to learn more about either the Gmail.com or Hotmail/Outlook.com web email service, visit Gmail.com or Outlook.com to get all the details.
Mail Settings
Closing out this chapter, I want to give you some thoughts on the various settings available for the Mail app. Go ahead and open the Settings app and tap the Mail, Contacts, and Calendars option.
Scroll down the right side of the screen until you see the Mail category, which allows you to alter a number of settings:
• Show—Modify this option to increase or decrease the maximum number of email messages displayed in the Mail app. Any messages not displayed aren’t gone—they’re just hidden until you scroll further up to view them.
• Preview—This option lets you pick how many lines of text from the email you wish to display under the email in the Mailbox list. The more you choose, the fewer emails will be visible on the iPad screen (more lines equals more space). Options run from zero to five lines.
• Show To/Cc Label—Turn this on or off to hide the To: and CC: fields in a message you are composing.
• Ask Before Deleting—Turn this on if you wish to get a pop-up window asking you to confirm the deletion of an email.
• Load Remote Images—Turn this on if you want any embedded images that are referenced using a web link displayed in an email.
• Organize by Thread—Turn this on or off, depending on whether you wish to see any previous back-and-forth conversations in an email you are viewing. This option will also display the number of conversations (emails) in parenthesis for the current discussion.
• Always Bcc Myself—Only turn this on if you want to receive an email every time you send a message out. It’s annoying and time consuming to get a copied email, so use this option only if you absolutely must.
• Increase Quote Level—Leave this on if you want the original text of a message included in a reply to be slightly pushed to the right for ease of reading.
• Signature—Mentioned previously, you can modify the text in this option, and that text will always be added to your emails (replies included).
• Default Account—If you have multiple email addresses, you can add them in Settings by tapping the Add Account option. Even with multiple email addresses configured, only one will be used when you send outgoing emails. Select that email account as the default account. If you only have one account, this option can be ignored.