5. Notes and Reminders
My iPad goes everywhere I do—I call it my personal assistant for a reason! It provides me with a lot of tools, including email, web browser, instant messaging, maps, and much more. I showed you in Chapter 4, “Contacts,” how to use your iPad to keep all of your contacts in one place, and in the next chapter I’m going to show you how to use the Calendar app for keeping your appointments and important dates always at hand.
But between accessing my contacts and my calendar, there are two reasons I use my iPad often and cannot live without it. The first is the ability to take quick notes. Regardless of whether I’m on a phone call, in a face-to-face meeting, or stuck in traffic, I open the Notes app when I need to jot down some basic text so I won’t forget.
And speaking of not forgetting, that’s the other benefit I get from keeping my iPad handy—reminders. The Reminders app keeps me organized, reminding me of conference calls with my editor, chapters due, doctor and dentist appointments for my kids, and much more.
The best thing about the Notes and Reminders apps is that they’re just so simple to use. Let me show you.
 Note
Note
iPhone owners who use iCloud will find that the Notes and Reminders apps share entries between the iPad and the iPhone. Create a reminder in your iPad and that reminder will be synced with your iPhone. Likewise, type up a note on your iPhone and later you can edit it on a larger screen by opening the same note on your iPad.
Takin’ Some Notes!
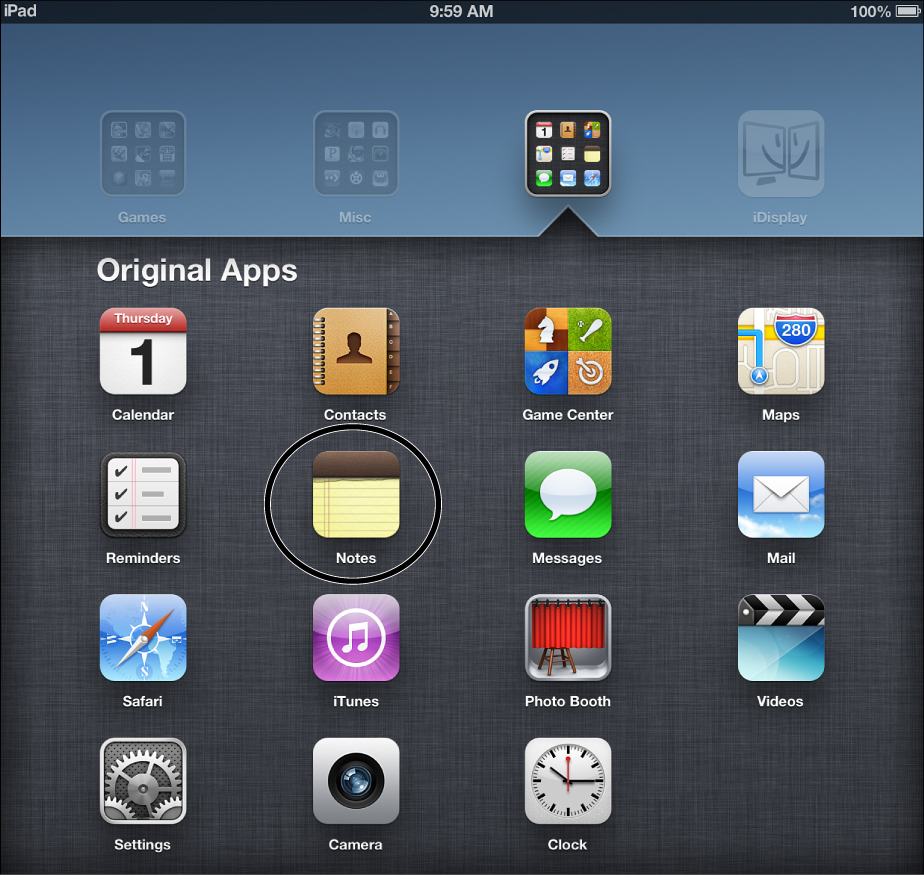
The Notes app has been included with every version of iOS, and you’ll be happy to know it’s still available with the newest versions of iPad and iPad mini, as well as the iPhone 5. You can see the icon for the Notes app in Figure 5.1.
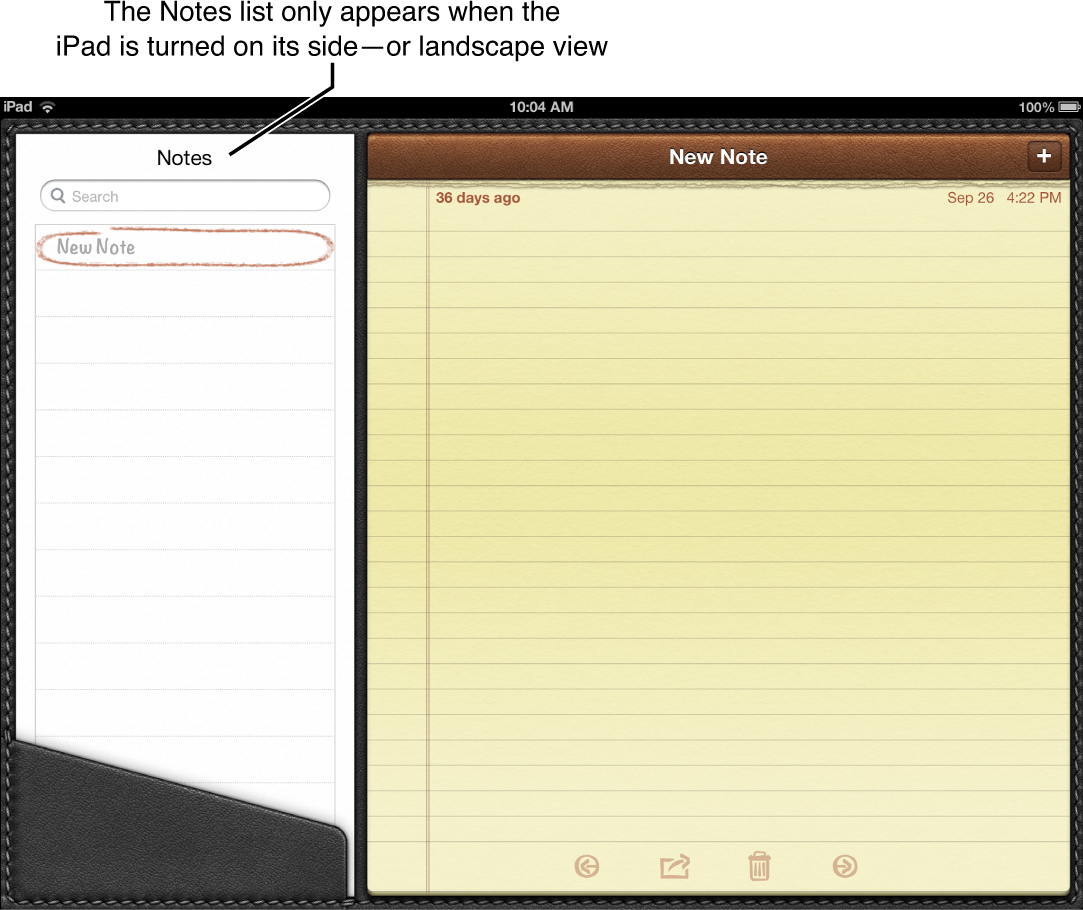
Tap the icon to open the Notes app and you’ll be greeted by a blank note page, as shown in Figure 5.2.
 Note
Note
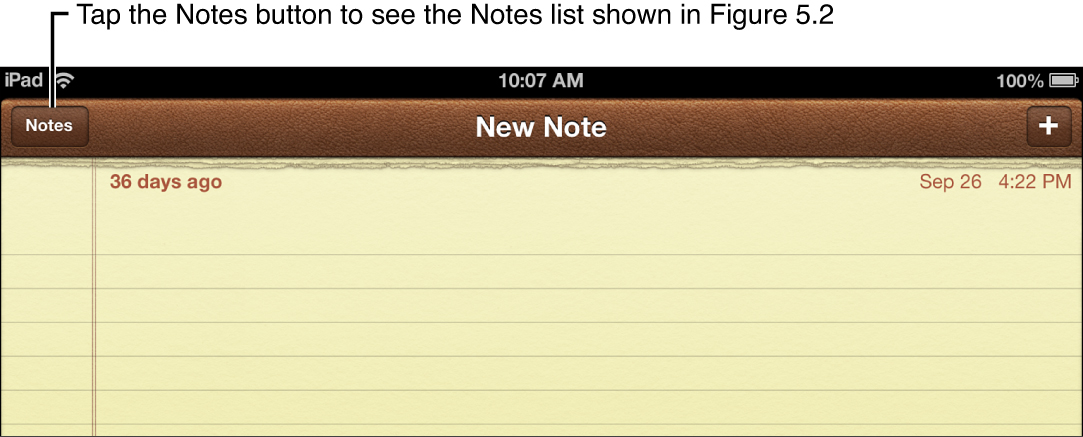
As a reminder, I’ll be using Notes in Landscape view in this chapter because it shows all the notes I have stored in the app. In Portrait view, the Notes list (or pane, as some call it) shown in Figure 5.2 on the left will not be visible until you tap the Notes button in the upper-left corner of the screen, as shown in Figure 5.3.
Returning to the Notes app in Landscape view, let me explain the different sections and icons.
Creating Notes
First, because you haven’t yet used Notes, the listing on the left side is blank, and the current page is called New Note and is circled to indicate that you are working on that page. As you add more pages, you simply tap the note you wish to view or edit and that note will be circled and displayed on the right side of the screen, as shown in Figure 5.4.
When you start using the onscreen keyboard to type up a note, the title of the note changes to whatever is entered on the first line. As you can see in Figure 5.4, the first line of the current note I’m viewing is “Jim’s To Do List.” I can edit that title by tapping at the end of that line with my finger and then using the keyboard’s Backspace key to modify it.
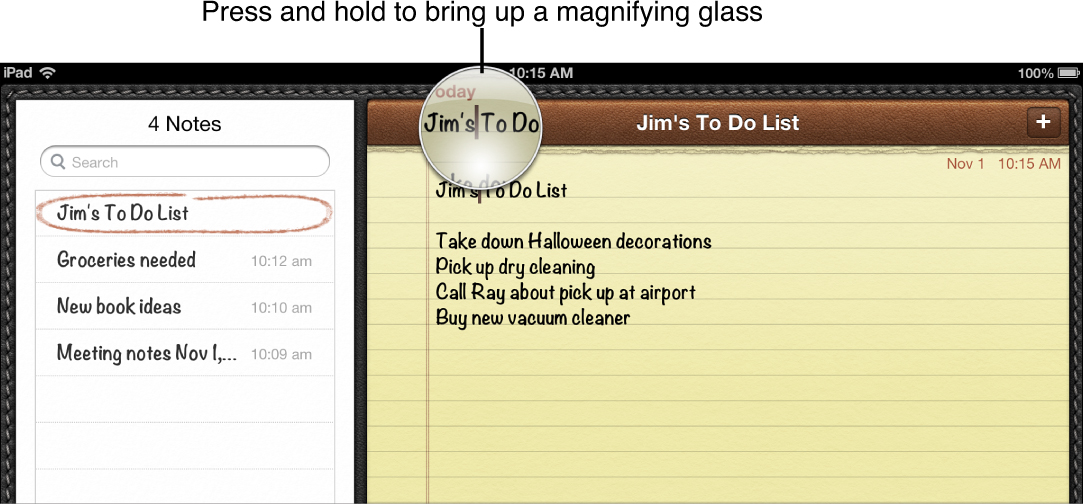
If you’d rather not delete an entire line of text but maybe insert a bit of text at the beginning, you don’t have to use the Backspace key to completely erase the existing line. Instead, press and hold your finger anywhere on the line, and a small magnifying lens will appear, as shown in Figure 5.5.
While the magnifying lens is visible, move your finger left or right and place the cursor where you wish to begin editing. You can then use the Backspace key to delete some text or just type to add new text. Figure 5.6 shows that I’ve added my first name to the To Do List line, and this is also reflected in the title of the note.
To add a new note, tap the plus sign (+) in the upper-right corner; a new, clean note page will appear, allowing you to type up a new page of notes.
Once you have a note typed, you have some tools available that aren’t readily visible.
Editing Notes
First, the magnifying lens will work with any text you’ve typed into a note, so use it to make quick edits. Forget to capitalize a word? No problem! Tap and hold your finger so the magnifying lens appears and then drag the cursor just behind the letter that needs changed. Use the Backspace key, type in the uppercase letter to replace the deleted lowercase letter, and then tap elsewhere to move the cursor either to another location that needs editing or to the end of the note to add new text.
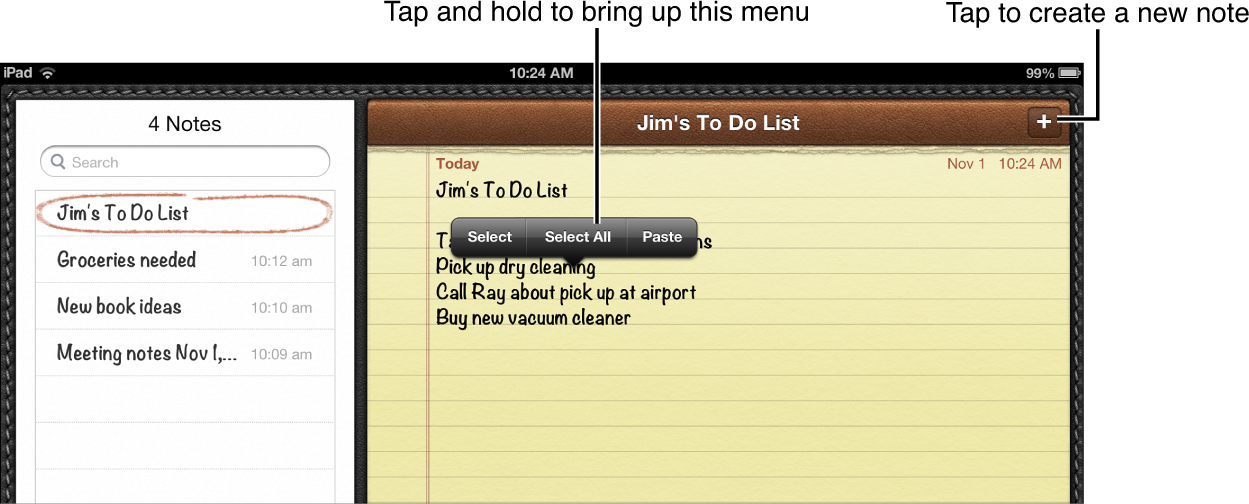
Now try this: Tap and hold on an existing word in a note until the magnifying lens appears and then remove your finger. A small pop-up toolbar will appear, as shown in Figure 5.7.
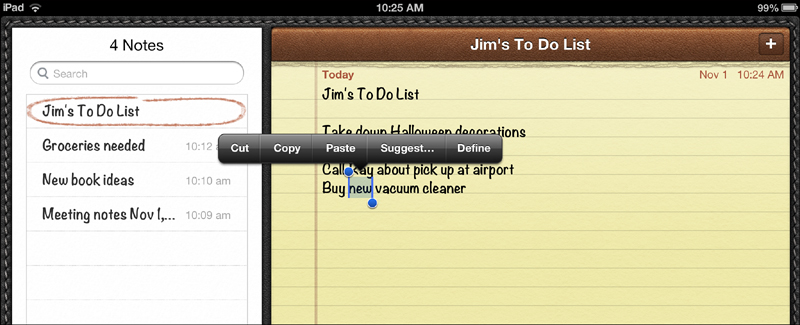
The pop-up toolbar offers three choices: Select, Select All, and Paste. If you tap Select, the word you tapped and held will briefly be selected, as shown in Figure 5.8.
The word will be highlighted and a new toolbar will appear that offers five options: Cut, Copy, Paste, Suggest, and Define.
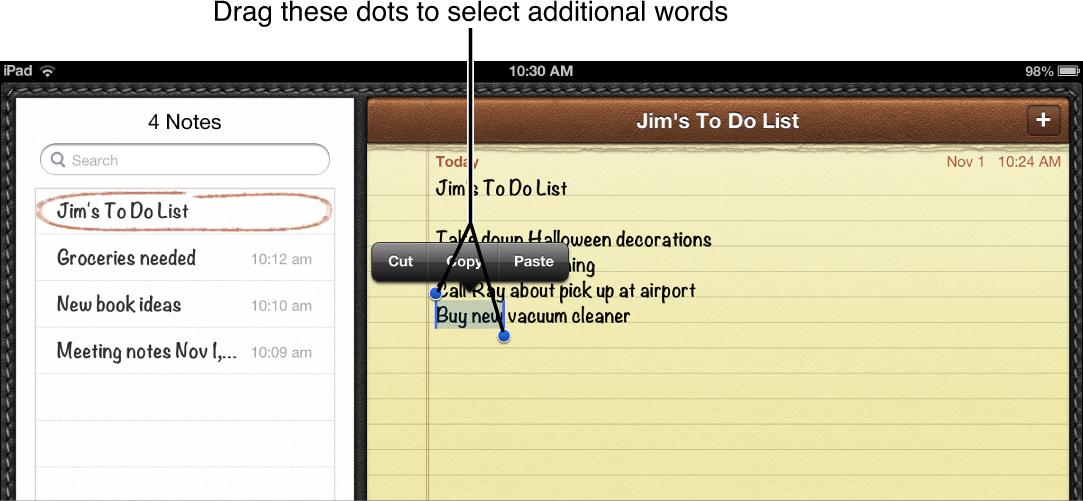
Before I explain these options, notice that the highlighted word has two small dots surrounding it. If you drag the dot in the upper-left corner of the word to the left, the selection can be expanded to include any words that occur before the single selected word. Likewise, dragging the dot in the lower-right corner to the right will allow you to highlight additional words to the right of the single selected word. As you can see in Figure 5.9, I’ve used these dots to select two words.
 Note
Note
Using the dots can take some practice. Fortunately, a rectangular magnifying lens will appear that can help you properly select the words you need.
Once I’ve selected the words to edit, I can use Cut, Copy, or Paste. In this case, I’ll choose Copy. When I do, the small toolbar disappears.
Next, I’ll tap on an empty line in the note (use the Return key to add additional blank lines if you need them) and a familiar toolbar appears, offering the options Select, Select All, and Paste. When I select Paste, the copied text is added.
Now let’s revisit the Select All option. I’ll tap and hold my finger and then release it so the toolbar shown in Figure 5.7 appears. This time, however, I’ll tap Select All, which selects the entire word.
After making the text selection, you choose whether you want to Cut, Copy, or Paste. Cut removes the text completely, Copy stores a copy of the selected text on the clipboard, and Paste replaces any text currently selected (in this case, all of it) with whatever is currently stored on the clipboard (in this case, “Buy new”). You can also expand the current text selection using the dots as described previously.
 Caution
Be careful with the Select All and Paste options because there is no Undo feature in the Notes app!
 Note
Note
The Notes app is extremely simple to use, but that means its text features are extremely simple as well. You won’t find any font selections, larger or smaller font sizes, and formatting features such as tabs and bullet lists. It’s basic text, and nothing else. If you want more advanced writing features, be sure to read Chapter 20, “Eight Great Paid Apps,” where I give you a recommendation for a more powerful writing app called Pages.
Back in Figure 5.8, you saw that two other options are available when you select a word: Suggest and Define.
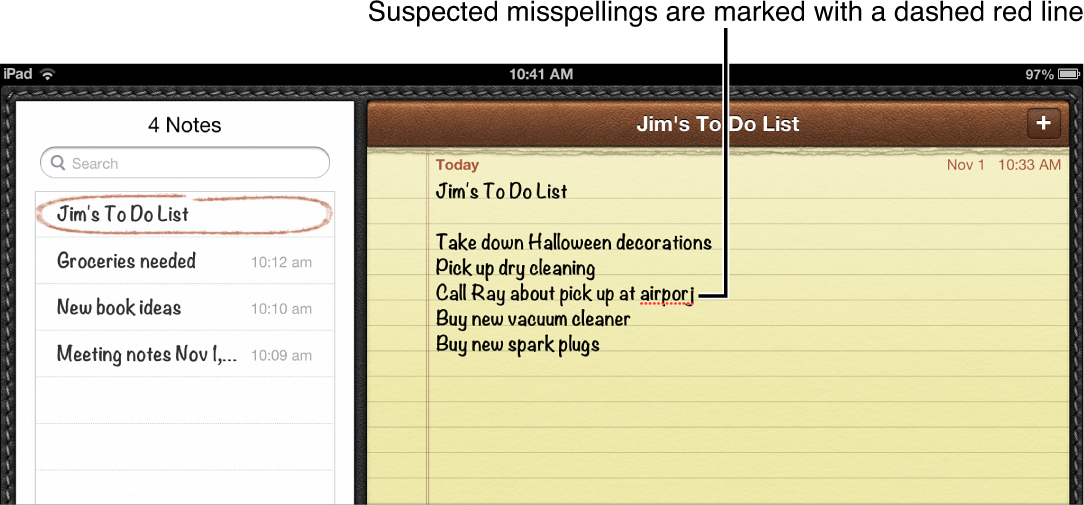
If you tap Suggest, you will be given a short list of replacement words—these aren’t always synonyms, so be careful. Instead, Notes typically offers a pluralized form of the selected word or a different spelling option. Honestly, I’ve never found the Suggest feature to be of much use. If the iOS thinks a word is misspelled, the word will be underlined, as shown in Figure 5.10.
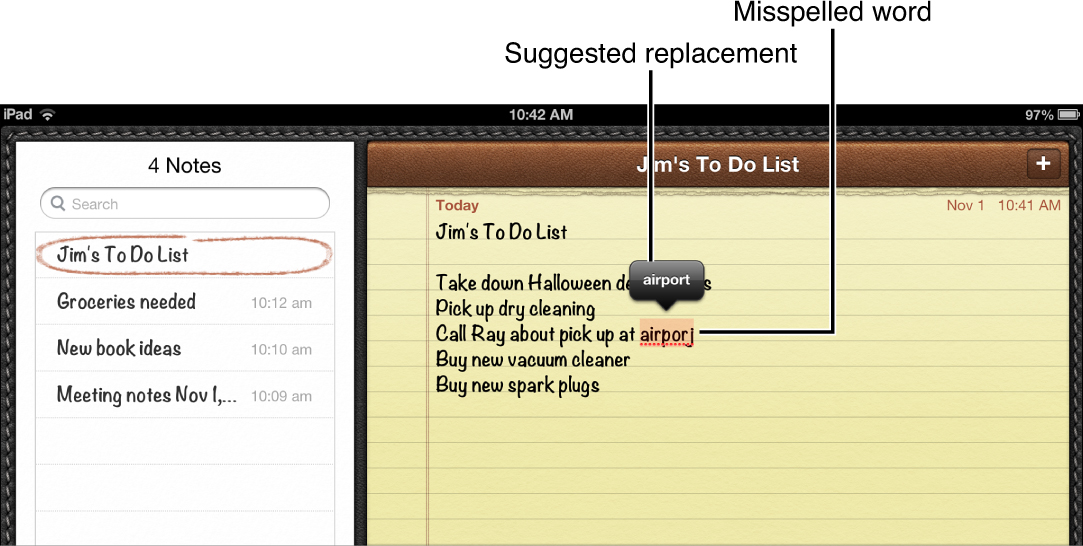
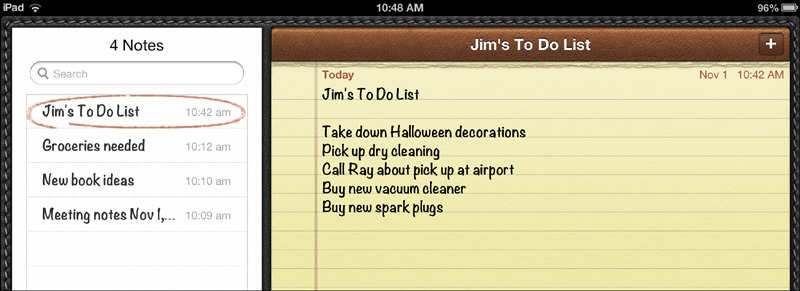
Tap the misspelled word and a suggested correction will appear above it, as shown in Figure 5.11. If you prefer the suggestion, tap it and the original (misspelled) word will be replaced.
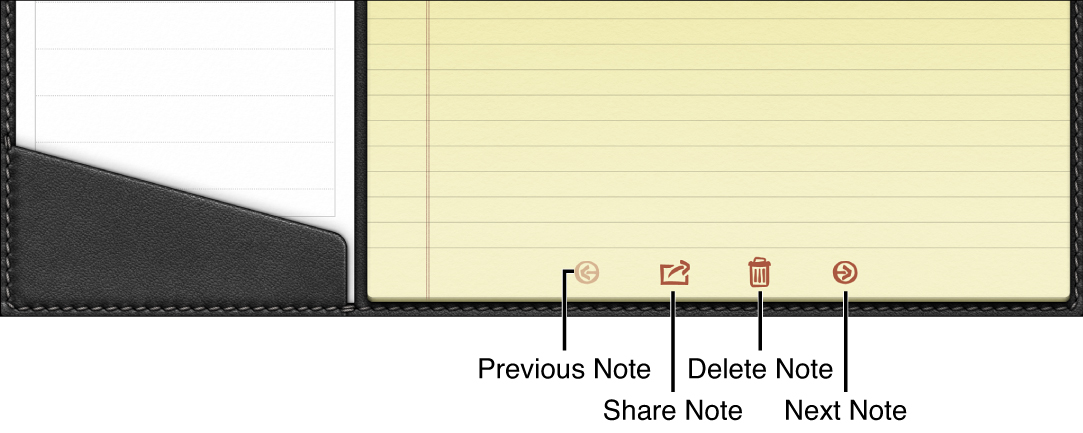
At the bottom of each note you’ll see the four icons shown in Figure 5.12. If you cannot see the four icons, you may need to hide the keyboard by tapping the Hide Keyboard button in the lower-right corner of the on-screen keyboard. (It looks like a keyboard with a small arrow beneath it.)
The Previous Note and Next Note buttons are self explanatory: Tap the Next Note button and the note below the current one in the Notes List will appear. If you’re viewing the last note in the list, the Next Note button will be disabled. Tap the Previous Note button to view the note above the current one in the Notes List; the Previous Note button will be disabled when viewing the note at the top of the Notes List.
The Delete Note button looks like a trashcan; tap it and a Delete Note button will appear.
Tap the Delete Note button to delete the note, or tap elsewhere to keep the note. Deleting a note is permanent, so only tap the Delete Note button if you’re 100% certain you won’t need it again.
The Share button offers four options—Mail, Message, Print, and Copy—as shown in Figure 5.13.
I cover the Mail app in Chapter 7, “The Mail App,” and the Message app in Chapter 10, “Apps for Instant Communication,” but just know that if you select either of these options, the matching app will open, allowing you either to email the contents of the note to a recipient (with the Mail app) or to instant message them to a contact (via the Message app).
The Print option will only work if you have a printer that has the AirPrint service built in. If you’d like a list of printers that offer this option, visit http://support.apple.com/kb/HT4356 and read the list of vendors that sell compatible printers as well as instructions for enabling the AirPrint feature on your iPad.
The Copy option allows you to place a copy of the note’s contents on the clipboard so you can paste the text elsewhere in other apps (or simply in a new note). Not all apps have access to the clipboard, but if you find the Paste option in another app (such as Calendar), it’s a good bet you’ll be able to copy content from a note and paste it in the other app.
Before leaving the Notes app, I want to show you two more features the Notes app offers.
Searching and Deleting Notes
The first is the Search box that appears at the top of the Notes List, as shown in Figure 5.14.
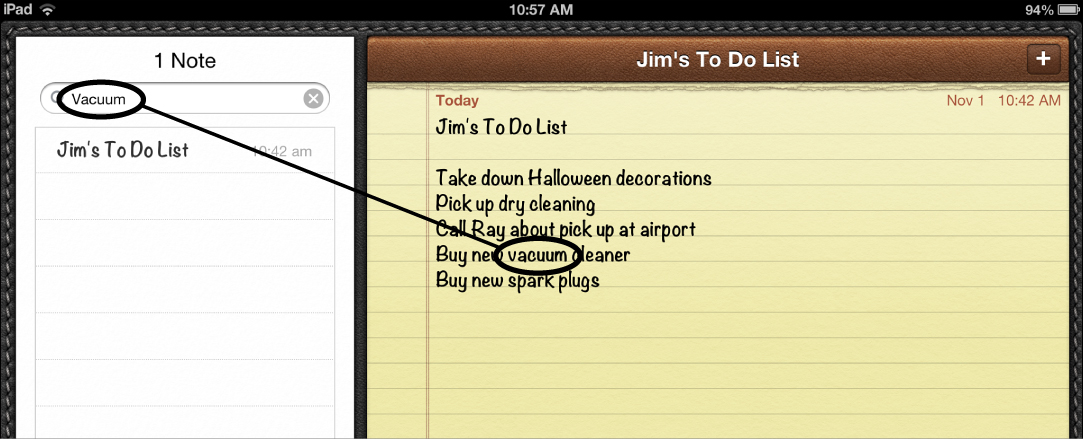
Over time, you’re likely to build up quite a collection of notes in the Notes app. The title of a note doesn’t always give you the best idea of what’s inside, so type a word in the Search box and any notes that contain that word will be filtered and listed below the Search box, as shown in Figure 5.15. Notes that do not contain that word are not visible.
 Tip
Tip
You can type in multiple words in the Search box, but only notes that contain every word you type will be visible. It’s best to type one word at a time until you find the note you want. If more than one note appears in the list, type another word to see if notes start dropping off.
The second feature is more of a shortcut for the Delete Note button. If you tap and drag your finger left on the title of a note in the Notes List, a small red Delete button will appear, as shown in Figure 5.16. Tap the Delete button to permanently remove the note.
And that’s the Notes app. Pretty simple, isn’t it? But it’s one of my go-to apps that I constantly use. I don’t need fancy fonts and formatting most of the time, so the Notes app is fast and easy to use when I just need to type up some thoughts or ideas without risk of losing them.
 Tip
Tip
If you’d like to change the default font in the Notes app, open the Settings app, tap the Notes option in the left column, and on the right side of the screen select from Noteworthy, Helvetica, and Marker Felt.
Go ahead and press the Home button to close down the Notes app. Don’t worry—any note you are currently working on will be saved instantly!
Using Reminders
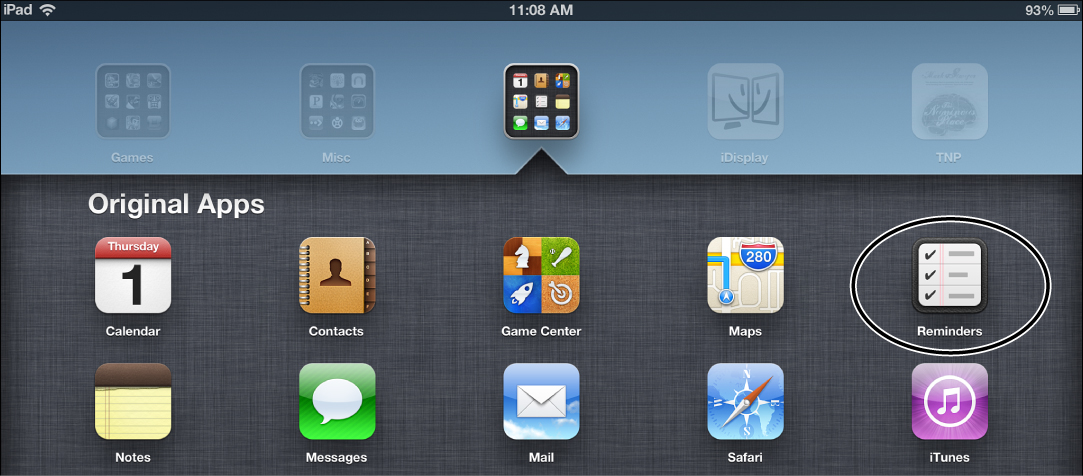
Now open the Reminders app by tapping its icon once (see Figure 5.17).
The Reminders app looks the same in either Landscape or Portrait view, but in Portrait view the list of reminders displayed will be thinner so that longer descriptions will wrap to another line.
I’ll start with the simplest task first: creating a reminder. Here are the steps to follow:
1. Tap the plus button (+) in the upper-right corner of the screen (or simply tap on the first line in the Reminders List) and the onscreen keyboard appears along with an empty check box on the selected line.
2. Type in a description of the reminder—keep in mind that you don’t have to enter a time or date at this point. I’ll show you how to set that information shortly.
3. Tap the Done button to add the reminder to the Reminders List.
4. Continue to add additional reminders either by tapping the plus sign or just tapping the Return button on the keyboard to move to the next line. Figure 5.18 shows that I’ve created three new reminders.
5. Tap and hold any Reminder item and drag it up or down to shift its location in the list.
Choosing When You Want to Be Reminded
Adding reminders is easy, as you’ve just seen, but the real power of the Reminders app is actually having your iPad give you enough advanced notice about a reminder so that you can plan your day (or not forget an important item).
For instance, let’s say I really need to remember to confirm the babysitter for Saturday evening, but rather than check with her on Saturday afternoon, I’d rather check on Friday. Here are the steps I would follow:
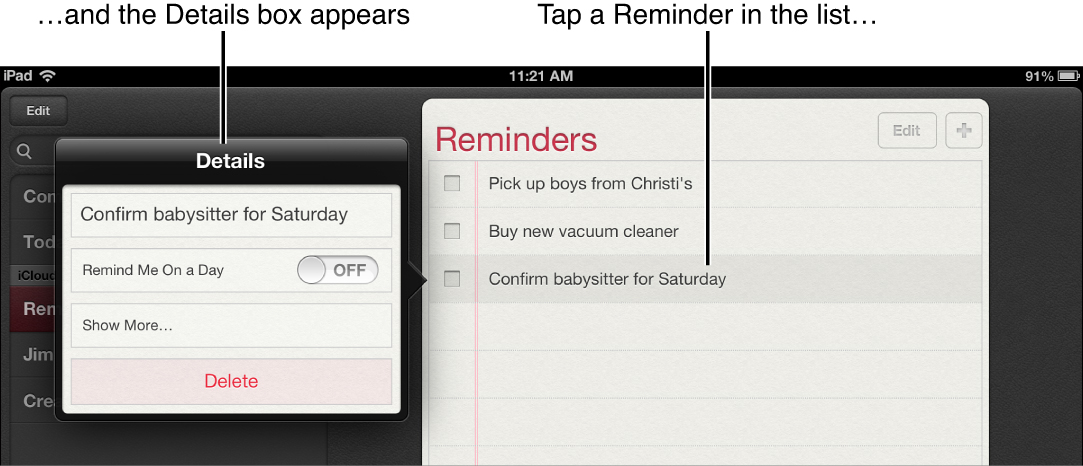
1. I start by tapping the reminder in the Reminders List. The Details window appears, as shown in Figure 5.19.
2. The first line is obvious: It matches the text of the reminder I created. I can tap in that text field, however, to edit the title if necessary.
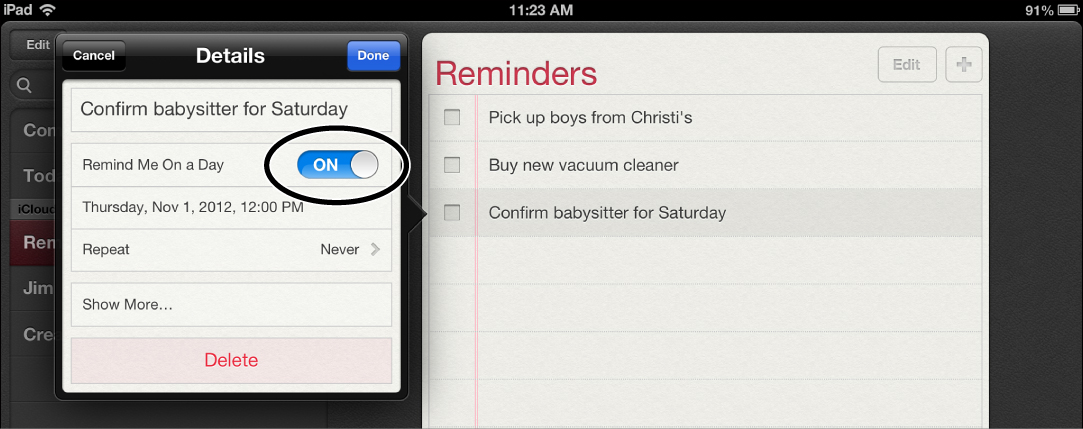
3. As you can see, the Remind Me On a Day feature is turned Off, but I can simply tap the Off button to turn it to the On position, as shown in Figure 5.20. Turning on this option reveals more information that can be tweaked.
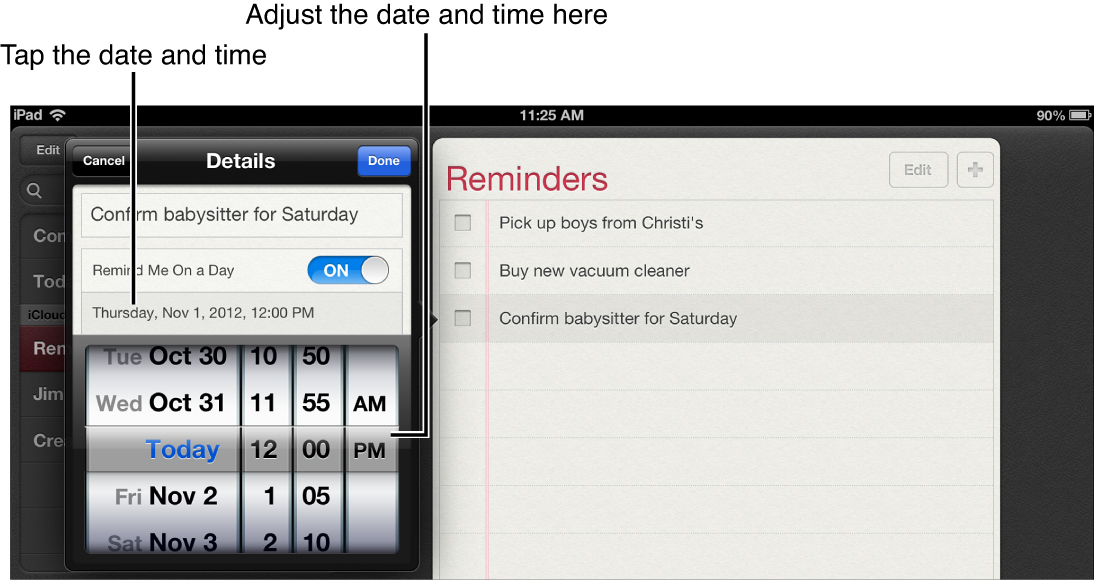
4. As you can see, the reminder date is set for today (Thursday, November 1, 2012 at 12 p.m.). The default reminder time will always be 30 minutes after you turn on the reminder, but this is easily changed. Just tap the date and time displayed, and four spinning columns will appear, as shown in Figure 5.21.
5. I can now use my finger to adjust the date and time as necessary.
 Note
Note
The Reminders app allows you to fine-tune the reminder time in 5-minute increments.
6. When I’m happy with the selected day and time, I tap my finger on the title of the reminder to close the day/time selection tool.
7. I can also click the Done button if all I want is a single, one-time reminder.
Setting Recurring Reminders
Setting one-time reminders is very useful, but what if you want to set up a reminder that recurs at the same time each day, week, or month? Fortunately, your iPad can do just that. In this example, let’s adjust a reminder so that it reminds us every Friday. Here are the steps to follow:
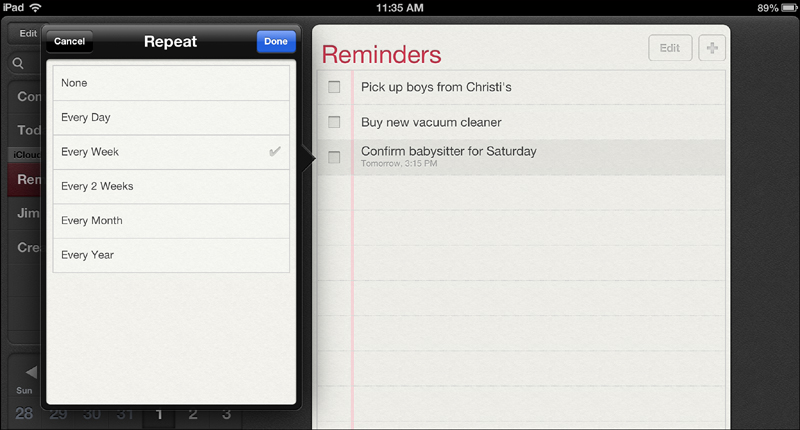
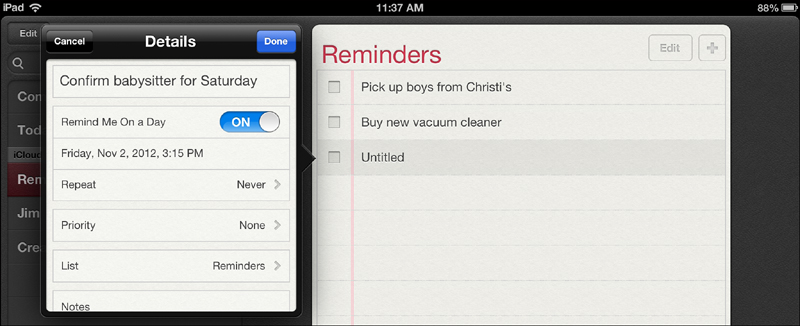
1. As you saw in Figure 5.20, the Reminder Details window shows the Repeat option. By default, it’s set to Never. However, if you tap that line, you get the list of options shown in Figure 5.22.
2. Several options are available: Every Week, Every 2 Weeks, Every Month, Every Year, and even Every Day (for those of you who need a constant daily reminder of something). In this example, we have chosen Every Week.
3. Once you’ve finished selecting a Repeat pattern, click the Done button, which takes you back to the previous screen.
4. If you want to set a specific end date, choose the End Repeat option, which allows you to select a day/time using the familiar columns that spin up and down.
5. Tap the Show More option, and you’ll be given the ability to set the reminder’s priority, select a list that holds the reminder, and add notes if you like. Figure 5.23 shows these three options.
• Priority—Tap the Priority option and you can set a reminder to None, Low, Medium, or High priority. Depending on your selection, the reminder will have one, two, or three exclamation points added its left, as shown in Figure 5.24.
• List—Choosing the List option allows you to assign a reminder to the default Reminders List unless you tap the Create New List button shown just above the calendar. You can create new lists to organize reminders; you might create a work list and a home list to keep different reminders. Tap a list to only view reminders stored inside.
 Tip
Tip
You’ll also use the List option to move a reminder from one list to another. Simply place the checkmark next to a different List and the reminder will be moved to that list after you tap the Done button.
• Notes—Use the Notes field to type in information such as an address or gate code or other piece of information that will be relevant when the reminder opens. (I’ll show you what a reminder on the iPad looks like when it pops up, in just a moment.)
 Tip
Tip
The calendar displayed in the lower-left corner of the Reminders app allows you to tap a day to view only reminders that have been set to trigger on that day. Use the Forward and Back arrows to change the month.
6. When you’ve completed a task, especially one you haven’t configured to trigger at a certain day and time, simply tap the check box to the left of the item.
 Note
Note
Reminders that are checked off will be moved to the Completed List. To permanently delete an item from the Completed List, simply swipe left on the item and click the Delete button that appears.
Receiving Alerts
Regardless of whether your iPad is sleeping or turned on, an alert box like the one shown in Figure 5.25 will appear, along with an audible warble (if you haven’t turned off the speaker or turned the volume all the way down). An alert is triggered if you configured a Reminder app item (such as “Pick up Dan from airport”) with a day and time to remind you (such as April 5, 2013 10:00AM).
Tap the Close button to remove the alert or tap the View button to open the Reminders app so you can place a check in the box.
 Note
Note
If you have iCloud turned on, your reminders will sync up with any other iOS device you are using (well, any other device that is configured with your Apple ID—refer to Chapter 2, “Overview of iOS,” for more details). The default setting for Reminders to sync back with other iOS devices is one month, but you can go back as far as six months or choose All Reminders to synch with every reminder ever created on other iOS devices you own.
