14. Movies, Music, and More
If you’re not familiar with iTunes, this is the chapter for you. iTunes on your iPad gives you access to movies, television shows, music, and much more.
At this point in the book, you’ve learned how to use your iPad for so many things—email, web browsing, eBooks, video chat and messaging, social media (Facebook and Twitter), and taking photos and videos. Well, now it’s time to add the ability to watch movies and television shows and listen to music and podcasts. For me, iBooks, the App Store, and iTunes truly turn an iPad into an all-in-one entertainment device.
 Note
Note
If you’re not familiar with podcasts, think of them as prerecorded radio shows that you can listen to at any time. They are available for every possible topic you can imagine, including comedy, news, sports, and much more. Podcasts are to your iPad what books on tape were for your car, but the difference being you can listen to podcasts anywhere you can carry your iPad.
Exploring iTunes
One of the first things you have to learn about iTunes is that to get to it on your iPad, you must first go through the Music app. Figure 14.1 shows the Music app icon you’ll need to tap to open iTunes.
Tap the icon to open up the Music app. If you’ve never purchased any music from iTunes before, it will say “No Music.”
Because you probably don’t have any music yet, tap the Store button to open the iTunes store.
Note
You can download music to play on your iPad from music CDs you currently own. For instructions on doing this, visit http://www.ehow.com/how_6199240_transfer-cds-ipad.html and read the instructions provided.
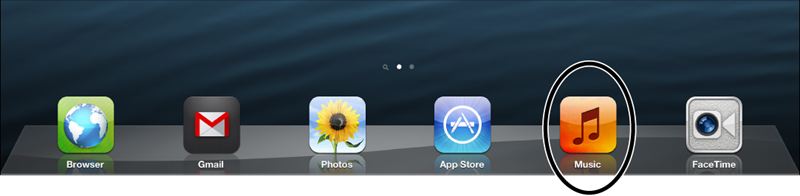
You’ll see an animated menu appear like the one in Figure 14.2. These are new albums and singers that Apple is currently promoting.
If this screen looks a bit familiar, you’re right—it follows a format similar to the iBooks Store and the App Store. Along the top are various category buttons that you can click to filter out other styles to display what you are interested in. (Click the More button to see more categories.)
Along the bottom are the buttons that let you change the type of media you wish to search—Music, Movies, TV Shows, Audiobooks, and the Top Chart sellers—as well as Genius suggestions (based on your previous listening/viewing purchases) and a button to view all previously purchased content from iTunes.
Because I’m currently viewing the Music library offered by iTunes, let me show you how to search, listen, and buy a song. The steps are the same whether you’re searching for a song, an album, a TV show, a movie, or any other type of media that iTunes sells, such as audiobooks or podcasts.
Along the top is a rotating number of featured artists or albums—this will frequently show you newly released albums or artists that iTunes is currently promoting. At the time I write this, one of the albums that Apple is promoting is from Tim McGraw.
I can tap the Tim McGraw banner at the top of the screen to immediately visit a page dedicated to this singer and his albums and music. Likewise, you’ll notice that in the upper-right corner of the screen is the familiar Search Store box—type in a keyword, a song, the name of an album, or an artist’s name, and you can view songs related to your search term.
Note
Remember, the Search feature is specific to the type of media you are currently searching. Use the Movies, TV Shows, and other buttons at the bottom to first change the type of media you wish to search and then use the Search box to find what you need.
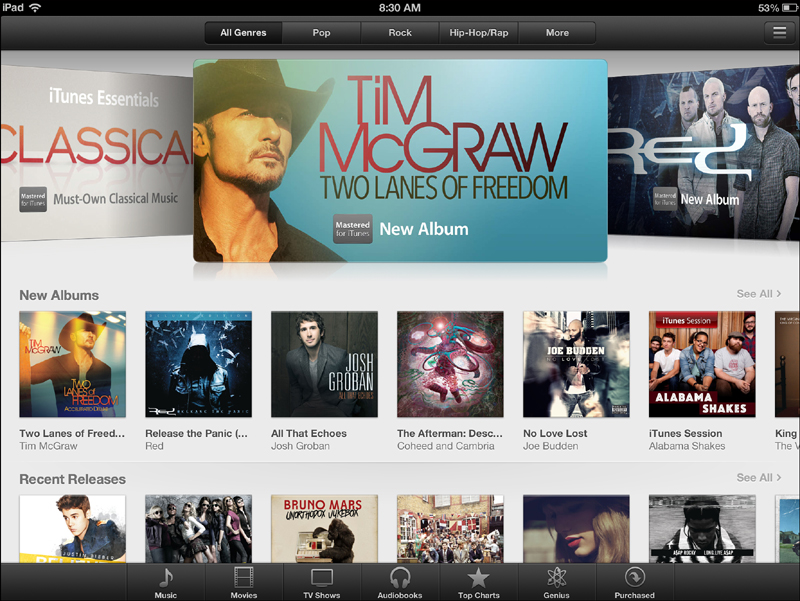
As you can see in Figure 14.3, I can tap on an album cover to view (and listen to) all the songs contained in that album, or I can tap individual songs. Most songs on iTunes can be purchased individually, with the average price being $1.29 per song. Other songs can only be purchased as part of a digital album, and these are usually around $9.99 to $14.99.
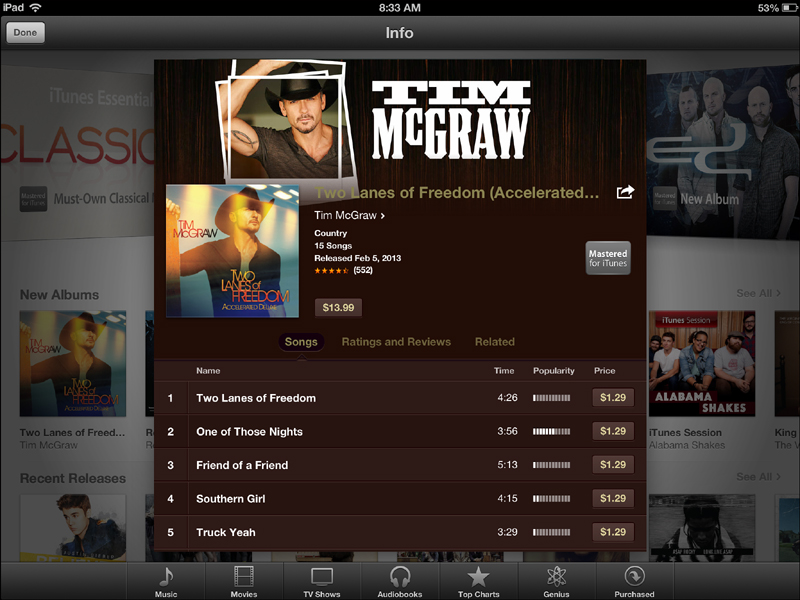
Right now, I’d just like to listen to a single song before I consider a purchase. If I tap on a song (“One of Those Nights”), a small circle appears to the left of the song title, as shown in Figure 14.4.

If you have your iPad’s volume turned up (and not muted), you’ll immediately begin to hear the song play. Apple lets you listen to about 60 seconds of a song (it used to be 30 seconds) to help you decide if you’d like to make the purchase. If you don’t want to hear the entire snippet, then tap on the song and it will stop.
If I click on an artist’s name, I’m provided with an information page similar to the one you find with the iBooks app. I can review all the songs, read listener reviews, and view related music from the artist or band, or I can click on an album cover to view songs specific to that album (a pop-up window will appear similar to the one shown in Figure 14.3).
After I’ve found an album or song I wish to purchase, I tap the price button, provide my Apple ID password, and the song is downloaded to my iPad’s music library. Easy!
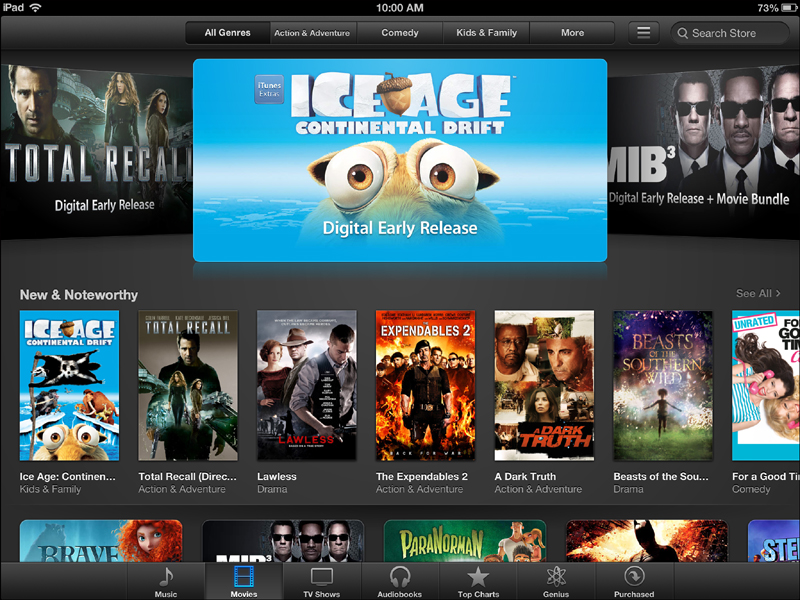
Tap the Movies button at the bottom, and you’ll see a familiar layout, shown in Figure 14.5, with scrolling (left-to-right) movie banners at the top, a Search Store box in the upper-right corner, and movie categories as you swipe down the page.
 Tip
Tip
If you want to preorder movies not yet released so they are immediately downloaded to your iPad on the day they become available, scroll all the way to the bottom and tap the Pre-Order Movies button and follow the instructions.
Now, here’s the great thing about movies on your iPad—you can buy them or... you can rent them! Not every movie is available for rent, and the only way you’ll know for sure is to tap the image for a movie to view its information page, as shown in Figure 14.6.
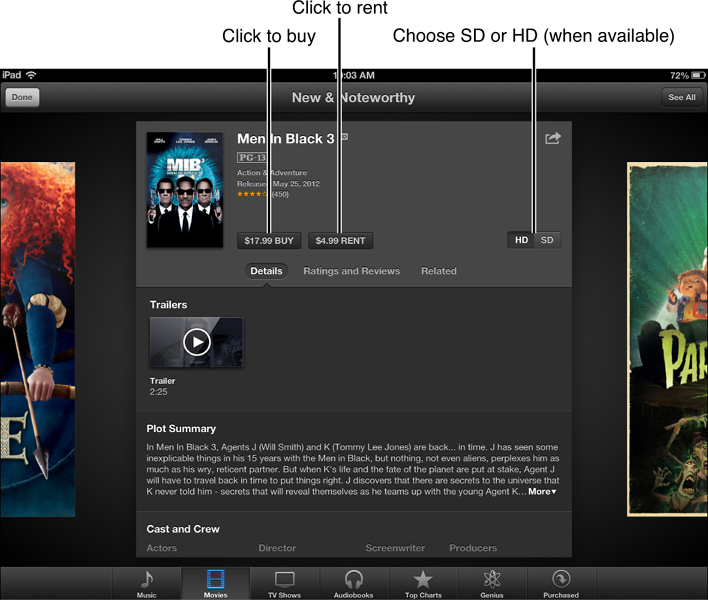
Once again, you’ll see the price button to buy the movie as well as some buttons that let you read summaries of the film, read reviews, and view similar movies that other customers have purchased. Notice in Figure 14.6 that this movie also has a Rent button—tapping the Rent Movie button or the price button will require an Apple ID and password to purchase, but the difference is that a movie you buy can be kept on your iPad for as long as you like, whereas a rented movie is only available for 24 hours after you first tap the Play button. (You’ve got 30 days to press Play, so don’t dawdle!)
Note
You can delete purchased movies off your iPad and reload them at a later time as often as you like, just as you can with eBooks and apps. A rented movie, however, will disappear forever 24 hours after you tap the Play button, so be sure to watch it all before it’s gone!
Also, if you plan on watching the movie on your iPad, leave the HD (High Definition) button selected, as shown in Figure 14.6. If you think you might watch it on a computer screen or your iPhone, you might want to download the SD (Standard Definition, as in pre-HD) version because it will take up less space and will download faster.
(By the way, with iCloud enabled, you can also view your movies on any other device you own that has iCloud running!)
If you choose to rent or buy a movie or television show, it will appear in the Movies app on your iPad. I will show you how to use the Movies app in Chapter 15, “Magazine, Newspaper, or Movie?”
If you tap the TV Shows button while in iTunes, you’ll see a screen like the one in Figure 14.7.
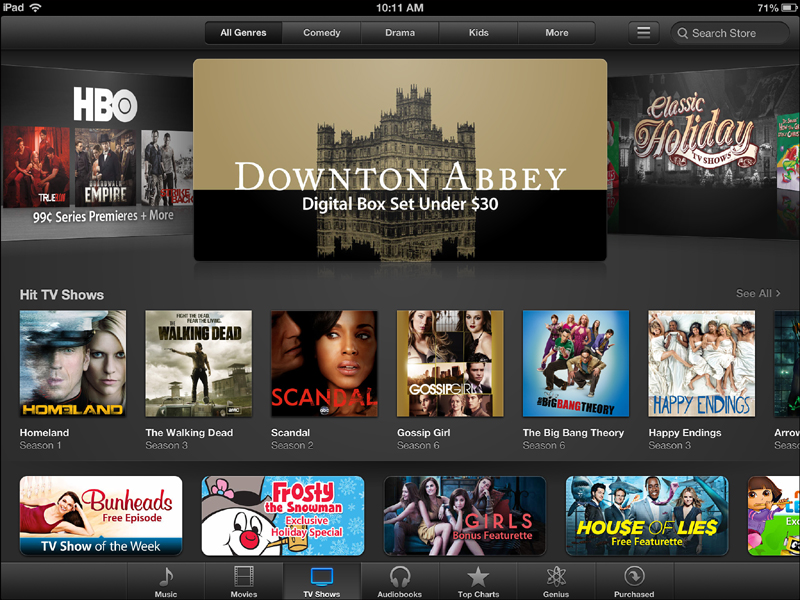
You can use the Search Store box to find what you are looking for or swipe down the page to see what iTunes is currently recommending. As with music or movies, tapping on a TV show’s Season icon will display that season’s worth of episodes, as shown in Figure 14.8.
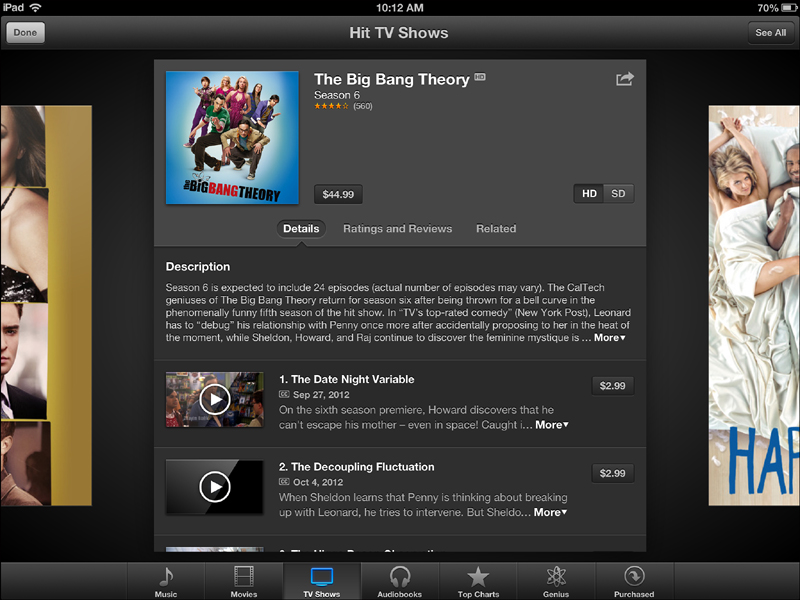
As you can see, you can tap the full season’s price button to download all episodes, or you can scroll down and tap the price button for a single episode. Downloaded episodes are stored on your iPad and can be viewed using the Movies app. (You should also be aware that you cannot rent television show episodes; you can only purchase them.)
Purchasing music, TV shows, movies, and audiobooks is easy with iTunes. In fact, that’s probably one of the reasons Apple has been so successful with it—users have the ability to immediately grab a song or TV show and can watch or listen to it on their iPad. And because you’ve purchased these items from the iTunes store, they’re also available on any other devices you have that are running iTunes or have iCloud configured. One added benefit of iCloud is that it will even remember where you left off with a movie or TV show! Start watching a movie on your iPad, and finish it later by watching it on your iPhone!
I’ll show you in Chapter 15 how to watch movies and TV shows, but before I end this chapter, let me show you how easy it is to listen to music on your iPad.
Listening to Music
You’ll need to tap the Home button to exit iTunes, and then re-tap the Music button to open up your iPad’s music library for a listen. When you tap the Music app again, you’ll now be given the opportunity to view your (hopefully growing) music library. Figure 14.9 shows the basic controls of the Music app.
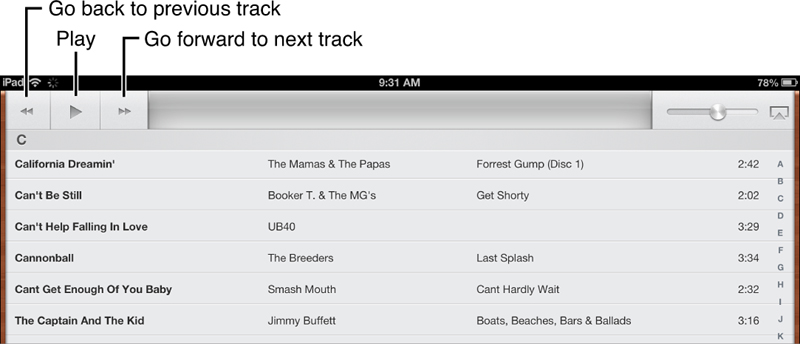
In the top-left corner, you’ll see the traditional Play button—it’s the triangle pointing to the right. To the left of the Play button is the Back button that will begin playing the previous song in the library; the button to the right of the Play button is the Forward button that will jump you to the next song.
In the top-right corner is the volume controller—while you can use the iPad’s Up/Down volume buttons, this draggable volume controller is a fast way to adjust the volume manually and in small increments as opposed to the Up/Down buttons that affect the volume in larger incremental changes.
Note
If you’ve got an Apple TV, you can also tap on the AirPlay button to the right of the Volume slider control to play your music through the Apple TV. The sound will be provided by your television’s speakers or sound system.
As a song plays, you can see the name of the song scrolling across the top of the screen and a small orange bar that shows you how far along the song has progressed.
The progress bar is draggable, so you can easily drag it back a bit to replay a bit of a song (or all the way to the left to start at the beginning). There are two small icons I’d like to point out to you—one is to the left of the song’s progress bar and one is to the right.
The icon to the left is the Repeat button; tap it once to hear a song play over and over...tap it again to have it repeat just once (a small numeral 1 will appear), and tap it once more to turn it off.
The icon to the right is the Shuffle button; tap it and all the songs in the library you are viewing will be played in a random order.
You might also notice the small Genius icon; tap it and the song you are listening to will be added to the list of songs used by the Genius feature to help you find music with a similar sound that you might enjoy. You’ll need to access the Genius button in iTunes to see what iTunes offers up, but it’s a nice way to tag a song that you like and wish to use to help iTunes find new music you might not know about.
As you begin to collect music in your iPad’s library, you’re going to want to start organizing it so you can more easily find what you want to listen to at any given time. While you can manually swipe up and down to find a song, a better method is to organize your music into what are called playlists, and I’d like to show you how to use them.
Using Playlists
Imagine you have a large music CD collection. You could stack them alphabetically by artist or band name, or you could make a bunch of smaller stacks by organizing your CD collection by the music genre—Classical, Rock, Country, and more.
With physical stacks, however, a CD can only be one stack. If you have a stack for Rock Music and a stack for ’80s Music, your Def Leppard CD is going to be found in only one of those, not both.
But playlists are different. Think of playlists as labels that you could print, peel, and stick to all of your music CDs, allowing you to give them multiple categories such as Rock and ’80s Rock. The difference being that with physical CDs, if you want to listen to ’80s Music (not just Rock), you’ve got to sift through all your CDs to pull out only those that have an ’80s Music label.
Playlists allow you to quickly and easily view only songs, but first you’ve got to assign a song to a playlist. And even though the Music app comes with some pre-made playlists, you’re going to want to create your own (especially if you have a category such as ’60s Country Duets).
After you’ve opened the Music app and are viewing your music library, tap the Playlists button at the bottom as shown in Figure 14.10.
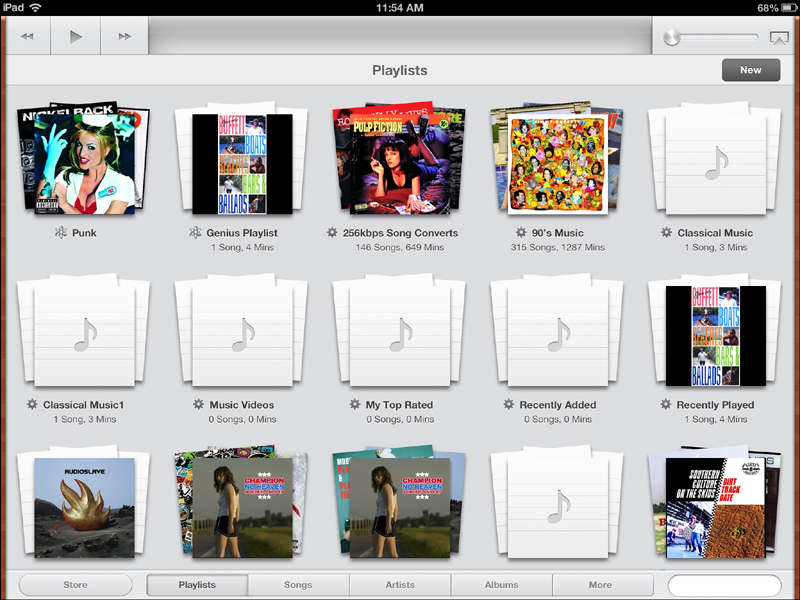
As you can see, there are playlists such as My Top Rated, Recently Played, and more. Some of the ones you see in Figure 14.10 were created for me, and others I had to create myself.
To create a playlist, tap the New button in the upper-right corner. A small window will open where you can type the name of your playlist. Tap the Save button to create it.
Now you need to assign some of your music library to your new playlist. After you create a playlist, you’re immediately taken back to your music library, but this time notice that every song has a circle with a plus sign at the far right as shown in Figure 14.11.
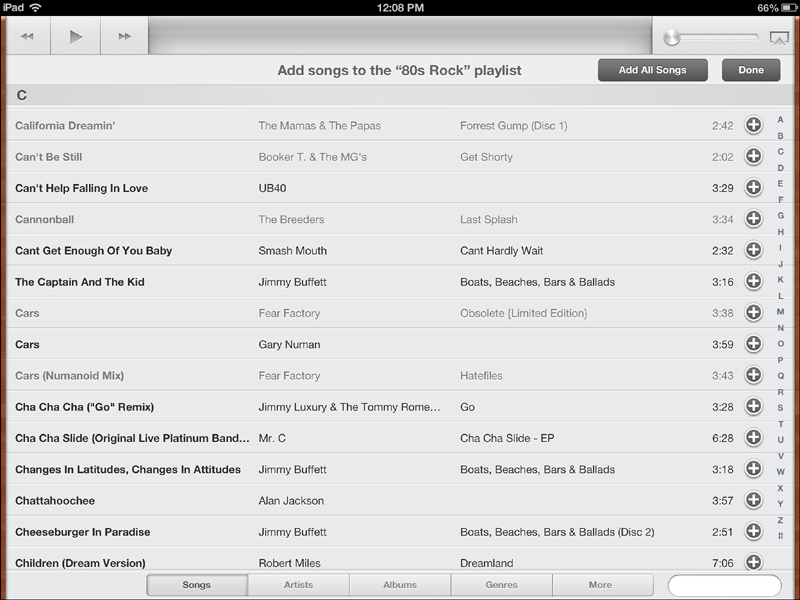
Tap the plus sign to the right of every song you wish to add to a playlist. As you tap each song, the song’s title will appear in a lighter color to indicate it’s been added. Tap the Done button to assign the playlist to the selected songs. (Or you can tap the Add All Songs button, but that’s not a good idea as you’re basically creating a new playlist that is the same as the complete music library.)
After you tap the Done button you’ll see a list of all the songs you selected displayed as shown in Figure 14.11.
If you’re happy with the selections, tap the Done button. You can also tap the Add Songs button if you want to add more. If you’d like to remove a song, tap the red circle with the minus sign to the left of the song’s name, and then tap the Delete button that appears. Remember—you’re not deleting the song from your iPad, only from the playlist. The song will still exist in your main music library!
Tip
At the bottom of th list of songs you’ll find a small Cloud button. I don’t have room to go into it here, but Apple offers a yearly subscription service called iTunes Match that basically stores your entire music collection in iCloud (see Chapter 3, “iCloud and Settings”) until you choose to download them to your iPad by tapping the small Cloud button. This is beneficial because you can choose to only download certain playlists and leave the rest of the songs off your iPad to save memory. For more information, visit http://www.apple.com/itunes/itunes-match/.
After you’ve created your playlist and stored some songs in it, tap the Playlists button again, and you’ll see your new playlist along with any others you’ve created.
The great thing about assigning songs to playlists is that you can play the same song in multiple playlists. By creating playlists for specific types of music, you can easily tap a playlist to listen to music that you’re in the mood for and nothing else. Putting a song in a playlist doesn’t create a duplicate of that song, so you can store a song in one, ten, or even a hundred playlists without any penalties.
Tip
The software version of iTunes that you run on a computer has many more features than the iPad’s Music app, including the ability to burn CDs from playlists.
The Music app is a great way to take your music with you. Any music you play can be heard through the iPad’s speakers, or you can listen privately with a set of headphones plugged into the iPad’s headphone jack.
Keep in mind that the version of iTunes that you install on a computer will have many more special features (such as tracking the number of times a song is played or making changes to the sound quality of a track). If you have iTunes running on a home computer and can synch your iPad with that computer, you’ll find many more tools available for managing your music collection as well as backing up your music.