
Part I
Quick Start Guide
In your hands is one of the most exciting devices to hit the market since the original version: the new iPad 2. This Quick Start Guide will help get you and your new iPad 2 up and running in a hurry. You'll learn all about the buttons, switches, and ports. You'll also learn how to use the innovative and responsive touch screen, as well as multitask with the new App Switcher bar. Our App Reference Tables introduce you to both the built-in apps and some valuable additions from the App Store—and serve as a quick way to find out how to accomplish a task. We also show you some popular accessories that will help you get more out of your iPad.
Quick Start Guide
This Quick Start Guide is meant to be just that—a tool that can help you jump right in and find information in this book—and learn the basics of how to get around and enjoy your iPad right away.
We start with the nuts and boltsin the “Learning Your Way Around” section—what all the keys, buttons, switches, and symbols mean and do on your iPad. You'll see some handy features such as how to double-click the Home button to multitask; how to configure the Rotation Lock/Mute switch; and how to interact with the menus, submenus, and set switches—which you do in almost every application on your iPad. You'll also find out how to read your connectivity status and what to do when you travel on an airplane.
TIP: Check out Chapter 2: “Typing Tips, Copy/Paste, & Search” for great typing tips and more.
In “Touch Screen Basics,” we help you learn how to touch, swipe, flick, zoom, and more.
In “App Reference Tables,” we've organized the app icons into general categories, so you can quickly browse the icons and jump to a section in the book to learn more about the app a particular icon represents. Here are the tables:
- Getting Started (Table 2)
- Staying Organized (Table 3)
- Being Entertained (Table 4)
- Staying Informed (Table 5)
- Networking Socially (Table 6)
- Being Productive (Table 7)
In “Other Fun Stuff,” we show you the Electronic Picture Frame feature and how to enjoy videos on your iPad.
In “iPad Accessories,” we give you a brief overview of some of the more common accessories you might find interesting.
So let's get started!
Learning Your Way Around
To help you get comfortable with your iPad, we start with the basics—what the buttons, keys, and switches do—then we move into how you start apps and navigate the menus. Probably the most important status indicator on your iPad, besides the battery, is the one that shows network status in the upper-left corner. You'll see how to quickly read the network status icons.
Keys, Buttons, and Switches
Figure 1 shows all the things you can do with the buttons, keys, switches, and ports on your iPad. Go ahead and try out a few things to see what happens. Try pressing the Volume Down key for two seconds, double-clicking the Home button, using the Rotation Lock/Mute switch, and pressing and holding the Power/Sleep key. Have some fun getting acquainted with your device.
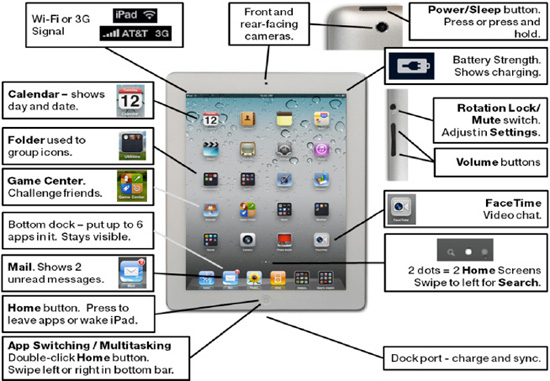
Figure 1. The iPad 2 buttons, ports, switches, and keys
Locking the Screen Rotation or Muting Your iPad
As soon as you start touching the iPad, you'll notice the screen rotates amazingly fast. There are times when you don't want it to rotate (called Rotation Lock or sometimes Orientation Lock)—for example, when you have it in your lap or on the table. The switch above the volume buttons on the upper-right edge of your iPad can be set to do two different functions. One function enables Rotation Lock, while the other enables you to Mute your device. (For example, you can mute rings from any incoming FaceTime video calls.) You can adjust which function you want to use for this side switch in the Settings app. In that app, select General ![]() Use Side Switch to
Use Side Switch to ![]() Rotation Lock or Mute. Please see Chapter 8: “Multitasking and Mute/Lock Switch” for more details on how to use this switch.
Rotation Lock or Mute. Please see Chapter 8: “Multitasking and Mute/Lock Switch” for more details on how to use this switch.
Starting Apps and Using Soft Keys
Some apps have soft keys at the bottom of the screen, such as the iPod app shown in Figure 2.
For the soft keys to work in the iPod app, you must have some content (e.g., music, videos, and podcasts) on your iPad. See Chapter 3: “Sync with iTunes,” for help syncing your music, videos, and more. Follow these steps to use the soft keys in the iPod app:
- Tap the iPod icon to start the iPod app.
- Touch the Albums soft key at the bottom to view your albums.
- Touch the Artists soft key to view a list of your artists.
- Try all the soft keys in iPod and other apps.
TIP: You know which soft key is selected because it is highlighted—either with dark gray or with a color. The unselected soft keys are light gray or white.
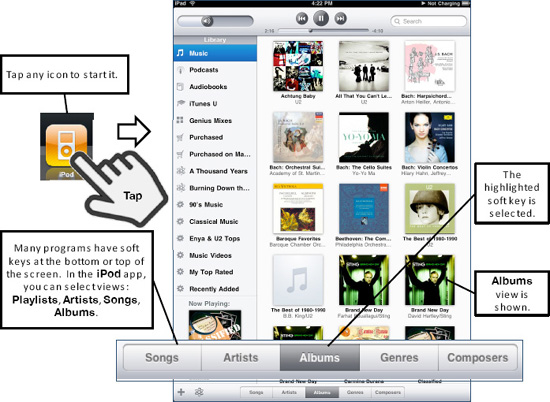
Figure 2. Working with soft keys in apps
Menus, Options, and Switches
Once you are in a program, you can select any menu item by simply touching it. In the Settings app, tap any item in the left column to see more options appear in the right column. Tap any item with a Greater Than symbol (>) to see another screen with options that you can adjust, such as Show Each Photo For (see Figure 3).
TIP: You know there is a list of options if you see the Greater Than symbol (>) next to the menu item.
How do you get back to the previous screen or menu? Tap the button in the top left of the Options screen that shows the name of the previous screen. If you're in the Show Each Photo For screen, for example, you'd touch the Picture Frame button.
You'll see a number of switches on the iPad, such as the one next to Zoom In on Faces shown in Figure 3. To set a switch (e.g., from ON to OFF), just touch it.
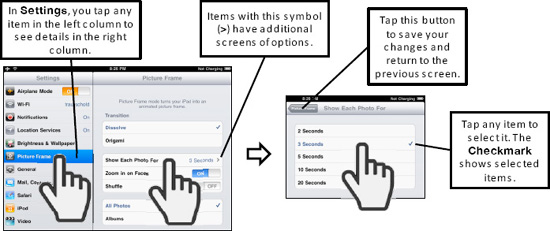
Figure 3. Selecting menu items, navigating submenus, and setting switches
Reading the Connectivity Status Icons
Since most of the functions on your iPad work only when you are connected to the Internet (e.g., email, the Web, the App Store, and iTunes), you need to know when you're connected. Understanding how to read the Status bar can save you time and frustration.
Cellular (3G) Data Signal Strength (1-5 bars):
| Strong | |
| Weak | |
| Radio Off—Airplane Mode |
Wi-Fi Network Signal Strength (1-3 symbols):
| Strong | |
| Weak | |
| Off |
You can tell if you are connected to a network—and the general speed of the connection—by looking at the left end of your iPad's Top Status bar. Table 1 shows what you may see.
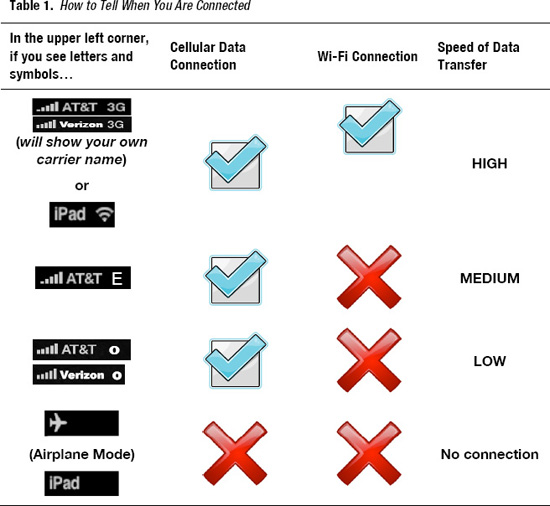
Chapter 5: “Wi-Fi and 3G Connectivity” shows you how to connect your iPad to a Wi-Fi or 3G Cellular Data Network.
Traveling with your iPad—Airplane Mode and Wi-Fi
When you're flying on an airplane, the flight crew usually asks you to turn off all portable electronic devices for takeoff and landing. Then, when you get to altitude, they say “all approved electronic devices” can be turned back on.
You can turn off the iPad by pressing and holding the Sleep/Wake button on the top-right edge until the slider appears. Next, use the Slide to Power Off switch with your finger.
If you have a 3G/Cellular Data iPad, you can turn on Airplane Mode in the Settings icon as follows:
- Tap the Settings icon.
- Set the switch next to Airplane Mode in the top of the left column to ON.
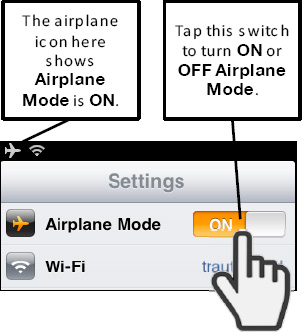
TIP: Some airlines do have in-flight Wi-Fi networks; in this case, you'll want to leave your Wi-Fi turned on.
It's easy to turn off your Wi-Fi connection(see Figure 4):
- Tap the Settings icon.
- Tap Wi-Fi in the top of the left column.
- Set the switch next to Wi-Fi in the top of the right column to OFF.
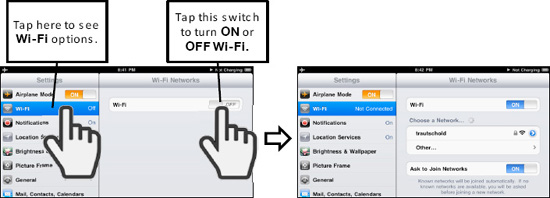
Figure 4. Turning Wi-Fi OFF or ON
Multitasking or App Switching
One of the great features on your iPad is the ability to multitask, or jump between applications, while leaving things like music playing in the background (see Figure 5).
Check out Chapter 8: “Multitasking and Mute/Lock Switch” for more information.
Double-click the Home button to bring up the App Switcher app at the bottom of the screen. Next, swipe right to see more icons of any app that is running. Tap the icon of any app you want to start. If you don't see the icon you want, then click the Home button to see the entire Home screen. Repeat these steps to jump back to the app you just left. The nice thing is that the app you just left is always shown as the first app on the App Switcher bar. Swipe to the left to see music controls and the opposite of the function you set for your side switch. For example, if you set your side switch to Rotation Lock, then you will see the Mute control here (and vice versa).
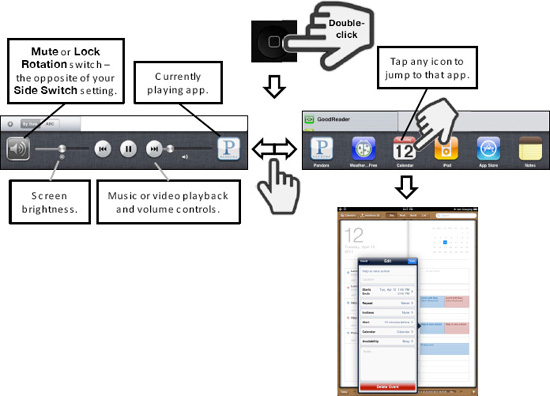
Figure 5. Double-click the Home button to switch apps or multitask on your iPad.
Touch Screen Basics
In this section, we describe how to interact with the iPad touch screen.
Touch Screen Gestures
The iPad has an amazingly sensitive and intuitive touch screen. Apple—renowned for making the iPhone, iPod touch, and iPod easy to use—has come up with an excellent larger touch-screen device.
If you are used to a physical keyboard and a trackball or trackpad, or an iPod's intuitive scroll wheel, this touch screen will take a little effort to master. With a little practice, though, you'll soon become comfortable interacting with your iPad.
You can do almost anything on your iPad by using a combination of the following:
- Touch screen gestures
- Touching icons or soft keys on the screen
- Tapping the Home button at the bottom
The following section describes the various gestures.
Tapping and Flicking
To start an app, confirm a selection, select a menu item, or select an answer, simply tapthe screen. To move quickly through contacts, lists, and the music library in List mode, flick sidetoside or upanddown to scroll through items (see Figure 6).
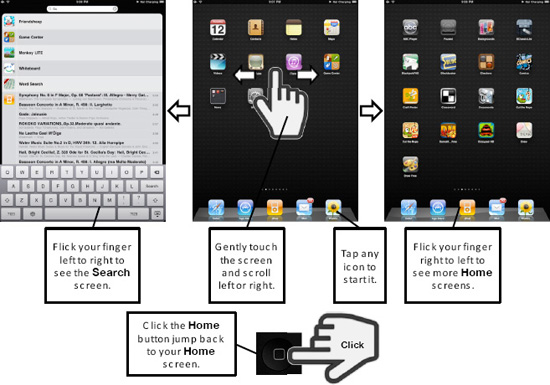
Figure 6. Basic touch-screen gestures
Swiping
To swipe, gently touch and move your finger (see Figure 7). You can also do this to move between open Safari web pages and pictures. Swiping also works in lists, such as the Contacts list.
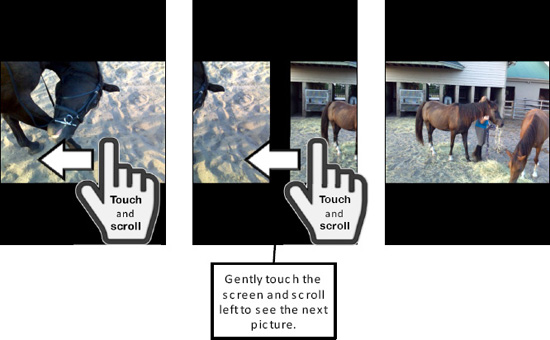
Figure 7. Touch and swipe to move between pictures and web pages.
Scrolling
Simply tap and slide your finger to move or scroll around the screen (see Figure 8). You can use this gesture in messages (email), the Safari web browser, menus, and more.
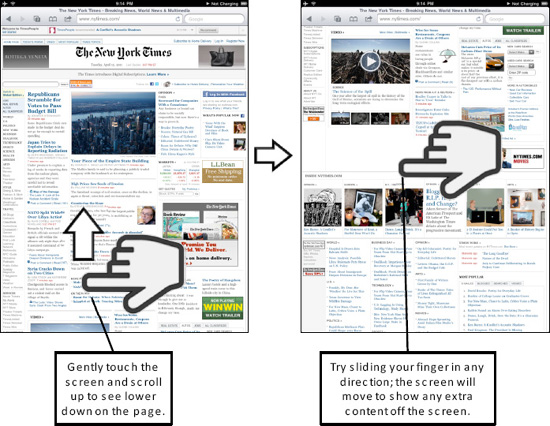
Figure 8. Touch and slide your finger to scroll around a web page, a zoomed picture, and more.
Double-Tappingto Zoom In or Out
You can double-tap the screen to zoom in and then double-tap again to zoom back out. This works in many places, such as web pages, mail messages, and pictures (see Figure 9).
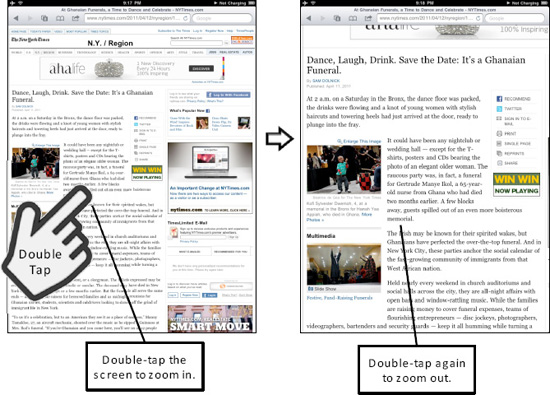
Figure 9. Double-tapping to zoom in or out
Pinching
You can also pinch open or closed to zoom in or out. This works in many places, such as web pages, mail messages, and pictures (see Figure 10). Follow these steps to use the pinching gesture:
- To zoom in, place two fingers touching on the screen.
- Gradually slide your fingers open. The screen zooms in.
- To zoom out, place two fingers with space between them on the screen.
- Gradually slide your fingers closed so they touch. The screen zooms out.
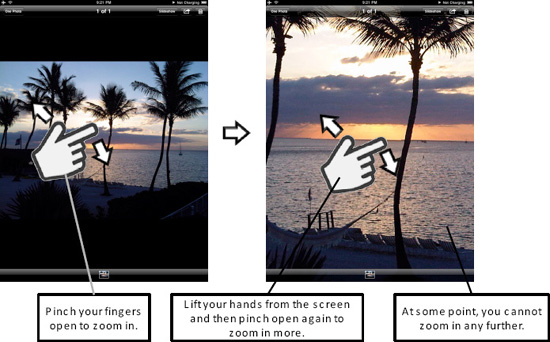
Figure 10. Pinch open to zoom in and pinch closed to zoom out.
The Two-Finger Twist
This trick works in all the iWork apps (Pages, Numbers, and Keynote). This also works if you have turned on Accessibility ![]() Web Rotor or Language Rotor. Touch an image with two fingers at the same time, then rotate your hand on the screen to rotate the image (see Figure 11). It works temporarily in the Photos app, but the images rotate back to their previous orientation when you let go.
Web Rotor or Language Rotor. Touch an image with two fingers at the same time, then rotate your hand on the screen to rotate the image (see Figure 11). It works temporarily in the Photos app, but the images rotate back to their previous orientation when you let go.
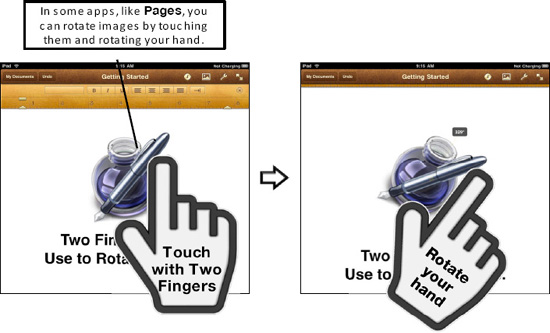
Figure 11. Twist with two fingures to rotate an image.
App Reference Tables
This section gives you a number of tables that group the apps on your iPad, as well as other apps you can download, into handy reference tables. Each table gives you a brief description of the app and tells where to find more information about it in this book.
Getting Started
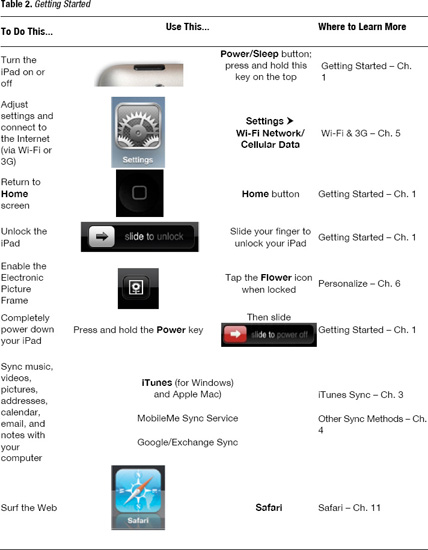
Table 2 provides some quick links to help you connect your iPad to the Web (using Wi-Fi or 3G), buy and enjoy songs or videos (iTunes, iPod, and Videos), get out of apps, sleep, power off, unlock your iPad, use the Electronic Picture Frame feature, and more.
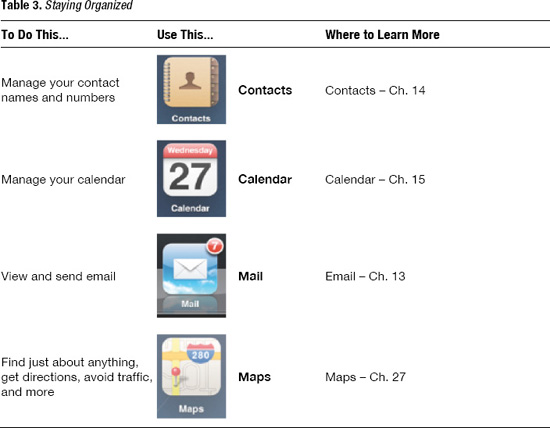
Staying Organized
Table 3 gives you links to everything from organizing and finding your contacts to managing your calendar; from reading and responding to your email to getting driving directions; and more.
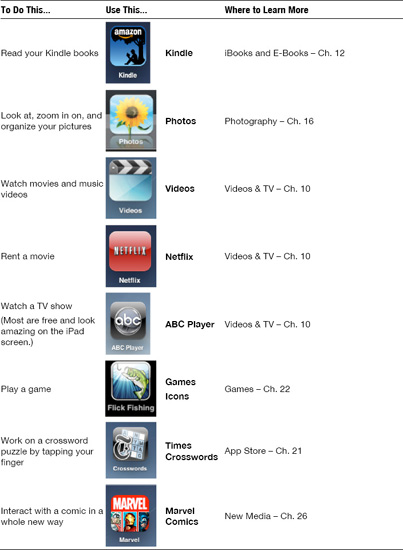
Being Entertained
You can have lots of fun with your iPad; Table 4 shows you how. You can buy or rent movies, check out free Internet radio with Pandora, and buy a book and enjoy it in a whole new way using iBooks. If you already use a Kindle, you can sync all your Kindle books to your iPad and enjoy them right away. Choose from over 350,000 apps from the App Store to make your iPad even more amazing, fun, and useful. Rent a movie from the Netflix or iTunes service and download it immediately for later viewing (say on an airplane or train). If you have a favorite ABC TV show, chances are you can find and watch it using the ABC app.

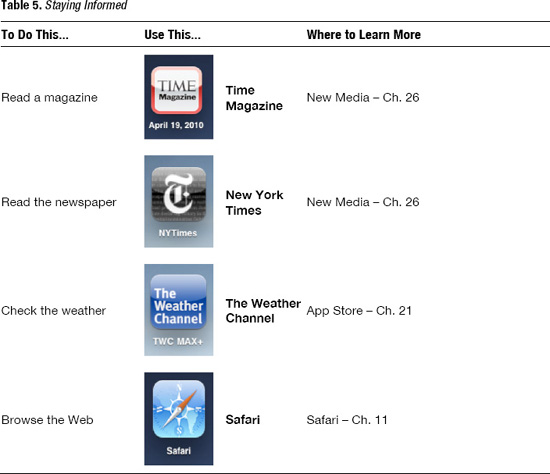
Staying Informed
You can also use your iPad to stay informed. For example, you can use it to read your favorite magazine or newspaper with up-to-the-minute and vibrant pictures and videos (see Table 5) or check out the latest weather like never before. You can do much more than simply browse the Web—you can interact with it using Safari on your iPad.
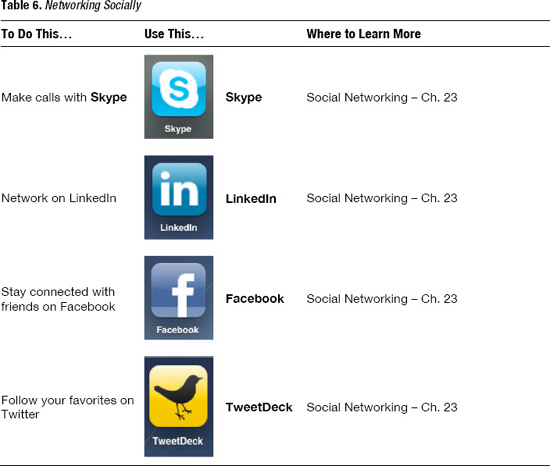
Networking Socially
Your iPad also lets you connect and stay up to date with friends, colleagues, and professional networks using various social networking tools (see Table 6).
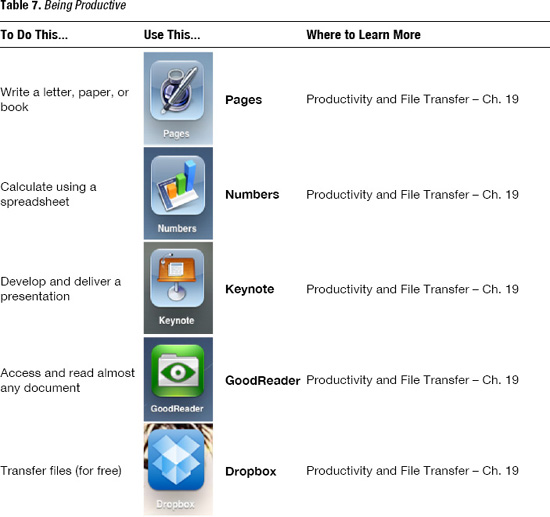
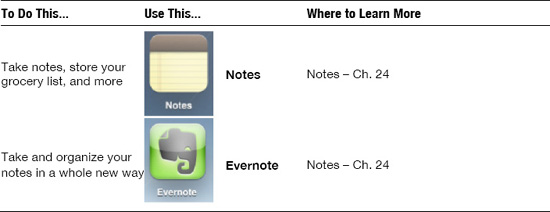
Being Productive
You can work with documents, spreadsheets, and presentation files using the Pages, Numbers, and Keynote apps—and the touch screen interface on the iPad. You can grab images to size, rotate, or move around in documents and presentations by just dragging, expanding, or rotating them with your fingers. You can access and read just about any PDF file or other document with the GoodReader app. You can also take notes with the basic Notes app or step up to the advanced Evernote app, which has amazing capabilities for integrating audio, pictures, and text notes, as well as syncing everything to a web site (see Table 7).
Other Fun Stuff
The iPad can be used as a fantastic electronic picture frame—we show you the basics here. And you'll love your iPad as a video player! In this section, we give you a few quick tips for getting around your video and music player, as well as for getting the most out of videos you see embedded in web pages.
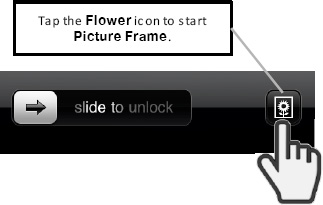
The iPad as an Electronic Picture Frame
You may wonder what that little Flower icon next to the Slide to Unlock switch does when you lock your iPad. This starts the Electronic Picture Frame feature—a great way to share your pictures with others or simply enjoy your own pictures. To enjoy the Electronic Picture Frame feature, you need to do the following:
- Load up your iPad with your pictures using iTunes (see the “Photos—Automatically Sync” section in Chapter 3: “Sync Your iPad with iTunes”).
- Tap the Picture Frame icon to turn on the Electronic Picture Frame feature.
- Tap the icon again to turn it off.
The Electronic Picture Frame will cycle through all your pictures, or it can be customized to show only selected photo albums.
TIP: You can customize the way your picture frame operates, select specific albums, and more. See the “Personalize Your Picture Frame” section in Chapter 6: “Personalize & Secure Your iPad.”
Navigating Around Your Music and Video Player
When playing a song or video, just tap anywhere in the middle of the screen to show or hide the controls at the top of the screen, as shown in Figure 12.
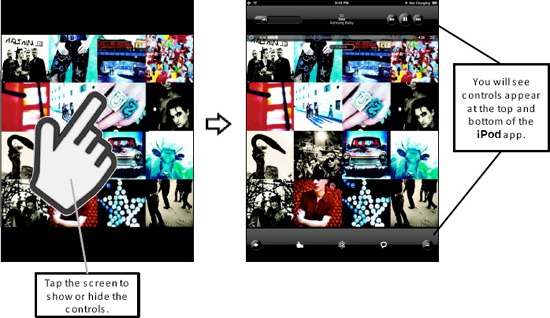
Figure 12. Navigate around your music and video player.
Watching Videos in Web Pages
A really fun thing to do is watch supported video formats right in their web pages. Unfortunately, the iPad does not support the Adobe Flash video format, which is used by many web sites. But there are many videos you can watch, such as the videos on the front page of the New York Times web page, as shown in Figure 13. Follow these steps to watch a video in a web page on this site:
- Tap the Safari icon.
- Tap the Address bar at the top and type in:
www.nytimes.com. - Locate and tap any video; usually you'll see a Play icon like this
 in the middle of the picture.
 - The video will start playing right in the web page.
- To expand the video to full screen, pinch open right inside the video. Put two fingers in the video and expand them while sliding them on the screen.
- To watch the video in widescreen, tilt your iPad to Landscape mode.
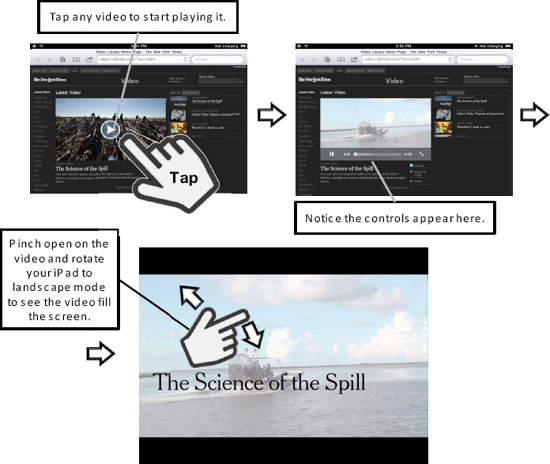
Figure 13. How to enjoy videos in web pages.
iPad Accessories
Now let's take a brief tour of some of the accessories you might purchase to enhance the functionality of your iPad. You can buy most of these from any Apple store, Apple.com, or other accessory stores.
NOTE: We show you more accessories, such as cases, in Chapter 1: “Getting Started.”
Apple Keyboards
You should invest in one of Apple's two keyboards if you plan on doing a lot of typing on your iPad (see Figure 14). Each one costs about $70.00. We show you more about how to use these keyboards in Chapter 2: “Typing, Copy/Paste, &Search.”
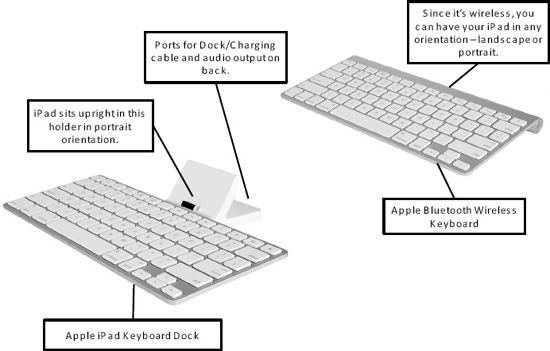
Figure 14. The Apple iPad Keyboard Dock and the Apple Wireless Bluetooth Keyboard
The Apple iPad Dock
If you want to set up your iPad in a vertical orientation to use it as an electronic picture frame or have it held for you while you use it, check out the $29.00 iPad Dock. The iPad Dock also has a dock connector port in the back, so you can connect it to your computer or charger while the iPad is in sitting in the dock (see Figure 15).
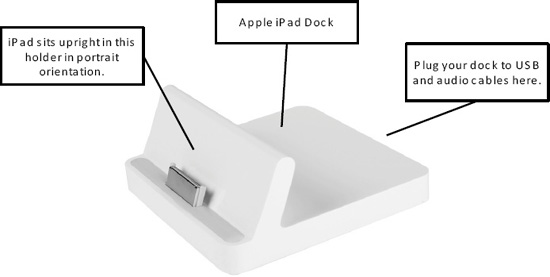
Figure 15. The Apple iPad Dock
The Apple Camera Connection Kit
If you want to transfer your pictures from your digital camera to your iPad directly, but without first transferring them to your computer, you can do it with the Camera Connection Kit accessory. This $29.00 accessory gives you two small accessories—the one shown on the left of Figure 16 is the USB adapter; the other is the SD Card adapter. Both plug into the dock connector port on the bottom of your iPad.
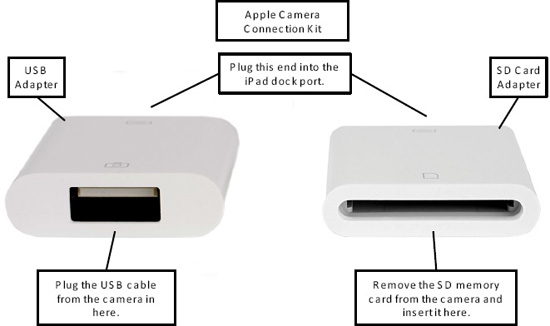
Figure 16. The Apple Camera Connection Kit
To import photos using these adapters, follow these steps:
- Plug either the USB or the SD Card accessory into the dock port at the bottom of your iPad.
- If you are using the USB connector, plug the USB cable from your camera into the connector.
- If you are using the SD card connector, remove the SD memory card from your camera and insert it into the connector.
- Your iPad should be turned on. If it is, it will immediately bring you to the Import Photos screen (see Figure 17).
- To import all photos, tap the Import All button in the upper-right corner.
- To import selected photos, begin by tapping pictures to select them. Next, tap the Import button and choose Import Selected.
- You then have the option to Keep or Delete the photos on the camera or SD card.
- The most recent imported photos will show up in the Last Import photo album. All imported photos will show up in the All Imported photo album.
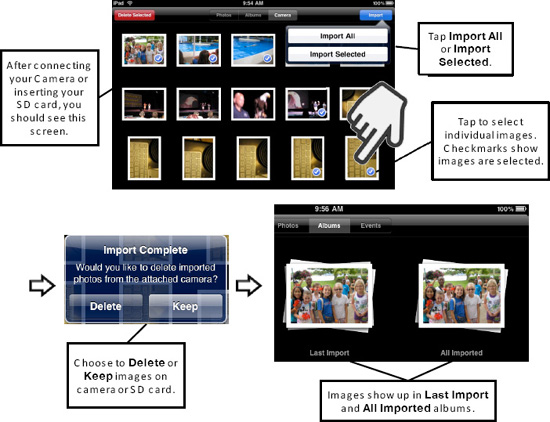
Figure 17. Import photos using the Camera Connection Kit.
VGA Adapter Cable
The VGA Adapter Cable is for you if you are using the Keynote app and want to play a presentation on a larger external VGA monitor from your iPad, or you want to play moviesyou rent or purchase from the iTunes Store.
CAUTION: At the time of publishing, the VGA Adapter Cable accessory worked only in very limited apps and situations. For example, it worked only for the Keynote app in Play mode, and for certain movies purchased or rented from iTunes. However, it did not display the iPad screen as soon as you plugged it in.
This VGA Adapter Cable costs $29.00. You plug one end into your dock connector on the bottom of your iPad and connect the other end to the VGA cable going to the external monitor, as shown in Figure 18. When you play your presentation in Keynote, you can advance slides or jump between slides using your iPad.
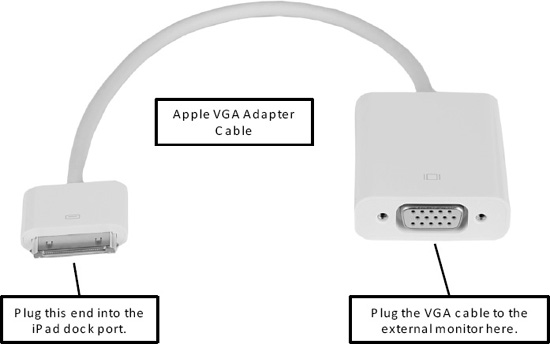
Figure 18. The VGA Adapter Cable for the iPad