
Chapter 1
Getting Started
In this chapter, we will take you on a step-by-step tour of your iPad 2, from charging it to activating the iTunes app for the first time. In the “iPad Basics” section at the end of this chapter, we will show you the basics of how to maneuver around on your iPad, so you can get up and running quickly.
Getting to Know Your iPad 2
In this section, we show you how to use everything you get in the box with your iPad 2. We also give you some iPad battery and charging tips, help you determine if your iPad has already been activated, and take a look at the Slide to Unlock feature.
What's in the Box
The cardboard box that contains your iPad 2 is barely larger than the iPad itself; indeed, it may seem skimpy if you're new to Apple products. However, it does contain everything you need to get started and enjoy your iPad 2—except for a good manual, which is why we wrote this book!
At the very top, as soon as you open the box, you see your new iPad 2.
Under the plastic holder for the iPad, you'll find a paper booklet with the text, “Designed by Apple in California.” The box also includes the following:
- A One Page Reference Guide: One page?! Yes—it's just one page, front and back! The front shows the buttons, and the back tells you to download iTunes and connect your iPad to your computer to get started.
- The iPad Product Information Guide: This is a small booklet with a font that's way too small to read. It contains all the legal terms, conditions, warnings, and disclaimers related to your iPad.
- Apple Logo Stickers: You get two of those nice white Apple logos you sometimes see on car windows. Enjoy!
Atthe bottom of the box, you'll find the rest of your gear, as shown in Figure 1-1.
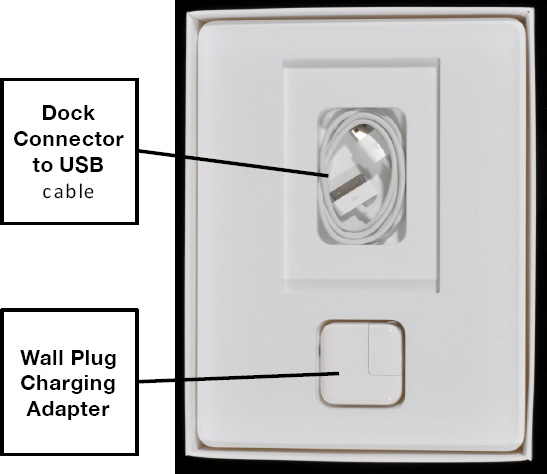
Figure 1-1. The USB cable and wall plug charging adapter at the bottom of the box
Dock Connector to USB Cable
Your iPad box ships with a Dock to USB cable. This is the cable you use to connect to your computer; it also doubles as your power cable.
Wall Plug Adapter (10 Watt)
The iPad also comes with a useful piece of hardware called a wall plug adapter (see Figure 1-1). This adapter lets you charge your iPad directly from a wall outlet without having your computer around. All you do is plug the Dock to USB cable into this wall adapter and the other end into your iPad.
TIP: Buy an extra adapter, then keep one at home and one at the office. Current pricing for this plug adapter is less than US $10 at discount online stores.
Expected Battery Life and Charging Times
Apple says battery life for the new, faster iPad 2 with its advanced 25-watt rechargeable lithium-polymer battery should be the same as for the original iPad (see Table 1-1).
Table 1-1. Battery Life Specifications from Apple
| Video and Audio Playback | 10 hours |
| Surfing the Web | 10 hours on Wi-Fi, 9 hours on 3G cellular |
| Charging Time | 2 hour to get 80% in a fast charge, 4 hours to get fully charged |
These battery life durations are in ideal conditions with a new, fully charged battery. You will notice that, over time, your actual battery life will diminish.
TIP: If you find that your iPad battery is no longer holding a good charge or getting anywhere near the 10 hour expected life, you can have your battery replaced by Apple. Visit Apple's website at www.apple.com/batteries/replacements.html to learn how to get a new battery for your iPad. Cost at publishing time was $99 plus shipping.
Battery and Charging Tips
There's nothing worse than running out of juice just when you need it. The key question is this: how can you maximize your battery life and make sure your iPad is ready when you are? Here are a few tips that can help.
Getting More from Each Charge
To extend your battery life, try these tips:
- Put the iPad into Sleep mode. Tap the Power/Sleep button on the upper-right edge of the device to put it into Sleep mode.
- Turn off Wi-Fi or 3G when not needed. The Wi-Fi and 3G antennas use power even if you're not connected to a Wi-Fi or 3G network, so turn them off when you don't need them. Tap Settings, then set Airplane Mode to ON.
- Lower your screen brightness: Tap Settings and then Brightness& Wallpaper. Use the Slider bar to lower your brightness to a level less than halfway across that still works for you. Also, make sure Auto-Brightness is set to ON.
- Turn off Location Services: If you don't need your actual location to be transmitted to your apps, you can turn this off. Tap Settings, then Location Services. Set Location Services to OFF. If you start an app that wants your location, you'll be reminded to turn it back on.
- Set a Shorter Auto-Lock: Shortening the time your iPad takes to turn off the screen when not being used and go into Sleep mode can help save your battery. To do this, tap Settings, General, and Auto-Lock. Set Auto-Lock as short as possible—you can set this as short as 2 minutes if you like.
- Turn off push email and push notifications: Tap Settings, and then Mail, Contacts, Calendars. Next, tap Fetch New Data and set Push to OFF.
- Learn moreabout battery life and get more cool iPad-related tips from the Apple website at
www.apple.com/batteries/ipad.html.
Making the Battery Last Longer
A rechargeable battery loses its ability to maintain a charge over time, and it has only a limited number of cycles during its useful life. You can extend the life of your iPad battery by making sure you run it down completely at least once a month. The rechargeable battery will last longer if you perform this complete draining on a regular basis.
iPad Charging Accessories
No matter what you do, if you use your iPad a lot, you'll want to find more places and more ways to charge it. Table 1-2 lists some other options for charging your iPad besides using your power cord or connecting it to your computer.
Table 1-2. Other Places and Ways to Charge Your iPad
Charging and Battery Tips
Your iPad may already have some battery life, but you might want to charge it completely, so you can enjoy uninterrupted hours of use after you get it set up. This charging time will give you a chance to check out the rest of this chapter, install or update iTunes, or browse all the cool iPad apps in the iTunes App Store (see Chapter 21: “The Amazing App Store”).
The Dock to USB cable also doubles as your charger cable. It is located under the little white booklet beneath your iPad in the box that says, “Designed by Apple in California.” Plug the wide end of the cable into the bottom of your iPad (next to the Home button), then plug the USB cable end into the small white box that has the fold-out plug for the electrical socket.
| To make sure your device is plugged in correctly and getting charged, look for the small Plug icon inside the battery indicator in the upper-right corner of the iPad screen. If the screen is blank, tap the Home button once to light up the screen. You see the 100% next to the battery icon in this image to the right because we went into Settings |
 |
Will my iPad charge when connected to my computer?
The answer is: “It depends.”
Your iPad is charging if you see the Plug icon inside the Battery icon when you connect your iPad to your computer with the USB cable. Most Mac computers, some Windows computers, and some powered USB hubs (an accessory that you can purchase that is plugged into the wall and has USB ports) provide enough power to charge your iPad while it is “awake” (the screen is on).
This is harder to determine when the iPad is in Sleep mode (screen off), and you see a “Not Charging” message next to the Battery icon on your iPad after you connect it to your computer. In this case, your iPad will probably be charging when it is in Sleep mode. You will have to experiment with your computer and iPad to make an accurate determination for a given condition. We discovered that, with a Windows laptop, the iPad definitely charged fine in Sleep mode, even though it said “Not Charging” when it was awake.
Your iPadActivation May Already Have Been Completed
For example, you may see a Slide to Unlock screen or a screen of icons on your Homescreen when you turn on your iPad or tap the Home button (at the bottom of the device). If so, your iPad has already been activated. If you see a black screen showing a USB cable that needs to be plugged into iTunes (see Figure 1-3), then you still need to activate the device.
Slide to Unlock
When you first power on your iPad, you will see the Slide to Unlock screen. Just follow the path of the Arrowiconand gently slide the Unlock button to the right.
Once you do that, you will see your Homescreen.
You will see four icons locked in the Bottom Dock (see Figure 1-2, bottom-right), while the rest of the icons can move back and forth in pages above this Bottom Dock. Learn how to move your favorite icons into the Bottom Dock in the “Moving Icons” section in Chapter 7: “Personalize and Secure Your iPad.”
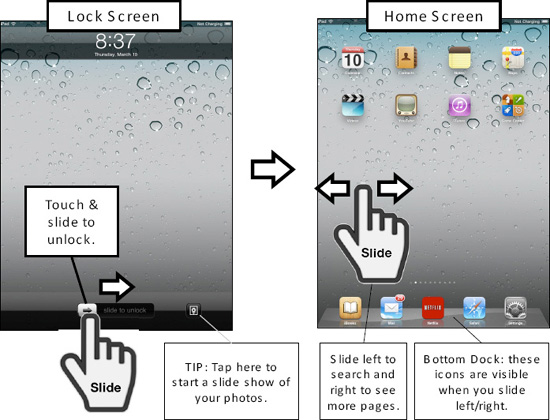
Figure 1-2. Slide to Unlock, moving around your Home screen, and the Bottom Dock
iTunes and Your iPad
To activate your iPad and load up yourcontent (e.g., music, pictures, videos, and more), you will need to connect the device to the iTunesapp on your computer. The iTunesapp is also required to backup (and later restore) your iPad.
If you don't have the iTunes app, or you are not sure if you have the latest version, then you will have to upgrade. Connecting your iPad to the iTunes service for the first time will activate or tie your iPad to your Apple ID. Once you do that, you can buy songs, movies, books, and just about anything else right from your iPad or in iTunes on your computer.
Install or Update iTunes on Your Computer
If you see a screen on your iPad showing a USB plug pointing to iTunes, then you need to connect your iPad to the iTunes app on your computer (see Figure 1-3).
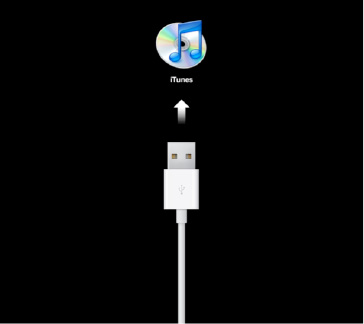
Figure 1-3. An iPad screen showing the need to connect to iTunes to get started
Generally, you will need to make sure you have the latest version of the iTunes program installed.
If you need to updatethe program, start iTunes. If you are a Windows user, select Help and then Check for Updates. If you are a Mac user, select iTunes and then Check for Updates. Follow the instructions provided to update iTunes.
Need detailed instructions? See our “iTunes Update” section in Chapter 29: “Your iTunes User Guide.”
If you do not have the iTunes program loaded on your computer, then open a web browser and go to www.itunes.com/download. Download the software from the link provided.
Need detailed instructions? Again, see our “How to Download and Install iTunes”section in Chapter 29: “Your iTunes User Guide.”
Connecting Your iPad to iTunes
Once you have installed or upgraded to the latest version of the iTunes program, you are ready to connect your iPad to the iTunes service on your computer.
TIP: Using the iTunes app's Home Sharing feature, you can share your purchased content from the same iTunes account (music, apps, videos, iBooks, and more) on your iPad and across authorized computers on your home network. Also, you can sync any of the same content to any iPod/iPhone/iPad under the same iTunes account. Learn more about syncing content using iTunes in Chapter 3: “Sync Your iPad with iTunes” and learn about Home Sharing in Chapter 29: “Your iTunes User Guide.”
By connecting your iPad to iTunes, you will register or associate your iPad (via the device serial number) to a particular iTunes Account (Apple ID).
TIP: The bonus of this approach is that, if you have purchased apps and other content (e.g., music, videos, and more) for an iPhone or iPod touch, then you can run most of those apps on your iPad—although with a little smaller screen size. Note that you can authorize an iPad on more than one iTunes account; however, all content you sync to that iPad has to originate from a single computer. Therefore, you need to select your “main” computer to sync with your iPad.
If you do not yet have an iTunes account (Apple ID), don't worry—you can create one as you register your iPad.
Start iTunes
If the iTunes app isn't already running, double-click the iTunes icon on your desktop:
- Mac users: Click the Finder icon, select the Go menu, and then select Applications to look for iTunes (shortcut: Shift+Command+A for Applications).
- Windows users: Click the Start menu or Windows logo in the lower-left corner, select All Programs, and then choose iTunes.
Registering Your iPad the First Time
Once you have the iTunesapp installed or updated and running on your computer, you are ready to connect your iPadfor the first time and get it registered or activated. Once you do these things, you can start using your new iPad.
NOTE: You can skip this registration section and jump to the “Set Up Your iPad” section later in this chapter if your iPad has already been registered. You know if your iPad is already registered if you see either Slide to Unlock at the bottom of the screen or a screen of icons when you tap the Home button on the bottom of your device.
Follow these steps to connect to your iPad and register or activate it:
- Plug in the white USB connection cable that was supplied with your iPad to an available USB port on your computer.
NOTE: When you connect your iPad to your computer the first time, your Windows computer should automatically install the necessary drivers. If you are on a Mac computer, depending on which version of operating system you have installed, Apple may recommend that you upgrade to the latest version of the operating system before using your iPad.
- Click your iPad under DEVICES in the left column of iTunes in order to get started.
- If you have not already registered your iPad, you should see a Welcome screen (see Figure 1-4). Click Continue to start registering your iPad.
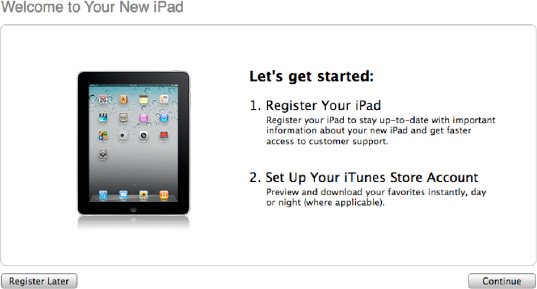
Figure 1-4. The iPad Welcome screen in iTunes
- You will now see the iPad Software License Agreement.
- Assuming you agree with the legal terms, check the box that says I have read and agree to the iPad Software License Agreement and click the Continue button.
- Next, you will be given the opportunity to sign in using your Apple ID or to create a new Apple ID. Enter your Apple ID and password or click I do not have an Apple ID and select your country (see Figure 1-5).
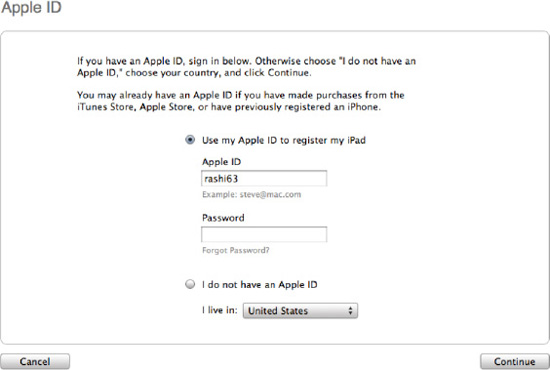
Figure 1-5. The Apple ID screen in iTunes
- Click the Continue button.
- If you tried to enter your Apple ID and password and received an error message that “additional security information is required,” read the “Troubleshooting: Fixing the Apple ID Security Error” section in Chapter 29: “Your iTunes User Guide.”
- You should now see the Register your iPad screen (see Figure 1-6).

Figure 1-6. The Register Your iPad screen in iTunes
- Type or verify that your information is correct and click Submit to complete your registration.
Setting up the Find My iPad Service
After you register your iPad, you may see a screen similar asking if you would like to set up the free Find My iPad service (seeFigure 1-7). Click the Set up Find My iPad button and follow the on-screen instructions to get started. This service enables you to locate your iPad (whenever it is powered on and connected to the network) using the MobileMe Apple website (http://me.com).
TIP: Please check out the MobileMe service detailed description in Chapter 4: “Other Sync Methods” to learn all about the various features of the service.
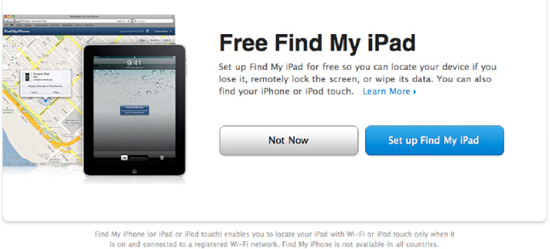
Figure 1-7. Set up the Free Find My iPad service
If you do not see this screen, follow these steps to get set up on your iPad:
TIP: You can also watch a video and learn more on Apple's site here: www.apple.com/ipad/find-my-ipad-setup/.
- Your iPad may be busy syncing with iTunes at this point. You'll have to wait until the sync is completed, and you see either the Home or Slide to Unlock screen; at that point, you can get started.
- Tap the Setup app.
- Tap Mail, Contacts, Calendars.
- Tap Add Account and select Mobile Me.
- Enter your Apple ID and Password and tap Next to login. You can click a link to create a free Apple ID if you don't have one. You may need to agree to the Terms of Service if this is the first time you are using your Apple ID with the Mobile Me service.
- You should then receive an email message at your main email account connected to your Apple ID. You need to click the link in the email message you receive to Verify your account.
- After a successful login, you should see a little pop-up window asking Allow MobileMe to Use the Location of your iPad? As you probably guessed, you definitely need to answer OK to have this service work correctly.
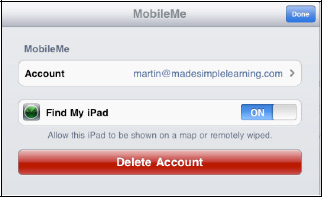
- Make sure to set the Find My iPad to ON, as shown here. Then tap Save to complete the setup process.

Disable or Adjust Find My iPad
You can also disable the service or change the MobileMe account used by returning to MobileMe's Accounts screen, as follows:
- Tap the Setup app.
- Tap Mail, Contacts, Calendars.
- Tap the Mobile Me account under the Accounts screen in the right column.

- From this screen, you may:
- Tap Account to adjust the account used.
- Set Find My iPad to ON or OFF.
- Delete your MobileMe account from this iPad.
- Tap Done to save your changes.
Using Find My iPad from the Me.com Website
You can use the Find My iPad service from almost any web browser, whether it is on your computer or another mobile device. Follow these steps to use the service:
- Open up a web browser and go to
www.me.com. - Log in with your same Apple ID and password.

- You should now see the Find My iPad (or iPhone) screen, which immediately shows the last known location of your device. Notice that, if you have multiple devices, you can select a different device in the left column to locate it.
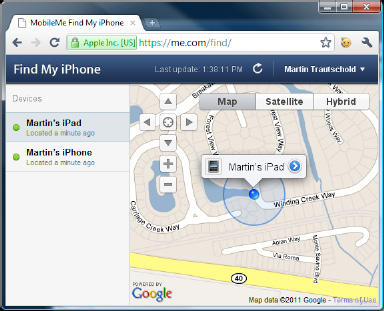
NOTE: A Clock icon next to the name of the device on the map
 indicates that it has been a little while since the last update. If your device has been powered off, then the last known location will be the location mapped when it was turned off.
 - Click the name of the device to see more options. You can do the following:
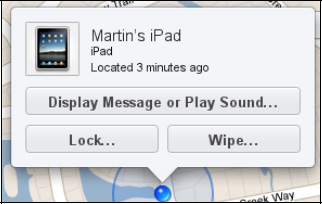
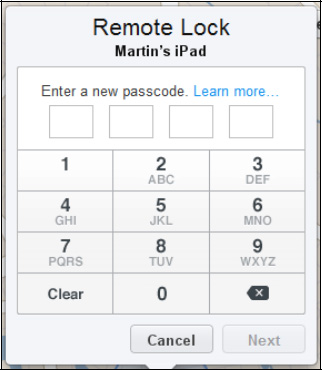
- Click Lock to remotely lock your iPad. This protects your private information by adding a four-digit passcode.
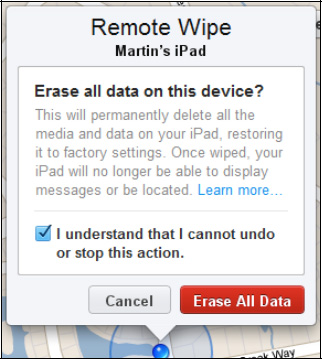
- Click Wipe to remotely erase all your private information. Remember that you will have everything saved on your computer from the point of your last backup on iTunes, which is usually the last time you connected your iPad to iTunes on your computer. Check the box at the bottom and click Erase All Data to complete the process.
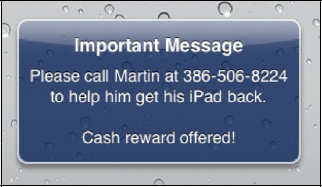
- Click Display Message or Play Sound to send a message to be displayed on your iPad or to play a sound for 2 minutes to help you locate your device. The sound is like the sonar sound on a ship, so it's pretty distinctive!
If you check this box, the message to the right will be displayed on your iPad and a sound will be played within a few seconds—a pretty nice feature!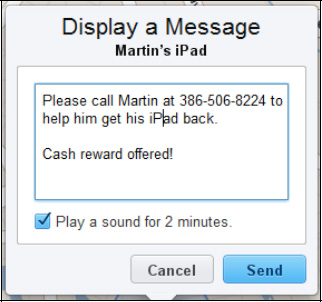
Using Find My iPad from Another iOS Mobile Device
You can also access the Find My iPad service using a free app (called Find My iPhone) you download from the App Store. Follow these steps to use the app:
NOTE: At the time of publishing, the app was called Find My iPhone, its original name. So, if that is the only app you find in the App Store, go ahead and download it for your iPad. |
 |
- Tap the Find iPhone app and log in using your Apple ID and Password.
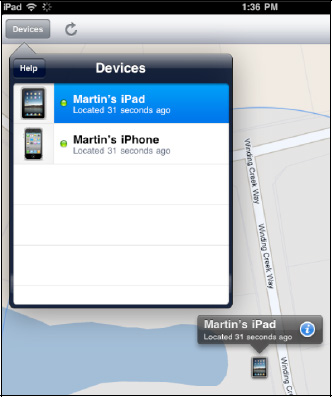
- Immediately you should be taken to the Map view showing your iPad.
- Just as with the web-based version described previously, you can tap the name of the device to Display a message/play a sound on, remotely Wipe (erase), or remotely Lock (with a four-digit passcode) the device.
NOTE: None of these options (i.e., Display, Wipe, or Lock) will work if you are using your iPad to view itself.
- As on the
me.comwebsite, if you have more than one Apple device running iOS 4.2 or higher (e.g. iPhone or iPod touch), you can view these devices right from the app on your iPad. Simply tap the Devices button in the upper-right corner to see all your devices.
Apple's MobileMe Sync Service
After registering your iPad for the first time, you may see a screen advertising the MobileMe wireless sync service from Apple. To keep setting up your iPad, click the No Thanks button to continue to the next screen.
What is MobileMe?
As you saw in the earlier “Find My iPad” section, MobileMe provides the iPad location service for free. However, MobileMe does much more than that; it also provides a way to keep your email, contacts, calendar, and web bookmarks shared across all your computers and mobile devices. At publishing time, photo-sharing is limited to Mac computers with MobileMe iPhoto folders. MobileMe is free for a limited time (currently 60 days), and then it costs US $99.00 for a single user or US $149.00 for a family plan. See our “MobileMe Tour” section in Chapter 4: “Other Sync Methods.”
Set Up Your iPad
The first time you connect your iPad, you have the chance to give it a name and select some other options (see Figure 1-8).
If you instead see a screen that asks about Restoring from a backup, then skip to the “Set up or Restore from Backup” section later in this chapter.
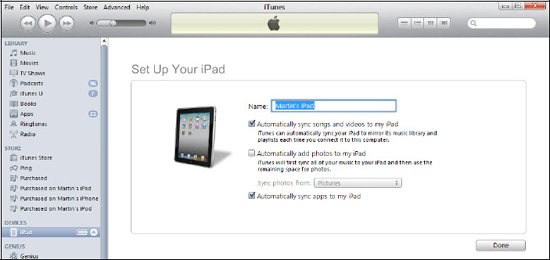
Figure 1-8. Set up your iPad screen
NOTE: If you are going to actively use two iPads, then we recommend you set up your second iPad as a new device and do not restore from a backup file. Otherwise, you might end up with two iPads with the same device name and cause confusion.
- Give your iPad a Name. Each time you plug in your iPad—to this or any other computer—your iPad will show the name you choose here. In this case, we will call this one: Martin's iPad.
TIP:Setting up an iPad Quickly
To get moving quickly, uncheck all three boxes on the screen shown in Figure 1-9 and click Done. You can check or uncheck these boxes within the tabs you find in the iTunes app later. We show you the details in Chapter 3: “Sync Your iPadwith iTunes” and in Chapter 29: ”Your iTunes User Guide.”
- Check the box next to Automatically sync songs and videos to my iPad if you want all of your music and videosstored in your computer's iTunes library on your new iPad.
CAUTION: Your iPad does not have as much memory as your computer, so be careful when selecting automatically sync if you have thousands of songs, photos, or many videos in your computer's iTunes library.
- Check the box next to Automatically addphotos to my iPad if you wantall your photos in specific folders on your computer synced to your new iPad.
- Check the box next to Automatically sync applications to my iPad if you would like applications you purchase on your iPad backed up to your computer. This option allows you toupdate apps from the iTunes app on your computer; it also enables you to manage and arrange your app icons and Home screens using the iTunes app on your computer. We recommend you check this box.
- Click Done to complete the Set Up screen.
Set up or Restore from Backup
If you have already synced a similar device such as an iPhone or iPod touch to your iTunes, then you will probably see the Set Up Your iPad screen with options to Set Up as a new iPad orrestore from a backup (see Figure 1-9).
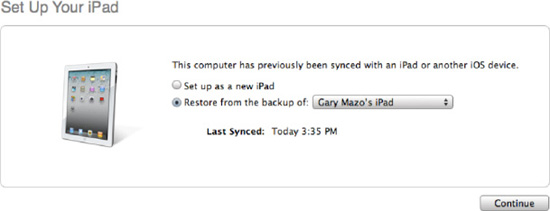
Figure 1-9. Setting up or restoring an iPad
- Now you have several choices depending on your particular situation:
- If you are using an iPad for the first time, then select Set up as a new iPad.

- If you have previously synced your computer with another iPad and you want to restore from that backup file, select Restore from the backup of and then select the correct iPad backup file from dropdown list.
- If you have backed up another iOS device besides an iPad (e.g., an iPhone or iPod touch), we recommend you select Set up as a new iPad.
 You can later sync your apps, pictures, songs, and more to your iPad from iTunes; this approach is safer than using the backup file from a non-iPad device.
CAUTION: We have heard of people experiencing problems (lock-ups, lower battery life, and so forth) when they restore a backup from a non-iPad (iPhone/iPod touch) to the iPad. Also, selecting restore here assumes you have first made a backup of your old device (iPhone/iPod touch) in order to restore the latest information to your new iPad.
- If you are using an iPad for the first time, then select Set up as a new iPad.
- Click the Continue button.
NOTE: If you want to keep your existing iPhone and/or iPod Touch and set up your new iPad, then you should select Setup a New iPad.
Setup Complete: The iPad Summary Screen
Once you confirm your choices and click Done (see Figure 1-8) or click Continue from the Set up/Restore screen (see Figure 1-9), you will be taken to the main Summaryscreen(Figure 1-10).
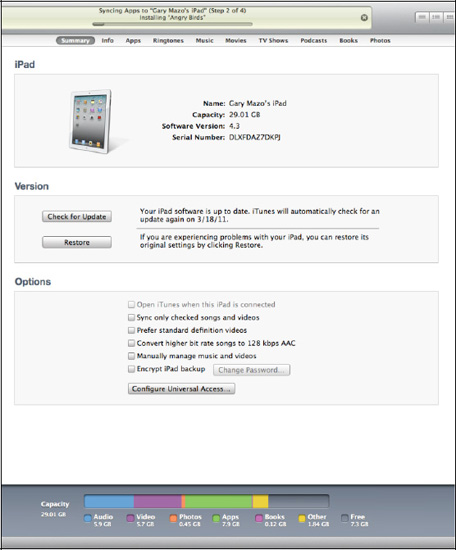
Figure 1-10. The iPad Summary screen in iTunes
Maintaining Your iPad
Now that you have set up your iPad, you will want to know how to safely clean the screen and then keep it protected with various cases.
Cleaning Your iPad Screen
After using your iPad a little while, you will see that your fingers (and possibly other fingers besides yours) have left smudges and oil on the formerly pristine screen. You will want to know how to safely clean the screen. One way to keep the screen cleaner throughout the day is to place a protective screen cover on the iPad, which may also have the added benefit of cutting down on glare (discussed in the next section).
We also recommend doing the following:
- Turn off your iPad by pressing and holding the Sleep/Power key on the top edge, then use the Slider bar to turn it off.
- Remove any cables, such as the USB Sync cable.
- Rub the screen with a soft, dry, lint-free cloth (such as a cloth supplied to clean eyeglasses or something similar).
- If the dry cloth does not work, then try adding a tiny bit of water to dampen the cloth. If you use a damp cloth, try not to get any water in the openings.
CAUTION: Never use household cleaners, abrasive cleaners such as Soft Scrub, ammonia-based cleaners such as Windex, alcohol, aerosol sprays, or solvents.
Cases and Protective Covers for Your iPad
Once you have your iPadin your hands, you will notice how beautifully it is constructed. You will also notice that it can be fairly slippery and could slip out of your hands or rock around a bit. It's also possible for the back of the iPad to get scratched when you are typing on it.
We recommend buying a protective case for your iPad. Average cases run about US $10-40 and fancy leather cases can run US $100 or more. Spending a little to protect your iPad that costs $500 or more makes good sense.
Where to Buy Your Covers
You can purchase your iPad protective cover at any of the following locations:
- Amazon.com (
www.amazon.com) - The Apple Accessory Store (
http://store.apple.com) - iLounge (
http://ilounge.pricegrabber.com) - TiPB – The iPhone + iPad Blog Store (
http://store.tipb.com/)
You could also do a web search for “iPadcases” or “iPad protective covers.”
TIP: You may be able to use a case designed for another type of computer for your iPad; for example, a case for a netbook or small tablet computer might work well. If you go this route to try and save some money, however, just make sure your iPad fits securely in the case or cover.
What Cases to Buy
The following sections list some types of cases from which to choose and their price ranges.
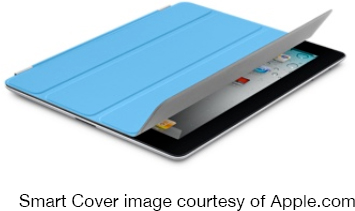
Apple iPad Smart Cover (about $40 for plastic, $70 for leather)
What these do: Magnets on the case instantly draw the cover to the iPad for a solid fit. You can fold the cover back to create a nice, low stand.
Pros: Many colors, lightweight, and designed by Apple specifically for the iPad 2—need we say more?
Cons:Will not protect the iPad as well from dings or dents (no protection on back of device).
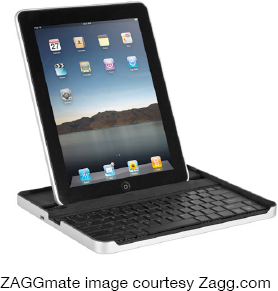
Metal Case with Keyboard Built-in (about $100)
What these do: Provide a solid case and a built-in Bluetooth keyboard. If you are typing a lot on your iPad, this is a nice compact option.
Pros: Inexpensive compared to a separate case and keyboard. Easy to type with.
Cons: Add bulk and weight to the device.
Rubber/Silicone Cases ($10-$30)
What these do: Provide a cushioned grip and should absorb iPadbumps and bruises.
Pros: Inexpensive, colorful, and comfortable to hold.
Cons: Not as professionalin appearance as a leather case.
Waterproof Cases ($10-$40)
What these do: Provide waterproof protection for your iPad and allow you to safely use the iPad near water (in the rain, at the pool, at the beach, on a boat, and so forth).
Pros: Provide good water protection.
Cons: May make the touch screen harder to use; do not usually protect from drops or bumps.
Hard Plastic/Metal Case ($20-$100)
What these do: Provide hard, solid protection against scratches, bumps, and short drops.
Pros: Provide good protection.
Cons: Add some bulk and weight.
Leather Book or Flip Cases ($40-$100+)
What these do: Provide more of a luxury feel and protect the front and sides, as well as the back.
Pros: Provide leather luxury feel and protect the front and the back.
Cons: More expensive and add bulk and weight.
Screen and Back Cover Protectors ($5-$40)
What these do: Protect the screen and back of the iPadfrom scratches.
Pros: Help prolong life of your iPad and protect against scratches. Also, most such cases decrease screen glare.
Cons: Some may increase glare or affect touch sensitivity of the screen.
iPad Basics
Now that you have your iPad charged with a clean screen, registered, and decked out with a new protective case, let's take a look at some of the basics to help you get up and running.
Powering On/Off and Sleep/Wake
To power on your iPad, press and hold the Power/Sleep button on the top edge of the iPadfor a few seconds (see Figure 1-11). Simply tapping this button quickly won't power on the iPad if it is completely off—you really need to hold it until you see the iPadpower on.
When you are no longer using your iPad, you have two options: you can either put it into Sleep mode or turn it off completely.
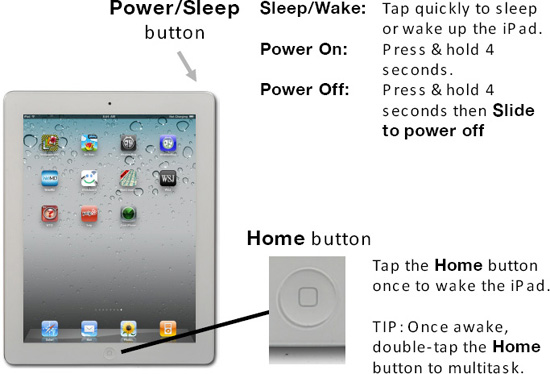
Figure 1-11. The Power/Sleepand Home buttons
The advantage of Sleep mode is that, when you want to use your iPadagain, a quick tap of the Power/Sleep button or the Home button will bring your iPadback awake. According to Apple, the iPad has up to a month of stand-by power.
If you want to maximize your battery or if you know you won't be using your iPadfor quite some time—say, when you go to sleep—you might want to turn it off completely. The way to do this is to press and hold the Power/Sleep button until you see the Slide to Power Off bar appear. Just slide the bar to the right and the iPadwill power off.
The Home Button
 |
The key you will use most often is your Home button (see Figure 1-11). This button will begin everything you do with your iPad. Press it once to wake up your iPad (assuming it is in Sleep mode.) |
Pressing the Home button will take you out of any application program and bring you back to your Home screen.
TIP: Double-tapping your Homebutton can be set to do different things, such as starting the iPad function, search, and more(see how to configure this button in the section that follows).
Multitask by Double-Clicking the Home Button
One of the nice features of the iPad (new in iOS 4.2 and higher) is multitasking. This feature enables you to have more than one app open at a time. To multitask, simply double-click the Home button, then slide your finger back and forth to select an app to jump to.
TIP: You'll find more details on multitasking in Chapter 8: “Multitasking and Voice Control.”
Volume Keys
Located on the upper-right side of the iPad are simple Volume Up/Volume Down keys that you will find very handy (see Figure 1-12). In many places, you can also control the volume of the song, video, FaceTime call, or podcast playing by sliding your finger on the screen volume control.
FaceTime Ringer Volume
If you're not playing a song, video, or other content, pressing these Volume keys will adjust the volume of your FaceTime app's ringer.
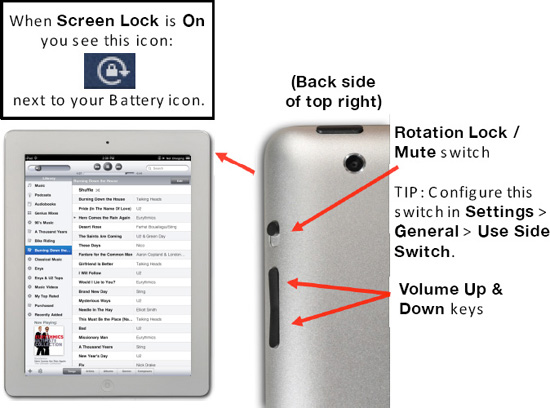
Figure 1-12. The Mute / Screen Rotation Lock switch, Volume Up/Down keys, and Home button
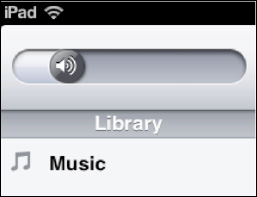
TIP: You can also adjust the volume of music playback using the Slider control in the upper-left corner of your ipod app. |
 |
Rotation Lock / Mute Switch
Just above the Volume keys, you will find the Mute / Screen Rotation Lock switch (see Figure 1-12).
This particular switch has had a varied life on the iPad. If you owned an original iPad, then you know that this switch started out as a Screen Rotation Lock switch. Then Apple changed it to be simply a Mute switch in IOS 4.2. With iOS 4.3 and later devices, you can now configure the function of this switch.
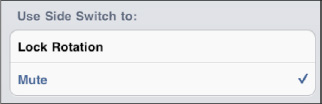
To change the function of this switch, follow these steps:
5. Tap Settings, then tap General.
6. In the Use Side Switch to: section, select Lock Rotation or Mute
Use this when you want to mute the iPad or force it to stop rotating the screen. The Rotation Lock is useful when you have your iPad sitting flat on your desk or in your lap, and you want to force it to stay in either Portrait or Landscapeorientation.
TIP: This is a great way to read iBooks in bed. Turn your iPad to Landscape mode, lock the screen rotation, and read your book. Check out Chapter 12: “iBooks and e-Books” for more.
Adjust or Disable the Auto-Lock Time Out Feature
You will notice that your iPad will Auto-Lock and go into Sleep mode with the screen blank after a short amount of time. You can change the time interval before this happens or even disable this feature altogether using the Settings icon:
- Touch the Settings icon from your Home screen.
- Touch General in the left column, then touch Auto-Lock in the right column.
- You will see your current time interval next to Auto-Lock on this page (Figure 1-15). The default setting is that the iPad locks after five minutes of sitting idle (to save battery life). The choices you have for this setting range from two to fifteen minutes, or Never.
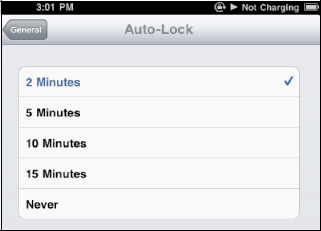
- Touch the desired setting to select it—you know it's selected when you see the Checkmarkiconnext to it.
- Then, tap the General buttonin the top row to get back to the General screen. You should see your change now reflected next to Auto-Lock.
BATTERY LIFE TIP:
Setting the Auto-Lock shorter (for example, 2 minutes) will help you save battery life.
Adjusting the Date and Time
Usually, the date and time is either set for you or adjusts when you connect your iPad to your computer, which we cover in Chapter 3: “Sync Your iPad with iTunes.” You can, however, manually adjust your date and time quite easily. You may want to do this when you are traveling with your iPad and need to adjust the time zone when you land. Follow these steps to do so:
- Touch the Settingsicon.
- Touch Generalin the left column and Date & Timein the right column to see the Date & Time settings screen.
- If you prefer to see 09:30 and 14:30 instead of 9:30 AM and 2:30 PM, respectively, then tap the 24-Hour Time setting switch to ON.

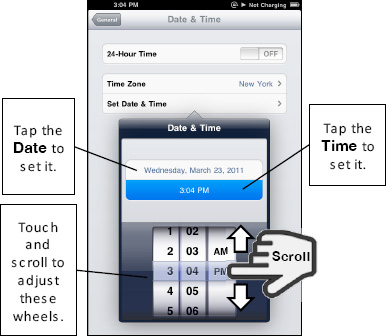
- To set the date and time, touch the Set Date & Timebuttonto see the pop-up window with the wheels that rotate as you touch and move them.
- Touch and slide the hour, minute, and AM/PM wheels to move them up or down.
- Similarly, to change the date, tap the Date (in this image Wednesday, March 23, 2011).
Setting Your Time Zone
Follow these steps to set the time zone:
- Tap Time Zone on the same Date & Time screen shown in the previous section.
- Start to type in the name of the desired city (see Figure 1-13).
- Touch the name of the city to select it and the screen will automatically move back to the Date & Time screen.
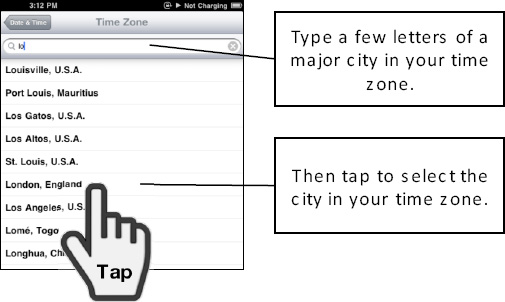
Figure 1-13. Setting your time zone
Adjusting the Brightness
Your iPad has an Auto-Brightness control available, which is usually set to ON by default (see Figure 1-14). This uses the built-in light sensor to adjust the brightness of the screen. Generally, we advise that you keep this set to ON.
If you want to adjust the brightness, you certainly can. From your Home screen, touch the Settings icon. Then touch the Brightness& Wallpaper tab, which is near the top of the left column, and move the Slider control to adjust the brightness.
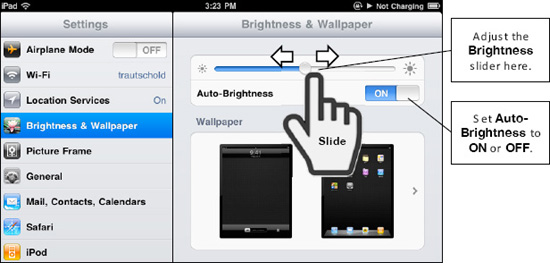
Figure 1-14. Setting the brightness of your iPad
TIP: Setting the brightness lower will help you save battery life. A little less than 1/2 way across seems to work fine.