
Part IV
iPad 2's Soul Mate: iTunes…
Your iPad 2 is inextricably tied to iTunes—the e-commerce center of Apple. iTunes is not only where you buy music, videos, and apps, but it's also where you organize all of the great content you can use on your iPad 2. Use the new Ping social networking feature in iTunes to keep up to date with your favorite artists' and friends' taste in music. You can even use Ping to meet up with friends and buy tickets for upcoming concerts. Learn how to purchase exciting new content—and even how to find it for free. Learn something new with iTunes U or find give your music library a fresh new feel using the Genius mix. We even help you learn how to save money with the iTunes Home Sharing feature, which now works on your iPad, too!
Chapter 29
Your iTunes User Guide

In this chapter, we will show you how to do virtually everything you might want to do with iTunes. We cover iTunes version 10 with the cool social networking feature called Ping (see Figure 29–1). We will help you get iTunes installed and updated, then take you on a guided tour. We will also describe all the great ways to organize and view your music and videos, as well as how to prepare for putting them on your iPad.
At the time of publishing, the latest version of the iTunes app was 10.2.1.1. When you read this, your version may be slightly higher, but the vast majority of the content will be similar.
Besides Ping, we will cover iTunes DJ, the Genius feature, and the money-saving Home Sharing feature. We will also show you how to import music CDs, DVDs, PDFs, and E-Book files, as well as how to get album artwork for all your music. We will even teach you about authorizing computers to share content using iTunes. Finally, we will provide some useful troubleshooting tips for iTunes.
NOTE: If you are looking to set up your iPad for the first time, please check out Chapter 1: “Getting Started.” If you are trying to sync your computer to your iPad using iTunes, please check out Chapter 3: “Sync Your iPad with iTunes.”
If you need to install the iTunes software on your computer, please jump to the “Downloading and Installing iTunes Software” section later in this chapter. If you already have the iTunes software installed, then go to the “Updating iTunes Software” section to make sure you have the latest version.

Figure 29–1. The iTunes screen showing the Ping feature, which is new in version 10.0
Seeing If iTunes Is Already Installed

If you are a Windows PC user, then begin by looking for the iTunes icon on your desktop and double-clicking it. If you don't find it, then click the Windows logo or the Start button in the lower-left corner and type “iTunes.” If you don't see the iTunes app appear in the search results, then you might not have iTunes installed. If that's the case, then follow the steps in the next section, “Downloading and Installing iTunes Software.” If iTunes is installed, you will see it appear—just click its icon to start it and skip to the “iTunes Guided Tour” section.
If you are a Mac user, iTunes is installed by default on your computer. Check to see if the iTunes icon is on your desktop or Desktop Dock. If you see it, then double-click it and skip to the “iTunes Guided Tour” section. If you do not see the iTunes icon, then start the Finder, click Applications, and look for iTunes in the alphabetical list of apps.
Downloading and Installing iTunes Software
If you have never installed iTunes before on your computer, you can download the software directly from the Apple web site by following these steps:
- Open a web browser on your computer, such as Apple's Safari, Microsoft's Internet Explorer, Google's Chrome, or Mozilla's Firefox.
- Type the web address
www.itunes.com/downloadinto the top of your browser, and then press Enter. This web address works for both Windows PC and Mac users. - Next, select the software that matches your computer's operating system, assuming that you're given a choice.
- If you are given a choice to run or save the software, choose Run so that the installation will start automatically once the download is complete.
- If the installation does not start right away, then locate the file you downloaded (Windows users should look for a file with a name like
iTunes.exe, and Mac users should look for something likeiTunes_Install.dmg). Double-click the install file to start the installation. - Follow the on-screen instructions to install iTunes.
Updating iTunes Software
It's easy to update your iTunes software because the program checks its version status by default and will automatically let you know if a newer version is available for download. After you start iTunes, if a newer version of iTunes is available, you will see a pop-up window. As noted previously, the version number will be higher than the 10.0 shown in Figure 29–2.

Figure 29–2. The Apple Software Update screen
TIP: If you want to be sure you are using the latest version, then select Help ![]() Check for Updates from the iTunes menu.
Check for Updates from the iTunes menu.

After you click Download iTunes, you will be taken to the iTunes web site. Select the appropriate software for your computer and click the Download Now button.
You can also get to this download page by going to www.iTunes.com and clicking the Download iTunes button.
Follow the on-screen instructions to install the updated iTunes on your computer.
TIP: To determine your computer operating system on windows, click the Start button or Windows logo in the lower-left corner. Next, right-click Computer and select Properties. On the Mac, click the Apple logo in the upper-left corner and select About This Mac from the menu.

What iTunes Can Do For You
The iTunes software on your computer allows you to do many things, including the following:
- Buy apps, music, videos, TV shows, and more (or download them for free): You can purchase or download free apps, music, movies, TV shows, podcasts, iBooks, PDF files, and audiobooks. You can even download educational content from iTunes U, a special area in iTunes devoted to educational content from universities and other institutions of learning. The best part: Much of this content is free!
- Organize your media: You can use the various views and automatic playlists, and set up your own custom playlists.
- Participate in Social Networking: Using the new Ping feature in iTunes, you can follow your favorite artists and learn what music they are talking about. You can also share your favorite music with your friends, and you can even see who is going to the concert next weekend.
- Sync your music, videos, contacts, and more to your iPad: You want to be able to take all your great music and videos with you on your iPod—use iTunes to sync your content and go (see Chapter 3: “Sync Your iPad with iTunes”).
- Play your music, videos, and audio content: The iTunes app serves as a great media player for your computer, enabling you to play all your media, including music, videos, TV shows, and podcasts.
- Back up and restore your iPad: This option lets you back up and restore your iPad data.
Common Questions About iTunes
What follows is a list of frequently asked questions about iTunes for the iPad, followed by short answers that address the core concern or issue raised by the question.
Is the iTunes software on my computer the same as the iTunes app on my iPad?
The iTunes software on your computer does the same job as a number of apps on your iPad. You need the following apps on your iPad to do all that iTunes can do on your computer: iPod, Videos, iTunes, iBooks, and the App Store.

I have an iPhone or another iPod; can I share music and videos with my new iPad?
Yes! You can definitely keep listening to all your music and sharing all your videos on all of your Apple devices, including your new iPad.
Can I use my existing iTunes software and account?
Yes! You can use the same iTunes software already installed on your computer, as well as your existing iTunes account, to set up your iPad.
Can I use my purchased apps from my iPhone or iPod touch?
Yes, but with limitations. iPhone and iPod touch apps will work; however, iPhone/iPod touch-specific apps will show up in a small window in the middle of the screen and typically will not rotate as you tilt your iPad on its side (Landscape mode). You can press a small 2× button to expand the app to fill the screen, but it will look a little grainy.
iTunes Guided Tour
After you have the latest version of iTunes installed (which was version 10 at the time of writing this book), you're ready to take a quick guided tour of the iTunes interface on your computer. The nice thing is that the interface looks very much the same on PCs and Macs.
When you first start iTunes, you will see the main window with controls at the top to play your music or videos (see Figure 29–3). You will also see the Left Navigation (Nav) Bar, which lets you select from your library, the iTunes Store, your iPad (when connected), shared media, Genius playlists, and your own playlists. The Top Nav Bar adjusts, depending on what you have selected in the Left Nav Bar. Also, the center main window adjusts, depending on selections from the Left and Top Nav Bars, as well as what is inside the main window itself.

Figure 29–3. The iTunes main window
Starting from the top left of the main window, you can see the following menus, controls, windows, and other visual elements:
- Main menus: These are located just above the media controls, and they provide access to all the actions iTunes can perform through a logical and convenient set of menus. While a lot of the functionality in these menus is available in buttons and toolbars, these menus are where you'll find what you're looking for in a logical list.
- Media controls: These buttons let you play, pause, or skip to the next song or video, as well as adjust the volume.
- Status window: Located in the top-middle section of iTunes, this window shows you the status of what is currently going on (sync status, whether you're playing a song/video, or any other related messages).
- View adjustment buttons: These buttons allow you to adjust views between List, Grid, or Cover Flow views. (These are only active when you are in your own media libraries.)
- Search box: This box allows you to search your library or the iTunes Store for a particular song, video, TV show, or anything else based on the text you enter.
- Sign-in link: Located just below the Search box in the upper-right corner, this button allows you to sign into the iTunes Store or create a new Apple ID. Notice that the figure to the right shows [email protected] instead of Sign in. This is because Martin has already signed in with his Apple ID.

- Top Nav Bar: This set of buttons under the status window will vary, depending what you have selected in the Left Nav Bar. Sometimes there are very few buttons; other times, they will stretch across the screen. Click any of these buttons to change the content shown in the main window.
- Left Nav Bar: This bar allows you to view your library (e.g., music, videos, TV shows, and podcasts), the iTunes Store and Ping, your purchased content, any currently connected devices (your iPad, iPod, iPhone, and so on), shared libraries, Genius mixes, and your own playlists.
- Main window: This is where you can see all the content based on your selections in the Left and Top Nav Bars. For example, if you selected your iPad in the Left Nav Bar and Apps in the Top Nav Bar, you would see a screen similar to the one shown in Figure 29–3.
Apple Video Tutorials for iTunes
In addition to all the information provided in this book, you can find some good video tutorials from Apple to help you start using the iTunes app. You can check these tutorials out from within the iTunes app by clicking the Help menu and selecting iTunes Tutorials.
Using Ping in iTunes

As we mentioned, Ping is the new social networking feature focused on music; it is available in iTunes version 10 and higher. It allows you to follow your favorite artists, as well as those of your friends. The feature also lets you share your likes and dislikes with people, find out about local concerts, and more.
Getting Started and Creating Your Profile
To get started, click Ping in the Store section in the Left Nav Bar of iTunes.
NOTE: If you have already registered and enabled Ping, but are not signed into your iTunes account with your Apple ID, then you will see a message to Turn On Ping in the main window. Just click the link and log in to see your Ping account.
Now click the Turn On Ping button ![]() in the main window. You will need to sign into the iTunes service again to get started with Ping. Next, you will need to create your profile for Ping. Enter your first and last name, enter your gender, add an optional picture, indicate where you live, give a brief bio, and finally select up to three music genres you like.
in the main window. You will need to sign into the iTunes service again to get started with Ping. Next, you will need to create your profile for Ping. Enter your first and last name, enter your gender, add an optional picture, indicate where you live, give a brief bio, and finally select up to three music genres you like.
Click Continue to select how music is displayed on your profile. The default is Automatically display all music I like, rate, review, or purchase. However, you can adjust this to meet your preferences. Click Continue.

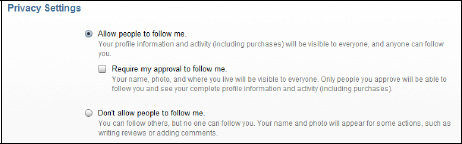
Finally, you can choose to allow people to follow you with or without approval (the default) or not allow them to follow you at all. Select your choice, and then click Done to finish setting up your Ping profile.
After you complete your setup, you will see a page similar to this one, with recommendations based on music you have purchased in the iTunes Store. To start following artists, click the Follow buttons at the bottom or type a search to follow a friend or artist.

You can also click the Invite button to invite your friends to join Ping.
If you want, you can invite your friends by email by clicking the Invite button and entering their email addresses.

Following Your Favorite Artists
To find artists to follow, type their names in the Search window of the Ping screen. When you see the artists appear, click the Follow button. We searched for and found The Rolling Stones, but note that this is not the rock group—this is a person who has taken the band's name.
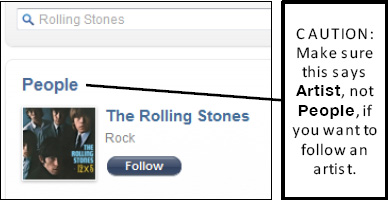
CAUTION: Some people have (or have used) the same name as artists, so make sure to click the Show Artists link to the right of the search window. Otherwise, you might end up following Peter Gabriel the beer-drinking German who enjoys alternative, electronic, and rock, instead of the artist Peter Gabriel.

Following Your Friends and Other People
Use the same Find feature to locate and follow your friends and others. In the next example, Martin has decided to follow Gary Mazo, so Martin searches for Gary's name. After clicking Follow, a pop-up window is displayed, telling Martin that Ping will have to send a name, photo, and email address to Gary, so he can approve the request. Notice what Gary will see on his iPad when Martin requests to follow him (see Figure 29–4).

Figure 29–4. A Follow request from the Ping feature in iTunes as it appears on a mobile device
Recent Activity Feed
The heart of Ping is all the updates you receive from the artists and people you are following. The default view when you start Ping is shown to the right; however, if you are in some other view, then you need to click the Recent Activity link in the PING box in the upper-right corner.

NOTE: Everything you or your family purchases on the same Home Share account will show up as purchased on your Ping account. Hey, at least you can blame that lame ballad on your spouse or the gangsta rap on your teenage child.
The Recent Activity view will show all the recent activity for you and your followed friends and artists (see Figure 29–5). It's very similar to your Wall in Facebook. It allows you to provide comments, like what you see posted, and read comments from other followers. Have fun, let your opinions be heard, and get in on the conversation!
If the friends that you follow allow you to see their purchases, you can comment on those as well. Of course, the iTunes app makes it easy for you to purchase albums or songs that your friends purchase with the handy Buy button next to the listed item.
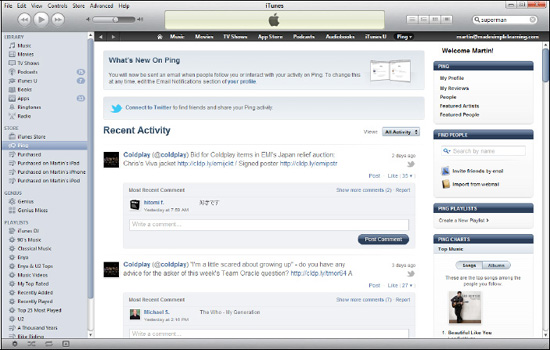
Figure 29–5. Ping's Recent Activity page gives you the ability to add a comment or say that you like something.
Navigating Back and Forth in iTunes
Sometimes you want to simply get back to the page you just left when you clicked a link. It might not be obvious, but there are little Triangle icons in the upper-left corner of the main iTunes window that allow you to navigate back and forth through pages in Ping and other parts of the iTunes app.

Concerts: Find Out and Share with Friends
When you click an artist's page in Ping, you can see if they have any upcoming concerts scheduled by looking for the Concerts box in the lower-right corner of the page. The accompanying image shows upcoming concerts for U2. Click the See All link in the Title Bar of the box to see all details and tell people whether you're going to any of these concerts.
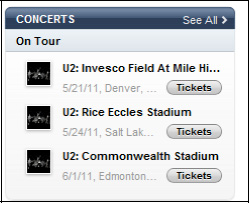
After clicking the See All link, you will see details of all concerts. You can click the I'm Going button to show others that you're attending and the Tickets button to try purchasing tickets. If you click I'm Going, you can add a comment about your post for your friends to see—for example, maybe you'll tell them what seat you have, so they can find you.
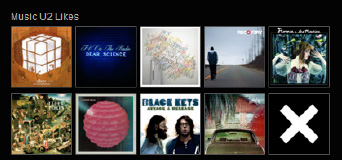
Seeing What Artists Like in Ping
If you go to some artists' pages in Ping, you can see what music they like in the upper-right corner. In this image, we can see that U2 likes Elbow, TV on the Radio, The National, and more. Click any of the album covers to listen to and even purchase songs from the album.
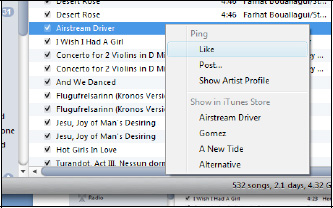
Using the Ping Dropdown Menu for a Song
Next to all your songs in most of the iTunes views, you will see a little Ping dropdown menu. Click the Ping menu to Like, Post, or Show Artist Profile. You can also view the iTunes store to see more songs by that artist, album, or even other songs in the same genre, as shown to the right.
![]()
Viewing Ping in the Right Column
As you move between items in your music library, you will soon notice that Ping will show up at the top of the right column. You can say if you Like the song or Post a comment on the song from this column.

Ping Mobile

You can access Ping right from the iTunes app on your iPad. To see Ping, start your iTunes app on your iPad, and then tap the Ping soft key in the bottom row.
Notice that you can switch between Activity, People, and My Profile by tapping those buttons along the top.
The image to the right shows the Activity tab.

Changing Views in iTunes
There are many ways to view your music, videos, and other media in iTunes on your computer. Getting familiar with these views on your computer will also help you understand your iPad because your iPad has many of the same views. There are four customizable views in iTunes: Song List, Album List, Grid, and Cover Flow.
NOTE: Album List view is new in iTunes version 10.0. It is a nice view because it groups your songs by album and shows you the album art in the Album column.
Song List View
Click the leftmost of the view icons to see the Song List view (see Figure 29–6). You can re-sort the list by any column by clicking that column's heading. For example, to sort by name, you would click the Name column heading. To reverse the sort order, just click the same column heading again. Song List view can be especially helpful for finding all the songs by a particular artist or on a particular album.

Figure 29–6. Song List view
Album List View
As we mentioned earlier, this is a new view in iTunes version 10.0. Click the second view icon to see Album List view (see Figure 29–7). You can re-sort the list by any column by clicking that column's heading. For example, you can sort by name by clicking the Name column heading. To reverse the sort order, just click the same column heading again. The Album List view can be especially helpful for finding all the songs by a particular artist or on a particular album.

Figure 29–7. Album List view
Grid View
Click the third icon to show Grid view (see Figure 29–8). This is a very graphical view, and it is helpful if you want to quickly find album or poster art.
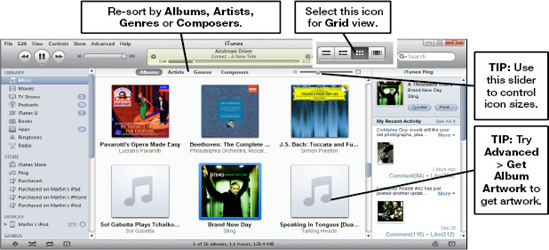
Figure 29–8. Grid view
Cover Flow View
Click the rightmost icon to see Cover Flow view (see Figure 29–9). This is a fun view because it is visual, and you can quickly flip through the images using the slider bar to browse through the album covers. Like Grid and Album List views, this view provides an easy way to find an album when you know what the cover looks like.
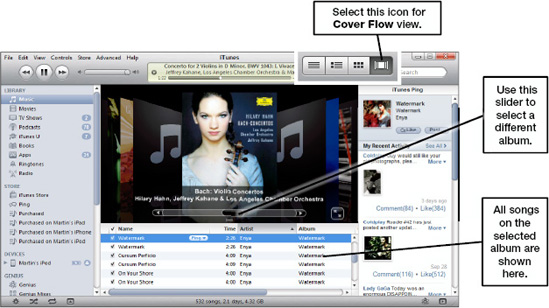
Figure 29–9. Cover Flow view
Playing Songs, Videos, and More
If you are new to iTunes, these basic pointers can help you get around the app (see Figure 29–10):
- Playing a song, video, or podcast: Double-click an item to start playing it.
- Controlling the song or video: Use the Rewind, Pause, and Fast Forward buttons, in addition to the Volume slider in the upper-left corner, to control the playback.
- Moving to a different part of the song or video: Just click the Diamond icon in the slider bar under the song name at the top of the window and drag it left or right as desired.

Figure 29–10. Playing your songs, videos, and more in iTunes
The iTunes Visualizer
There is a very interesting visual feature in iTunes that is quite entertaining. It looks like a screen saver that reacts to the music you are playing. There are two versions: the iTunes Classic Visualizer and the new iTunes Visualizer. To see a visualizer, from the menu select View ![]() Show Visualizer (alternatively, on Windows you can press Ctrl+T, and on the Mac you can press Command+T). To change between the Classic and New Visualizer versions, from the menu select View
Show Visualizer (alternatively, on Windows you can press Ctrl+T, and on the Mac you can press Command+T). To change between the Classic and New Visualizer versions, from the menu select View ![]() iTunes Visualizer or iTunes Classic Visualizer. Figure 29–11 shows examples of the two visualizers.
iTunes Visualizer or iTunes Classic Visualizer. Figure 29–11 shows examples of the two visualizers.
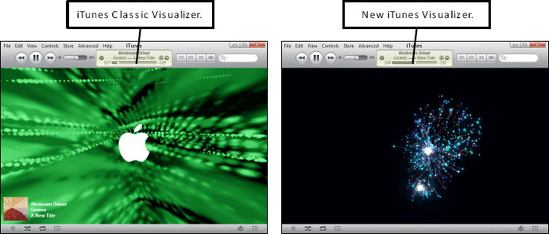
Figure 29–11. The iTunes Classic and New Visualizers
Using the iTunes Equalizer
You can enhance the sound of your music by matching the built-in equalizer to the type of music you are listening to. To view the iTunes Equalizer, from the menu select View ![]() Show Equalizer (alternatively, on Windows you can press Ctrl+Shift+2, and on the Mac you can press Command+J and check Equalizer). You can choose from over 20 preset settings, including Classical, Rock, Pop, and R&B, and you can modify the settings to fit your individual tastes.
Show Equalizer (alternatively, on Windows you can press Ctrl+Shift+2, and on the Mac you can press Command+J and check Equalizer). You can choose from over 20 preset settings, including Classical, Rock, Pop, and R&B, and you can modify the settings to fit your individual tastes.

iTunes Mini Player
Sometimes you want to keep iTunes playing on your computer, but you don't want it taking so much screen real estate. Luckily, iTunes has a built-in miniature version called the Mini Player.

To show the Mini Player, from the menu, select View ![]() Switch to Mini Player (alternatively, on Windows you can press Ctrl+M, and on the Mac you can press Shift+Command+M). To switch back to regular view, press the same shortcut key.
Switch to Mini Player (alternatively, on Windows you can press Ctrl+M, and on the Mac you can press Shift+Command+M). To switch back to regular view, press the same shortcut key.
Drag the lower-right corner to see the Status window.
![]()
iTunes DJ

If you want to listen to your music in a new order without running out of songs, you should try out the iTunes DJ feature. To start it, click iTunes DJ at the top of your Playlists section in the Left Nav Bar.

iTunes DJ will play a continuous mix of music based on your entire music library or a single playlist. To adjust the source, click the dropdown menu next to Source at the bottom of the screen.
You can see the list of songs that the DJ is about to play in the iTunes DJ main window. To change the order in which the songs will be played, you can simply drag and drop a song higher or lower in the list (see Figure 29–12).

Figure 29–12. iTunes DJ and changing the order of songs to be played
You can also add songs to the iTunes DJ list or play them next by right-clicking the song in your library and selecting Add to iTunes DJ or Play Next in iTunes DJ.

Apple Remote App
One fun thing to do is to use the Remote app on your iPad or other Apple device. To get started, open the App Store on your iPad and do a search for “Remote.” The Remote app from Apple is free, so be careful not to purchase one of the paid apps that appear. Make sure you are downloading the Remote app made by Apple.
After you get the app installed on your iPad, tap it to start it. Next, you need to connect the app to iTunes on your computer by entering a four-digit passcode:
- On your iPad, tap the Remote app to start it (see Figure 29–13).
- If you are starting the Remote app for the first time, then tap Add an iTunes Library. If you have already added Home Sharing or another library, then you will need to tap the Settings (Gear icon) in the upper-right corner of the Remote app. Next, tap Add an iTunes Library and you should see a four-digit passcode.
- On your computer, start iTunes. In the Devices section, your iPad should now be displayed with the Remote icon next to it. Click it to get started.
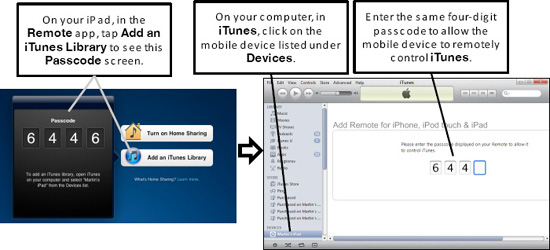
Figure 29–13. Connecting your mobile device (iPad, iPhone, or iPod touch) to iTunes using Apple's Remote app
With your iPad (or other Apple device) connected, you can now remotely control iTunes. For example, you can play, pause, skip a song, or even change playlists—virtually anything you can do related to playing music when sitting at your computer!
AirPlay: Wirelessly Stream Your iTunes Music Around Your House
Apple has had the AirTunes app for a while. This app allows you to stream your iTunes music to specially designed wireless speakers throughout your house. Recently, Apple changed the app's name to AirPlay, and it has expanded the number of manufacturers that build this new standard into their speaker, dock, and stereo systems. AirPlay even transmits information from iTunes about the currently playing song, including the song name, artist name, time played, and time remaining. AirPlay will work audio-only with Airport Express and also stream video with Apple TV.
To make sure the next speakers, dock, or stereo you purchase is compatible, look for language such as “Apple AirPlay Compatible” in the product description or packaging. Many manufacturers have products with this new standard already, including iHome, Sony, Denon, Marantz, B&W, and JBL.
TIP: You can use the Apple Remote app (described in the “Apple Remote App” section of this chapter) to control iTunes when you have music streaming through your wireless speakers—even when you are nowhere near your computer! This is a great feature to help you enjoy and control your music throughout your house with your iPad.
Using iTunes Search
If your library does not already contain hundreds or thousands of songs and other media, it will soon! How do you quickly find that special song you are in the mood for right now? The quickest way to locate an individual song or video is to use the search field in the upper-right corner of the iTunes app.
First, in the Left Nav Bar, click the type of content you wish to find. For example, click Music to find songs, Podcasts to find podcasts, Apps to find apps, and so on.
After selecting the category of media in the Left Nav Bar, click in the Search field and start typing any part of the name of a song, artist, composer, album, podcast, TV show, app, or audiobook.
You will notice that, as soon as you type the first letter, iTunes will narrow your search results (shown in the main window) by that letter. In this case, iTunes is finding all matching songs/videos that have the letter (or series of letters) that match any part of the artist, album, composer, or song/video name.
In the example shown in Figure 29–14, we clicked Podcasts and typed “Marketplace” into the Search window to find the podcasts of the NPR radio show, Marketplace (see Figure 29–14).

Figure 29–14. Searching for media in iTunes
TIP: If you want to narrow your search by a specific category such as artist, composer, song name, or title, then click the little Magnifying Glass icon in the Search field to see a dropdown list. Click any item in the dropdown list to narrow the search using that item.

Ways to Search iTunes
You can type any combination of words to match the item you are trying to find. For example, assume you know that the song you want has the word “love” in the title, and the song is by U2. You could just type in those two words, separated by a space—“Love U2”—and you will immediately be shown all matching items (see Figure 29–15). In this case, only two songs match, so you can quickly double-click the song you want to listen to. Search is also contextual. This means that if you are in your music library, the search function will search for music; if you are in your apps library, the search will look only for apps. In every search, both your own library and the App Store (if you have a live Internet connection) will be searched.

Figure 29–15. Use two or more words separated by spaces to quickly narrow the search results.
When you are done searching, click the little × in the circle next to the search words to clear out the search and see all your songs and videos again.
Creating a New Playlist
You may be used to listening to all the music on a particular album, but you will soon find the benefits of creating your own custom playlists. These are lists of particular songs that you group together. You can create a normal playlist or a smart playlist.
You can group playlists however you like, as in this example:
- Workout music
- Favorite U2 songs
- Traveling music
TIP: You can create playlists in your iTunes library or directly on your iPad. To create a playlist for your computer, click any existing playlist under the Playlists heading in the Left Nav Bar. To create a new playlist directly on your iPad, click your iPad, listed under Devices in the Left Nav Bar. Depending on what you have highlighted in the Left Nav Bar, your new playlist will be created either on the computer or on the iPad.
Creating a Normal Playlist
A normal playlist is one in which you can drag and drop songs manually onto your new playlist.
Once you have decided whether to create your playlist on your iPad or on your computer, you are ready to get started. Follow these steps to create a new normal playlist:
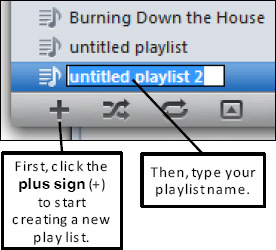
- Press Ctrl+N (or Command+N on the Mac) to select a new playlist from the File menu. Or, you can simply click the New Playlist button in the lower-left corner of iTunes, as shown to the right.
- Type the name of your playlist in the entry that appears in the Left Nav Bar.
TIP: If you want to create a new playlist with songs very similar to another playlist, then right-click the playlist and select Duplicate.
After creating and naming your playlist, you are ready to add songs to your new playlist (see Figure 29–16). To select from your entire library, click Music on the Library tab.
To select songs from an existing playlist, click that playlist.
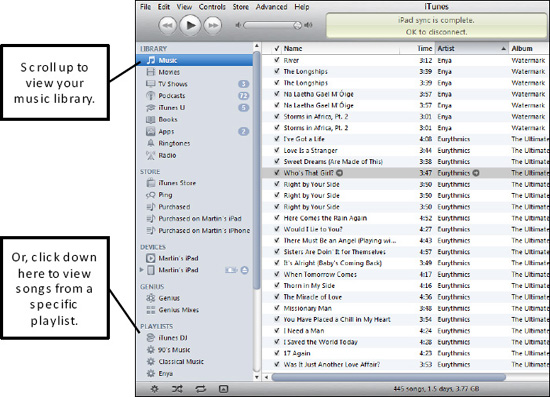
Figure 29–16. Locating songs to add to a playlist
Adding Individual Songs
You can easily add individual songs to your new playlist:
- Click any individual song to select it, and then keep holding down the mouse button as you drag the song over to your new playlist.
- To put the song into the playlist, drop it by letting go of the mouse button when the song name you are dragging is over the name of the playlist.

Adding Multiple Songs or Videos (Not in a List)
You can add multiple items in two simple steps:
- To add selected songs that are not listed sequentially, press and hold the Ctrl key (Windows) or the Command key (Mac), and then click the individual songs/videos. Once you are done selecting songs/videos, release the Ctrl/Command key.
- After all the songs/videos are selected (highlighted), click one of the selected songs, and then drag and drop the entire selected group onto your playlist.

Adding a List of Songs or Videos
You can also add a list of songs/videos using this pair of steps:

- To add a list of songs/videos to a playlist all at once, press and hold the Shift key. While pressing the Shift key, click the top item in the list and then click the bottom item. Both items clicked, as well as all the items between them, will be selected.
- After all the songs/videos are selected (highlighted), click one of the selected songs, and drag and drop the entire selected group onto your simple playlist.
Creating a New Smart Playlist
A smart playlist is one that iTunes creates for you based on your selections. For example, you can create a smart playlist for your ten most-played songs, specific artists, or a specific genre, and you can even limit the playlist to a certain size based on the number of songs or their size (in MB or GB).
To start creating a smart playlist, select File ![]() New Smart Playlist (alternatively, on Windows you can press Ctrl+Alt+N and then select New Smart Playlist from the File menu; and on the Mac you can press Command+Option+N and just input the search parameters).
New Smart Playlist (alternatively, on Windows you can press Ctrl+Alt+N and then select New Smart Playlist from the File menu; and on the Mac you can press Command+Option+N and just input the search parameters).
Figure 29–17 illustrates that you have many options for creating a smart playlist. All of the default playlists you see in iTunes are smart playlists. Default categories include 90's Music, Classical Music, Music Videos, My Top Rated, Recently Added, Recently Played, and Top 25 Most Played.

Figure 29–17. The Smart Playlist settings screen
Editing a Smart Playlist
The best way to get a feel for how the smart playlist function works is probably to check out some of the preset smart playlists. To edit a smart playlist, select Edit Smart Playlist from the File menu. In Figure 29–18, you can see the smart playlist for 90's Music; you can also see that it will pull all music and music videos from 1990 to 1999. Check out a few other default smart playlists to begin learning how the myriad options interact to create a very powerful playlist function.

Figure 29–18. The Smart Playlist settings screen for 90's Music
NOTE: The Live Updating feature of smart playlists allows them to scan whenever you play a song or add any new media (e.g., songs and videos) to your library; it then includes any new songs that it deems may fit the criteria of the smart playlist. This makes the playlists really dynamic.
The iTunes Genius Feature
The iTunes Genius feature can do all sorts of fun things to help enhance your music and video library in iTunes. You can take advantage of it by following these steps:
- Click Genius in the Left Nav Bar, and then click the Turn On Genius button. If you don't see the Genius item, then click Store and Turn On Genius from the iTunes menu.
- If you are not already logged into the iTunes Store, you will be asked to log in. If you do not yet have an Apple ID, then please jump to the “Creating an iTunes Account” section later in this chapter to learn how to create one.
- Read and agree to the Genius license agreement to continue.
- Next, you will see a window on your screen for some time (longer if your library is large) that says the Genius feature is starting.
- In order for the Genius feature to work correctly, iTunes needs to understand the types of music and videos you have in your library. It will use this information to help make suggestions on similar music or videos that you don't yet own, but might want to purchase. When this step is done, you will see a final success screen telling you Genius is now set up. Now you are ready to start using the Genius feature!
TIP: You can use the Genius feature on your iPad, but only after you have enabled it on your computer (as just described).
You can think of the Genius feature as your personal shopper, one who knows your tastes and makes good recommendations (Genius suggestions). You can also think of the Genius feature as your personal DJ, one who knows the music that goes well together and will create a great playlist for you (Genius playlists).
Creating Genius Mixes and Playlists
Follow these steps to create a Genius mix and playlist:
- Right-click a song in your library that you would like for your Genius playlist and select Start Genius.
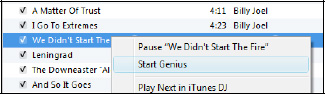
- After you click the Start Genius dropdown item, the screen will immediately change to show you the Genius mix of all songs that iTunes thinks match the type of song you selected (see Figure 29–19); these suggestions are based on computer algorithms and feedback from other iTunes users. You may be surprised at the list of music or even artists that you would not normally put together into a playlist.
TIP: Genius mixes and playlists provide a great way to keep your music library fresh, helping you to put together songs that go well together—often in combinations that you might not have thought about yourself.
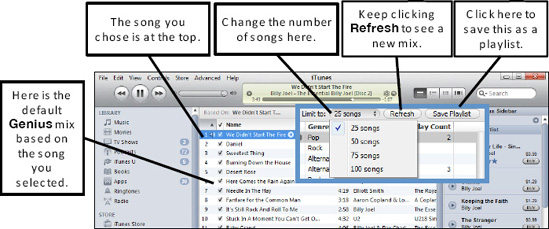
Figure 29–19. The options for the Genius Mix screen
- On the Genius Mix screen, you have options to choose between 25, 50, 75, or 100 songs. Click the Refresh button to see a new (usually slightly different) mix/playlist.
- If you like the mix and want to save it as a playlist, click the Save Playlist button in the upper-right corner. Notice that the playlist is saved under the Genius section in the left column. The default name of the playlist is the name of the song you first clicked. You can change this name by double-clicking the playlist name. You will see it turn into editable text; from here, you can type a new name.

Turning Off Genius
To turn off the Genius feature and remove all your Genius mixes and playlists, select Store from the iTunes menu, and then choose Turn Off Genius.
Updating Genius
If you have added a lot of music, videos, or other content to your iTunes library, periodically you will want to send an update to the Genius function in iTunes. To send this update, select Store from the iTunes menu, and then choose Update Genius.
How to Back Up and Restore Your iTunes Library
In order to protect the sizable investment in your iTunes music, videos, and more, you should periodically back up your library. You can use the built-in CD or DVD burner in your computer to back up your library, but this process becomes cumbersome if you have a large media library. When you have a larger iTunes library, you should backup your library to an external hard disk.
Back up with CDs or DVDs (for Smaller Libraries)
For smaller iTunes libraries, you can use CDs or DVDs to backup your media. To do this, select File ![]() Library
Library ![]() Backup to Disc from the iTunes menu. You will see a window with several options (see Figure 29–20). We recommend selecting the default and backing up everything; however, you could also choose to back up just purchases from the iTunes Store. After you insert all the disks required for the backup, you will see a backup complete message. If you have recently backed up to disk, then you can save time and space by checking the Only back up items added or changed since last backup box.
Backup to Disc from the iTunes menu. You will see a window with several options (see Figure 29–20). We recommend selecting the default and backing up everything; however, you could also choose to back up just purchases from the iTunes Store. After you insert all the disks required for the backup, you will see a backup complete message. If you have recently backed up to disk, then you can save time and space by checking the Only back up items added or changed since last backup box.
TIP: If you need to back up to DVD or CDs, we highly recommend opting for the DVD method to do the backup, since it can hold four to eight times the content of a CD.
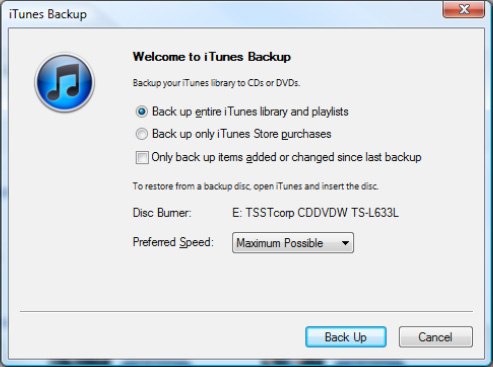
Figure 29–20. The options for iTunes backup
To Restore from CDs or DVDs
All you need to do to start restoring your library is to insert the first backup CD or DVD, and iTunes will ask you if you would like to restore from the backup disk.
TIP: You can also restore individual files by clicking the backup disk under the Devices section listed in the Left Nav Bar, and then dragging-and-dropping files from the backup to your library. However, a few items are lost from restored files, such as bookmarks of the last played content.
Back up to an External Hard Disk (for Larger Libraries)
As your iTunes library grows larger, it could take you dozens or even a hundred or more DVDs or CDs to complete the backup, so you should use an external hard disk instead. This method works best only when your iTunes library is located in a single folder.
Step 1: Make Sure All Media Is in a Single Folder
You can use iTunes to move all your media to a single folder by following these steps:

- From the iTunes menu, select Edit
 Preferences (Windows) or iTunes Preferences (Mac).
 - Click the Advanced tab and check the box next to Copy files to iTunes Media folder when adding to library in the middle of the page.
- Click OK.
- From the iTunes menu, select File Library Organize Library to see the window to the right.
- Check both checkboxes as shown and click OK.
- This will cause all your media to be copied to a single iTunes media folder.

Step 2: Drag and Drop Your Library to an External Hard Disk
This assumes you have purchased and connected an external hard disk. If you don't have one, you can find one by visiting your local computer store or doing a web search for “external hard disk” for your computer operating system type, whether it's a Windows or Mac. Follow these steps to copy your library to an external hard disk:
- Open a window on your computer and locate your iTunes library. The default media location for your iTunes library is:
- Windows XP:
Documents and SettingsusernameMy DocumentsMy Music - Windows Vista or Windows 7:
UsersusernamemusiciTunesiTunes music - Mac OX X:
/Users/username/Music/
- Windows XP:
- Open another window on your computer for your external hard disk.
- Drag and drop the iTunes library onto the external hard disk window to copy all the files. This will take quite a while if your library is very large, but at least you won't be swapping disks every few minutes!
Restoring from an External Hard Disk Backup
Restoring from an external hard disk backup is a multistep process. Begin by closing iTunes, and then follow the steps outlined in the sections that follow.
Step 1: Copy Your Library Back to Your Computer
Reverse the steps described previously to drag and drop your library from the external hard disk back onto your computer. You may want to put the library in the same location as the original iTunes library for the sake of simplicity. Refer to the previously mentioned default locations if you need to.
Step 2: Open iTunes and Select the Library
To open the newly copied library, you have to open iTunes in a special way:
- On Windows, hold down the Shift key while you open iTunes. On a Mac, hold down the Option key. Make sure to keep the key pressed until you see the small window shown to the right. If you let go too soon, then iTunes will open normally.
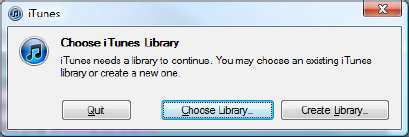
- Select Choose Library and locate the library you just copied from your external hard disk.
- Click Open (Windows) or Choose (Mac) to open the iTunes library file.
Following these steps should allow you to restore your iTunes library by opening the file you just copied from your external hard disk.
The Home Sharing Feature
If you have several people in your home who use iTunes, and they are all connected together on a home network, then the Home Sharing feature will help you share your content (music, videos, and more) across your computers and now, for the first time ever, your iPad or other mobile Apple device. Follow these steps to take advantage of the Home Sharing feature:
- Pick the account to use for the Home Sharing feature. All computers and mobile devices connected with the Home Sharing feature have to use the same iTunes account and password to log in and be connected. You will usually want to pick the account that has the most purchased content or the content you would like to share across all the computers.
NOTE: New with iOS 4.3: You can now enjoy the Home Sharing feature on your iPad or other iOS mobile device (iPhone or iPod touch).
- Set up the Home Sharing feature and authorize each of the other computers. You can get started with Home Sharing much as you can with the Genius feature. On your computer in iTunes, click Home Sharing under the Shared heading in the iTunes app's Left Nav Bar (see Figure 29–21). If you do not see Home Sharing in the Left Nav Bar, then from the menu go to Advanced Turn Off Home Sharing, and then Advanced Turn On Home Sharing. That should fix the issue.
NOTE: All versions of videos and movies purchased or rented from the iTunes Store are protected by digital rights management (DRM) using FairPlay. However, such DRM-protected content can be played on up to five authorized computers (PC or Mac). Rented DRM content, such as a rented movie, must be physically transferred to one machine or device at a time. Protected music can be authorized on up to five computers, and music can be synced to a large number of mobile devices, as long as those mobile devices sync to only a single computer.

Figure 29–21. Starting the Home Sharing feature
TIP: Check out Chapter 9: “Playing Music” to learn how to enable Home Sharing in the iPod app on your iPad.
- You can control a Home Sharing library on your iPad or other mobile device by following these steps:
- Download and install Apple's free Remote app from the iTunes Store on your iPad.
- Tap Remote to start it.
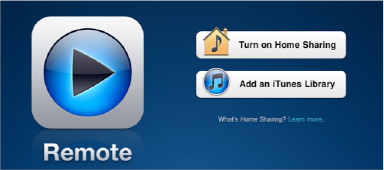
- Tap Turn on Home Sharing.
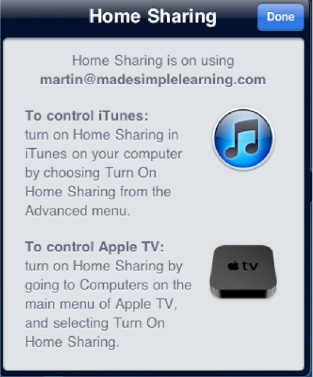
- Enter the Apple ID that was used to create the original Home Share to log in.
- Once logged in, you will see a screen similar to this one, with instructions for controlling iTunes.
- Tap Done to close the window.
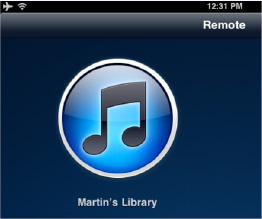
- Now you will see all libraries on the next screen. In this case, it shows just Martin's Library. Tap the library to open it and play the content right on Martin's computer running iTunes.
- Repeat Steps 2 and 3 on every computer and mobile device you want to give access to your home-shared content. Make sure that you use the same iTunes account on every computer; this could be a little confusing at first, but it's important to use the same account. On the other computers, you will probably have to authorize the computer to play content from your iTunes library. The iTunes app will notify you if you need to authorize the computer by popping up a window.
NOTE: Up to five computers and mobile devices can be authorized as home-sharing devices.
- Click Yes to continue. Once authorization is complete, you will see a screen showing how many of your five total authorizations have been used up. To learn more about authorizing or deauthorizing computers, see the “Authorizing and Deauthorizing Computers” section later in this chapter.
- Start enjoying the shared content. Once the Home Sharing feature is enabled on at least two computers, the second computer will then see the shared content underneath the Shared heading in the Left Nav Bar in iTunes. To start viewing, playing, and importing this shared content, click the shared library (see Figure 29–22).

Figure 29–22. Viewing a home-shared library and filtering to view all items or those not in your own library
Filtering a Home-Shared Library to Only Show Items Not in Your Library
Once you get up and running with a home-shared library, you will notice that there is a switch at the bottom of the screen that allows you to show only those items that are not in your library (see Figure 29–22). This is a great way to quickly assess what you might need to add (i.e., import) to your library from the shared library.
Two Types of Shared Libraries
You will see two logos in the Shared category on the Left Nav Bar of iTunes. Each type of logo shows you whether the library is a fully shared library (the House icon) or a listen-only type of library (the Stack of Papers icon). Table 29–1 describes the differences.
Table 29–1. Fully Shared vs. Listen-Only Libraries
| Types of Shared Libraries | What This Means |
 Fully Shared Library (the House icon) |
Martin's library is fully enabled for home sharing—you can view, listen, and import (add) items from this library. |
 Listen-Only Library (the Stack of Papers icon) |
LS-WTGL7AC is a listen-only and view-only library. You cannot import any songs from this library to your own library. |
Importing Shared Content into Your Library
When you are viewing a home-shared library, you can listen to anything in that library, as long as your computer has been authorized to do so. If you hit any authorization issues, please refer back to Chapter 3: “Sync Your iPad with iTunes.” In that chapter, we show you how to authorize your computers for iTunes.
You can manually drag and drop content into your library, or you can set up the Home Sharing feature to automatically import all new purchases from the home-shared iTunes account.
Importing by Manually Dragging and Dropping
The drag-and-drop method for importing works well if you want to grab a few songs or videos from the shared library. Simply click the songs or videos to highlight them, and then drag them over to your library.
You can also click the songs/videos to highlight them, and then click the Import button in the lower-right corner to do the same thing.
Automatically Importing New Purchases
Follow these steps if you want to share all new purchases from the home-shared iTunes account to the library on another device or computer automatically:
- Click the home-shared library you would like to import from in the Left Nav Bar.
- Click the Settings button in the lower-right corner of the iTunes screen.
- Now you will see a small window pop up that is similar to the one shown to the right. Check off those items to be automatically transferred from the home-shared library into your library.
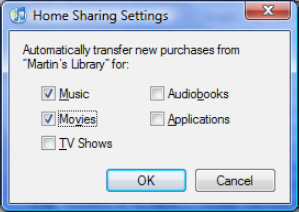
- Click OK to save your Home Sharing settings.
Toggling Home Sharing Off and On
Once you have enabled the Home Sharing feature, you may want to turn it off at some point. You do this by going to the Advanced menu of iTunes and selecting Turn Off Home Sharing. To turn it back on, repeat the steps described previously by going to the same Advanced menu and selecting Turn On Home Sharing.
Troubleshooting Home Sharing
Sometimes you may see a “Computer Not Authorized” error, even though your computer has already been authorized on the Home Sharing account. Usually this happens because the content (e.g., song or video) that you are trying to view or listen to from the home-sharing account was purchased by an account other than the home-shared iTunes account. To correct this problem, follow these steps:
- Locate the person in your home who originally purchased the song.
- Ask him to authorize your computer. (If you hit any authorization issues, then you'll find Chapter 3: “Sync Your iPad with iTunes” useful; this chapter explains how to authorize your computers for the iTunes service.)
- Once your computer is authorized, you should be able to enjoy the music or video.
Creating an iTunes Account
If you have already registered for an iTunes account using an Apple ID or AOL screen name, then you need to sign in (see the “Signing into the iTunes Store” section later in this chapter for information on how to do this).
If you want to buy or download free songs, books, apps, videos, TV shows, and more, you will need to acquire them from the iTunes Store. You can do so by following these steps:
- Click the Sign In button in the upper-right corner (see Figure 29–23). If you do not yet have an iTunes account, then click the Create New Account button and follow the instructions to create your new account. If you already have an account, enter your Apple ID or AOL screen name and password, click the Sign In button, and skip ahead to the “Signing into the iTunes Store” section. This is where you'll enter your Apple ID or AOL account details, if you have them.

Figure 29–23. The iTunes Store Sign In screen, where you can start creating a new account
- When you click the Create New Account button, you will see a new account Welcome screen; click Continue to move on.
- Read and accept the terms and conditions by clicking the checkbox at the bottom of the screen, then click Continue to move on.
- On the next screen, you set up your Apple ID (your login name for the iTunes Store), your password, and your secret question and email preferences. If you do not want email notification, be sure to uncheck the boxes at the bottom of the page. Click Continue to move on.
- On the next screen, you are asked to enter your billing information. Note that you can create a US-based account without billing information. Also, you can enter an iTunes gift card to receive credit, so you do not need to enter a credit card or PayPal account. This screen contains your preferred billing information, which will be used when you buy music, videos, and iPad apps (from the App Store app on your iPad). Click Continue to move on. Please note that the contents of this screen may vary slightly, depending on the country in which you are located.
- Depending on your locale, you may need to verify your county, province, or other local taxing authority. Click Done.
- Now you should see a screen that asserts you have correctly set up your iTunes account. Click Done to finish.
Signing into the iTunes Store
If you've successfully created an iTunes account or you already own one, then the wonders of the iTunes Store are now yours to explore! The following sections show you most of the things you can do once you're signed in. But first you need to sign in.
To do this, begin by clicking the iTunes Sign In button to go to the Sign In screen, where you'll then be asked to enter your Apple ID and password. Alternatively, you can enter your AOL screen name and password.
Getting to the iTunes Store
You can always get back to the iTunes Store by clicking the iTunes Store link under Store in the Left Nav Bar.
Buying or Getting Free Media from the iTunes Store
After signing in or creating a new account, you will be able to search the store for any artist, album, composer, or title.
To find all the songs by a particular artist, type that artist's name into the Search box in the upper-right corner. You could also search by part or all of a particular song's name. Once you press the Enter key, you will be presented with all the matching items from the iTunes Store (see Figure 29–24).
TIP: Use the Power Search feature shown in the upper-left corner of the main iTunes window to further narrow your search. Also note that you can refine your search by using the Filter by Media Type box just below Power Search. Filter the search by music, movies, TV shows, apps, audiobooks, podcasts, iTunes U, or Ping.
You can then navigate around and purchase individual songs with the Buy buttons at the bottom.

Figure 29–24. Searching for and buying songs in the iTunes Store
After you click the Buy button, you will need to log in, unless you have previously instructed iTunes to keep you logged in for your purchases.
CAUTION: If you are at a public computer or are worried that someone might access your computer and buy stuff without you knowing, then don't check the Remember password for purchasing box!
After you log in, you will see a pop-up window if you have just clicked the Buy button.
If you don't want to see this dialog box every time you buy something, check the box at the bottom pop-up window that says Don't ask me about buying songs again, and then click the Buy button.
Now the song, video, or other item you purchased will be queued up to be downloaded to your local library in the iTunes app on your computer.
Making Sure All Items Are Downloaded
After you purchase a song, video, app, or other item from the App Store—or if you have just authorized this computer on your account—you should click the Downloads link that appears under the Store category heading in the Left Nav Bar.
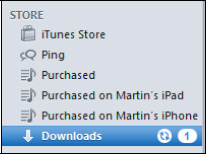
Any items currently being downloaded will show a Status bar in the main Downloads window. You will see a Done status message when the items are completely downloaded to your computer.
![]()

You will need to see a status of Done before you can put the purchased item onto your iPad. If you see a pop-up window asking whether you want iTunes to download all your purchased items, then click Yes.
Redeeming iTunes Gift Cards or App Promo Codes
At some point, you may receive an iTunes gift card or a Promo Code for free apps. Follow these steps to learn how to redeem the value of the card to your iTunes account:
NOTE: iTunes gift cards are country-specific. In other words, a US gift card will only work for a US iTunes account.
- If you are not already signed in, then sign into your iTunes account by clicking the Sign In link in the upper-right corner of iTunes.
- Click the little Dropdown Arrow to the right of your iTunes Apple ID where you saw the Sign In link, and then select Redeem from the dropdown list.

- On the Redeem screen, you will need to enter the code from the back of the gift card or Promo Code (see Figure 29–25). You may need to scratch off the silver/gray covering to see the card's code.
- Click the Redeem button.

Figure 29–25. The iTunes Redeem screen.
- To verify that the gift card is being applied to the correct iTunes account, you will need to sign in or re-enter your password.
- Click the Sign In button or the View Account button (if you're already signed in).
- When the gift card has been successfully applied to your account, you will see the total amount of the card in the upper-right corner of the iTunes screen, right next to your sign-in name. Now you can use this gift card credit to buy stuff from the iTunes Store.
Getting Your Stuff into iTunes
If you have music CDs, DVDs, E-Books, and PDF files you want to enjoy on your iPad, you will first have to import them into your iTunes library on your computer. We show you how in the upcoming sections.
Importing Music CDs
If you are of legal drinking age, then it's likely that you have a few music CDs in your home library. If you are over 40, that likelihood goes up to 100 percent. So, how do you get all your best CDs loaded onto your iPad? Accomplishing this is a two-step process:
- First, you must load the CDs into iTunes.
- Second, you must sync or manually transfer those CD songs to your iPhone. (We show you how to sync or manually transfer content with iTunes in Chapter 3: “Sync Your iPhone with iTunes.”)
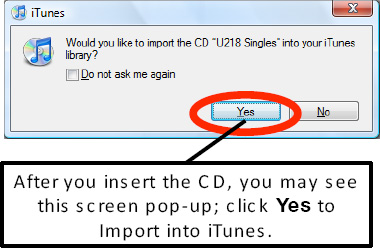
In order to import your music from a CD, insert the CD into your computer's CD drive. You may see a pop-up window inside iTunes that asks whether you would like to import the CD as shown. Click Yes to import the CD.
If you did not receive this pop-up window, then you can manually start the CD import into iTunes by clicking the Import CD button in the lower-right corner. Also notice that the CD appears under the Devices list in the left column (see Figure 29–26).
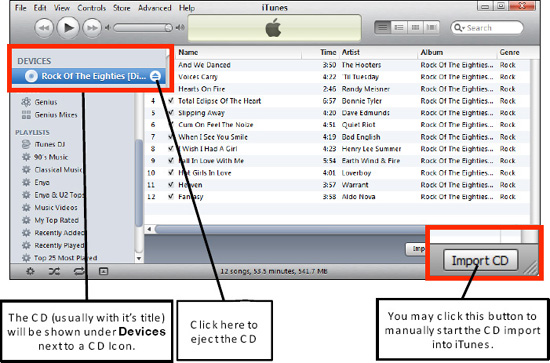
Figure 29–26. Working with a music CD inside iTunes
Importing Movies from DVDs
Some of the more recent DVDs and Blu-rays that you can purchase may have two versions of the movie: one for your DVD or Blu-ray player and an extra digital copy that can be loaded automatically into iTunes.
Usually, there will be text on the DVD box that states that there is an extra digital copy for your computer. You can check whether this copy exists by inserting the DVD into your computer's DVD drive and opening iTunes. If the digital copy exists, then iTunes will automatically detect it and ask whether you would like to import the movie.
CAUTION: Most DVDs or Blu-rays do not provide this extra digital version, which is meant to be loaded and watched on your computer and mobile devices. Standard DVDs or Blu-rays are copy-protected and cannot normally be loaded into iTunes. However, if you do a web search for “load DVD into iTunes,” you may find some software products (such as Handbrake; see http://handbrake.fr) that allow you to rip or burn your DVDs into iTunes. We strongly urge you to obey copyright laws; if you use software like this, you should only use the DVD on your own computer or iPad and never share the movie or otherwise violate the copyright agreement.
Importing E-Book (PDF and iBook Format) Files
If you want to read a PDF file or E-Book (in the industry standard ePub format set by the International Digital Publishing Forum) on your iPad, you will first need to get the file into iTunes to sync it to your iPad. There are a couple of ways to get E-Books into iTunes. You can use the drag-and-drop method or the menu commands to add files or folders to the library.
The Drag-and-Drop Method
This is a great way to add a single file or just a few files. Follow these steps to do so:
- Locate the file on your computer.
- Click and drag that file onto your iTunes library. Let go of the mouse to drop this file into your library. A box will be drawn around your library, as shown in the image to the right. When you see the box, you can let go of the mouse button.
- Since the file is readable by the iBooks app, you should then see the file appear in the Books section of your library.

Using Menu Commands
Using menus works well if you have an entire folder or multiple folders of files you want to move into iTunes.
TIP: This method works for E-Books and also other content such as music.
- From the iTunes menu, choose File and then select Add Folder to Library to add an entire folder of content or Add File to Library if you have only one file to add.
- Now navigate to the folder or file you wish to add and click Select Folder (or Open for a single file).
- All iBooks-readable files will be added to iTunes.

Getting Album Artwork
iTunes can automatically get the album art for most songs and videos; however, if you need to manually retrieve this artwork, follow these steps:
- Start iTunes.
- Go to the Advanced menu.
- Select Get Album Artwork.

NOTE: You will need to have an iTunes account already and be logged in for this to work correctly.
Authorizing and Deauthorizing Computers
As mentioned previously, you can authorize up to five different computers to play your iTunes media (e.g., music and movies).
CAUTION: Once you hit five authorized computers, you can deauthorize them all, but only once a year.
Here's a question that you may hear quite often: Someone else has authorized my computer to play her songs; can I now load and listen to these “authorized songs” on my iPad?
The short answer is maybe. The answer is no for all songs purchased on iTunes prior to January 2009. It is also no for all songs purchased with DRM protection. These songs are tied specifically to one person's mobile device (i.e., iPad, iPhone, or iPad).
The answer is yes for all songs purchased without DRM protection enabled. Early in 2009, iTunes announced that it would start selling some songs and videos without DRM protection, which means they can be played on multiple iPhones and iPads. Follow these steps to authorize or deauthorize your computer for being able to play songs on your computer and possibly your iPad from someone else's iTunes library:
- Start up iTunes.
- To authorize a computer, go to the Store menu and select Authorize This Computer… To deauthorize a computer, go to the Store menu and select Deauthorize This Computer…
NOTE: You will need to know your iTunes or AOL username and password for this to work.

- Enter your Apple ID, or if you prefer, click the radio button next to AOL, and enter your AOL screen name and password.
- Next, click the Authorize or Deauthorize button.
iTunes Troubleshooting
In this section, we will provide a few tips and tricks to help you deal with some common issues you might encounter when using iTunes. We also have an entire chapter devoted to troubleshooting (see Chapter 28: “Troubleshooting”) if you cannot find answers to the problems you encounter in this section.
What to Do If the iTunes Automatic Update Fails
The automatic update may fail if you have the About iTunes.rtf text file open, or you have another related file open that cannot be closed by the installer automatically. If you locate and close the problem file, you should be able to retry the automatic update.
If you see a message similar to the one shown to the right, then you will have to manually install the update. Follow these steps to do so:

- From the Apple Software Update screen, select the Tools menu and then Download Only.
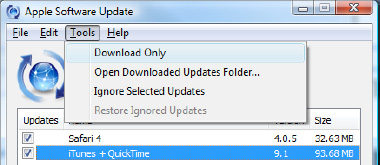
- You will see the Download status screen (shown in the image to the right of step 1). Once the download is finished, a new window should pop up, showing the downloaded files ready for you to install manually (see Figure 29–27).

Figure 29–27. The Apple Software Update manual installation folder (Windows PC)
- To manually start the install, double-click the iTunes installer file (see Figure 29–27). The file may be slightly different from the one shown in the figure (e.g.,
iTunes.msioriTunes64.msi), depending on the operating system on your computer. - From here, you need to follow the iTunes installation screens.
Fixing the Apple ID Security Error
If you try to log in with your Apple ID, you might receive an error message at the top of the screen that looks similar to this one:
![]()
If this happens, then you will have to log in to the Apple Store web site, enter a security question/answer, and then add the month and day of your birth.
To correct this error, follow these steps:
- Open a web browser on your computer and go to
www.apple.com. - Click the Store link in the left portion of the Top Nav Bar, and then hover your mouse over the Account link in the upper-right corner to see a dropdown list. Select Account Information from this list (see Figure 29–28).

Figure 29–28. Getting to your account information to correct your security information
- If you clicked Account, then you will need to select the Change account information link from the next screen.
- Log in with your Apple ID and password (the one that caused the error).
- Most likely, your security question and answer or your birth month and date are blank. You need to add this information, type your password twice, scroll to the bottom of the screen, and then click the Continue button.
You should now be able to use your Apple ID and password to register your iPad.
CAUTION: Apple will never send you an email asking you for your password or asking you to log in and enter your password. If you receive such an email, it is probably a scam. Don't click any links in such an email. If you are concerned about your iTunes account, log in through the iTunes app to manage it.
Getting Your Music Back If Your Computer Crashes
The good news is that you'll probably have a lot, or perhaps all, of your music on your iPad. We can't help you get your computer back up and running in this book if the initial reboot isn't successful. However, we can tell you about how you can get your music back from your iPad to your iTunes app once your computer is running again.
So, if your only copy of your music, videos, and other content resides on your iPad, iPod, iPhone, or iPod touch, then you need to use a third-party tool to copy your music from that mobile device back into the iTunes app on your computer, once you get your computer up and running again.
Do a web search for “copy iPad or iPod to iTunes” and you will find a number of both free and paid software tools to accomplish this task. We recommend using a free trial of any software before purchasing it to make sure it will meet your needs.
This solution will also help if you encounter the problem where all your iPad music is grayed out when you view it from iTunes. In that case, you will need to copy all your iPad music to iTunes, and then start fresh with the sync or manual transfer steps described in Chapter 3: “Sync Your iPad with iTunes.”
CAUTION: Please do not use this third-party software to create unauthorized copies of music, videos, or other content that you have not legitimately purchased.