
Chapter 4
Other Sync Methods
In Chapter 3: “Sync Your iPad with iTunes,” you learned how to connect your iPad to your computer and use iTunes to sync your personal information, music, videos, and more. In this chapter, we explore some alternative ways to wirelessly synchronize information to your iPad. The benefit of the wireless methods is that you don't need to connect your iPad to your computer to have the information updated. Everything happens over the air—automatically. The two methods we cover are Apple's MobileMe Service and Exchange/Google Sync.
NOTE: If you use the Gmail account setting instead of Exchange (as we describe in this chapter) to set up your Gmail, you will be able to wirelessly sync your email, calendar, and notes, but not your Google contacts. So if you don't need Google Contacts synced, you can use the Gmail setting instead of Exchange.
Wireless Sync of Your Google, Hotmail or Exchange Information
Using the steps we describe here, your iPad can wirelessly sync your email, contacts, and calendar from a Microsoft Exchange account or a Google Account.
TIP: You can now wirelessly sync multiple Exchange accounts on your iPad. If you have several Google, Hotmail, or Microsoft Exchange accounts, you can wirelessly sync all accounts at the same time to your iPad.
Why Do We Say Google/Exchange?
We use the words Google and Exchange interchangeably here because you set up your Google sync using the Exchange setting on your iPad. Google has licensed Microsoft Exchange ActiveSync so you can now set up your Google account just like an Exchange account and enjoy the same push email, contacts, and calendar functionality. We know it is a little confusing, but you set up both your Google and Exchange accounts in the identical manner, using the Exchange settings on your iPad—so we say Google/Exchange.
Between the time of writing the original iPad book and this iPad 2 book, Hotmail has also added ActiveSync capabilities, so we have included information in this chapter about setting up Hotmail as well.
If You Want a Google Account, Create One
If you don't have a Microsoft Exchange account, but you still want a wireless sync, then you should set up a free Google account to store your contacts and calendar. The account will allow you to start using Google Mail (Gmail), Contacts, and Calendar.
To set up your Google account, follow these steps:
- From your computer web browser (you can't create a Gmail account your iPad) type in:
www.gmail.com. - Click the Create an account button.
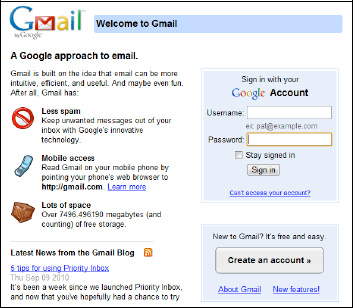
- On the next screen, enter the information requested and click the button at the bottom of the page that says I accept. Create my account.
- If successful, you'll see a screen that says Congratulations! Click the Show me my account button to get started.
- To see your Calendar, click the Calendar link in the upper left corner (see Figure 4–1).
- To see your Contacts, click the Contacts link in the left side of the Gmail Inbox page.

Figure 4–1. Navigating around to see your Gmail Inbox, Contacts, and Calendar
As soon as you set up the sync as shown in this chapter, you will begin to see all changes to your contacts and calendar from Google magically appear on your iPad. The same goes for any changes or additions from your iPad—they will automatically appear in Google in moments.
TIP: It is extremely easy for your Google Contacts list grow into the thousands because it automatically includes everyone you have ever emailed from your Gmail account. You may want to clean up your list before you set up the sync to your iPad.
Set Up Your Google, Hotmail, or Exchange Account on Your iPad
The following steps show you how to set up the wireless sync for either your Exchange account or your Google contacts and calendar:
- Touch the Settings icon on your iPad.
- Touch Mail, Contacts, and Calendars.
- In the right column, you'll see a list of your email accounts and, below that, the Add Account option.

If you have no accounts set up, you will see only Add Account. In either case, tap Add Account.
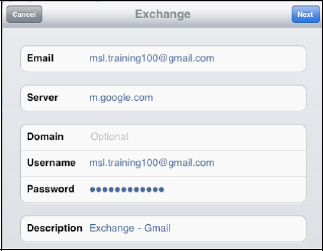
- On the next screen, choose Microsoft Exchange.
NOTE: You should choose Microsoft Exchange if you want to have the wireless sync with your Google Contacts and Calendar. If you select Gmail, you will not be able to wirelessly sync your Google Contacts and Notes, but not your Calendar.

- Type your email address.
TIP: To type the .com (or .net, .edu, .org, etc.) in the email address, press and hold the period key until you see the .com key appear above it. Slide over and press .com.


- Many times, your email address is also your username. If so, it's easier to copy and paste than re-type. To copy your e-mail address into the Username field, follow these steps:
- For Gmail, leave the Domain blank.
For Exchange email, you may need to enter the Domain name supplied by your administrator.
Type your Password.
If you want, you can adjust the Description of the account, which defaults to your email address.

- Tap the Next button in the upper right corner.
- You may see an Unable to Verify Certificate screen as shown. If you do see it, click Accept to continue.

- For Gmail, type m.google.com in the Server field.
For Hotmail, type m.hotmail.com In the Server field.
For Exchange email, enter your server address. (Example: mobile.servername.com)
- Click Next in the upper right corner.
- On this screen you have the option to turn the Mail, Contacts, and Calendars wireless sync On or Off. For each sync you'd like to turn on, tap the switch to change it to On.


NOTE: If you already have contacts or calendar items on your iPad, you may see warning pop-up messages after you tap Yes next to Contacts and Calendar.
Your choices are to Keep on My iPad or Delete. If you choose Cancel it stops setting up your Exchange account.
Select Keep on My iPad to keep all existing contacts and calendar events on your iPad. These items will not end up on your Google or Exchange account—they will stay on your iPad.
You may end up with some duplicate contacts or calendar events on your iPad if the same ones already exist on your Google or Exchange account.
Select Delete if you already have these contacts or calendar items in your Exchange or Google account and do not want to duplicate them.
- Tap Save to save your settings.

- You're done with the initial setup of your account. You should see your new account listed under the Accounts heading on the Mail, Contacts, Calendars screen.


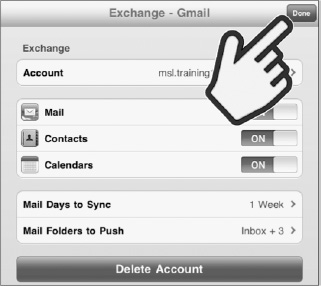
Edit or Delete Your Google, Hotmail, or Exchange Account
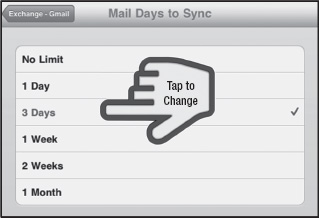
After you set up your Google, Hotmail, or Exchange account on your iPad, you may want to adjust some of the default settings, such as which mail folders are synced (only the inbox by default), number of days of mail to sync (default is three days), and other settings. You would also use the steps shown here to remove or delete the account.
- Get into your Mail settings screen as you did when you first set up your account (tap the Settings icon, tap Mail, Contacts, Calendars).
- Tap the mail account you wish to adjust or remove.
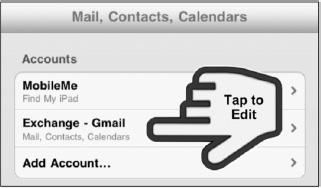
- In order to change your account username, account name, or password, tap Account at the top. You will see the information you saw when you first set up this account.
- If you want to remove this account from your iPad, tap Delete Account at the bottom and confirm your selection.

- To enable or disable wireless syncing for Mail, Contacts, and Calendar items, tap the switches to set them On or Off.
NOTE: If you set any switch to Off for these items, they will all be deleted from your iPad. For example, all synced contacts would immediately be deleted from your Contacts app.
- To adjust how much mail is synced to your iPad, tap Mail Days to Sync and adjust to suit your needs (you can go from 1 Day to No Limit, with 3 Days as the default).
Tap the button with your Email Account Name in the upper left corner to save your choices and return to the previous screen.
- Tap Mail Folders to Push to specify which mail folders should sync to your iPad.
The default is just the Inbox, but you can tap to select any number of folders. (Each selected folder is shown with a check mark.)
TIP: You can only move mail between these folders on your iPad if you have selected them here to sync.

- Tap the Email Account Name in the upper left corner to save your choices and return to the previous screen.
- Then tap the Done button in the upper right corner to finish with this account and return to your Settings.
- Press the Home button to return to the Home screen.
Working with Wirelessly Synced Data on Your iPad
Once you set up the wireless sync, your Contacts and Calendar information will flow quickly into your iPad. If you have thousands of contacts, it could take several minutes for the first sync to complete.
You may want to jump ahead and review Chapter 14: “Working with Contacts” and Chapter 15: “Your Calendar” for details about working with both apps.
NOTE: Since the sync with Google or Exchange is wireless, you'll need to make sure you have an active network connection from your iPad. Check out Chapter 5: “Wi-Fi and 3G Connectivity” to learn more.
New Group for Google/Exchange Contacts
For each Google/Exchange account you add to your iPad, you will end up with a separate group in your Contacts app. If you've added some contacts to your iPad or synced it at least once with iTunes, you may end up with additional groups of contacts (see Figure 4–2).

Figure 4–2. You may see various groups in your Contacts.
The default view in your Contacts list is to see all contacts from all synced accounts. You can selectively view contacts from various accounts. To view your Google or Exchange contacts, follow these steps:
- Tap the Contacts icon.
- Tap the Groups tab in the upper left corner.
- If you've added new contacts or synced your address book, you'll see a From My PC or From My Mac group at the top. Under that you will see your Google or Exchange email address or the descriptive name assigned to that account when you set it up. Exchange - Gmail and Exchange are the two Google/Exchange accounts synced in our example (see Figure 4–2).
- Tap the Contacts listed under your Google or Exchange email address/account name to see all your synced contacts.
Working with Contacts
To add, edit, or delete contacts in your Google or Exchange contacts group, do the following:
- Follow the steps to view your Google or Exchange contacts group.
- To add a contact: Tap the + button in the upper right corner of the Contacts list view. Add contact details (covered in Chapter 14: “Working with Contacts.”) Touch Done in the upper right corner.
- To edit a contact: Locate the contact in the list and tap the Edit button at the bottom under the contact details. Make any changes and press the Done button.
- To delete a contact: Locate the contact you want to remove. Tap the Edit button under the contact details. Scroll to the bottom of the details and tap the Delete Contact button.
- To search for a contact on your iPad:
- If you don't see the Search window at the top, drag your finger all the way up the right-side alphabet to the top.
- Tap in the Search window and type a few letters of someone's first name, last name, or company name to find them.
- Your Contacts list will immediately be filtered by what you type. If you see the name you want, tap it. Otherwise, tap the Search button in the lower right corner.
- To perform a global address list search:
- Tap the Groups tab in the upper left corner (see Figure 4–2).
- Tap the second button under the Google/Exchange contacts group, the Global Address List search button. If your email address is long, then you will see only your email address on this button; however, if you have a short email address or have provided a short descriptive name, then you will see something like Exchange - Global Address List (see Figure 4–2).
- Tap in the Search window and type a few letters of someone's first name, last name, or company name to find them.
- Press the Search button to start searching.
The great thing is that any changes you make to your Google or Exchange contacts on your iPad are wirelessly communicated and appear in your Google or Exchange account in just a few seconds.
NOTE: To add, edit, or delete contacts in your other group (not the Google or Exchange group), first go to that group (From My PC or From My Mac), then make the changes you want. These additions, edits, or deletions will not affect your Google or Exchange contacts—they are kept separate.
Working with the Calendar
After you set up the sync with the Google or Exchange calendar on your iPad, all the calendar events will appear on your iPad—no wires or sync cable required. You will also be able to invite people to meetings and respond to meeting invitations.
Any event you change or update on your iPad will be wirelessly synced with Google or Exchange.
Each Calendar Has a Different Color
You will also notice that every new Google or Exchange account you add to your iPad will create a separate calendar with a new color. To see the color used for each calendar, tap the Calendars button in the upper left corner. On this screen you can see the color for each calendar. You can selectively show calendars by tapping on the email address. To hide a calendar, tap the email address to remove the checkmark. To show a calendar, tap the email address to add the checkmark. |
 |
Invite People to Meetings from Your iPad
Now you can invite people to your calendar events. Here are the steps to follow:
- Tap your Calendar icon to start your calendar.
- Touch the + button in the lower right corner to schedule a new event.
- On the Add Event screen, enter the meeting title and location and adjust the starting and ending time as required.
- Tap the Invitees tab to invite people (see Figure 4–3.)
- In order to invite someone, you have a few options.
- Type his or her email address (all invitations are sent via email).
- Type a few letters of his or her first and last name separated by a space to instantly locate the person if he or she is in your contact list.
- Or, tap the blue plus sign to find someone by browsing your contact list.
- Touch the name and email address you want to use. If someone has more than one email address, you'll need to select one.
- Add more invitees if you desire, then tap Done to exit the Add Invitees window.
- Adjust any other items in the Add Event screen and tap Done to save.
- The meeting invitation(s) will be sent via email immediately to everyone you invited.

Figure 4–3. How to invite people to meetings.
Seeing the Status of Invitees on Your Calendar
You can see who has accepted, rejected, or not replied your invitations by viewing the status of the invitations in the left column of your Calendar. You will see the status of each person's reply shown next to their status. The various status indicators you will see are:
|
 |
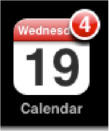
Responding to Exchange Meeting Invitations from Your iPad
When you are connected to an Exchange email server and the person who invited you to a meeting is also on the same Exchange server, you will be able to use the Invitations inbox inside your Calendar app. You will receive notifications on your Calendar icon, shown here. In this image, there are four new meeting invitations. |
 |
Follow these steps to work with Exchange meeting invitations in your Calendar invitations inbox. You will also receive an alert pop-up on the iPad screen similar to the one shown in Figure 4–4. If you are ready to respond immediately to the meeting, tap View from the pop-up alert.
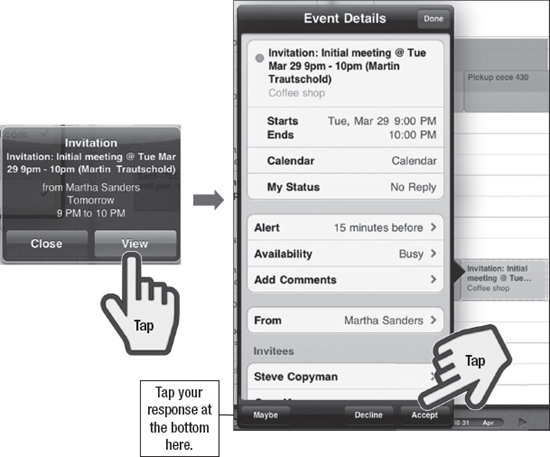
Figure 4–4. Reply to meeting invitations from the pop-up alert window
If you want to reply later, simply tap Close from the alert. Then you can use the Invitations inbox in your Calendar to reply.
- Start your Calendar app.
- Tap the Invitations inbox button in the upper left corner of the Calendar screen (see Figure 4–5).
- If you only have one invitation, it will open. If you have multiple invitations, you will see all your invitations listed. Tap the invitation to which you wish to respond.
- To respond to the invitation, tap one of the three buttons at the bottom of the Event screen: Accept, Maybe, or Decline.
- If you select Accept or Maybe, the calendar event is added to your iPad calendar and the response is sent immediately via email to the meeting organizer. You're done.

Figure 4–5. Replying to Exchange meeting invitations using the calendar Invitations inbox
Responding to Google or Hotmail Meeting Invitations from Your iPad
If you are using Google or Hotmail Calendar with Exchange sync, you will be able to reply to meeting invitations in the Mail app on your iPad.
- Tap your Mail icon to start the program.
- Navigate to the Inbox, which has the meeting invitation.
- Locate the invitation.
Most invitations look something like the image shown here. Usually they start with the word Invitation.

- Tap the Meeting Invitation to open it.
- Tap Yes, Maybe, or No next to Going? to reply to the invitation.
- As soon as you tap one of the choices, your reply will be sent. You may be shown a Google or Hotmail Calendar web page to type optional details in your invitation reply.

Wireless Sync Using the MobileMe Service
Another option if you do not use Google or Exchange and still want to wirelessly sync your information is to use the MobileMe service from Apple. The MobileMe service provides a great service to wirelessly sync your personal information between your computer (PC or Mac) and your iPad and other mobile devices, such as an iPad.
The MobileMe Cloud: The MobileMe service uses what is sometimes called a cloud to sync all your information. The MobileMe Cloud is a term used to describe the web servers where all your MobileMe information is stored on the Internet. The servers and the associated software you install on your computer (PC or Mac) and your mobile devices (iPhone, iPad, etc.) help keep all your mobile devices in sync with your computer. The idea is that changed information (a new calendar event, a new contact name) gets sent from your iPad to the cloud. Then the cloud disperses the changed information to all the devices in your MobileMe account, such as your computer, iPhone, or iPad.
Once you set up MobileMe from your computer and then set up access from your iPad, all your personal information (contacts, calendar, even bookmarks) will be shared wirelessly between your computer and your iPad.
In addition to the wireless sync of personal information, MobileMe lets you do the following:
- Create a web-based photo gallery that you can access and add to from your iPad.
- Create an iDisk that allows you to share documents easily between your iPad and your computer. You can also use it to share files that are too large to email (some email systems block files larger than about 5MB).
- Find your lost iPad using the Find My iPad feature (described in Chapter 1: "Getting Started").
- Erase all of the personal data on your lost iPad remotely using the Remote Wipe feature.
- If you have multiple Macs in your home or business, MobileMe also allows you to sync docks, settings, passwords, and other information between your Macs, and use Back to my Mac remote desktop to retrieve files or share screens.
NOTE: As of publishing time, after your 60-day free trial, Apple charges $99/year for individual MobileMe service and $149/year for a family plan.
However, also at publishing time, there was a rumor floating around the web that Apple may make MobileMe a free service. Check with the MobileMe web site (www.mobileme.com) to find out the latest information.
Sign Up for the MobileMe Service (PC or Mac)
Apple makes it easy for you to learn about MobileMe from iTunes after you register your iPad or the first time you connect your iPad to your computer. You will most likely see an ad for MobileMe with a Try It Free button.
If you use iTunes to sync your iPad, you will also see a Learn More button at the top of the Info tab (see Figure 4–6).
- Connect your iPad to your computer.
- Click on your iPad in the left nav bar of iTunes.
- Click the Info tab at the top.
- Click the Learn More button in the MobileMe section.

Figure 4–6. Get started with MobileMe from the iTunes Info tab
You can also sign up for MobileMe directly from their web site.
- Type your personal information to set up your account and click the Continue button. Then enter your billing information and click the Sign Up button at the bottom.
- If everything was entered correctly, you'll see a Signup Complete screen similar to the one shown here.
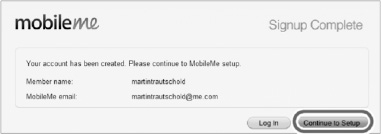
You have now created your MobileMe account. Now you'll set up MobileMe on your Mac or PC and your iPad.
If you are a Windows PC user, skip to the “Set Up MobileMe on Your PC” section.
Set Up MobileMe on Your Mac
After you have created your MobileMe account, you are ready to set up the software on your Mac. The MobileMe software that runs on your Mac is included in the latest version of the Leopard (v10.5.8 or higher) or Snow Leopard (v10.6.3 or higher) operating systems.
If you don't have the latest version of the Mac system software, you'll have to install it and configure the MobileMe software to sync to the MobileMe cloud to get started.
- Click on the Apple menu and select Software Update as shown.
TIP: You'll find extensive step-by-step instructions showing you how to install or upgrade software on your Mac in Chapter 30: “Your iTunes User Guide.”

- Follow the steps to complete the software update.
- After you have successfully installed the software update, click on the Apple menu and select System Preferences.

- Click on the MobileMe icon in the Internet & Wireless section of System Preferences.

- Enter your MobileMe Member Name and Password.
- Click Sign In.

- Click the Sync tab at the top to see the screen shown here.
- Check the box next to Synchronize with MobileMe.
- Next to this check box is a drop-down for configuring the sync frequency. The default is Automatically, but you can sync every Hour, Day, Week, or Manually.

- To sync bookmarks, check the box next to Bookmarks and select your web browser.
- To sync contacts, check the box next to Contacts.
- To sync calendars, check the box next to Calendars.
- You can also sync various other items by checking them. After you have set up syncing, you can configure your iDisk by clicking the iDisk tab and completing the screen (see Figure 4–7).
- When you are done, close the MobileMe control panel.

Figure 4–7. MobileMe control panel showing the iDisk tab
As soon as you close the MobileMe control panel, MobileMe will start sending your selected items—Contacts, Calendars, and Bookmarks— to the MobileMe web site.
Now you can skip to the “Multiple Ways to Access MobileMe” section while we discuss how Windows users configure MobileMe.
Set Up MobileMe on Your Windows PC
After creating your MobileMe account, you need get the software set up on your PC. You will install the latest version of iTunes and the MobileMe software on your PC and then configure it to sync to the MobileMe cloud to get started.
- In your web browser, go to
www.apple.com/mobileme/setup/pc.html. - If you don't have iTunes version 10 or later, click the iTunes link to download it.
TIP: We provide step-by-step instructions for installing or upgrading iTunes in Chapter 30: “Your iTunes User Guide.”
Click the link to download the MobileMe Control Panel for Windows.
- Click the Download button on this screen to download the installation file.
- Follow the steps on the screen to install the software on your computer.

- Once the software is installed, start it up by one of these two methods:
- Clicking on the MobileMe icon on your Windows desktop
- Starting it from your Start button or searching for via the Windows icon in the lower left corner. Type MobileMe and the icon should appear at the top of the Start menu under Programs. Click it.
- Click the Sync tab at the top.
- Check the box next to Sync with MobileMe.
- Next to this check box is a drop-down for the sync frequency. The default is Automatically, but you can choose to sync every Hour, Day, Week, or Manually.
- To sync contacts, check the box next to Contacts and select where your contacts are stored (such as Outlook, Google Contacts, Yahoo!, or Windows Contacts). For Google and Yahoo!, you will need to enter your username and password by clicking the Options button that appears (see Figure 4–8).

Figure 4–8. MobileMe for Windows preferences control panel showing the Sync tab
- To sync calendars, check the box next to Calendars and select where your Calendars are stored (e.g., Outlook or elsewhere).
- To sync bookmarks, check the box next to Bookmarks and select your computer's web browser (only Safari and Internet Explorer were supported for syncing bookmarks at publishing time).
- Click OK when done.
As soon as you click OK, MobileMe will start sending your selected items—Contacts, Calendars, and Bookmarks—to the MobileMe web site.
Multiple Ways to Access MobileMe
After the first sync, you will have at least the following three ways to access your synced information:
- The computer where you originally stored your contacts and calendar
- The MobileMe web site
- Your iPad (or other mobile device)
Since you already know how to get to the information on your computer, we will focus on how to access information from the MobileMe web site and your iPad.
A Quick Tour of the MobileMe Web Site
You can do many useful and amazing things from the MobileMe web site. You can locate your iPad, send messages to it, make it beep loudly, and remotely lock or erase it. Here's a quick tour.
- Go to the MobileMe from a web browser on your computer by typing
www.me.com. - Type your username and password and click Log In.

- To view your mail, click the Cloud icon
 in the upper left corner, then click the Mail icon.

- This will show your MobileMe inbox for all email going to your Mobile Me email address:
(membername)@me.com.
- To view your contacts, click the Cloud icon then click the Contacts icon.

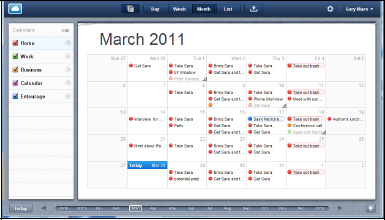
- To view your calendar, click the Cloud icon then the Calendar icon. Note that there are various buttons at the top for the calendar views: Day, Week, Month and List.
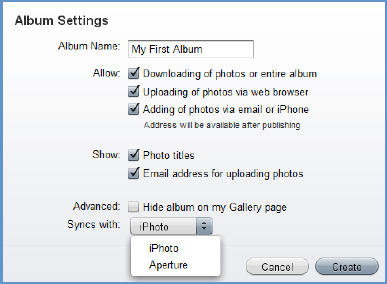
- To view your photo albums, click the Cloud icon then the Gallery icon.
- To create a new album, click the + in the lower left corner.

- Enter your Album Name, and check the Allow and Show settings you want. Also, for Mac users, decide whether you want to sync with iPhoto or Aperture.
- Click the Create button to create your new album.
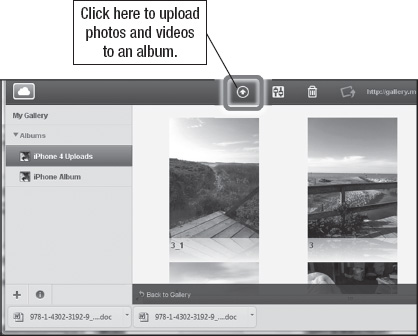
- Click the Upload Arrow to select photos or videos to upload to your MobileMe album.
- Navigate to the folder on your computer where your pictures are stored, click the picture or video to select it, and then click the Open button.
NOTE: The following image file formats are supported: .png, .gif, .jpg, .jpeg. The following video types are supported: .mov, .m4v, .mp4, .3gp, .3g2, .mpg, .mpeg, .avi.

- Click the Cloud icon then the iDisk icon to view the files located on the MobileMe iDisk.
TIP: You can easily store and retrieve files on this iDisk from your computer and your iPad. You can even share files that are too large to email or that you'd like to print from your iPad using the Public folder.

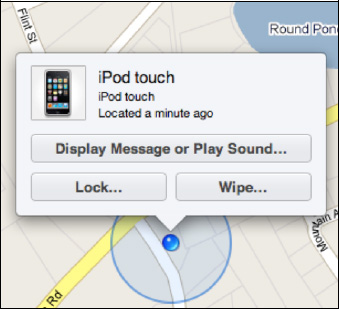
- Click the Cloud icon then the Find My iPad icon to locate your iPad. You will need to re-enter your password for security purposes. This feature assumes you have already logged into MobileMe from the Settings app on your iPad.
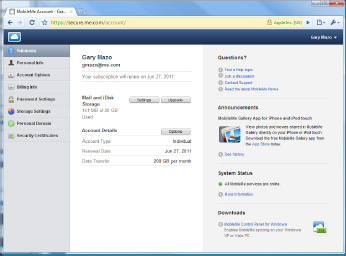
- Click your name in the upper right corner, then select Account from the drop-down list. In your account page, you can adjust the options, see your account type and trial expiration date (if you are on a free trial), get help, or check whether the MobileMe service is running.

Setting Up Your iPad to Access Your MobileMe Account
Now that you've set up your MobileMe account, you are ready to sign into it from your iPad. We show you how to do this in the “Find My iPad” section of Chapter 1: “Getting Started.”
- Tap your Settings icon.
- Tap Mail, Contacts, Calendars.
- Tap Add Account.
- Tap MobileMe for the account type.
- Enter your Name and your MobileMe Email Address and Password, then tap Next.
- Now you'll see the MobileMe configuration screen showing your sync options.
- To turn any synced item On or Off, tap the switch.
- To turn on Find My iPad, which will show your iPad on a map on the MobileMe web site, move the switch to On.
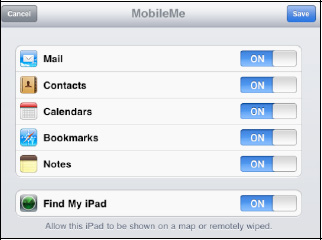
- When you are done, tap Save. You should be brought back to the Settings screen and see your MobileMe account listed with the selected items turned on for syncing.
Using MobileMe After Setup
Using MobileMe is fairly seamless once you get it set up. You update your contacts and calendar on your iPad and the changes just appear on your computer. And, if you've set up other mobile devices such as an iPad on the same account, the changes appear there as well. Everything is kept in sync wirelessly and automatically.
MobileMe has a few very cool features that we will highlight next.
Find My iPad, Send Messages, and Remote Wipe
From any web browser, you can locate your iPad using the Find My iPad feature in MobileMe. You can send a message and play a loud sound to alert someone on your iPad, even if it is locked. You can remotely lock your iPad using a four–digit code and remotely erase all information on your iPad.
Please refer to the “Find My iPad” section of Chapter 1: “Getting Started.”
Additional Settings for Google/Exchange or MobileMe
Once you set up the Google/Exchange or MobileMe sync, you may notice a few new options on your Settings screen in addition to the ones shown in Chapter 14: “Working with Contacts” and Chapter 15: “Your Calendar.”
- Tap the Settings icon.
- Tap Mail, Contacts, Calendars in the left column.
- Scroll down the right column to the bottom to see the image shown here.
- The new option in the Contacts section is the Default Account. You can set this to be either your Exchange/Google account or your computer's account.
- Notice that you can turn your New Invitation Alerts On or Off.
- The new option in the Calendars section is Sync, which allows you to set how much of your calendar to sync (2 weeks, 1 month, 3 months, 6 months, or All events).
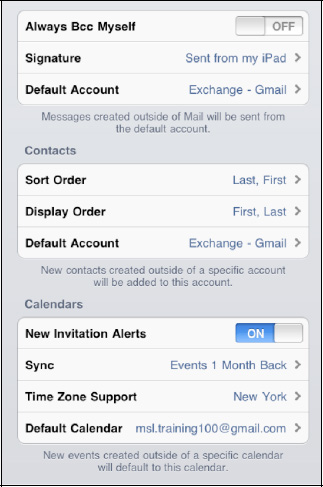
- You can also select which is your Default Calendar for new events you add to your iPad. You can change this calendar when you create a new event.