
Chapter 12
iBooks and E-Books
Ever since the iPad was announced, one of its most touted features has been its ability as an E-Book reader. In this chapter, we will show you that what has emerged is an unparalleled book-reading experience. We will cover the iBooks app, how to buy and download books for it, and how to find some great free classic books. We will also show you some other E-Book reading options on your iPad, including the third-party Kindle and Kobo readers.
The iPad uses Apple's proprietary E-Book reader, iBooks. In this chapter, we will show you how to download the iBooks app, how to shop for books in the iBooks store, and how to take advantage of all the features in the iBooks app.
With iBooks, you can interact with a book like never before. You can turn pages, adjust font sizes, look up words in the built-in dictionary, and search through your text.
In the App Store, you can also find apps for Amazon's Kindle reader and other popular E-Book readers.

Download iBooks
The first time you open the App Store on your iPad, you will be prompted to download the free iBooks app. Select Download and iBooks will be downloaded and installed on your iPad.

The iBooks Store
Before you can start enjoying your reading experience, you need to load up your iBooks library with titles. Fortunately, many books can be found for free in the iBooks store, including the complete Gutenberg Collection of classics and public domain titles.
Just touch the Store button in the upper left-hand corner of your bookshelf, and you will be taken to the iBooks store.

The iBooks store is arranged much like the App Store. There is a Categories button in the top left, next to the Library button. Touch this to see all the available categories from which you can choose your books.
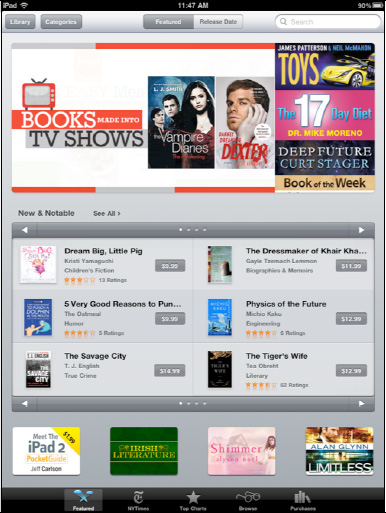
Featured books are highlighted on the front page of the store, with New and Notable titles displayed for browsing.
At the bottom of the store are five soft keys: Featured, NYTimes, Top Charts, Browse, and Purchases. Touch the NYTimes button

to see the charts for the NYTimes bestsellers in fiction and non-fiction categories.
Touch the Top Charts button  to see all the bestselling and top free books in the store.
Touch the Purchases  button to see all the books you have purchased or downloaded for your library.

Purchasing a book is much like purchasing an app. Touch the book title that you are interested in and browse the description and customer reviews. When you are ready to purchase the title, touch the Price button.
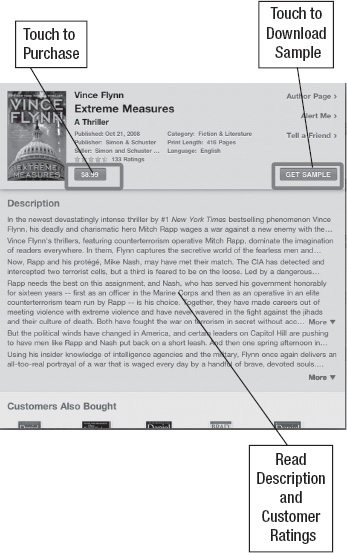
NOTE: Many titles have a sample download. This is a great idea if you are not sure whether you want to purchase a book. Downloading a sample is a great way to preview a book; you can always purchase the full book from within the sample.
Once you decide to download a sample or purchase a title, the view shifts to your bookshelf. At this point, you can see the book being deposited onto your bookshelf. Your book is now available for reading.

NOTE: New downloads will have the word “New” along the top of the right-hand corner.
Using the Search Window
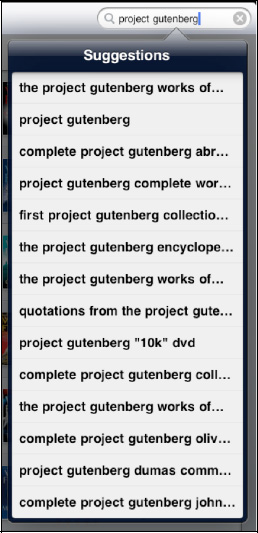
Just like iTunes and the App Store, iBooks gives you a Search window into which you can type virtually any phrase. You can search for an author, title, or series. Just touch the Search window and the on-screen keyboard pops up. Type in an author, title, series, or genre of book.
NOTE: You can also use the Browse button at the bottom for searching. For example, you can browse by author or category or use the Search box.
TIP: To search for lots of free books, perform a search for “Gutenberg Project” to see the thousands of free public domain titles.
You will see suggestions pop up that match your search; touch the appropriate suggestion to go to that title.
Reading iBooks
Touch any title in your bookshelf to open it for reading. The book will open to the first page, which is often the title page or other front matter in the book.

There is a Table of Contents button in the upper left-hand corner, next to the Library button (see Figure 12-1). To jump to the table of contents, touch either the Table of Contents button or simply turn the pages until you see these pages.
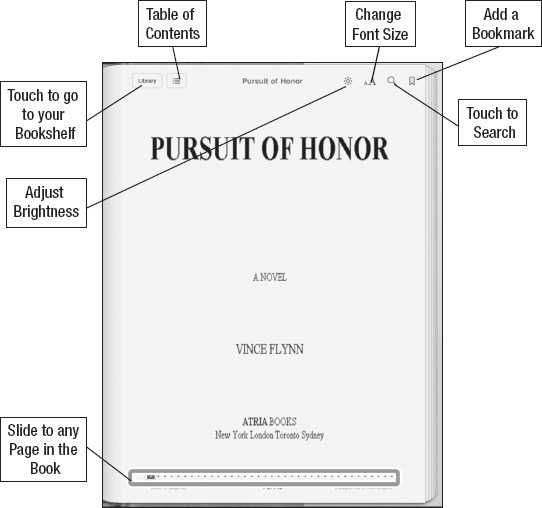
Figure 12-1. The iBooks page layout
You can turn pages in one of three ways:

- Touch the right-hand side of the page to turn to the next page.
- Slowly touch and hold the screen on the right-hand edge of the page. While still touching the screen, gently and slowly move your finger to the left.
TIP: If you move your finger very slowly, you can actually see the words on the backside of a page as you “turn” it—a very cool visual effect.
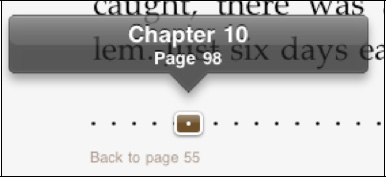
- The last way to turn pages is to use the Slider control at the bottom of the page. As you slowly slide from left to right, you will see the page number on top of the Slider control. Release the Slider control and you can advance to that particular page number.
Customizing Your Reading Experience: Brightness, Fonts, and Font Sizes
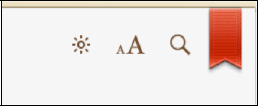
In the upper right-hand corner of the book, there are three icons available to help make your reading experience more immersive (see Figure 12-2).
Touch the Brightness icon and you can adjust the brightness of the book.
If you are reading in bed in a very dark room, you might want to slide it all the way down to the left. If you are out in the sunlight, however, you may need to slide it all the way to the right. Keep in mind that turning up the screen brightness is one of the more power-intensive things you can do on an iPad, so remember to turn it back down when you don't need the screen to be so bright anymore.

NOTE: The preceding example adjusts the brightness only within the iBooks app. To adjust the global brightness of the iPad, use the control in the Settings app, which you can access by clicking the Settings iconand then choosing Brightness & Wallpaper.
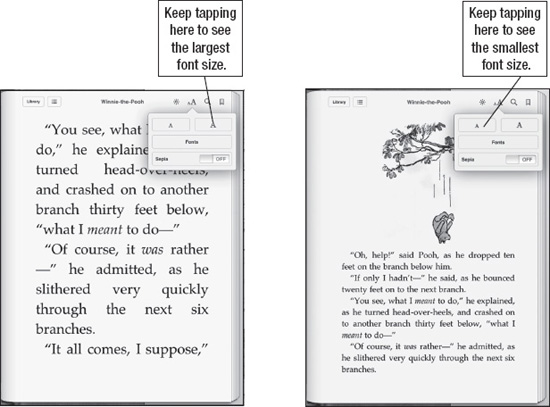
Figure 12-2. Adjusting font sizes in the iBooks app
The next Text Size icon lets you adjust the font size and type. After selecting this icon, you can increase the font size by tapping the large A button multiple times.
To decrease the font size, tap the small A button multiple times.
There are five available font styles. (There may well be more fonts when you read this book.)
Have fun and try out some of the various fonts. The default selection is the Palatino font; however, all of the fonts look great, and the larger font sizes can make a difference for some. The goal is to manipulate the fonts to make this reading experience as comfortable and as enjoyable as possible.

Grow Your Vocabulary Using the Built-in Dictionary
iBooks contains a very powerful built-in dictionary, which can be quite helpful when you run across a word that is new or unfamiliar.
TIP: Using the built-in dictionary is an easy and fantastic way to build your vocabulary as you read. Instead of thumbing through a dog-eared dictionary to find the word, you will see the definition instantly appear in the pop-up window!
Accessing the dictionary could not be easier. Just touch and hold any word in the book. A pop-up will appear with the following options: use the Dictionary, set a Bookmark, or use Search to find other occurrences of this particular word.

Touch Dictionary, and a pronunciation and definition of the word will be displayed.
Setting an In-Page Bookmark
There may be times when you wish to set an in-text bookmark for future reference.
The upper right-hand corner includes a Bookmark icon. Touch the Bookmark icon and it will change to a red bookmark on the page.
To view your bookmarks, touch the Table of Contents icon at the top left of the screen (next to the Library icon) and then touch Bookmarks. Touch the bookmark highlighted and you will jump to that section in the book.

TIP:You do not need to set a bookmark every time you leave iBooks. iBooks will automatically remember where you left off in your book. Even if you jump to another book, you will return to exactly where you left off when you return to the book you were just reading. iBooks will now also sync with your iPhone or iPod touch iBooks app, so you can move back and forth between devices and keep your place.
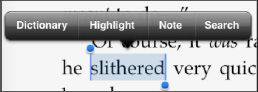
Using Highlighting and Notes
There are some very nice “added touches” to the iBooks app. There may be times when you want to highlight a particular word to come back to at another time. There may be other times you want to leave yourself a note in the margin.
Both of these tasks are very easy to accomplish in the iBooks app. This feature is not yet available when viewing PDF files in iBooks.
Highlighting Text
Follow these steps to highlight text in a book you're reading:
- Touch and hold any word to bring up the menu options.
- Choose Highlight from the menu options.
- To remove the highlight, touch and hold the highlighted section, and then select Remove Highlight.
To change the color of the highlight, do the following:
- Touch and hold the highlighted word.
- Choose Colors from the menu.
- Choose a new color (see Figure 12-3).

Figure 12-3. Using the highlighting feature in iBooks
Adding Notes
Do the following to add a note in the margin:
- Touch and hold any word, as you did previously.
- Choose Note from the menu.
- Type in your note and then touch Done.
- The note now appears on the side of the page in the margin (see Figure 12-4).
TIP: Your notes will also appear under your bookmarks on the title page. Touch the Title Page button and then touch Bookmarks. The notes you write will be at the bottom of the page.

Figure 12-4. Using the Notes feature in iBooks
Using Search
The iBooksapp contains a powerful search feature built right in. Just touch the Search bar (as in other programs on the iPad) and the built-in keyboard will pop up. Type in the word or phrase for which you are searching and a list of chapters is shown where that word occurs.
Simply touch the selection desired and you will jump to that section in the book. You also have the option of jumping right to Google or Wikipedia by touching the appropriate buttons at the bottom of the Searchwindow.
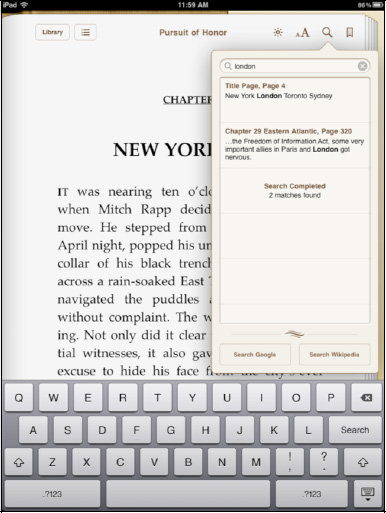
NOTE: Using the Wikipedia or Google search will take you out of iBooks and launch Safari.
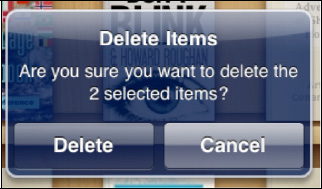
Deleting Books
Deleting books from your iBooks library is very similar to deleting applications from the iPad.
In the Library view, just touch Edit in the top right-hand corner. ![]()

Once you touch the Edit button, touch any book and a small blue check mark will appear.
Now touch the Delete ![]() button at the top and you will be prompted to Delete the book. Once you touch Delete, the book will disappear from the shelf.
button at the top and you will be prompted to Delete the book. Once you touch Delete, the book will disappear from the shelf.
Arranging Your Shelf
The upper right-hand corner of the bookshelf has two icons: Cover view and List view. The default arrangement for your bookshelf is to use the Cover view.
Follow these steps to change to List view:
- Touch the List view icon to the right of the Cover view icon.
- Choose whether you wish your books to be listed by Bookshelf, Titles, Authors, or Categories.
- Touch the corresponding button at the bottom and your view of the shelf will change to reflect your choice.

Figure 12-5. Arranging books in either Cover or List view
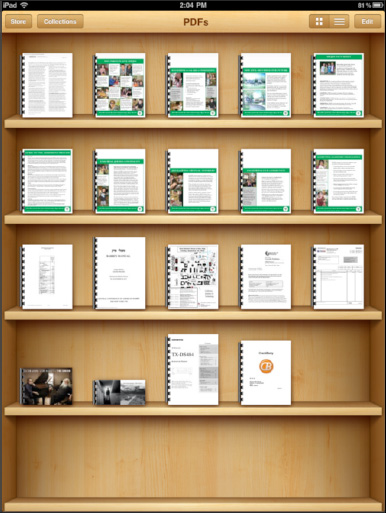
Collections
New toiBooks is the ability to store various collections. The two most common collections are PDFs and Books.
When you receive a PDF in an email (see the example in the next section) or transfer a PDF file via iTunes (see Chapter 29), you can choose to Open the PDF in iBooks. It will then be stored in your PDF collection.
Reading PDF Files in iBooks
One very cool feature of iBooks is the ability to read PDF files that are sent to you via email or synced via iTunes (see Chapter 3: “Sync Your iPad with iTunes”).
In this example, a PDF file has arrived in our email, and we want to save it and view it iniBooks.

Follow these steps to open a PDF received via email:
- Open the PDF file from the email.
- In the upper right-hand corner, choose Open in... and then choose iBooks. The PDF file will now go in to the PDF category of iBooks.
- The PDF is saved in the PDF section. Just touch the file to open it and read it like any other iBook.
- To delete a PDF file, follow the earlier instructions for deleting an iBook.
NOTE: When you select Open in...in the upper right-hand corner of the PDF from the email, all available PDF reading apps will be listed. Choose iBooks from the list to open the file in iBooks or choose another reader to open the file in that app.
Until you save your first PDF file, you will see Collections listed, but you won't have any files stored. After you save your first PDF file, you will have PDF files in the Collections next to the Store button.
You can touch the Collections button to switch between the Books and PDFs categories.
Other E-Book Readers: Kindle and More
As we have noted, the iBooks app offers an unparalleled E-Book reading experience. There are, however, other E-Book reader apps available for the iPad that are worth checking out.

Many users already have a Kindle and have invested in a Kindle library. Others use the Kobo E-Reader software (formerly called Short covers) and have invested in a library of books for that platform.
Fortunately, both E-Book platforms have apps in the iPad App Store. When either program is downloaded and installed, you can sign in and read your complete library on your iPad.
NOTE: No matter which of these other E-Readers you choose, you can always just sign in to the appropriate service to see your complete library and pick up just where you left off in your last book—even if you started reading on a different device.
Download E-Reader Apps
Go to the App Store. Touch Categories and then touch Books. You will find the Kindle and Kobo readers among the list of apps displayed. Both are free apps, so just touch the Free button to initiate the downloads.
TIP: It is usually faster to just search by the name of the app if you know which one you are looking for.
Once the desired E-Reader software is installed, touch its icon to start the app.
Kindle Reader
Amazon's Kindle reader is the world's most popular E-Reader. Millions of people have Kindle books; the Kindle reader allows them to read their Kindle books on their iPad.
TIP: If you use a Kindle device, don't worry about signing in from your iPad. You can have several devices tied to your single account. You will be able to enjoy all the books you have purchased for your Kindle right on the Kindle readerinstalled on the iPad.
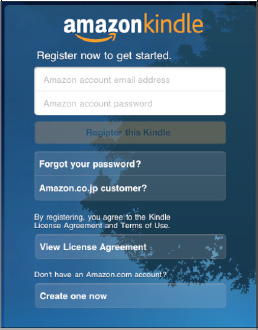
Just touch the Kindlereader and either sign in to your Kindle account or create a new account with a user name and password.
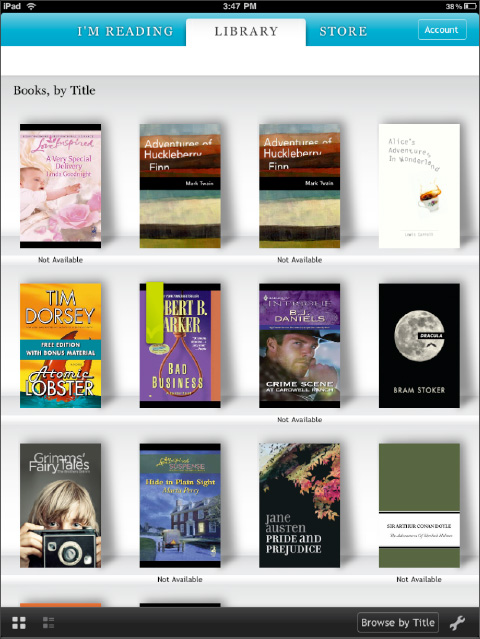
Once you sign in, you will see your Kindle books on the Home page. You can either touch a book to start reading it, or you can touch the Shopping Cart to start shopping in the Kindle store.

NOTE: Touching the Shopping Cart will start your Safari browser. From there, you can purchase Kindle books. Once you are done, you will need to exit Safari and restart the Kindle reader.
To read a Kindle book, touch its cover. The options for reading can be found along the bottom row of icons.
You can add a bookmark by touching the Bookmark icon in the top right-hand corner. Once the bookmark is set, a small bookmark appears–just like in the iBooks app.
You can go to the cover, table of contents, or specify any location in the book to jump to (such as the beginning) by touching the Goto button.
The font, as well as the color of the page, can be adjusted. One very interesting feature is the ability to change the page to Black, which is great when reading at night.
To advance pages, either swipe from right to left, or touch the right-hand side of the page. To go back a page, just swipe from left to right or touch the left-hand side of the page.
Tap the screen and a Slider control appears at the bottom. You can adjust this control to advance to any page in the book.

Kobo Reader
Like the Kindle reader, the Kobo reader you begins by asking you to sign in to your existing Kobo Books account. All of your existing Kobo Books will then be available for reading.
Kobo uses a “bookshelf” approach, similar to the one in iBooks. Tap the book cover for whichever book you wish to open.
Or you can touch the I'm Reading tab to pick up with what you were reading last. You can also go directly to the Kobo store to purchase books by touching the Store tab.
You can find three buttons along the top of the Kobo reader: Table of Contents, Overview, and Bookmarks.
![]()
Touch any button to advance to the particular feature desired.
You can also find four icons along the bottom: Font, Brightness, Add Bookmark, and Display Settings. Touch any of the buttons to make adjustments to your viewing.
![]()
To advance pages in the Kobo reader, touch the right-hand side of the page. To go back a page, just touch the left-hand side of the page. You can also use the Slider control at the bottom to advance through the pages.